
In the spirit of the quote that opens this chapter, I believe that a simple demonstration is one of the best ways to introduce a new technology. So I’m opening this book by providing a tutorial that will use the Dojo Toolkit to enhance a basic HTML form. This chapter introduces the tutorial, which continues through Chapter 5, “Processing Forms with Dojo,” and comprises Part I, “A Dojo Tutorial.”
Imagine that you are a web developer (which is probably not a stretch if you are reading this book) and you are being encouraged to add some Ajax features to a site you’re working on. Maybe the originator of this request is your boss or your boss’s boss, who is not even sure what Ajax is, let alone what kinds of features might be useful. And maybe you’re not sure yourself. Imagine that your prior experience has mostly been on the server-side, developing in Java or some other server-side technology, and your experience with HTML and JavaScript has been fairly limited. This is the scenario we will explore over the next several chapters as you are introduced to the Dojo Toolkit.
To further flesh out the scenario, imagine that you’ve heard lots of things about how powerful the JavaScript programming language can be and that there are a number of JavaScript libraries and frameworks that can help you take advantage of that power. You’ve decided to use the Dojo Toolkit because some of the web sites and forums that you frequent to keep up with the ever-changing IT industry have recommended it. And you’ve already selected one of the most frequently used pages in your application to be the first candidate for being “Ajaxified.”
This tutorial walks you through a number of steps to update the page with Ajax features. We will enhance the page in a number of small ways that each address a specific type of issue. Along the way, we’ll see the kinds of features that Ajax allows us to add to web pages, and we’ll see exactly how to implement those features using the Dojo Toolkit.
The primary goal of this tutorial is to show you how to use the Dojo Toolkit to introduce some common Ajax features into your web pages. The tutorial provides instructions for picking the low hanging fruit. In other words, it focuses on the features that are fairly easy to implement and yet provide a substantial return in increased usability. This tutorial is not meant to demonstrate every feature of Dojo, nor is it intended to exhaustively cover the features that we implement together. You can think of this tutorial as addressing the first phase of web site enhancement.
Another main goal of this tutorial is to implement features in the plainest way. Although most Dojo features can be implemented either declaratively (in HTML markup) or programmatically (using JavaScript), we’ll first focus on the declarative technique given that most web server-side developers are more familiar with HTML markup than with JavaScript. Of course, we will also use some JavaScript as the glue to tie things together.
What do we hope to achieve by using Dojo? First and foremost, we expect that our pages will be more usable. This might manifest itself in a variety of ways. The page should be faster. It should be better looking. It should be easier to operate by the user. It should help the user enter the required information properly, and the page should be easier to navigate. Yet at the same time, we should not violate any of the user-interface conventions that users have come to expect when accessing web pages. We should make significant usability gains without sacrificing anything that the user already depends on.
How do we make these gains in usability? Dojo provides enhancements to the existing HTML form elements that provide additional functionality. These enhancements should make the current form elements behave in more useful ways.
Performance can be improved either by making things run faster or by making things appear to run faster. The ideal way to make a process appear faster is to have the process run while the user is doing something else rather than just having him wait for the process to complete. Ajax provides the ideal mechanism to support this technique. We’ll use Dojo to allow a page to make data requests of the server asynchronously while the user is continuing to work. The page will appear to the user to be faster and more responsive.
Data validation can be improved by bringing the validation of data closer to the entry of data. Dojo supports the ability to send small validation requests to the server without requiring an entire form to be submitted. When appropriate, we might even want to adopt the desktop application paradigm of validating data on a keystroke by keystroke basis.
We also expect our features to be easy to implement. We want to be able to leverage what we know about HTML, and when we use JavaScript, the programming model should be consistent and powerful. We expect to write a lot less code than if we were developing the functionality by writing it all ourselves. Less code means less opportunity for error. As you learn Dojo, you can expect that what you learn will continue to be useful as you dig further into Dojo. And when things do become more complex, you will have tools to aid in debugging. In short, you can expect Dojo to provide a great programming environment.
Finally, we hope to be constantly surprised by the benefits we derive from using Dojo, obtained without any extra work on our part. For example, we expect that any features we add will work the same regardless of what browser our users are using. And we expect our visual elements to support Web Accessibility and Internationalization standards.
We’ve set quite a high bar for Dojo to cross over. We’re asking for a lot and not expecting to sacrifice much to obtain it. Can Dojo really deliver? Let’s find out. We start at the beginning by reviewing the page that will be the basis for our enhancements and identifying the kinds of problems we hope to solve.
We begin by selecting a page from our application that will be the target for our Dojo enhancements (see Figure 1.1). This page comes from a hypothetical Customer Service application for a nation-wide cable company and allows a customer to create an account and to request service. The tutorial is going to be pretty vague about the operations of our “business” because, as you probably guessed, this form is being used to highlight some specific types of functions that many business applications possess. So, if you can suspend your disbelief for a little while, let’s review the form.
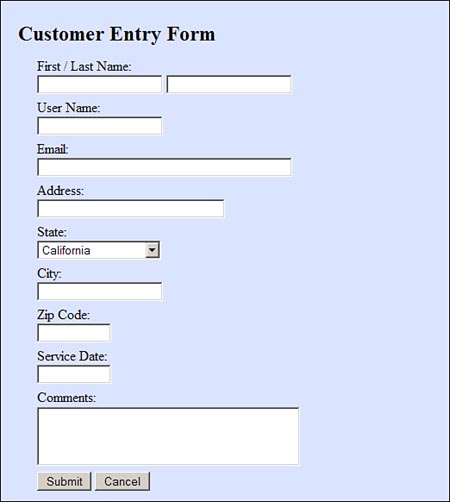
This page has a very basic design—almost no design at all. It uses only a small bit of styling and is about as plain as you can get. Your pages probably look much better than this, but we start with this minimal design to keep the examples as simple as possible.
Let’s walk through each of the fields on this form and discuss the usability problems. A discussion of how Dojo can solve these problems then follows.
The first data entry field is used to hold the customer’s first name. Straightforward enough, yet we already have a problem. The label for the field says “First / Last Name:” and is followed by two text fields for input. Although the user can probably figure out what the page is asking for, it may be more difficult to understand for screen readers, which are used by those with visual impairment.
You could argue that from a usability perspective, this is already a bit confusing. All the other labels on the page refer to a single text box only, while this label refers to two text boxes. When a name is separated into two parts, should the last name be entered before the first name, or the other way round? These are good questions, but we’ll have to wait for the answers. Remember, we’re just identifying the problems now. We look at solutions later in the chapter.
Now let’s examine the HTML markup for these fields.
    <label for="firstName">First / Last Name: </label>
    <input type="text" id="firstName" name="firstName" />
    <input type="text" id="lastName" name="lastName" />
You might not have used the <label> tag before, but it can be helpful for improving your site’s accessibility for the disabled. The tag is useful to screen readers when the label does not immediately precede the input field, such as when the label is in a different table cell. It also makes it easier to style all the labels with a single style when using Cascading Style Sheets (CSS). Another problem is that only one of the fields has a <label> tag.
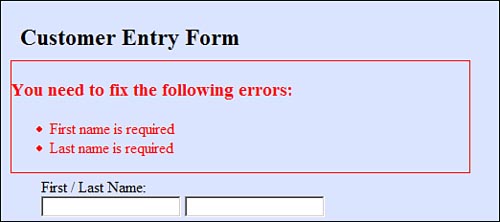
Both the first name and last name fields are required. However, in our standard form, no JavaScript is being used, so how do we make the fields required? There is no HTML tag or attribute for this, so we’ll depend on the server to do the validation. That means the user won’t know the fields are required until after submitting the form and receiving an error message back from the server.
How will the error messages be displayed? Let’s say that the user has entered some data in the form and pressed the “Submit” button. The browser will make a request to the server that will then validate the data and return the form back to the browser along with some error messages. Hopefully the server will also send back the data that the user entered so they don’t have to re-enter it. Oftentimes, the error page will display all the error messages near the top of the page. The page with error messages might appear as shown in Figure 1.2.
Our application will allow the user to sign in and manage his or her account, so we’re asking the user to create a user name that will be used for that purpose. We ought to provide him with some guidance for creating a proper name, but that would require us to add quite a bit of text to the page, so we’ve decided not to. The form simply asks for a user name and provides a text field.

The HTML markup for this is quite similar to the “First / Last Name:” fields, just a <label> and <input type="text"> tag as shown here.
   <label for="userName">User Name: </label>
   <input type="text" id="userName" name="userName" size="20" />
We’ve added a little client-side validation by specifying the size="20" attribute to ensure that the user can’t enter a name longer than 20 characters.
A problem with this field involves validation. A user would like to create a short user name that is easy to remember, but because this is also the goal of every other user, it is possible that the name might have already been selected. How is the user notified of this? Again, validation can’t be done until the user submits the page. The server will check the user name to see if it has already been assigned and, if so, will return a page that redisplays the form and shows the error message (along with any additional error messages associated with other fields). It might be helpful also to suggest some alternatives to the user so that he doesn’t keep entering names that have already been taken. These suggestions should be based on the user’s desired user name.
We’d like to communicate with the user through email, so we’ll ask for an address. A simple text box will be used to let the user enter the email address.
The HTML markup is shown here and is very similar to the other text fields on the page.
    <label for="email">Email: </label>
    <input type="text" id="email" name="email" size="45" />
Again, we’ve enabled some client-side validation by specifying the size of the field. But is there a way to tell if the email address is valid? There are two types of validation we could try. First, is the email address in the correct format? For instance, does it contain the “@” symbol? Does it end with a TLD such as “.com”? Second, is it an actual working email address? Unfortunately, there is no way to determine the latter without actually creating and sending an email. Though this might be useful for sending the user a password and letting her validate the user name, it is beyond the scope of what we want this page to do. So we’ll just focus on confirming that the email address at least appears to be formatted correctly.
We’ll ask for the first line of the user’s home address and use a regular text box to capture it.

The HTML is similar to the previous fields.
    <label for="address">Address: </label>
    <input type="text" id="address" name="address"/>
This field should contain the first line of the customer’s billing address, so we need to make sure it is entered. It is a required field, but again we’ll have to depend on the server to perform that validation.
We need the user’s state as part of the billing address. Because there are only a limited number of states, we can use a <SELECT> to provide a pull-down list of states, one of which can be chosen. A typical example of a pull-down list of states is shown in Figure 1.3.

HTML provides the <SELECT> form element, which can be used to supply a list of values. A snippet of the markup necessary to create the field is shown here.
         <select name="state" >
                 <option value="AL">Alabama</option>
                 <option value="AK">Alaska</option>
                 <option value="AS">American Samoa</option>
                 <option value="AZ">Arizona</option>
             ... additional state values not shown ...
         </select>
Because there is only a small set of values for state, they can all be shown. For this field, validation is not a problem, but behavior is. I live in Illinois, and I make frequent purchases on the Web, so I’m often faced with entering my billing address. When I come to the state selection field on a form, I first type an “i”, and “Idaho” pops up on the list because it is the first state that begins with an “i.” Fair enough—even though I don’t live in Idaho. Next I type an “l” (a lowercase “L”), and “Louisiana” pops up. Now, many fine people live in Louisiana, but I am not one of them. The problem is that the <SELECT> tag interprets my typing as two distinct cases of typing the first letter of a word instead of just one case of typing the first two characters of a single word. When I type “il” I want to see all the states that begin with the letters “il”, and only Illinois makes that cut. Unfortunately, this just isn’t how a <SELECT> tag works—it displays “Louisiana” when I type the “l,” assuming that I’m typing the first letter of the state again.
This isn’t always a problem. Some browser versions do work as we’d like them to (interpreting the entire string “il” as the first characters of the state), but we need to have consistent behavior on our page regardless of what browser the page happens to be running in.
This is another required field. We’ll use a text box to capture the value from the user.

The HTML will be the same as we’ve already seen for the other text fields.
        <label for="city">City: </label>
        <input id="city" name="city"/>
The basic HTML form will not provide any type of validation for this field. However, couldn’t we have presented the user with a pull-down list of valid cities like we did for the state selection? There are only a finite number of cities for each state, but the number isn’t small. Across the entire United States there are somewhere around 30,000 cities. So simply listing all of the values in our page would have increased the size of the page, making it slower to load. It is also not correct to list all the cities; we must list only the cities for the state selected by the user. We would need to create some JavaScript logic to do that, and we’re trying to avoid JavaScript in our simple form.
The usability of the pull-down list would also be problematic. Because there are so many cities, many of them would start with the same letter. Typing the first letter of the city would only get the user to the beginning of a long list. The user would have to scroll down for quite a while to reach certain values—something that would get pretty tiresome.
Zip code is the final required field for the billing address. We’ll use a text box to capture the data from the user.
The HTML is the same as for the other text fields.
    <label for="zipCode">Zip Code: </label>
    <input type="text" id="zipCode" name="zipCode" size="10" /></br>
Validation is required. Again, we’ll depend on the server for making sure the field has been entered. The server will return a page containing the form, any data entered by the user, and any validation error messages that are created. Aside from making the field required, what other validations might be performed? Just like for the email address, there are two types of validation. Is the data in the right form? And is the data a valid value?
Zip codes take two forms in the United States. They can be five numeric digits long or five digits followed by a dash and then four more digits. This means that the entered data can either be five characters long or ten characters long. HTML does provide us with a technique for enforcing a maximum length by using the size attribute. However, there is no way in HTML to specify a minimum length. Nor is there a way to specify that a dash is required to separate the two parts of the long style of zip code. The server can perform all these checks but only after the user has submitted the form.
We could go even further. Like states and cities, the U.S. has a certain finite set of zip codes. Would we be able to list them in a <SELECT> list? And since we already know the state and city, could we list just the zip codes that apply? That logic is actually more complicated than you might think—some cities have multiple zip codes while some zip codes cross over city boundaries. Also if we expand our geographic reach beyond the boundaries of the U.S., we’ll discover additional complexities. However, we’ll stay within the U.S. borders for the sake of keeping our tutorial fairly simple.
We’ve introduced lots of problems with this field. Remember, solutions are suggested later in the tutorial.
Our customers would also like to schedule the start of their cable service, so we provide a text box where they can enter the starting service date.
The HTML is the same as we have seen before for the other text fields.
   <label for="serviceDate">Service Date:</label>
   <input type="text" id="serviceDate" name="serviceDate" size="10"/>
What kinds of validation are required for the service date? Of course, it must be a valid date, but what format should the date be entered in? We’re not giving the user guidance. This is clearly a problem. Beyond that, the date should be in the future and not the past. There might even be dates that should be blocked out such as non-business days.
Another usability problem with this field is that people can’t easily calculate future dates. What is the date of the day two weeks from now? Do we just add 14 to the current date? Not if the current month ends before we reach that date. And what is the date of the first Monday three weeks from now? It can be very difficult for the user to calculate dates without having a calendar available.
Finally we come to the last field on the form—Comments. The user can enter free-form comments describing how she found out about our service and what kinds of shows she likes—or anything else she might want to tell us.
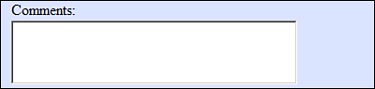
This is a multi-line text box that allows the use to enter as much or as little text as she would like. The HTML is shown here.
    <label for="comments">Comments:</label>
    <textarea name="comments" rows="3" cols="35" id="comments">
    </textarea>
This is not a required field, so no validation is necessary. The HTML form element <textarea> provides some basic text editing capability. It will automatically wrap words when the user comes to the end of each line. Once the user enters more text than can fit in the visible portion of the box, a scroll bar automatically appears on the right-hand edge of the box to allow up and down scrolling. But that’s the extent of its features. There are no formatting capabilities.
This completes our review of the original HTML form. Now that we’ve cataloged the many problems with this form, we can plan our strategy for addressing them with Dojo.
There is a lot of work to do to address all the problems we’ve identified. We need to create a plan of attack, and the first task is be to organize our problems into some broad categories. We’ll start with the simplest changes first and gradually move up to more complicated ones. The categories are listed here. Each category will be a step of the tutorial.
Each topic is described in more detail in the following sections.
The first step of the tutorial shows you how to add Dojo to a web page and is contained here in Chapter 1.
Dojo is a library of functions that we can access either programmatically or declaratively. We use it programmatically by writing JavaScript, which makes calls to Dojo functions, or declaratively by calling Dojo using HTML markup. But before we can make any calls to Dojo, we must make it available to our page. In other words, we must include Dojo in our web page. This step alone won’t implement any of the many features available to us, but without it, we can’t use Dojo at all.
The second step of the tutorial focuses on client-side validation and is contained in Chapter 2, “Using Dojo for Client-side Validation.”
Many of the usability problems we identified were things that could be solved by providing some validation in the browser. In this step we only address the validation that doesn’t require communication with the server. Some developers might not even consider these features to be Ajax because there is no server request created. But that would not be quite accurate. After all, Ajax is a two-sided coin. One side is certainly asynchronous server communication without a page refresh, but the other side of the coin is all the interactivity and eye candy available by using JavaScript to manipulate the display.
One of the problems we solve in this step is the validation of required data. Rather than submit the form and asking the server to check that a required field has been entered, we use JavaScript to test for data before submitting the form. This will make the application seem faster because the user won’t have to wait for a server response to find out about bad data.
The third step of the tutorial focuses on the classic definition Ajax—making calls to the server without refreshing the page that the user is working on. This topic is covered in Chapter 3, “Using Dojo to Work with the Server.”
Some of the other problems with our form were caused by forcing a page submit to validate certain kinds of data. For example, the user name needs to be validated against existing user names on the server. There is no way to avoid checking the server—that’s where the data is. But we don’t have to request a whole new page. We can create an Ajax request just to check the user name, and the server will return just the validation information, not an entire new page. This will be quicker and won’t interrupt the user’s flow.
We’ll also make requests to the server to get data based on values entered by the user. For instance, we can go get a list of cities from the server based on the state selected from the pull-down list. This step will require some additional scripts on the server to allow it to respond to these Ajax requests. I’ve created some simple JavaServer Page (JSP) scripts on the server to allow the examples to work. The scripts are over-simplified but serve the purpose of demonstrating the features that are discussed in the tutorial.
The fourth step of the tutorial demonstrates some of Dojo’s powerful widgets and is contained in Chapter 4, “Using Dojo Widgets.”
Eye candy is the term some designers use to describe cool visual effects. Drag–and-drop in Google Maps is at least partly an eye candy feature. Not only does Dojo allow us to enhance existing HTML form elements, but it also provides entire new visual elements called widgets, which provide new form elements not available in HTML. For example, one of the problems with service date was that the user really needs to see a calendar to pick the date. We can add the Dojo Date Picker widget, which causes a calendar to display right on the page. We can also replace the simple <textarea> element with a full-blown rich text editor widget.
The fifth and final step of the tutorial demonstrates form processing and submission and is discussed in Chapter 5.
The final step of the tutorial deals with treating the form elements as an integrated whole. We look at how to verify that all the client-side validations have been performed before the form is submitted, and we see how to submit the form. I hate to ruin the end of the movie, but here goes (spoiler alert): Dojo will submit the form data as through it were a regular HTML form. In other words, we won’t have to modify the component on the server that processes the form data. The server won’t even know that the form has been “Dojo-ized.” That will save us some work on the server.
Each step in the tutorial is fully described in this book. However, you might want to play along at home. All the source code required for the tutorial is available at the web site for the book, which includes starting code for each step along with the final code for each step. You can download the starting code and make the changes yourself—or just download the final code for each step and run it.
You can use whatever editor you like to modify the code. For some of the steps, you do not even need a web server. However, this is a web application, so some of the features do require a server. I’ve created some server components using Java Server Pages (JSPs). These server components are sufficient only to run the examples and are not suggested or recommended for production systems use.
To run the server code you need a web server that provides a JSP container. I’d recommend Tomcat, available at the Apache Software Foundation web site.[1] Tomcat is free. However, any web server which supports JSPs will do. The web site for the book also provides support for running the code along with corrections to the book’s text. Please check out the website and feel free to contact me.[2]
The purpose of the first step of this tutorial is to make the Dojo Toolkit functions available to our web page. For now, we can think of Dojo as a JavaScript file that must be included on our page (and on each page that will use Dojo). This is a simplification. The Dojo Toolkit actually consists of many files organized in a directory structure. We explore that in later chapters, but for now we can pretend that Dojo is just a single JavaScript file.
We include Dojo in our page using the same technique that we would use to include any JavaScript source file. We will use the <script> tag, which is explained in more detail shortly.
Before we can modify the form to include a <script> tag, we must first create the form. Just in case any problems have been identified since this book was published, you might want to check the book’s website. You can also download the source files there. You’ll need two files: “form.html” and “form.css.” The source code for each file is also included here in the text.
Following is the code for the form itself. This file should be named “form.html.”
<?xml version="1.0" encoding="utf-8"?>
<!DOCTYPE html PUBLIC "-//W3C//DTD XHTML 1.0 Transitional//EN"
   "http://www.w3.org/TR/xhtml1/DTD/xhtml1-transitional.dtd">
<html xmlns="http://www.w3.org/1999/xhtml" xml:lang="en" lang="en">

<head>
  <!— Dojo Tutorial - Step 1 (form.html) —>
  <meta http-equiv="Content-Type" content="text/html;charset=utf-8" />
  <title>Customer Entry Form</title>
  <!— CSS —>
  <link rel="stylesheet" href="form.css" type="text/css" />
</head>
<body>

<div class="formContainer">
<form action="submit.jsp" method="get" name="custForm">

    <div class="formTitle">Customer Entry Form</div>

    <div class="formRow">
    <label for="firstName">First / Last Name: </label>
    <input type="text" id="firstName" name="firstName" />
    <input type="text" id="lastName" name="lastName" />
    </div>
    <div class="formRow">
    <label for="userName">User Name: </label>
    <input type="text" id="userName" name="userName" size="20" />
    </div>

    <div class="formRow">
    <label for="email">Email: </label>
    <input type="text" id="email" name="email" size="35" />
    </div>

    <div class="formRow">
    <label for="address">Address: </label>
    <input type="text" id="address" name="address" size="32"/>
    </div>

        <div class="formRow">
      <label for="state">State:</label>
          <select name="state" >
                <option value="AL">Alabama</option>
                <option value="AK">Alaska</option>
                <option value="AZ">Arizona</option>
                <option value="AR">Arkansas</option>
                <option value="CA" selected="selected">California</option>
                <option value="CO">Colorado</option>
                <option value="CT">Connecticut</option>
                <option value="DE">Delaware</option>
                <option value="DC">District of Columbia</option>
                <option value="FL">Florida</option>
                <option value="GA">Georgia</option>
                <option value="HI">Hawaii</option>
                <option value="ID">Idaho</option>
                <option value="IL">Illinois</option>
                <option value="IN">Indiana</option>
                <option value="IA">Iowa</option>
                <option value="KS">Kansas</option>
                <option value="KY">Kentucky</option>
                <option value="LA">Louisiana</option>
                <option value="ME">Maine</option>
                <option value="MD">Maryland</option>
                <option value="MA">Massachusetts</option>
                <option value="MI">Michigan</option>
                <option value="MN">Minnesota</option>
                <option value="MS">Mississippi</option>
                <option value="MO">Missouri</option>
                <option value="MT">Montana</option>
                <option value="NE">Nebraska</option>
                <option value="NV">Nevada</option>
                <option value="NH">New Hampshire</option>
                <option value="NJ">New Jersey</option>
                <option value="NM">New Mexico</option>
                <option value="NY">New York</option>
                <option value="NC">North Carolina</option>
                <option value="ND">North Dakota</option>
                <option value="OH">Ohio</option>
                <option value="OK">Oklahoma</option>
                <option value="OR">Oregon</option>
                <option value="PA">Pennsylvania</option>
                <option value="PR">Puerto Rico</option>
                <option value="RI">Rhode Island</option>
                <option value="SC">South Carolina</option>
                <option value="SD">South Dakota</option>
                <option value="TN">Tennessee</option>
                <option value="TX">Texas</option>
                <option value="UT">Utah</option>
                <option value="VT">Vermont</option>
                <option value="VA">Virginia</option>
                <option value="WA">Washington</option>
                <option value="WV">West Virginia</option>
                <option value="WI">Wisconsin</option>
                <option value="WY">Wyoming</option>
      </select>
    </div>

    <div class="formRow">
    <label for="city">City: </label>
    <input id="city" name="city"/>
    </div>

    <div class="formRow">
    <label for="zipCode">Zip Code: </label>
    <input type="text" id="zipCode" name="zipCode" size="10" />
    </div>

    <div class="formRow">
    <label for="serviceDate">Start Service:</label>
    <input type="text" id="serviceDate" name="serviceDate" size="10"/>
    </div>

    <div class="formRow">
    <label for="comments">Comments:</label>
    <textarea name="comments" rows="3" cols="35" id="comments">
    </textarea>
    </div>
    <input type="submit" value="Submit" id="submit" />
    <input type="reset" id="reset" value="Cancel" />

</form>
</div>

</body>

</html>
This form refers to a CSS file that can provide some simple styling. This CSS file, which should be named “form.css,” follows.
/* - - - - - - - - - - - - - - - - - - - - -
 File         : form.css
 Description  : Dojo Tutorial
 Last Updated : March 1, 2008
 - - - - - - - - - - - - - - - - - - - - -
*/

.formContainer {
        margin: 2px auto;
      background: #DBE4FF;
      width: 500px;
      border-width: 1px;
        border-style: solid;
        border-color: purple;
      padding: 10px;
}

.formTitle {
        font-size:24px; font-weight:bold;
        padding: 10px;
}

form {
        margin-top: 5px;
        width: 480px;
}
.formRow {
        position:relative;
        padding: 4px 0.75em 2px 10em;
}

.formRow label {
        position: absolute;
        left: 0.75em;
        float: none;
        width: 10em;
        display:block;
        margin: 0;
}Now we need to add a reference to the Dojo Toolkit to our page. Usually we would do this by downloading the source from the Dojo web site and putting it on our own site then linking to it. But one of the goals of this tutorial is to be as simple as possible, so we’re going to take advantage of a cool technique for referencing the Dojo source files on the Internet without requiring us to have the source on our own web server.
AOL provides a facility it calls the Content Delivery Network (CDN), which is a “worldwide geographic edge caching” mechanism for the Internet. This allows super fast delivery of files to web users from AOL servers that are geographically close to them. The files are also compressed, which further improves the download speeds. AOL has generously made this facility available to developers and end users. For more information on the AOL CDN and Dojo, visit http://dev.aol.com/dojo.
So we can just provide a link to the Dojo files on AOL CDN and do not need to download them to our site at all. Include the following code in the <head> tag in “form.html.” Please put this below the ending </head> tag so your code is consistent with the rest of the tutorial.
    <script type="text/javascript"
        src="http://o.aolcdn.com/dojo/1.1.0/dojo/dojo.xd.js"
        djConfig="parseOnLoad: true"></script>
There are a few caveats. The link provided in the code was for the current version of Dojo at the time this book was published. A more recent version may be available for you. If you choose to use a later version, check this book’s web site to see if the source code has changed.
You don’t have to use the AOL CDN. You can download Dojo to your own server. This might be a preferable approach, especially during development. It allows you to look at the Dojo source code and to work offline in case you don’t have an Internet connection.
Downloading Dojo is easy. You simply point your browser to Dojo’s web site, http://www.dojotoolkit.org, and look for the download link. The download page contains links to the current version and to older versions. While new versions might provide you with additional features, they might not necessarily work with the source code for this tutorial. Just check this book’s web site for updates.
If you choose to download Dojo, the <script> tag for the link will be different. The following code snippet assumes that you have downloaded the Dojo zip file and unzipped it to the same directory as your form.
    <script type="text/javascript"
        src="dojo-release-1.1.0/dojo/dojo.js"
        djConfig="parseOnLoad: true"></script>
The attribute djConfig="parseOnLoad: true" tells Dojo to search the HTML on your page for any Dojo widgets you may have added. For this to work, we need to include the Dojo parser. This is accomplished by adding some JavaScript code to our page. Include the following code in the <head> tag after the <script> tag that linked to Dojo.
<script type="text/javascript">
   dojo.require("dojo.parser");
</script>Throughout the tutorial, we add various Dojo widgets to our page. The “look” of the Dojo widgets is defined through styles specified on a few style sheets that must be added to our page. The Dojo team has separated the “look” of the widgets into separate style sheets. This is an outstanding feature of Dojo widgets. It means that you can easily style the widgets to match the look of your website by overriding the default styles. You’re not limited to whatever out-of-the-box style that the widgets come with.
The first style sheet, “dojo.css,” overrides some of the styles of standard HTML page elements such as <body>, <div>, and <form>. There are just a few styles, and they’re meant to set the style to a plain vanilla look.
The next file, “tundra.css,” defines the style for components of many of the standard Dojo widgets. The “tundra” theme is one of the three built-in themes available in Dojo. Why the name tundra? A tundra is the cold, treeless area just below the icecap of the arctic regions. It consists of the permanently frozen subsoil populated with mosses and small shrubs. Dojo’s “tundra” theme is meant to be reminiscent of that barren landscape and provides a minimal palette for the widgets. The “noir” theme is darker (“noir” is a genre of film that emphasizes starkness and often is filmed in black and white). And the “soria” theme is brighter (Soria is a city in the sunny north-central region of Spain).
Add the following code to the <head> section of the page to style our widgets and provide the Dojo tundra theme. Order is not important.
<style type="text/css">
  @import "http://o.aolcdn.com/dojo/1.1.0/dojo/resources/dojo.css";
  @import
    "http://o.aolcdn.com/dojo/1.1.0/dijit/themes/tundra/tundra.css";
</style>
The code just given only makes the styles available to the page. Now we must actually apply the theme to the page by adding a class attribute to the <body> tag as the code that follows demonstrates.
<body class="tundra">
We’ve made quite a number of changes to the page, and it might be a little confusing as to exactly what the page should now look like. Following is a new listing of the top part of the page so that you can see all the changes.
<!— Dojo Tutorial - Step 1 (form.html) —>
<?xml version="1.0" encoding="utf-8"?>
<!DOCTYPE html PUBLIC "-//W3C//DTD XHTML 1.0 Transitional//EN"
   "http://www.w3.org/TR/xhtml1/DTD/xhtml1-transitional.dtd">
<html xmlns="http://www.w3.org/1999/xhtml" xml:lang="en" lang="en">

<head>
  <!— Dojo Tutorial - Step 1 (form.html) —>
  <meta http-equiv="Content-Type" content="text/html;charset=utf-8" />
  <title>Customer Entry Form</title>
  <!— CSS —>
  <link rel="stylesheet" href="../form.css" type="text/css" />

  <!— CSS —>

  <style type="text/css">
    @import "../dojo-release-1.1.0/dojo/resources/dojo.css";
    @import "../dojo-release-1.1.0/dijit/themes/tundra/tundra.css";
  </style>

  <link rel="stylesheet" href="../form.css" type="text/css" />

  <script type="text/javascript"
  src="../dojo-release-1.1.0/dojo/dojo.js.uncompressed.js"
  djConfig="isDebug: true, debugAtAllCosts: true"></script>

<script type="text/javascript">
   dojo.require("dojo.parser");
</script>

</head>

<body class="tundra">
Once all these changes are made, we can run the new page to see what it looks like.
The new page appears as shown in Figure 1.4.
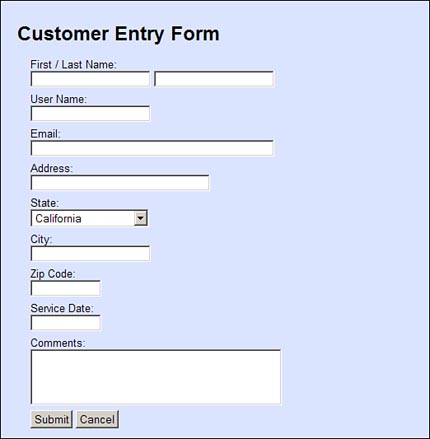
Hopefully you’re not too disappointed—the page appears to look almost the same as the original form. There are some subtle style changes, though, such as the font for the labels and form title—but nothing dramatic. That is ok. We really haven’t started using Dojo yet. We’ve just made it available to our page. In the next chapter, we continue on with step 2 of the tutorial where we implement the client-side validations, which is when we start to see some exciting stuff.
The next chapter continues the tutorial. Now that we’ve made Dojo available to our page, we can start to use it to do some client-side validation on our text fields.
[1] You can download the Tomcat web server fromt the following address: http://tomcat.apache.org/.
[2] The web site for this book can be found at the following URL: http://www.objecttraininggroup.com/dojobook.