
This chapter describes how we can use Dojo to communicate with a server. Two of the primary purposes that the server can fill are to run processes and provide data. Examples of both of these are provided in this part of the tutorial.
Although Dojo calls itself a JavaScript library, it is often categorized as an Ajax library instead. Though the characterization might not be accurate, it is understandable. Because there is no “International Organization For the Definition of Ajax,” the term has been used in a variety of ways. In general, it’s used to refer to web pages that access the server without benefit of a full page refresh and that perform some snazzy manipulation of the DOM to make the site more interactive than stodgy old HTML alone can. But still, for some, we’re only using real Ajax when we’re making server requests.
This chapter deals with making Ajax requests of the server. We examine two kinds of requests. The first type of request is to ask the server to perform some processing. In this case, we’ll ask the server to validate user name. The second type of request is to ask the server to provide some data, which we will then add to the DOM so it is visible to the user. Our data request will be for a list of cities in a given state.
Note
There are two primary reasons for communicating with the server: (1) to perform validation and (2) to get data. This part of the tutorial is split into two steps to correspond to each of these reasons for using the server. The first step, 3a, describes server-side validation. The second step, 3b, describes getting data from the server.
In this step of the tutorial we use the server to validate some data entered by the user. A number of interesting questions are addressed. How do we capture the data? At which point should the server request be made? What should the application do while waiting for the server to return? How should the server response be handled? As simple as this scenario might appear, it does introduce a few complexities. Dojo provides flexibility in coding for these issues, and some common patterns and best practices will emerge.
We can validate that a user name entered by the user is not already assigned to another customer. Many applications allow a user to specify a name by which they are known to the application. This user name allows the user to login to the application to do things like edit his or her account or see transaction history. The user name must be unique for each user across the entire system; therefore, it requires server-side validation to ensure that it hasn’t been assigned to another user. The use case for this scenario might seem rather simple, but still it introduces some interesting complexities.
The process begins with the user entering a desired user name. The user types the characters and at some point is finished. But how do we really know that the user is done entering data? Is it when the individual stops typing? If so, how long does the application wait before deciding that the user is done? We could even perform the validation after each keystroke. However, this approach has a number of drawbacks. The load on the server would be needlessly increased. And the user might be subjected to a flurry of messages describing the intermediate validations. It would be more useful to perform the validation just once, when the user has completed entry of the data.
A better approach might be to wait until the user exits the field by pressing the Tab key or even the Enter key. The problem with pressing Enter is that the browser might interpret this as a form submission (the default behavior for a standard HTML form). By pressing the Tab key or using the mouse to place the cursor into another field, the user would be signaling that he is done entering the user name field and wishes to enter data for a new field. We’ll use this condition as the right time for the validation to be performed.
Now we need to translate the logical event we wish to capture (the user exiting the field) into an actual event monitored by the browser. JavaScript provides us with two possible candidate events, onblur and onchange. The onblur event is triggered when the focus leaves the field, which normally means that the user has pressed the tab key to move to the next field or used the mouse to click on another field. The onchange event does almost the same thing. The difference is that if the data did not change, onblur would still be called anyway, but onchange would not. The first time the user enters this field, the difference is moot. But if the cursor passes through the field again without the user changing the data, then the event will be triggered again, and an unnecessary call will be made to the server. So the most efficient event to use would be onchange. We need to create a function that will handle the onChange event and we need to call that function when the event occurs.
At this point we need to discuss the difference between regular JavaScript events and Dojo events. JavaScript provides a way to assign an event handler (function) to an event on a DOM element. The code that follows presents an example of this by setting the onChange attribute to a value of userNameOnChange(). This will cause the userNameOnChange function to execute when the browser detects that the value of the field has been changed.
    <input
        type="text"
        id="userName"
        name="userName"
        size="20"
        dojoType="dijit.form.ValidationTextBox"
        onchange="userNameOnChange()"
    />
The same technique using Dojo appears in the following code.
    <input
        type="text"
        id="userName"
        name="userName"
        size="20"
        dojoType="dijit.form.ValidationTextBox"
        onChange="userNameOnChange"
     />
Notice that we are not using the standard function calling syntax in the second example. In other words, Dojo uses a reference to the function, not a call to the function. We can tell this because the first example uses double parentheses at the end of the function name, while the second example does not. Another difference is that the attribute has a different case—although the spelling is the same, the “C” in the second example is capitalized. As you might guess, Dojo is intercepting the browser events and calling its own events. We go into more detail on exactly what Dojo is doing in Part II, “Dojo Widgets.” But for now, we only have to recognize that Dojo has a slightly different syntax than regular JavaScript for specifying event handler functions.
Let’s put the handler function into a completely separate JavaScript file. This isn’t necessary but will allow us to keep our JavaScript separate from the original HTML file and will make our code easier to read. Create a new JavaScript file called “userNameValidation.js” with a function called userNameOnChange. The following code contains the contents of our new JavaScript file. We enhance it as we progress through this step of the tutorial.
    // define function to be called when username is entered
    function userNameOnChange() {
        return;
    }
We also need to reference the JavaScript file in our page, so we’ll have to add a new <script> tag to our HTML page to include the new file. The code the follows should be placed in “form.html.” The order isn’t important, but to facilitate good organization of our code, we should put it after the <script> tag for including Dojo.
    <script type="text/javascript" src="validateUserName.js">
    </script>
The first thing you might notice is that the onChange function is called when the form is first displayed, even before the user has entered any data in the field. The field doesn’t even have focus yet. This is because the default behavior for a form widget (of which our widget is a subclass) calls the onChange function when it first sets the value of the element. So we’ll want to remember to skip our validation if there is no data in the form yet, as is shown in the following code. The additional code has been bolded for emphasis.
    // define function to be called when username is entered
    function userNameOnChange() {
        var userName = document.getElementById("userName").value;
        if (userName == "") {
        console.log("userName is empty");
            return;
        }
        return;
    }
Notice that we are using the console.log function to display messages in a special browser console that is separate from the web page. Logging is a useful technique during development so that we can see what the program is doing without having to use JavaScript alert boxes or write to the web page itself. We dig deeper into debugging in Dojo in Chapter 17, “Testing and Debugging.”
We’ve placed the hook into the page so that when the user enters or changes the value of the user name, our handler function will run. But our function is merely a stub—it doesn’t really do anything. Now, let’s flesh out the function and do the work that needs to be done. We need to perform the following steps:
Get the data entered by the user.
Send the data to the server along with a request for the server to validate it.
Handle the response from the server.
Additionally, we’ll need to handle the response on the server and then process the results that come back from the server but that can wait a bit. Let’s concern ourselves with that at a later stage and start with getting the data.
Dojo provides a number of techniques for getting the value of entered data from a widget. But to understand them, it might be helpful to remind ourselves of how we can get data from form fields without Dojo, just using plain old JavaScript and the DOM. The DOM automatically builds references to form elements, and we can use that to get a value.
var userName = document.form.custForm.userName.value
Another technique is to use the id property of the DOM elements to find the correct form element. Of course, this will only work if we’ve assigned id properties to the elements (as we have in our form).
var username = document.getElementById("userName").valueDojo provides some additional techniques. The DOM gives us a single object to get data from—the object corresponding to the DOM element for the field. But when using Dojo, there are two possible objects we could use to get the value. The first object is the DOM element, as with plain old JavaScript, but Dojo provides a shortcut for referencing that object. Notice the dojo.byId function in the following code.
var username = dojo.byId("username").valueThe second object that Dojo provides is one that is not part of the DOM. It is a separate object that contains additional properties and functions that don’t exist in the DOM element—the Dojo widget object. Every Dojo widget object corresponds to a set of DOM elements that describe that widget. We need a different Dojo function to access the widget object.
var userName = dijit.byId("userName").getValue()Notice in the preceding code that we are referencing a different namespace (that is, dijit.byId, not dojo.byId). The function dojo.byId returns a reference to a DOM element. The function dijit.byId returns a reference to the “shadow” object corresponding to each Dojo widget.
Alright already! We’ve got lots of ways to get the data. Which one should we use? “In for a penny, in for a pound,” as Ben Franklin use to say. Because we’re using Dojo, let’s really use it. We’ll write our code against the Dojo object whenever possible so we’ll use the last version discussed—getting the value from the Dojo widget object using the dijit.byId function.
Let’s add the new code to our userNameOnChange function. We’ll replace the existing code that assigns userName. The new code is bolded.
    // define function to be called when username is entered
    function userNameOnChange() {
        var userName = dijit.byId("userName").getValue();
        if (userName == "") {
        console.log("userName is empty");
            return;
        }
        return;
}Now we’ll send the data to the server. We need to use the XmlHttpRequest (XHR) object. But rather than use it directly, we’ll take advantage of the function wrapper provided by Dojo. By using the dojo.getXhr function, we’ll be using the XHR object indirectly and letting Dojo handle the housekeeping for us. Our code will be simpler that way.
    // define function to be called when username is entered
    function userNameOnChange() {
        var userName = dijit.byId("userName").getValue();
        if (userName == "") {
        console.log("userName is empty");
            return;
        }

        dojo.xhrGet( {
            url: "validateUserName.jsp?userName=" + userName,
            handleAs: "json",
            handle: userNameValidationHandler
        });
    }
The dojo.xhrGet function has a very interesting signature. It takes a single object as an argument, but that object might have a number of properties. And it is specifically which properties we set and their assigned values that determine how the XHR call is made. We go into much greater detail in Chapter 15, “Ajax Remoting,” but let’s take a cursory look at the function now. It might be helpful at this juncture to remind ourselves of how we would use the XHR directly using JavaScript.
var xhr = new XMLHttpRequest();
xhr.open("GET","validateUserName.jsp?userName=" + userName);
xhr.onreadystatechange = function() {userNameValidationHandler;}
How does our call to dojo.xhrGet differ from the standard usage for XHR? First, and most obviously, we aren’t creating a new XHR object. The new object does get created eventually—somewhere deep in the internals of Dojo (actually not that deep but more on that later). But we have a simpler syntax using an existing Dojo function.
Second, rather that pass the HTTP message type as a parameter, it is built into the name of the function. To do an HTTP GET, we use dojo.xhrGet, while to do a POST we use dojo.xhrPost instead.
Third, and finally, we pass the callback function, userNameValidationHandler, as a property of our argument object, not by setting an XHR property. There are some benefits that aren’t obvious from viewing this code. When using XHR directly, our callback method has to test the state and status properties of the XHR object before it can safely execute the handler code. When using dojo.xhrGet, Dojo will perform the checks before calling our handler, allowing us to write simple handler code. The less code we write, the less the potential for error. That’s a good thing, as Martha Stewart might say.
The server receives our request, processes it, and returns the response back to the browser. The browser executes a callback function internal to Dojo. Dojo, in turn, calls the function that we specified as the callback, userNameValidationHandler, in the dojo.xhrGet function call. All we have to do is code that function. What must this function do? At a minimum, it should display an error message stating that someone else has already taken the user name. The following code will display an error message.
    function userNameValidationHandler(response) {

      // Clear any error messages that may have been displayed
        dijit.byId("userName").displayMessage();

        if (!response.valid) {
        var errorMessage = "User name already taken";
            // Display error message as tooltip next to field
            dijit.byId("userName").displayMessage(errorMessage);
        }
    }
Note that we’re making sure to clear the error message first. This is necessary to get rid of the error message if the user is entering this field a second time after having failed to enter a valid user name the first time.
There is at least one thorny issue left. What if the call to the server to validate user name takes a long time—maybe 20 seconds or more? The user might already be entering the next field. We don’t want to interrupt what the person is doing by switching focus back to the user name field. But what will they think when an error message suddenly appears next to a field they aren’t even working on? We could block the user from working while the validation is being done by making the XHR call synchronous, but that could also be frustrating for the user. We’ll discuss this issue further in Part II when we explore Dojo widgets in more detail.
Our example rests on the assumption that the server can validate the user name. To do that we’re traveling past the boundaries of Dojo. We assume that there is some resource on the server called “validateUserName.jsp.” This resource takes the user name as a parameter and returns a JavaScript Object Notation (JSON) string, defining an object with a property called valid that might either be true or false. Dojo doesn’t care how you write this resource or what kind of server it is running on, just so long as the server can talk HTTP. Following is a simple JSP page that would validate the user name with a hard coded check to see if the value is “olduser.” As long as it isn’t, then the user name would be considered valid. This will allow our example to work, but obviously the server program should be more sophisticated.
<%@ page contentType="text/plain"%>
<%
    try {

                 System.out.println("UserName  : " +
                request.getParameter("userName"));
                 if (request.getParameter("userName").equals("olduser")) {
                     out.println("{valid: false}");
                         System.out.println("To Browser  : false" );
                 } else {
                     out.println("{valid: true}");
                         System.out.println("To Browser  : true" );
                 }

         } catch (Exception ex) {
                 out.println(ex.getMessage());
                 ex.printStackTrace();
         }
%>
The code will return the following JSON string for invalid user names.
{valid: false}And for valid user names, the following JSON string will be returned instead.
{valid: true}You might be wondering how our page can receive JSON and yet never have to convert it to an object. In our callback function we are able to use the object by referencing response.valid. We’re taking advantage of some Dojo magic. By specifying the handleAs property and giving it a value of json, we are telling Dojo to expect to receive a JSON string from the server and to create the object from the JSON string and pass it to our callback method. Now that really saves us some coding!
In this step of the tutorial we use the server to return some data back to the browser. We need to send a state value to the server so that it can determine the cities within that state. The server will send back the cities, and then we’ll populate the city select list. The user will be able to select a city from the newly populated pull-down select list. This approach will work most of the time, but there is a small problem. There are a lot of cities in the U.S., and it is just possible that we’ve missed one or that a new one has been incorporated. Therefore, it would be useful to allow the user to type the value of a city just in case it isn’t in our list. The regular HTML <select> doesn’t allow for this but, fortunately, the Dojo version does.
Let’s summarize the steps.
Select the appropriate Dojo widget to replace the HTML
<select>for city.Get the value of state and send it to the server.
Process the response from the server
Now let’s drill into the details for each of these steps.
In the original HTML form for entering customer information, the “City” field is a textbox in which the user can enter the city by typing it in. Some city names can be rather long and require a lot of typing, making the entry time consuming and prone to spelling errors. We could improve the user interface by providing an auto suggest facility that would list the cities corresponding to the letters typed by the user. For example, if the user typed “ch,” they would be presented with a list of cities beginning with those two letters as shown in the following example.
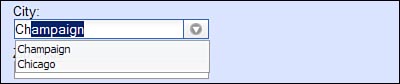
An additional refinement would be to list only the cities of the state the user selected from the “State” field. Shall we congratulate ourselves on such a wonderful solution? Well, let’s not throw a party quite yet. After all, there is no standard HTML widget that provides the features we so ardently seek. Luckily, we are using Dojo, which just happens to have a widget called the ComboBox that contains just the features we are looking for.
Let’s replace the standard textbox for city with the Dojo ComboBox. We must make sure that the code for the widget is included by using the dojo.require statement. Add the following code to the <script> tag containing the other require statements.
dojo.require("dijit.form.ComboBox");Then the Dojo widget must be attached to the DOM by adding the dojoType attribute to the <input> tag for the “City” field. The following code shows how to replace the standard textbox with the new Dojo widget. The new code is in bold.
    <input type="text" id="city" name="city" title="city"
        dojoType="dijit.form.ComboBox"
        autoComplete="true"
        forceValidOption="false"
    />
The dojoType attribute tells the Dojo parser to attach the widget to the DOM. The autoComplete attribute tells the widget to automatically include the full text for the first matching value based on the characters entered by the user. So if the user enters “ch,” and the first matching city is “Chicago,” then the user can leave the field, and the widget will assign the entire city name to the field value. This saves the user significant typing, especially for long city names.
The forceValidOption attribute setting of false allows the user to enter a value that isn’t included in the select list. This behavior is quite different from a regular select list, which only allows the user to select one of the listed values. If you want that behavior, simply set the forceValidOption attribute to true. However, in this case, we get some useful functionality setting it to false because it is possible that the user’s city is not in our list.
The Dojo ComboBox widget is a great replacement for the standard <select> list. So why not use it for the “State” field also? Let’s do that! We’ll just make a few changes. Because the list of possible states is well-known, we’ll force the user to select one from the list rather than being able to enter a new one. This will require setting the forceValidOption attribute to true. This widget also provides a neat technique for entering data, which solves a problem we’ve already discussed. When you type the letters “il” in the standard <select> list, the state of “Louisiana” is selected because most browsers treat each letter as the first letter of the state, even though you would have already typed an “i.” Instead, the Dojo ComboBox uses the entire string to properly select the intended state of Illinois.
Following is the code to replace the standard select list for state with the new Dojo widget. The new code is in bold.
    <input type="text" id="state" name="state" title="state"
        dojoType="dijit.form.ComboBox"
        autoComplete="true"
        forceValidOption="true"
/>Now that we’ve got the appropriate widgets for both state and city, we need to focus on getting the correct data. As we’ve discussed already, we could pre-populate the city list with all the possible cities in the U.S. The problem is that there are nearly 30,000 of them, and loading them all would make our page unnecessarily large. The better approach is to get from the server only the cities found in the specific state selected by the user.
This introduces a few challenges. First, we must decide how and when to capture the value of state. Second, we must then make a request to the server to get some city data. And third, we must populate the city list with just those cities. Let’s just tackle each of these problems in turn.
Every time the user selects a state, we should repopulate the city list. We’ve already dealt with this kind of issue for the user name field. We’ll use the onChange event for the state select list. By assigning an event handler to the event, we’ll be able to capture the new state value and submit it to the server at just the right point. We’ve already discussed the issues related with event handlers in step 2 of the tutorial. For more detail go back and read that step.
Let’s add an event handler to the state field so that every time the value changes, we’ll call an event handler function that will populate the city list. Let’s name our event handler populateCity, And let’s associate it with the onChange event for the “State” field using the following code by setting the onChange attribute for the state ComboBox to the name of the event handler function. The new code is in bold text.
    <input type="text" id="state" name="state" title="state"
        dojoType="dijit.form.ComboBox"
        autoComplete="true"
        forceValidOption="true"
        onChange="populateCity"
    />
Now whenever the user selects a new state value, the event handler will be called. This will also work the first time that the user selects a state. The correct event handler will be called, but what should it do? It needs to get city values, but what is the correct approach for achieving this? We need to get the value of the state and then send it to the server. Getting the value of the state is pretty straightforward. We just need to run the getValue method for the widget, and it will return the selected value.
Once we get the value, life gets more complicated. Our intuition might tell us that we’ve already solved this problem. In the prior step of the tutorial, we created an XHR call to the server. We could use that same technique again. However, this time we’re populating a Dojo widget that has some data coming back from the server, so our solution can be simpler. Some Dojo widgets are “bound” to server data. What this means is that the widgets will automatically make an XHR call to the server and automatically populate themselves with the data returned by the server. This can save us lots of coding. And fortunately for us, the ComboBox widget happens to be one of these data bound widget types.
Although the coding for using data bound widgets can be simpler, it does require us to understand a new Dojo concept, that of data stores. A former professor of mine was fond of saying that any problem in Computer Science could be solved simply by wrapping it in an abstraction. That philosophy certainly applies when using Dojo data stores, which provide a wrapper around various underlying types of data. The data that an application might use could exist in many places or in many formats. Typically, we would be getting data from a server, but we might be getting it from a web service instead, or a legacy application in Cobol, or even a Directory Service. Additionally, the data might exist in many different possible formats such as XML, JSON, raw text, or some other proprietary format. It would be very difficult for the Dojo team to create different widgets for all these possible scenarios, so instead Dojo has provided an abstraction layer between the widget and the data source called the store.
The store provides a consistent set of method calls, or API, which allows the widgets to communicate with the data source without knowing exactly what kind of data source they are dealing with. The Dojo team has provided documentation necessary to write a data source layer because they can’t anticipate all the different data sources that an application might communicate with.
However, there are some data sources already defined for us. One of these is the JSON data source. If your server is providing data in JSON format, you can use the JSON data source as a way of connecting to that data. How do you use this data source? The following steps are necessary to bind a data source to a Dojo widget using the data store layer.
Expose the data through an HTTP request on the server.
Define the data store Dojo object on the client.
Bind the data store to the Dojo widgets that use it.
Now that we know about the existence of data stores, let’s use one.
To use some data, we must have access to it. In other words, the server must be able to provide the data. We’ll expose the data by creating a server resource, which can be called through either an HTTP GET or POST request and that will return some data in JSON format. The server resource can use parameters passed in the request to dynamically build the data that is being requested.
For our tutorial, we’ll create a server resource called getCities.jsp, which will take a state as a parameter and return a list of cities in that state. To make our code simpler, we’ll only return a list of cities for the state of Illinois. All the other states will just return a single city called “Anytown.” And for the state of Illinois, we’ll only provide a small number of the actual cities. Following is the JSP page we need to create to expose our city data.
<%@ page contentType="text/plain"%>
<%
response.setHeader("Cache-Control","no-cache"); //HTTP 1.1
response.setHeader("Pragma","no-cache"); //HTTP 1.0
response.setDateHeader ("Expires", 0); //prevents caching at the proxy server
%>
<%
String state = request.getParameter("state");
if (state == null) { state = "";}
if (state.equals("Illinois")) {
%>
{identifier:"name",
items: [
    {name:"Champaign", label:"Champaign"},
    {name:"Chicago", label:"Chicago"},
    {name:"Naperville", label:"Naperville"},
    {name:"Wheaton", label:"Wheaton"}
]}
<%
} else {
%>
{identifier:"name",
items: [
{name:"Anytown", label:"Anytown"}
]}
<%
}
%>
This is fairly primitive code. The web site for this book contains some additional examples that show more complete techniques for returning all the cities from all the actual states[1].
The data that comes back from the server for Illinois appears as follows.
{identifier:"name",
items: [
        {name:"Champaign", label:"Champaign"},
        {name:"Chicago", label:"Chicago"},
        {name:"Naperville", label:"Naperville"},
        {name:"Wheaton", label:"Wheaton"}
]}
If this data format seems strange to you, it might be that you have not worked with JavaScript Object Notation (JSON) before. JSON is a technique for representing complex data objects as text strings. Think of it as XML for JavaScript. This JSON string is representing an array with four elements, one element for each city. Further, each element of that array is also an array that consists of two elements containing values for the city select list.
Each element corresponds to one option in the <select> list. The object has a property called “name,” which contains the string for the value attribute of the <option> element, which defines each of the items in the select list. This is also the value sent to the server. The label property contains the string that displays to the user. In this case both values are the same, but they can be different.
This is the format for JSON data necessary to feed the widget properly. This widget needs elements with two values where the first value is the value sent to the server when an item is selected and the second value is the value displayed for the user in the select list. Part II describes the data format used by various other data enabled Dojo widgets. For more information on using JSON, see Chapter 13, “Strings and JSON.”
For Dojo to be able to automatically use the data from the server, we must create an object within the browser to represent the data. This object is known as a Dojo data store. We can get the Dojo parser to create the object for us by declaring the store using HTML. Although this is the simplest approach, it is also possible for us to create the object using JavaScript. Because we will create a new data store each time a different state is selected, we’ll use the programmatic technique for creating the store object.
We’ll add JavaScript code to the “populateCity.js" file referenced as our event handler. As before, when we create a new JavaScript file, be sure to reference the file using a script tag as shown in the following code. Place the code after the <script> tag for including the “validateUserName.js” file.
    <script type="text/javascript" src="populateCity.js">
    </script>
Now we must create the new file and define the handler function.
    function populateCity() {

        // Get the new value of state
        var selectedState = dijit.byId("state").getValue();

        // Build URL to make XHR call to server
        var url = "getCities.jsp?state=" + selectedState;

        // Build new data store
        cityStore = new dojo.data.ItemFileReadStore({url: url});

        return;
    }
The data store is now created but does not make an XHR request yet. That will only occur after we bind the data store with the widget.
To actually cause the data store to get the data from the server, we need to associate it with the widget that will use the data. All we have to do is assign the value of the store property of the widget to the data store, and Dojo does all the rest.
We need to add additional code to our event handler to get a reference to the widget and to assign the new property value. Add the following code that is in bold to your handler function.
    function populateCity() {

        // Get the new value of state
        var selectedState = dijit.byId("state").getValue();

        // Build URL to make XHR call to server
        var url = "getCities.jsp?state=" + selectedState;

        // Build new data store
        cityStore = new dojo.data.ItemFileReadStore({url: url});

          // Create a reference to the city widget
        var city = dijit.byId("city");

        // Clear out any existing values in the widget
        city.setDisplayedValue("");

        // Assign new data store which will force a new XHR request
        city.store = cityStore;

        return;
    }
This is all that is necessary. By building a new data store to ask for the selected state and then assigning that data store to the widget, Dojo automatically creates an XHR object to get data from the server and then populates the widget with that data. With just a few lines of code we’ve implemented a powerful server lookup feature in our form.