In previous chapters, we’ve seen how we can select and style elements by XHTML tag name, by class, by id, and by elements that are inside other elements. Those methods of selecting will suffice in many, if not most cases. But sometimes, you need to zero in on particular elements on a page in order to style them. For example, you might want to style alternating rows in a table, as shown on this page. Or you might want to change the first letter in a paragraph to give the effect of a drop cap. Using CSS, you can get as specific as you like about the page elements you want to style.
You may or may not use all of the examples in this chapter in your own sites; we’ve included them here to teach you more about particular CSS selectors, and how to accomplish particular tasks. We also suggest that you go back and review the “Understand the Cascade” section of Chapter 1, if you’re not clear how the cascade works.
It’s common these days to want to add CSS styles to tables. You can get very fancy with formatting, styling rows, columns, or combinations. You can also add rollover effects to help the user see the information better. In this section, we’re going to show you three methods of styling a table. The selectors and techniques we’re using aren’t limited to tables, however; you can use them throughout your sites, wherever you need to style specific elements.
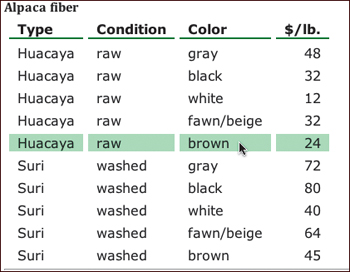
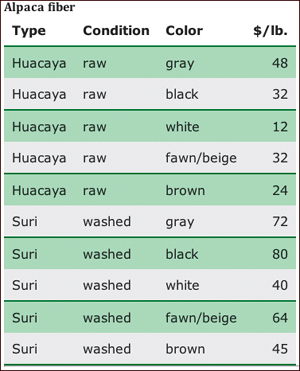
On the services.html page of the Alpaca Repo site, we’ve added a table of different kinds of alpaca fiber the site has for sale. For this first example, the table columns have bold headers, with a green bottom border for each cell in the top row. When the user hovers the mouse over a row, the cell background color turns light green, highlighting the items in the row.
There are five rules that apply the styling to the table.
Many of the properties in these rules are familiar from earlier in this book, and to save space, we won’t explain them again. The new selectors, new properties, or properties we’re using in new ways, will need some explanation. All of these rules target various aspects of the fiberChart id, which is assigned to the table in the services.html page.
In the first rule, border-spacing: 6px; adds 6 pixels of space between the borders of adjacent cells. If you remember the cellspacing attribute in XHTML tables, you’ll see that border-spacing is similar, but for CSS. This CSS attribute hasn’t been used much until recently, because Internet Explorer (up until IE 8) didn’t support it.
#fiberChart {
   border-spacing: 6px;
}

#fiberChart td {
   padding: 1px 10px;
}

#fiberChart tr:first-child td {
   font-weight: bold;
   border-bottom: 2px #006600 solid;
}

#fiberChart tr:hover {
   background-color: #BAE8BF;
}

#fiberChart td+td+td+td {
   text-align: right;
}
In the third rule, tr:first-child td uses the first-child pseudo-class. As a reminder, in an XHTML table, the tr tag denotes a table row, and td defines a cell in a table. For tr:first-child, read it as “Find the row that is the first child of the parent element, i.e., find the first row of the table”—that is, while there are a number of rows in the table, only the first row is the first tr child of the parent table. For the compound selector tr:first-child td, you should read it as “Any cell in the first row of the table.” The rule then goes on to set the font weight and sets a green bottom border for the cells.
Note that we’re selecting tr:first-child, not table:first-child. While you might think that we’d want to select the first child of the table, that’s not the way :first-child works. Instead, we want to select the first child row in the table, so :first-child is applied to the row itself.
In the fourth rule, we use tr:hover. We introduced the :hover pseudo-class in Chapter 5. Here, we’re showing how you can use it with something other than a link. Note that each row changes its background color when the visitor hovers over that row.
In the last rule, the td+td+td+td selector says, “Look for any cells that are the fourth cell in a row,” that is, you’ll have a match any time you have the fourth cell and on. That is, if this table had five cells across, this would match the last two cells, and so on. The + is the sibling selector, which is all about selecting elements that are adjacent. The compound selectors that we’ve seen up to this point have all been about something that is inside something else (for example, p img, which selects an image that is inside a paragraph). The sibling selector is all about what elements are next to each other. See the Extra Bits for more about adjacency. All the rule is doing here is right-aligning the contents of the cells in the right-most column. And that’s all there is to styling this table.
But what if you want to add a bit more complexity to the styling? One popular and attractive way to display a table is with zebra-striping, where alternating rows of the table are shown with different background colors.
Here’s the CSS used for this version of the table:
#fiberChart {
   border-collapse: collapse;
}

#fiberChart td {
   padding: 10px;
}

#fiberChart td:last-child {
   text-align: right;
}

#fiberChart tr:first-child td {
   font-weight: bold;
   border-bottom: 2px #006600 solid;
}

#fiberChart tr+tr+tr,
#fiberChart tr+tr+tr+tr+tr,
#fiberChart tr+tr+tr+tr+tr+tr+tr,
#fiberChart tr+tr+tr+tr+tr+tr+tr+tr+tr,
#fiberChart tr+tr+tr+tr+tr+tr+tr+tr+tr+tr+tr {
   background-color: #EEEEEE;
   border-bottom: 2px #006600 solid;
}

#fiberChart tr+tr,
#fiberChart tr+tr+tr+tr,
#fiberChart tr+tr+tr+tr+tr+tr,
#fiberChart tr+tr+tr+tr+tr+tr+tr+tr,
#fiberChart tr+tr+tr+tr+tr+tr+tr+tr+tr+tr {
   background-color: #BAE8BF;
   border-bottom-width: 0;
}
This targets the fiberChart id, and each rule modifies elements of the table.
In the first rule, the border-collapse property is the more traditional of the CSS ways to style a table. With borders collapsed, you (1) don’t get any space between cells, and (2) if you have two borders next to each other (say, every row has both a top and bottom border), they’ll collapse into each other. That is, instead of 2px bottom border + 2px top border producing a 4px border, it will be a 2 pixel border.
In the third rule, the td:last-child selector is the more flexible, modern way of doing the same function we performed in the last rule of the previous example (that is, to select the right-most column, and right align its contents). However, note that there is no current or planned IE support for this selector, so the previously shown way to do the job may be safer.
In the fifth and sixth rules, we use the sibling selectors to select the odd and even rows of the table, respectively.
In the fifth rule, we select the third, fifth, seventh, ninth, and eleventh table rows (if the table is shorter, the selector finds no match, and has no effect). Then the rule applies a light gray background color, and a 2 pixel solid green bottom border to the row.
The sixth rule selects the second, fourth, sixth, eighth, and tenth rows and sets the background color of the rows to light green. Setting border-bottom-width to zero on the even rule makes it so that every other row has a border, cutting the table into sections for a nice effect.
If you find this a little confusing, remember what we said about specificity (in understand the cascade) in Chapter 1: when deciding which rule takes precedence, it’s all about which is the most specific. If you take the zebra-striping rules individually, the tr+tr, for example, applies to every row from the second on (that is, it applies to row 2 because it’s next to row 1, and to row 3 because it’s next to row 2, and so on). But tr+tr+tr is more specific than tr+tr, so it applies to rows 3 and up—that is, row 3 is next to 1 and 2; row 4 is next to 2 and 3, and so on, so that rule applies to those. But wait! The tr+tr+tr+tr rule is even more specific, so it overrides the previous rules, applying to rows 4 and up. And so on, and so on, up until the last rule, which applies to the last row.
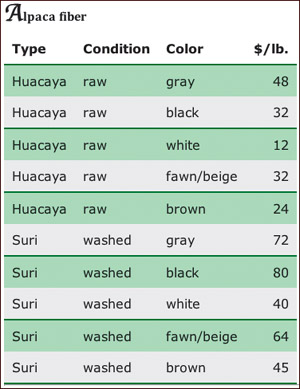
The third way to format the table produces the same zebra-striping as the method we just used, but it is easier to understand and much more flexible. The drawback is that it uses a selector, nth-child, that is part of the emerging CSS3 standard. That means that it is supported by the latest versions of Safari and Firefox (3.1 and later), but is not supported by any currently existing version of Internet Explorer. So you should use this method only in situations where you know that your users will be using browsers that can support it or when the zebra-striping isn’t a major design element.
The look of the table in this example is a little different; we’ve chosen to put visible borders around all the cells, and put thicker borders after every other row.
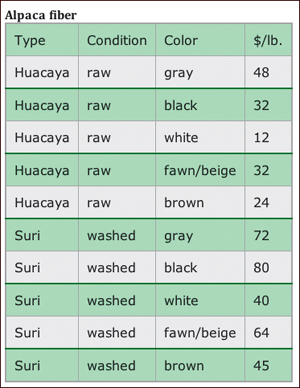
The CSS that produces these effects is much shorter than that in previous examples.
#fiberChart {
   border-collapse: collapse;
   border: 2px #A7A7A7 solid;
}

#fiberChart td {
   padding: 10px;
   border: 1px #A7A7A7 solid;
   background-color: #BAE8BF;
}

#fiberChart tr:nth-child(even) td {
   background-color: #EEEEEE;
   border-bottom: 2px #006600 solid;
}
The first rule begins with the border-collapse property, as shown earlier, then adds a 2 pixel solid border around the table itself.
The second rule sets all cells to have padding, a background color, and a 1 pixel border.
The last rule uses nth-child(even), which overrides the second rule for the even-numbered rows. Using this selector, you don’t have to jump through the hoops we did in the previous example: nth-child(even) only applies to even-numbered rows, so we can create a blanket rule that applies to the whole table (which will end up applying to only the odd-numbered rows) and then override it for the specific rows we want to target (the even rows), and for just the specific rules that we want to override.
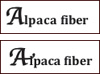
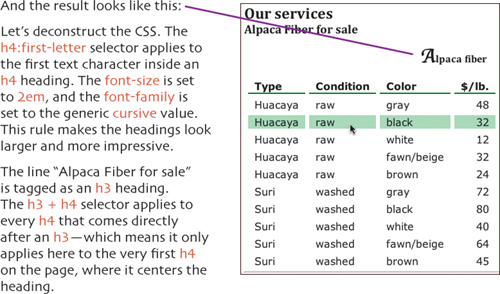
On our page, we have the title “Alpaca fiber” above the table. The line is styled as a h4 heading. That’s fine, but it does look a little dull. Let’s jazz it up a little by making it start with a fancy capital letter. This CSS will do the trick.
h4:first-letter {
   font-size: 2em;
   font-family: cursive;
}

h3 + h4 {
   padding: 5px;
   text-align: center;
}
There are three other selectors that we want to tell you about. The first is the universal selector, the second is the !important selector, and finally, there’s the child selector.
We added another rule to our CSS file, which uses *, which is the universal selector—that is, it applies to every element.
* {
   margin: 0;
   padding: 0;
}
This rule sets all margins and padding for all elements on the page to zero. Using the universal selector in this fashion is fairly common (to avoid cross-browser incompatibilities), and is referred to as doing a global reset.
The !important selector is the Jedi mind trick of CSS. It tells the browser that this rule, no matter what selectors it uses (or doesn’t use) is always the most specific, forcing it (absent any other rules marked !important) to always be applied.
The selector is pronounced “bang important.” It’s useful when you’re having trouble making a specific enough rule to force the particular rule you want to take effect.
td {
   padding: 20px !important;
}
Lastly, the child selector uses the character >. It targets the immediate child of a given element—that is, if you wanted to apply a rule to all links within a paragraph, so long as that paragraph was within the #mainContent div, you could target them by using the descendent selector #mainContent p a. But what if you wanted that rule to not apply to any blockquotes inside that div? You have paragraphs within the blockquote, and links within the paragraph—so how do you stop it?
You can do that by changing the above selector to #mainContent > p a. That tells the browser that you only want to target links which are inside paragraphs, where those paragraphs are direct descendents of the #mainContent div. If there’s a blockquote in between, the rule won’t apply. We’ll have a specific example of using a child selector in Chapter 7.?????????
Add Fancy Headings p. 79