
The Develop module is where all of the photographic magic happens, and the time you spend with these chapters will help your photography improve by leaps and bounds. Sometimes I get carried away working in the Develop module because it is so easy to arrive at compelling results and it’s also incredibly fun. My hope is that you will learn more about the technical aspects of the module controls and with these new skills reignite your passion for capturing images.
In this chapter, we will go beyond the essentials and cover a range of specialized Develop module controls. We’ll focus on Hue/Saturation, Grayscale, Split Toning, Reducing Noise, Sharpening, Chromatic Aberration, Cropping, Vignetting, and Camera Calibration.
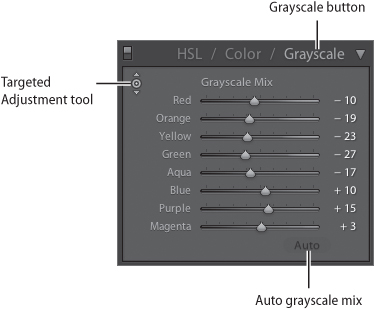
To use the Hue, Saturation, and Luminance (HSL) controls open the HSL/Color/Grayscale panel in the Develop module (Figure 59a). Next, click on the buttons at the top to select the controls for Hue, Saturation, Luminance, or All, as shown in the screen capture below. Next, drag the sliders to the left to decrease or to the right to increase the particular aspect of the image. At times it is difficult to determine which slider will affect a particular area of an image. When that’s the case, click on one of the Targeted Adjustment tool icons. Position the tool over an area of an image and drag down to decrease or up to increase the effect.

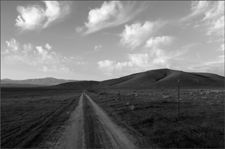
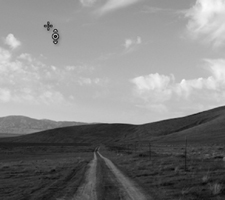
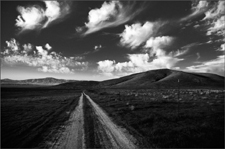
The best way to understand how these controls work is by seeing an example. Often in landscape photography, you need to darken the sky (Figure 59b). To do this click on the Targeted Adjustment tool for the Luminance sliders. Next, position the tool over the sky and then click and drag down (Figure 59c). The final result is a much more visually interesting image (Figure 59d).
Photographer Rodney Smith once told me, “Black-and-white is simply more emotional.” I agree. There is something incredibly believable, powerful, engaging, and intriguing about black-and-white photography. Learning how to convert to grayscale (as it’s called in Lightroom) can be very fruitful.
The quickest way to convert to grayscale is to choose Settings > Convert to Grayscale or to press the V key. This will convert the photo based on the Color Temperature controls in the Basic panel. While this conversion is not always best, it can be a good way to check to see if an image with look good in black-and-white, or it may simply be a nice starting point to make further adjustments.
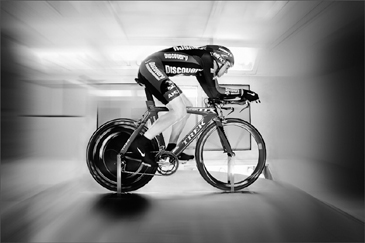
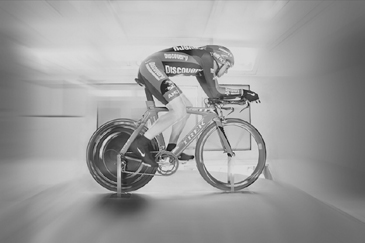
Another technique is to open the HSL/Color/Grayscale panel and then click the Grayscale button (Figure 60a). This will automatically convert the image to grayscale based on the Color Temperature controls. Next, move the sliders or use the Targeted Adjustment tool to dial in an appropriate black-and-white conversion. The final result of using the grayscale
controls can be a dramatic and compelling image (Figure 60b) as opposed to one obtained by simply pressing the V key for the default conversion (Figure 60c).
Split toning can be used to add a color tone to the highlights or shadows of a photo. Traditionally, split toning was used to tone black-and-white images, and in Lightroom it can be used to create intriguing effects on both grayscale and color images.
To split tone an image, open up the Split Toning panel in the Develop module (Figure 61a). The panel is divided into Highlights and Shadows so that you can add tone to the brighter or darker tones. Next, use the Hue slider to choose a specific color and the Saturation slider to determine color intensity. Typically, when the saturation amount is low it is difficult to choose a specific color with the Hue slider. In this case, hold down Alt (Windows) or Option (Mac) and click and drag the Hue slider to view a preview of the hue at 100 percent Saturation.
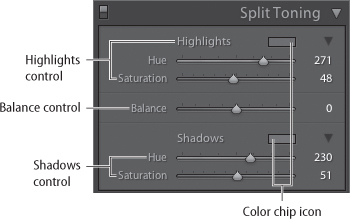
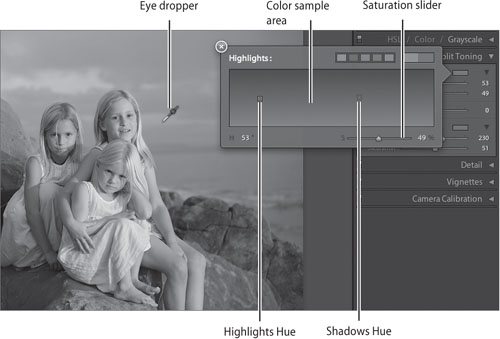
For even more control over the split tone effect, click on the color chip icon to open up the Split Toning Hue/Saturation menu (Figure 61b). In this menu, click in the color sample area to select a hue. Or click and drag over the image itself to select a color right from the image. In addition, you can use the Saturation slider to change the Saturation.
While there are many reasons to celebrate digital photography, there are also a handful of challenges. One of the most common is dealing with noise in the shadow areas that results from high ISO settings or from low light. The problem with noise is that it contains both brightness and color problems. The good news is that fixing typical types of noise in Lightroom is a snap with the Detail panel (Figure 62a).
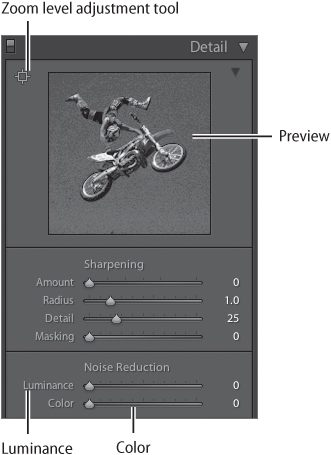
To begin the process, zoom the image to 100 percent to see the actual details of the image. Next, click in the preview window to change the zoom of the preview. To change the area of the image revealed in the preview window, either click and drag to reposition the image, or select the zoom level adjustment tool and hover over the image. As you hover over the image, the preview will be updated.
Next, use the Luminance and Color sliders to remove the noise. The Luminance slider controls noise caused by brightness. The Color slider removes noise that results from color artifacts by reducing the color variance.
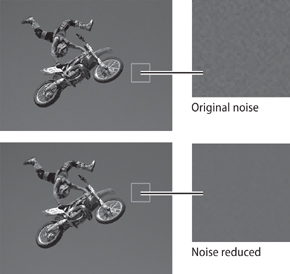
The first image in Figure 62b was captured with an ISO of 1600 as a test and had excessive noise in the sky. By simply moving the Color and Luminance sliders up to approximately 20, the noise was successfully removed in the bottom image. But as you reduce the noise of the image you also soften the edges. As a result, noise reduction techniques work best in when used in unison with the sharpening controls (which will be discuss in the next technique). In other words, after you reduce the noise, be sure to go back and increase the sharpening to compensate for the softening from the noise reduction.
Whether you shoot and capture raw or JPEG images, you will find that all images need a certain level of capture sharpening in order to correct any softness of the image that results from capture. Later we will discuss output sharpening (in Tip #94) in order to complete the picture. Sharpening is tricky, as it is easy to over-sharpen photos. It is a good idea to proceed delicately and to spend adequate time learning how the sharpening tools work.
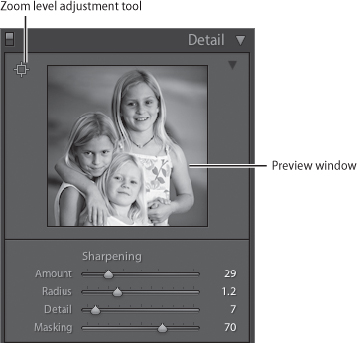
You can access the sharpening controls from the Develop module Detail panel (Figure 63a). To sharpen successfully, zoom the image to 100 percent to view the details. Next, click in the preview window to change the zoom of the preview. To change the area of the image revealed in the preview window either click and drag to reposition the image or select the Detail zoom level adjustment tool and hover over the image. As you hover over the image, the preview will be updated.
To begin the sharpening process, try one of the two sharpening presets in the left side Presets panel (Figure 63b):
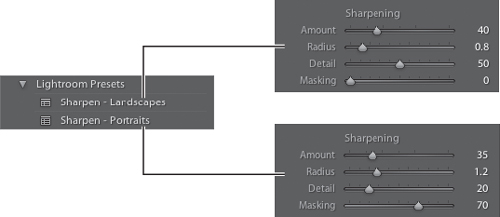
Sharpen – Landscapes to add a moderate amount of overall sharpening while sharpening many of the smallest details of the image.
Sharpen – Portraits to add a moderate amount of overall sharpening while protecting the small details from being sharpened. The sharpening will be applied mostly to the areas of high contrast (like edges), but not to small details in the skin, which would be unflattering.
Next, modify the sharpening sliders to create the best sharpening mix. The best sharpening results from combining all four sliders. Let’s take a look at how each slider contributes to the sharpening process:
Amount – Controls the overall intensity of the sharpening. Be careful not to increase this amount too much, as it can lead to an unnatural look. If the amount goes into the red area of the slider, be sure to use the controls below (and the noise reduction controls, described in Technique #62) to scale back the sharpening.
Radius – Controls how far out from an edge the sharpening extends. A low radius setting keeps the sharpening close to the edge. A high radius setting expands the reach of the sharpening. If you notice a halo around the edges of your image, decrease the radius to reduce it.
Detail – Controls sharpening on small details. A low amount prevents the sharpening of small details, while a high number sharpens small details.
Masking – Controls where the sharpening is applied. The higher the number, the larger the mask, which limits the sharpening to the edges or to the areas of high contrast.
Recently one of my photography students said in jest, “I’ll give you $20 if you can tell me what chromatic aberration means.” The term does suggest a strange and deeply complex subject, but it’s quite simple. Chromatic aberration refers to the color fringing that is a common problem with wide-angle lenses (for more details see “More on Chromatic Aberration”). You may notice a color edge (for example, red or cyan, etc.) on the side of an object in an image. If you come across this problem, fixing it will be a breeze if you use the Chromatic Aberration controls located in the Detail panel (Figure 64).
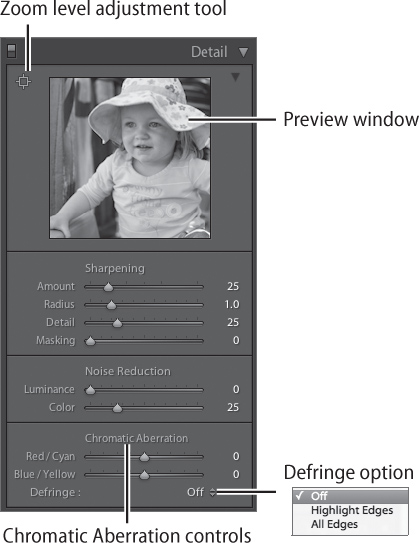
To fix chromatic aberration, zoom in to an area of the image near the edge or corner. Click the zoom level adjustment tool and position it over the area you would like to inspect. The preview window will display the area. Or click and drag in the preview window to change the area that is previewed. Next, look for color fringing along the edges of the objects in the photo.
Use the controls to fix the fringe color. The Red/Cyan slider allows you to fix red/cyan fringing. For example, if you notice a red fringe, drag the slider to the left. The Blue/Yellow slider allows you to fix the blue/yellow fringing—if you notice a blue fringe, drag the slider to the left.
Finally, select a defringe option from the pull-down menu. Try choosing Highlight Edges first so that the correction is limited to the highlighted area. If that is not sufficient, choose All Edges to apply the color fringing correction to all edges. If you select this option, be careful to watch for small gray lines or undesirable effects. If you notice any negative effects, go back to Highlight Edges or choose Off to turn off the defringing option.
It is always best to crop and compose on camera. Sometimes, however, you just don’t get the composition right. In addition, you may simply want to recompose the image for creative purposes. In either case, cropping in Lightroom will soon become an integral part of your postproduction workflow. In addition, unless you are using a full-frame high-end camera, you have only about a 90 percent view of the actual shot through the viewfinder, so the final composition will vary slightly from what you saw on camera. As a result, in many situations it becomes essential to crop in postproduction. Either way, let’s first look at how to apply a basic crop, and second, examine some of the other crop and straighten options.
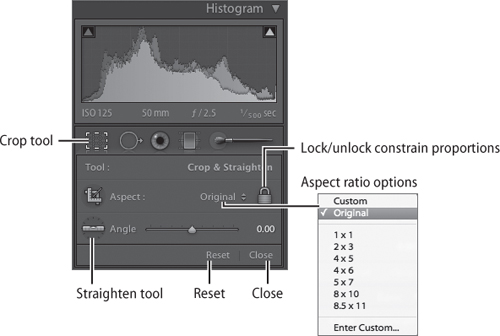
First, to select the Crop tool choose View > Crop, or press R, or click on the Crop tool icon under the Histogram in the Develop module (Figure 65a). After you select the Crop tool, an outline with adjustment handles will appear on top of the photo. To adjust the crop, drag one of the adjustment handles and reposition the photo within the crop frame by dragging the photo. When you have finished, press Return or Enter to accept the crop.
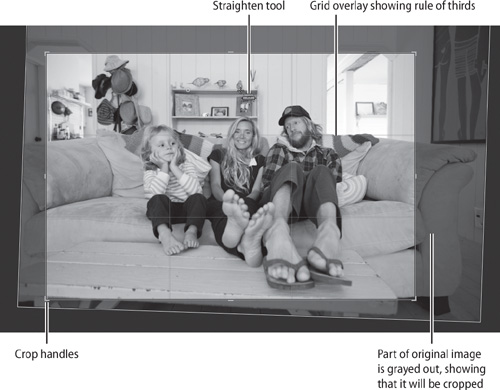
One of my favorite crop options is the grid overlay. After you have selected the Crop tool you will notice a grid overlay on the image. To change the grid overlay press the O key to cycle through six different options. This is valuable to help you determine what crop will work best. The different grid overlay views will also teach you about composition (Figure 65b).
After you have selected the Crop tool you can access more aspect ratio options. First, use the padlock icon to control whether the crop aspect ratio is constrained or not. If the padlock is locked, the crop aspect ratio is constrained; if it is unlocked, the crop aspect ratio is freeform. Next, choose an aspect ratio from the pop-up menu next to the padlock.
After you have selected the Crop tool you can access the Straighten tool and the Straighten slider. Click on the Straighten tool and click and drag along something in the image that you want to be level. Let go of the mouse button, and a new crop and rotation will appear. Press Enter or Return to apply the crop. Or use the Straighten slider by dragging the slider to quickly rotate the image.
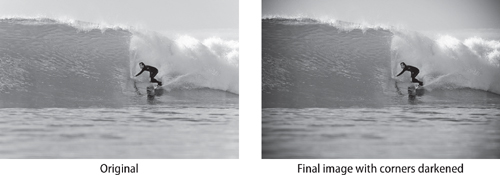
In photography, vignetting, which makes the corners of an image dark, is the result of a lens defect. This typically occurs with wide-angle lenses. The Lens Correction controls were created to help fix the corners, but you will quickly discover that the controls can also be used to create a unique aesthetic—the tool has evolved to be about both form and function. To take advantage of this valuable tool, open the Vignetting panel in the Develop module (Figure 66a).
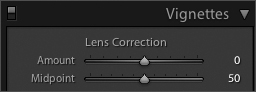
Let’s take a look at the sliders and an example to understand how the Lens Correction controls work. The Amount slider controls the overall type and intensity of vignetting. Drag the slider to the left to darken the corners, and drag the slider to the right to brighten them. The Midpoint slider controls how far from the corners the corner effect extends. Drag the slider to the left to extend the effect toward the center of the image, or drag the slider to the right to limit the effect to the corners. After applying lens correction it is typically best to go back to the Basic panel and make any final tone adjustments.
To fully understand how the Lens Correction controls work, just for fun let’s look at a photograph a friend took of me surfing (Figure 66b). In this image the Amount slider was decreased to – 100 in order to darken the corners. The Midpoint slider was increased to 85 to limit the effect to the corners. Next, in the Basic panel the overall contrast was increased slightly.
Note
The Lens Correction controls do not work very well on the edges of an image after it’s been cropped. For a good way to get a vignetting effect on a cropped image, see Technique #67.
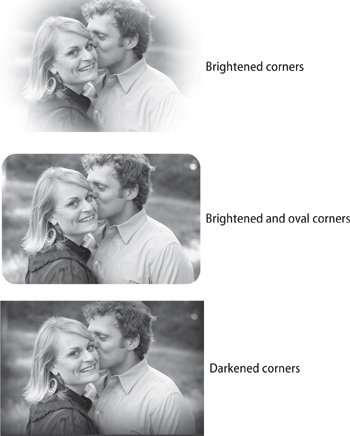
The Post-Crop controls in Lightroom 2 were created in response to photographers who wanted to apply vignetting effects to their images after they have been cropped. The Lens Correction controls work only on the original edges, rather than the cropped edges, so for creative cropped vignetting, they have always worked poorly. Adobe not only responded to this shortcoming, but gave us even more in a set of creative and versatile new controls that I plan to use on a regular basis.
The Post-Crop controls are in the Vignettes panel in the Develop module (Figure 67a). First, let’s take a look at what each slider does:
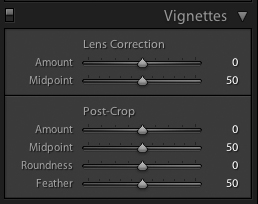
Amount – Drag the slider to the left to darken corners and to the right to brighten corners.
Midpoint – Drag the slider to the left to extend the effect toward the center of the image. Drag the slider to the right to limit the effect to the corners of the image.
Roundness – Drag the slider to the left to make the corner edges more oval. Drag the slider to the right to make the corner edges more circular.
Feather – Drag the slider to the left to remove feathering (softening) and to create a more distinct edge. Drag the slider to the right to increase feathering and to create a larger area of transition.
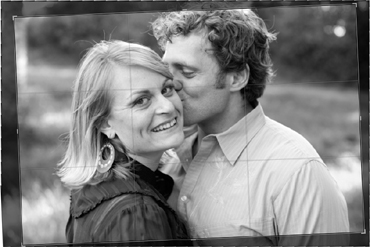
Once you have applied a crop to the image (Figure 67b), modify the sliders for a wide range of effects (Figure 67c).
Establishing a workflow to achieve a high level of precision and accurate color can be a bit tricky. Camera models made by different manufacturers record color in subtle yet different ways, so any one set of controls in Lightroom won’t work the same for everyone. That being said, the majority of users will not need to go through the camera calibration process, as Lightroom does a phenomenal job with color. However, sometimes it’s a good idea to use this advanced camera calibration process to achieve even more accurate color.
The controls in the Camera Calibration panel (Figure 68) can be used to modify how Lightroom interprets and displays the colors specific to your camera. Photograph a standard color target under the lighting you want to calibrate and then set the controls in the Camera Calibration panel. Next, save the adjustments as a Develop preset (see Technique #47). Then you can apply this preset to photographs that were taken in similar lighting conditions.
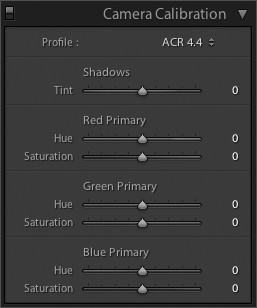
Let’s take a look at the options to learn how to use the controls:
Profile– The Profile sets the version of the camera profile to use with your particular camera. Lightroom is equipped with various camera profiles that Adobe created after testing an extensive number of digital cameras. ACR 3.0 and higher are the newer and more improved profiles. The Profile ACR option that has the highest number is the most current profile. Choosing the highest number will give you the most current profile, but you may find that it makes the image appear different. In that case, try an older profile to maintain consistency with legacy photos.
Shadows– The Shadows slider allows you to correct for a green or magenta tint in the dark shadow areas of the photo.
Red Primary, Green Primary, and Blue Primary– This next set of controls allow you to adjust the color (Hue) and the color intensity (Saturation). Typically, it is best to modify the Hue and then dial in the Saturation. Moving the sliders to the left equals a negative or decrease in value, moving to the right equals a positive or increase in value.