Chapter Thirteen
Develop Module—The Graduated Filter
The digital equivalent of a traditional photographic tool—the graduated filter—is now a part of Lightroom 2. This tool provides photographers with a unique way to make image corrections and enhancements. Using a wide range of controls, from Exposure to Sharpness, you can apply an effect that has a distinct starting point and then eventually fades or trails off. In addition, you can control where and how quickly the effect fades, which allows you to make improvements that blend seamlessly into the photo without any telltale signs.
The Graduated Filter tool helps creatively solve problems that photographers have been grappling with for ages (see sidebar “The Graduated Filter in Context”). This new tool does require a shift in thinking as it enables you to manipulate effects and to accomplish results that were previously limited to other software or to in-camera solutions.
This short chapter will help get you up to speed on this topic and show you with two specific examples how to use this tool. While the tool offers almost innumerable uses, the intent here is to show you how it works and to lead you to think about new ways to improve your own images.
The Graduated Filter tool lets you make adjustments to your images within Lightroom that were previously impossible. You can create a gradiated correction or enhancement made up of Exposure, Brightness, Contrast, Saturation, Clarity, Sharpness, or Color.
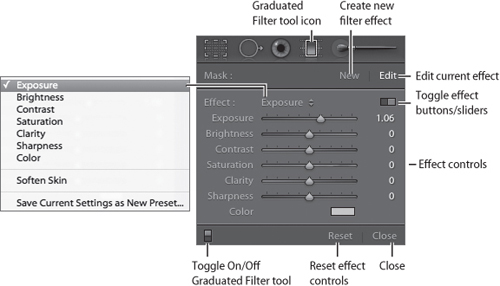
To Select the Graduated Filter tool, just click on it in the tool strip (Figure 78a), or choose View > Graduated Filter, or press M. Next, choose an Effect, or modify the Effect slider controls. Now that the tool is set, click on the area where you would like to use the effect. Continue to hold the mouse button down and drag away from the initial area that was clicked. Drag farther away to create more of a gradiated and fading transition. Drag less to create less of a transition. Drag and rotate in order to rotate the direction of the transition.
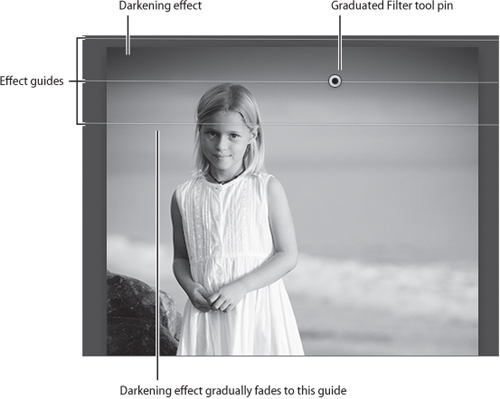
As you drag, notice the effect, the effect guides, and a small node (called a pin). The lines reveal where the effect occurs and the length of the transition (Figure 78b). Position the cursor next to the pin, and the cursor will changed into a bent line with an arrow on each end. When you see this new cursor, click and drag in order to rotate the effect. Position the cursor over the pin, and the cursor will change into a hand icon. With the hand icon visible, click and drag to reposition the effect. If you would like to make changes to the controls, simply modify the sliders. Finally, if for some reason the effect is undesirable, press the Delete or the Backspace key to delete the effect.
Tip
If you find the Graduated Filter tool pins and effect guides to be distracting, simply toggle the H key to hide or show those elements.
Tip
For more creative results, you can add multiple Graduated Filter tool adjustments to one image. To create another adjustment click the New button and then go through the steps described above.
One of the most common uses for the Graduated Filter tool is to correct an image when the subject is correctly exposed but sky in the background is overexposed. (This is how traditional film photographers use a graduated filter on a camera lens and where the idea for the building a digital version of the filter originated.)
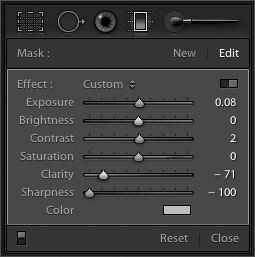
To darken the sky, select the Graduated Filter tool. Click on it in the tool strip, choose View > Graduated Filter, or press the M key. Next, modify the controls to darken and increase the contrast of the sky (Figure 79a). While the actual settings will depend on the brightness of the sky, try these example amounts as a starting point. Most important, lower the Exposure significantly. Finally, slightly lower the Brightness. Increase the Contrast, Clarity, and Sharpness. Keep in mind that if these control settings don’t work with your image you can always change them after you have applied the tool.
Now that the controls are set, click on the area of the photo where you would like the effect to occur. With the examples below, I have clicked above the horizon and dragged down (Figure 79b). Next, continue to press the mouse button and drag to increase the transition or fade of the effect. Click and drag farther away from the initially clicked area to increase the transition. Click and drag less distance to shorten the transition. Or click, drag, and rotate to change the gradient direction, as was done in the example on the left.

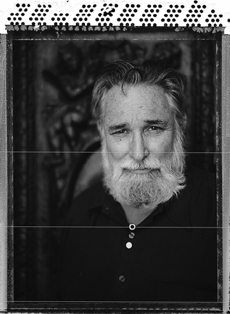
In this brief technique, we’ll look at how the Graduated Filter tool can be used to creatively shift the focus of an image. To Select the Graduated Filter tool, click on it in the Tool Strip, or choose View > Graduated Filter, or press the M key. Next, decrease the Clarity and Sharpening amounts (Figure 80a).
In the example below, I photographed Nick Dekker, black-and-white photographer and master printer. I enjoy Nick’s photography and vision, so I wanted to use on-camera focus to create a film image that emphasized his eyes. After I developed the film and opened the image in Lightroom, I decided to shift the focus even further, by making his shirt and beard more out of focus. I used the settings described above, so I clicked above the button on his shirt and dragged up. The final result is an image that communicates my visual intent even more strongly than the unenhanced photo did (Figure 80b).