
Chapter Four
Library Module Organization
For me, one of the best features of Lightroom is that it provides an efficient system to access and organize my images. Among various software options, Lightroom is my “top pick” because it was built specifically for digital photographers. Lightroom simplifies my postproduction process, taking the mystery out of the complex tasks of finding, filtering, organizing, and storing images on one or more hard drives.
In this chapter you will spend some time learning how to organize and access your images in Lightroom. You will learn how to use Lightroom Catalogs, Folders, Collections, Filters, Image Sorting, and Renaming. These techniques will help you not only to become more organized, but also to be more creative as you find you have more time on your hands to make images.
One of the main advantages of using Lightroom is that when you import your images they are added to a database, which is called a catalog. By having your images in a catalog you can find, preview, process, print, and showcase your work quickly.
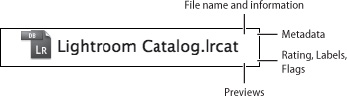
The Lightroom Catalog is essentially a database file (Figure 28) containing image previews and information about the images. A catalog doesn’t actually contain the image files, and this is advantageous because it provides you with added flexibility. For example, you can have one catalog that contains images located on multiple external hard drives. If the external drives are turned off you can still view the images and make metadata changes, add star ranking and color labels, add the images to Collections, and more.
Even more, catalog information provides you with an immense amount of flexibility in managing, accessing, and processing your photos. For example, if you are traveling with a laptop computer, you can import photos into Lightroom and when you return to your home or studio, move the photos and catalog to your desktop computer or to other hard drives for backup. When you do this you can retain any changes and edits you have made while on the road.
In the previous technique, we discussed the value of catalogs. Before you begin working in Lightroom, it is important to set up a Backup option in Catalog Settings that fits your needs. To open the dialog (Figure 29a), on a PC select Edit > Catalog Settings, and on a Mac select Lightroom > Catalog Settings. The General settings are divided into three sections: Information, Backup, and Optimize.
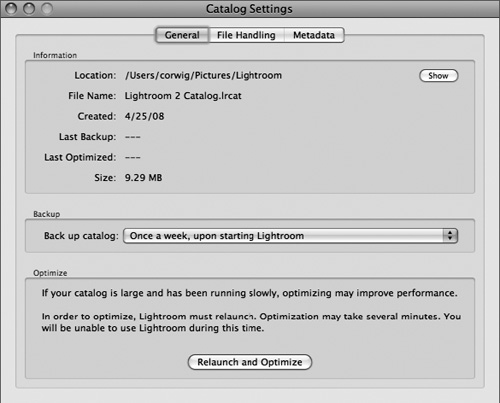
In the Information section you’ll find details such as the location, file name, date created, last backup, last optimized, and file size. It is helpful to view this information so that you know a bit about the catalog you’re using and about how recently it has been optimized and backed up.
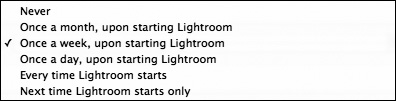
In the backup section, click the pull-down menu to choose how frequently the catalog gets backed up (Figure 29b). Choose the option that best suits your needs, based on how often you use Lightroom and how important preserving your work is. The more regularly you use Lightroom and the more essential your work, the more frequently you will want to back up the catalog.
In the Optimize section you will find some information on ways to improve Lightroom performance. If you experience any program performance issues, navigate to this preference and choose Relaunch and Optimize.
When you open Lightroom and import photos, a catalog file (Lightroom Catalog.lrcat) is created automatically. In most situations, it makes sense to use one catalog for all of your photos, but sometimes it may be advantageous to use more. For example, if you regularly shoot an incredibly high volume of photos you may find that Lightroom’s performance slows as the catalog size increases. Or, let’s say you’re a professional race-car photographer. You may want one catalog for racing photos and another, separate catalog for your family photos. When working with multiple catalogs choose one of these options:
File > New Catalog—creates a new (and empty) catalog
File > Open Catalog—opens a preexisting catalog
File > Open Recent—shows a list of your recent catalogs
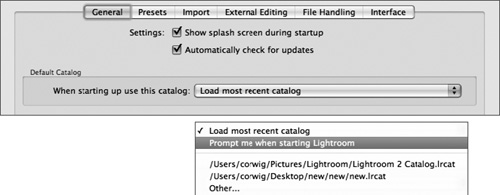
If you know that you are going to use multiple catalogs, navigate to your General Preferences to select which catalog is loaded when you start up Lightroom (Figure 30a). Choose Edit > Preferences > General (Windows) or Lightroom > Preferences > General (Mac) and change the default catalog to the option that best fits your workflow. By default, Load most recent catalog is selected. This option usually makes sense, but if you switch between catalogs frequently, choose Prompt me when starting Lightroom and you will be able to choose the catalog you want each time.
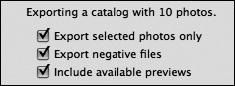
At other times, it may be advantageous to export images and the catalog file from your current catalog. For example, let’s say that after a photo shoot you have made the selection of ten final images. You are running short on time and want to give these images and the catalog information to an assistant to create and upload a Web gallery for the client to view. To export the selected images as a catalog, follow these steps:
This will open the Export dialog, where you can select a location for the exported files. You have a few more options to specify (Figure 30b). To limit the export to your selected images, choose Export selected photos only. In order to include a copy of the original image files, choose Export negative files. Finally, in order to speed up the preview for your assistant, choose Include available previews.
Folders can be used in order to manage, locate, and organize images. In fact, Lightroom Folders are a default feature of the program. When you import images into Lightroom you can choose either to leave images in their current location or to move them. Either way, Lightroom takes notes of where the images are and remembers the hard drive and folder location for them.
Navigate to the Library module and open or expand the Folders panel. Here you will find the titles of the hard drives from which you have imported images into Lightroom. In the screen grab below you will notice that I have images on two hard drives, “el jefe,” the internal drive on my laptop, and “sashimi,” an external drive (Figure 31a). The status light to the left of the hard drive name will change based on the drive’s connectivity. If the drive is disconnected, the light will go off. If the light turns yellow, it serves as a warning that you are low on disk space. If the light turns red, then the drive is almost out of disk space. If the drive is connected, the light will be green.
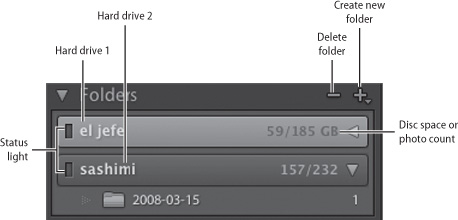
To open the hard drive folder, click anywhere in the rectangular space where the name of the hard drive is displayed. In the screen grab above I have opened the folder for the drive “sashimi.” Beneath the name of the hard drive you can see which images have been imported into Lightroom. The sashimi display shows that I have imported one image from this drive, and that it is in the folder 2008-03-15.
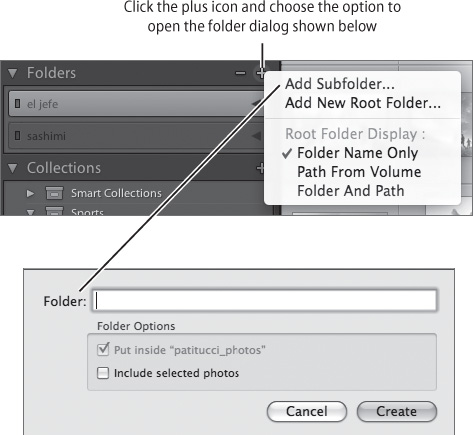
As you begin to work with folders you will discover a number of ways to modify them and their contents. For starters, you can double-click the folder name to rename the folder. You can drag images into new folders by simply clicking and dragging, but note that when you do that the move dialog will ask you to confirm the relocation of an image. To confirm the change, press the move button. To add or delete folders click the minus and plus icons in the top right corner of the Folders panel (Figure 31b). When you click the plus icon it opens a dialog where you can name the folder, place it inside of another folder, and select images to include in that folder.
Figure 31b Click the plus icon to choose between Add Subfolder or Add New Root Folder. A subfolder is automatically added inside of the currently selected folder. A new root folder is a separate root-level folder. In addition, you can click the plus icon to change how the folder appears in the Folders panel. By default only the folder name is displayed, but you can choose to display only the path from the volume or both the folder name and the volume path.
Both collections and folders allow you to view a specific group of images, but each feature is distinct. Collections can be viewed, utilized, or modified in every module except the Develop module. Folders can only be viewed in the Library module. Another difference between collections and folders is that folders contain images that are located in one place, while collections can contain a set of images from multiple folders. In other words, collections allow you to group, view, and access images in a way that is not dependent on the traditional folder structure.
In this tip, I want to cover three types of collections: Collections, Smart Collections, and Quick Collections. All three can be used in different ways to create groups or sets of images, based on specific criteria.
To create a normal collection, you can select multiple images in the Filmstrip or in the Library Grid view, or simply create a collection without selecting images. Either way, the next step is to click the plus icon in the Collections panel (Figure 32a) and choose Create Collection. This will open the Create Collection dialog (Figure 32b), where you can define a collection name, include the collection in a set, Include selected photos (if you have selected photos), and Make new virtual copies of the photos for the Collection.
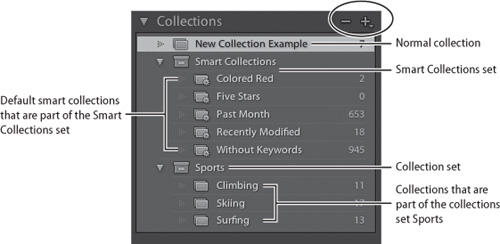

While normal collections are created by selectively adding images, smart collections are based on specific criteria or rules. By default, Lightroom is equipped with a set of predefined smart collections, as shown in Figure 32c. Of course, you can also create your own.
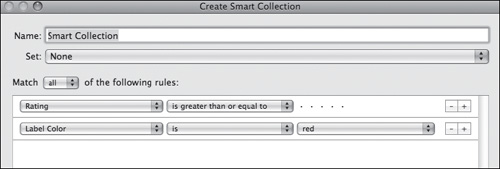
To create a Smart Collection, when you click the plus icon shown in Figure 32a, choose Create Smart Collection to open a dialog (Figure 32c). Use this dialog to name the smart collection, to include the smart collection in a collection set, and to define specific rules for the smart collection. You can add or delete rules by clicking the plus or minus icons next to the rules. Next, click on the pull-down menus to change the criteria for the rules.
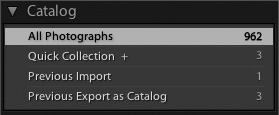
The advantage of Quick Collections is speed; it allows you to quickly group images together. You can save a quick collection to a collection by right-clicking and choosing Save Quick Collection. Also, if you want to save a particular group of images, you can turn it into a normal Collection, as described above.
To add images to a quick collection, navigate to the Library module. Next, select one or more images and press B or drag the selected image(s) to the Quick Collection option in the Catalog panel (Figure 32d). Once an image has been added to a quick collection, press B again to remove it. To view the images in the quick collection, press Control + B (Windows) or Command + B (Mac).
On a recent California backpacking trip in the Sierra, I ran out of water, so I needed to use a special water filter to remove the impurities of the stream water. Water filters typically remove unwanted stuff, and this is also exactly what a filter does in Lightroom. In digital photographic context, knowing how to edit or filter your images is paramount.
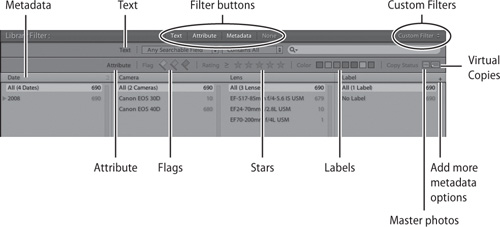
The filter bar is in an easy-to-access location, right above the thumbnails in the Library Grid module. There are three types of filters: Text, Attribute, and Metadata. There is no one filter that works best, as each filter performs a different task. At times, one filter by itself will lead to the best results. Other times a combination of filters results in the most useful searches. To open one of the filters, click on the filter buttons to the right of the Filter, and the filter menus will appear below (Figure 33a).
The Text filter allows you to type in search word(s) and then define the search parameters from those words. There are three ways to define the parameters:
1. Click Any Searchable Field and choose from a list of options.
2. Click Contains All and choose from a list of options.
3. Check the drop-down menus in the Text field to choose from the entire list of options (Figure 33b).

The Attribute filter allows you to show images based on Flag, Star rating, Color Label, Master Photos or Virtual Copies. Click a single option or multiple options to fine-tune your search.
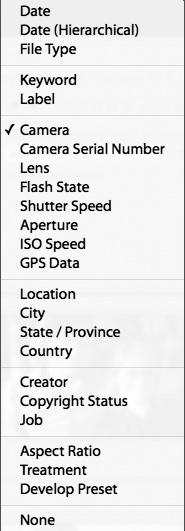
The Metadata filter provides you with the most in-depth options. There are four customizable default general criteria columns—Date, Camera, Lens, and Label. To filter based on metadata, simply click on the metadata field. For example, to filter based on a specific lens, click on the type of lens in the Lens column. Now you will only see images photographed with that lens. You can also select criteria from multiple columns to limit your filtering even further. In addition, you can click on the column title to access more than 20 metadata options (Figure 33c). For more, click the plus sign icon in the far right column to add up to four additional metadata columns.
Tip
If you find yourself using the filters often, try the Custom Filter option. It is at the top and to the far right of the Filter area. Click the button to choose a range of custom filters, or choose Save setting as a new Custom Filter to create your own filter for frequently used search criteria.