
17. Using Core Location and MapKit
Core Location infuses the iPhone with on-demand geopositioning based on a variety of technologies and sources. MapKit adds interactive in-application mapping allowing users to view and manipulate annotated maps. With Core Location and MapKit, you can develop applications that help users meet up with friends, search for local resources, or provide location-based streams of personal information. This chapter introduces these location-aware frameworks and shows you how you can integrate them into your iPhone applications.
How Core Location Works
Location is meaningful. Cocoa Touch understands that. Where we compute is fast becoming just as important as how we compute and what we compute. The iPhone is constantly on the go, traveling along with its users, throughout the course of the day, both at home and on the road. Core Location brings the iPhone’s mobility into application development.
Core Location addresses location-based programming. It enables applications to hook into location-aware Web APIs like fireeagle.com, outside.in, upcoming.org, twitter.com, and flickr.com. It helps you provide geotagged content to your user and lets your user search for local resources such as restaurant and event listings. With on-demand geolocation, mobile computing opens itself up to a wide range of Web 2.0 API libraries.
All of these features depend on one thing: location. And it’s up to Core Location to tell your application where your users are. The iPhone uses several methods to locate you. These technologies depend on several providers including Skyhook Wireless (http://skyhookwireless.com, aka http://loki.com), Google Maps (http://maps.google.com/), and the U.S. Department of Defense Global Positioning System (http://tycho.usno.navy.mil/gpsinfo.html). The following sections provide a rundown of the ways an iPhone can detect and report position.
GPS Positioning
On newer-model 3G/3GS iPhones, the onboard GPS system tracks movement courtesy of a series of medium Earth orbit satellites provided by the U.S. Department of Defense. These satellites emit microwave signals, which the iPhone picks up and uses to triangulate position to a high level of accuracy. Like any GPS system, the iPhone requires a clear path between the user and the satellites, so it works best outdoors and away from trees.
GPS positioning is not currently available for the first generation iPhone or the iPod touch line. These units must fall back to other ways of tracking location, just as a 3G/3GS iPhone does when it cannot lock to a satellite signal.
SkyHook Wi-Fi Positioning
In the United States, Core Location’s preferred pseudo-GPS geopositioning method calls on SkyHook Wireless. SkyHook offers extremely accurate Wi-Fi placement. When an iPhone detects nearby Wi-Fi and WiMax routers, it uses their MAC addresses to search SkyHook’s databases, positioning you from that data. All iPhone models, including the touch line, are Wi-Fi enabled, allowing them to scan for those units.
SkyHook Wi-Fi data collection works like this. SkyHook sends drivers and pedestrians down city streets throughout its covered territories, which includes most U.S. metropolitan areas. These agents scan for Wi-Fi hotspots (called access points) and when found, they record the location using traditional GPS positioning matched to the Wi-Fi MAC address.
This works great when Wi-Fi routers stay still. This works terribly when people pack up their Wi-Fi routers and move with them to, say, Kentucky. That having been said, SkyHook data does get updated. It provides pretty accurate positioning and can usually locate you within a few hundred feet of your actual location, even though people and their routers will continue to move to Kentucky and other places. You can submit coordinate and MAC address information directly through Skyhook’s volunteer location program. Visit http://www.skyhookwireless.com/howitworks/submit_ap.php for details.
Cell Tower Positioning
A less-accurate location approach involves cell tower positioning. Here, the iPhone uses its antenna to find the nearest four or five cell towers and then triangulates your position based on the cell tower signal strength. You’ve probably seen cell tower location in action; it’s the kind that shows you about a half mile away from where you are standing—assuming you’re not standing right next to an actual cell tower.
iPod touch units cannot use cell tower positioning, lacking the GPRS cell tower antennas that are iPhone standard issue. Cell tower-based location usually acts as a fallback method due to its low accuracy.
Internet Provider Positioning
SkyHook actually offers a third positioning approach, but it is one I’ve never seen the iPhone use. Then again, I live in a major metropolitan area; I haven’t given it a very good try. This last-ditch approach uses an Internet provider location to find the nearest mapped Internet provider’s central office. This is a solution of last resort. The returned data is typically up to several miles off your actual location—unless you happen to be visiting your Internet provider.
Hybridizing the Approaches
The iPhone approaches location in stages. Based on the accuracy level you request, it uses a fallback method. If it cannot accurately locate you with GPS or Wi-Fi technology, it falls back to cell tower location for iPhone users. If that doesn’t work, it presumably falls back further to Internet provider location. And if that doesn’t work, it finally fails.
The latest releases of the SDK provide multiple asynchronous success callbacks for each of these fallback methods. You may receive three or four results at any time. What’s more, those methods keep working over time, as the iPhone’s location changes. Each callback includes an accuracy measure, indicating the method used.
Knowing how the iPhone does this is important. That’s because any ten attempts to grab your location on a first generation iPhone may result in maybe three or four Wi-Fi successes, the remainder falling back to cell tower hits. Although you can set your desired location accuracy to the highest possible settings, unless you listen for multiple callbacks, you might miss out on catching the best possible location.
The cost to this is time. A location request may take 10 or 15 seconds to establish itself. Working with multiple requests, averaging, and best-results repetition is best done in the background away from the GUI. When possible, avoid making your user wait for your program to finish its location queries.
Note
Apple requires that users authorize all location requests when Core Location is first launched. Once authorized, you may use location for the duration of the application session.
Recipe: Core Location in a Nutshell
Core Location is easy to use, as demonstrated by the following steps. They walk you through a process of setting up your program to request location data that’s representative of normal use. These steps and Recipe 17-1 provide just one example of using Core Location’s services, showing how you might pinpoint a user’s location.
1. Add the Core Location framework to your project. Drag it into your Xcode project and add it to the Frameworks folder in the Groups & Files column. Make sure to include the CoreLocation headers in your code.
2. Allocate a location manager. Set the manager’s delegate to your primary view controller or application delegate. Optionally, set its desired distance filter and accuracy.
The distance filter specifies a minimum distance in meters. The device must move at least this distance before it can register a new update. If you set the distance for 5 meters, for example, you will not receive new events until the device has moved that far.
The accuracy property specifies the degree of precision that you’re requesting. To be clear, the location manager does not guarantee any actual accuracy. Setting the requested accuracy asks the manager to (attempt to) retrieve at least that level. When you do not need precision, the manager will deliver its results using whatever technology is most available.
When you do need precision, the desiredAccuracy property informs the manager of that need. You’ll find a high level of accuracy especially important for walking and running applications. A lower accuracy level may work for driving in a car or for locating users within large geographical boundaries like cities, states, and countries.
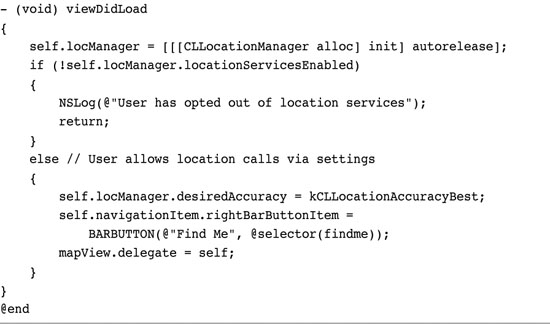
3. Check whether the user has enabled Core Location by testing the location manager’s locationServicesEnabled property. Users have the option to switch off Core Location from General > Location Services in the Settings application.
4. Start locating. Tell the location manager to start updating the location. Delegate callbacks let you know when the location has been found. This can take many seconds or up to a minute to occur.
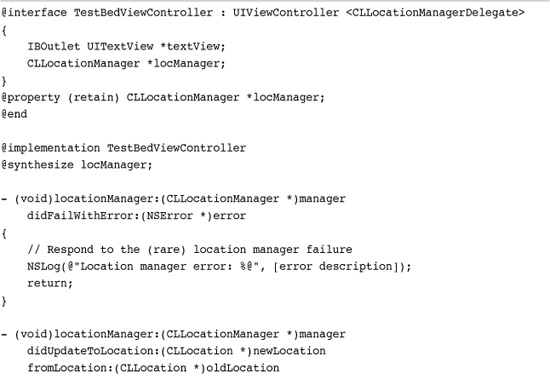
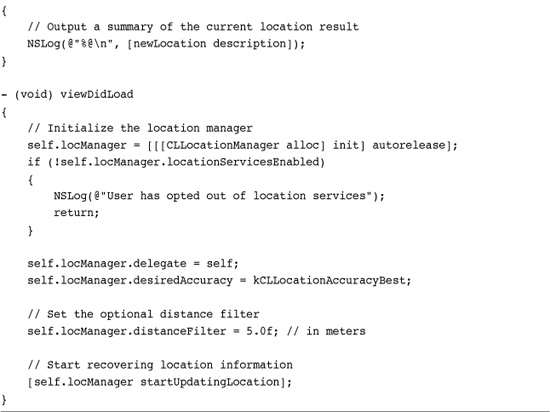
5. Handle the location event delegate callbacks. You’ll deal with two types of callbacks: successes that return CLLocation data (locationManager:didUpdateToLocation:fromLocation:) and failures that do not (locationManager:didFailWithError:). Add these delegate methods to your code to catch location updates. In Recipe 17-1, the successful location logs an information overview (description) that includes the current latitude and longitude results.
Depending on your requested accuracy, you may receive three or four location callbacks based on the various location methods used and the requested accuracy, so take this nonlinearity into account.
6. Wait. Callbacks arrive asynchronously, as location data becomes available. The location information returned to your application includes positioning information along with accuracy measures that you can use to evaluate precision.
Test your Core Location applications on the device and not in the simulator. The simulator is hard coded to return the geocoordinates of Apple Headquarters in Cupertino. Deploying Recipe 17-1 to the device allows you to test results as you walk or drive around with your iPhone.
Recipe 17-1 Using Core Location to Retrieve Latitude and Longitude
Get This Recipe’s Code
To get the code used for this recipe, go to http://github.com/erica/iphone-3.0-cookbook-, or if you’ve downloaded the disk image containing all of the sample code from the book, go to the folder for Chapter 17 and open the project for this recipe.
Location Properties
Each CLLocation instance returned by the updated location callback contains a number of properties that describe the device as it travels. Location objects can combine their various properties into a single text result, as used in Recipe 17-1, via the description instance method. Alternatively, you can pull out each value on a property-by-property basis. Location properties include the following:
• altitude—This property returns the currently detected altitude. It returns a floating-point number in meters above sea level. Speaking as a resident of the “Mile High City,” I can assure you the accuracy of this value is minimal at best. Use these results with caution.
• coordinate—Recover the device’s detected geoposition through the coordinate property. A coordinate is a structure with two fields, latitude and longitude, both of which store a floating-point value. Positive values for latitude lie north of the equator; negative ones south of the equator. Positive longitudes lie east of the meridian; negative longitudes west of the meridian.
• course—Use the course value to determine the general direction in which the device is heading. This value, which is 0 degrees for North, 90 degrees for East, 180 degrees for South, and 270 degrees for West, roughly approximates the direction of travel. For better accuracy, use headings (CLHeading instances) rather than courses. Headings provide access to magnetic and true North readings via the magnetometer. They are another feature of Core Location and are detailed later in this chapter.
• horizontalAccuracy—This property indicates the accuracy (i.e., the uncertainty or measurement error) of the current coordinates. Think of the coordinates that are returned as the center of a circle, and the horizontal accuracy as its radius. The true device location falls somewhere in that circle. The smaller the circle, the more accurate the location. The larger the circle, the less accurate it is. Negative accuracy values indicate a measurement failure.
• verticalAccuracy—This property offers an altitude equivalent for horizontal accuracy. It returns the accuracy related to the true value of the altitude, which may (in theory) vary between the altitude minus that amount to the altitude plus that amount. In practice, altitude readings are extremely inaccurate, and the vertical accuracy typically bears little relationship to reality.
• speed—In theory, this value returns the speed of the device in meters per second. In practice, this property is best reserved for car travel rather than walking. Recipes follow later in this chapter that demonstrate how this raw property value is used, and that derive velocity independently.
• timestamp—This property identifies the time at which the location measurement took place. It returns an NSDate instance set to the time when the location was determined by Core Location.
Note
Running a continuous location query is a power-consuming choice. Location services may result in a short battery life, as has been demonstrated by many jogging and biking applications currently released on App Store.
Recipe: Tracking Speed
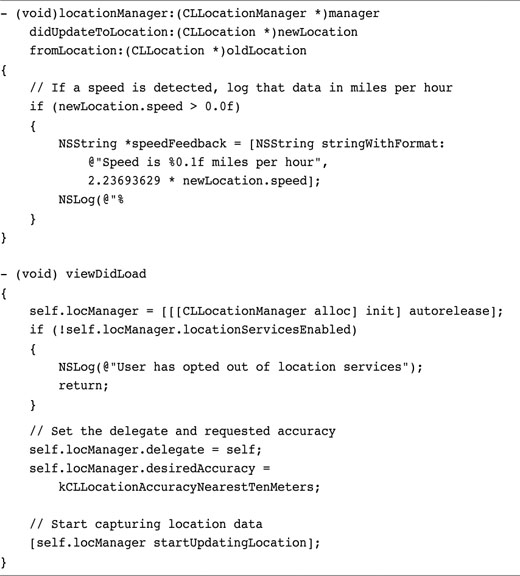
The built-in speed property returned by each CLLocation instance allows you to track the device’s velocity over time. Recipe 17-2 highlights its use. When the location manager callback updates the device’s location, the code recovers the speed and logs it. This recipe computes the current speed in miles per hour by multiplying the meters per second value by 2.23693629.
Recipe 17-2 Recovering the speed Property from a Location Instance
Get This Recipe’s Code
To get the code used for this recipe, go to http://github.com/erica/iphone-3.0-cookbook-, or if you’ve downloaded the disk image containing all of the sample code from the book, go to the folder for Chapter 17 and open the project for this recipe.
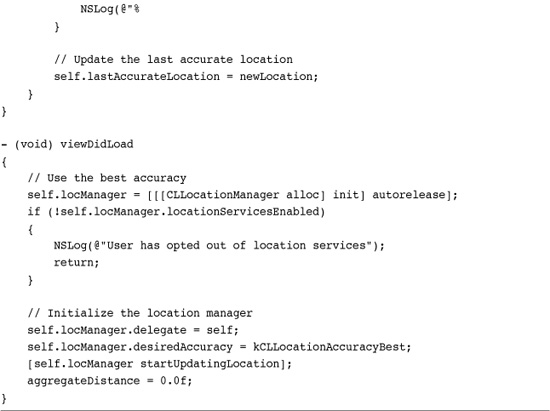
The following viewDidLoad method sets the desired accuracy to the nearest 10 meters, skipping the distance filtering used by Recipe 17-1. This example is intended for use in a vehicle rather than walking. For walking, running, or biking, you want to use a higher level of accuracy and use a strategy that eliminates inaccurate readings. Recipe 17-3 shows how to do so.
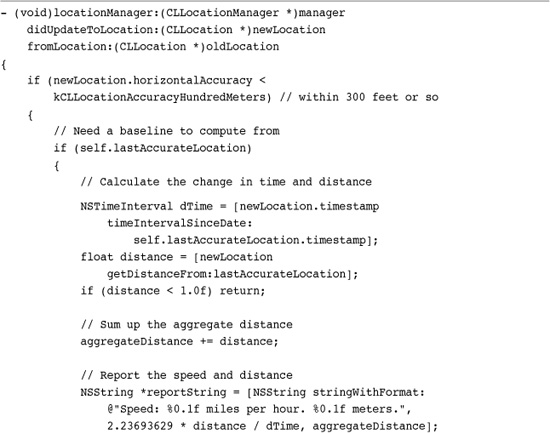
Recipe 17-3 Deriving Location Information
Get This Recipe’s Code
To get the code used for this recipe, go to http://github.com/erica/iphone-3.0-cookbook-, or if you’ve downloaded the disk image containing all of the sample code from the book, go to the folder for Chapter 17 and open the project for this recipe.
Recipe: Computing Speed and Distance
When moving slowly, or at least more slowly than a car typically moves, you want make two specific code accommodations. First, increase your desired accuracy to the highest possible value. Second, ignore the built-in speed property and calculate your speed from scratch. Recipe 17-3 meets these two goals by keeping track of the last-detected most accurate location possible. For purposes of this recipe, “most accurate” is defined as within 100 meters, that is, a likely GPS position.
It uses “accurate” positions to calculate a distance by calling CLLocation’s getDistanceFrom: method. Dividing the distance by the change in time yields the device’s velocity. The method discards values with lower accuracy and values where the device has not moved at least a meter in distance.
For walking and biking, this method produces a more accurate speed while still falling far short of “precise.” This is best demonstrated by testing the sample code in the real world with a 3G or later GPS-enabled iPhone. Should you need to deploy a Core Location-based application with higher accuracy than these samples provide, you’ll need to tweak your sample rates and feedback based on the likely real-world use for the device.
Recipe: Keeping Track of “North” by Using Heading Values
The iPhone’s onboard location manager can return a computed course value that indicates the current direction of travel, that is, North, South, Southeast, and so on. These values take the form of a floating-point number between 0 and 360, with 0 degrees indicating North, 90 degrees being East, and so forth. This computed value is derived from tracking a user’s location over time. Newer iPhone units have a better way to determine a user’s course. Recent devices provide an onboard magnetometer, which can return both magnetic North and true North values.
Not every iPhone supports headings. A magnetometer was first released on the iPhone 3GS. Test each device for this ability before subscribing to heading callbacks. If the location manager can generate heading events, the headingAvailable property returns YES. Use this result to control your startUpdatingHeading requests.
if (self.locManager.headingAvailable)
[self.locManager startUpdatingHeading];
Cocoa Touch allows you to filter heading callbacks just as you do with distance ones. Set the location manager’s headingFilter property to a minimal angular change, specified as a floating-point number. For example, if you don’t want to receive feedback until the device has rotated at least 5 degrees, set the property to 5.0. All heading values use degrees, between 0.0 and 360.0. To convert a heading value to radians, divide by 180.0 and multiply it by pi.
Heading callbacks return a CLHeading object. You can query the heading for two properties, magneticHeading and trueHeading. The former returns the relative location of magnetic North, the latter true North. True North always points to the geographic north pole. Magnetic North corresponds to the pole of the Earth’s geomagnetic field, which changes over time. The iPhone uses a computed offset (called a declination) to determine the difference between these two.
On an enabled iPhone, magnetic heading updates are available even if the user has switched off location updates in the Settings application. What’s more, users are not prompted to give permission to use heading data. Magnetic heading information cannot compromise user privacy so it remains freely available to your applications.
You can only use the trueHeading property in conjunction with location detection. The iPhone requires a device’s location to compute the declination needed to determine true North. Declinations vary by geoposition. The declination for Los Angeles is different from Perth’s, which is different from Moscow’s, and London’s, and so forth. Some locations cannot use magnetometer readings at all. Certain anomalous regions like Michipicoten Island in Lake Superior and Grants, New Mexico, offer iron deposits and lava flows that interfere with normal magnetic compass use. Metallic and magnetic sources, such as your computer, car, or refrigerator, may also affect the magnetometer. Several “metal detector” applications in App Store leverage this quirk.
The headingAccuracy property provides an error value. This number indicates a plus or minus range that the actual heading falls within. A smaller error bar indicates a more accurate reading. A negative value represents an error in reading the heading.
You can retrieve raw magnetic values along the X, Y, and Z axes using the x, y, and z CLHeading properties. These values are measured in microteslas and normalized into a range that Apple states is -128 to 128. (The actual range is more likely to be -128 to 127 based on standard bit math.) Each axis value represents an offset from the magnetic field lines tracked by the device’s built-in magnetometer.
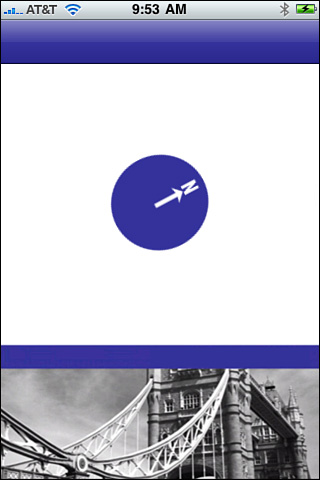
Recipe 17-4 uses CLHeading data to rotate a small image view with an arrow pointer. The rotation ensures that the arrow always points North. Figure 17-1 shows the interface in action.
Figure 17-1 The iPhone’s built-in magnetometer and the code from Recipe 17-4 ensure that this arrow always points North.
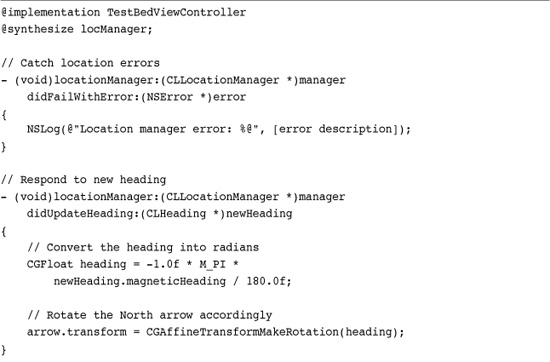
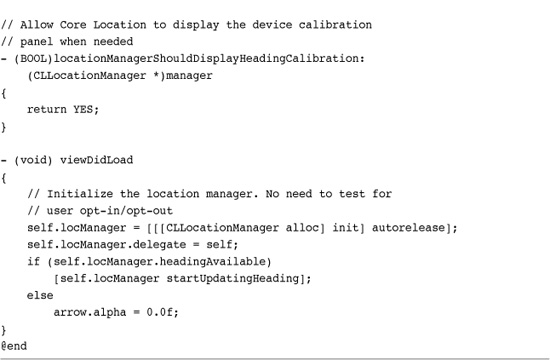
Recipe 17-4 Detecting the Direction of North
Get This Recipe’s Code
To get the code used for this recipe, go to http://github.com/erica/iphone-3.0-cookbook-, or if you’ve downloaded the disk image containing all of the sample code from the book, go to the folder for Chapter 17 and open the project for this recipe.
Recipe: Reverse Geocoding
The phrase reverse geocoding means transforming latitude and longitude information into human-recognizable address information. MapKit offers a reverse geocoder class that converts from coordinates to location descriptions by way of Google. Using this feature binds you to the Google Maps terms of service, which you can read about at http://code.google.com/apis/maps/iphone/terms.html.
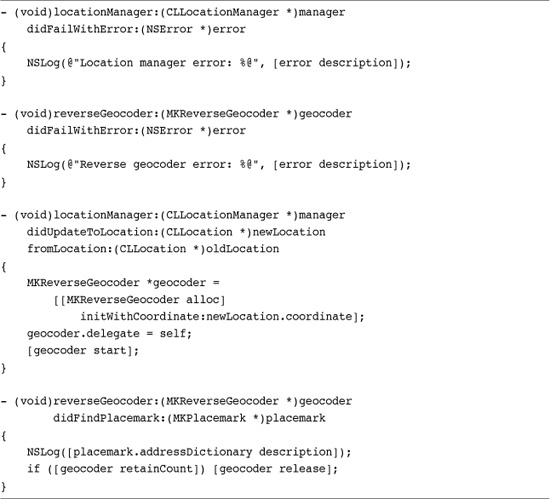
Performing a reverse geocoding request requires little more than allocating a new MKReverseGeocoder instance, setting its coordinate and delegate and telling it to start. The delegate declares the MKReverseGeocoderDelegate protocol and implements the two callbacks (success and failure) shown in Recipe 17-5.
Recipe 17-5 Recovering Address Information from a Coordinate
Get This Recipe’s Code
To get the code used for this recipe, go to http://github.com/erica/iphone-3.0-cookbook-, or if you’ve downloaded the disk image containing all of the sample code from the book, go to the folder for Chapter 17 and open the project for this recipe.
When a reverse geocoding request succeeds, the delegate callback provides an MKPlaceMark instance. This object includes an addressDictionary that contains key-value pairs describing the address. Figure 17-2 shows the contents of the address dictionary for Lollipop Lake in Denver.
Figure 17-2 Address Dictionary contents for Lollipop Lake at Garland Park in Denver, Colorado.

The MKPlaceMark object also offers individual properties with the same information outside the dictionary structure. These properties include the following:
• subThoroughfare stores the street number, e.g., the “1600” for 1600 Pennsylvania Avenue.
• thoroughfare contains the street name, e.g., Pennsylvania Avenue.
• sublocality, when available, refers to the local neighborhood name or a landmark, e.g., White House.
• subAdministrativeArea is typically the local county, parish, or other administrative area.
• locality stores the city, e.g., Washington, D.C.
• administrativeArea corresponds to the state, such as Maryland or Virginia.
• postalCode is the zip code, e.g., 20500
• country is self-explanatory, storing the country name, such as the United States.
• countryCode provides an abbreviated country name, like “US”.
These properties’ names are used in capitalized form in the address dictionary. For example, the subThoroughfare property corresponds to the SubThoroughfare key. You can see this capitalization in the keys shown in Figure 17-2.
In addition to these properties, the address dictionary offers a FormattedAddressLines entry that stores an array of preformatted strings for the address in question. You can use these strings to display an address, for example, “1600 Pennsylvania Avenue NW”, “Washington, DC 20500”, “USA.”
Recipe: Viewing a Location
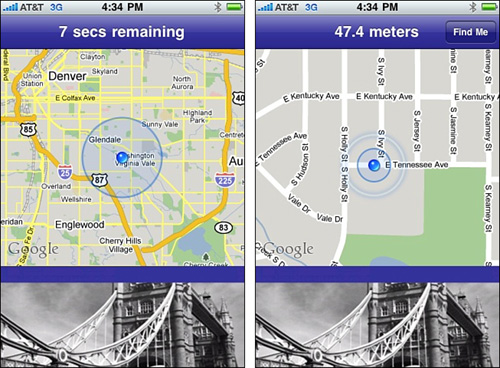
The MKMapView class presents users with interactive maps built on the coordinates and scale you provide. Available in Interface Builder, you can easily drag a map view into your GUI and access it via an IBOutlet. The following code snippet sets a map’s region to a detected Core Location coordinate, showing 0.1 degrees of latitude and longitude around that point. In the United States, a region with that range corresponds to the size of a relatively small city or large town, about seven by five miles. Figure 17-3 (left) shows that 0.1 degree-by-0.1 degree range on a map view.
Figure 17-3 A coordinate region of a tenth of a degree latitude by a tenth of a degree longitude covers an area the size of a smallish city or large town, approximately 5 to 7 miles on a side. Shrinking that region down to 0.005 degrees on a side produces a street-level display (left). These streets lie within Denver’s Garland Park/Virginia Vale neighborhood (right).
mapView.region = MKCoordinateRegionMake(
self.bestLocation.coordinate, MKCoordinateSpanMake(0.1f, 0.1f));
Region size changes occur due to the curvature of the earth. At the equator, one degree of longitude corresponds to about 69 miles (~111 kilometers). This shrinks to zero at the poles. Latitude is not affected by position. One degree of latitude is always approximately 69 miles (~111 km).
To view map data on a neighborhood level, cut the coordinate span down to 0.01 by 0.01. For a street-by-street level, you can use a smaller span, say, 0.005 degrees latitude by 0.005 degrees longitude. Figure 17-3 (right) shows the Garland Park neighborhood at this range.
You can avoid dealing with latitude and longitude degrees and create regions by specifying distance in meters. This snippet sets the view region to a 500-by-500 meter square around the central coordinate. That roughly approximates the 0.005 by 0.005 degree lat/lon span, showing a street-by-street presentation.
mapView.region = MKCoordinateRegionMakeWithDistance(
self.bestLocation.coordinate, 500.0f, 500.0f);
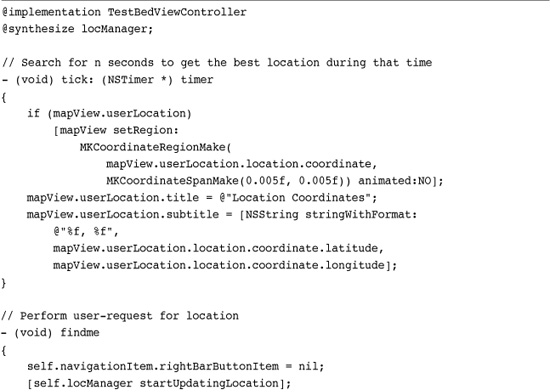
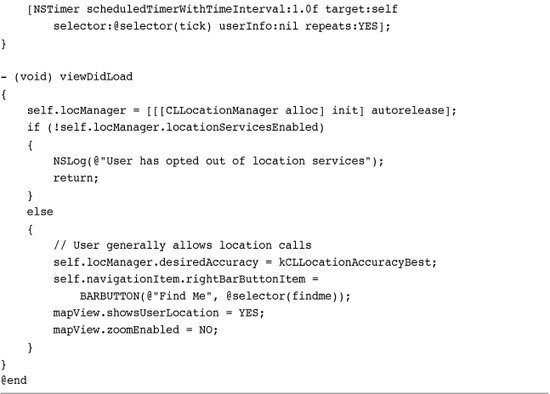
Finding the Best Location Match
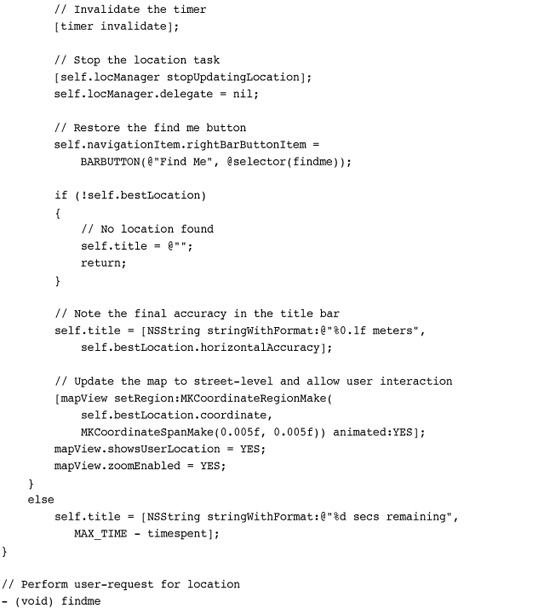
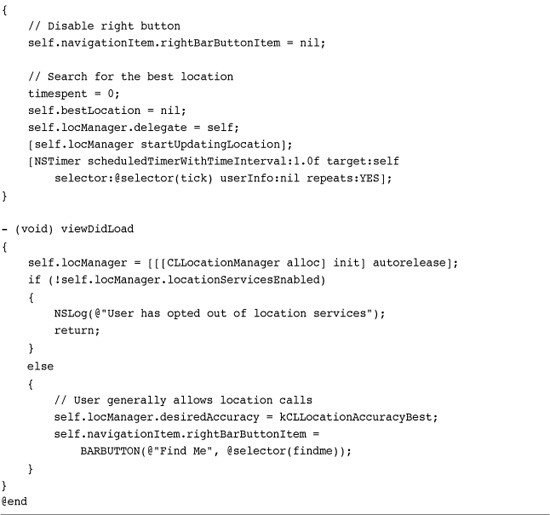
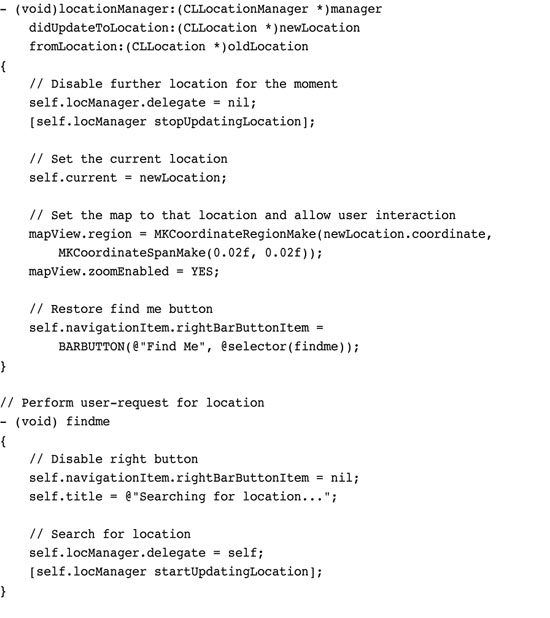
Recipe 17-6 performs an on-demand location search using a timed approach. When the user taps the Find Me button, the code starts a 10-second timer. During this search, it attempts to find the best possible location. It uses the horizontal accuracy returned by each location hit to choose and retain the most accurate geoposition. When the time ends, the view controller zooms in its map view, revealing the detected location.
Recipe 17-6 Presenting User Location Within a Map

Get This Recipe’s Code
To get the code used for this recipe, go to http://github.com/erica/iphone-3.0-cookbook-, or if you’ve downloaded the disk image containing all of the sample code from the book, go to the folder for Chapter 17 and open the project for this recipe.
Recipe 17-6 displays the current user location both during and after the search. It does this by setting the showsUserLocation property to YES. When enabled, this property produces a pulsing purple pushpin that initially appears at the center of the map view at the device location. That location is detected with Core Location. Figure 17-3 shows the user pushpin at the center of both screenshots.
Whenever this property is enabled, the map view tasks Core Location with finding the device’s current location. So long as this property remains set to YES, the map will continue to track and periodically update the user location. A pulsing circle that surrounds the pushpin indicates the most recent search accuracy. Recipe 17-7 later in this chapter takes advantage of this built-in functionality to skip the search-for-the-best-result approach used here in Recipe 17-6.
Recipe 17-7 Tracking the Device Through the MapView
Get This Recipe’s Code
To get the code used for this recipe, go to http://github.com/erica/iphone-3.0-cookbook-, or if you’ve downloaded the disk image containing all of the sample code from the book, go to the folder for Chapter 17 and open the project for this recipe.
Once the location is set, the Recipe 17-6 permits the user to start interacting with the map. Enabling the zoomEnabled property means users can pinch, drag, and otherwise interact with and explore the displayed map. This recipe waits until the full search completes before allowing this interaction, ensuring that the user location remains centered until control returns to the user.
Upon finishing the search, the recipe stops requesting location callbacks by calling stopUpdatingLocation. At the same time, it permits the map view to continue tracking the user, leaving the showsUserLocation property set to YES.
After unsubscribing to updates, the view controller instance sets its location manager delegate to nil. This assignment prevents any outstanding callbacks from reaching the controller after the timer finishes. Otherwise, the user and the outstanding callbacks might compete for control of the screen.
Recipe: User Location Annotations
Recipe 17-6 provided a way to visually track a location event as it focused over time. Recipe 17-7 kicks this idea up a notch to track a device as it moves over time. Instead of sampling locations over time and picking the best result, it employs a far easier approach while achieving similar results. It hands over all responsibility for user location to the map view and its userLocation property.
As mentioned in the discussion for Recipe 17-6, enabling the showsUserLocation property automatically tasks Core Location to track the device. Recipe 17-7 leverages this capability by checking that location once a second. It updates the map view to reflect that location, keeping the map centered on the user and adding a custom annotation to the user pin to display the current coordinates.
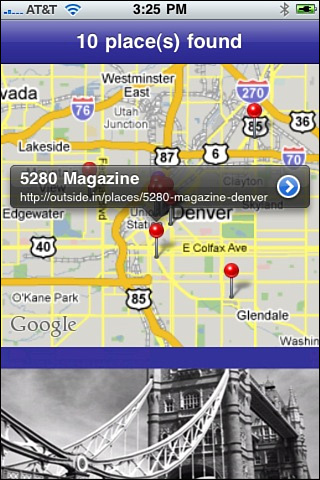
Annotations are pop-up views that attach to locations on the map. They offer a title and a subtitle, which you can set as desired. Figure 17-4, which follows in the next section, shows a map that displays an annotation view.
Figure 17-4 This annotated map view was created using data from MapKit and the outside.in Web site.
The MKUserLocation class provides direct access to the user location pin and its associated annotation. It offers two readable and writable properties called title and subtitle. Set these properties as desired. Recipe 17-7 sets the title to “Location Coordinates” and the subtitle to a string containing the latitude and longitude.
The MKUserLocation class greatly simplifies annotation editing, but you are limited to working with the map view’s user location property. The more general case for annotations proves more complicated. It is detailed in Recipe 17-8, which follows this section.
Recipe 17-8 Creating an Annotated, Interactive Map

Get This Recipe’s Code
To get the code used for this recipe, go to http://github.com/erica/iphone-3.0-cookbook-, or if you’ve downloaded the disk image containing all of the sample code from the book, go to the folder for Chapter 17 and open the project for this recipe.
Recipe: Creating Map Annotations
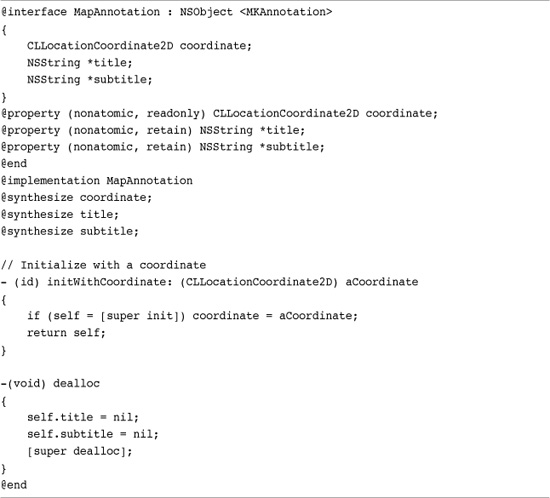
Cocoa Touch does not provide a map annotation class. This is surprising since annotations play such an important role in most map-based applications. Instead, Cocoa Touch defines an MKAnnotation protocol. You must design your own classes that conform to this protocol, which demands a coordinate property and title and subtitle instance methods. Listing 17-1 demonstrates how to do this. It builds a simple MapAnnotation class, providing the coordinate, title, and subtitle features demanded by the protocol.
Listing 17-1 Building a Map Annotation Object
Creating, Adding, and Removing Annotations
To use annotations, you must create them and add them to a map view. You can do so by adding a single annotation at a time:

Alternatively, you can build an array of annotations and add them all at once:
[annotations addObject:annotation];
[mapView addAnnotations:annotations];
Delete annotations from a map by performing removeAnnotation: to remove just one annotation or removeAnnotations: to remove all items in an array.
If you need to return a map view to a no-annotations state, remove all its existing annotations. This snippet recovers the array of existing annotations via the annotations property. It then removes these from the map.
[mapView removeAnnotations:mapView.annotations];
Annotation Views
Annotation objects are not views. The MapAnnotation class laid out in Listing 17-1 does not create any onscreen elements. It is an abstract class that describes an annotation. It’s the map view’s job to convert that annotation description into an actual onscreen view. Those views belong to the MKAnnotationView class. You can retrieve the annotation view for an existing annotation by querying the map. Supply the annotation and request the matching view.
annotationView = [mapView viewForAnnotation:annotation];
Nearly all annotation views you’ll work with belong to an MKAnnotationview subclass, namely MKPinAnnotationView. These are the pins that you can drop onto maps. When tapped, they display a callout view. Figure 17-4 shows a map view with ten annotations, one of which has been tapped. Its callout shows information for the 5280 Magazine headquarters along with an information URL and an accessory button that links to that URL.
Customizing Annotation Views
After adding annotations, via addAnnotation: or addAnnotations:, the map view starts building the annotation views that correspond to those annotations. When it finishes, its delegate, which must declare the MKMapViewDelegate protocol, receives a callback. The delegate is notified with mapView:didAddAnnotationViews: once the views are built and added to the map. This callback provides your application with an opportunity to customize those annotation views.
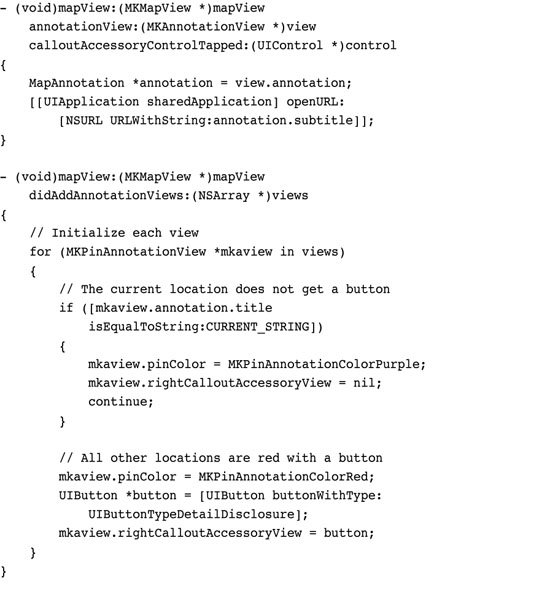
An array of annotation views is passed as the second parameter to that callback. You can iterate through this array to set features like the view’s image or to customize its accessory buttons. Listing 17-2 shows how you might prepare each of these annotation views for use based on their annotations.
Listing 17-2 Preparing Annotation Views for Use
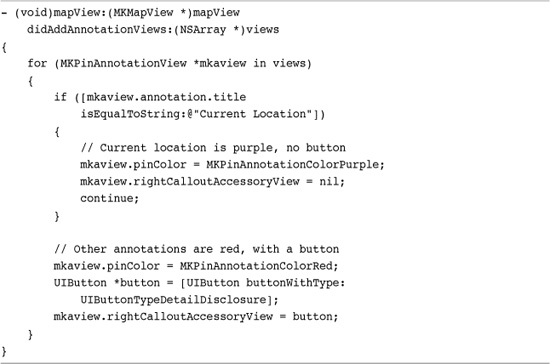
This example uses the annotation title to choose a pin color and whether to display a button. You are not limited to the built-in annotation protocol, which was minimally satisfied with the class defined in Listing 17-1. Design your annotation class with any instance variables and methods you like for more control over how you query the annotations to prepare your annotation views.
Each annotation view provides direct access to its annotation via its annotation property. Use that annotation data to build the exact view you need. Here are some of the annotation view properties you’ll want to customize in your MapKit applications.
Each MKPinAnnotationView uses a color. You set this color via the pinColor property. MapKit provides three color choices: red (MKPinAnnotationColorRed), green (MKPinAnnotationColorGreen), and purple (MKPinAnnotationColorPurple). According to Apple’s human interface guidelines, red pins indicate destination points, places that the user may want to explore or navigate to. Green pins are starting points, places from which the user can begin a journey. Purple pins are user-specified. When you encourage users to add new data into the map, use purple to indicate that the user has defined them. As you saw in previous recipes, a map view-defined purple pin also indicates the current user location.
Each annotation view offers two slots, on the left and right of the callout bubble. The rightCalloutAccessoryView and leftCalloutAccessoryView properties allow you to add buttons or any other custom subview to your callout. Figure 17-4 shows a callout that uses a right-side detail disclosure button. This button was built in Listing 17-2. You are not limited to buttons, however. You might add image views or other standard Cocoa Touch views as needed.
The canShowCallout property controls whether tapping a button produces a callout view. Enabled by default, you can set this property to NO if you do not want user taps to open callouts.
You can offset the callouts (normally they appear directly above the pin in question) by changing the calloutOffset property to a new CGPoint. You can also change the position for the annotation view itself by adjusting its centerOffset property. With pin annotations, the view’s art is set by default, but you can create custom annotation art by assigning a UIImage to the view’s image property. Combine custom art with the center offset to produce the exact map look you want.
Responding to Annotation Button Taps
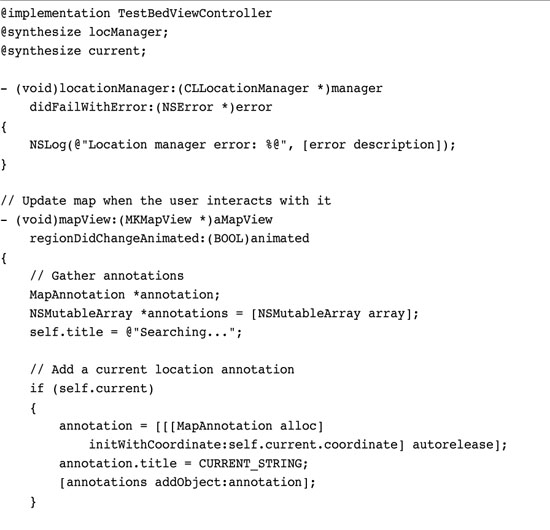
MapKit simplifies button tap management. Whenever you set a callout accessory view property to a control, MapKit takes over the control callback. You do not need to add a target and action. MapKit handles that for you. All you have to do is implement the mapView:annotationView:calloutAccessoryControlTapped: delegate callback, as demonstrated in Recipe 17-8.
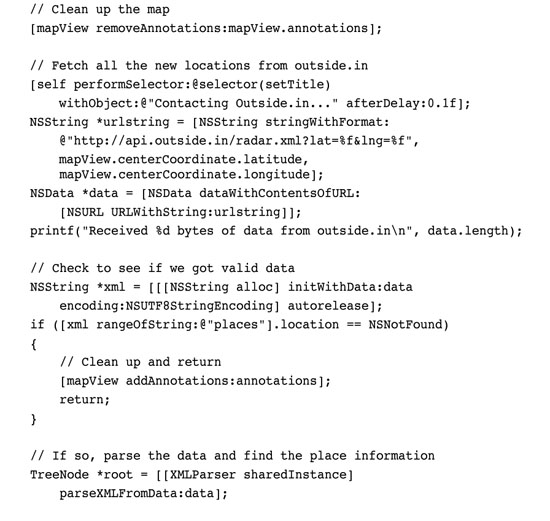
Recipe 17-8 uses the outside.in Web service (http://outside.in) to locate noteworthy places near any given coordinate. It derives the coordinate of interest from user interactions with the map view. Whenever the user adjusts the map, the map view delegate receives a mapView:regionDidChangeAnimated: callback. The callback pulls the coordinate of the map center via its centerCoordinate property. It submits this coordinate to outside.in and retrieves an XML list of places.
The recipe iterates through these places, adding an annotation for each. The XML data supplies the title for each place and an outside.in URL, used as a subtitle. This information is used in the accessory control callback. When the user taps the button, the callback method opens the subtitle URL, providing a hot link between the callout view and a Safari page with location details.
One More Thing: Geocoding
Geocoding means to turn a normal street address into a latitude and longitude. For example, you might start with “1600 Pennsylvania Avenue NW, Washington D.C.” and end up with 38.879971, -76.982887, the latitude and longitude of the United States White House.
As you can see, this is the opposite process of reverse geocoding, which starts with a coordinate and returns a human-readable address. Geocoding starts with the human-readable version and returns a coordinate.
Unfortunately, Apple did not build normal geocoding into MapKit. Fortunately, there are other external providers for this service, including Yahoo, MapQuest, and Virtual Earth. Yahoo’s Geocoding API (http://developer.yahoo.com/maps/rest/V1/geocode.html) offers on-demand geocoding using a simple REST API.
To use it, you must sign up for a developer API key. Your requests will not work without that key, and you will be subject to Yahoo’s terms and conditions. A rate limit applies, and Yahoo reserves the right to charge fees at some point in the future for its services. You need a separate API key for each application you build. Requesting that key is simple and requires little more than describing the application, offering a Web site link, and signing in with your Yahoo credentials.
To use the API, you submit your app ID, and the street and city you want located. The more information you provide, the more specific your geocoded result will be. This snippet creates a RESTful URL for the Big Chicken in Marietta, Georgia. The Yahoo service responds with a short XML result, providing the latitude and longitude information for that location.

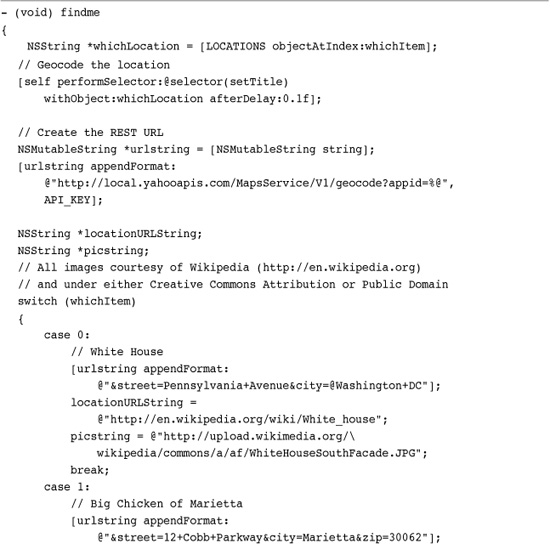
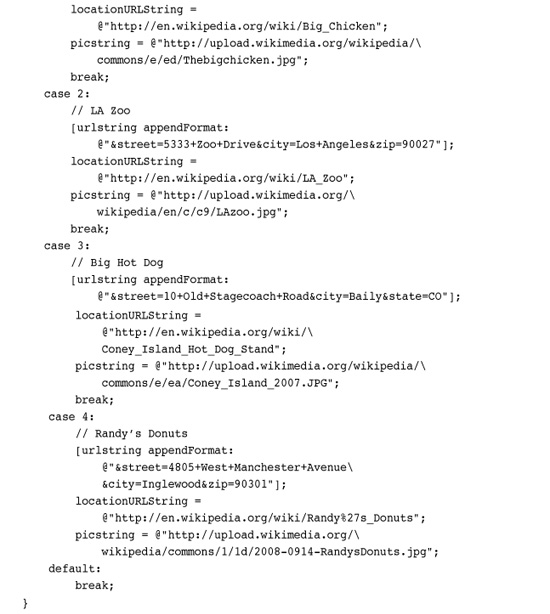
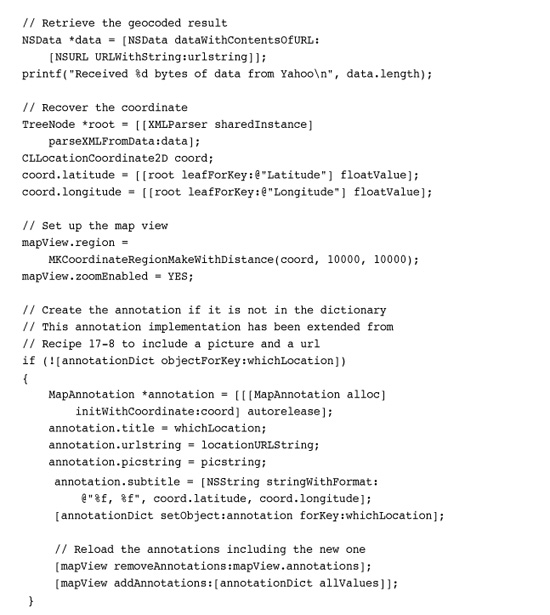
Recipe 17-9 uses the Yahoo API to find several points of interest within the United States. It uses those geocoded coordinates to create custom annotations, presenting the interface shown in Figure 17-5. This recipe relies on an annotation object that has been expanded somewhat from the one used for Recipe 17-8. Its annotation stores a URL string for the disclosure button and an image URL string to help create the image shown at the left of the disclosure.
Recipe 17-9 Reverse Geocoding Locations for Use with MapKit

Get This Recipe’s Code
To get the code used for this recipe, go to http://github.com/erica/iphone-3.0-cookbook-, or if you’ve downloaded the disk image containing all of the sample code from the book, go to the folder for Chapter 17 and open the project for this recipe.
Figure 17-5 Reverse geocoding a street address lets MapKit display an annotation at the proper map location.

As the recipe shows, addresses, Web sites, and image URLs have been hard coded into the example. You could easily expand this to a more general API service that offers local sites of interest.
Summary
Core Location and MapKit go hand in hand, offering ways to locate a device’s geoposition and present related location information in a coherent map-based presentation. In this chapter, you discovered how to use Core Location to obtain real-time latitude and longitude coordinates and how to reverse geocode those coordinates into real address information. You read about working with speed and course headings both in their native and computed forms. You learned how to set up a map, adjust its region, and add a user location and custom annotations. Here are a few final thoughts for you before you navigate away from this chapter:
• Know your audience and how they will be using your application before deciding how you will approach your location needs. Some Core Location features work better for driving, others for walking and biking.
• Test, test, test, test, test, test. Core Location applications must be exhaustively tested and tuned in the field as well as at Xcode for best results in App Store.
• “Oh, didn’t I see you at -104.28393 west today?” Addresses are a lot more meaningful to most people than coordinates. Use reverse geocoding to produce human-readable information.
• Zip codes are especially API-friendly. Even if you do not plan to use a map presentation in your application, zip codes are ready for traditional GUI integration. A reverse-geocoded zip code can help retrieve nearby retail information such as addresses and phone numbers as well as information about nearby parks and attractions.
• Well-designed annotation views help bring meaningful interactivity into a map view. Don’t be afraid to use buttons, images, and other custom elements that expand a map’s utility.