8. Combining Images

Images can be combined using various techniques for different goals. In a photo illustration, you can create an illusion by hiding the seams between layers, whereas in an artistic collage, you can leave conspicuous seams “on purpose” to emphasize differences in subject matter, scale, color, and texture. This chapter covers the gamut of compositing tools and techniques, including the Auto-Align Layers command, the Background Eraser tool, drag-and-drop, the Move tool, the Clone Source panel, and the Vanishing Point filter—plus our old standby, layer masks.
Tips for creating montages
• Depending on the effect you’re after, you can make the edges on an image layer rough or jagged with the Brush tool or filters, or fuse layers together gently via gradients in layer masks.
• If you’re creating an artistic montage, try venturing out of your comfort zone. For source material, artists have been known to scan everything but the kitchen sink: objects, drawings, paintings, fabric, handmade papers—even their own face or hands. Fiddle with that distortion filter you’ve always been curious about or apply a surreal color cast via the Color Balance (Color Imbalance!) command. Ultimately, of course, whatever techniques you settle on should serve the greater good of the overall image. We’re not advocating a lapse of good taste!
• Once all the components are scaled, manipulated, and positioned where you want them, consider using the layer style controls (Blending Options or layer effects), color adjustments, or lighting to create unity and cohesiveness.
• To add a handmade touch to your montages, incorporate some of the techniques found in Chapter 11, Fine Art Media.
• For inspiration, study the work by montage pros. Look for images labeled “photo illustration” in newsweekly magazines and other media; or browse the websites of our favorite Photoshop “montagists”: oldtin.com (Clifford Alejandro), aliciabuelow.com, jeffbrice.com, daltoncowan.com (Stephanie Dalton Cowan), dianefenster.com, naomishea.com, and kerismith.com.
Aligning and blending shots of the same scene
It can be a challenge to get a whole group of people to smile simultaneously for a portrait (unless there happens to be a comedian in the crowd)—and to keep everyone from blinking when you click the shutter. If you take multiple shots of the same scene, you can blend the choice areas of two of the best photos in Photoshop via the Auto-Align Layers command and a layer mask.
To align and blend two shots of the same scene: ![]()
1. Open two RGB photos from the same shoot that contain figures or areas that you want to combine the best features of.A–B (We’ll use a portrait for our illustrations, but other subject matter can be used.)
2. On the Arrange Documents menu ![]() on the Application bar, click a 2 Up button. Shift-drag the Background from the Layers panel of one photo onto the document window of the other. Holding down Shift ensures that the copy appears in the correct location.
on the Application bar, click a 2 Up button. Shift-drag the Background from the Layers panel of one photo onto the document window of the other. Holding down Shift ensures that the copy appears in the correct location.
On the Arrange Documents menu, click the Consolidate All (first) button to restore the single document view.
3. On the Layers panel, Shift-click to select both layers, then choose Edit > Auto-Align Layers.
4. In the Auto-Align Layers dialog (A, next page), click a Projection option: Reposition if you used a tripod, or Auto for all other shooting situations to let Photoshop choose the best alignment option. Click OK. The Background will be converted to a layer.
A We want to combine the mother and child on the left from this photo...

B ...with the father and child on the right from this photo. The first step is to drag the image layer from one document into the window of the other.

A In the Auto-Align Layers dialog, we clicked Auto as the Projection option.

5. Optional: Click the top layer, lower its Opacity (to around 50%) to check the position of the imagery relative to the underlying layer, then restore its Opacity to 100%.
6. Click the top layer, Alt-click/Option-click the Add Layer Mask button ![]() at the bottom of the Layers panel, and keep the mask thumbnail selected. For the moment, the mask is hiding the top layer completely.B
at the bottom of the Layers panel, and keep the mask thumbnail selected. For the moment, the mask is hiding the top layer completely.B
7. Choose the Brush tool ![]() (B or Shift-B), a Soft Round tip, Normal mode, and 100% Opacity. Zoom in, then paint strokes with white as the Foreground color to reveal the more desirable parts of the top layer.C–D
(B or Shift-B), a Soft Round tip, Normal mode, and 100% Opacity. Zoom in, then paint strokes with white as the Foreground color to reveal the more desirable parts of the top layer.C–D
B The Auto-Align Layers command converted the Background to a layer and matched up the two layers. Next, we created a black layer mask, which for the moment is fully blocking the top layer.

C With the Brush tool, we’re applying white strokes to the black layer mask to expose just the faces of the father and child from the top layer.

D In the process, we also revealed some of the light background along the edge of the child’s face; we’ll remedy that next.

8. To touch up the mask, decrease the brush diameter and zoom in further. Paint along the edges of the shapes to reveal more of the top layer, or press X to paint with black to reduce the mask and reveal more areas of the underlying layer.A–B
A We zoomed in, reduced the brush diameter, and then, with the layer mask still selected, painted with white (and then black) to correct the masked area between the mother and child.

B The final image is a seamless composite of the two photos, achieved by using the Auto-Align Layers command and brush strokes on a layer mask.

Using Auto-Blend Layers
You can also use Auto-Blend Layers (a cousin of the Auto-Align Layers command) to combine two portraits. Our best results have been with photos in which there’s space between the subjects and the background happens to be soft or blurry.

Drag and drop a layer from one document into another. To convert the Background to a layer, double-click it, then click OK in the dialog. With the Rectangular Marquee tool, select and then delete the unwanted portion of each layer (shown as lightened areas here for illustration purposes), making sure to allow the portions that remain to partially overlap.

Deselect. Shift-click the two layers, then choose Edit > Auto-Blend Layers. When the dialog opens, click Panorama and check Seamless Tones and Colors.![]() The command will create a layer mask for each layer to blend the overlapping area between them (it does all the work for you!).
The command will create a layer mask for each layer to blend the overlapping area between them (it does all the work for you!).
Using the Background Eraser tool
When you click or drag with the Background Eraser tool, colored pixels are replaced with transparent ones. This tool gives you greater control than the plain old Eraser tool, because it lets you sample the color to be erased and also lets you choose whether adjacent colors will be erased, within a specific range of the sampled color.
To use the Background Eraser tool:
1. Open an RGB image.A Press Ctrl-J/Cmd-J to duplicate the Background, then hide the Background.
2. Choose the Background Eraser tool ![]() (E or Shift-E) and a brush tip. If you have a pressure-sensitive tablet, via the Brush preset picker, set the brush Size and Tolerance to Pen Pressure.
(E or Shift-E) and a brush tip. If you have a pressure-sensitive tablet, via the Brush preset picker, set the brush Size and Tolerance to Pen Pressure.
3. On the Options bar, click a Sampling button to control the tool behavior:
Continuous ![]() to replace all the colored pixels directly under the pointer with transparent ones, as well as adjacent colors that are within the current Tolerance range.
to replace all the colored pixels directly under the pointer with transparent ones, as well as adjacent colors that are within the current Tolerance range.
Once ![]() to replace only pixels that closely match the first color you click with transparent pixels.
to replace only pixels that closely match the first color you click with transparent pixels.
Background Swatch ![]() to erase only pixels that match the current Background color. For this option, pick a Background color now.
to erase only pixels that match the current Background color. For this option, pick a Background color now.
4. To control which pixels can be erased, choose from the Limits menu:
Discontiguous to erase all pixels within the current Tolerance range that the tool passes over; pixels don’t have to be adjacent to one another.
Contiguous to erase only pixels adjacent to the one you click, within the Tolerance range.
Find Edges to erase pixels contiguous to the one you click, while preserving shape edges.
5. Choose a Tolerance percentage to control how widely the colors to be erased can differ from the first color you click. For the Continuous sampling option, use a low Tolerance (less than 8%); for the Once option, use a moderate Tolerance of around 20–30%.
6. Click or drag in the document window B (also A–E, next page, and A–D, page 191). You can change the Sampling option, Tolerance, brush diameter, or brush hardness between strokes.
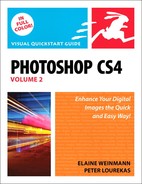
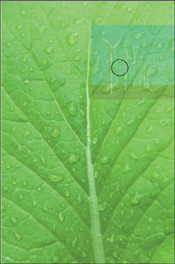
A We are going to erase the sky in this photo (a stock photo taken in Angkor, Cambodia, in case you’re wondering).

B With the Background Eraser tool, we dragged horizontally from the sky into the trees. Because the tool setting was Sampling: Once, it sampled the sky color only from the point where we started dragging and erased only colors that were close in value to the sampled color, within our chosen Tolerance range of 30%.

Erasing Sky Behind Foliage
A The Background Eraser tool is successfully removing the sky colors while preserving the leaves. Since the sky contains multiple colors, we will need to click and drag multiple times to sample and erase.

B Next, we clicked the left side of the image with the Background Eraser tool to sample that part of the sky.

C Dragging across the tree removed sky colors within the chosen Tolerance range, while preserving the leaves.

D Using a smaller brush (and a lower Tolerance range, to avoid erasing the highlight colors on the buildings), we erased the sky near the buildings, then dragged from the sky toward the buildings to sample and erase only the sky color.

E Next, we dragged a layer of sky imagery from another document into this one, then restacked it below the layer that we erased pixels from. The new sky looks too bright and saturated, though, so we’ll fix that problem next.
A We created a Hue/Saturation adjustment layer above the sky layer, and with Master chosen on the second menu, lowered the Saturation.

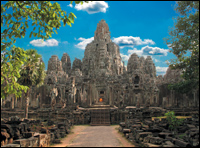
B To lighten the sky, we created a Levels adjustment layer and moved the gray and white Input Levels sliders.
C This is the Layers panel for the final image, which is shown below.

D In the final montage, the two image layers meld successfully: the trees and temple from the original image together with the new sky layer.

Enlarging the canvas area
Before creating a montage, you may need to enlarge the canvas area—that is, add a blank area to one or more sides of the image—to accommodate more imagery. When you draw a marquee with the Crop tool that’s larger than the image, you effectively increase the canvas size. Unlike the Canvas Size command, this technique gives you manual control over the size and location of the added canvas area. Another use for this technique is to reveal imagery that extends beyond the live canvas, which may result when you drag and drop or paste in a layer from a larger document.
To enlarge the canvas area using the Crop tool:
1. Open an image, then choose a Background color.A
2. Change the zoom level, if necessary, to show some gray area around the image.
3. Choose the Crop tool (C or Shift-C).![]()
4. Drag a crop marquee within the image.
5. Drag any of the handles of the marquee beyond the live canvas area (A–B, next page).
6. To accept the edit, do one of the following (C, next page):
Double-click inside the marquee.
Press Enter/Return.
Right-click/Control-click the image and choose Crop.
If the image has a Back ground (Layers panel), the added canvas area will fill with the current Background color; if not, it will fill with transparent pixels. Pixels that were previously located outside the edge of the canvas area may now display within it.
• To cancel the crop marquee before accepting it, press Esc.
A We want to add blank space around this image to accommodate other image layers that we’re going to add to it.
A We lowered the zoom level and chose white as the Background color. With the Crop tool, we drew a marquee within the image, then dragged the lower right handle of the marquee to enlarge it.

B We finished enlarging the crop marquee, then pressed Enter/Return to accept the edit.

C The canvas area now includes a white area around the original imagery.
Blending imagery via layer masks
When you create a montage from multiple image layers, you can let the seams stay visible or you can apply a gradient to each layer mask to meld the imagery together, as we show you how to do here.
To combine images into a composite:
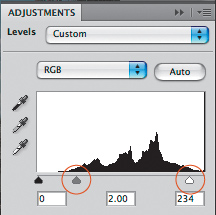
1. Open an RGB image to be used as a background for a composite image (e.g., a soft-focus image or a photo of a texture), and make sure it’s large enough to contain the other images that you’re going to add. If you need to enlarge the canvas area, see the preceding two pages. Alternatively, you can create a blank document and fill it with a solid color or a gradient.
2. Open two or more smaller RGB images to be placed on top of the master background image. To make your job easier, make sure all the files have the same resolution (Image > Image Size).
On the Arrange Documents menu ![]() on the Application bar, click an available “Up” button.
on the Application bar, click an available “Up” button.![]()
3. Click in one of the smaller images, then drag the Background or a layer from the Layers panel into the document window of the master image. If desired, use the Move tool (V) to scale any of the imported layers.* Repeat to add imagery from the other files, then close all but the master file.A–B
* If you find that you need to enlarge any layer by a substantial amount, do so in the original file via Image > Image Size, and then reimport it.
4. Save the master file, then hide all but one of the new layers.
5. Choose the Move tool ![]() (V). Click the visible image layer, then drag it to one side of the document. Click the Add Layer Mask button
(V). Click the visible image layer, then drag it to one side of the document. Click the Add Layer Mask button ![]() on the Layers panel.
on the Layers panel.
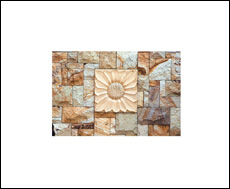
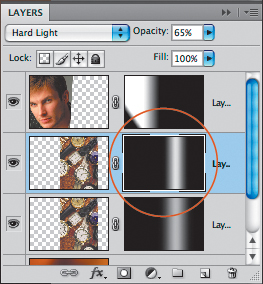
A Into a horizontal document that contains a background texture, we dragged a portrait layer and a watches layer.

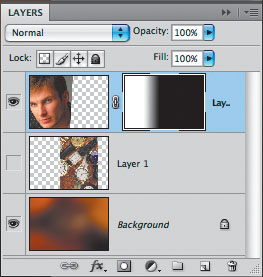
B The two layers that we imported appear on the Layers panel.

6. Choose the Gradient tool ![]() (G or Shift-G). On the Options bar, click the Black, White preset in the Gradient preset picker, click the Linear Gradient button,
(G or Shift-G). On the Options bar, click the Black, White preset in the Gradient preset picker, click the Linear Gradient button,![]() set the Mode to Normal, set the Opacity to 100%, and uncheck Reverse.A
set the Mode to Normal, set the Opacity to 100%, and uncheck Reverse.A
7. In the document window, start dragging horizontally from where you want the imagery to be transparent (the black area of the mask), and stop dragging where you want the image to remain fully opaque (the white area of the mask).B A representation of the gradient will appear in the layer mask thumbnail.C
8. To transform the mask to control where the fadeout occurs on any layer, do the following:
Click the Link button ![]() between the layer and layer mask thumbnails to unlink them, then click the layer mask thumbnail.
between the layer and layer mask thumbnails to unlink them, then click the layer mask thumbnail.
A Choose the Gradient tool. On the Options bar, click the Black, White preset on the Gradient picker and click the Linear Gradient button.

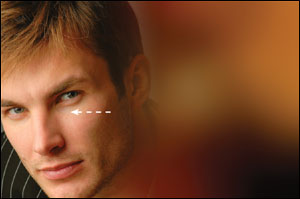
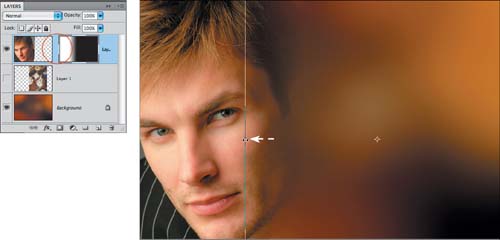
B We scaled and repositioned the face, then hid the watches layer. Next, we added a layer mask to the face layer, then dragged with the Gradient tool to fade the right side of the man’s face.
C The linear gradient appears in the layer mask thumbnail for the face layer.
Choose the Move tool ![]() (V). On the Options bar, check Show Transform Controls. Drag the middle handle on the transform box (to control where the fadeout is),A then double-click inside the transform box to accept the edit. Click between the image and mask thumbnails to relink them.
(V). On the Options bar, check Show Transform Controls. Drag the middle handle on the transform box (to control where the fadeout is),A then double-click inside the transform box to accept the edit. Click between the image and mask thumbnails to relink them.
9. To fade a corner of the same image layer, do the following:
Click the layer mask thumbnail. Choose the Gradient tool and the same settings as in step 6, except this time choose Multiply as the tool Mode (Normal mode would replace the existing gradient, whereas Multiply mode will combine the new and existing ones).
Drag from the edge of the imagery toward the middle.B–C
10. Redisplay the hidden image layer(s), and repeat steps 5–9 to add a layer mask and gradients to those layers.
• If you need to redo a gradient, press Ctrl-Z/Cmd-Z to remove the current one, then reapply it.
A We unlinked the layer mask from the layer and then, with the Move tool, adjusted the position of the fadeout by dragging a handle on the transform box (as shown by the white arrow).
B With the Gradient tool Mode set to Multiply, we added another gradient to the layer mask to fade the bottom left corner.

C The diagonal gradient appears in the layer mask for the portrait layer.

To fade a layer from its center:
1. Click an image layer on the Layers panel (a different layer, if you’re continuing with the preceding task), then click the Add Layer Mask ![]() button.
button.
2. Choose the Gradient tool.![]() On the Options bar, click the Black, White preset on the Gradient preset picker, click the Reflected Gradient
On the Options bar, click the Black, White preset on the Gradient preset picker, click the Reflected Gradient ![]() button, set the Mode to Normal and the Opacity to 100%, and check Reverse.
button, set the Mode to Normal and the Opacity to 100%, and check Reverse.
3. In the document window, drag horizontally from the center of the imagery to the edge.A Note how the gradient looks in the layer mask thumbnail.B
4. To blend the imagery, on the Masks panel,![]() increase the Feather value to soften the edge of the mask. Also lower the layer Opacity.C
increase the Feather value to soften the edge of the mask. Also lower the layer Opacity.C
To refine the lighting, follow the steps on the next page.
A We made the watches layer visible and repositioned and scaled it. Next, we added a layer mask, then dragged the Gradient tool (with the Reflected Gradient style chosen) to fade both sides of the watches layer.

B The reflected gradient is fading to black on both sides of the layer mask.

C On the Masks panel, we increased the Feather value to 130 px and reduced the layer Opacity to 80%. The layer could use some lighting refinements (see the following page).

For a finishing touch, add some subtle lighting tweaks to the composite image.
To refine the lighting on an image layer:
1. Click the layer that contains the reflected gradient in its mask, then press Ctrl-J/Cmd-J to copy it.A
2. Click the layer mask thumbnail for the duplicate layer. To make the layer look brighter, on the Masks panel, reduce the Feather value. Whitening the center of the mask reveals more of the image.B
3. Optional: To intensify the light, choose a different blending mode for the duplicate layer, such as Hard Light or Luminosity, and adjust the layer Opacity.C
4. Optional: To narrow the lighting effect on the duplicate layer, make the white area in the mask narrower. Click the mask thumbnail, then click Mask Edge on the Masks panel. In the dialog, click Default, lower the Contract/Expand value (try a value between −25 and −40), then click OK.

A We duplicated the watches layer.

B We clicked the mask on the duplicate watches layer, then reduced the Feather value to 65 px (Masks panel) to lighten the middle of that layer.

C The sharper transitions are evident in the layer mask. Finally, we chose the Hard Light blending mode for the duplicate layer and reduced the layer Opacity to 65%.
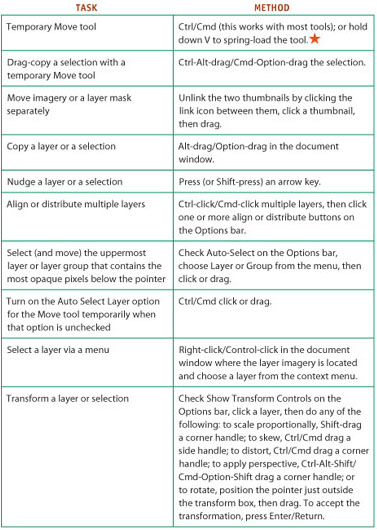
Quick Summary: Using the Move Tool
Once your imagery has been collected into one document—whether via the Clone Stamp tool, drag-and-drop, or copy-and-paste—you can use the Move tool ![]() to reposition or transform each layer individually. For the following tasks (except the first one), choose the Move tool.
to reposition or transform each layer individually. For the following tasks (except the first one), choose the Move tool.
Using the Clone Source panel
To gather fragments from multiple images, you can copy and paste or drag and drop selections or layers from other documents, or use the Clone Stamp tool, which we feature here. With this tool, you can clone imagery from one layer to another within the same file or between files. The Clone Source panel lets you keep track of up to five different clone sources (represented by a row of buttons at the top of the panel); assign different sources; clone repeatedly from the same source; and best of all, scale, rotate, or reposition the source pixels before or as you’re cloning them.
To use the Clone Stamp tool and the Clone Source panel:
1. Open one or more RGB documents to use as source imagery, and create or open the document that you want to clone imagery to.A
2. Choose the Clone Stamp tool ![]() (S or Shift-S) and then, on the Options bar, choose a large Soft Round brush tip; choose a Mode; choose Opacity and Flow values; and check Aligned.
(S or Shift-S) and then, on the Options bar, choose a large Soft Round brush tip; choose a Mode; choose Opacity and Flow values; and check Aligned.
3. Display the Clone Source panel. ![]() By default, the first clone source button is selected.
By default, the first clone source button is selected.
4. Check Show Overlay and Auto Hide, then set the Opacity to 35–40% so you’ll be able to preview the source as an overlay (a faint version of the source layer below the pointer) while you clone.
5. In the document you’re going to clone to, create a new blank layer, and keep it selected.
• For the next two steps, you can either display all the open documents simultaneously by clicking an “Up” icon on the Arrange Documents menu ![]() on the Application bar
on the Application bar ![]() or click back and forth between the documents by clicking their tabs.
or click back and forth between the documents by clicking their tabs.
6. Click in the document that you want to clone from and then, from the Sample menu on the Options bar, choose Current Layer, Current & Below, or All Layers, depending on what you want to clone, and if necessary click the desired layer.
Alt-click/Option-click an area to establish it as a source point for cloning. The document (and layer name, if you didn’t click the Background) will be assigned to, and listed below, the first clone source button on the panel.B
A Our first step was to open some files to be used as source material for a piece on green energy (we clicked a 3 Up icon on the Arrange Documents menu).

B We chose the Clone Stamp tool, clicked the first clone source button on the Clone Source panel, then Alt/Option clicked to set a source point in another document. The name of the source document appeared below the buttons.

7. Click in the document the imagery is going to be cloned to.
8. Move the pointer over the image without clicking to position the clone overlay, then drag to start cloning.A–B The overlay will disappear temporarily (because you checked Auto Hide), and then will reappear when you release the mouse. Note: When you start dragging, the position of the source overlay will become fixed. To reposition it, see the instructions on the next page.
• Check Clipped on the Clone Source panel if you prefer to display the overlay only within the brush tip.![]()
9. Before or while cloning, you can do any of the following:
Change the Rotate value ![]() on the Clone Source panel, or hold down Alt-Shift/Option-Shift and press < or >.
on the Clone Source panel, or hold down Alt-Shift/Option-Shift and press < or >.
To scale the clone source, change the W or H value on the Clone Source panel, or hold down Alt-Shift/Option-Shift and press [ or ]. Activate the Maintain Aspect Ratio button ![]() to preserve the current aspect ratio as you change the W or H value. Avoid scaling beyond 150 or –150%.
to preserve the current aspect ratio as you change the W or H value. Avoid scaling beyond 150 or –150%.
To flip the clone source, choose negative W and/or H values on the panel.
• To restore the default rotation and scale settings at any time, click the Reset Transform button on the panel.![]()
• To change values quickly on the Clone Source panel, use the scrubby sliders.
A After we Alt/Option clicked in a source image with the Clone Stamp tool, we positioned the overlay in our destination file...
B ...then dragged with the tool to make a portion of the source image appear.

10. To clone from more sources, click the second source button,A create a new layer in the target document, and repeat steps 6–9.B–C
Note! The Clone Source panel keeps the links active only while the source document is open.
• To switch between source files while cloning, click a different source button. The new source will display within the overlay.
• When using the Clone Stamp tool, check the Ignore Adjustment Layers When Cloning button ![]() on the Options bar if you want to exclude adjustment layer data from the source file.
on the Options bar if you want to exclude adjustment layer data from the source file.
As soon as you begin cloning, the position of the source overlay becomes fixed. However, you can clone the source imagery in a new location by repositioning the source overlay.
To reposition the source overlay after you’ve begun cloning:
1. With the overlay visible in the document you’re cloning to, do either of the following:
Change the Offset: X and/or Y value on the Clone Source panel.
Alt-Shift-drag/Option-Shift-drag the overlay.
2. Click, then drag to clone in the new location.
A We clicked the second clone source button to clone an image of solar panels, positioned the overlay...

B ...then dragged long strokes to make part of the second clone source imagery appear.
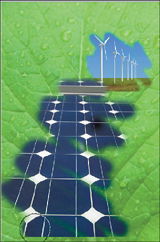
C We also added editable type, drag-and-dropped silhouetted image layers from three other files (the recycle symbol, wind turbine, and bamboo), and used a Hue/Saturation adjustment layer to make the Background (the large leaf) lighter and less saturated.

Adding Finishing Touches to a Montage
A With a few alterations, the image is now complete.

B We used an adjustment layer to make the turbine layer whiter. To limit the effect of the adjustment layer to just the layer below it, we clicked the Clip to Layer button ![]()
![]() on the Adjustments panel (to create a clipping group).
on the Adjustments panel (to create a clipping group).

Using the Vanishing Point filter
The Vanishing Point filter lets you paste imagery or a pattern into a perspective plane, such as a building facade, wall, floor, or object. It can’t compare to a dedicated drafting or 3D modeling program that an interior designer, architect, or package designer might use—and it doesn’t always work perfectly—but you might find a use for it. You can work with multiple source and destination surfaces.
To place imagery into perspective:
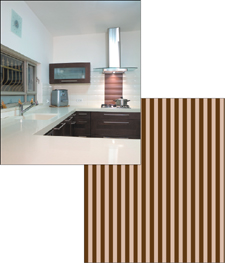
1. Open the file that contains the imagery to be pasted, and make sure its resolution is similar to that of the destination document. With a selection tool, select the area to be pasted, then copy it (Ctrl-C/Cmd-C).A Or to select text instead, Ctrl-click/Cmd-click the T icon on the Layers panel before using the Copy command.
2. Open a document that you want to paste imagery into. Create a new, blank layer, and keep it selected. Optional: Select an area of the layer that you want the copied imagery to fit into.B
3. Choose Filter > Vanishing Point. The Vanishing Point dialog opens. Press Ctrl- –/Cmd- – (hyphen) once to reduce the preview size.C
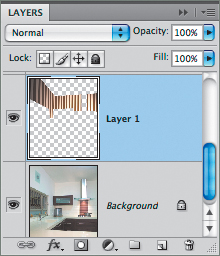
A We are planning to paste the striped “wallpaper” onto the side and back walls of the kitchen image. We created the stripes in Adobe Illustrator, placed the file into a blank Photoshop document, then selected and copied it.
B With the Polygonal Lasso tool, we selected the areas that we’re going to apply the wallpaper to.

C The image displays in the preview in the Vanishing Point dialog.

4. To define the perspective grid for the imagery to be pasted onto, choose the Create Plane tool ![]() (C), click in the preview to place the first corner node for the perspective grid, then click to place three more nodes to complete the four-sided blue grid.A The Edit Plane tool
(C), click in the preview to place the first corner node for the perspective grid, then click to place three more nodes to complete the four-sided blue grid.A The Edit Plane tool ![]() becomes selected automatically.
becomes selected automatically.
• Press and hold down X to zoom in temporarily, click to place a node, then release X. (To delete the last node, press Backspace/Delete, then click to place new nodes.)
5. With the Edit Plane tool,![]() do any of the following (Note: To undo any of these edits, press Ctrl-Z/Cmd-Z):
do any of the following (Note: To undo any of these edits, press Ctrl-Z/Cmd-Z):
To reshape the grid, drag a corner point.
To reposition the whole grid, drag it.
The grid should still be blue (signifying that it’s a valid plane). If it’s yellow or red, drag a corner handle until the grid becomes blue.B–C
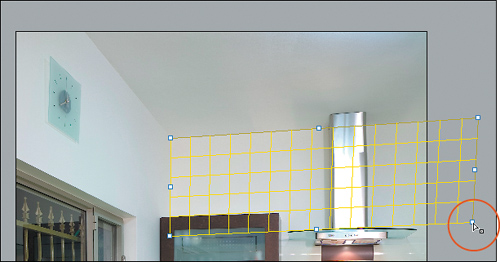
A With the Create Plane tool, we placed four corner points to create a grid.

B With the Edit Plane tool, we dragged a corner of the yellow grid...

To connect a second plane to the existing one, Ctrl-drag/Cmd-drag a midpoint handle away from the edge of the grid.
To change the angle of the new plane relative to the first one, Alt-drag/Option-drag a midpoint handle.A–B
6. Press Ctrl-V/Cmd-V to paste the imagery from the Clipboard. Don’t deselect the new floating selection! The Marquee tool ![]() becomes selected automatically. Drag the pasted imagery onto the first grid you defined (A, next page).
becomes selected automatically. Drag the pasted imagery onto the first grid you defined (A, next page).
7. Choose the Transform tool ![]() (T), then do either or both of the following:
(T), then do either or both of the following:
Reposition the pasted imagery within the planes by dragging it.
Scale the pasted imagery by dragging any of the small white handles on its edge (B, next page). (If you don’t see any of those handles, drag the imagery to bring one or more into view.)
• To blend the pasted imagery into the background, choose the Marquee tool (M), then choose Luminance from the Heal menu to blend lights and darks, or choose On to blend lights, darks, and colors. These options take time to process.
8. Click OK (C, next page). For a way to enhance the Vanishing Point results, see page 208.
• To hide and show the grid and any selection while in the Vanishing Point dialog, press Ctrl-H/Cmd-H.
• At the top of the Vanishing Point dialog, read a hint for the currently selected tool.
• To learn more about the Vanishing Point filter, see Adobe Photoshop CS4 Help > Retouching & Transforming.
A We Ctrl/Cmd dragged the left midpoint on the grid to add a second (connected) plane to define the left wall. Then we fine-tuned the angle of the new plane by Alt/Option dragging a midpoint (the plane swung like a door).

B Now the grid is ready for us to paste in the imagery.

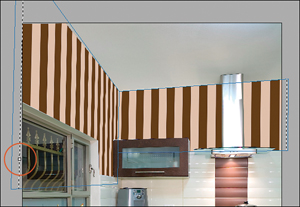
A We pressed Ctrl-V/Cmd-V to paste the imagery we copied into the grid and then, with the Marquee tool, dragged the selection into the first plane that we defined.

B With the Transform tool, we dragged the midpoint handle to the left to fill the grid.
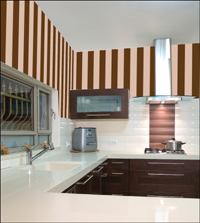
C Our use of the Vanishing Point filter produced this result. We think it could use a lighting enhancement, though, to make the wallpaper look more realistic (see the next page).
Adding Realism to Vanishing Point Results with Lighting
A To add realism to the scene, we applied Filter > Render > Lighting Effects, using the default Spotlight type (we widened the lighting ellipse slightly).

B This is the Layers panel for the final image, which is shown below.

• As an alternative to using the Lighting Effects filter, change the mode of the layer you applied the Vanishing Point filter to (try Multiply), and see if that does the trick.