9. Sharpening
The difference between an unsharpened photo and a sharpened one may be subtle, but the former will look blah and undefined and the latter will have that extra, well, edge. In this chapter, you’ll learn how to use three sharpening filters in Photoshop: Unsharp Mask, High Pass, and Smart Sharpen.
If you’re wondering whether to use the sharpening controls in Camera Raw or in Photoshop, the answer is “both.” Use Camera Raw to apply a moderate amount of “capture” sharpening to your image, as described in Chapter 3; then, after completing all your tonal and color correction, image edits, and noise reduction work and any scaling or transformations that cause resampling, sharpen the image again in Photoshop. For the latter, follow the instructions in this chapter.
Before exporting your file, you should apply a last round of sharpening to a copy of it (see page 325). For Web output, do this after downsizing the image to 72 ppi. For print output, the extra sharpening will help compensate for the fact that when digital images are converted to dots of ink on paper, the details are softened slightly.
The two powerhouse sharpening filters that we use most often are Unsharp Mask and Smart Sharpen. We’ll show you how to use Unsharp Mask once for overall sharpening and then a second time to sharpen a specific tonal range further, and how to use the Smart Sharpen filter to target the sharpening effect to specific tonal ranges. We’ve also included instructions for applying the High Pass filter and Unsharp Mask to sharpen edges.
In Photoshop, you can apply sharpening to the entire image or, as we’ll show you in this chapter, to targeted areas or tonal ranges. You’ll learn how to control where the sharpening is applied as well as how to regulate the intensity of the effect.
Note: Settings listed in the captions in this chapter were chosen for photos that are approximately 3000 × 2000 pixels.
Sharpening a whole image with the Unsharp Mask filter
The best time to sharpen an overall image with the Unsharp Mask filter is after applying capture sharpening in Camera Raw, reducing noise, and performing color corrections and other image edits, and before outputting or exporting your file. To achieve a sharpening effect, Unsharp Mask increases the contrast between adjacent pixels. Dialog options let you control the increase in contrast (the Amount), the width of the area of surrounding pixels the filter affects (the Radius), and the level of contrast needed between adjacent pixels for an area to be sharpened (the Threshold).
To apply the Unsharp Mask filter:
1. Open an RGB image, and flatten it if it contains layers. Choose a zoom level of 50% (A, next page).
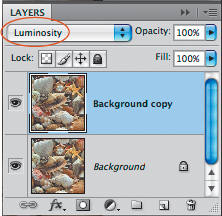
2. Press Ctrl-J/Cmd-J to duplicate the Background. Change the blending mode of the duplicate layer to Luminosity to allow the sharpening to affect only its tonal values. Keep the duplicate layer selected.
3. Choose Filter > Sharpen > Unsharp Mask.
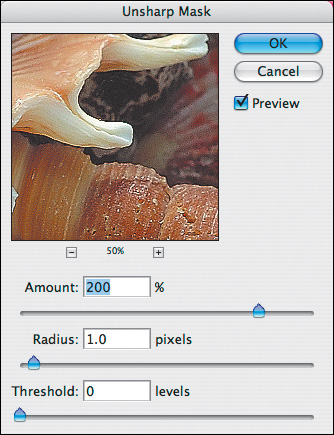
4. In the Unsharp Mask dialog, choose an Amount value to control the intensity of the sharpening (B, next page). For a high-resolution portrait or landscape (2000 × 3000 pixels or higher), use a low setting of around 80–120; for an image containing hard-edged objects, use a higher setting of 150–170.
5. The Radius setting controls how wide an area of pixels surrounding high-contrast edges will be sharpened (C, next page). Two variables to consider are the pixel count of the file (the higher the pixel count, the higher the Radius value needed) and its subject matter. For a low-contrast image that contains large, simple objects and smooth color transitions, a high Radius of 1.5–2 is usually effective; for an intricate, high-contrast image with sharp transitions, a lower Radius of around 1 would probably work better. You may need to experiment.
• Think of the Amount and Radius settings as interdependent. If you adjust one value, you should also readjust the other (A, page 212).
6. Choose a Threshold value for the degree of contrast an area must contain in order to be sharpened. Start with a Threshold of 0 (which would sharpen the entire image), then raise the value slowly. At a Threshold between 5 and 10, high-contrast areas will be sharpened and areas of lesser contrast will receive very little sharpening. At higher Threshold values, only high-contrast edges will be sharpened, in which case you can also increase the Amount and Radius to apply more sharpening to just those areas without oversharpening the lower-contrast areas (B, page 212).
7. Uncheck, then recheck Preview to compare the original and sharpened versions of the image.
• To inspect a different part of the image, click in the document window; that area will display in the preview window in the dialog. To compare the unsharpened and sharpened images, click and hold on the dialog preview, then release.
8. Click OK, then flatten the document (choose Flatten Image from the Layers panel menu).
A The details in this original image look too soft.
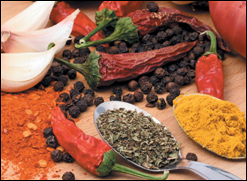
B We chose a high Amount value of 200 in the Unsharp Mask dialog temporarily to better judge the Radius and Threshold values that we’ll set next.

C We can see that a Radius value of 2.5 is too high, because it produced halos along the edges of some of the shapes.
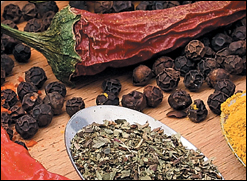
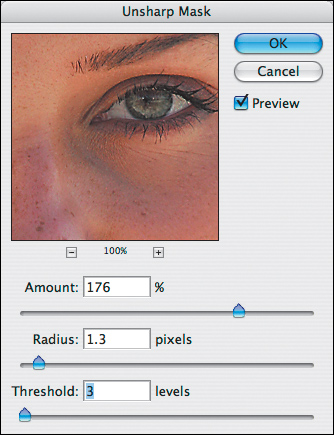
A We lowered the Amount value to 160 to lessen the overall sharpening and lowered the Radius value to 1.3 to remove the halos.
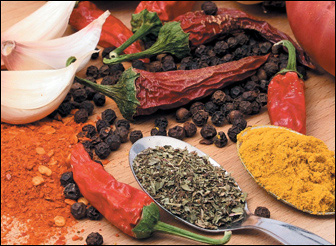
B Our final Unsharp Mask filter edits were to raise the Threshold value to 3 to restrict the sharpening to just high-contrast edges and to raise the Amount value to 170 to slightly increase the sharpening of those edges. Now you can practically smell the chile powder.

Suggested Unsharp Mask Filter Settings for Different Types of Images*
* These settings apply to high-resolution images.
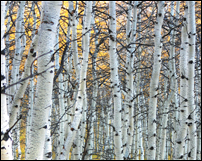
Landscapes containing sharp details
A For “high-frequency” images that contain numerous fine details, try an Amount of 120–170, a Radius just below 1.0, and a Threshold of 3 or 4.
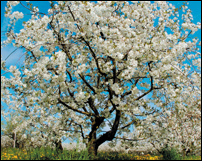
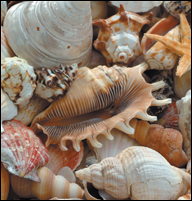
Subjects containing soft edges
B For images that contain mostly soft textures with a few distinct edges here or there, try a high Threshold of 6–8 to preserve the softness, an Amount of 100–150, and a Radius of 1.
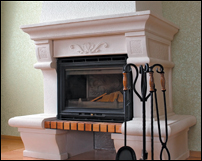
Buildings and other high-contrast subjects
C To preserve the contrast, surface detail, and well-defined edges in a subject like this one, try a high Amount of 170, a high Radius of 2–3, and a low Threshold of 0–3.
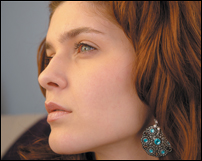
Portraits
D To control the softness or sharpness of a portrait, try an Amount of 90–120. Set the Radius to 1–2 to make the hair and facial details crisp, and set the Threshold to 3–6 (to the point where the skin begins to look smoother).
Sharpening Midtones with the Unsharp Mask Filter
After using the Unsharp Mask filter once, you can refine the results by further sharpening just the midtone areas (not the highlights and shadows). In the second round, apply the filter to a duplicate layer,A–D then use the Blend If sliders in the Layer Style dialog to control which more-sharpened pixels in the duplicate layer stay visible and which less-sharpened pixels from the Background show through (A–C, next page).
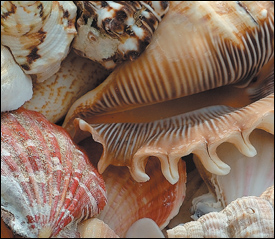
A This image is sharpened adequately, but we want to further enhance the surface detail in the midtones.
B We duplicated the Background and chose Luminosity as the blending mode for the duplicate.
C Next, we applied the Unsharp Mask filter to the duplicate layer, using the settings shown at right.
D In this close-up of the image after the Unsharp Mask filter was applied, you can see that the highlight and shadow areas look oversharpened (it’s especially noticeable on the two shells in the center).
A We double-clicked the duplicate layer to open the Layer Style dialog, and clicked Blending Options on the left side. In the Blend If area, we set both black sliders to 25 and both white sliders to 230, to enable the less-sharp shadow and highlight pixels from the Background to show through the duplicate layer.
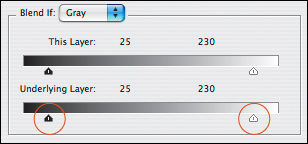
B Finally, we held down Alt/Option and dragged the right part of the black This Layer slider to 65 and the left part of the white This Layer slider to 195. These changes allowed the extra-sharp midtone areas on the duplicate layer to stay visible but also fade into the less-sharpened areas.

C After the Blend If adjustments, in this closeup you can see that the midtones are still very sharp and the highlights and shadows display neither oversharpening nor unwanted noise. Compare the red shell on the left side and the interior of the striped shell with the same areas in figure D on the preceding page.

Enhancing details with the High Pass filter
The High Pass filter is a simple but effective tool for increasing the edge contrast and enhancing details in an image. If you apply the filter to a duplicate layer, you’ll be able to control not only the intensity of the sharpening, but also which areas become sharpened.
To apply sharpening using the High Pass filter:
1. In an RGB image that needs sharpening,A press Ctrl-J/Cmd-J to duplicate the Background, and keep the duplicate layer selected.
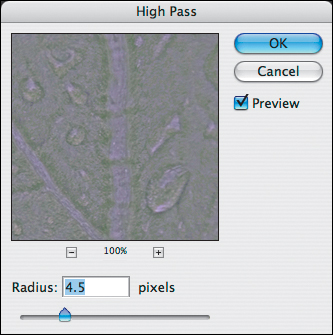
2. Choose Filter > Other > High Pass. The High Pass dialog opens.B
3. For a high-resolution image (300 ppi, or 2000 × 3000 pixels or larger), choose a Radius value of 4; for a low-resolution image (150 ppi or lower), set the Radius to 2. Click OK.
4. To restore color to the image and control the effect of the High Pass filter, choose one of the following blending modes for the duplicate layer:
To display the sharpening effect, choose Overlay (A, next page).
To intensify the sharpening effect, choose Hard Light or Vivid Light (B, next page).
To soften the sharpening effect, choose Soft Light.
A This image could use some extra sharpening.

B We duplicated the Background, then applied the High Pass filter at a Radius of 4.5 pixels.
5. Set the zoom level to 50% or 100% to judge the amount of sharpening, and then, if needed, lower the Opacity of the layer to compensate for any oversharpening.C
6. Optional: To restrict the sharpening effect to specific areas of the image, click the duplicate layer, then Alt-click/Option-click the Add Layer Mask button ![]() at the bottom of the Layers panel to add a black mask. Choose the Brush tool
at the bottom of the Layers panel to add a black mask. Choose the Brush tool ![]() (B or Shift-B), a Soft Round tip, Normal mode, and a brush Opacity of 80%, and press D, if necessary, to make the Foreground color white. Draw strokes where you want to reveal the sharpening effect. If you need to remask any of the sharpened areas, press X to paint with black.
(B or Shift-B), a Soft Round tip, Normal mode, and a brush Opacity of 80%, and press D, if necessary, to make the Foreground color white. Draw strokes where you want to reveal the sharpening effect. If you need to remask any of the sharpened areas, press X to paint with black.
A Choosing Overlay blending mode for the High Pass layer restored the color and displayed the effect of the High Pass sharpening.
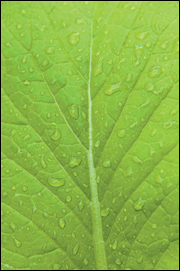
B We settled on Vivid Light blending mode for the High Pass layer to increase the sharpening effect...
C ...but lowered the High Pass layer Opacity to 50% to soften the sharpening by half.

Sharpening areas selectively
One way to give an image more punch is by applying extra sharpening to select areas. To control which areas receive the extra sharpening, you’ll use a layer mask (of course!). You can exercise some creative license with this approach, depending on the image content—or in a commercial setting, how much latitude you’re allowed.
To sharpen areas selectively:
1. Open an RGB image that has areas that could benefit from an extra sharpening boost.
2. If you already applied some capture sharpening via Camera Raw, skip this step. If not, choose Filter > Unsharp Mask and apply a moderate amount of sharpening.A
3. Press Ctrl-J/Cmd-J to duplicate the Background. Keep the the duplicate layer selected, and change its blending mode to Luminosity.
4. Choose Filter > Sharpen > Unsharp Mask.
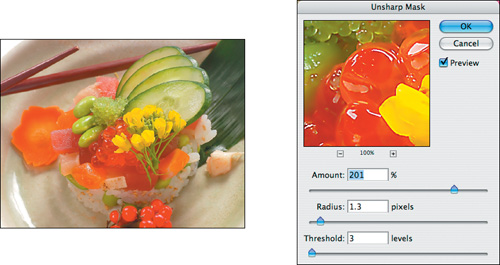
In the dialog, set the Amount to 200%, the Radius to 1–1.5, and the Threshold to 3, then click OK.B Don’t worry if the image now looks too sharp.
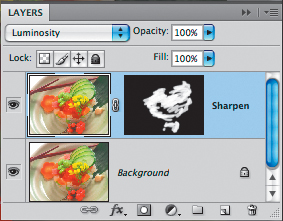
5. Alt-click/Option-click the Add Layer Mask button ![]() on the Layers panel to add a black mask, which will hide the extra sharpening that you just applied.
on the Layers panel to add a black mask, which will hide the extra sharpening that you just applied.
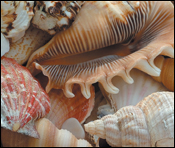
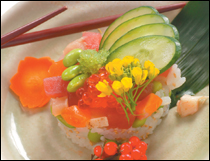
A Some capture sharpening was applied to this photo in Camera Raw. To emphasize the food details in the center, we’ll apply some extra sharpening to just those areas.
B We duplicated the Background, chose Luminosity as the blending mode for the duplicate layer, and applied the Unsharp Mask filter using the settings shown at right.
6. Choose the Brush tool ![]() (B or Shift-B), a Soft Round tip, Normal mode, and 80% Opacity. Press D to make the Foreground color white. Draw strokes in areas where you want to reveal the extra sharpening.A–B Reapply your brush strokes to any areas that need an extra boost. If you need to remask any sharpened areas, press X to paint with black.
(B or Shift-B), a Soft Round tip, Normal mode, and 80% Opacity. Press D to make the Foreground color white. Draw strokes in areas where you want to reveal the extra sharpening.A–B Reapply your brush strokes to any areas that need an extra boost. If you need to remask any sharpened areas, press X to paint with black.
7. Optional: To soften the transition between the masked and unmasked areas, display the Masks panel, ![]() then increase the Feather value.
then increase the Feather value.![]()
A We added a layer mask, then painted with a soft-edged brush (Foreground color white) to reveal the heightened sharpening along the edges of the flowers, roe, cucumber, and pieces of sushi.
B The extra sharpening heightened the edge details and textures in the center of this image. (Question: Are the flowers edible?)

Using the Smart Sharpen filter
Although the Unsharp Mask filter is fast, powerful, and a good tool for sharpening an overall image, when you want to apply selective sharpening without having to use a selection or mask, we recommend using the Smart Sharpen filter instead. Via the Smart Sharpen controls, you can target more sharpening to a particular tonal range, such as the midtones, and less sharpening to the highlights and shadows. It’s particularly useful when you need to sharpen some areas in an image more than others, such as key features in a portrait.
Smart Sharpen offers several advantages:
• More control: Via the Tonal Width control in the Smart Sharpen dialog, you can widen or narrow the range of tonal values that receive sharpening. Also, Smart Sharpen lets you fade the sharpening in the shadow and highlight areas separately, whereas Unsharp Mask does not.
• More muscle: The More Accurate option in the Smart Sharpen dialog applies sharpening in multiple passes.
• Fewer halos: Because it has the ability to detect edges, Smart Sharpen produces fewer color halos than Unsharp Mask.
• Flexibility: Smart Sharpen corrects Gaussian blur, lens blur, or motion blur, depending on your choice of three algorithms, whereas Unsharp Mask corrects only Gaussian blur.
• Improved workflow: Smart Sharpen lets you save your settings, so you can apply them to other images.
To sharpen areas selectively with the Smart Sharpen filter:
1. Open an RGB image that needs sharpening.A On the Layers panel, click an image layer or the Background, then press Ctrl-J/Cmd-J to duplicate it. Right-click/Control-click the duplicate layer and choose Convert to Smart Object, then click OK if an alert dialog appears.
2. Choose Filter > Sharpen > Smart Sharpen. In the Smart Sharpen dialog,B keep the zoom level for the preview at 100%.
3. Check More Accurate to allow multiple passes of the filter, for higher-quality sharpening (it’s worth the extra processing time).
4. From the Remove menu, choose an algorithm for the correction:
Gaussian Blur uses a sharpening method similar to that of the Unsharp Mask filter.
Lens Blur (our favorite) does a superior job of detecting edges and produces fewer color halos.
Motion Blur is useful if the blurring was caused by a slight movement of the camera or subject and you know the angle at which that movement occurred.

B The settings shown in the Basic pane of the Smart Sharpen dialog properly sharpened the facial details (eyes, teeth, and lips) but also oversharpened the skin.
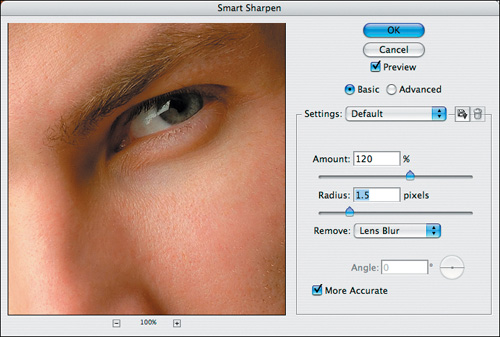
5. Try an Amount of 100–140% and a Radius of 1–2 pixels (you can use the scrubby slider to set values in this dialog). The image should now look slightly oversharpened.A
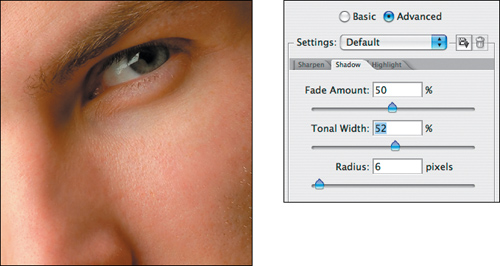
6. Next, you’ll fade the effect. To control the amount of sharpening in the shadow and highlight areas, click Advanced, then click the Shadow tab. Drag in the preview to display an area of the image that contains both shadows and midtones, then do the following:
Raise the Fade Amount to reduce any over-sharpening in the shadows.
Choose a Tonal Width to control the range of midtones that are affected by the Fade Amount. The higher the Tonal Width, the wider the range of midtones in which the sharpening will be reduced, and the more smoothly the reduction will fade to no sharpening in the shadows.
Choose a Radius between 5 and 15 to control how many neighboring pixels will be compared to a sharpened pixel. The higher the Radius, the larger the area that will be compared.
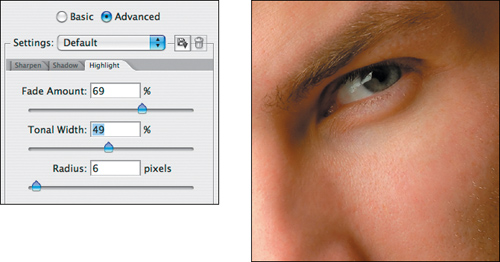
7. Click the Highlight tab. Drag the image in the preview to display an area that contains both highlights and midtones. Adjust the Fade Amount, Tonal Width, and Radius settings, as in the preceding step.
8. Hopefully, the key details (e.g., the eyes and mouth, in a portrait) are now sharpened properly, and the larger expanses (e.g., cheeks and forehead) are smooth. If the overall image looks too sharp, click the Sharpen tab and lower the Amount value slightly. After making adjustments in one tab, you may need to readjust the settings in the other two.
• To save your Smart Sharpen settings for future use, click the Save a Copy of the Current Settings button, ![]() type a name in the New Filter Settings dialog, then click OK. Saved settings can be chosen from the Settings menu for any image.
type a name in the New Filter Settings dialog, then click OK. Saved settings can be chosen from the Settings menu for any image.
9. To compare the unsharpened and sharpened images, click and hold on the dialog preview, then release. Click OK (A–C, next page).
• To restore all the options in the dialog box to the default settings, hold down Alt/Option and click Reset; or if a preset is chosen on the Settings menu, choose Default from that menu.
A To apply the Smart Sharpen filter selectively and fade the sharpening, we clicked the Shadow tab and chose the settings shown above. A Tonal Width of 52% reduced the sharpening completely in the shadow areas (the side of the face and around the eyes) but preserved it in the midtones.
A In the Highlight tab of the Smart Sharpen dialog, we chose a high Fade Amount to reduce the sharpening and a medium Tonal Width value to fade the sharpening partially in the lighter midtones and completely in the highlights. At these settings, less sharpening is being applied to the cheeks and lower eyelids. The final image is shown at right and in figure C.
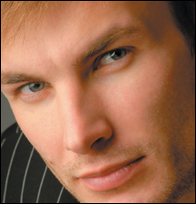
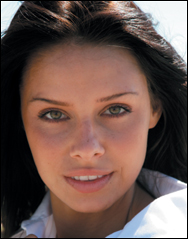
B This is the original image before the Smart Sharpen filter was applied.

C Using Smart Sharpen, we were able to successfully sharpen the eyes, eyebrows, nose, lips, and hair without oversharpening the skin.
Selecting edges for sharpening
Sometimes you can achieve better sharpening results by limiting the correction to just the edges of shapes (the areas of highest contrast) and leaving the lower-contrast areas unsharpened. The method given here for selecting only high-contrast edges works best on images that have large swaths of low-contrast color, such as a hazy sky or a portrait with soft skin tones, and a small proportion of contrasty edges. If used on an image that contains many intricate details, too many edges will become selected.
To select the edges of shapes: ![]()
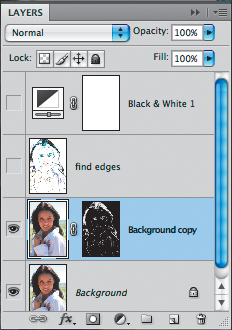
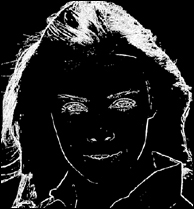
1. Open an RGB image that needs sharpening.A Click the Background layer, then press Ctrl-J/Cmd-J twice. Rename the topmost duplicate “find edges,” and keep it selected.
2. Choose Filter > Stylize > Find Edges to reduce the layer to line work.B
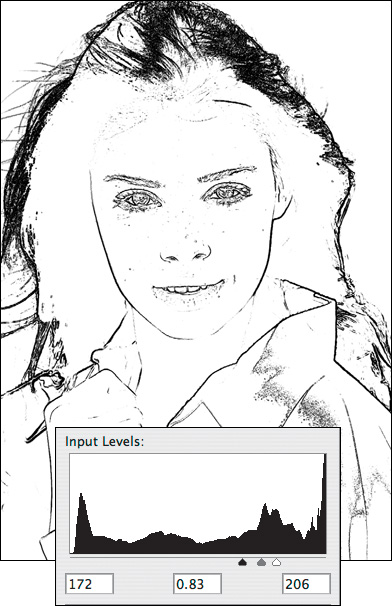
3. To increase the contrast and discard the thinnest edges, choose Image > Adjustments > Levels (don’t create an adjustment layer), then do the following: C
Move the white Input Levels slider to the left to remove the thinnest lines in areas of low contrast (e.g., the cheeks and forehead, or details in the foreground). The three Input Levels sliders should now be closer together.
Move the black Input Levels slider to the right to darken the line work.
Move the gray Input Levels slider slightly to the right to further darken the line work.
Click OK.
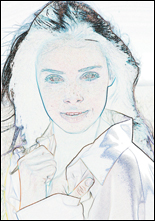
A We will select just the high-contrast edges in this image, for targeted sharpening.

B We applied the Find Edges filter to a duplicate layer.
C We used these Levels dialog settings to boost the contrast in our “find edges” layer and to reduce it to just high-contrast line work.
4. On the Adjustments panel,![]() click the Black & White button,
click the Black & White button,![]() then do the following:
then do the following:
For a portrait, move just the Yellows slider to the right (to around 130) to remove the thinnest lines.
For a landscape, move the Yellows slider to the right to remove the finest lines and the Blues slider to the left to darken the line work.
5. Choose the Magic Wand tool ![]() (W or Shift-W). On the Options bar, set the Tolerance to around 60 and uncheck Contiguous.
(W or Shift-W). On the Options bar, set the Tolerance to around 60 and uncheck Contiguous.
6. Click one of the thick black lines in the image, then choose Select > Similar to select all the other medium to heavyweight lines.
7. Hide both the adjustment layer and the “find edges” layer. Click the Background copy layer.
8. On the Masks panel,![]() click the Add Pixel Mask button.
click the Add Pixel Mask button.![]() A
A
9. Click Mask Edge. In the Refine Mask dialog, click Default, then do the following:
Click the Mask preview button (the last button in the row) to see how your mask edges will be modified.
To preserve fine details, such as strands of hair, choose a Radius value of around 2 px.
Keep the Contrast value at 0%.
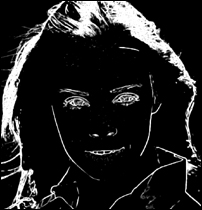
To eliminate thin edges in areas of low contrast, choose a Smooth value between 5 and 10.B
To soften the transition between the selected and unselected areas, choose a Feather value between 1 and 1.6 px (A–B, next page).
To widen the selection lines, choose a Contract/Expand value between +5 and +12%.
By feathering and expanding the edges of the mask, you enlarged the editable area slightly. The result will be a smoother transition between the edited and unedited areas.
Click OK.
To sharpen the image using the new layer mask, follow the instructions on the next two pages.
A We duplicated the Background and added a mask to the duplicate layer.
B In the Refine Mask dialog, we clicked the Mask preview button (to view the edges of the mask more clearly). Setting the Radius value to 2.1 px and the Contrast value to 0% preserved the fine details, such as the hair, and setting the Smooth value to 7 eliminated edges from low-contrast areas.
A For our final Refine Mask adjustments, we set the Feather value to 1.6 px to soften the transition between the selected and unselected areas, and set the Contract/Expand value to +11% to expand the layer mask. Now there are fewer lines in the broad area of the mask and the remaining line work is softer.

B For comparison, the mask is shown here without any Refine Mask adjustments. The mask contains both moderate and high-contrast edges, and the edge transitions are abrupt.
Sharpening edges
In the preceding instructions, we showed you how to select only the high-contrast edges in an image and then convert your selection to a layer mask. Here we’ll show you how to use that mask to limit sharpening to the edges of shapes when applying the Unsharp Mask filter. Sharpening that is applied subsequently will affect only the sharp details and will blend smoothly into the low-contrast areas. This method works well for sharpening a portrait, in which you typically want to emphasize facial features (edges) and de-emphasize the skin texture (pores and blemishes).
To sharpen edges:
1. Open an RGB image,C and follow the steps on the preceding two pages to create a selection of edges and a layer mask.
2. Click the layer thumbnail for the Background copy (A, next page) and zoom to 50%.
3. Choose Filter > Sharpen > Unsharp Mask.
C We’ll apply some targeted sharpening to this image using our saved selection (shown as a close-up).
4. You can use higher Amount and Radius values in the Unsharp Mask dialog than usual because the filter will affect only the selection of edges:
Set the Amount to 150–180%.
Set the Radius to 1.3 pixels.
Set the Threshold value to between 1 and 4.
Judge the Threshold effect in the document window, not in the dialog; the preview won’t show the effect of the layer mask.B (Don’t use a Threshold value of 0, which would apply full sharpening to all the edges.)
Optional: Increase the Amount value if you want to increase the edge sharpening.
Click OK.
5. Optional: To soften the overall sharpening effect, lower the Opacity of the duplicate layer.C
A We clicked the layer thumbnail for the Background copy.

B We chose these Amount and Radius values in the Unsharp Mask dialog. Note: Although the dialog preview displays sharpening in the whole image, in actuality, the layer mask is limiting the effect.
C A Threshold value of 3 sharpened the soft, low-contrast edges. We also lowered the layer Opacity to 80% to soften the overall sharpening effect.
