
2. The Three Ts: Terminology, Technology, and Tools
As you learned in the previous chapter, we covered the basic game design, storyline, and game components for Sir Lamorak’s Quest. Although this is all-important information to have at the moment, it’s no more than a story. What we now need to do is take a look at the three Ts: the terminology, technology, and tools we are going to use to turn this story into a fully functional (and entertaining) iPhone game.
Note
It is not intended that this book will teach you how to develop in Objective-C or C or teach you everything you need to know about the other technologies in their own right; there are many excellent books1 and online resources that cover OpenGL and OpenAL in greater detail. We will, however, cover these topics in enough detail to allow you to understand why we are using them and how.
The terminology used when developing computer games can be very different from terminology you may have come across when creating other types of applications. The common terminology used in game development will be covered in this chapter, so you will more easily understand the concepts throughout the rest of this book.
The second area, technology, will discuss technologies such as Objective-C, which is Apple’s programming language of choice on their platforms, including the iPhone, as well as game-specific technology, such as OpenGL ES (Open Graphics Language Embedded Systems) and OpenAL (Open Audio Language).
The third area covers the tools that are required to create Sir Lamorak’s Quest. You will certainly have access to the development tools you need, but you may also have alternatives to some of the other tools I will use, such as Pixelmator (www.pixelmator.com). There is nothing to stop you from using your favorite graphics package.
By the time you finish this chapter, you will have a good understanding of the terminology you will see throughout this book, as well as having a high-level view of the technology and tools we are going to be using. Don’t worry if you’re unfamiliar with the technology mentioned so far; we will build up your knowledge of these areas as we run through this book. Google is a fantastic tool for getting more information on specific subjects you may become interested in as you read through the book. Knowing the technology and terminology that is going to be used will give you the ability to more easily find what you are looking for.
Terminology
First up is terminology. Whether you are an experienced programmer or novice, game development has a different terminology than what you’ve probably been accustomed to. This section covers the terms you will come across most frequently when reading this book.
Before deciding what technology you need to use for your game, such as how to render a sprite on the screen, you first need to know what a sprite is. If you think a sprite looks like a green fairy with wings, you really need to continue reading this chapter.
As you read through this section, you will find terms you see throughout this book. You may have an understanding of some of these terms already, such as sprite or animation, but I’ll still cover them, specifically looking at how they are used within computer games.
Sprite
The term sprite refers to a 2D bitmap image that can be moved around the screen independently of everything else. Because early home computers, such as the Sinclair Spectrum or the Commodore 64 (or worse, the VIC-20), didn’t have powerful CPUs and Graphics Processing Units (GPUs) to process and render graphics, sprites were used to render and move graphics around the screen.
Note
A GPU is a specialized processor that offloads graphics processing functions from the CPU. They are specially designed to support the mathematical calculations necessary when rendering 2D and 3D graphics.
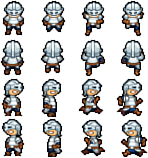
On some of these early home computers, programmers assigned a bitmap image to a hardware sprite, which was then rendered on top of everything else drawn on screen. The sprite’s position could then be changed by simply updating the location within a CPU register. No other drawing code was needed. These hardware-based sprites allowed early home computers to perform functions that would just not have been possible with the limited hardware resources of the day. Sprites were most often used in games to represent the player ship, missiles, bullets, and the enemies you were fighting. Figure 2.1 shows the sprite for Sir Lamorak.
Figure 2.1 Example of a sprite. This particular sprite is the one used for Sir Lamorak.
![]()
The iPhone is many times more powerful than the home computers we had back in the 1980s. Its GPU, particularly in the iPhone 3GS, iPhone 4, and iPad, allows it to achieve some impressive visual effects, thanks to their support for OpenGL ES 2.0.
What Is OpenGL ES?
OpenGL ES is a subset of the OpenGL graphics language for mobile devices (ES stands for Embedded Systems). The first-generation iPhone and the second-generation iPhone 3G only supported OpenGL ES 1.1, and the iPhone 3GS, iPhone 4 and iPad support both OpenGL ES 1.1 and 2.0. The main benefit of OpenGL ES 2.0 is its support of shader language. This allows the programmer to define how the GPU should process data rather than only being able to use functions that have been predefined.
For Sir Lamorak’s Quest, I’m going to simply refer to sprites as images. We will display more than our hero and bad guys in the game, so we will build a generic Image class that will be used to display sprites, backgrounds, buttons, and such.
How Do I Create a Sprite?
At this point, you may well be asking how you create the sprite images. This is something covered in more detail later on, but the quick answer is to open up your favorite graphics app—such as Photoshop or Pixelmator—and draw your sprite.
Once you have your sprite, export it in a supported format such as PNG. PNG is not the only format we can use to get graphics onto the iPhone. Other formats, such as GIF and BMP, can also be used. We will be using the PNG format throughout the book because it’s the format recommended by Apple for use on the iPhone. In Chapter 5, “Image Rendering,” when we have created the Image class, you will see how to load the PNG file into an OpenGL texture and render it to the screen.
One important point I haven’t mentioned is that getting the sprite onto the screen is much easier (in my opinion) than actually creating the sprite. Of course, this could be because I seriously lack any artistic talent, but the code you’ll use to display, animate, and move the sprite around the screen is actually pretty straightforward. If drawing isn’t your strongest suit, there are plenty of freelance designers you can call upon to help make your dream game a reality.2
Sprite Sheet
As described earlier, a sprite is a single image that is used (and reused) to represent an individual element onscreen, such as the player’s character, an enemy, and so on. As you can imagine, having many individual sprites within a game—and having a separate file for each sprite, which is then loaded into the game—could be difficult to manage. To simplify sprite management and, more importantly, improve performance, it is common to store more than one sprite in a single image. Images that hold more than a single sprite are called sprite sheets.
The idea is that a single image contains a series of sprite images in the form of a grid. Each sprite can then accessed by using its column and row location within the larger image. Simple sprite sheets contain individual sprites, each with the same dimensions. This makes it easy to access a specific sprite on that sheet using its row and column location. For example, if we had a sprite sheet that contained sprites whose dimensions were all 40 pixels square, it would take a simple calculation to work out in pixels where a given sprite was using its row and column; for example:
x = column * 40
y = row * 40
Calculating these values for a sprite at column 3, row 2 would result in 120 for x and 80 for y. This calculation would give you the exact pixel location for the top-left corner of that sprite image. Figure 2.2 shows an example 4 × 4 sprite sheet with each sprite being 40 pixels square. The origin of this sprite sheet (that is, x = 0 and y = 0) is the top-left corner.
Figure 2.2 A simple 4 × 4 sprite sheet, containing 16 sprite images.
Note
Sprites don’t have to be square; they just are in this example. A sprite could easily be a rectangle that does not have the same width and height, as long as each sprite has the same width and height.
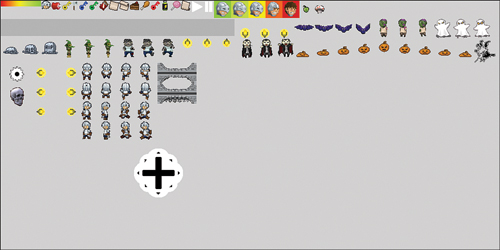
More complex sprite sheets, or packed sprite sheets (like the one shown in Figure 2.3), are images that contain a number of smaller sub-images, each of which could be another sprite sheet or image. As you’ll notice by looking at Figure 2.3, a packed sprite sheet can contain a number of different-sized sprites.
Figure 2.3 A packed sprite sheet can contain different-sized images; you’ll just need to be more careful when providing the coordinates for each image.
These more complex sprite sheets mean you cannot perform a fixed calculation as seen already to work out where inside the sprite sheet a specific sprite may be. Instead, you need to include a control file, which does two things:
• It defines the location of each sprite within the sprite sheet.
• It defines a key for each sprite in the sprite sheet (for example, the name of the sprite).
Control files can be either plain text or XML, and are often created when the sprite sheet is created. The data contained in the control sheet can be populated manually (that is, you sort out the coordinates for each sprite in the sprite sheet), or using a tool such as Zwoptex3, which can generate the sprite sheet and control file from separate images. When your game launches, the control file is parsed so the game knows where the sprites are located within the sprite sheet.
Note
For the purposes of this game, we will be using both simple and complex sprite sheets. We look at how to use applications that help to create sprite sheets when we cover sprite sheets in Chapter 6, “Sprite Sheets.”
Just to make things interesting, you will likely see a different term used for sprite sheets when dealing with OpenGL ES as a sprite sheet is often referred to as a texture atlas. OpenGL ES and textures are covered later in this chapter, but for now, it is good to know that a texture is basically another term for an image that is mapped onto a shape drawn using OpenGL ES. Just as a sprite sheet contains many sprite images, a texture atlas is an image that contains many smaller texture images.
Creating a sprite sheet is basically the same as creating a sprite. You can use your favorite graphics package to place individual sprites into a larger image. Care must be taken to ensure that each sprite occupies the correct location within the sprite sheet. Because this can be a complex exercise, using tools to help with their creation is a recommended approach.
Sprite sheets are also useful when it comes to animation, which we review next, as well as tile images used within tile maps (again, something we cover later in this chapter).
Animation
I find it very hard to create animated sprites, but as I mentioned earlier, this could easily be because I have no skill when it comes to drawing. Animation is perhaps one of the most important elements of a game. Even with a simple game like Tetris, things move—they animate. Having your hero move around the screen in a fixed pose like some kind of statue is not much fun to watch. It’s much more exciting to see your characters arms and legs moving as they walk around the screen. With most modern 3D games, the objects within the game (such as bad guys) are 3D models with many triangles used to represent a complex shape. Movement of these objects is achieved by applying mathematical transformations to the triangles making up the 3D object, causing them to move as required. Some games even employ a skeletal system allowing the animator to simply move the bones of a character and have their body follows as necessary.
Because Sir Lamorak’s Quest is a simple 2D game, we won’t need anything that complex. Instead, we’ll use a simple form of animation that’s very similar to stop-motion animation. This process shows one image (sprite) after another, with the new image (sprite) being in a slightly different position to the last. When pieced together (with code), the images appear to animate as one-image transitions to the next.
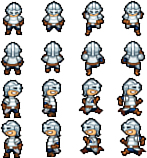
By now, you should start to see the benefits of having a sprite sheet. The sprite sheet defines the animation’s different frames; then we use code to load each sprite (or frame) into the animation and display the animated sprites onscreen. Figure 2.4 shows a simple sprite sheet containing sprites that can be used within an animation. The first line shows the character running down, the next line running up, then right, and finally left.
Note
The ability to easily refer to each sprite on a sprite sheet when defining each frame of the animation makes the sprite sheet a very powerful tool, and one we will be using when we create the Animation class in Chapter 7, “Animation.”
Figure 2.4 An animation sprite sheet.
We all want the best graphics available, but unless you or someone you know has the necessary graphics skills, you will need to use whatever you can find—legally, of course—to keep your project moving along. If you know you will be stuck with developer art, try to come up with a game that suits your drawing abilities. The game Parachute Panic4 is a great example of what a developer can do with limited drawing skills; it’s stick figure art at its best. Another great example is Neon Tango by Freeverse.5 These two games are proof that you can use simple geometric shapes instead of complex art and still create a cool game that’s fun to play.
Prototyping with Placeholders
Because I’m not the world’s greatest graphic artist, one trick I’ve learned is to use images or animations I find on the Internet as a placeholder while prototyping a game. If you can find some graphics to stand in while you’re developing the game, things can move ahead, and then you can swap out the graphics later. I’ve seen many projects stall and fail due to people getting hung up on the graphics.
Bitmap Fonts
All the graphics in Sir Lamorak’s Quest will be rendered with OpenGL. In fact, the iPhone uses OpenGL ES (ES stands for Embedded Systems), which is a subset of OpenGL for mobile devices. We cover OpenGL ES in more detail in the section, “Technology.”
Sadly, though, OpenGL ES doesn’t support the ability to render fonts to the screen. As a result, we’ll have to use bitmap fonts.
Bitmap fonts aren’t too different from sprites and sprite sheets. In fact, we use sprites and sprite sheets to support bitmap fonts. This will be covered in Chapter 8, “Bitmap Fonts.”
Because OpenGL ES lacks font support, you’ll have to define a font as a series of images. To do this, you’ll need to create a complex sprite sheet that contains an image for each character in the font. If we were doing this manually, it would be a real pain, but luckily, tools such as Hiero6 and bmfont7 make the process of turning a font into a sprite sheet really easy. More detail on Hiero can be found in the section, “Tools.”
AngelCode has created the bmfont tool, and it is this tool and its generated output that Hiero has been based. Although bmfont is much more feature-rich compared to Hiero, it is currently only available on the Windows platform. For this reason, I will be using the Java-based Hiero that will run on a Mac.
Tile Maps
Throughout this book, I have been referring to the 1980s, where my love of games and game programming started. Although technology has moved on greatly since then, those concepts are still valid to this day.
One of the issues with the old 8-bit (and even 16-bit) home computers and consoles was the availability of memory (RAM). When creating a platform-based game or role-playing game (RPG), it was not feasible to have large images of each level held in memory. It doesn’t make sense to hold a huge image in memory either, especially when the player is only able to see the portion of the image that fits into their display. For the iPhone and iPod devices pre the iPhone 4 and iPad, the maximum display size in landscape mode is 480 × 320 pixels. The iPhone 4 has a display size of 960 x 640 pixels in landscape mode and the iPad has 1024 x 768.
To overcome this issue, tile maps were created. A tile map is usually a two-dimensional grid. Each grid cell contains information about that location within the tile map, such as the ID of the image that should be rendered when that tile location is displayed, as well as information on the type of tile in that location. For example, is this a solid tile that the player cannot move through, such as a wall, or is it an object that could hurt the player should they walk into it?
This method of storing and building environments greatly reduces the amount of memory needed to store images and provides benefits later on when you need to know where a player actually is within a map. Although the iPhone is many times more powerful than the old 8-bit machines, memory is still a limited resource, and anything that can reduce the amount of memory being used is a good thing.
Tile maps are usually made up of two elements, as follows:
• A sprite sheet that contains separate tile images that can be used to build the environment.
• A map file that specifies which tile should be used in specific tile locations in the map, and so on. This can be done manually, but it becomes complex very quickly as your map gets bigger.
In Sir Lamorak’s Quest, our hero will be walking around inside a castle. Although we could create the necessary tile maps manually, it’s much easier to draw the tile maps visually, and that is exactly what we are going to do. We cover the creation of tile maps in Chapter 9, “Tile Maps.”
Most large games, such as Doom 3 or Quake Arena, have some kind of level editor, which allows the level designers to freely create new 3D levels. Although we don’t need anything that complex, I still want to be able to easily create and change the map used in Sir Lamorak’s Quest. Allowing your game to be data driven means that tuning and developing the game becomes a lot easier than when everything is hard coded.
One tool you can use for creating tile maps is Tiled.8 More information on this free open-source application can be found in the section, “Tools.”
Particle System
I’m sure you will have played many games where effects, such as smoke and fire, are used. There are two ways to create these effects. The first is to use sprite animation, and the second is to use a particle emitter. To use a sprite animation, you would need to create a number of frames for each phase of the effect and then play them back in sequence. This sprite animation technique was popularized by arcade games over 20 years ago and is still in use by game developers today.
However, today’s desktops and console games pack powerful CPUs and GPUs that we could only dream of back then. Even the iPhone packs more processor and graphical punch than early arcade games. Rather than employing 20-year-old technology, we can create a particle system to animate effects in real-time.
Don’t Panic
The particles we are talking about are not the same as those created within the Large Hadron Collider (LHC), which is rumored to be a harbinger of doom that will create a huge black hole that ends the world. We won’t be creating exotic particles and hurling them around our iPhones.
The term “particle system” refers to a technique that enables you to simulate certain organic behaviors, such as fire, smoke, moving water, rain, and snow. A particle system enables you to configure the number of particles you want to generate and how you would like them to move, including the following:
• Their speed
• Their lifespan
Even with these simple settings, it is possible to create some impressive effects with a particle system.
What Is a Particle?
You may be wondering what we mean when we say particle. Don’t think of it in terms of atoms or quarks like you would in a physics class. When it comes to game development, what we really mean when we say “particle” is “image”. Each “particle” is in fact an image that is rendered to the screen at the particle’s current location with the particle’s size and color. The image could be a simple circle, a star, or whatever you want, just as long as it gives you the effect you are looking for.
A particle system normally has a particle emitter. The emitter is responsible for generating new particles and tracking their progress through their life before removing them when they die. When a particle is created, the particle emitter sets some parameters, including the following:
• Speed: The speed at which the particle moves.
• Life span: The amount of time a particle will live for. Each cycle through the game loop causes the particles lifespan to reduce until it reaches 0. The particle is then removed from the update list.
• Direction: The direction that particle will move. This direction could change over time based on other settings such as gravity.
• Start color: The color the particle will have when it is created.
• End color: The color the particle should have when it reaches the end of its life cycle.
•Size: The size of the particle.
Although the particle emitter will ask each particle to update itself, it is the particle’s responsibility to track its own position, color, life span, and so on. This allows each particle to move independently of each other. Add to this a level of randomness, and it is possible to create very organic-looking effects, such as fog and smoke.
You’ll see how to create a particle system in Chapter 10, “The Particle Emitter.”
As with tile maps, it is possible to configure particle emitters manually, but this can take up a lot of time. It certainly speeds things up to use a visual editor for creating these effects, such as Particle Designer.9
Collision Detection
Collision detection is the ability to identify when one object collides with another. Sounds pretty simple, I know, but there’s a bit more to it.
As Sir Lamorak walks around the castle, we don’t really want him walking through walls or doors (well, not until he is dead and turns into yet another ghost who haunts the castle, which is not part of the game design). We also want to know when Sir Lamorak has been hit by a ghost or has walked over an energy item or that a ghost has been hit by Sir Lamorak’s mighty axe.
There are many ways to detect collisions. Some are simple and involve checks to see if the box inside which our player’s sprite is drawn intersects the bounding box of another object, such as a ghost or wall. Other techniques are much more complex, especially when you start to work with physics engines, which is beyond the scope this book. These collisions are not just a binary yes or no; they can provide you with information on exactly where the two objects collided, and so on.
Note
We won’t need a sophisticated collision detection system in Sir Lamorak’s Quest; simple collision detection will do. What technique you use in your own game really depends on what is needed.
Collision detection is made up of two key elements:
• Detection of the collision
• How an object, such as the player, should react to that collision
For example, when the player walks into a wall, the only consequence will be that the player won’t be able to move any further in the direction of the collision. However, if the player were to walk into a ghost, the reaction would be to remove the ghost from the game and reduce the player’s health by a specified number of units.
Artificial Intelligence (AI)
Artificial intelligence (AI) is what makes your game “smart.” The intent is not to create Skynet10 and cause our iPhones to become sentient and take over the planet. And although they are in some sense, we want the enemies in our game to have some kind of artificial intelligence. We don’t want our baddies to be so predictable that it’s no challenge to fool them, so the AI in Sir Lamorak’s Quest will control how the bad guys move around and how they decide to chase Sir Lamorak, as opposed to just moving around in some random way.
Note
AI really can make or break your game. Although we won’t introduce or use more complex AI methods, such as A* path finding, you’ll learn how to create a form of AI that makes the game more addictive to play.
Even when you’re not using clever algorithms and decision graphs, the simple rules about how something should move or interact is still a form of AI. This basic entity control should give you a good start on your road to creating the next world-dominating game bent on the destruction of the human race—or maybe just a racing game—it’s up to you.
Game Loop
The last term I’m going to run through is the game loop. This is an important part of any game and is responsible for making sure that your game performs all the right functions at the right time and in the right order. There are a number of core activities that a game loop must do, such as the following:
• Take input from the user.
• Update the state of the player based on the user’s input.
• Update the state of the other entities in the game, such as baddies.
• Check for collisions between entities.
• Render the game to the screen.
This is not all the items that need to be handled within a game loop, but it is an example of what needs to be done. The game loop is responsible for making sure that even when the player is not doing anything, the rest of the game is being updated. For example, the baddies are still moving around, ambient sounds still play, and so on.
Tip
You may read about game cycles, tick count, and so on, but they are all referring to the game loop or iteration through that loop.
At its most basic level, the game loop is exactly that—a loop—and functions are called within that loop for things that make the game tick. We will create our own game loop for Sir Lamorak’s Quest in Chapter 4, “The Game Loop,” but as we have been through so much and not seen a single line of code, I thought it might be helpful to put the basic game loop code here in Listing 2.1. The idea here is not for you to fully grasp what’s going on within that loop. My intent is to show you that a simple game loop can actually be very small.
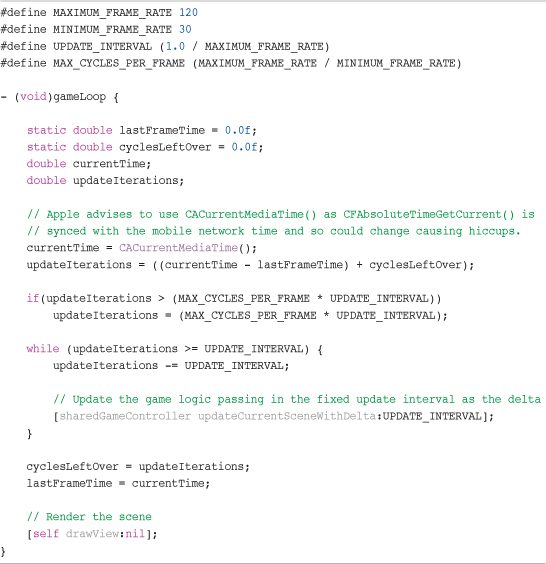
The loop shown in Listing 2.1 is an open loop, which means it runs at regular intervals using a timer external to the loop. The other type of game loop is called a tight loop. Once a tight loop starts, it continues to loop as fast as it can, running code within the loop over and over again. There are benefits and drawbacks to both methods, and the one you use will greatly depend on the type of game you are writing (more on this in Chapter 4).
The second function of the game loop is to make sure that the game runs at a constant speed. If you were to run a tight loop that just went as fast as it could, you would have a game in which objects would move around the screen faster on quick hardware and slower on slow hardware. This isn’t something you want to happen. You want to give the players of the game a consistent experience regardless of the hardware the game is running on.
For the iPhone, it is a little easier, as we are dealing with a limited number of device types:
• iPhone (first generation, or Gen1)
• iPhone 3G
• iPhone 3GS
• iPhone 4
• iPod Touch (first generation, or Gen1)
• iPod Touch (second generation, or Gen2)
• iPad
Although similar, each device is different. For example, the iPhone 4 is faster than the iPhone 3GS, which is faster than the iPhone 3G, and the Gen2 iPod Touch is significantly faster than the iPhone 3G. The game loop is where we can handle these differences.
At its simplest, the game loop measures the amount of time, normally in milliseconds, that passes between each loop. The amount of time between each loop is called the delta. This delta value is then passed to the functions that update the logic of the entities within the game and is used to calculate game elements, such as movement. For example, if you specify how far a ghost should move per millisecond, the ghost will only move that far regardless of the device’s speed. Sure, the movement will appear smoother on faster devices than slower ones, but the amount of movement, as well as the game play, will be at a consistent speed.
Technology
So far, this chapter has gone through the basic terminology you will come across throughout this book and as a game developer. This section talks about the technologies you’ll use to create the sample game, Sir Lamorak’s Quest.
Objective-C
As the name implies, Objective-C is an object-oriented superset of the C programming language. Because Objective-C is a superset of C, it shouldn’t take you long to learn Objective-C. If you have already have experience working with C or C++, you can continue to build iPhone games in those languages, but you’ll need to know a bit of Objective-C to make use of the Cocoa Touch API. The key difference between Objective-C and C is that Objective-C fully supports object-oriented programming techniques, such as the use of classes and their instantiation.
The code throughout this book uses Objective-C 2.0 with a little C thrown in where necessary.
Note
C and C++ have historically been the most popular languages for writing games. Although you can use other languages, such as Java or Python, for game development, those languages are not supported on the iPhone. You’ll have to stick to Objective-C, C, C++ or a mixture of these.
There are some great resources available for learning Objective-C. Apple itself has a number of great documents available that help you learn Objective-C such as “The Objective-C Language.”11 There are also great books available, such as the following:
• Cocoa Programming for Mac OS X, Third Edition, by Aaron Hillegass (Addison-Wesley, 2008).
• Learning Objective-C 2.0, by Robert Clair (Addison-Wesley, 2011).
• Programming in Objective-C 2.0, Second Edition, by Stephen G. Kochan (Addison-Wesley, 2008).
• Cocoa Design Patterns, by Erik M. Buck and Donald A. Yacktman (Addison-Wesley, 2009).
Cocoa Touch
Cocoa Touch is a set of object-oriented frameworks that provide a runtime environment for applications running on iOS. Cocoa Touch is an iPhone-specific framework that enables you to create touch-based user interface elements as well as access hardware-specific features of the iPhone, iPod touch and iPad, such as the accelerometer, gyroscope, camera, and the magnetometer.
You need to use Objective-C to access the Cocoa Touch API. This is why even if you want to develop your entire game in C or C++, there will also be small aspects of the game that are in Objective-C, so that you can gain access to Cocoa Touch-based functions, such as touch.
iOS 3.0 introduced some great features that provide access to the iPod functions on the iPhone, and these are all Cocoa Touch APIs. If you want to go deeper, though, and start to control the audio services at a lower level, you need to use C functions that the iOS SDK makes available to you, which can become a little trickier. We talk about this more in Chapter 11, “Sound.”
OpenGL ES
OpenGL ES is a lightweight version of OpenGL for embedded systems (that’s the ES), and is a software interface to the graphics hardware on your iOS device. OpenGL ES is a standard governed by the Khronos Group and implemented by graphics hardware manufacturers within their GPUs.
Note
There are currently two versions of OpenGL ES: 1.1 and 2.0. At the time of this writing, only the iPad, iPhone 3GS, iPhone 4 and iPod 3rd Gen support OpenGL ES 2.0; every other version of the iPhone and iPod Touch supports OpenGL ES 1.1. That said, the iPad, iPhone 4 and iPhone 3GS support both versions (1.1 and 2.0), so if you write your game on OpenGL ES 1.1, it will run on all the current iPhone, iPod Touch and iPad devices.
OpenGL has been around for a long time and has pretty much been the de-facto standard when it comes to software interfaces with graphics hardware. OpenGL is a huge API with around 700 different commands. On the other hand, OpenGL ES is a much smaller API that is really focused on performance. Within the full OpenGL standard, there are many ways of doing the same thing, but with OpenGL ES, they decided to only provide support for the fastest methods, which is important when you are running on a mobile device with limited memory, bandwidth, and CPU capabilities.
What OpenGL ES Can (And Can’t) Do
OpenGL ES on the iPhone provides you with a great interface to access the features of the GPU. This interface enables you to create objects in both 2D and 3D space and apply color, texture, and transformations to these objects. Because OpenGL ES uses the GPU instead of the CPU, the graphics rendering is hardware accelerated, which means it’s really fast. The GPU is capable of performing floating-point operations over 100 times faster than the CPU. It is a real number-crunching monster.
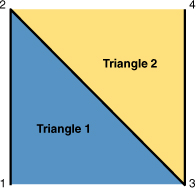
The objects themselves are made up of triangles. Mapping together different-sized triangles can make any shape you can think of, and this approach is taken by OpenGL ES. To define a shape, simply provide the points (known as vertices) for each point on the triangles, and then ask OpenGL ES to render those points to the screen. For example, you would use two triangles to create a square, as shown in Figure 2.5. There is, of course, more going on than meets the eye, but for the purposes of this book and our game, we’ll keep OpenGL as simple as possible.
Figure 2.5 Two triangles making up a square.
Once you have defined your shape using vertices, you can optionally define the color (or colors) along with a texture (image) you want to be applied. Applying a texture (image) to the shape is a technique known as texture mapping. Texture mapping enables you to basically glue an image onto a geometric shape you have created. Doing so then allows OpenGL ES to make sure that the image is rendered correctly based on the position of the polygon onto which it has been placed. For example, if you are working in 3D and you are looking at your polygon in perspective with it turned away from the viewer, the image that has been texture mapped onto the polygon will be rendered correctly to appear in perspective (see Figure 2.6). OpenGL ES takes care of this, so it’s not something you need to worry about.
Texture mapping is a large and complex subject with many different ways of doing things. When you start to create more complex games, it’s worth delving further into texture mapping using sources, such as OpenGL Programming Guide: The Official Guide to Learning OpenGL Versions 3.0 and 3.1, Seventh Edition (Addison-Wesley, 2009).
We are not going to be working in 3D, which makes our lives easier for now as we start using OpenGL ES. We are going to be working in 2D, however, with our objects being flat polygons onto which we will place a texture (image) that will represent an entity within our game, such as the player or a ghost.
When we cover the creation of the Image class in Chapter 5, we cover in more detail how you create your polygon and how you apply a texture to it.
Figure 2.6 A textured polygon in perspective.
OpenGL ES 1.1 vs. 2.0
I’ve mentioned that there are two different versions of OpenGL ES currently, and it’s worth going through the key difference between them. OpenGL ES 1.1 has what is called a fixed pipeline architecture, which means that the operations available are fixed. You provide data to OpenGL ES regarding vertex, color, material, lighting, and texture, and specific functions are then carried out using that data. You can change the data that is passed in, but you cannot change the functions themselves.
With OpenGL ES 2.0, you no longer have a fixed pipeline; instead, it has a shader pipeline. This means that instead of having the fixed functions into which you pass your data, you can write code to be executed inside OpenGL on the GPU in something called shader language. This code is compiled onto the GPU, and is then called whenever you need that function. This means you can pretty much do anything you like—you are not restricted to what is delivered out of the box with OpenGL ES, but perform any action you like on the data that you pass in.
On the up side, you are able to achieve some spectacular effects being able to control the functions that are performed on the GPU, and because these functions are being performed on the GPU, they are very quick. On the down side, it means there is more work to do because you have to create the functions you want to use. I expect to see more and more games taking advantage of OpenGL ES 2.0 now that it is supported on the iPhone 3GS, iPhone 4, and iPad, and over time, this will most likely be the way everyone goes. For our game and throughout this book, I will be using OpenGL ES 1.1, so as to get maximum compatibility with the currently available devices and also to keep things simple.
Note
Although a game written using OpenGL ES 1.1 will run on the iPad, iPhone 3GS and iPhone 4, a game written using OpenGL ES 2.0 will only work on the iPad, iPhone 3GS and iPhone 4. It is not possible to run these games on older hardware unless the game supports two rendering methods: one for OpenGL ES 1.1 and OpenGL ES 2.0. Creating different rendering methods within the same game and then deciding which should be used based on the hardware is a complex undertaking. Currently, most indie developers are sticking with a single OpenGL ES 1.1 render method.
iPhone GPUs
iPhones currently use two different Graphics Processing Units, as follows:
• PowerVR MBX
• PowerVR SGX
All iPhone devices prior to the iPhone 3GS used the PowerVR MBX chip. From the iPhone 3GS, they use the PowerVR SGX chip. This is where the difference in OpenGL ES support comes from. The MBX chip only supports the OpenGL ES 1.1, whereas the SGX chip supports both OpenGL ES 2.0 and emulates OpenGL ES 1.1.
A company called Imagination manufactures the PowerVR chips. Their website is a good source of technical information on their chips and they provide a number of resources for developers. The Imagination website for the PowerVR chips can be found at www.imgtec.com/powervr/powervr-technology.asp.
OpenAL
OpenAL stands for Open Audio Library. It is a cross-platform 3D audio API that is well-suited for use with games.
The concept behind OpenAL is very similar to that of OpenGL ES. OpenAL is a software interface to the sound hardware that enables you to create audio sources that can be positioned within and moved through 3D space. In order to hear the sounds being generated, a listener is required. There is a single listener that can also be configured, which defines where in OpenAL 3D space the listener is located and also which way it is facing. The listener is normally located at the same location as the player.
Based on this information, OpenAL will then play the sound to the listener using the appropriate volume and pitch. This allows OpenAL to provide a real sense of 3D sound around the player. If the sound source or listener is moving, OpenAL will even apply the Doppler effect, much as you get when you hear an emergency siren coming toward you and then moving away from you. For Sir Lamorak’s Quest, we are working in 2D, but that still allows us to play sounds around the player based in that 2D space. Having doors slam shut in the distance along with spooky sounds positioned around the player can add a lot of depth to the game.
There are many other items that can be configured within OpenAL, such as the distance model, which defines how quickly sound drops off as the listener moves away from the sound source among other things.
OpenAL enables us to play multiple sounds simultaneously. At a high level, you load audio data into a sound buffer and associate it with a sound source. Once that has been done, the sound in the sound buffer can then be played. The iPhone supports a total of 32 sound buffers, allowing you to play up to 32 sounds simultaneously.
OpenAL is covered in more detail in Chapter 11.
Tools
We have covered the terminology and technology, so now it’s time to look at the tools we’ll use to create Sir Lamorak’s Quest.
From a developer point of view, everything you need to develop using the iPhone SDK can be downloaded from the iPhone Dev Center (developer.apple.com/iphone), as shown in Figure 2.7. This section also covers other tools that are useful when developing games. These are not available directly from the Apple Developer websites, but I have included their locations on the Internet with their descriptions so you know where to get them.
Figure 2.7 Apple’s iPhone Dev Center.
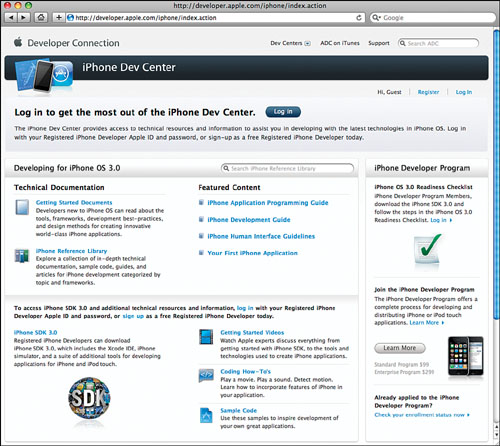
The iPhone development center provides a huge amount of information about developing on the iPhone platform, including documents on getting started, a reference library, and other useful guides. It is also from this site that you can register as an iPhone developer. This is important, as you need to be a registered iPhone developer before you can download the tools necessary to develop on the iPhone. You can register for free, which gives you access to the development tools you will need as well as documentation, and this is where most people start. It also enables you to have a play with the iPhone SDK before parting with any money, which is always nice.
If you plan to submit iPhone games or applications to the App Store, you need to sign up to the iPhone Developer Program. For this, you pay $99 per year for the Standard Program.
Once you have signed up and registered, you will then be able to download all the tools and examples you need to start rocking and rolling on the iPhone.
The iPhone SDK
The iPhone SDK (available at developer.apple.com/iphone) includes everything you need to start developing on the iPhone. It includes the following:
• Xcode and Interface Builder
• The iPhone Simulator
• Additional tools for debugging and performance, such as Shark and Instruments
Once you have downloaded and installed the iPhone SDK, you will have a full development environment allowing you to develop for the iPhone.
Xcode
Xcode (shown in Figure 2.8) is Apple’s integrated development environment (IDE) for developing Mac and iPhone applications. Xcode is a full-featured IDE and provides you with access to all the features you need to develop on the iPhone. These features include syntax highlighting, context-based access to documentation, and code sense, which automatically provides suggestions for the commands you are typing in. This can save you a significant amount of type when writing your code.
From within Xcode, you can create and manage your projects, debug your code, and also read Apple’s developer documentation, without ever having to leave Xcode. Having access to all of these things in one place makes Xcode a great development environment.
Interface Builder
Interface Builder is an Apple tool that enables you to visually design views to be used on the iPhone. This application is used heavily when developing native view-based applications on the iPhone. As with most things, being able to visually design your views and then wire it up to the code you write greatly speeds up the development process. Figure 2.9 shows what Interface Builder looks like.
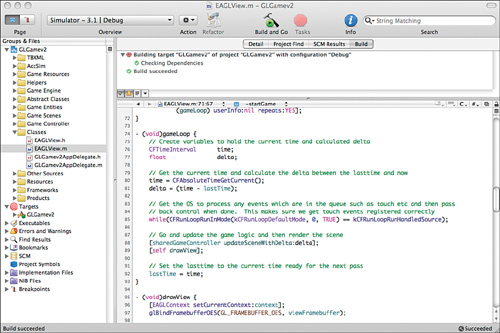
Figure 2.9 Using Interface Builder to create the Settings screen for Sir Lamorak’s Quest.
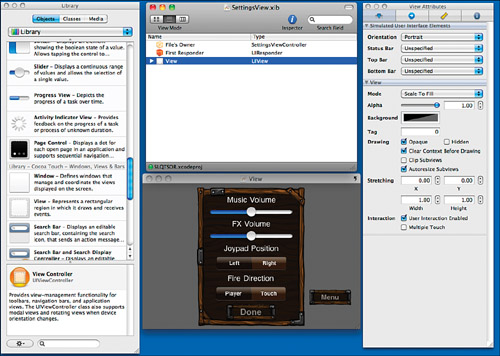
Although we will not be making much use of Interface Builder when building Sir Lamorak’s Quest, we will be using it to design items such as the settings screen, so it’s important to know that this tool exists.
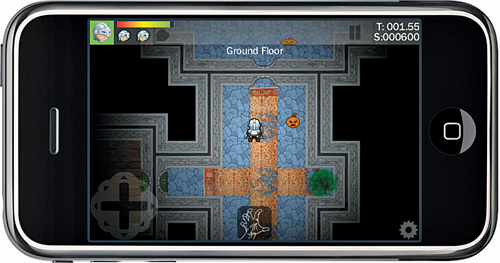
The iPhone Simulator
The iPhone Simulator (shown in Figure 2.10) is a small application within Xcode that lets you to test your application on your desktop, without installing the app on your iPhone. Although the iPhone Simulator is a great tool for most applications, there is no substitute for testing your games on a real device.
Figure 2.10 The iPhone simulator running Sir Lamorak’s Quest during testing.
Testing on the actual device is extremely important because the iPhone Simulator, which runs on your desktop, uses your Mac’s CPU, memory, and graphics card, which are quite different from the iPhone’s internal components. Let me reiterate that the differences between the iPhone Simulator and an actual device are substantial—game testing should really be done only on the device. Here’s why:
• Different CPUs—Because the iPhone Simulator uses your Mac’s CPU, the performance you see in the Simulator will be much different from what you experience on the device.
• More (or Less) RAM—Because you’re using your Mac for development, design, and a host of other things, you probably have at least 2 GB of RAM on your development system. This provides you with a great deal of memory for textures. The iPhone device only lets you use 24 MB of memory for textures, sounds, and program code, so you have to watch how much texture data you are loading and remember to release what you don’t need.
• Different graphics capabilities—Your Mac does not have the same graphics card as your iPhone, and the Simulator uses a software rasterizer for rendering to the screen.
• Different OpenGL/OpenGL ES support—Because the iPhone Simulator runs on your Mac, it supports the full implementation of OpenGL—not just OpenGL ES. Although this might sound like a good thing, it can be really problematic. You can end up with something that works great in the iPhone Simulator, but just crashes or runs slowly on the iPhone. All your real testing should be on the real device.
• Different device capabilities—The iPhone and iPod Touch use technologies such as core location (a GPS/cellular location), Bluetooth, wireless, accelerometer, and with the iPhone 3GS, iPhone 4, and iPad, a magnetometer. Sure, your Mac has Bluetooth and wireless, but those can’t be tested in the iPhone Simulator, nor can any game feature that relies on the accelerometer or magnetometer. If your game uses any device-specific technologies, you really should tether your iPhone and install and test the game there.
The bottom line here is that you should always test your game on a real device, and only rely on the iPhone Simulator for testing simple things, such as game preferences and prototyping your code. There really is nothing like the real thing.
Instruments
Instruments (shown in Figure 2.11) is great for tracking down things like memory leaks and identifying bottlenecks within your game. It is used to dynamically trace and profile your application when running on the iPhone Simulator or the iPhone device.
Figure 2.11 Instruments analyzes your application’s code to help you find memory leaks and provide information that could help your game run faster and more efficiently.

Instruments has a graphical interface that is much easier to interpret than other debugging and performance tools, such as the command line-based GDB. It takes a little while to master the information it provides, but once you get the hang of using Instruments, you’ll quickly wonder how you lived without it.
Shark
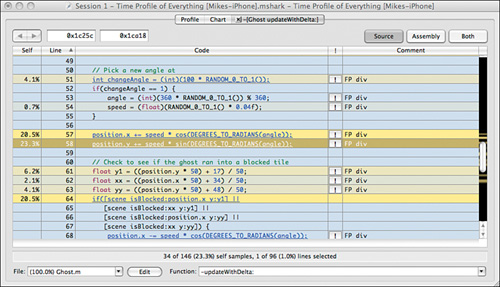
Shark is not some throwback to the Jaws movies, but it will attack your code in a good way. Shark is used to track down performance problems you may find in your code. Although you should always strive to get the best performance out of your applications, it is even more important with a game on a mobile device. You can be running a game quite happily, with everything working well, and then bang—suddenly the game starts chewing up a ton of memory or starts to act glitchy. The only way to really find out what’s wrong with your code is to run Shark and profile the code at a low level.
Interpreting the information Shark provides (as shown in Figure 2.12) can be difficult, but it normally points you to the problematic code fairly quickly. Once Shark isolates the problem, it gives you clues on where to start focusing your attention.
Figure 2.12 Shark, like Instruments, analyzes your application’s code and helps you locate code that could be hindering performance.
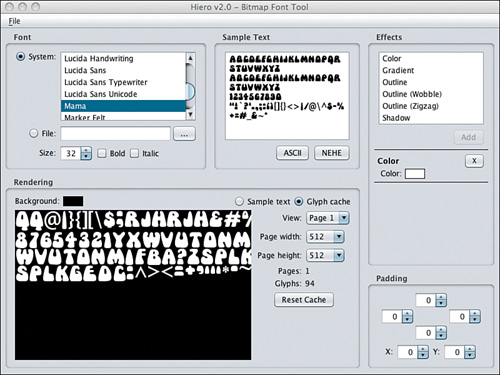
Hiero
As each character of the font could be a different size, we cannot use the simple sprite sheet approach. In addition to creating a sprite sheet of font characters, Hiero (shown in Figure 2.13) also creates a control file that defines where each character image is within that sprite sheet. When we create our bitmap font class in Chapter 8, we will be using the control file produced by Hiero to get access to the characters within the bitmap font sprite sheet.
Figure 2.13 Hiero can be used to create sprite sheets for bitmap fonts you want to use in your game.
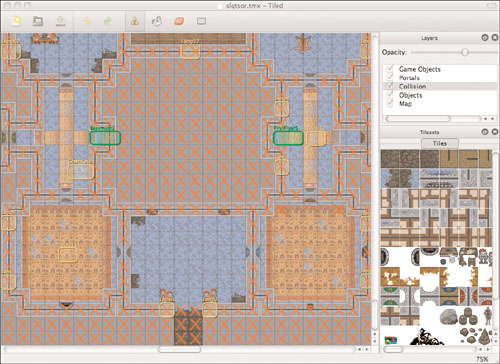
Tiled
This is a free open source tile map editor. Tiled (shown in Figure 2.14) enables you to load tile images and then graphically draw your map. You can have multiple layers of tiles and multiple tile sets, and you can even define parameters associated with either the entire map, levels, or tile images.
Tiled will be covered in more detail in Chapter 9 when we build the tile map class to use as the output from the Tiled application for the game.
Figure 2.14 Tiled tile map editor.
Summary
This chapter covered a lot of material, but it was important to provide you with some insight into the terminology, technology, and tools we are going to use to build Sir Lamorak’s Quest.
Before going any further, make sure you download and install the following applications on your system:
• The Xcode Tools (these get installed in a /Developer directory at the root level of your hard drive). This includes Instruments and Shark automatically.
• Hiero, the bitmap font creation tool (www.n4te.com/hiero/hiero.jnlp).
• Tiled, the tile map editor (mapeditor.org).
What About Instruments and Shark?
After you’ve installed the Xcode Tools, you can find Instruments in /Developer/Applications, and Shark in /Developer/Applications/Performance Tools.
You might want to drag all of these applications to your dock so they’re easier to get to during the development process.
With the information we have covered in this chapter, you will now be able to follow what is happening in the rest of this book. In the next chapter, we create a project in Xcode using the OpenGL ES project and take a detailed look at what the code does and why.