
6. Sprite Sheets
Chapter 5, “Image Rendering,” was large and covered a number of complex concepts. Having done all that hard work, and with the classes in place for representing and rendering images, we can move on to the other components needed in the game engine for Sir Lamorak’s Quest.
As the title suggests, this chapter is all about sprite sheets. If you remember from Chapter 2, “The Three Ts: Terminology, Technology, and Tools,” a sprite sheet is a large image that contains a number of smaller images.
There are two key benefits to using sprite sheet, as follows:
• You reduce the number of times you need to ask OpenGL ES to bind to a new texture, which helps with performance.
• You gain the ability to easily define and reuse image elements of the game, even in animations.
This chapter reviews the SpriteSheet and PackedSpriteSheet classes and shows how to extract specific images from within a larger image sprite sheet.
Introduction to Sprite Sheets
As mentioned in Chapter 2, there are two different types of sprite sheets, as follows:
• Basic, where all the images in the sprite sheet have the same dimensions.
• Complex, where the images in the sprite sheet could all have different dimensions.
For Sir Lamorak’s Quest, we are going to be using both kinds of sprite sheets. Although it is possible to merge both the simple and complex sprite sheet functionality into a single class, I have split them into two different classes to make things easier to understand. Basic sprite sheets are handled in a class called SpriteSheet, whereas the PackedSpriteSheet class handles complex sprite sheets.
Note
I use the term packed because you can place smaller sprite sheets within this larger sprite sheet, thus reducing the number of separate sprite sheets used in the game.
Another term for a sprite sheet is a texture atlas, but I will continue to use the old-school term of “sprite sheet” throughout this book.
Simple Sprite Sheet
The SpriteSheet class takes the image provided and chops it up into equally sized sub-images (sprites). The dimensions to be used when dividing up the sprite sheet will be provided when a new sprite sheet is instantiated. Information is also provided about any spacing that has been used within the provided sprite sheet image. Spacing is an important property within a sprite sheet. Without going into detail, when defining texture coordinates within an image for OpenGL ES, it is possible to sample a pixel beyond the edge of the texture you are defining. This can cause your textures to have an unwanted border that is made up of pixels from the image around the image defined with your texture coordinates. This is known as texture bleeding.
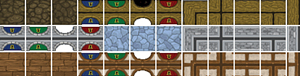
To reduce the risk of this happening, you can place a transparent border around each image within a sprite sheet. If OpenGL ES then goes beyond the edge of your texture, it will only sample a transparent pixel, and this should not interfere with the sprite you have defined. Zwoptex1 enable you to specify the number of pixels you would like to use as a border around your sprites. Figure 6.1 shows a simple sprite sheet image with single pixel border between each sub-image. If you are drawing non-square triangles, the spacing may need to be more than one pixel to help eliminate texture bleeding.
Figure 6.1 Sprite sheet with spacing between each sprite.
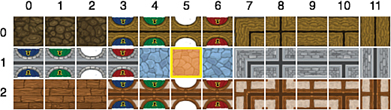
In terms of how we are going to access the sprites on a simple sprite sheet, we’re going to use its grid location. A simple sprite sheet makes a nice grid because all the images are the same size. This makes it easy to retrieve a sprite by providing its row and column number. Figure 6.2 shows a sprite sheet of twelve columns and three rows with the sprite at location {5, 1} highlighted.
Figure 6.2 Sprite sheet grid with location {5, 1} highlighted.
Complex Sprite Sheets
The PackedSpriteSheet class takes an image and the name of the control file. The control file is parsed to obtain the location and size of every sprite within the sprite sheet image.
The control file is the key difference between a basic (SpriteSheet) and complex (PackedSpriteSheet) sprite sheet. With the basic sprite sheet, you can work out where each sprite is by performing a simple calculation using its grid position. This is harder to do with a complex sprite sheet because the sprites can be different sizes and are often placed randomly throughout the image to make the best use of space.
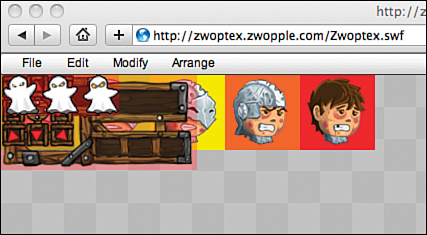
To help identify the coordinates of the sprites in a complex sprite sheet, the control file provides information on where each sprite is located inside the sprite sheet, along with its dimensions. The control file also gives each image a key, usually the name of the image file of the original sub-image, which then allows the PackedSpriteSheet class to reference each sprite. Figure 6.3 shows the complex sprite sheet that we use in Sir Lamorak’s Quest.
Figure 6.3 Complex sprite sheet from Sir Lamorak’s Quest.
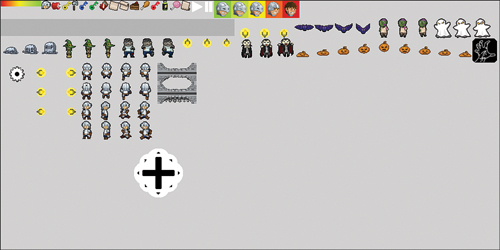
As you can see from Figure 6.3, a complex sprite sheet has many images that are all different sizes and shapes—thus the need for a control file to make sense of it all.
You could create your own control file for these files, providing the information on the pixel locations within the image and its dimensions, but to be honest, that is a really tedious job. Luckily for us, there are tools that can help.
The Zwoptex tool (mentioned earlier, and discussed in Chapter 2) is one such tool. It not only produces a PNG image of the generated sprite sheet, but it also creates the control file you need to identify the individual images within.
Zwoptex has a number of different algorithms that can help pack images, but it also enables you to move the images around, making it possible for you to pack as many images as possible into a single sheet. There are some good algorithms out there for optimizing the packing of variably sized images, but you’ll always get the best results doing this manually.
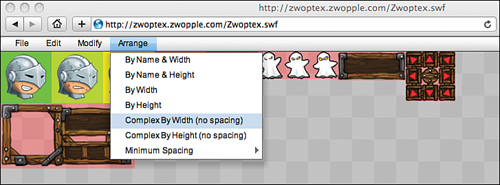
Figure 6.4 shows the flash version of Zwoptex editing the complex sprite sheet.
Figure 6.4 The Flash-based Zwoptex tool, used for editing a complex sprite sheet.

Zwoptex has three different outputs, as follows:
• A project file that stores your settings and images for a particular sprite sheet
• A PNG image of the sprite sheet
• A plist control file, which you can add to your game
The thing I like the most about Zwoptex is that it gave me the control file as a plist file. Although you can obviously handle raw XML if needed (or any other format, for that matter), having a plist file makes things so much easier (and I like to take the easy route whenever possible).
Now that you know what Zwoptex is, let’s show you how to use it.
Using Zwoptex
Using Zwoptex is really easy. Just point your browser to www.zwoptexapp.com/flashversion/. Once there, Zwoptex opens, and you can start creating your sprite sheet.
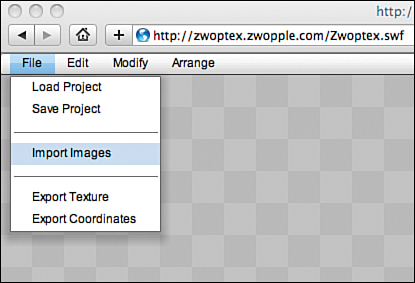
The first step is to import images. Start by going to the menu File > Import Images (see Figure 6.5), and you see an Open File panel for you to navigate to the file(s) you want to import.
Figure 6.5 Import images into the sprite sheet.
After you select your images, hit the Select button to load the images into Zwoptex. All the images you’ve selected will be placed at the top-left corner of the screen, as shown in Figure 6.6.
Figure 6.6 Zwoptex imports the images in the top-left corner of the canvas.
Now that you’ve placed the images in Zwoptex, there are a number of ways to arrange the sprites on the canvas. Under the Arrange menu, you will find different options for laying out the sprites. Figure 6.7 shows the sprites having been laid out using the Complex By Width (no spacing) option.
Figure 6.7 Sprite options menu and arranged sprites.
You can do this manually by clicking any sprite and moving it to the position you want. You can also use the Modify menu to change the size of the canvas to fit your needs.
By default, Zwoptex trims transparent edges from the imported images. This can be a problem, however, if the image you imported will be used as a simple sprite sheet. These images need to retain their original dimensions or the calculations used to define the position of each sprite will be incorrect.
Within the Modify menu is the option to Untrim Selected Images. This should be used to ensure that the images are returned to their original size. This is not necessary if the image won’t be used as a sprite sheet.
Having arranged your sprites, you can then export both the image (texture) and the control file (coordinates). There are two options within the File menu that let you do this: Export Texture and Export Coordinates. Both options enable you to select the location where you would like the file(s) saved.
That’s it! You now have a sprite sheet image file and its accompanying control file.
The SpriteSheet Class
Having looked at the basics of a sprite sheet, we can now look at our implementation of the SpriteSheet class. In Xcode, open the CH06_SLQTSOR project and look inside the Game Engine group. You will see a new group called Sprite Sheet, inside of which are the SpriteSheet classes header and implementation files.
Initialization
Inside the SpriteSheet.m file, you find the following class methods:
• spriteSheetForImageNamed:spriteSize:spacing:margin: imageFilter
• spriteSheetForImage:sheetKey:spriteSize:spacing:margin:
These methods are used to create new sprite sheets either from an image file or from an Image instance that has already been created. Notice that both of these are class methods. This means you don’t need an instance of the SpriteSheet class to access them. Having also defined a static NSDictionary within the class, you can use these class methods to access the dictionary information that only has a single instance.
The idea is that a sprite sheet is cached when it is created. Whenever a new sprite sheet that either uses the same image file or key is requested, a reference to the sprite sheet already created is returned. This helps with performance when you have a large number of entities that share the same sprite sheet (for example, the Door class, which you will see soon).
These class methods still make use of the standard initializer methods; they just cache the sprite sheet returned by these methods for later use. Listing 6.1 shows the spriteSheetForImageNamed:spriteSize:spacing:margin:imageFilter: method.
Listing 6.1 The spriteSheetForImageNamed:spriteSize:spacing:margin:imageFilter: Method

The first line in Listing 6.1 defines a static NSMutableDictionary. This creates a single instance of NSMutableDictionary that the class methods use to cache the sprite sheets. This dictionary has been defined at the class level, which means that only a single copy of this dictionary will exist, regardless of how many SpriteSheet instances are created. This provides us with a single cache of the sprite sheets.
The rest of the class simply checks to see if an entry already exists in the dictionary for an image name passed in (using spriteSheetForImageNamed). If the other method passes in a ready-made image, the sheetKey provided is used.
If no match is found, a new sprite sheet is created and added to the dictionary. Otherwise, the matching entry from the dictionary is passed back to the caller.
The initializer used when an image name is provided is shown in Listing 6.2.
Listing 6.2 SpriteSheet initWithImageNamed:spriteSize:spacing:margin:imageFilter Method
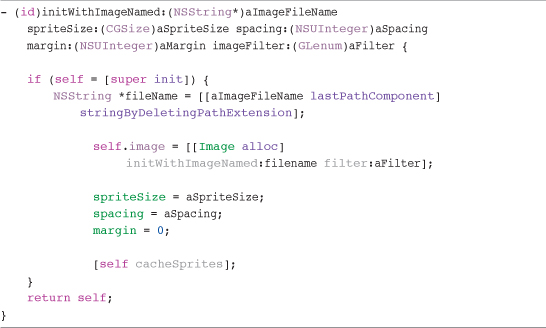
The start of the initializer method is standard, and we have seen it many times already. The first interesting action comes when we create an image instance of the image used as the sprite sheet.
We are using the Image class that we created in the last chapter, passing in the image name that has been provided along with the image filter.
Next, the sprite’s size, spacing, and margin are defined. At this point, we branch off and call a private method, called cacheSprites, which caches the information for each sprite in this sprite sheet. Calculating this information only once is important to help performance. This information should never change during the lifetime of a sprite sheet, so there is no need to calculate each time we request a particular sprite.
We examine the cacheSprites method in a moment; first, there is another initializer method to look at, as shown in Listing 6.3.
Listing 6.3 SpriteSheet initWithImage:spriteSize:spacing:margin Method
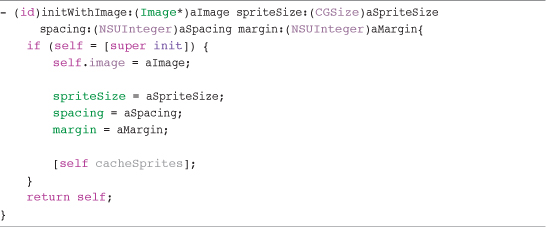
The previous initializer took the name of an image file and created the image as part of creating the sprite sheet. This second initializer takes an image that’s already been created. Not only is it useful to create a sprite sheet using an image instance that already exists, but it is also the method that’s used when we create a sprite sheet from an image held in a complex (or packed) sprite sheet.
The only difference in this initializer from the last is that we set the sprite sheet’s image to reference the Image instance that has been passed in. This method still calls the cacheSprites method, and that’s the next method we discuss.
The cacheSprites method (shown in Listing 6.4) is a private method, as we only use it internally in the SpriteSheet class.
Listing 6.4 SpriteSheet cacheSprites Method
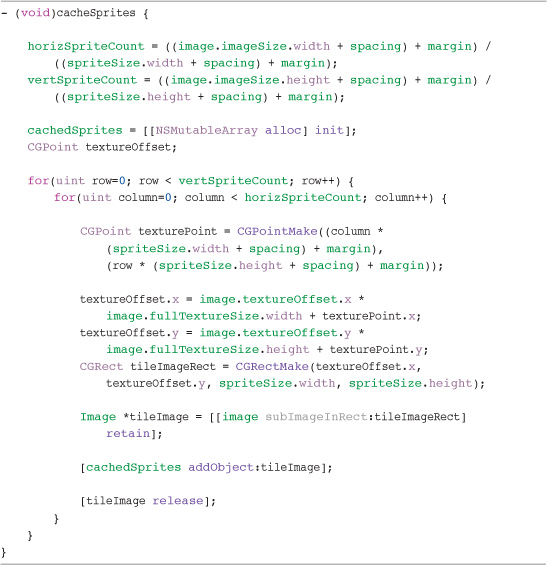
The first two calculations work out how many sprites there are in the sprite image, and a new NSMutableArray is created. This array holds Image instances created for each image in the sprite sheet. Again, creating the images at this stage and caching them improves performance. This is not an activity you want to be performing in the middle of game play.
With the array created, we then loop through each row and column, creating a new image for each sprite. We use the information we have about the sprite sheet, such as size, spacing, and margin, to calculate where within the sprite sheet image each sprite will be. With this information, we are now able to use the subImageInRect method of the Image class to create a new image that represents just the sub-image defined.
Retrieving Sprites
Having set up the sprites on the sprite sheet, the next key activity is to retrieve sprites. We have already discussed that one of the key tasks of the SpriteSheet class is to return an Image class instance configured to render a single sprite from the sprite sheet, based on the grid location of the sprite.
The spriteImageAtCoords: method shown in Listing 6.5 implements the core mechanism for being able to retrieve a sprite.
Listing 6.5 SpriteSheet spriteImageAtCoords: Method
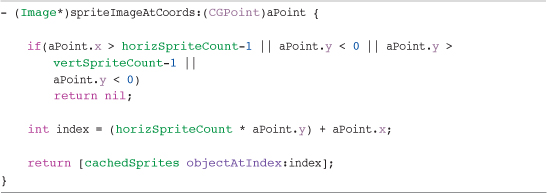
The first check we carry out in this class is on the coordinates that are being passed in. This method takes the coordinates for the sprite in a CGPoint variable. CGPoint has an x and y value that can be used to specify the grid coordinates in the sprite sheet.
When we know that the coordinates are within the sprite sheet, we use the coordinates of the sprite to calculate its location within the NSMutableArray. It’s then a simple task of retrieving the image from that index and passing it back to the caller
That’s it for this class. It’s not that long or complex, but it does provide an important building block within our game engine.
PackedSpriteSheet Class
As mentioned earlier, the PackedSpriteSheet class is responsible for dealing with complex sprite sheets. These sprite sheets contain many variably sized images to which we want to get access. This often includes other sprite sheets. This class can be found in the same group within the CH06_SLQTSOR project, as before.
Initialization
This class uses the same caching technique as the SpriteSheet class. There is, however, only one initializer, which is shown in Listing 6.6.
Listing 6.6 PackedSpriteSheet initWithImageNamed:controlFile:filter Method
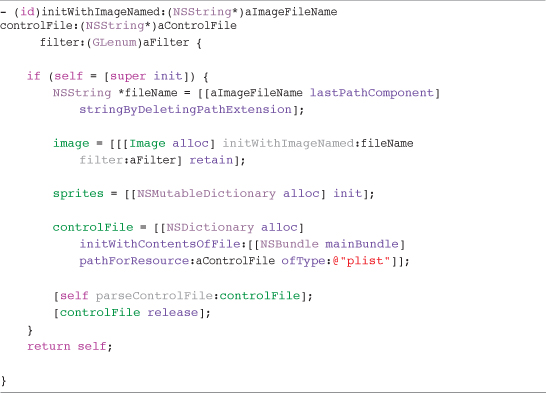
Once inside the initializer, we create a new Image instance from the details passed in and allocate an NSMutableDictionary instance called sprites that will hold the details of the sprites in our packed sprite sheet.
The last section of the initializer grabs the contents of the control file that were passed in and loads it into an NSDictionary called controlFile. It is always assumed that the type of file is a plist, so the file type is hard coded. After we have the controlFile dictionary populated, we then parse the information inside that dictionary using the private parseControlFile method shown in Listing 6.7.
Listing 6.7 PackedSpriteSheet parseControlFile: Method
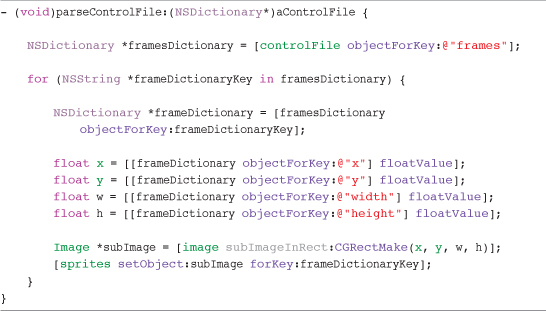
Parsing the Control File
The parseControlFile method creates a dictionary from all the frames objects within the dictionary we passed in. There are several objects inside the plist file, as follows:
• Texture, which holds the dimensions of the texture.
• Frames, which hold objects keyed on the image’s filename for each image in the sprite sheet.
An example of the plist file inside the Plist Editor can be seen in Figure 6.8.
Figure 6.8 Sprite sheet plist control file.
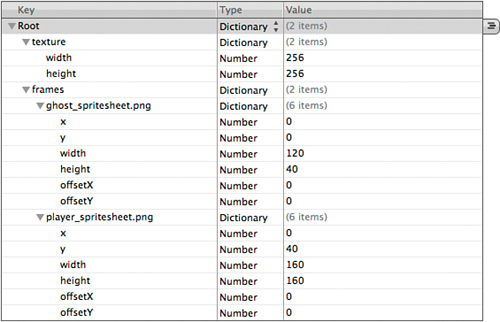
The details we want for the sprites are therefore held in the frame’s objects.
Now that we have a dictionary called frames, we loop through each of them, extracting the information we need. For each frame we find, we assign another NSDictionary that contains the objects for the key we are dealing with. Remember that the key is a string that contains the name of the original image file that was embedded into the larger sprite sheet. This makes it easy later on to reference the image we need.
Once we have the information for the frame, we then add a new object to our sprites dictionary. The key is the name of the image file we have just read from the control file, and the object is an Image instance.
Getting a sub-image from the full sprite sheet image creates the Image instance. Again, we are just making use of functionality we have already built.
This process is repeated for each image in the sprite sheet control file, and we end up with a dictionary that contains an image representing each image in our packed sprite sheet.
Retrieving a Sprite
Having all our sprites in a dictionary now makes retrieving a sprite from our PackedSpriteSheet very simple. This is done using the imageForKey method. Listing 6.8 shows this method.
Listing 6.8 PackedSpriteSheet imageForKey Method
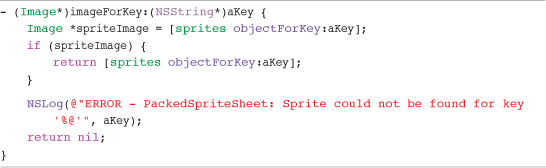
We pass an NSString into this method containing the key to the sprite’s dictionary that we created earlier. If you remember, the key is the filename of the image that was placed inside the packed sprite sheet. If an image is found for the key supplied, a reference to this image is returned. Otherwise, an error is logged, so we know that the sprite we wanted could not be found.
Note
Notice that, in some methods, an error is raised using NSLog. This is handy when debugging your game, but this is also a huge performance hog. To reduce the possibility of an NSLog message being called in the production code, it would be worth only generating the log messages when running in debug code.
Summary
In this chapter, we have reviewed the SpriteSheet and PackedSpriteSheet classes that continue to build out our game engine for Sir Lamorak’s Quest. These classes enable us to retrieve sub-images from within a specified image in a number of ways:
• SpriteSheet class: As a new Image instance based on a sprite’s grid location.
• PackedSpriteSheet class: As an Image reference based on a sprite’s key (for example, the sub-image’s original filename).
These important classes enable us to not only manage the number of textures we need, but also provide us with a mechanism for grabbing the images needed to create animation.
Classes such as Image, SpriteSheet, and PackedSpriteSheet are the building blocks that form the backbone of our game engine. Being comfortable with how they work and how they can be used enable you to get the most out of the game engine itself, as well as a clearer view of how to implement your own games. Although the game engine we are building for Sir Lamorak’s Quest is not suited to all types of games, it provides you with the basis for any future games you want to develop. This enables you to take the game engine in new directions as your needs and experience grow.
The next chapter covers animation. It’s not exactly Pixar Animation,2 but animation nonetheless.
Exercise
The example project that is provided with this chapter, CH06_SLQTSOR, displays three different images that have been taken from a single sprite sheet. These images are scaled, rotated, and colored using the features of the Image class covered in Chapter 5 to show that the Image instance returned is an entirely separate image in its own right.
The current project is using a couple of sprite sheets from Sir Lamorak’s Quest that have been placed inside a complex sprite sheet.
Using this project as a guide, why not try to create your own basic sprite sheet or download one from the Internet? Once you have your sprite sheet, create a complex sprite sheet using Zwoptex and then render your sprites to the screen.
Here are the steps you need to follow:
- Decide what fancy sprites you want to create.
- Work out the dimensions each sprite is going to be (for example, 40×40 or 50×80) and any spacing you want to use.
- Open up your favorite graphics package and draw your sprites, remembering to keep each sprite in a square that has the dimensions you decided.
- Export your sprite sheet as a PNG file.
- Open up the Zwoptex link (www.zwoptexapp.com/flashversion/), and add the sprite sheets that are included in the project along with your own.
- Export the texture and coordinates from Zwoptex.
- Add the two files you have just generated to the Xcode project. This can be done by right-clicking the Images group inside the Game Resources group and selecting Add > Add Existing File. Inside the panel that pops up, navigate to the file and select it. You should also select the Copy option to make sure the files are copied to the project folder.
- Finally, follow the code example in the current project to import and start using your sprite sheet.
- Once you are rendering your sprites, try to apply some image functions, such as scaling, rotation, and color.