
7. Animation
We’re starting to add all the core classes to our game engine. We can now render an image using the Image class and apply different functions to it, such as scale, rotation, and color. In Chapter 6, “Sprite Sheets,” we looked at the SpriteSheet class that enables us to store multiple images that share the same dimensions in a single image and then retrieve a sub-image (sprite) using its grid location within that larger image. We also reviewed the PackedSpriteSheet class, which enables us to handle a sprite sheet that is made up of images that have different sizes and dimensions.
In this chapter, we build on the Image, SpriteSheet, and PackedSpriteSheet classes we now have and create an Animation class. This class enables you to string together multiple images with a delay between each, allowing us to create animation.
Animation is an important and fun side to games. There are game styles for which animation is not really needed, but to be honest, most interesting games have some kind of animation.
We all know how Apple uses animation within Mac OS X and the iOS to improve usability; this can also be done in games. Using animation to attract a player’s attention when there is a lot going on can be really useful, such as flashing an icon or player sprite. It also means you have to think about the animation you are going to use. Just because you can animate it, doesn’t mean you should. Too much animation can overload the player and actually harm the player’s experience.
Animation Chapter Project
Open, build, and run the CH07_SLQTSOR project inside Xcode.
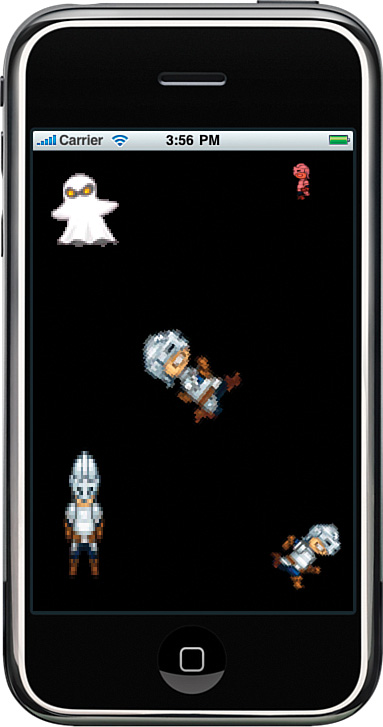
When the project runs, you see a number of images rendered to the screen, as shown in Figure 7.1.
You will recognize some of the images from those seen in the Chapter 6 project. What’s new in this project are the animated sprites in the top-left and bottom-right corners of the screen. The project accompanying this chapter uses both the PackedSpriteSheet and SpriteSheet classes and creates a couple of animations from the images in those sprite sheets.
Figure 7.1 iPhone simulator running the CH07_SLQTSOR project.
This chapter runs through the requirements for the Animation class and then reviews the implementation we are using for Sir Lamorak’s Quest.
Introduction to Animation
Let’s do some thinking about what it is our Animation class is going to need to do. There is no doubt that we could make the animation class very sophisticated indeed, but based on the game design we discussed in Chapter 1, “Game Design,” we don’t need to get carried away.
Next are the different features that need to exist within our Animation class so we can implement our game design.
Frames
First, we need to be able to create an instance of the Animation class and then add frames to it. A frame would be a single Image instance that represents one frame of the animation.
Along with the image, a delay would also be associated with a frame. The delay would specify how long that frame should appear on screen in seconds. We could have a single delay value that is used for all frames of the animation, but that is too restrictive. We may have animation where we want certain frames to appear on the screen longer than others. Having a delay associated with each frame will allow us to do that.
State
As with most things inside a game, our animation will need to manage its state. We don’t need anything complex, but we need to be able to identify if the animation is running or is stopped.
Type
As well as defining the frames and the state of our animation, we will also want to define the type of animation. The type will define if the animation is going to run in one of three ways, as follows:
• Repeating: Repeating animations reach the end of the defined frames and then start again back at the beginning.
• Ping-Pong: Ping-pong has nothing to do with small white balls and paddles. It does, however, describe an animation characteristic. When it reaches the end, it runs backward to the beginning and then forward again.
• Once: As the name suggests, this type causes the animation to run once and then stop.
Direction
This enables us to identify which direction the animation is currently running. This may not be useful when using a repeating animation, but when using a ping-pong animation, it can be useful to know which direction the animation is running.
Bounce Frame
This is something introduced to help reduce the complexity of some animations. Our hero, Sir Lamorak, is going to have a number of different frames within his animation. Figure 7.2 shows the animation frames for Sir Lamorak running to the right.
Figure 7.2 Sir Lamorak’s animation frames.
![]()
Notice that the first frame of the animation shows Sir Lamorak standing still. This is what we would use when he is not moving, of course. The other three frames are played in order to represent him running to the right.
When we come to develop the class that controls our hero, it would be handy to have a single animation instance that handles him running right and also standing still. To keep this simple, the concept of a bounce frame was introduced. This is a simple property that defines a frame in the animation that should cause the animation to bounce, or run in the opposite direction without that frame being drawn.
As we see later in Chapter 14, “Game Objects and Entities,” we will be able to have a single animation instance for running right and also be able to render the standing still frame when the player is not moving using frames from a single Animation instance.
Animation Class
Because we have looked at the key features we need to cover with the Animation class, we now look at how this is implemented within the Animation class.
If you open the CH07_SLQTSOR project, you see a new group within the Game Engine group called Animation. This group contains the Animation class’s .h and .m files. Open the Animation.m file now.
Initialization
As with the previous chapters, we start by looking at how you initialize an instance of the Animation class. For this class, we are simply overriding the init method; we are not taking any other parameters. Listing 7.1 shows the complete initializer method for the Animation.m class.
Listing 7.1 Animation init Method
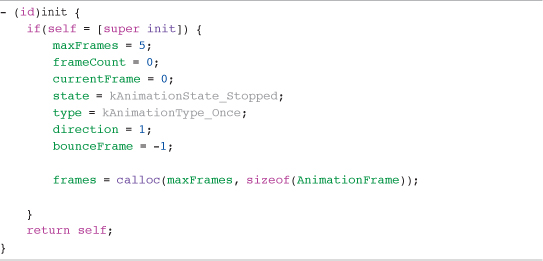
You can see that the initializer method is not that big. The key function being performed, other than setting default values for the classes’ properties, is setting up the storage for the frames that are going to be loaded into the instance. You’ll also notice that the method is using constants, such as kAnimationType_Once, that are defined in the Animation.h file.
By default, we are setting maxFrames to 5. This causes the frames array to be allocated with enough space to store five frames of animation. You may be wondering why we are setting the maxFrames to five when we may need more frames than that. This is just the default value for the Aniamtion class. We will see in the next method that deals with adding frames how we extend the storage to hold more frames as necessary. Five is not a bad number to start off with and helps reduce the amount of wasted space we have assigned but are not using.
If you know you are going to always have animations with more than five frames, you can up the maxFrames value in here to help reduce the number of storage extensions that need to be done.
Notice that as part of the calloc command, we are getting the size of a structure called AnimationFrame. This has been defined inside the structures.h file in the Global Headers group of the project:
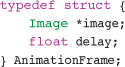
The structure is actually very simple and just contains a pointer to an Image instance and a float that represents the delay to be used for that frame. The rest of the initializer is simply setting the default values of the class.
Note
We are using a C structure to store the frame information for performance reasons. Although we could have used an NSArray to store information about frames, animation is updated frequently during the game loop, and we want to use a method that has as little overhead as possible.
After a new Animation instance has been created, we can add animation frames to it.
Adding Frames
To add a frame of animation, we have the addFrameWithImage:delay method shown in Listing 7.2. This method is responsible, as you would expect from the name, for adding frames to the animation instance. The first check that is carried out is making sure we are not adding more frames than we have allocated storage for in the frames array. Trying to put more data into an array than we have allocated storage for is a bad idea and has unpredictable results.
Earlier, you saw that we set the maxFrames property to five. It is inside this check that we are adding more space to the frames array if it’s necessary.
Listing 7.2 The addFrameWithImage:delay: Method
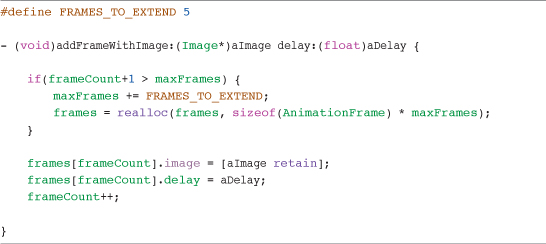
Once the check is complete and we know we have enough storage for a new frame, we start creating a frame, setting its properties, and incrementing the frame count.
Animation Updates
Having created a new Animation instance and loaded it with frames, we need a mechanism that enables us to move through those frames. In Chapter 3, “The Journey Begins,” we discussed how we should break up the update and render elements of the loop. This means that for any entity in the game that needs to be updated, it will be asked to update itself from within the update element of the game loop.
We are going to model any class that can both update and render using this concept. Implementing two specific methods inside classes that can update and render themselves will do this:
• updateWithDelta
• render
The updateWithDelta method is called from inside the game loop’s update routine. This method is passed the delta value from the game loop, and this value can then be used when performing time-based calculations. For our animation, this is going to be important because we are defining how long each frame should be shown for.
The render method is, as you would expect, responsible for actually rendering the entity. This method will not perform any actions on the entity’s properties or state, as this is handled inside the update method. There are also convenience methods for rendering, such as renderCenteredAtPoint, but these are still just responsible for rendering the entity.
So, inside the Animation.m file, you see a method called updateWithDelta:, shown in Listing 7.3.
Listing 7.3 The updateWithDelta: Method
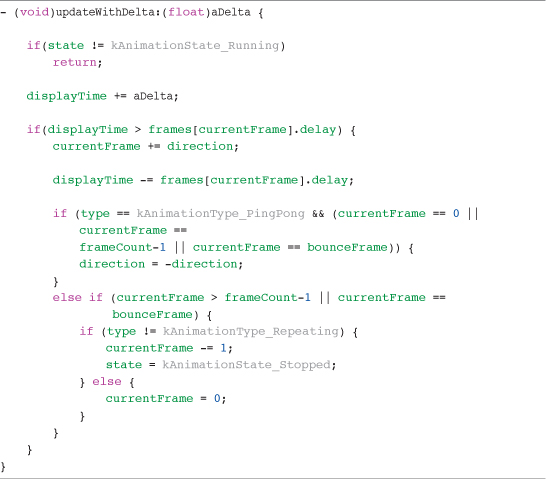
The first check is on the state of the animation. If it is not running, there is no need to update its state and we can just leave the method.
Note
kAnimationState_Running and kAnimationState_Stopped form an enum that has been configured in the Animation.h file. State is a simple integer, so creating an enum enables us to use a friendlier name for the states of the animation. There is also an enum configured in the header for animation types as well.
Next, we increment the displayTime variable. This variable is tracking how much time has passed since the last update and enables us to know when to move to the next frame.
Knowing that we should move to the next frame, we increment the currentFrame based on the direction variable and reset the displayTime to the difference between displayTime and the frames delay. This means the correct frame is shown if the game slows down, causing the displayTime value to be larger, as frames may need to be skipped. The direction variable stores either 1 for moving forward or -1 for moving backward through the frames.
Having incremented the frame, we can update the animation based on its configured type.
If the animation type is kAnimationType_PingPong and the currentFrame is either equal to 0, the number of frames in the animation, or to the configured bounceFrame, the direction of animation is reversed.
If the animation is not of type kAnimationType_PingPong and currentFrame, it has either passed the last frame of the animation or is equal to the configured bounceFrame. If this is the case, the currentFrame is set to 0 being the start of the animation.
Last of all, we check to see if the type is kAnimationType_Repeating. If not, it must be kAnimationType_Once and the animation state is set to kAnimationState_Stopped.
That is the complete update method. It’s a simple method, but it provides us with all the functionality we described at the start of this chapter for our animation class. Now we can move onto how we then render the animation.
Animation Rendering
Having dealt with updating the animation, we can now look at how we render the currentFrame. This is actually simple, as we make use of the render methods provided by Image class. All we need to do is provide some convenience methods that give us access to the different render methods in the Image class. Listing 7.4 shows the render methods inside the Animation.m file. These are convenience methods for rendering an animation to the screen.
Listing 7.4 The Render Methods within Animation.m
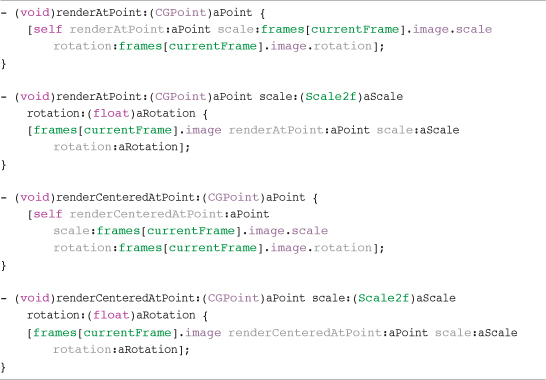
You can see that we are grabbing the current frame from the frames array using the currentFrame as the index. With that, we are then able to access the image property and from there call the necessary method on that image.
As I’ve said before, we are just continuing to build on the previous classes we have created, using that functionality from within the new classes. Clearly understanding what class is responsible for what function helps to simplify the process of adding more functionality later on.
Finishing Things Off
The last few methods we look at are some getters and setters and the class’s dealloc method.
Some of the functions we may want to support need a little more effort than just setting a property. If we look at how we set either the rotationPoint or actual rotation for an animation, we see that it does involve more than just setting a property.
Our images do accept a point of rotation and a rotation amount, but our animation is made up of a number of images. For this reason, when setting the rotationPoint or rotation for an animation, we need to set these properties for each image that makes up the animation. This could be done manually, of course, by setting the image property for a specific frame, but it’s useful to be able to set that value for all frames, and this is what our setters are doing:
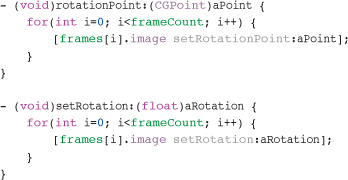
We are simply looping through all the frames in the animation and setting the necessary properties for the image associated with that frame.
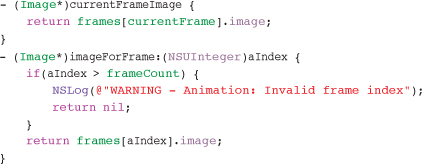
A couple of other convenience getters enable us to get the image for the current frame or the image for the specified frame:
Organic Growth
Not all the methods in the classes we have been through have existed from day one. I personally have found that as I develop a game, I come across handy methods that help to simplify the API to the game engine and keep the game code cleaner. I always consider if a method I am adding to the game content should be placed into the game engine code. If it is something I could reuse across classes, I usually try to identify the right class for it to live in and add it.
Adding these items to classes is not always a simple change either. There are times when you find that adding a method to a class requires other changes to that class to be made for it to still be logical. Don’t be afraid to make these changes. Experience has shown me in all aspects of programming, and maybe even more so in games, that adding hacks here and there to just make things work will usually not turn out favorably for you in the end.
I have spent many hours trying to debug horrible issues that end up resulting from a hack I had introduced to get a quick fix. I normally find that I end up spending more time debugging these than I would have spent implementing the change fully from the start.
Much like everyone else, I’m always after instant gratification, and a quick hack normally hits the spot. But you must remember that in the end, you typically will live to regret it.
The last method we need to discuss is the dealloc method. We haven’t really been looking at this method much, but it’s extremely important. Managing memory on the iPhone, in general, is something to spend time on. Because we have a limited amount of resources, and as there is no garbage collection1 to help us out, we need to think about memory all the time. How can we reduce how much we need, and how can we make sure we give back what we have taken?
Note
The Objective-C 2.0 documentation from Apple does talk about garbage collection, but this is not available in iOS.
Unlike a lot of classes where you simply release the objects you have allocated in the dealloc method, the Animation class requires us to free memory we have allocated to structures.
As we added frames of animation, we were allocating memory for our AnimationFrame structure. To make sure we give this all back when the Animation instance is released, we need to loop through all the frames in our animation, freeing memory as we go:
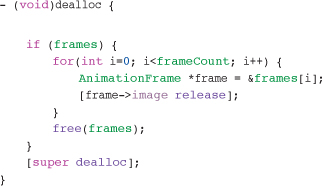
After we have freed the memory for each frame, we then finish off by freeing the memory allocated to the frames array that held our animation frames.
Summary
The Animation class is a relatively simple class to implement. However, even though it is simple, it provides a key element to our game engine. Being able to generate animation from multiple images is a tried and tested approach to animation within 2D games.
The animation that you create could be for any use really. You don’t have to limit animation to game characters or the player; you could also have animation on buttons and other GUI elements. Having a GUI element animate when the user touches it just gives them some feedback and acknowledgment of the action they have performed.
Clever use of animation can really make a game. Even a simple game can look impressive with the right mix of animation within the GUI and game itself.
The next chapter introduces another important element to our game engine. We now have all the game engine components we need to render images to the screen and handle sprite sheets and animation. The next chapter deals with rendering text to the screen.
Being able to render text to the screen is important and not something OpenGL ES provides for us, so Chapter 8, “Bitmap Fonts,” runs through a well-used technique for being able to render dynamic text.
Exercise
If you have opened and run this chapter’s project called CH07_SLQTSOR, you have seen how we built on the Chapter 6 project and added some animation elements.
If you completed the exercise in Chapter 6, you have created your own sprite sheet and rendered it to the screen. Why not use that sprite sheet to try out the new Animation class? Even if your sprite sheet is not animated, you could still cycle through the sprites to get the hang of how to use the Animation class.
You could also search the Internet and try to find some animated sprites you could use.
Once you have your own sprites in the project, try out the different animation types, as follows:
• kAnimationType_Repeating
• kAnimationType_Pingpong
• kAnimationType_Once
You can also try applying effects to your animation, such as scaling and rotating the images you have inside your animation. You will see that this has been done inside the Chapter 7 project. Simply applying a rotation, rotation point, color, or scale to the sprite sheet image you are going to use causes each image extracted from that sheet to have those properties.