
8. Bitmap Fonts
Most games provide the player with important information during game play using text. It’s important to be able to provide players with information such as their score, health, and time, as well as messages for the players.
The iPhone SDK provides great features to render very attractive text to the screen. This is used by applications that use the UIKit components available on the iPhone. If you were developing a game using just UIKit, Quartz, and Core Animation, you could use these capabilities to easily select the font, size, and color of the text you want to display.
When using OpenGL ES to render the game scene, displaying text is a little more challenging. There are no features built into the OpenGL ES API to render text. As you have already seen, OpenGL ES simply deals in triangles, points, and lines. It has no concept of fonts or the characters that make up a font.
For this reason, we need to use a concept that has been around as long as computer games themselves. This concept is called bitmap fonts. Bitmap fonts consist of a complex sprite sheet that contains a sub-image for each character needed to render a font. To display text, you identify the characters that are included in the text you want to render and then render the image for each character in that text to the screen.
This chapter covers the creation of bitmap fonts and also the BitmapFont class we are using in Sir Lamorak’s Quest.
Bitmap Font Project
Open and run the CH08_SLQTSOR project that comes with this chapter. As with previous chapters, this chapter continues to build on the work we have done before. This project includes the BitmapFont class that can be found within the Bitmap Font group inside the Game Engine group.
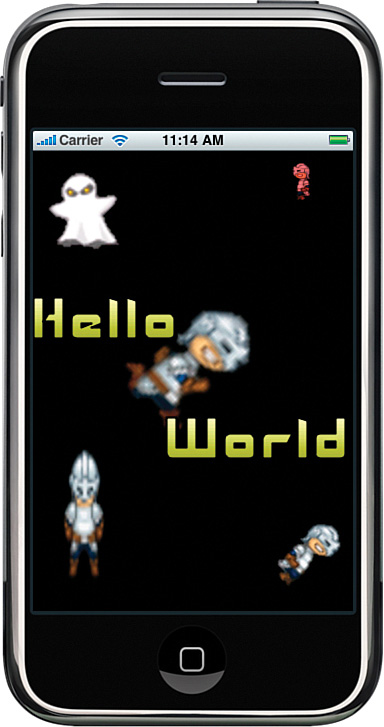
Figure 8.1 shows a screenshot of this project running.
You will recognize the images from Chapter 7, “Animation,” but also notice the colorful text in the middle of the screen. Being able to render all kinds of different fonts in different sizes and colors is what the BitmapFont class is all about. By the end of this chapter, you will have all the tools and knowledge necessary to take a font and use it within your game.
Figure 8.1 CH08_SLQTSOR project running on the iPhone simulator.
Introduction to Bitmap Fonts
As mentioned earlier, bitmap fonts enable you to render text to the screen using OpenGL ES. Even before OpenGL ES, developers were using the concept of bitmap fonts to render text to the screen.
Back in the 1980s, the 8-bit home computers and consoles were able to render only very basic fonts to the screen using built-in functions. To enable games developers to use larger, more interesting, and even colorful fonts, they came up with the concept of bitmap fonts.
Each character in a bitmap font is represented by an image. To render text to the screen, each character in the text message has its associated image rendered to the screen. This sounds complicated, but it is not that difficult to implement.
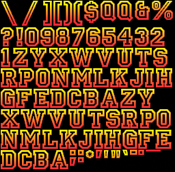
For the purposes of this book, we can think of bitmap fonts as complex sprite sheets (that is, a single image that contains smaller sub-images representing the different characters in our font). Figure 8.2 shows a bitmap font sprite sheet generated using the Hiero1 application.
Figure 8.2 Bitmap font sprite sheet.
You may be wondering if we could use the PackedSpriteSheet class covered in Chapter 6, “Sprite Sheets”—unfortunately, the answer is no. The PackedSpriteSheet class was designed specifically to parse the sprite sheet control file generated by the Zwoptex application. Because the bitmap font image is also going to be a complex sprite sheet, it too needs a control file. The problem we have is that the tool we are going to use to generate our bitmap font sprite sheets generates the corresponding control file in a different format to Zwoptex.
Although it’s not impossible to implement an extra parser in the PackedSpriteSheet class, the way we are going to parse and then render our bitmap font lends itself to be a stand-alone class.
It’s also worth mentioning that you don’t have to use bitmap fonts for ALL text you want to render to the screen. It is perfectly possible to create UILabel instances and add those to your EAGLView and use them to render text to the screen. This is a simple task, and it does save a lot of time. That said, you may find the fonts and capabilities available with UIKit limiting, so understanding how to use bitmap fonts is still a good idea.
Creating the Bitmap Font Sprite Sheet
Having mentioned that we are going to be using a tool to generate our bitmap font sprite sheet, let’s look at how that is done. As with the complex sprite sheets, there is nothing stopping us from generating our own sprite sheet image and control file; it’s just tedious and difficult to get it right.
To make things easier, we are going to use a free Java application called Hiero (n4te.com/hiero/hiero.jnlp). You may remember that we touched on this tool briefly in Chapter 2, “The Three Ts: Terminology, Technology, and Tools.”
Note
There is also a Windows-based application called BMFont (www.angelcode.com/products/bmfont) that can create bitmap fonts from TrueType fonts. This application, like Hiero, generates both an image and control file. Although this application runs only under Windows, it does provide more functionality than Hiero; if you are able to run it, it’s worth checking it out.
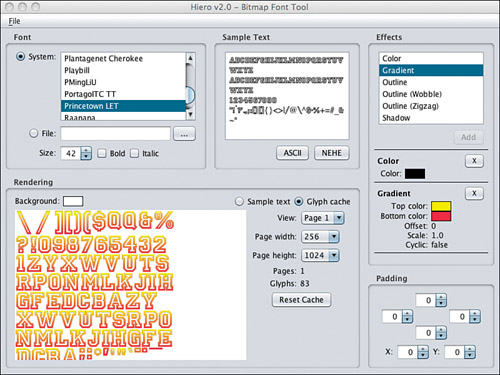
As described, Hiero enables you to take a TrueType font and generate a sprite sheet of the font’s characters and the control file needed to process the sprite sheet. Figure 8.2 shows the Hiero GUI as seen when creating the bitmap font, shown previously in Figure 8.1.
The first step in creating a bitmap font is to start the Hiero app by visiting n4te.com/hiero/hiero.jnlp. After Hiero has opened, you see the GUI shown in Figure 8.3. You are now able to select either a system font that’s shown in the top-left corner of the interface, or select a font file that you have downloaded from the Internet.
After you choose your font, you can then set the size of the font as well as details of how it is going to be placed within a sprite sheet.
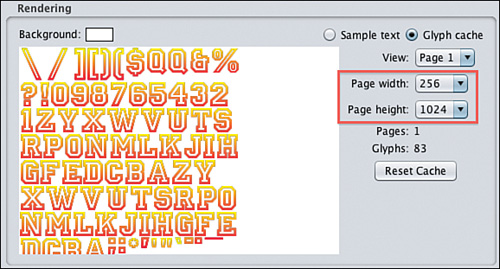
To configure the size of the sprite sheet, select the width and the height to be used inside the rendering panel, shown in Figure 8.4.
Figure 8.4 Setting texture width and height in Hiero.
Note
The maximum texture size that the iPhone 3G and all preceeding iPhone devices will handle is 1024×1024. It is important to make sure you do not exceed this size. If you do, the Texture2D class shrinks the texture by 50 percent to make it fit into the 1024×1024 limits. This causes the control file values that are also generated for the font to be incorrect, and you will get unknown results. From the iPhone 3GS onwards, the maximum texture size increased to 2048×2048.
You can also apply effects to the font as well, such as shadows, gradients, and outlines. Figure 8.5 shows the Effects panel in Hiero.
Figure 8.5 Effects panel in Hiero GUI.
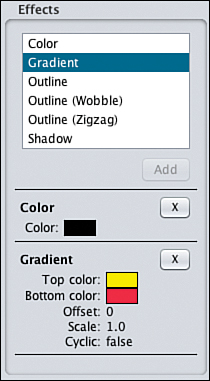
Although there are only limited effects available in Hiero, it is still really useful to be able to add effects before exporting the bitmap font.
Tip
You could load the PNG file produced by Hiero into a graphics application and make changes to the colors or shadows directly. This can be tricky, though—you need to make sure that each character does not move or change size. If the position or size changes, the control file that’s generated also needs to be updated.
After you have finished configuring how you want your font to look, it is time to export the font for use in the game. This is done using the File > Save BMFont filts (text). When you select this menu option, a Save dialogue appears, allowing you to name the file and select its location.
When you hit the Save button, two files are generated. The first is a PNG file that contains the image you are going to use as the sprite sheet, and the second is the control file that holds the details of where each character of the font is located within the image file. The control file has the .fnt file extension.
After you have those files, you have everything you need to start using that font. Well, everything except the BitmapFont class used to process and render the font you just created, so let’s take a look at that in the next section.
The BitmapFont Class
The BitmapFont class is responsible for loading the image that is to be used as the sprite sheet for the font and also the processing of the control file. Remember, the control file contains the details of where in the image each character of the font can be found. We can use this information when extracting characters.
Header File
We normally start these sections by looking at the initializer methods. This time, let’s start with the header file. Header files are normally self-explanatory and don’t need much coverage. For the BitmapFont class, however, we need to look at a structure, shown in Listing 8.1, that has been defined in the header.
Listing 8.1 Structure of BitmapFontChar

This structure is going to be used to store information on each character in the font. Each character in the font has data that is associated with it, such as its ID, location within the font image, size, and offsets. The BitmapFontChar structure stores this information inside an array for each character in the font control file.
What’s with the C?
Notice that we are starting to use C structures more often as we get deeper into this book. This is because when working with Objective-C objects, there is an overhead in terms of messaging to and from those objects. Asking an instance of a class for a properties value is handled using messages between those objects.
When information is to be queried or updated regularly, it is worth seeing if the information can be held in a C structure rather than creating a class with properties.
Initializer
The initializer continues to follow the same structure as those in previous classes. Listing 8.2 shows the entire initializer method.
Listing 8.2 BitmapFonts initWithFontImageNamed:controlFile: Method
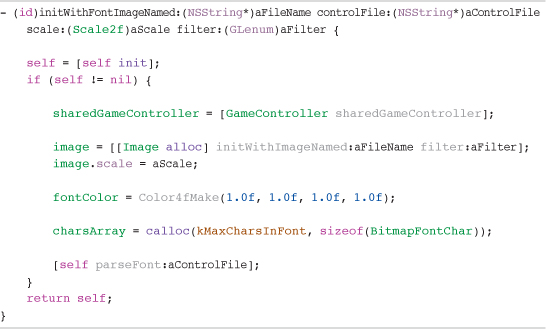
The initializer first grabs a reference to the GameController and then creates an Image instance using the image details that were passed in.
After the image has been created, the scale of the image is set along with the color. By default, all components of the color are set to 1.0. This maximum intensity setting means that the actual colors of the font image will be used when the characters are rendered. You could change these values, but it would cause all characters to render with a colored filter applied. (A color filter could be applied later if we wanted to.)
With the scale and color set, we next allocate the space required for the charsArray that is configured to hold BitmapFontChar information. This array is sized using the maximum number of characters that can be found in a font, kMaxCharsInFont, and the BitmapFontChar structure that is going to be used to store the character information.
You may be wondering why we are not allocating this space dynamically when we have identified how many characters are in the font we are processing. The reason comes down to how we are going to be accessing the font characters later in the BitmapFont class which we will see shortly.
When the arrays have been set up, the initializer method then parses the control file for the font we are processing.
Parsing the Control File
As mentioned earlier, the bitmap font is made up of two components: the sprite sheet image (a PNG file) and the control file. The control file tells us where each character is within the image. Inside the BitmapFont.m file is a private class that is used to parse the font’s control file.
If you look at the bottom of the BitmapFont.m file, within the private implementation you see a method called parseFont:, as shown in Listing 8.3.
Listing 8.3 BitmapFont parseFont: Method
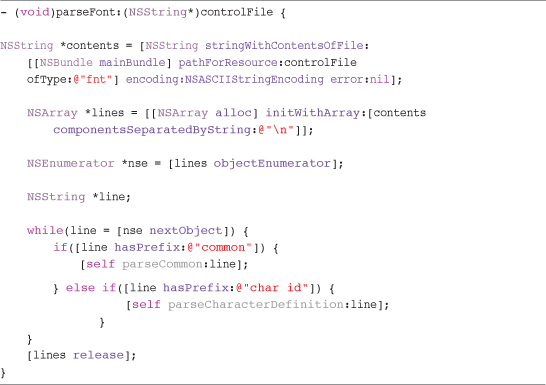
The first action of the method is to load the contents of the control file into a string. It is assumed that the control file will have a .fnt extension, as this is the default extension used by Hiero (described earlier).
Having loaded the file into an NSString, it’s now necessary to break that string into individual lines; each line within the control file represents a single character’s definition. This is done by creating an NSArray and populating it with the contents string separated by
. This is basically breaking the contents string into pieces whenever a new line marker is found. Each of these pieces is then loaded into its own element in the lines array.
Now that we have an array full of strings representing each character definition in the control file, we create an enumerator for the lines array, which we can use to move through each line in the array. We also create a variable in which to hold each line as we are processing it, called line.
The control file is a simple text file with each line representing a character definition (that is, the character’s image location within the image file), its image size, and how far we need to move horizontally or vertically so we can position characters correctly next to each other. Listing 8.4 shows a sample from the bitmap font control file.
Listing 8.4 Excerpt from the Bitmap Font Control File

Each line starts with a prefix that identifies the kind of information held within that line. Listing 8.3 uses an if statement to check what the prefix of the line is and then performs the necessary action.
A number of different prefixes are used within the Hiero control file, but for our implementation, we are interested in only two of them:
• common: Provides common information about the font image, such as the scaleW and scaleH of the image itself and also the lineHeight that gives us the common height in pixels of a font character.
• char id: Provides the character definition information for each character in the font. This includes its location within the font’s image file, along with the size of the character. It also specifies how far we need to advance after rendering that character to correctly place the next character.
If we find that the prefix is common, we call the parseCommon method. If the prefix is char id, we call the parseCharacterDefinition method.
Parsing the common Prefix
There is a single line in the control file that has the common prefix. As stated earlier, this is the common line information on the width and height of the font’s image file and the common height in pixels of characters in the font. Listing 8.5 shows the method used to parse this information.
Listing 8.5 BitmapFont parseCommon: Method
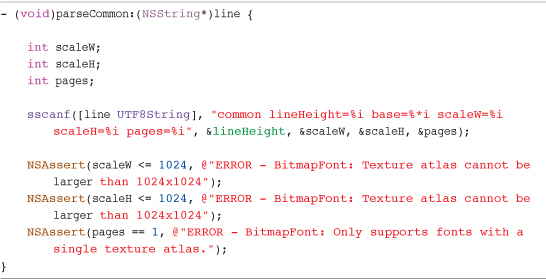
A string is passed into the parseCommon method that contains the line of text from the control file that has a prefix of common. Using the sscanf C function, we populate the lineHeight, scaleW, scaleH, and pages variables.
The remaining checks make sure that the image for this font is not larger than the maximum image (texture) size the older iPhone’s can handle, 1024×1024, and that this font does not use multiple pages or image files, as this class can only process one. If any of these conditions are not met, an assertion error is thrown using the error text defined.
This is a good way of making sure we don’t carry on regardless when we have come across a serious problem. We obviously need the font if we are creating an instance of it, but the configuration of the font would not allow it to initialize correctly, so it’s best to stop and let everyone know there is a problem and where.
Parsing the char id Prefix
If we come across a line in the control file that has the char id prefix, the parseCharacterDefinition: method is called. This method is basically the same as the parseCommon method. Listing 8.6 shows that the parseCharacterDefinition: method is the same as the parseCommon method, in which we separate the line sent in using = and then create an enumerator.
Listing 8.6 BitmapFont parseCharacterDefinition: Method
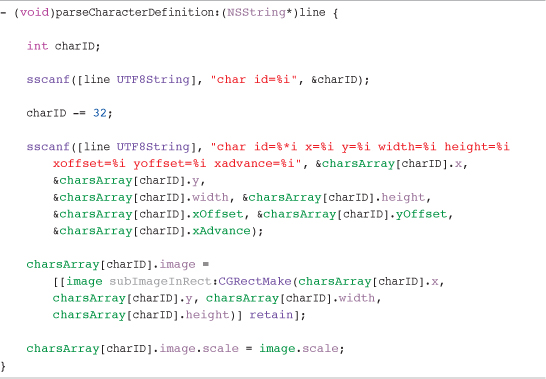
Let’s look at an example char id line from a font control file:
![]()
The layout for a char id line is the same as you saw earlier with common; there are just different name-value pairs.
Notice that when we calculate the charID, we are subtracting 32 from the value taken from the control file. Each character definition we read will be stored within the charsArray created in this class’s initializer. To make things simple, we are going to use the ID of the character as the index into the array.
Hiero only supports characters from 32 to 255. The first 32 characters are not used within the font itself, so to save space, we are subtracting 32 from the ID of all characters we process. Doing the same calculation, when we go to look up a font character, we then need to make sure we access the correct index in the array.
We finally add the Image instance to the BitmapFontChar for the current character’s ID.
Remember that the charsArray is made up of BitmapFontChar structures, and within that structure, there are variables to store the information we have just processed from the control file, along with an Image reference.
It’s important to remember that this image needs to be retained, as the image passed back when requesting a sub-image is auto-released by the Image class.
The final line of code simply sets the scale of the image we have just created to match the scale provided when this font was initialized.
Rendering Text
So far, we have covered the functions needed to load a font’s image file and parse its control file. It’s all important stuff, but now we are going to look at something more interesting—how to actually render the text onscreen.
I’m not sure about you, but I find working on code that actually puts something on the screen much more exciting than the plumbing around it. It’s just a shame that the plumbing is such an important prerequisite.
Getting text on the screen is actually going to be a lot easier than you think. The way we have built up this class means we have laid down all the necessary foundations to make the rendering of text nice and easy.
Listing 8.7 shows the renderStringAt:text: method used for rendering the text.
Listing 8.7 BitmapFont renderStringAt:text: Method
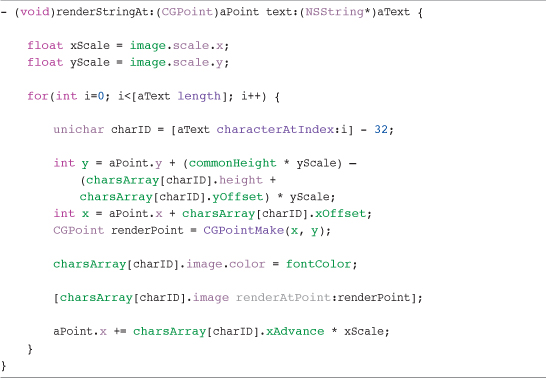
The core of this method is a loop that runs through all the characters in the text provided. The first line of code in the loop creates a variable called charID. This holds the ASCII code of the character. You’ll notice we are subtracting 32 from this value. This is to compensate for the fact that we are not using the first 32 ASCII character codes. You’ll remember that when we were parsing the control file, we also subtracted 32 from the character’s code, so we need to do the same here.
Next, we need to calculate the y position of the character. We have passed in a point, aPoint, where we want the text to be rendered, but depending on the character to be rendered, the y position needs to be adjusted.
Some letters have descenders that fall below the base line (such as g, j, p, q, and y), and others have ascenders that rise above other characters (such as d, f, h, and k). To make sure that the bottom of each character sits correctly on the base line with descenders and ascenders appearing normally, we perform a calculation that gives us the correct y offset.
Figure 8.6 highlights how characters are rendered to the screen based on the calculation. The line labeled y represents the position where you want the text to be rendered onscreen. The characters are actually rendered above that line so that letters with descenders and other characters, such as the underscore, are rendered correctly in relation to the other characters.
Figure 8.6 Character positions when rendering.

In the font control file, there is a lineHeight value. This value is a common height for all characters in the font. To calculate the correct y value for each character, the characters height plus yOffset is subtracted from the lineHeight. The result positions the character correctly when rendered next to other characters.
Now that the y position has been calculated, the renderPoint is calculated. With the renderPoint calculated, we set the color of the image for the character we are about to render and then simply render that image at renderPoint.
Next, we increase the x location of the renderPoint ready to render the next character. This is done using the xAdvance value for the character and adjusting it by any scale that may have been applied.
Note
Kerning information, if the font supports it, is also held within the control file produced by Hiero, making it possible to implement kerning as well. Because we aren’t using a great deal of text in Sir Lamorak’s Quest, we won’t worry about kerning the text. It’s good to know this information is available, though, if you need more control over the text in a game you are developing.
Rendering Justified Text
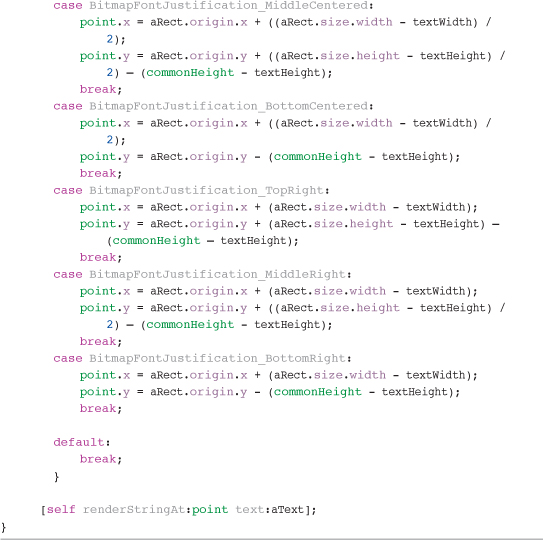
As well as being able to render text to a specified point on the screen, it would also be useful to justify the text within a defined box. This, as you can imagine, makes centering text onscreen very easy. For this, we’ll use the renderStringJustifiedInFrame:justification:text: method, as shown in Listing 8.8.
Listing 8.8 BitmapFont renderStringJustifiedInFrame:justification:text: Method
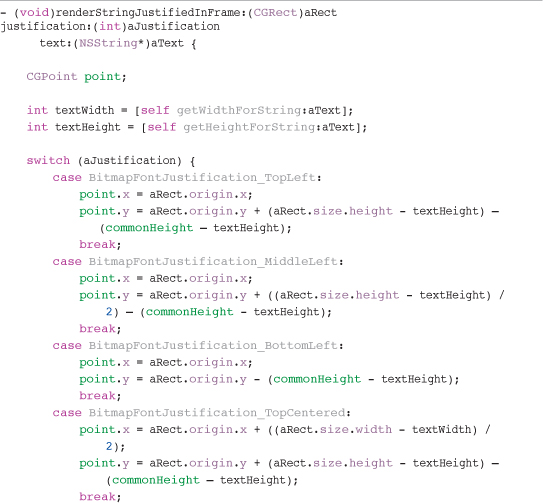
The CGRect defines the box inside of which the text is to be rendered. The text inside the rectangle won’t be clipped; it just provides the bounds and location for the rendering to take place.
The justification value is an enum defined within the header file of the BitmapFont class. The possible justification values include the following:
• BitmapFontJustification_TopCentered
• BitmapFontJustification_MiddleCentered
• BitmapFontJustification_BottomCentered
• BitmapFontJustification_TopRight
• BitmapFontJustification_MiddleRight
• BitmapFontJustification_BottomRight
• BitmapFontJustification_TopLeft
• BitmapFontJustification_MiddleLeft
• BitmapFontJustification_BottomLeft
These values are used inside a switch statement to calculate the point at which to render the text onscreen. After the point has been calculated, the renderTextAtPoint: method is called to actually render the text.
Text Width and Height
Now that we can actually render text to the screen, there are a couple of handy functions that we need to add. When rendering text, it can be useful to know the width and height in pixels the text will be when on the screen. For example, if you wanted to center some text, you would need to know the width of the text in pixels to perform the following calculation, commonly used to center text:
Screen width – Text width / 2
Listing 8.9 shows the method for returning the width of a string.
Listing 8.9 The getWidthForString: Method
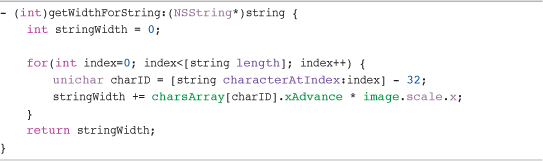
This method is really simple. It loops through the characters in the string that are passed in and looks up the character’s xAdvance value. It applies any scaling that has been defined and accumulates the value. It then returns the result. Listing 8.10 shows a similar method that returns the height of the string passed in.
Listing 8.10 The getHeightForString: Method
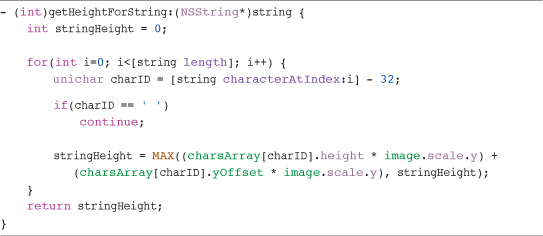
The method in Listing 8.10 does almost the same thing as the one to calculate the width of text. The difference is that it ignores space characters, as they have no height the stringHeight variable only stores the maximum height found.
Deallocation
The final method to review is the dealloc method. Listing 8.11 shows the dealloc method for the BitmapFont class.
Listing 8.11 The dealloc Method for the BitmapFont Class
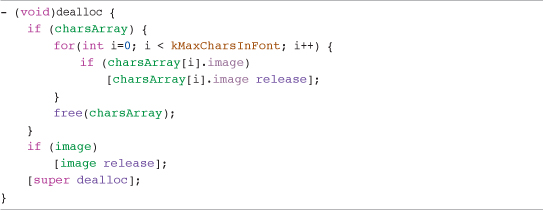
The dealloc method is similar to the dealloc method inside the SpriteSheet class. We have allocated space for each character in the charsArray, so we need to loop through that array, freeing the memory for each character. After that is done, we free the charsArray itself, the image we instantiated, and we call the parent’s dealloc method.
Summary
This chapter has given us the ability to take any font we like and turn it into a bitmap font for use within our game engine. Being able to communicate with the player is important, and not having the ability to render text to the screen would leave our game engine a little lacking.
In terms of the features, our game engine needs are almost finished. The next chapter covers the TiledMap class, which enables us to create large complex playing areas for our game, followed by Chapter 10, “The Particle Emitter,” where we will be able to start creating explosions and other organic effects.
Exercise
This chapter should have given you all the information needed to be able to use your own fonts now. To practice what we have been through during this chapter, try adding your own font to the CH08_SLQTSOR project and render some text to the screen.
If you don’t already have any fonts that you would like to use, check out www.dafont.com. This great website contains thousands of different fonts to use. Some of them are free, whereas others are for limited use or requiring purchasing/licensing. Make sure you understand the license for the font you want to use if it’s going to be in a game you publish and charge money for.