
9. Tile Maps
Tile maps are used in computer games to both store and render a large playing area while using as little memory as possible. The technique isn’t as important today as it was 15 or 20 years ago, but there are still valid reasons for using a tile map in a game, especially for things like collision detection. Knowing where an object is in relation to the player is really useful, and a tile map is a simple way of finding that information.
This chapter introduces the concept of tile maps and covers the associated classes used in Sir Lamorak’s Quest to implement the tile maps.
Tile maps are a fundamental element of Sir Lamorak’s Quest’s game engine, and will be used not only to render the core map Sir Lamorak is running around, but also for objects within the map, such as the baddies and other elements of the game.
Getting Started with the Tile Map Project
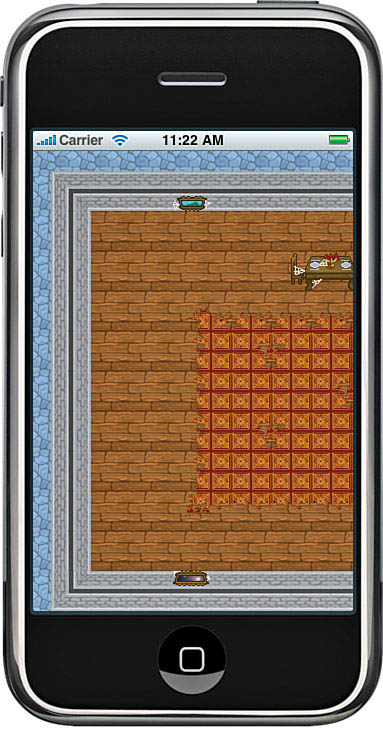
To get started, open the CH09_SLQTSOR project that accompanies this chapter and run it in the iPhone Simulator. You see a tile map slowly scrolling from right to left, as shown in Figure 9.1.
By the end of this chapter, you will understand tile maps in general and be able to create a tile map using the Tiled (www.mapeditor.org) tile map creation tool. You will also understand the classes required to use the maps you design using Tiled inside both Sir Lamorak’s Quest and your own games.
Figure 9.1 iPhone Simulator running the CH09_SLQTSOR project.
Introduction to Tile Maps
Back in the early days of game development, managing memory efficiently was not just a nice optimization; it was a necessity. With limited memory and graphical performance, those early arcade games needed to store large playing areas and graphics in a way that would allow for smooth graphics and fast game play.
It was from these requirements that the concept of the tile map was born. The idea is simple. A typical tile map consists of a 2D array containing references to tile objects. The actual tile object holds information about the tile, such as the following:
• The ID of the image to be rendered
• Whether the tile block is impassable
• Whether the tile causes damage to the player
By defining a map as an array, the same tile can be used over and over again rather than having every tile load up its own image. This enables you to reduce the amount of memory needed to store a large playing area. It is assumed, for example, that if you had a large open grassy area to render, you would need just a couple of different grass tiles that could be used over and over again. This is much more efficient than storing a single large image that you were rendering each frame and having to store in memory.
Figure 9.2 shows an example of a tile map that has been created from using a number of smaller images.
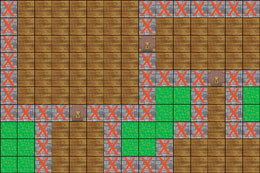
Areas of the map, such as the wooden floor, are all represented by a single image. This means we only have to store that one image in memory and just render it to the screen wherever the tile map identifies it should go.
Now this is a very basic map. To make things more interesting, you could have more than a single image for the floor and walls. This enables you to introduce some variance into the tile map, making it look less like a tile map and more like a very large solid area you are walking around.
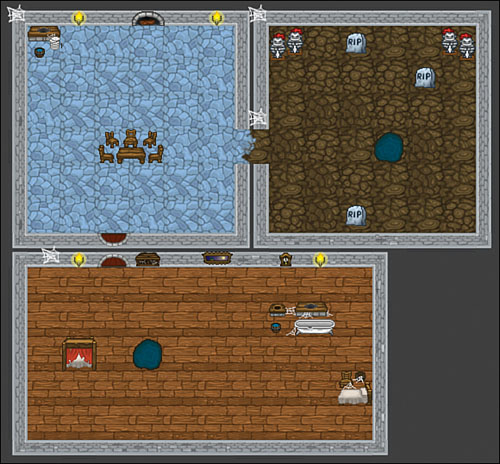
We will use many different tiles for Sir Lamorak’s Quest. In fact, there are over 130 tiles that we’ll use to draw the rooms and then object tiles on top of that. Figure 9.3 shows a small tile map created using some tiles from Sir Lamorak’s Quest.
Figure 9.3 Tile map using tiles from Sir Lamorak’s Quest.
You can see that using many different tiles, you can create nice detailed maps. What is great is that as your map grows, your memory storage requirements do not. After you have all of your tiles images loaded, no matter how many times they are used in the tile map, you don’t need to store any additional image data.
As your tile map grows, only the tile map data itself gets larger.
Tile Map Editor
Chapter 2, “The Three Ts: Terminology, Technology, and Tools,” covered a number of different tools we are going to use to create Sir Lamorak’s Quest. One of these tools was called Tiled Qt. Tiled is an open source general tile map editor written using the Qt framework, and we’ll use this tool to create the tile map for Sir Lamorak’s Quest.
There are many different ways to create a tile map. The most basic of these is to manually populate a 2D array with values that represent the images to be drawn. The game engine then processes that array and calculates where to draw each image that is referenced. For Sir Lamorak’s Quest, though, we need something more sophisticated.
The tile map is the backbone of our game; it’s what that the player will be walking around and the primary visual the player sees. Editing a tile map by simply populating a text file with numbers to be loaded into an array is not particularly intuitive. Luckily, Tiled provides us with a WYSIWYG editor that we’ll use as our level design tool.
Being able to see how the tile map looks when rendered is really important, and most complex tile map-based games also have their own level editors for doing the same job. Figure 9.4 shows a screenshot of Tiled rendering a tile map for Sir Lamorak’s Quest.
Figure 9.4 Tiled GUI with a map being edited.
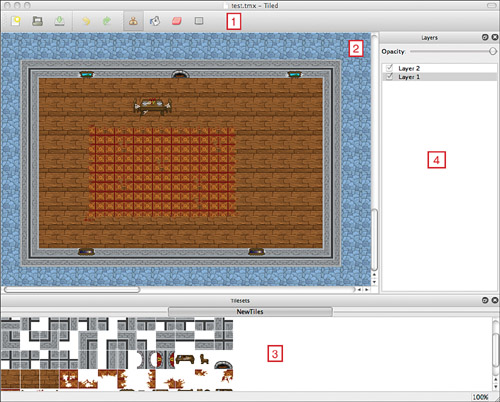
Tiled has four key panels marked by red numbers in Figure 9.4. These panels are as follows:
- Toolbar (at the top)
- Main editor panel (in the middle)
- Tile palette (at the bottom)
- Layer palette (on the right)
This gives us the perfect environment to build a tile map and see how it will look before using it in our game. This really speeds up the development process. Having to run the map in the actual game every time we wanted to see how it looked would be time consuming. It also means that it’s hard for someone other than the game engine developer to work on the map.
Using tools such as Tiled, you can actually get someone else to help you create the maps for your game. After all the tile images have been created, you can give the editor and the tiles to your level designer, or to someone who is willing to help you out, and get them to draw the map for you. This gives you time to carry on building the game engine.
Note
You will, of course, need to communicate with the person designing the level to make sure he implements things in the right way. As the game developer, you may be building functionality that causes special things to happen for certain tiles or objects on the map.
Sir Lamorak’s Quest will have portals placed around the map. These portals, when walked into (or collided with), cause the player (Sir Lamorak) to be transported to another location on the map. The location of these portals is defined within the tile map using tile map objects. Also, when a door is found on the tile map, the game engine creates a door entity that manages that particular door, including when it opens and closes, and whether it is locked or not.
For this to be effective, there may be properties that need to be associated with a tile, which is where communication with the level designer becomes very important.
Tile Palette
The tile palette inside Tiled enables you to select images from tile sets and start painting with them. Creating a tile map really is as simple as picking an image and then painting the map you require using the stamp tool within Tiled.
Note
Tiled supports multiple tile sets within a single map. If you are creating a very large map that has more tiles that you can fit on a single 1024×1024 tile sheet, this is a handy feature. For our purposes, we will stick with a single tile sheet, supported by the TiledMap class.
A tile sheet is basically the same as a simple sprite sheet. It is a large image that contains smaller images, all of which have the same dimensions.
Layers
Layers are really useful when creating a tile map. Being able to draw one layer on top of another enables us to define different layers for different purposes, as well as manage how the layers are rendered; for example:
• Base map tiles (that is, floors and walls)
• Map objects (that is, chairs and tables)
• Collision information
• Portal information
Keeping these layers separate makes them easier to handle within the game engine, and it also makes maintaining the tile map within the Tiled editor easier.
With Tiled, each layer that is created takes on the dimensions of the map, allowing you to specify an image at any location on that layer.
When we run through the Tiled class later in this chapter, you will see that we create an object for each layer within the tile map. These layer objects are responsible for holding the data associated with each layer (that is, the layer’s name and tile data). It also implements methods that enable you to query a layer’s data based on a tile’s coordinates.
Creating a Tile Map
After having a brief look at Tiled, let’s run through how you would create a tile map.
Inside the CH09_SLQTSOR project, you find a tile image called NewTiles.png. Copy this image to your desktop, as you will need this when testing the tile map.
When you launch Tiled (the version used is Tiled Qt 0.4.0), if it is the first time you have launched the application, you are presented with an empty workspace (that is, there will be no tile sets, layers, or map image).
To create a new tile map, select File > New. Figure 9.5 shows the New Map dialog box, which asks for details for the map you want to create.
Figure 9.5 New Map dialog in the Tiled application.
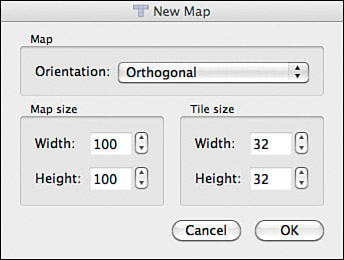
Let’s quickly run through the New Map dialog:
• Map orientation: There are two different types of map available to choose from: Orthogonal and Isometric. The only map type we will be using is Orthogonal, and this is the default value within the dialog box. The map type defines the shape of the tiles we are going to be using.
• Map size: The map size defines how many tiles wide and high the map is going to be. For this test, make the width and height both 50.
• Tile size: Tile size defines the size of the tiles in the map. You can have any size you want, and the tile height does not necessarily need to match the size of the tile images you are going to use. The normal practice, though, for Orthogonal maps is to match the tile size to the size of the tile images you are going to be using.
Our tiles are 40×40, so use that for the width and height and then click OK. The tile map panel will turn a dark gray color, signifying that you are now editing a map.
Create a New Tile Set
In the menu bar, select Map > New Tileset. This displays the New Tileset dialog, shown in Figure 9.6.
Figure 9.6 New Tileset dialog in the Tiled application.
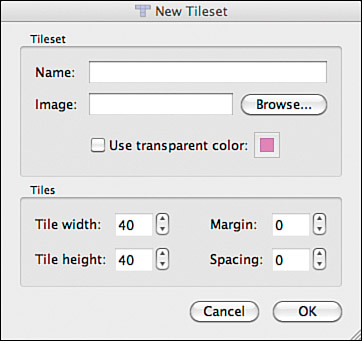
As the name suggests, this dialog enables you to create a new tileset. Let’s quickly run through the New Tileset dialog’s options, as follows:
• Name: This enables us to set a name for the tileset. This is most handy when you have more than one tileset, but we are only going to have a single tileset in Sir Lamorak’s Quest. That said, it is still a good idea to give the tileset a sensible name, such as SLQ Tiles.
• Image: This section enables you to select the image you want to use for the tileset. As stated earlier, you can think of a tileset image as a simple sprite sheet. To select an image, click Browse, and be sure to enable the Reference tileset image button in the dialog that appears.
You can also define a color within your tileset that should be treated as transparent by enabling the Use transparent color option. Enabling this option allows you to select a color within the image that will be transparent. We won’t use this option and it will not be implemented within the Tiled class either.
• Tile Width and Tile Height: Notice that it is possible to change the width and height of the tile set being imported as your tiles. The tile set we are using has the same dimensions as the tile map so we will be leaving the values unchanged.
In this dialog, click Browse and select the NewTiles.png file, which you copied to your desktop earlier.
If your tileset image had spacing between the tile images, the tile spacing and margin values should be changed to match the spacing in the image.
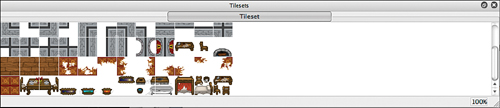
After you finish configuring the settings, press OK. You see a palette of tile images appear at the bottom of Tiled’s window, as shown in Figure 9.7.
Figure 9.7 Tileset palette containing the NewTiles.png tileset.
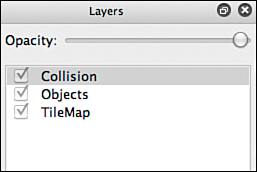
Creating Map Layers
By default, a single layer is created for us when we create a map. If you look in the Layers panel (on the right in Tiled), you see a single layer called Layer 1. Double-click this name to make it editable, and change the name to TileMap.
You can create multiple layers as described earlier, so let’s see how you create a new layer within our map. In the menu bar, select Layer > Add Tile Layer. A new dialog appears, asking for the name of the layer. Add the Collision and Objects layers to your tile map, as shown in Figure 9.8.
Creating Object Layers
Within Tiled, there are special layers called object layers. These layers enable you to create rectangles at any pixel location within the map and not be limited to the tile map locations. This is useful if you want to place objects within the game that are not aligned to tiles or even to define collision bounds.
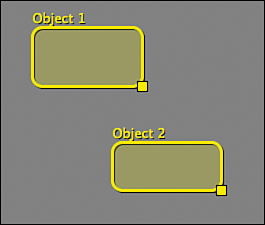
You create an object layer by selecting Map > Add Object Layer in the menu bar, and providing the layer with a name. With this layer selected, clicking the map creates a new object within that layer. The handle on the bottom-right of the object (as shown in Figure 9.9) enables you to resize the object as necessary.
Within the Tiled configuration file, information is saved about the location of each object in an object layer, as well as the object’s dimensions. Figure 9.9 shows two objects created within the tile map.
Figure 9.9 Objects within a Tiled object layer.
Tip
The color used to render each object layer’s objects can be changed using the layer’s properties, which you can access by right-clicking a layer.
Now that we have the layers, save the map and call it tilemap.tmx.
Drawing the Map
Next, we can start drawing the map itself, so make sure the TileMap layer is selected in the layer panel. To draw a tile, simply select the tile you want to draw from the tileset palette and make sure that the brush tool is selected in the toolbar (along the top). Simply click the tiles in the map view where you would like that image to be used.
Removing a tile is just as simple. Just make sure you have the eraser tool selected and click the tile images you want to remove.
Tip
Make sure you have the correct layer selected before you start erasing or drawing. I have been caught out a number of times by drawing an entire section of map on the wrong layer or by going to erase something on one layer and actually removing it from another.
Getting into the habit of checking the layer you have selected before you do anything will save lots of stress.
Placing Objects
To place an object on the map (for example, a table or chair), we need to draw the object in the Objects layer. This causes the object tile to be rendered on top of any layers below it. This is also how we will render game objects. We render the tile map one layer at a time (that is, the TileMap layer followed by the Object layer). This causes the objects in the game to be rendered on top of the map just as they are in the Tiled editor.
Select the Objects layer and then try drawing some of the object tiles onto the map. The objects will be rendered on top of the map layer without obviously replacing the tile from the layer underneath.
Understanding the Tiled Configuration File
When you create a map using Tiled, the output is a configuration file that describes the map you have created. This file is an XML file that contains the information necessary to recreate the map you have designed inside your game.
At this point, it is worth taking a look at this file so you understand the information it contains. Later in this chapter, you see how this file is parsed by the Tiled class and used to recreate the map you have designed in your game.
The standard configuration file generated by Tiled has the .tmx extension and is a standard XML file. This is handy because it means it is human-readable if you need to take a look inside.
The first couple of lines in the .tmx file are a standard XML header, as shown here:
![]()
Map Element
The map element is the root element of the .tmx file:
![]()
It provides high-level information about the map defined within the file, such as the width and height of the map in tiles and the tileWidth and tileHeight, which are the dimensions of the tiles themselves.
Within the map element is a properties element defining any number of properties. If there is information you would like to hold at the map level, you can create properties, which are basically name-value pairs, to hold that information. Map properties can be added using the Map > Map Properties menu item:

This example shows a couple of properties that have been added to store the players start position. This could be used rather than hard coding the location in the game code. There could be any number of property elements within the properties elements.
Tileset Element
A map element can contain one or more tileset elements. We have already discussed how Tiled supports more than one tile set per map. Each tile set used generates a tileset element within the .tmx file. Although Tiled can pass as many tileset elements as found in the .tmx file, only the first tile set is used when rendering. This is how we have implemented the TiledMap class and is not a restriction of the Tiled editor.
Listing 9.1 shows a tileset element from a .tmx file.
Listing 9.1 A Complete Tileset Element within a .tmx File
The tileset element shown in Listing 9.1 contains the name and firstgid of the tile set, along with the tileWidth and tileHeight; these are the pixel dimensions of the tiles defined within the tileset. There is also an image element that holds the name of the source image of the tileset. This is the image that should be used as the sprite sheet for the tiles.
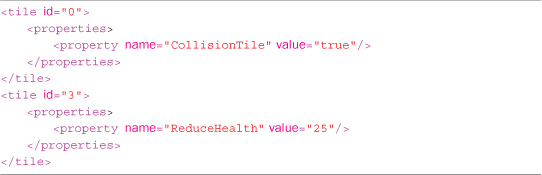
As well as setting properties at the map level, it is also possible to set properties on individual tile images within a tileset. These too are name-value pairs, and you are free to create as many as you need. This is handy if you want to store information that can be used during game play, such as by how much the player’s health should be reduced if he hits a particular tile.
Layer Element
The layer element holds information about a specific layer. Just as a map can contain multiple layers, there can be multiple layer elements within a .tmx file, as shown in Listing 9.2.
Listing 9.2 Complete Layer Element within a .tmx File
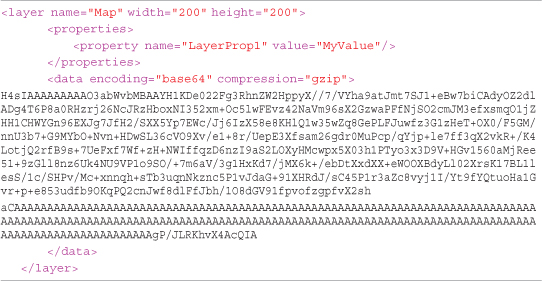
Attributes within the layer element define the layer name, width, and height. It is normal for a layer’s dimension to equal the map’s dimension, although nothing stops them from being different. As with the map and tileset elements, the layer element can have any number of properties defined for it. They follow the same format as with the previous elements, where each name-value pair is represented by a property element within the properties element.
The large blob of characters within the data element is the individual tile information for each tile inside the layer. Tiled enables you to gzip this information and store it base64 encoded within the .tmx file. This significantly reduces the size of the .tmx file, as well as the speed at which this information can be parsed.
Note
In a layer that is 200×200, not encoding and compressing the information results in tens of thousands of lines of XML bloating the size of the .tmx file from a few kilobytes to many megabytes. On a platform such as the iPhone, this is not a good idea. Parsing that amount of information would also take far too long. Keep it simple, and compress.
The encoding and compression types used are specified as attributes within the data element. The Tiled class detailed later in this chapter only supports gzip compression.
Object Group Element
The final element you find in a .tmx file is the objectgroup. As mentioned earlier, object layers are a special kind of layer that enable you to place objects anywhere on a map (that is, they can be located on a specific pixel rather than aligned to the tiles).
This can be useful if you have objects or images that you want to render on top of the map that are not aligned to the tiles, and you want to define their locations in the Tiled editor rather than in code. These objects could be entity spawning points, portal locations, or simple objects such as chairs and tables. Listing 9.3 shows a complete objectgroup element.
Listing 9.3 Complete objectgroup Element Within a .tmx File
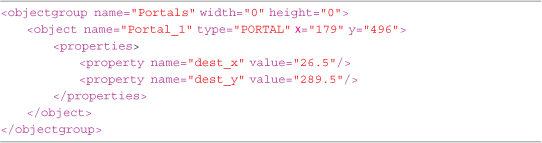
The objectgroup element has attributes that define the name of the group along with the width and height. We won’t be using the width and height of the objectgroup in Sir Lamorak’s Quest, so there’s no need to concern yourself with those elements.
A single objectgroup can contain any number of object elements. These define the
name of the object along with their type and pixel location stored in the x and y attributes. Again, an object can have as many user-defined properties as you would like, and these are held as property elements within a single properties element.
You will see how object properties are used in Chapter 14, “Game Objects and Entities.” One entity type we have in Sir Lamorak’s Quest is a portal that can transport the player to another location on the map. The portal (a tile location) to which the player is transported is defined as properties within the portal object.
Tile Map Classes
Having covered the basics of tile maps and how to use Tiled to create a map, we can now look at the classes used in Sir Lamorak’s Quest’s Tiled map. The following three classes make up the complete tile map class set:
• Layer: Responsible for holding all tile and tile image data on a specific layer as well as providing functions that enable us to query that tile information.
• TileSet: Stores the image- and tile-related information for the tile sets we will be using. As noted earlier, even though Tiled supports multiple tile sets, we use only one in Sir Lamorak’s Quest.
• TiledMap: The main class used in the game. We create an instance of this class when we want to use a tile map. TiledMap makes use of the Layer and TileSet classes internally, as they are not designed for direct access.
Let’s examine these classes in more detail.
Layer Class
As described earlier, a single map can be made up of many layers. Each layer is responsible for storing and providing access to the actual tile data defined for that layer. To store this information and provide the functions necessary for a layer, we use the Layer class. This class can be found in the CH09_SLQTSOR project inside the Game Engine/Tile Map group and is called Layer.m.
A layer has the following properties:
• Layer ID: Unique ID given to each layer.
• Layer name: Name given to the layer inside Tiled.
• Layer data: Multi-dimensional array for storing the tile information within the layer.
• Layer width: Width of the layer in tiles.
• Layer height: Height of the layer in tiles.
• Layer properties: Properties that have been created on the layer.
• Tile images: Image information for each tile on the layer.
We see how these properties are used as we move through the Layer class’s implementation.
Initialization
Initialization follows the same pattern we have seen on other classes in previous chapters. Open the Layer.m file that can be found in the CH09_SLQTSOR project. The Layer.m file can be found within the Game Engine > Tile Map group. Listing 9.4 shows the complete initialization method for the Layer class.
Listing 9.4 Layer initWithName: Method
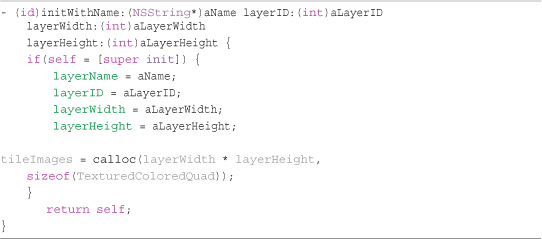
Information that has been read from the Tiled map configuration file is passed into the layer’s initialization method and is used to set the properties. We will be reviewing how the values are actually read from the configuration file when we review the Tiled class later in this chapter.
Inside the Global.h file, you find these two definitions at the top of the file:
![]()
These are used to define the maximum width (kMax_Map_Width) and height (kMax_Map_Height) a layer can have. These constants are used further down the header file when defining the layerData array that holds the tile data, as shown here:
![]()
The layerData array is a multi-dimensional array. The first two dimensions hold the x and y coordinates of a tile and the third-dimension is used to hold information related to the tile at that location.
Normally, the layer width and height is the same as the tile map’s width and height. If you ever wanted to use a tile map larger that 200×200, you would need to change the constants in the Layer.h file to reflect the dimensions you wanted to use.
The initializer is also responsible for setting up an array of TexturedColoredQuad’s, called tileImages, which is used to store the image information for each tile in the layer. As the TiledMap class parses the contents of a tmx file, it provides the layer class with image information for each tile that contains an image. This information is then used when rendering a layer.
Adding a Tile to a Layer
After the TiledMap class has initialized a layer, the layer needs to be loaded with the tile information for that layer. The TiledMap class loops through the tiles on the layer using the addTileAt:tileSetID:tileID: method, shown in Listing 9.5, to add that tile’s information.
Listing 9.5 Layer addTileAt:tileSetID:tileID: Method
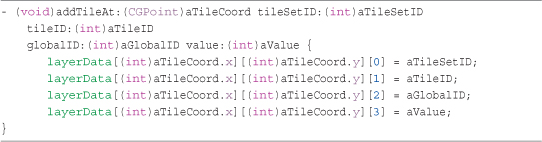
Each tile in a Tiled map has an x and y location within a layer. It also contains four other pieces of information:
• TileSetID: Identifies the tile set from which the tile image was taken. You may remember that Tiled supports the use of multiple tile sets. The Layer class has been designed to handle multiple tile sets in addition to the TiledMap class itself. Let me point out that currently, though, the method of rendering a tile map layer to the screen does not support multiple tile sets. To increase performance, I wanted to keep the number of texture swaps to a minimum, and I’ve found that having a single tile set has not been a problem while writing Sir Lamorak’s Quest.
The TileSetID starts at 0 for the first tile set and increments for each tile set used.
Note
Nothing is stopping you from updating the render method to provide the necessary performance along with multiple tile set support. If you do make changes, be sure to let me know what you did.
• TileID:The ID given to each image within a tile set. This starts at 0 and increases by 1 for each tile image. This number is used to identify which image should be rendered in a given tile location on a layer.
• GlobalTileID: Related to the TileID. The GlobalTileID identifies a tile image uniquely across multiple tile sets. Each tile set has a firstGID value. For the first tile set in a map, this would be 0. If the first tileset contained 45 images, indexing 0 through 44, then the firstGID for the second tile set would be 45. The GlobalTileID is basically the TileID plus the tile set’s firstGID.
• Value: Having added the TileSetID, TileID, and GlobalTileID to the layerData array, the final piece of data loaded is a simple integer. This Value container is something I added to make it easier to store other useful information against a specific tile. You will see, in later chapters, that I make use of this value by storing an index against any tile that is identified as a door within our map. This index value is used to identify the location of that specific door object within an array of door objects. It could, however, be used to store any useful numerical information you need.
It may seem like a waste of time to explain something that is not actually being used in our game, but I wanted to implement the TiledMap class to handle as much of the functionality in a Tiled map as possible. Apart from multiple tile sets, all the functionality provided within a Tiled map is supported in the TiledMap class and its supporting classes.
Adding a Tile Image to a Layer
In addition to adding a tile’s base information to a layer, we also need to be able to add a tile image. The Layer class is responsible for storing the tile image information for each tile on a layer. The TiledMap class uses the createLayerTileImages: method to loop through all tiles on a layer and add the necessary image information to each layer.
The method responsible for adding these tiles to a layer is called addTileImageAt:, and is shown in Listing 9.6.
Listing 9.6 Layer addTileImageAt: Method
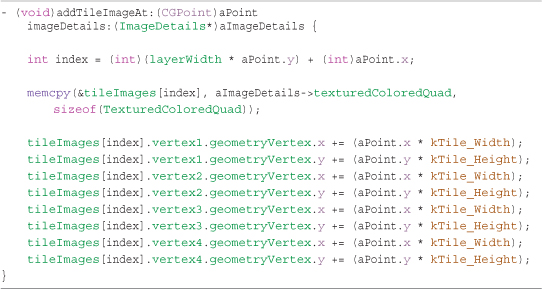
This method is passed the ImageDetails structure of the image that is being used in the tile map at the position provided. The TexturedColoredQuad structure within ImageDetails is copied into the tileImages array that is created during the initialization of a layer. The location within the array is calculated and held in the index variable.
The copy is necessary because a single tile image in a tile set may be used many times in a tile map. Simply pointing to the original image in the tile set means that every change we make to the location of an image will be overwritten the next time that image is used. We therefore need to take a copy of each image’s TexturedColoredQuad structure so that its location can be set correctly.
The TexturedColoredQuad information we place inside the tileImages array will be used when we come to render the layer.
The position of the image is defined based on its location within the tile map. This location is calculated by multiplying the tile location with the tile’s width and height. This gives us the pixel location where the tile should be rendered in relation to all other tiles on the map. The tiles themselves will never move, they will always be rendered in exactly the same place as defined in the tilemap file. Whilst the player will remain in the middle of the screen, as they move their location within the tilemap is updated. Using that location, we will calculate which tiles on the tilemap are visible and render only those tiles to the screen.
Getting and Setting Tile Information
Having created an instance of the Layer class and shown how to add tile information, we now look at the methods used to retrieve and set tile information within a layer.
This is important, as we will want to query a layer and use the tile information returned within our game. It was mentioned earlier that we would be identifying door tiles within Sir Lamorak’s Quest. This will be done using the tile’s TileID. If this value is equal to a door image, we perform the necessary steps to add a door object to the game at the appropriate location.
Note
Using the tile map data to add objects within the game allows us to really use Tiled as our level designer. We are not simply drawing a map in Tiled, but we are also specifying where on the map dynamic objects should be placed when the game runs.
Doors within Sir Lamorak’s Quest open and close randomly. In fact, the doors have their own logic and images. The logic controls when the doors should open and close, and the images are changed accordingly.
The methods used to get and set information within the layer are simple. You will see the methods inside the Layer.m file, and Listing 9.7 shows the method used to get the Global Tile ID of a specific tile.
Listing 9.7 Layer getGlobalTileIDAtX: Method

You can see that we simply pass in the x and y coordinates of the tile we want to query, and return the value held within the layerData array at that location. The last dimension is hard coded to 2, which is the index for the GlobalTileID.
Setting the value within the layerData array for a tile is also just as simple. We simply pass in the coordinates again along with a value that is assigned to the third index of the layerData array, as shown in Listing 9.8.
Listing 9.8 Layer setValueAtX: Method

The tileImageAt: method, shown in Listing 9.9, is used to retrieve a tile’s image information. This is the TexturedColoredQuad that we saw created within the addTileImageAt:ImageDetails: method earlier.
Listing 9.9 Layer tileImageAt: Method

This method is simple but important. It forms an important part of the rendering process when we come to render a layer’s tiles.
TileSet Class
Having looked at the Layer class and how it stores information relating to each layer in a Tiled map, we will now look at the TileSet class. This class can be found in the CH09_SLQTSOR project inside the Game Engine > Tile Map group and is called TileSet.m.
This class is used to store information on a single tile set that has been used within a Tiled map. One instance of the class is instantiated per tile set used in the map. Remember, though, that we are only using a single tile sheet in the map for Sir Lamorak’s Quest.
Just like the Layer class, the TileSet class has a number of properties, as listed here:
• Tile set ID: Holds the ID of the tile set.
• Name: Holds the name defined for this tile set in the Tiled editor.
• First GID: Holds the first Global ID to be used for this tile set.
• Last GID: Holds the last Global ID held within this tile set.
• Tile width: The width of each tile image in pixels.
• Tile height: The height of each tile image in pixels.
• Spacing: The spacing used between each image in the tile set.
• Margin: The margin to be used within the sprite sheet.
• Tiles: A SpriteSheet instance that holds the images to be used within the tile set.
As with the Layer class, the information passed into a TileSet instance is read from the Tiled map file.
Initialization
The initWithImageNamd:name:tileSetID:firstGID:tileSize:spacing:margin: method responsible for initializing a TileSet instance.
Listing 9.10 shows the complete method inside the TileSet.m file in the CH09_SLQTSOR project.
Listing 9.10 TileSet’s initWithImageNamed: Method
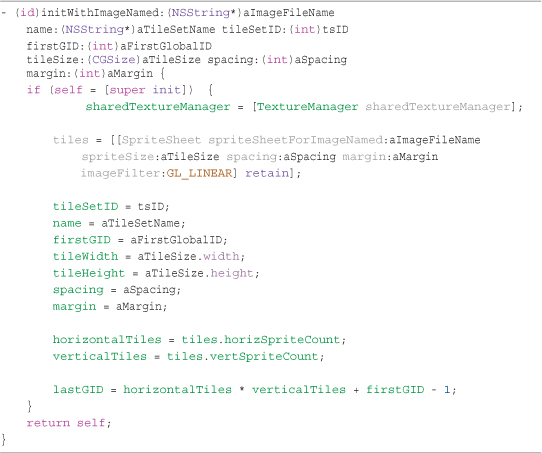
The first task of the initializer is to create a new SpriteSheet instance that will hold the sprites for this tile set.
With the tiles initialized as a sprite sheet, we then set the properties for this tile set using the information that has been passed in and by calculating some values such as the lastGID.
Getting Tile Set Information
There is not much information to get from a TileSet instance. The main property of the class is the sprite sheet called tiles. From this, the image information will be taken when we come to set up the rendering of a map layer inside the TiledMap class.
However, three methods provide access to tile information inside the TileSet.m file, as follows:
• containsGlobalID: Checks to see if the GlobalTileID passed exists within this tileset. This is important when there are multiple tile sets (not currently supported in the TiledMap class). When you find a tile ID, you can use this method to identify the tile set that the image comes from.
• getTileX: Given a TileID, this method returns the x component of where that tile is within the sprite sheet.
• getTileY: Same as getTileX, but returns the y component of where a tile is within the sprite sheet.
TiledMap Class
The Layer and TileSet classes are helper classes that are used within the TiledMap class. When you want to use a Tiled map, it is an instance of the TiledMap class that you create. This in turn creates instances of the TileSet and Layer classes based on the information read from the Tiled map configuration file. The TiledMap class can be found in the CH09_SLQTSOR project inside the Game Engine > Tile Map, and is called TiledMap.m.
The TiledMap class performs two key functions. First, it parses the .tmx configuration file we discussed earlier in this chapter. This stores all the information we need to recreate a map created within the Tiled editor. Second, it renders a map layer to the screen.
Although these two functions don’t sound like much, they are rather involved. Parsing the tmx file is important because it contains all the information we need be able to reproduce a map in our game.
XML Parsing
XML parsing is an interesting subject on the iPhone. The full XML specification and its associated technologies, such as XSLT, are complex. Providing support for all the different capabilities you have with XML is memory and processor intensive. As you know, the iPhone has limited resources in terms of both memory and processor. Trying to support all the different XML capabilities is therefore difficult.
By default, Apple provides us with an event-based XML parser called NSXMLParser. This class enables us to parse any XML file and deal with the data we find in that file in an event-driven manor. This works well for small XML files, but when you start to process much larger files, performance can really suffer.
I ran into performance problems when writing Sir Lamorak’s Quest when using NSXMLParser and needed to find a much faster way of parsing XML files. A good friend of mine (Tom Bradley) had the solution in the form of a very small and fast XML parser he had created called TBXML.
TBXML can parse any XML file that conforms to the W3C XML Specification 1.0. It can only be used to parse XML files and currently has no write capability. It also has a very simple API.
After testing TBXML, it was clear that it would give me the performance I needed and actually reduced the time to parse an uncompressed .tmx file considerably.
Since then, I have started to use .tmx files where the tile data is compressed and gzipped. Using NSXMLParser for that kind of file would not suffer from the performance problems I originally had, but because TBXML had already been implemented and was working well, I decided to stay with that.
You can find information on TBXML and download the source from www.tbxml.co.uk. When visiting the site, you will notice that, as well as the TBXML.h and TBXML.m files, there are several other files: NSDataAdditions.h and .m. These can also be found in the TBXML group inside the CH09_SLQTSOR project.
Note
The version of TBXML used in Sir Lamorak’s Quest, and referenced throughout this book, is version 1.3.
The NSDataAdditions class extends Apple’s NSData class, providing the ability to encode and decode base64 data and also inflate and deflate data using gzip. Information on the original authors of this class can be found in the NSDataAdditions.h file.
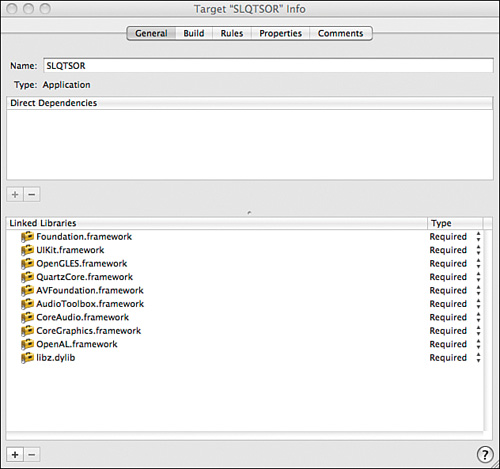
The NSDataAdditions class also requires that the zlib library be added to the project. This library comes with the SDK and can simply be added to the project. View the information on a project’s target in Xcode and within the general tab by pressing the plus button at the bottom of the Linked Libraries window. From the list that is displayed, select zlib.dylib and press OK.
Figure 9.10 shows the Target Info window that you can use to add the library.
Figure 9.10 Linked libraries in the project’s target info window.
These functions are really useful, and we will make use of them inside the TiledMap class when decoding and unzipping the tile data for a layer.
Initialization
Initialization of the TiledMap class continues to follow the standard pattern for initializing a class. Listing 9.11 shows the first half of the initWithFileName:fileExtension initialization method.
Listing 9.11 TiledMap initWithFileName:fileExtension Method (Part 1)
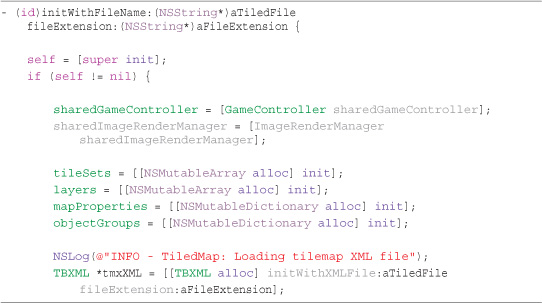
At the start of the method, we grab a reference to the sharedGameController and sharedImageRenderManager and allocate the mutable arrays and dictionaries used to store the tile sets, layers, map properties, and object groups. The method then creates a new instance of TBXML using the initWithXMLFile:fileExtension method.
Listing 9.12 shows the second half of the TiledMap initialization method.
Listing 9.12 TiledMap initWithFileName:fileExtension Method (Part 2)
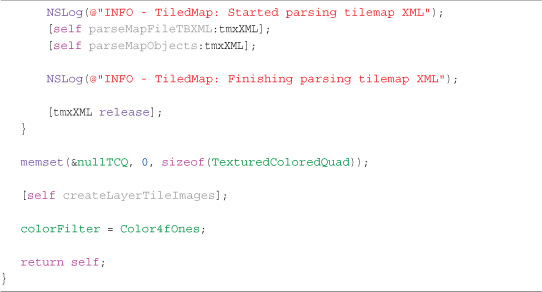
Having created an instance of TBXML called tmxXML, we then need to parse the .tmx file that has been opened. This is handled by two private methods: parseMapFile: and parseMapObjects: (covered next). The TBXML instance is released when the file has been parsed. The next line of code uses memset to initialize the nullTCQ structure we have to zeros. This will be used later when we check to see if a tile in the tile map has an associated image. With this structure initialized, the createLayerTileImages method is used to load the image data required by each tile in the tile map; these are used when the map’s layers are rendered.
Finally, the colorFilter for the tile map is defaulted to all ones and the new instance is returned. We cover what colorFilter is being used for when we review the render method inside TiledMap.
Parsing a Map File
There is a lot of data within a .tmx file, and this makes the method used to parse this information quite long. As you saw in the initialization method, the method used to parse a .tmx file is called parseMapFile.
This method takes a TBXML instance that has been created using a .tmx file and sets up some variables that we will be using as we parse the .tmx file.
Parsing the Map Element
Listing 9.13 shows start of the parseMapFile method inside TiledMap.m that deals with parsing the map element.
Listing 9.13 TiledMap parseMapFileTBXML: Method (Part 1)
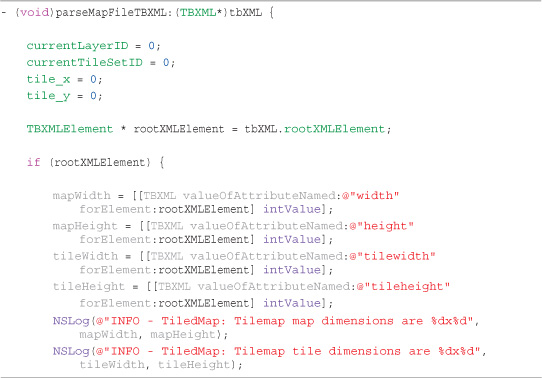
The first step is to get the root object of the file being parsed. All the lookups we will do inside the document will use this root element as the parent.
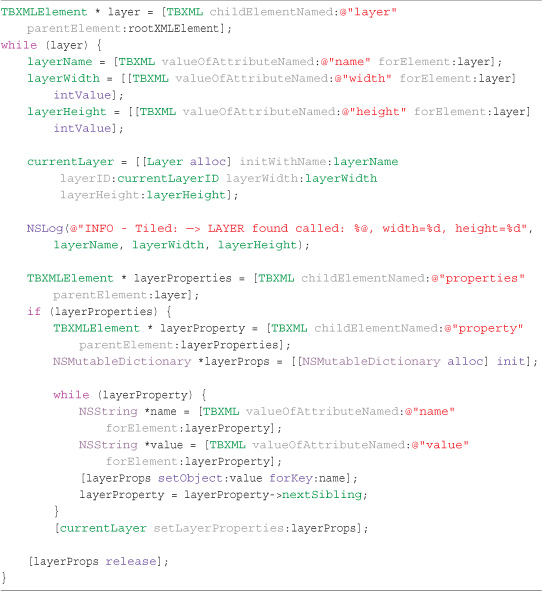
It’s then time to take the map element’s attributes and put their values into TiledMap properties. After the attributes are processed, we output a couple of debug message to provide information on the map and move onto checking for map properties. Listing 9.14 shows the loop that checks for and processes any map properties found in the .tmx file.
Listing 9.14 TiledMap parseMapFileTBXML: Method (Part 2)
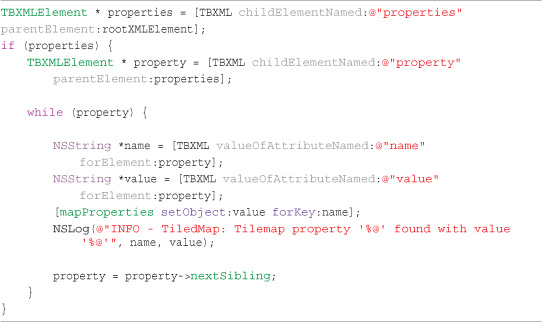
To find map properties, we create a new TBXMLElement called properties and populate it with the properties element if one has been found. There should only be a single properties element inside the map element, so if the properties element is not null, we know we have some properties to process.
If a properties element is found, we then create another TBXMLElement into which we place the first child property element. From property, we take the name and value attributes and load them into the mapProperties NSMutableDictionary. We also output some debug information to the log so we can see what has been found. These debug messages should be removed from a released version of this code.
The last command in the while loop loads the property element with the next sibling that is found. If this is null, we have finished finding all the properties; otherwise, we process the next property as before. This continues until there are no more properties to process.
Parsing the Tile Set Element
After we finish dealing with the map element, we move onto the tileset elements. Even though we create TileSet instances for all tileset elements found, only the first tile set will be used when rendering.
Listing 9.15 shows the code used to find the first tileset element and process its attributes. This is done in exactly the same way as we did for the map element.
Listing 9.15 TiledMap parseMapFileTBXML: Method (Part 3)

After we assign the tileset attributes, we output some debug information and then retrieve information from the image and source elements. These elements are used to store the actual name of the image file to be used as the tileset sprite sheet.

Once we have the image and source details for the tile set, we move onto processing any tile set properties. These properties are held at the tile image level (that is, each image inside a tile set can have any number of properties associated with it). This can be useful if you want to assign information to a tile image that maybe relates to its function in the map or maybe the amount of health that should be removed from the player should the player touch that tile.
Listing 9.16 shows the loop that is used to process any tile set properties.
Listing 9.16 TiledMap parseMapFileTBXML: Method (Part 4)
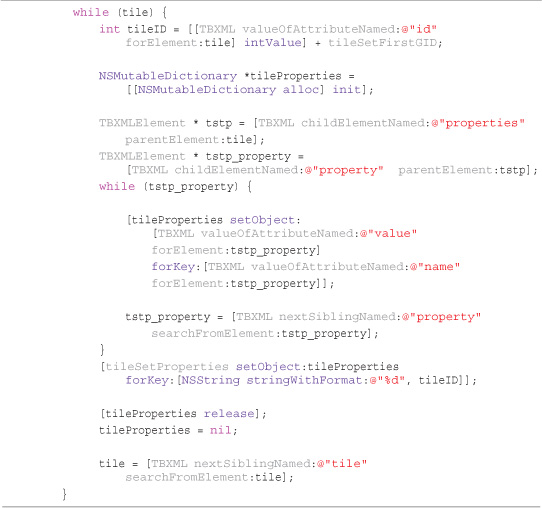
If we look at an example of the tile element and its properties, you see that we need a couple of loops: one that runs through all the tile elements that exist within a tileset, and another that processes the property details for each tile. Listing 9.17 is an excerpt from a .tmx file that shows a tile element with associated property elements.
Listing 9.17 Example Tile Elements with Properties
We loop through the tile and property elements in the same way we ran through the elements when processing the map element. This is a common pattern as we parse the different sections within a .tmx file.
Listing 9.18 shows how we finish processing the tileset.
Listing 9.18 TiledMap parseMapFileTBXML: Method (Part 5)
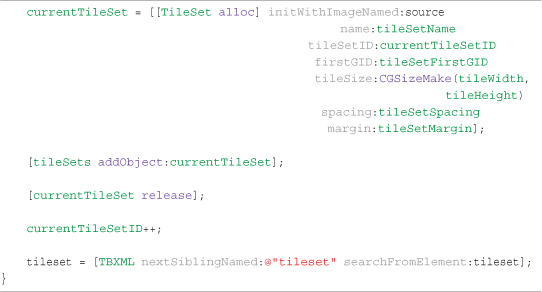
Having parsed the information from the tileset element, we then create a new TileSet instance, currentTileSet, using the information we have retrieved. We then add that currentTileSet to the tileSets array so that we can access it later.
Having added the tile set to our array, we then release currentTileSet because its retain count would have been increased when adding it to the tileSets array.
We finish off by incrementing the currentTileSetID counter and then looking for any other tileset elements.
Parsing the Layer Element
The layer element is processed in the same way as the map and tileset elements, as shown in Listing 9.19.
Listing 9.19 TiledMap parseMapFileTBXML: Method (Part 6)
As each layer is processed, we create a new Layer instance. This is loaded with the information we parse from the .tmx file. We also parse any properties that have been defined for the layer and pass them to the Layer instance.
Having parsed the layer element and created the Layer instance, next you’ll need to parse the tile information for that layer. This is a little more complex than the previous loops because the information about each tile could be base64 encoded and gzipped or simply plain XML.
Inside each layer element is a single data element. This contains the information for each tile inside an array. Listing 9.20 shows how we are searching for the data element and then checking to see if the information is encoded and gzipped.
Listing 9.20 TiledMap parseMapFileTBXML: Method (Part 7)
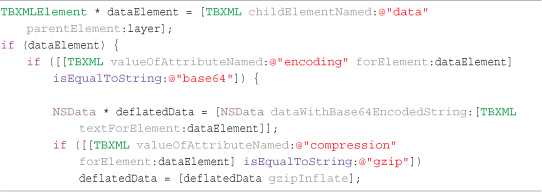
If we find a data element, we then check the encoding and compression attributes to see how the information has been stored. If the information has been encoded in base64, we decode it into an NSData instance called deflatedData. We then check to see if the compression is gzip, which is the only supported compression currently in our implementation. If it is gzip, we inflate the data held in deflatedData. The ability to inflate information held inside NSData is provided by the NSDataAdditions method that we discussed earlier in the sidebar, “XML Parsing.”
With the data now inflated, we allocate memory that holds the tile information for our layer. The information we are interested in is the GlobalID for each tile. By simply loading the inflated data into bytes, we have created an integer array that contains the GlobalID for each tile in the layer:
![]()
With this new array, we can now loop through the data and add each tile to the layer using the addTileAtX:y:tileSetID:tileID:globalID:Value method provided by the Layer class.
Listing 9.21 shows the loop we use to add the tiles to the layer we are currently processing.
Listing 9.21 TiledMap parseMapFileTBXML: Method (Part 8)
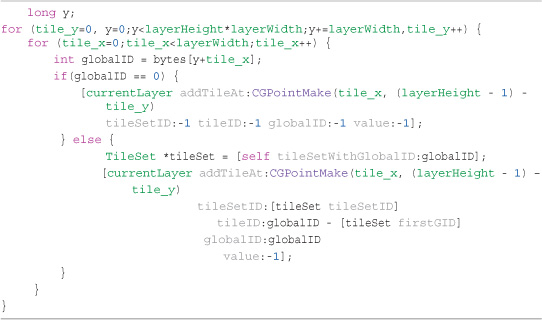
Notice that we are checking to see if the globalID is equal to zero or not. If globalID equals zero, it means that no tile image has been defined for that tile. If that is the case, we add a tile to the layer that has a tileSetID and tileID of -1. When rendering the tiles, a value of -1 indicates a blank tile and the rendering method will deal with it as necessary. We see how this is done when we cover layer rendering later in this chapter.
If the globalID is not zero, a tile image has been defined. We use the tileSetWithGlobalID: method defined in the TiledMap class to find out which tile set contains the tile image being used. Remember, we are supporting only a single tileset when rendering, even though the code necessary to load more tile sets has been implemented.
Having found the tile set that contains the tile image, we add the tile to the layer using the globalID and the information from the tile set.
Note
When we add a tile to the layer, you will notice that we are subtracting the tileY value from the full height of the layer. The reason for this is that a Tiled map has its origin in the top-left corner (that is, tile 0,0). Everything else that we do in OpenGL ES has an origin in the bottom-left corner. To simplify things later on, this small calculation reverses the y value so the map still has the same orientation as normal, but tile 0,0 becomes the bottom-left corner rather that the top-right. This enables you to render and perform calculations based on the origin being in the bottom-left corner.
If the data information was not base64 encoded, it means we need to process the tile data as plain XML.
Note
For large maps, this can create a significant performance problem, so base64 encoding should be used at all times. The preferences for saving a tile map can be changed from within Preferences.
Listing 9.22 shows the code necessary to process plain XML tile information.
Listing 9.22 TiledMap parseMapFileTBXML: Method (Part 9)
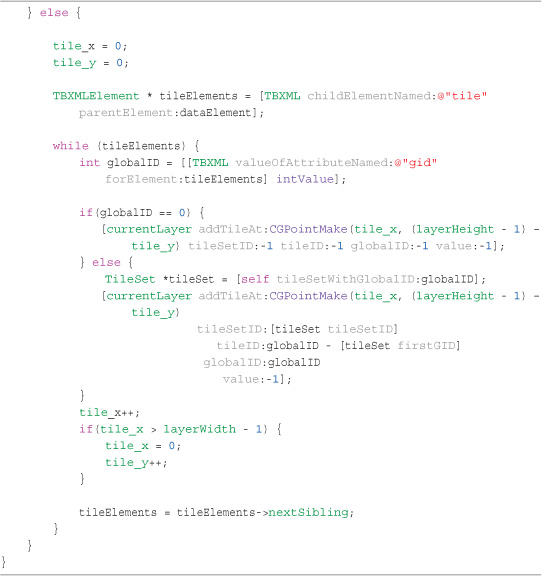
Processing the plain XML tile information is almost identical to processing the other .tmx file elements. We loop through all the tile elements and use the attribute information to add tiles to the layer, just as we did when processing the compressed tile information.
You will see that for both the compressed and plain loops, we are responsible for calculating tileID for each tile. This is a simple calculation that uses the globalID and subtracts the firstGID from the tileset the image is within.
After we finish dealing with all the tile data, we finally add the layer we have created to the layers array and release it. We then increment the layer counter, currentLayerID, and see if there are any more layers to process:
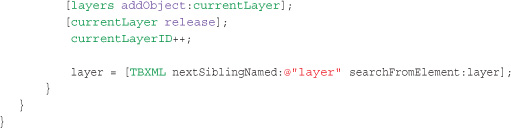
Parsing Object Group Elements
The final elements we need to parse are the object groups. As described earlier in the chapter when we reviewed the Tiled configuration file, object groups enable us to create objects within a special object group layer. Objects within these object groups can be positioned pixel-perfect rather than aligned to the map tiles. They can also have any number of properties defined that can be used to hold useful information.
If you review the code at the end of the parseMapFileTBXML method, you see that we deal with object groups in the same way we dealt with map, tileset, and layer elements.
We create three mutable dictionaries called objectGroupDetails, objectGroupAttribs, and objectGroupObjects, which we load with the information we find within object groups in the .tmx file.
The code to loop through the object groups is long, so I won’t reproduce the code in the book. You can review the code in the TiledMap.m file.
Creating the Layer Images
Having parsed the .tmx file, we now have all the information we need to configure the rendering of each layer within our map. The createLayerTileImages: method shown in Listing 9.23 is used to load the tile image information into the tile maps layers.
Listing 9.23 TiledMap createLayerTileImages: Method
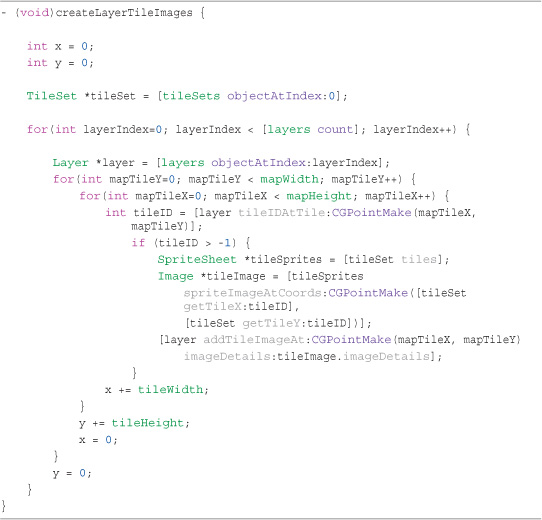
This loop is responsible for running through all tiles in a layer and identifying the image within the tile map’s tile set that is being used at each tile location. If a tile image has been set, its image is found in the tile map’s tile set. The ImageDetails structure for that image is then sent to the layer’s addTileImageAt: method that we saw earlier.
Note
To help performance, only layers that have a property called visible with a value of 1 are processed. A layer that does not have the property–or has it, but is not set to 1–will be ignored by this method. This enables us to skip layers that are never going to be rendered (for instance, the Collision layer in Sir Lamorak’s Quest).
Rendering a Layer
We’ve certainly covered a lot so far in this chapter. You’ll be glad to know that we are approaching the end now as we look at how we render a layer.
Having done all this hard work, we really want to start to see the results. For this, we need to be able to render our map layers to the screen. This is done by using the renderLayer:mapx:mapy:width:height:useBlending: method, shown in Listing 9.24.
Listing 9.24 TiledMap renderLayer:mapx:mapy:width:height:useBlending Method
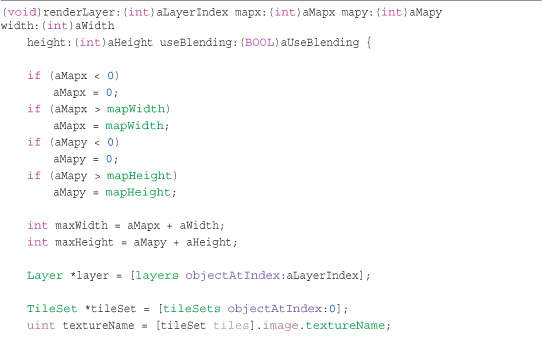
When we render a tile map layer, we are actually rendering a small part of the map. It makes no sense to render the whole layer, which could be hundreds of tiles wide and high, when you are only going to actually see an 8x13 section of the map on the screen.
I have experimented in different ways to render the tile map, including trying to get OpenGL ES to render the whole map, letting it work out which tiles should and should not be visible. The best performance I got was by limiting the tiles being rendered to just those visible on the screen.
This method first of all checks to make sure that the start and end locations within the tile map are within tile map bounds. If this is the case, the layer object specified is retrieved, along with the tile set and its texture name.
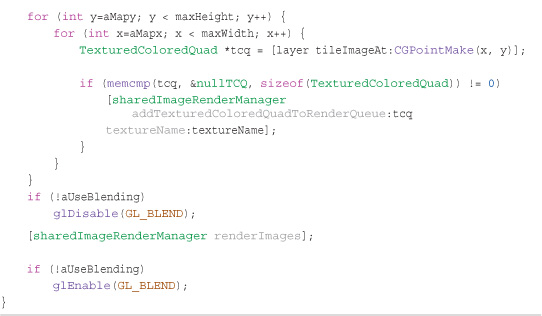
The method then loops through all the rows and columns defined by the tile map x and y location provided and the width and height. These are parameters passed in, so you can very easily change the tiles that should be visible.
For each tile in this grid, a check is performed to see if the tile’s image has been defined. The odd-looking memcmp command is being used for this. The tileImages array is just a chunk of memory that can store TextureColoredQuad structures. If a tile does not have an associated image, the TexturedColoredQuad structure at that location within the array will not be initialized. By comparing each entry in the tileImages array against a blank TexturedColoredQuad created during the initialization of the layer, we can see if an image exists for each tile in the layer.
If a tile image does exist, its TexturedColoredQuad information is added to the ImageRenderManager’s render queue. As you saw in Chapter 5, “Image Rendering,” the ImageRenderManager has a specific method called addTexturedColoredQuadToRenderQueue:texture:. This method is used to take information and place it in the render queue.
With all the visible tile images added to the render queue, a quick check is performed to see if blending should be disabled for this layer because it is enabled in the game engine by default.
Tip
If you have a layer of the tile map that does not contain any transparent tiles, such as the floor and walls in Sir Lamorak’s Quest, there is no need to have blending enabled. Blending is an expensive process on the iPhone, so turning off blending when it is not needed really helps performance.
With the blending set and the images loaded, the renderImages method is called on the ImageRenderManager, and the tiles for the layer are rendered to the screen.
The last check ensures that blending is re-enabled.
Getting Tile Informaiton
The final methods to discuss are those that let us query map information; for this, we’ll use the following methods:
• tileSetWithGlobalID:: Returns the tile set that contains the global tile ID provided.
• layerIndexWithName:: Returns the index of a layer that has a name that matches the name provided.
• mapPropertyForKey:: Returns the value of a map property identified by the supplied key.
• layerPropertyForKey:: Returns the value of a layer property identified by the supplied key.
• tilePropertyForGlobalTileID:: Returns the value of a tile property identified by the global tile ID supplied.
These methods provide us with access to any properties that have been defined in the map. They are very basic in that they use the key provided to search the dictionaries that were created when the Tiled map was parsed using the key provided.
Summary
Although the techniques for parsing .tmx map files is not complex, the amount of information held within the map file and making sure that the tile map class can be used for more than just a single game has caused the class to become complex.
Tile maps are still an important element in 2D games today. Having a robust tile map-editing tool, such as Tiled, and the ability to reproduce the maps designed in that tool in your game is a great asset. By making use of properties and object groups, it is possible to create a game that is data-driven for which the map provides a lot of this data.
Being able to change how your game functions by simply changing the tile map enables you to make game changes very quickly. When it comes to play testing and tuning the game, being able to make changes in the tile map and not having to dig through your game engine code will speed things up.
In the next chapter, we review the ParticleEmitter class. This class enables us to generate organic effects, such as smoke and fire, dynamically and is a great deal of fun to play with. We will be using particles in Sir Lamorak’s Quest to produce the effect of a baddie appearing and dying, as well as for the teleportation effects when Sir Lamorak gets bounced from one room to the next.
Exercise
The CH09_SLQTSOR project that accompanies this chapter moves over the top of a tile map, rendering two layers. The first layer is the map itself (that is, the floors and walls), and the second layer contains the objects, such as pictures, chairs, and so on.
Remember that the actual layers in a tile map are always rendered at 0,0, so movement inside the project is achieved by translating the OpenGL ES viewport before rendering. This gives the effect of moving over the tile map.
Try changing the values that are being used to translate the OpenGL ES world coordinates using the glTranslate command. It is important that you understand how using glTranslate affects what is rendered to the screen, as this technique is used within Sir Lamorak’s Quest to move the player around the map.
Note
The tile map in the project has the rooms drawn in the top-left corner of the tile map. For anything to be seen on the screen, we therefore need to translate the world coordinates so that when rendered, that area of the map is visible on the screen. Remember that the top of the tile map in pixels will be as follows:
Tile height * map height in tiles