
13. The Game Interface
This chapter covers the interface elements of Sir Lamorak’s Quest, including how the different interfaces were built and implemented. There are two types of interface in Sir Lamorak’s Quest. The first type is those built using OpenGL ES, such as the main menu and main game interfaces. The second type is those built using UIKit controls, such as UISlider and UIButton inside their own UIView. These interfaces, for example, are used for displaying and handling the settings within the game, such as volume and joypad position.
This chapter also covers how these interfaces handle rotation of the device. This is not always as easy as it sounds, so we review the approach taken to handle this within Sir Lamorak’s Quest.
Game Interface Project
The project we review throughout this chapter has taken a big leap from the previous chapter. The project for Chapter 13 is called SLQTSOR and is the complete game project for Sir Lamorak’s Quest.
At this point, we have covered all the key building blocks and are now reviewing the specific implementations for the game. Trying to pick apart the game and show these elements in isolation would be complex and not in context. By reviewing the complete game, however, we can see how the interface items have been implemented in the context of the completed game.
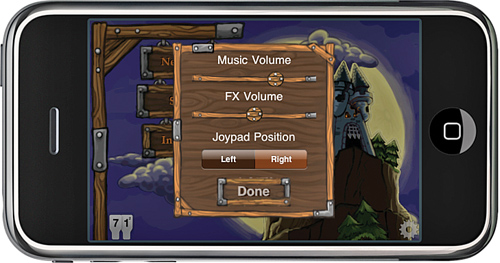
Figure 13.1 shows the iPhone Simulator running the SLQTSOR project. The interface being displayed is the Settings view, where the player can set the music and FX volume along with the location of the joypad.
When you run this project, you arrive at the Games main menu. Selecting the High Score, Instructions, and Information buttons brings up UIViews that are used to display that information. Pressing the gear icon in the bottom-left corner of the screen shows the Settings view, as seen in Figure 13.1.
Figure 13.1 iPhone Simulator running the SLQTSOR project.
With one of these views visible, rotating the iPhone causes the views to rotate and maintain the correct orientation to the player. You’ll also notice that the main menu in the background flips to maintain its orientation. This is also true when you are playing the game.
As you look through the SLQTSOR project, you see a great deal of new code—code that we have not reviewed yet. This chapter and the rest of this book look at this new code and how it’s used to implement the features we need for Sir Lamorak’s Quest.
Going through every line of code would take too long, but we cover all the important areas you need to understand. The remaining code is commented, and it should be reasonably easy to see what is being done and why.
OpenGL ES Interface
We start by looking at how the OpenGL ES interfaces have been created. There is no magic to this, and it simply uses techniques that we have already reviewed. The big difference between an OpenGL ES interface and something using the UIKit is that you have to build everything in OpenGL ES from scratch.
With UIKit, you get sliders and buttons that you can simply add to a view and start using. They handle the look and feel, as well as the actions that the controls provide. With OpenGL ES, you need to create the interface and controls manually using your own graphics and code for handling events.
You can make this as simple or as complex as you want. A simple button would consist of an image that is rendered to the screen and a CGRect that defines the bounds of the button. When a touch ends, the touch location is then checked against each button’s defined bounds. If the touch occurred inside a button’s bounds, you carry out the actions of that button.
If you wanted to make a more comprehensive control, you could create a new button class, for example, that would contain all the processing logic needed for your buttons. This class would be able to take care of rendering and identifying if a touch landed within the buttons bounds using some kind of visual highlight on the button.
What you implement is really down to the requirements for your game. It is amazing, though, what can be created using simple techniques.
The following sections cover the three elements that are needed to handle interface controls:
• Rendering
• Defining bounds
• Handling touches
Rendering the Interface
Rendering the interface in OpenGL ES is no different from actually rendering the game itself and any other OpenGL ES image. You design the graphics that you want to represent your buttons or other interface elements and then render these to the screen as normal.
Figure 13.2 shows the sprite sheet used for the main menu of Sir Lamorak’s Quest.
Figure 13.2 Sprite sheet used in Sir Lamorak’s Quest main menu.
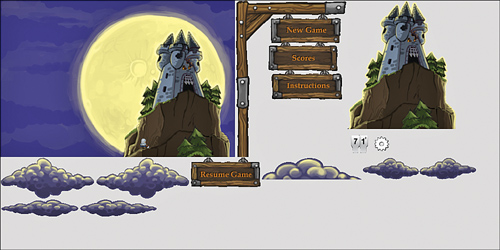
These images are used to generate the floating clouds, background, and the menu post. For the menu, I decided to have a fixed image for the majority of the options. These options never move and are always displayed, so having a single image was a simple solution. The Resume Game button appears only when there is a game to resume, so this needed to be a separate element in the sprite sheet. You can see that the Resume Game button has several chains on top. This makes the menu option look like it is hanging from the other panels on the signpost.
You will also notice that there is a logo and gear image in the sprite sheet. These images are both used as buttons. When the logo graphic is tapped, the credits for the game appear, and the gear displays the settings.
Inside the sample project is a group called Game Scenes. Inside this group are two further groups: Menu and Game. Inside the Menu group is the class that implements the main menu called MenuScene.m.
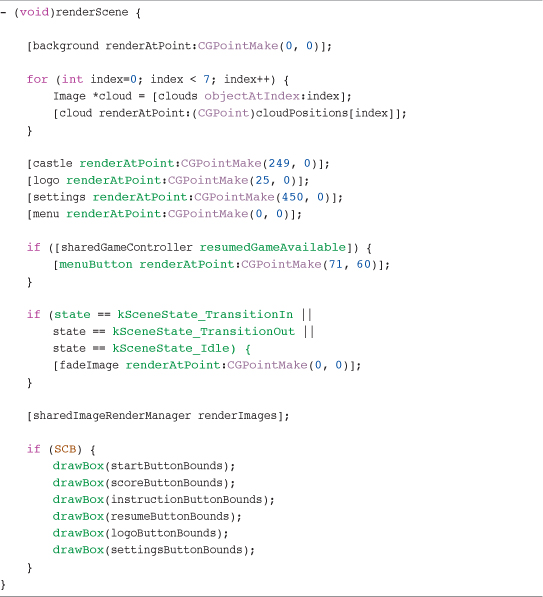
This class inherits from AbstractScene and contains all the logic and rendering code for the menu. The rendering code can be found in the renderScene method, shown in Listing 13.1.
Listing 13.1 MenuScene renderScene Method
This is basic code, and you should recognize it from what has already been covered in the previous chapters. The core elements in this method deal with rendering the clouds that move in different directions. This is handled by the for loop at the start of the method.
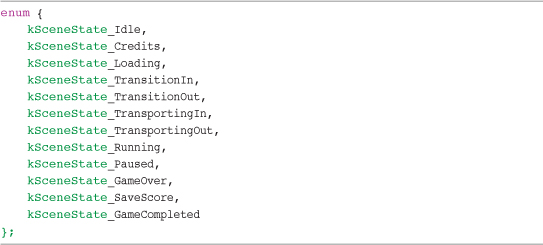
This method also checks the current state of the scene to decide on what needs to be rendered. The AbstractScene class has a property called state that can have a number of different values associated with it. These values are defined as an enum in the Global.h file inside the Global Headers group and are shown in Listing 13.2.
Listing 13.2 Scene States as Defined in the Global.h File
Within the renderScene method, we check to see if the state of the scene is kSceneState_TransitionIn or kSceneState_TransitionOut. If either of these states is set, the fadeImage is rendered. The fadeImage is a single black pixel that is scaled up to the size of the screen. This means that we can render an entire black image over the screen without the need for an image the size of the actual screen, which would use more memory.
The fadeImage is rendered above everything else when we need to fade in or out of this scene. As fading takes place, the alpha value of this image is changed, causing the underlying images that are being rendered to show through. This provides a very simple way of fading the entire screen.
As discussed in Chapter 4, “The Game Loop,” the rendering and logic are handled in separate methods. The state of the scene is used in both the render and update methods to make sure that the correct actions are taking place based on the state.
If you look at the updateWithDelta: method inside MenuScene.m, you see that a switch statement has been used to check the state of the scene. The scene state determines which actions are carried out. This method is employed throughout Sir Lamorak’s Quest to manage state within a scene.
Defining Button Bounds
Inside the MenuScene.h file, a number of CGRect variables have been created. These are shown in Listing 13.3.
Listing 13.3 CGRect Variables Defined in MenuScene.h

These variables hold the bounds defined for each of our buttons, and each is initialized within the init method inside MenuScene.m, as shown in Listing 13.4.
Listing 13.4 Initialization of Button Bounds

With the scene elements being rendered on the screen, it was a matter of working out where each button on the signpost was located and then defining the bounds for that button using those coordinates. The coordinates were worked out inside of a graphics package. Each screen was laid out using the images from the game inside an image the same size as the iPhone screen. Once items were where I wanted them, I was able to take the coordinates of each object and use them in the game code.
Handling Touches
With the interface buttons being rendered and their bounds defined, we can move onto processing touches.
The methods used to process touches were covered in Chapter 12, “User Input.” Each time a touch ends, we need to check if the touch occurred in any of the buttons bounds and then carry out actions associated with that button.
The touchesEnded: method is similar to the examples from the last chapter. The key difference is that we are only interested in single touches. This means that we don’t need to loop through all touches that are sent to the method; we just take any object from the UIEvent using the following command.
![]()
This takes any touch from the set of touches that may exist and is therefore not an approach to be used if you want to deal with multiple touches together. In this situation, you would need to loop through each touch, processing it as you go.
From the touch, we then grab its location and adjust the coordinates based on the orientation of the iPhone. (We review the orientation code a little later.)
Having obtained the location of the touch, we then check the state of the scene. We want touches to be processed only while the scene is running, not transitioning in or out. If the scene’s state is running, checks are made against the touch location and each button’s bounds. Listing 13.5 shows the check performed on the start button’s bounds.
Listing 13.5 Checking The Bounds Of The Start Button

We are using the CGRectContainsPoint function to check if the touch was inside the button’s bounds. If so, a sound effect is played and a number of variables are modified.
The scene’s state is changed to kSceneState_TransitionOut, which causes the menu to fade out, and the game scene to fade in. The code that handles the transition from the main menu to game can be found inside the updateWithDelta: method.
As part of transitioning to the main game, the iPhone’s idle timer is disabled using the following command:
![]()
This timer causes the screen to dim during inactivity, which can be annoying during game play.
Tip
Apple recommends that you enable the idle timer when displaying items such as the main menu, settings, or high score screens in your game. Having the screen fade to save battery while these items are displayed is good practice. However, having them fade during game play is not so helpful.
With touches being made on the screen, the timer does not normally dim the screen during game play. However, if you are using the accelerometer to control a game with no touches, the timer will assume inactivity and dim the screen, eventually putting the iPhone to sleep.
Handling touches is exactly the same for the other buttons on the main menu. The only difference is the code that is executed when a button is pressed.
Visualizing Boundaries
Setting up the boundaries for buttons and other elements does sound easy, but I found that identifying where boundaries were during testing was not so easy. I eventually came up with a simple method that let me visualize the boundaries for interface items, allowing me to easily see where they were onscreen. This was also extended to in game entities as well so that I could see where collision bounds were for objects within the game. Figure 13.3 shows the main game interface with boundary information switched on.
Figure 13.3 In-game screenshot showing the debug boundary information for touch areas.

The green boxes shown in Figure 13.3 represent the boundaries of the elements on the screen. This helped in fine-tuning those boundaries.
One important lesson was to make sure that the touch areas for interface items are large enough to be easily touched. An example of this can be seen with the Settings button in the bottom-right corner of the screen. The boundary for this item is large compared to the size of the image. This helps to ensure that when the user taps in the lower-right corner, the Settings appear.
Adding code to visualize these boundaries was very straightforward. I created a new class called Primitives and implemented a C function called drawBox. You can find the code for this inside the sample project inside the Game Engine > Primitives group. Listing 13.6 also shows the code for this function.
Listing 13.6 Primitives drawBox Function
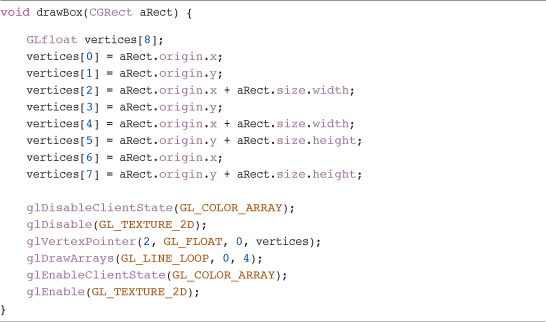
The method simply takes the CGRect passed in and creates the vertices necessary to render it to the screen. These vertices are held inside the vertices array and passed to the glDrawArrays command. The key item here is the use of the GL_LINE_LOOP mode. This tells OpenGL ES to draw a line between each vertex, giving us a rectangle. None of these calls are batched, so this method of drawing lines is not suitable for large numbers of lines as part of the game itself, but is fine for debugging purposes.
With this function in place, I then placed code inside the MainMenu and GameScene classes that drew the boundaries for the interface elements. Listing 13.7 shows the code used inside the MainMenu.m file.
Listing 13.7 Code to Render Interface Element Boundaries Inside MainMenu.m

The commands to render the boundaries were wrapped inside an ifdef compiler directive. If Show Collision Bounds (SCB) is not defined, this code won’t be compiled and the boxes aren’t drawn. SCB is defined within the Global.h file.
Having added this to the interface items, it was then a simple task to add the same feature to the game items, such as entities and objects. This allowed me to visualize collision boundaries for these items, which again was great for testing.
The code to render the boundaries was added to the AbstractEntity class inside the render method. Each entity in the game has two different boundaries: Movement bounds are checked against the map and stop the entity moving into a blocked tile, and collision bounds are checked against other entities and are used to see if one entity has collided with another. Movement bounds are rendered blue and collision bounds are rendered green. More detail about how and why this was done can be found in Chapter 14, “Game Objects and Entities.”
Handling Transitions
Transitions between scenes in Sir Lamorak’s Quest are handled using methods inside the GameController class and scene classes.
Inside the GameController class, the transitionToSceneWithKey: method is used to change the current scene. This method retrieves the scene with the matching key from the gameScenes dictionary and then calls the transitionIn method on the new scene.
The transitionIn method inside each scene is responsible for setting up the scenes state, as well as any other initialization that needs to be done. This provides a simple mechanism for switching between scenes and adding effects such as fading.
Transitions to UIViews, such as the high score, instructions, credits, and settings, are handled differently. A transition to these non-OpenGL ES views is done using the iOS notification center.
NSNotificationCenter provides a mechanism for broadcasting notifications. Classes can register with the notification center to listen for (observe) specific messages. This allows more than one class to be notified when a single message is broadcast.
When requesting the settings view, for example, there are a couple of actions we want to carry out. The first is to pause the game, and the second is to show the settings view.
Both the SettingsViewController and EAGLView classes register as observers for the showSettings message and get notified when the message is sent. On receiving this message, EAGLView pauses the game and SettingsViewController makes itself visible. If the hideSettings message was received, EAGLView would start the game and SettingsViewController would hide itself.
Notifications are a robust and quick way to pass notifications between classes and are used in Sir Lamorak’s Quest primarily for requesting a UIView to display or hide itself.
More detail on how these messages are processed will be provided in the next section.
OpenGL ES Orientation
When running the sample project and rotating the iPhone, you will have noticed how the OpenGL ES interface also flipped to maintain the correct orientation for the player. This is something that can cause people a lot of problems either around how to actually achieve it or with performance issues.
First of all, we need to look at how we can find out what the orientation of the iPhone is and then how to adjust the view to match it.
Manually Setting Orientation
By default, Sir Lamorak’s Quest starts up in landscape mode. This has been defined in the sample project’s SLQTSOR-Info.plist file, located in the Resources group, as shown in Figure 13.4.
Figure 13.4 Plist file for the SLQTSOR project.

In the property list, you see a line called Initial interface orientation that has a value of Landscape (right home button). This sets the iPhone’s screen orientation when the application launches. This plist file can also contain other useful settings. The last setting you will see in Figure 13.4 is Status bar is initially hidden. If you have this option enabled (that is, checked) in the plist file, the status bar will not be visible when you run your game.
This orientation does not, however, affect the orientation of the OpenGL ES view implemented within EAGLView. Only when using a UIViewController does the associated view automatically rotate to the orientation of the phone and only if the UIViewController is configured to support it.
It is possible to manually rotate the view associated with EAGLView using a CGAffineTransform on the view. This is not recommended, however. The performance overhead created when applying a CGAffineTransform onto a view displaying OpenGL ES content is high and can seriously degrade the performance of the application.
The recommended way to rotate the contents of an OpenGL ES view is to use OpenGL ES itself by applying a rotation matrix. A rotation matrix is far more efficient at rotating the view itself and is the recommended approach by Apple.
To apply the rotation, we first need to know the orientation of the iPhone. Luckily, we can ask the iPhone to start generating orientation notifications that are sent to the NSNotificationCenter. This is done inside the applicationDidFinishLaunching: method of the SLQTSORAppDelegate class, found in the Classes group of the sample project:
![]()
This asks the iPhone to switch on the accelerometer and to start sending notifications when the orientation changes. The name of the notification that gets sent is the following:
UIDeviceOrientationDidChangeNotification
To capture those notifications, the ES1Renderer class, found in the Classes > Views group of the sample project, registers an observer during initialization for that message. During registration, the method that should be called on receipt of that notification is also defined:
![]()
The orientationChanged method, which is inside the ES1Renderer class (and is shown in Listing 13.8), is called when the device orientation changes. This enables you to make changes to the OpenGL ES configuration. Of course, you could have as many classes as you want responding to this notification; they just need to register an observer.
Listing 13.8 ES1Renderer orientatonChanged Method
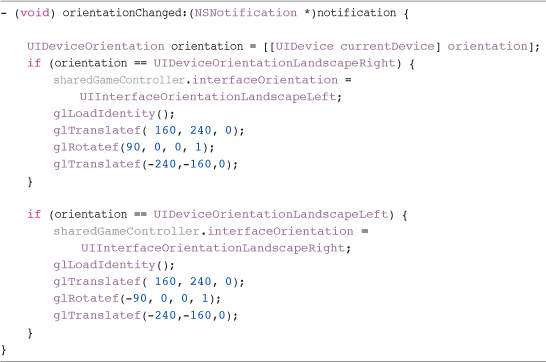
This method grabs the device’s orientation and then checks to see if it is equal to one of the two supported landscape modes (for example, UIDeviceOrientationLandscapeLeft or UIDeviceOrientationLandscapeRight).
When a match is found, the interfaceOrientation property of the GameController class is set, which will be used when orienting the UIKit views when they first appear. Finally, the OpenGL ES ModelView matrix is rotated.
With the rotation matrix applied, the OpenGL ES content will now be rendered in landscape mode with no other changes needed.
Tip
Even though the OpenGL ES content has been rotated, the view itself has not. For this reason, touch events and frame dimensions will still be reported as if in portrait mode. This means that the location of a touch event needs to be adjusted. In addition, the width of the view becomes the height, and the height becomes the width.
You’ll remember that when dealing with touch events, we called the GameController adjustTouchOrientationForTouch: method, which adjusted the touch location. Listing 13.9 shows this method and how it adjusts the touch locations to handle the game running in landscape mode.
Listing 13.9 GameController adjustTouchOrientationForTouch: Method

The method simply checks on the interface’s current orientation and then adjusts the touch location accordingly.
UIKit Interfaces
Building and using the OpenGL ES-based interface builds on what we have reviewed so far in the book by making use of images as interface elements and tracking touches against defined bounds. Building interfaces with UIKit is different in that a lot of the work you need to do in OpenGL ES is done for you by the UIKit framework and its controls.
This section reviews how to build a UIKit interface and integrate it into an OpenGL ES game. Integrating UIKit with OpenGL ES can be tricky—not so much technically in mixing the two, but when trying to maintain performance. Apple’s documentation states that mixing UIKit and OpenGL ES content can cause performance issues (and it indeed does), so we’ll tread carefully. These performance problems have been reduced with the increased power of new devices such as the iPhone 4 and iPad, but care should be taken not to mix too many UIKit controls over OpenGL ES, especially transparent ones as the blending required has a larger hit on performance.
Creating the Interface
UIKit interfaces can be hand-coded, but it is much easier to use Interface Builder. This allows you to graphically build your interface and then wire it up to a view controller. Most of the time, you will have two parts to your view: the view itself (as defined in a .xib file), and the view controller code file.
The view controller is a class that inherits from UIViewController. Inside this class, the code is placed that joins the view and its controls to the data to be used in your game. This is a standard approach used in creating iPhone applications and follows the Model-View-Controller (MVC) design pattern.
Know Your Design Patterns
If you want to learn more about design patterns and how they apply to the apps you develop for the iPhone, iPad, or Mac, I highly recommend picking up a copy of Cocoa Design Patterns by Erik M. Buck and Donald A. Yacktman (Addison-Wesley, 2009).
Because each view will normally have an associated view controller, they can be created at the same time within Xcode. Figure 13.5 shows the New File panel that is displayed when you create a new file in an Xcode project.
By selecting Cocoa Touch Class from the iPhone OS panel, and then the UIViewController subclass, you have the option to also create a .xib file for the user interface. By default, the .xib file will have the same name as the view controller class. If you are creating a view for the iPad, make sure you tick the Targeted for iPad option in the Options panel.
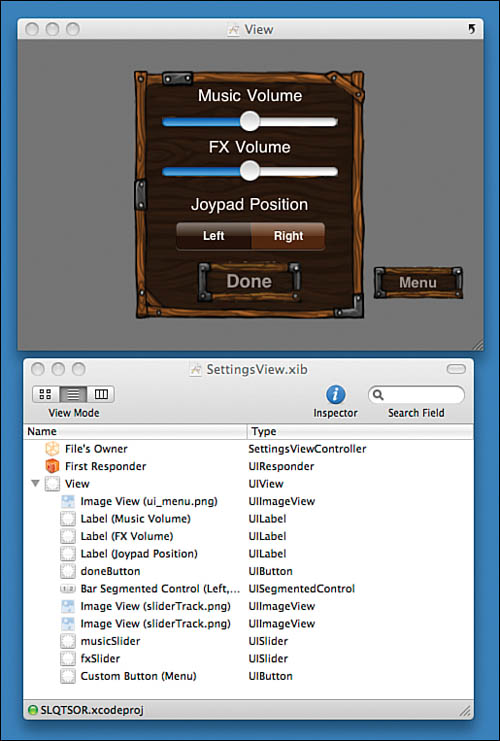
Inside the Resources group of the sample project, you find the Interface Builder files for the views used in Sir Lamorak’s Quest. Their associated view controller classes can be found in the sample project’s Classes > Views group. Figure 13.6 shows Interface Builder with the SettingsView.xib file opened.
Figure 13.5 New File panel in Xcode.
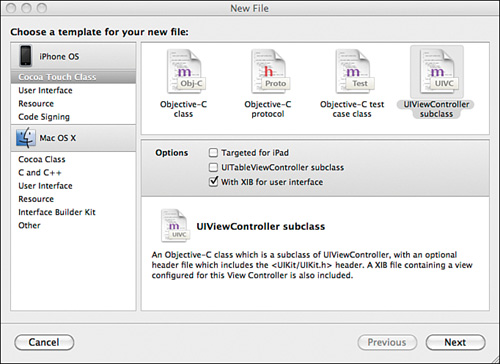
Figure 13.6 SettingsView.xib inside Interface Builder.
Note
If you open these .xib files from outside of Xcode, the images they use will not be found because they are stored within the Xcode bundle.
You see that this view was created from a number of different elements. A UIImageView was used for the background image of the wooden panel. On top of that, the labels and sliders were added along with the UISegmentedControl for the joypad position and then two buttons.
The buttons were configured with a background image. This allows us to theme the buttons to match the rest of the game. The UISlider controls stand out as not being themed in this screenshot.
To theme the UISlider controls, the thumb images need to be changed along with the slider track the thumb image moves along. The thumb image is changed using the following lines of code inside the viewDidLoad method of the SettingsViewController class:

Skinning the UISlider Track
As well as setting the thumb image using code, it is also possible to set the slider track images using code. The UISlider setMaximumTrackImage:forState: and setMinimumTrackImage:forState: methods can be used to set the end caps of the UISlider control along with the slider itself.
The image to be used with these methods needs to be carefully designed to get the effect you are after. The image needs to contain both the minimum and maximum end caps, along with a single pixel band after the left end cap that is stretched for the length of the slider to make the track.
When creating the image to be passed to these methods you use a UIImage method that specifies the size of the left end cap. The right end cap is automatically calculated as the width of the image minus the width of the left end cap and the one pixel-wide stretchable region. The UIImage is created as follows:
![]()
Using a different image when defining the minimum track image enables you to have the slider to the left of the slider thumb rendered in red and the track to the right rendered in white, or whatever colors your choose.
This is the method I used to skin the UISlider in Sir Lamorak’s Quest to make the UISlider control fit with the rest of the game.
Tip
When using images inside Interface Builder, they need to be part of the project or they will not be available to select in the Interface Builder GUI.
Setting up your view really is just a case of dragging around controls and laying them out as you need. One item worth noting is that the background color of the view itself has been changed. When this view appears, it will be over the top of the main menu of the game, and I want the game to show through so the background’s color has been made 55 percent transparent. This allows some of the background to be visible when this view is displayed.
Wiring Up the Interface
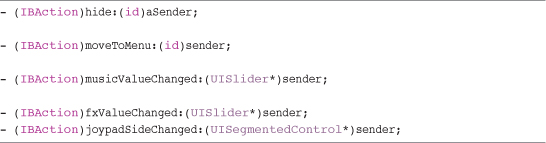
With the view built in Interface Builder, it is now time to write the code that joins the interface to the game. Within the SettingsView.xib file, there are several UISlider controls, a UISegmentedControl, and two UIButton controls. If you look inside the SettingsViewController.h file, you find that variables have been declared using IBOutlet, as shown in Listing 13.10.
Listing 13.10 SettingsViewController.h IBOutlets

IBOutlet is a hint that tells Interface Builder that these variables will be linking to objects in the view. After these have been created and the class has been saved, it is possible to link the objects in Interface Builder with the variables defined in the controller.
Figure 13.7 shows the music volume slider being linked to the musicVolume variable in SettingsViewController.h.
Figure 13.7 Linking an IBOutlet.

Right-clicking the File’s Owner in the SettingsView.xib panel causes the File’s Owner panel to pop up. This is the black panel on the bottom right of Figure 13.7. Under the Outlets section, you see all the variables defined in the SettingsViewController.h file as IBOutlets. If you don’t see the outlets there, make sure that IBOutlet has been specified in the header file of your view controller class and that the class has been saved. Also, make sure that File’s Owner has been configured to point to the SettingsViewController class.
To link the musicVolume variable with the music volume UISlider in the view, the empty circle to the right of the musicVolume item in the File’s Owner panel was clicked. While keeping the mouse button down, the circle was dragged to the music volume UISlider control. The mouse button was then released and the connection is made.
The same process is performed for all the controls on the view.
This process simply links the control on the view to a variable in the view controller, which enables us to access information about the control using that variable. Controls can also perform actions (for example, a button can be pressed and slider value changed). To capture these, we need to link these actions to methods inside the view controller.
The process is exactly the same. Inside the view controller header, the methods that are going to be linked to control actions are defined, as shown in Listing 13.11.
Listing 13.11 Action Methods Defined in SettingeViewController.h
You can see that the IBAction keyword has been used when defining these methods. Again, this is a hint to Interface Builder that these methods will be linked to actions. The process of linking the method to an action is almost identical to the one used to link a variable to an IBOutlet. The only difference is that on releasing the mouse button over a control, a new pop-up window is displayed, in which you can select the action that will trigger the linked method. Figure 13.8 shows this being done.
Figure 13.8 Linking an IBAction.

As you can see, there are a number of different actions supported by the control. We are interested when the value of the slider changes, so Value Changed is the action selected. The action for the buttons was Touch Up Inside (which is triggered when the button is pressed), and the action for the segmented control was (again) Value Changed. Listing 13.12 shows the IBAction methods in the SettingsViewController class.
Listing 13.12 SettingsViewController IBAction Methods

These methods simply set the value of properties in the GameController class that are then referenced to get the different volume settings or the joypad location.
All the UIKit views used in Sir Lamorak’s Quest are set up this way. The only difference is what they display. The credits and information views contain UIScrollView controls that allow the player to scroll up and down an image. The most complex view is the high scores view. This has a UITableView within it, which means it must implement the UITableViewDelegate and UITableViewDataSource protocols. This allows it to feed the UITableView with the data it needs.
This data is provided by the high scores table maintained in the GameController class. Even the cells that are used within the UITableView are defined using Interface Builder. The .xib file for the high scores table is called HighScoreCell.xib.
UIKit Orientation
As mentioned earlier, the process for managing orientation with a UIKit interface was different from that of an OpenGL ES interface. The reason for this is that the UIViewController class that sits behind each of our UIKit interfaces handles the rotation for us.
When the iPhone is rotated, the topmost view controller also rotates based on its configuration. On rotation, the shouldAutorotateToInterfaceOrientation: method is called in the view controller. This method returns a Boolean that identifies if the view should rotate to match the orientation of the iPhone. This enables you to limit rotation to an orientation supported by your application. Listing 13.13 shows this method inside the SettingsViewController class.
Listing 13.13 SettingsViewController shouldAutorotateToInterfaceOrientation: Method

There really isn’t too much to this method. It simply returns YES if the orientation of the iPhone is landscape. The UIInterfaceOrientationIsLandscape macro is defined within the UIKit.h file and is a simple way to identify if the orientation passed in is landscape, regardless of it being landscape left or right.
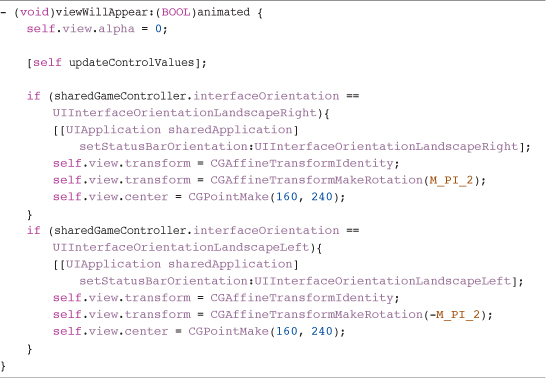
Having set up the view controller to rotate when we want it to, we have to deal with the orientation of the view when it appears. We want the views to appear in the correct orientation and not have to rotate when they first appear. To make sure the views are oriented correctly when they first appear, we can rotate them to the correct orientation within the viewWillAppear: method, shown in Listing 13.14.
Listing 13.14 SettingsViewController viewWillAppear: Method
Tip
Notice that M_PI_2 is used in the rotation transformation. This is a constant that holds PI divided by 2 and saves you from performing a calculation to find PI/2. This is defined in math.h.
This method first sets the alpha value of the view to 0. These views are going to fade into view using Core Animation, so when they initially appear, we need to make sure that they are transparent. With the alpha value set each of the controls on the view are updated with the values held in the GameController. This makes sure that the controls display the correct values when the view appears.
Next are the checks on the orientation of the iPhone. We check the value of interfaceOrientation in the GameController, which is updated when the iPhone is rotated inside ES1Renderer. Depending on the current orientation, the status bar orientation is set and then the view is rotated. Without doing both of these, the views will not appear in the correct orientation.
The view has a transform property that is first reset using CGAffineTransformIdentity. This is the same as the OpenGL ES command glLoadIdentity. The transform property is then given a rotation matrix that rotates it either 180 degrees to the left or right, and we make sure that the center of the view is set to the center of the screen. This now means that when the view does appear, it is positioned correctly in the middle of the screen with the correct orientation.
If the iPhone’s orientation changes while a UIKit view is visible, the view controller deals with rotating the view for us. We don’t need to worry about how that is handled.
Showing and Hiding a UIKit Interface
Having set up the orientation of a view that is about to appear, we need to actually make it appear. You’ll remember that a notification (such as showSettings) was sent when a button was pressed on the game’s main menu. Each view controller registers an observer in its initWithNibNamed: method. For example, SettingsViewController registers for the showSettings notification using the following:
![]()
When the showSettings notification is received, the show method is called that is used to display the view, as illustrated in Listing 13.15.
Listing 13.15 SettingsViewController show Method

The first task this method carries out is to add this view as a subview to EAGLView. Remember that EAGLView is the primary view onscreen, so we want to add this view as a subview. A check is performed to see which scene is currently active. If the settings view is displayed from the game scene, we want the menu button to be visible; otherwise, it should be hidden. The menu button on this view gives the player the opportunity to quit the game and return to the main menu; thus, it doesn’t need to be visible from the main menu.
The last task of this method is to actually fade in the view. This is done using Core Animation, which is perfect for this task. You simply make a call to the beingAnimations:context: class method and then make changes to the view.
In this example, we are setting the alpha to 1.0f, but you could also be rotating, scaling, or even changing color. When you then call the commitAnimations class method, the view is transformed from the original state to the end state, as defined between the begin and commit commands. This is not instant, though; this is done smoothly over time, creating a really slick animation.
More on Core Animation
Core animation is a complete topic in itself. If you’re looking for deeper coverage, I highly recommend reading Core Animation: Simplified Animation Techniques for Mac and iPhone Development by Marcus Zarra and Matt Long (Addison-Wesley, 2009).
Having the view on the screen, we need to be able to hide it. This is done using the hide: method. This method is wired to the Touch Up Inside action of the Done button on the view and is shown in Listing 13.16.
Listing 13.16 SettingsViewController hide Method
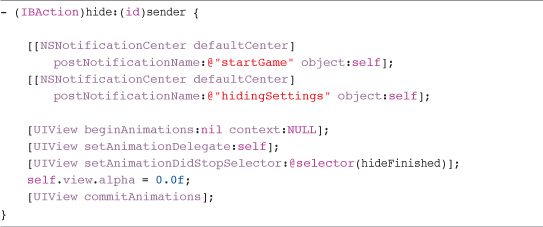
At this point, the game has been paused by EAGLView, so we post a startGame notification that causes EAGLView to start the game again. This is followed by the hidingSettings notification that is observed by GameScene. Inside GameScene, this notification causes the checkJoypadSettings method to be called, which is shown in Listing 13.17.
Listing 13.17 GameScene checkJoypadSettings Method

This method is used to make sure that the joypad and settings buttons are positioned correctly on the screen. Based on the joypadPosition property of the GameController class, it alters the position of the joypad and settings button and also their bounds.
With the notifications sent, the final task of the hide method is to fade out the view. This is almost identical to the fade that was used in the show: method. The key difference is that we want to know when the fade has completed.
Part of the clean up of this method is to remove this view from EAGLView. This is because only the topmost view controller within EAGLView will respond to the iPhone rotating. If we simply left all the view controllers attached to EAGLView as subviews, only the topmost view would rotate when the iPhone is rotated. To overcome this, we remove each view controller from EAGLView when it is hidden.
The trick here is that we don’t want to remove the view before it has finished fading out, so we need to be notified when the view has finished fading out. Luckily, Core Animation has a great way of handling this. You simply provide an animation delegate—which, in this example, is self—and then set the animationDidStopSelector to the method you want to run when the animation finishes.
In Listing 13.16, you see that we defined this method to be hideFinished:, which then runs the following command to remove the view from EAGLView:
![]()
Summary
This chapter covered how interface elements are created using both OpenGL ES in combination with UIKit. We have seen the differences between the two and looked at how you build interface elements, such as buttons from scratch using OpenGL ES, and how tracking the player’s touches can activate them.
For the UIKit interface elements, you saw how they were created in Interface Builder and then wired up to the view controller class responsible for managing the view’s actions and data.
We also saw how to handle the rotation of the iPhone while maintaining the screen’s orientation to the player, and how this needed to be implemented differently for OpenGL ES than it does for the UIKit interfaces. We also covered the use of Core Animation to fade the UIKit interfaces into and out of view.
Even with the detail we have covered in this chapter, we have only scratched the surface of what is possible. With this base knowledge, you are now in a position to experiment and take your interface design and implementation even further.
Chapter 14 reviews how entities were built in Sir Lamorak’s Quest. This includes the player, baddies, and game objects.