
14. Game Objects and Entities
We are now at the point where we need to start thinking about how to populate our game world with game objects and entities. Game objects are items in the game, such as energy pickups, parchment pieces, and animated tile map game objects (such as lamps). Game entities include the player (Sir Lamorak), the baddies roaming around the castle, the axe Sir Lamorak throws, and the castle’s doors that open and close on their own.
These entities and game objects form the backbone of the game play. How they interact with each other and the role they play in the game is important in bringing the game to life.
We know from the game design we covered in Chapter 1, “Game Design,” that we want the player to perform some basic actions such as throwing an axe, collecting items such as keys, and eating energy game objects. We also wanted to have baddies that roam around the castle, getting in the player’s way, as well as doors that are either locked and require the correct key to open, or those that simply open and close on their own, or maybe are helped by the resident ghosts.
This chapter covers how these objects and entities are created and implemented within Sir Lamorak’s Quest.
Game Objects and Entities Project
The project for this chapter is the same as for Chapter 13, “The Game Interface,” (SLQTSOR). Running this project and starting a new game, and you will immediately see the doors that open and close at will. Walking around the castle, you find energy items that can be collected and see baddies that start to appear in a cloud of purple smoke. You will also come across colored keys that Sir Lamorak needs to collect in order to escape from the castle.
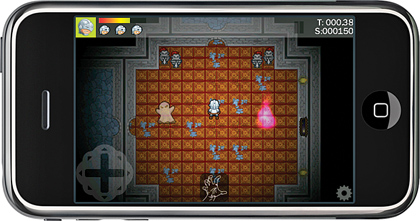
Figure 14.1 shows the iPhone Simulator running Sir Lamorak’s Quest with a ghost entity moving around and another entity appearing.
Figure 14.1 iPhone Simulator running SLQTSOR.
Game Objects
Before we start looking at how game objects have been implemented, we take a look at the different game objects that are used within Sir Lamorak’s Quest, including the following:
• Map: Implements the flickering lamps that can be seen on the walls and also the gravestone that appears when the player dies.
• Key: Implements the colored keys that are located around the map. These keys are needed to unlock colored doors.
• Energy: Implements the food items that can be collected by the player. These items replenish the player’s health and are used as soon as the player walks into them.
• Parchment: Implements the parchment pieces that the player must collect to escape from the castle.
These game objects perform specific tasks within the game so each one has its own class. These classes contain the logic and graphics specific to the game objects and allow us to easily change their behavior as required.
Game objects that share behaviors have been implemented in the same class, and each game object inherits from the AbstractObject class that we see later in this chapter. This abstract class contains type, subtype, state and energy properties. By setting the type type and subtype, the class knows which game object it should be representing. This changes the graphics used to render the game object, as well as the logic that controls it.
Game objects are held in an array in the GameScene class, called gameObjects.
AbstractObject Class
All game objects inherit from the AbstractObject class. This class contains all the properties that are common between game objects and the methods that these game objects can override. It also implements the NSCoding protocol. This is useful when information about a game object needs to be saved and restored at a later stage. More information about this can be found in the Saving a Game Object or Entity later in this chapter.
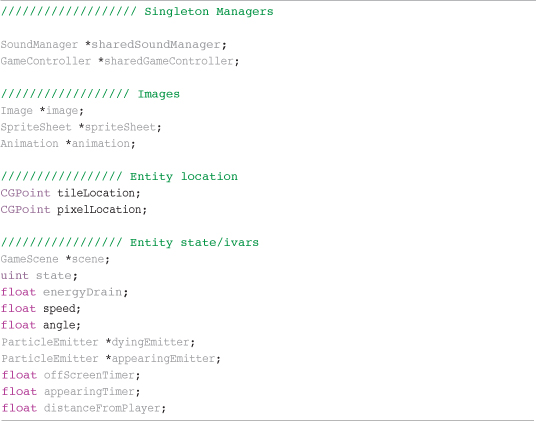
The AbstractObject class can be found in the sample project in the Abstract Classes group. Listing 14.1 shows the properties that the AbstractObject class defines.
Listing 14.1 AbstractObject Properties
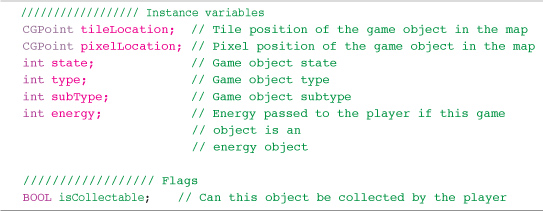
Each game object has a tileLocation that specifies the game objects location in terms of tiles on the tile map. It also has a pixelLocation that is calculated from the tileLocation. The pixel location is used when rendering the object to the screen. There is a common function used to convert the tileLocation to the pixelLocation called tileMapPositionToPixelPosition that is defined in the Global.h file. This function is called within the initWithTileLocation: method of the game object classes themselves (for example, EnergyObject).
You may have noticed that there is no member to store an image. The reason for this is that an object could have multiple images or use animation.
The valid types, subtypes, and states are defined as enums inside the Global.h file within the Global Headers group. These are shown in Listing 14.2.
Listing 14.2 Game Object Type and Subtype enums in Global.h

The values assigned to each of these type and subtype enums are used within the game code and also within the tile map editor. Game objects and their location are defined within the tile map, and it’s necessary to set their properties to specify their type and subtype. This is processed when the tile map is parsed as the game starts and the necessary game objects are created.
As the value of these enums is used outside the game code, specifying the number manually in a large list of enums, such as the subtype, makes it easier to read what the values are when creating game objects in the tile map.
The AbstractObject class also defines a number of common methods, shown in Listing 14.3.
Listing 14.3 AbstractObject Methods
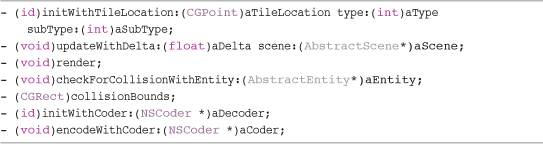
Each game object is responsible for its own updateWithDelta: and render methods that override the methods in the abstract class. Most of these methods are empty, and you would override them in the subclasses that inherit from AbstractObject.
Two methods that do contain code are the initWithTileLocation: and render methods.
The initWithTileLocation: method simply initializes the class and creates a reference to the shared sound manager. It is assumed that all game objects will want to play a sound at some point, so the shared sound manager reference is created within the abstract class.
The render method contains the code necessary to render a box around the game object that matches the game objects collision bounds. We discussed the visualization of boundaries in Chapter 13. If the SCB constant is defined in Global.h, the drawBox function is called and renders the supplied CGRect.
EnergyObject Class
Although there are four different game object classes within Sir Lamorak’s Quest that inherit from the AbstractObject class, for starters, we review the EnergyObject class as an example of how the game object classes have been implemented.
Note
The game object implementations can be found inside the Game Objects group of the sample project.
Initializing
When a game object is created, its initWithTileLocation: method checks to see what type and subtype the game object should be. This allows the game object class to then configure the necessary graphics to be used when rendering the game object to the screen. Listing 14.4 shows this method from the EnergyObject class.
Listing 14.4 EnergyObject initWithTileLocation: Method
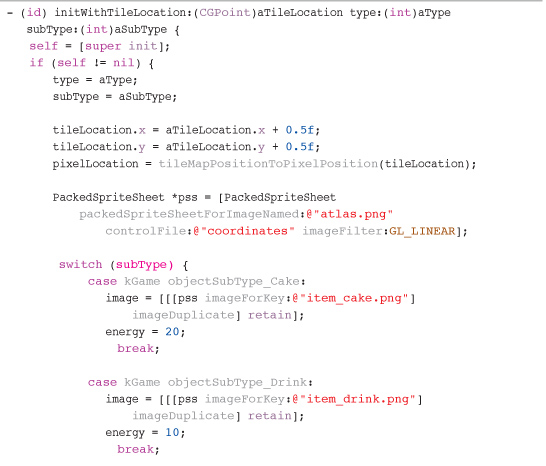
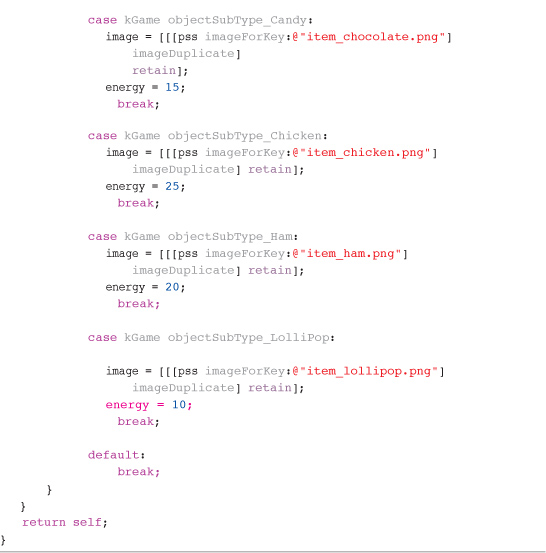
You can see that a simple switch statement is performed on the subtype. Based on this, the image for the game object is set, along with the energy amount the player will receive when the game object is collected.
You’ll also notice that we are taking a copy (duplicate) of the image from the sprite sheet. If we didn’t, we would end up referencing the same image for all energy objects that share the same sprite sheet. Changing the image in one of those instances would end up changing the image for all instances.
Note
This was a bug that took me a while to track down. Once I realized they were all sharing the same image, I implemented the imageDuplicate method inside the Image class.
Because a copy is being taken, the energy object becomes responsible for retaining and releasing that image as necessary.
Note
There are more sophisticated ways to create this configuration that remove the hard-coding from the values of the class (for example, the information is configured in some form of file that is parsed by the game object class). Given that there were not going to be that many game objects in Sir Lamorak’s Quest, I decided that hard-coding the values was not a bad option.
The MapObject, KeyObject, and ParchmentObject classes also use this same process when they are initialized to identify what type of game object they are.
Updating
During the game scenes update method, all game objects that are within the visible screen have their update method called. The check to make sure that an object is visible or not is done within the updateSceneWithDelta: method inside the GameScene method. The updateWithDelta: method is responsible for implementing the logic for a game object, as shown in Listing 14.5.
Listing 14.5 EnergyObject updateWithDelta: Method
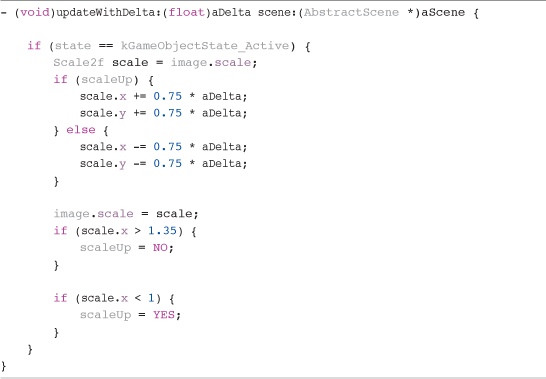
This update method is used to scale the game object’s image up and down if they are active. An EnergyObject has a state of kObjectState_Active while it is on the tile map and available to be picked up. When a game object collides with the player, the game object’s state is set to kObjectState_Inactive and a sound effect is played. This is done in the checkForCollisionWithEntity:, which we will see later.
As you can see, it’s simple to place any logic required for a specific game object into these methods. The approach here is that all energy game objects are implemented in the same class, but there is nothing to stop you from creating separate classes for each of your game objects, with each implementing their own logic.
My key reason for keeping the game objects in a single class was ease of maintenance. Having a single class I could update to change behavior during play testing was quicker and easier than having many different classes. Architecting the game in this way, and using abstraction and inheritance, is also just a good design pattern to use.
Rendering
Rendering of the energy game object could not be easier; the render method is shown in Listing 14.6.
Listing 14.6 EnergyObject render Method
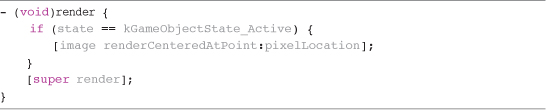
The image associated with the game object is rendered centered on the pixelLocation. The only check performed is that the game object is active. Only active energy game objects are rendered. The render method is then called in the abstract class, which takes care of rendering the bounding box if SCB has been defined. This is done by the [super render] command.
Dealing with Collisions
During the game scene update loop, the player game object is asked to check for collisions against each game object that is visible on the screen. Each visible game object is also asked to check for a collision with the Player entity using the checkForCollisionWithEntity:, shown in Listing 14.7.
The Player entity is responsible for identifying and responding to collisions with game objects, as are the game objects. This means that the response to a collision can be implemented differently in each case.
Listing 14.7 EnergyGame Object checkForCollisionWithEntity: Method
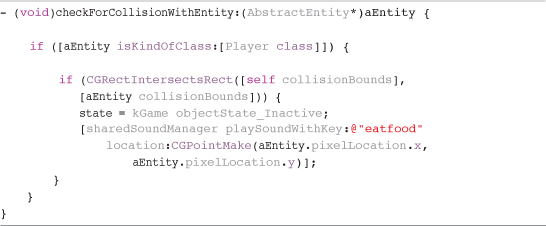
The collision method checks to see if the entity that has possibly collided with it is an instance of the Player class. In Sir Lamorak’s Quest, the only entity that will ever be passed to this method is the Player. This means that the first check is redundant, but I left that in there just in case I ever wanted to have other entities interact with game objects.
If the entity is the player, a further check is made to see if the bounds of the game object have intersected the bounds of the player. That being the case, the state of the game object is changed and a sound effect is played.
The bounds for each game object are defined within the collisionBounds method shown in Listing 14.8. In Sir Lamorak’s Quest, the bounds are the same for all game objects, but it is possible to have different bonds for different-sized game objects.
Listing 14.8 EnergyObject collisionBounds Method

This method is as simple as it gets and simply returns a CGRect. The size of this is hardcoded, but bounds could be dynamic. For example, you may want to implement a game object that has an animated image with some frames being larger than others. An example of this can be seen within the collisionBounds method of the Pumpkin class found in the sample project under the Game Entities > Moving group.
Game Objects and the Tile Map
The game objects we have discussed in this chapter are all located within the tile map and then collected by the player. We, therefore, need a way to specify where these objects are in the map. Having some kind of hard-coded list that specifies the type, subtype, and location for each game object could do this. This is OK, but can quickly become complex to manage.
In Chapter 9, “Tile Maps,” we looked at how the Tiled tile map editor can create tile maps for Sir Lamorak’s Quest. Being able to graphically position game objects on the map is a more efficient process, and one that makes changing an object’s position and details much easier.
The Tiled map editor supports the concept of layers, as well as a special kind of layer called an object layer. An object layer allows objects to be placed on the tile map at any pixel location. They are not limited to being positioned using tile locations.
By making use of an object layer, we can create and position game objects anywhere within the tile map. These objects are then parsed from within the tile map .tmx file during game initialization and loaded into the gameObjects array. We cover how the game objects are initialized in Chapter 16, “Pulling It All Together.”
Figure 14.2 shows the Tiled editor with the map for Sir Lamorak’s Quest. The tile map file can be found in the sample project and is called slqtsor.tmx.
Figure 14.2 Tiled editing the slqtsor.tmx file.
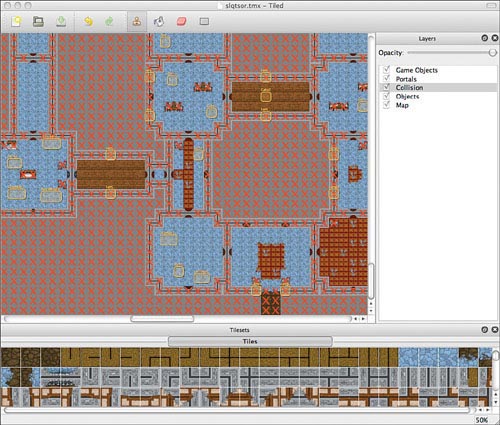
In Figure 14.2, you can see the different layers listed in the layers panel on the right. The layer called Game Objects is the layer that contains the game objects for the game. In the large center panel, where the map itself can be seen, the yellow boxes represent the different game objects that have been added to the map.
To add an object layer to the map, the Add Object Layer option should be selected from the Layer menu. A dialog appears, asking for the layer’s name. Enter a name for the layer, and when you click OK, the object layer is created.
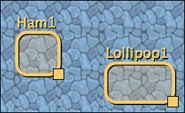
With the object layer highlighted, clicking anywhere on the map creates a new object. A colored box represents each object. These boxes have a handle on the bottom-right corner, enabling you to change the box size. Figure 14.3 shows two objects within the map.
Figure 14.3 Objects within the Tiled map editor.
The location and dimensions for these object boxes are written to the tile map’s .tmx file. This allows object layers to be used for different purposes (for example, collision detection).
The location of objects in the .tmx file are stored as pixel locations, not tile locations. When the objects are created, the pixel location of the bottom-left corner is converted to a tile location. When an object is initialized, 0.5 is added to that tile location so that the object is rendered in the center of that tile. The dimensions of the object (that is, the width and height) are not used in Sir Lamorak’s Quest. The different sizes you can see in the editor simply allow the name to be seen clearly.
Having created an object, it is then possible to add properties. Figure 14.4 shows the context menu that appears when you right-click an object.
Figure 14.4 Object context menu.
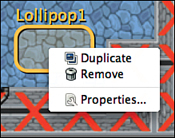
Through the context menu, it is possible to duplicate and remove the object and set the object’s properties. When you have an object with a number of properties, it is useful to be able to duplicate it and just change the property values on the new object.
Selecting the properties option brings up the Object Properties dialog, shown in Figure 14.5.
The name of the object is important, as it will help identify what the object is when you are working within the map editor.
Note
Object names must be unique because they are used as keys within the TileMap class. These keys are used to gain access to the properties that have been defined for each object. This is a restriction within the TileMap class and not of the Tiled editor itself.
Figure 14.5 Object Properties dialog box.
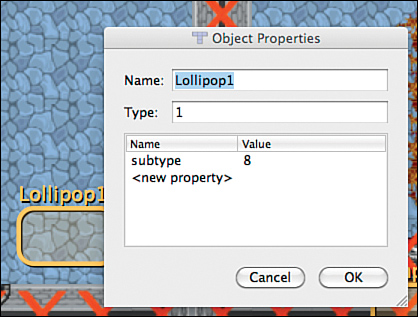
The type field is used to store the object type value. Remember that an object can be one of three different types:
• kObjectType_Key = 0
• kObjectType_Energy = 1
• kObjectType_General = 2
The item selected in Figure 14.5 is a lollipop, so the type should be 1 (that is, kObjectType_Energy). To store the subtype, a property has been added to the list of properties called subtype. This defines what type of energy object this will be. If you review Listing 14.2, you see that an object subtype value of 8 is a lollipop.
Note
Any number of properties can be added to an object, and it’s a great way of extracting configuration information from the game’s code to the map editor. This kind of approach really can help make the tile map editor your level editor.
By adding objects to the tile map and configuring their type and subtype, you can easily populate the game with all the objects needed. It’s also really easy to change their location when play testing shows they need to be moved, removed, or added.
Game Object Summary
We’ve not covered the implementation of all the game objects in Sir Lamorak’s Quest in this chapter, but having reviewed the AbstractObject and EnergyObject class, you should now have everything you need to investigate the other objects and see how their specific implementations differ.
Game Entities
Game entities in Sir Lamorak’s Quest are very similar to game objects—so similar, in fact, that there is no reason why they could not have shared the same abstract class with just a few changes. Although that may be true, I decided to keep them separate to denote the fact that objects are static and don’t proactively perform any actions. Entities, on the other hand, can both move and perform actions.
For this reason, the AbstractEntity class was created. A number of different entities in Sir Lamorak’s Quest inherit from this class:
• Player
• Axe
• Ghost
• Pumpkin
• Bat
• Zombie
• Witch
• Frank
• Vampire
• Portal
• Door
These entities and their classes are used to represent active elements in the game. The baddie entities should be easy enough to recognize in the list. These entities roam around the castle, getting in the player’s way. If the player runs into any of these guys, they vanish, and the player’s energy levels are reduced—a little like getting slimed.
Defining Doors
Each door in the castle is represented by an instance of the Door class. This class is responsible for handling the different doors in the castle (that is, locked doors that you need a key to move through, and those that simply open and close randomly).
Door locations and types are defined within the tile map. The doors are added to the tile map on the Collision layer. Within the maps tile set, the door tiles are given a property called type. Right-clicking on a tile brings up a context menu that enables you to view the properties that have been created for that tile.
The value of type relates to another set of enum values defined within the Global.h file. The value tells the Door class what type of door it should be representing and also the behavior of that door.
Only door tiles that show a closed door are used to specify the location of doors on the map. During initialization of the GameScene, door instances are created and added to the doors array while processing the collision layer of the map.
The Axe class is self-explanatory. This class represents the player’s axe that can be thrown. It handles the fact that an axe can bounce off walls and only exists for a defined period of time.
The last two classes in the list are Door and Portal. These entities don’t move, but they perform an action.
The Portal class controls the rendering of a particle effect that looks like some kind of spooky portal, and that when the player walks into one, he gets transported to another location on the map. How this transportation works, given Heisenberg’s Uncertainty Principle, no one knows—it just works.1
AbstractEntity Class
As stated earlier, this class is similar to the AbstractObject class. It defines a number of properties that are common among entities, as shown in Listing 14.9.
Listing 14.9 AbstractEntity Properties in AbstractEntity.h
These common properties are used by a large number of the entities in Sir Lamorak’s Quest. Apart from the Player, Axe, Portal and Door classes, no other entity uses its own properties, just those defined in the abstract class.
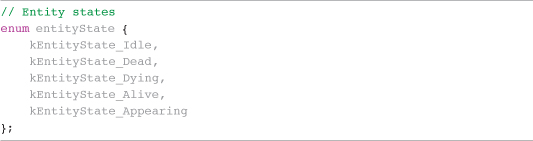
As with the game objects, entities have a state that is used to identify if they are alive or dead, among other things. Listing 14.10 shows the entity states as defined in Global.h.
Listing 14.10 Entity State enums Defined in Global.h
The AbstractEntity class also defines a number of methods, as did the AbstractObject class. Listing 14.11 shows the methods that are implemented within AbstractEntity.
Listing 14.11 AbstractEntity Methods

You’ll notice that the getTileCoordsForBoundingRect method is defined as a C function, not Objective-C. This function gets called a lot, so making it a C function reduces the messaging overhead that Objective-C introduces when calling methods on a class.
The getTileCoordsForBoundingRect method, along with the isEntityInTileAtCoords, initWithEncoder, and encodeWithEncoder are actually implemented inside the abstract class. These methods are the same across all entities, so they only need to be written once.
There is a new method called movementBounds. This defines a different bounding rectangle to that of collisionBounds. The movementBounds rectangle is used when checking to see if an entity has collided with a blocked tile on the map. This enables us to check for map collisions using one bounding box, and collisions with entities and objects using another.
Note
This is important, as I wanted the bounding box to be larger when checking to see if an entity had hit a blocked tile than when I was checking for collisions with entities and objects. The larger box for movement bounds allowed me to stop the graphics from the entities clipping from under doors when they passed through. With too small a bounding box, the edges of entities could be seen peeking from under the door graphics when they were in a doorway.
There are also two collision methods: one is used to check for a collision with another entity, and the other checks for a collision with an object. These could be merged, but having them split apart was part of the original design, and I’ve just stuck with it. The only class that actually uses the checkForCollisionWithObject: method is Player.
Artificial Intelligence
The use of artificial intelligence in games is a huge subject that has continually evolved since its inception. Since the 1950s, when the first programs using some form of Artificial Intelligence (AI) were written, such as checkers, game playing has been an area of research.
There are many books this topic, and it is too large to cover in any detail in this book, but it’s worth understanding where AI can be implemented.
As you have seen, each entity is responsible for its own updates and rendering, and it’s within the update method of the entities that the AI can be implemented. Sir Lamorak’s Quest doesn’t contain anything complex in terms of AI. The update routines for the game entities just deal with allowing the entity to move around the map, dealing with collisions.
It is a stretch to say that these entities have any form of intelligence. They really don’t have any understanding of what is around them. There is, however, one of the baddies that does implement more than just simple movement code.
The witch entity chases the player if they get too close. Listing 14.12 shows the code responsible for chasing the player in the Witch classes updateWithDelta:scene: method.
Listing 14.12 Witch Chase Code in the updateWithDelta:scene: Method
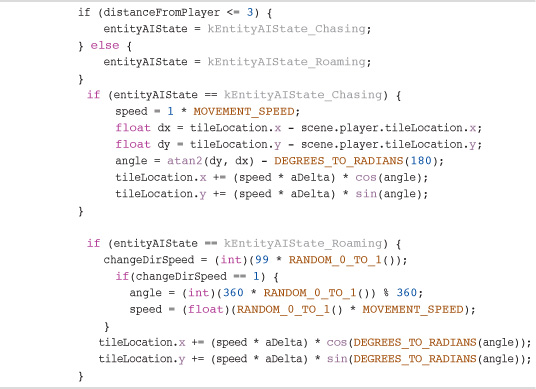
The distance the player is from the witch is calculated anyway, so we know if the entity is too far from the player and it needs to be re-spawned. If this distance is less than three tiles, the entity’s entityAIState variable is set to the kEntityAIState_Chasing enum. If it’s greater than three, the entityAIState variable is set to the kEntityAIState_Roaming enum.
When the entity is chasing, its speed is adjusted and the direction is calculated based on the location of the player. This causes the witch to chase the player should he get too close.
If the player manages to get more than three tiles between him and the witch, the witch gives up chasing and returns to just roaming around, until the player gets too close again.
This is a simple form of AI, but it can be used effectively to give the player a shock when the entity suddenly locks onto him. One consideration missing from this AI is blocked tiles. The logic does not check to see if there is a wall between the witch and the player; this means that the witch can cheat and see through walls.
Most games available have a form of AI cheating in them. This could be that the AI always knows where the player is, even if they can’t see the player, or that the AI entity gets a speed boost over the player when chasing him. These can seem unfair at times, but it is one way of making the AI more challenging. Without these little tricks, it is relatively easy for humans to overcome the AI within games. That said, AI is getting better and better all the time, so it may not be long before you come downstairs to find that your Mac has become self-aware overnight and has turned your kitchen appliances into an army of terminators.
Most AI makes use of a state machine. By using a number of input parameters, a specific state is set that causes the entity to exhibit specific behavior. In the Witch class, the entity’s AI state is held in the entityAIState variable, and an enum is used to define the current AI state. This can, of course, get much more complex when many more AI states and input parameters exist.
An addition that could be made for the entity’s AI is path finding. This is the process of finding a path through the map from the entity’s current location to some kind of target location. This could be a specific location in the map or the player’s current position. At the moment, the witch simply heads to the player and can get stuck behind walls. Using a path-finding algorithm would allow the witch to identify a route to the player without getting stuck.
A popular algorithm for finding a route through a map is called A* (pronounced A-star). This algorithm is well-suited to using a tile map to identify passable and blocked tiles. Using this information, the entity is then able to calculate a route from its current location to another location in the tile map.
The A* algorithm allows for different types of routes to be calculated by defining a cost for each move (for example, either a quickest route or a route that avoids specific types of tiles). Although we are not going cover the A* path-finding algorithm in this book, more information can be easily found on the Internet.2
Player Entity Class
The Player class is central to everything that goes on in Sir Lamorak’s Quest. It is responsible for the logic, rendering, movement, and inventory for Sir Lamorak. Although it does inherit from AbstractEntity, it does define a number of its own properties, as shown in Listing 14.13.
Listing 14.13 Player Class Properties
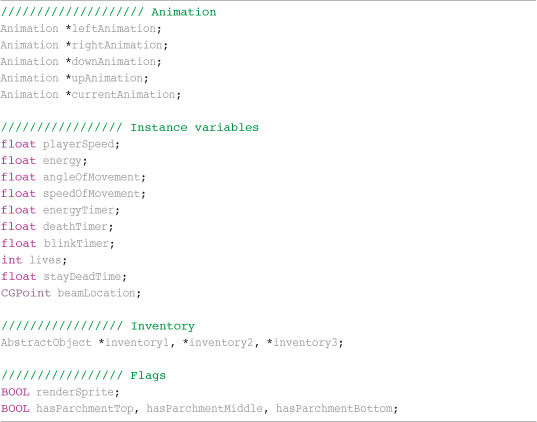
The animation properties store the different animations used when Sir Lamorak is moving up, down, left, and right. currentAnimation simply points to one of the four animations set up, depending on the direction the player is moving.
The inventory properties are used as pointers to objects inside the gameObjects array in GameScene. When an object is picked up, a reference to that object is held in the appropriate inventory slot. This means that no copy is needed of the object, as it is updated directly.
Initializing
Initializing the Player class is pretty standard now based on what we you have already seen. The animation is set up for the different directions. I didn’t want to have lots of if statements later in the code to decide which animation should be rendered or updated, so I decided to have a currentAnimation ivar that would point to one of the animations that has been set up. When the player changes direction, currentAnimation is updated to point to the new animation that needs to be used.
This means that the movement and render methods just deal with currentAnimation and don’t need to worry that different animations have been set up.
Updating
The updateWithDelta: method has a simple switch statement based on the state of the player. If the player is alive, his location and energy are updated. Listing 14.14 shows Part 1 of this method.
Listing 14.14 Player updateWithDelta: Method (Part 1)
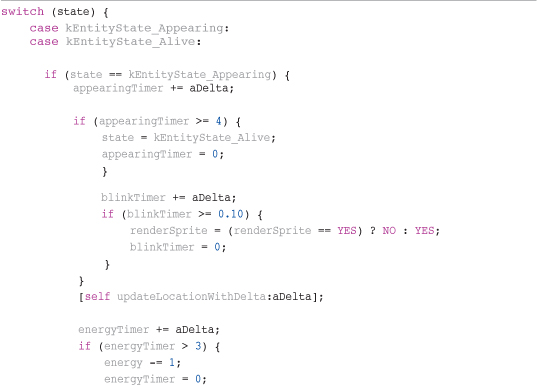
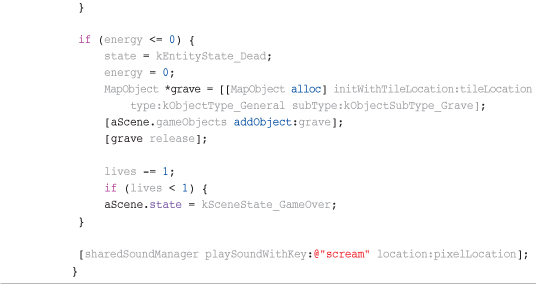
When the player’s energy has fallen to 0 or lower, his state is set to kEntityState_Dead. The energy value is set to 0 to make sure there is no residual value left that could cause the health bar to display some health, even though the player is dead.
Because the player has died, a gravestone needs to be added to the gameObjects array in GameScene. This object will then be rendered as a constant reminder of where the player bit the dust. You can see that when creating the MapObject instance, the type and subtype being used define the object as the gravestone.
With the gravestone added. the player’s lives are reduced and a check is made to make sure that he has some lives left. If not, the GameScene state is set to kSceneState_GameOver, and the sound of a harrowing scream is played to let the player know that he has failed miserably.
If the player did have lives left, the next time the player is updated, the switch statement will see that the state of the player is kEntityState_Dead and run the code shown in Listing 14.15.
Listing 14.15 Player updateWithDelta: Method (Part 2)

When the player dies, we don’t want him to immediately reappear. It would be good to give him some time to compose himself and carry on. For this reason, we have a simple timer that waits for a period of time and then sets the player’s status back to kEntityState_Alive and resets his health. The timer is implemented by simply incrementing an ivar each update using the delta value. When the player finally does appear, it’s also not a good idea to make him immediately vulnerable to attack. It’s common to give the player a few seconds where they can move around without getting hit by the baddies. This can be seen in Listing 14.14 when the player’s state is kEntityState_Appearing.
An ivar is updated that specifies if the player’s sprite should be rendered or not. This is changed every 0.1 seconds for a period of 4 seconds. This causes the players sprite to flash for 4 seconds telling the player that they are not going to get hit by baddies while flashing. Once the flashing stops, the player’s state is set to kEntityState_Alive and its then game on.
Updating the Player’s Location
Inside the updateWithDelta: method was a call to the updateLocationWithDelta: method. This is a private method and is used to update the player’s location based on the joypad input. It also handles the player colliding with blocked tiles. Listing 14.16 shows Part 1 of this method.
Listing 14.16 Player updateLocationWithDelta: Method (Part 1)
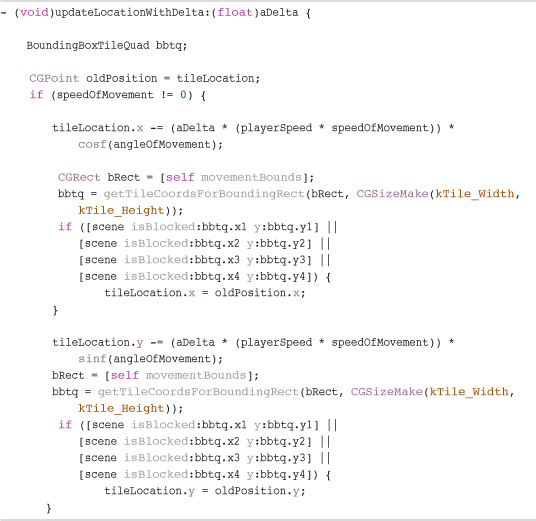
First of all, the player’s current position is stored in the oldPosition ivar. When trying to move the player, we may find that he has entered a blocked tile and need to move him back to where he was. This ivar is used to restore the player’s position if necessary.
Next, the speedOfMovement ivar is checked. If this isn’t 0, the player is moving, so we need to update his location. There is no point in running through all movement checks if the player isn’t moving.
If he is moving, we start to calculate the player’s new position. We do this one axis at a time (that is, x first followed by y). Checking one axis at a time enables the player to slide along walls.
The calculation of the new x location uses the player’s speed, the speed received from the joypad, and the angle delta value:
![]()
A little math is used to work out the new position based on the angleOfMovement. With a new x location calculated, the player’s current movement bounds are retrieved and the getTileCoordsForBoundingRect is called. This method converts the four corners of the rectangle into tile coordinates. This enables you to verify whether the tile in which that corner is located is blocked or not.
Figure 14.6 shows a diagram of what the collision check is doing.
Figure 14.6 Movement bounds checked against a blocked tile.
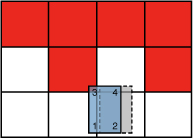
Figure 14.6 shows a tile map with blocked tiles colored red. The blue rectangle shows the movement bounds after applying the x movement, and the gray rectangle shows the original location.
You can see that Corner 3 on the blue rectangle is within a blocked tile. The check performed after the movement bounds have been converted to tile coordinates will spot this and set the player’s x position back to the original position. This is a very quick and simple way to react to a collision with a wall. Depending on how far the player moves in a single update, there could be a gap left between the player’s bounding box and the wall.
Within Sir Lamorak’s Quest, the speeds used mean the gap cannot be seen, but in games with faster-moving objects, it would be necessary to position the player so that his bounding box was up against the wall when a collision is detected, not back at its original position.
If the y movement were then applied, and it was in a positive direction (that is, going up the tiles), no corners would have entered a blocked tile, and the movement would be allowed. This demonstrates how checking each axis individually enables you to slide along walls and other objects. Stopping dead on all axes as soon as you can’t move in one of them is not a good feeling.
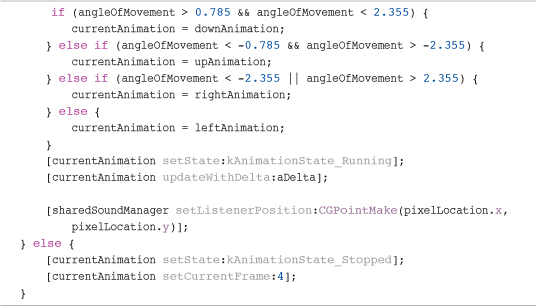
Listing 14.17 shows Part 2 of the updateLocationWithDelta: method that deals with switching the animation being used and setting the location of the OpenAL listener.
Listing 14.17 Player updateLocationWithDelta: (Part 2)
Note
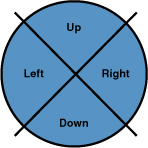
The odd-looking numbers used in Listing 14.17 are radians. These angles are used to define the quadrants shown in Figure 14.7.
When the joypad is touched, the player will run in the direction of the touch. To enhance the look of the game, we want to have the player animation that is used match the direction of travel. In Sir Lamorak’s Quest, we only have four different animations, covering up, down, left, and right. To make things look as good as possible, we set the animation that should be used based on the angle at which the player is moving.
Figure 14.7 shows the angles that are being used to define the animation that should be used.
The angleOfMovement is checked against the radian value of the angles shown in Figure 14.7. The quadrant in which the joypad angle lays defines the animation that is going to be used. The quadrants are actually defined using 45-degree angles. I tried a few different values, but 45-degree seemed to work best. The values used in the if statement are in radians because the angle passed from the joypad is also in radians.
With the animation sorted out, the appropriate animation is updated and the position of the OpenAL listener is moved to the new player location. This is important because the listener is used to work out what OpenAL sounds can be heard, as you remember from Chapter 11, “Sound.”
Figure 14.7 Joypad quadrants used to define animation based on the character’s direction.
If the player was not moving, the current animation’s state is set to stopped and the animation frame is set to 4, which is the standing pose.
Inventory
The Player class is also responsible for handling the player’s inventory. The following two classes are used to manage inventory:
• placeInInventoryObject:
• dropInventoryInSlot:
When the player adds an inventory item, the placeInInventory: method is called, as shown in Listing 14.18.
Listing 14.18 Player placeInInventory: Method
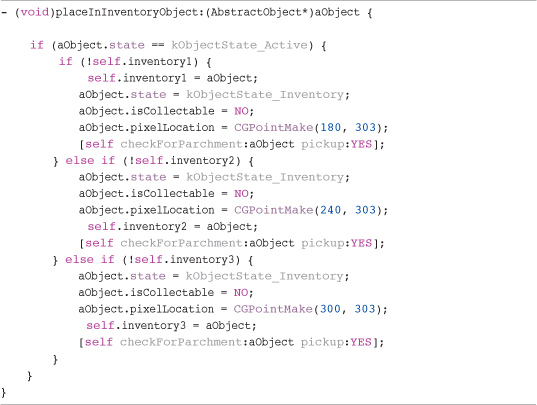
First of all, the object being added has its state checked. If it is not marked as active, it’s not added. If it is active, each of the three slots is checked to see if any are available. If an available slot is found, the state of the object is set to kObjectState_Inventory, marking it as being in the inventory. It is also marked as not collectible as you already have it, and its pixelLocation is set to the screen location used for that inventory slot.
A check is also performed to see if the object is a piece of parchment. Because the parchment pieces are important to finish the game, they are tracked. The checkForParchment:pickup: method is used to see if the object being picked up or dropped is a piece of parchment. If the player has all three pieces of parchment, a sound effect is played, letting the player know. Three flags are used to track which pieces of parchment the player is carrying. Only with all three flags set to YES can the player escape through the main entrance of the castle.
When dropping an inventory object, the dropInventoryFromSlot: method is called, as shown in Listing 14.19.
Listing 14.19 Player dropInventoryFromSlot: Method

The slot number is passed into the method from GameScene. The object associated with the inventory slot passed in is selected, and it has its pixelLocation set to the player’s current pixelLocation. Its tile location is also updated, along with its state.
Entity Summary
Again, we have not been through all the entities implemented within Sir Lamorak’s Quest, but we have reviewed the AbstractEntity and Player classes. This should provide you with the information you need to investigate the other entities to see how they work.
The entity classes we have not reviewed are very basic. The key activity takes place in their update routines that controls how they move and react to collisions with the tile map. The collision detection they perform on the map is the same as that used by the Player class.
Saving a Game Object or Entity
Being able to save the current state of a game object or entity is an important feature. This enables us to save the state of these objects and entities mid-game and then resume from where we left off later. This is actually easier than you may think.
You saw earlier that the AbstractObject and AbstractEntity classes implement the NSCoding protocol. This is a formal protocol, meaning that the class must implement the NSCoding methods. These are as follows:
• initWithCoder:
• encodeWithCoder:
Implementing this protocol means that the game object or entity can be archived using the NSKeyedArchiver to disk. When you have an array of objects or even single objects that you want to save, this is by far the easiest way to do it.
After an NSKeyedArchiver has been created, just a single command is needed to archive an entire array of objects or entities to a file. Listing 14.20 shows a snippet of code from the GameController saveGameState method.
Listing 14.20 GameScene saveGameState Method NSKeyedArchiver Creation Snippet
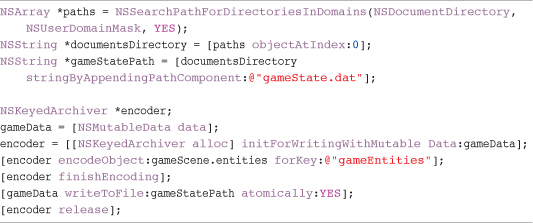
This code snippet is creating a new instance of NSKeyedArchiver that is going to place its data into an NSMutableData store called gameData. It then encodes an array of entity objects and gives it the key gameEntities.
That’s it—nothing else needs to be done, apart from asking the encoder to finish and then writing the data in the gameData structure to disk.
Each object inside the gameEntities array is asked to encode itself, which results in the encodeWithCoder: method being called for each object. This method is responsible for encoding each of the instance variables that need to be saved so that the object can be recreated at a later date.
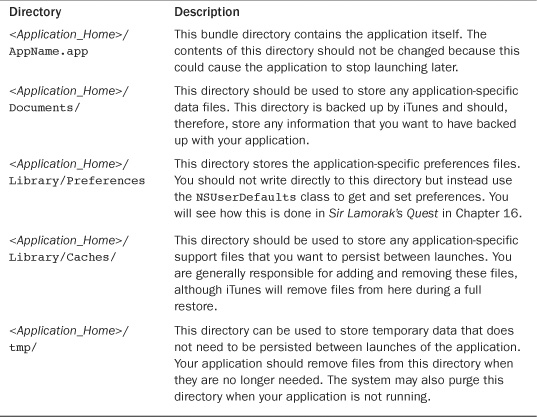
iPhone Application Directories
For security reasons, when an application is loaded onto the iPhone, it only has a few locations to which it can write data. When an application is installed, it creates a home directory and a number of subdirectories that you may need to access. Table 14.1 shows the directories created and their intended purpose.
It’s worth noting how the directories available to you should be used, so that your data gets backed up when necessary and is not removed when you least expect it.
Table 14.1 iPhone Application Directories
Both the AbstractObject and AbstractEntity classes implement these methods. The encodeWithCoder: method from the AbstractEntity class is shown in Listing 14.21.
Listing 14.21 AbstractEntity encodeWithCoder: Method

This class simply encodes each instance variable in the object using the NSCoder passed into the method. Each instance variable is given a key, and it is this key that is used to access that information when you come to decode.
When an object is asked to decode itself, the initWithCoder: method is called instead. Listing 14.22 shows this method from the AbstractEntity class.
Listing 14.22 AbstractEntity encodeWithCoder: Method
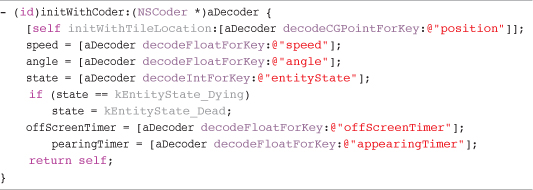
This class is provided with a decoder that is used to retrieve the instance variables for the class being created. This method needs to create a new instance of itself by calling its initializer, using the stored data if possible, and then sets the values of the remaining instance variables by using the key that was used when encoding the data.
By implementing NSCoder in the game object and entity classes, we have basically given them everything they need to encode and decode as necessary. The Player, Door, and Axe classes implement their own encode and decode classes because the data they save is different from that saved by the abstract class they inherit from.
We review how this is used to save the entire game state for Sir Lamorak’s Quest in Chapter 16.
Summary
As said at the beginning of this chapter, game objects and entities provide the core playability of the game. Their behaviors and interaction with the player really define how the game works. By splitting them up into separate classes, we have the ability to uniquely tune their behaviors so that they each take on their own AI or function within the game.
We saw that some classes are used to implement similar objects if their behaviors are the same, but we also saw how the entities were implemented separately so that their behaviors or AI can be tuned, almost providing each of the baddies with its own personality. The fact that the witch character starts to chase Sir Lamorak when he gets within a certain range is an example of some unique behavior that has been implemented.
Although we have not been able to review all the game objects and entities in Sir Lamorak’s Quest, having reviewed the abstract classes they use and a couple of examples, you should now be able to navigate the remaining classes to see how they work.
You should also not be afraid to make changes. Take something like the Ghost class and see if you can alter its behavior—maybe always chasing Sir Lamorak or altering how it roams around the castle. (Hint: Try making changes within the update method.)
In Chapter 15, “Collision Detection,” we will review the collision detection strategy being used within Sir Lamorak’s Quest and look at some other strategies that can be applied to the problem.