
15. Collision Detection
This chapter reviews how collision detection has been implemented within Sir Lamorak’s Quest, as well as the common problems that need to be solved. Without collision detection, the player and game characters would be able to wander through walls, and we’d have no way of knowing when the player or entities hit each other.
Although this chapter is titled “Collision Detection,” it is important to remember that collision response should also be included. Detecting a collision and then responding are two different stages that need to be managed separately. This doesn’t mean that they cannot physically be managed together in code, but that they should be considered separately when designing and implementing collision detection into your game.
Because Sir Lamorak’s Quest is a 2D game, the collision detection covered in this chapter is also designed around 2D. Although some of the concepts of 2D collision detection can be applied to 3D, the problems associated with 3D collision detection are beyond the scope of this book.
Introduction to Collision Detection
Collision detection in 2D is not that complex when you break down the problem. You basically need to identify when two objects intersect each other. Back in the 1980s, a lot of collision detection was done at the pixel level. If a pixel in one sprite overlapped a pixel in another sprite, a collision had taken place. On some platforms, there was even hardware that helped to do these checks quickly.
Today, much of what is rendered to the screen is built from triangles, so it’s not really a case anymore of just seeing if pixels have overlapped. That doesn’t mean that this cannot be done, as it can, but scanning pixels inside a texture and checking for overlaps is a time-consuming process.
A key point about most games is that they are a simulation. Therefore, if something can be done that looks good enough, then it is good enough. The fact that a collision is detected that’s not pixel perfect is not really a problem in games, especially in fast moving games where a mater of a few pixels is most likely not even going to be noticed by the player.
Some games model the real world much more accurately using physics engines, but again, some physics engines still cheat when checking for collisions and responses and just do enough to give the illusion of a real-world interaction between objects.
Luckily for us, Sir Lamorak’s Quest isn’t trying to be clever and uses just basic collision detection techniques.
Collision Pruning
As you can imagine, in a game with a lot of entities running around the screen (and maybe even off the screen), checking for collisions with each of them can become a big job. For this reason, it’s recommended that you prune the number of actual collisions that you check for.
There are many different ways of doing this, from using a basic tile map and identifying in which tile an entity may be through to spatial partitioning1 used to divide space into smaller areas.
With the tile-based approach, you can find out what tile an entity is in and compare that to the tile the player is in. If the tiles are the same or within a set distance of each other, you know that a collision is likely, so you perform the actual collision test. If the entity is in a tile, that means they could not possibly collide with the player and no collision check is necessary.
Reducing the number of collision checks done is a great way to improve performance. Although it may take more code to prune the checks that are carried out, it almost always improves overall performance, unless the pruning checks are carrying out even more complex calculations than the collision check.
This pruning done within Sir Lamorak’s Quest is based on an object’s tile location. The coordinates of the visible tile map are calculated within the GameScene’s updateWithDelta: method. Only objects that are located within those coordinates are updated and checked for collision with the player. Listing 15.1 shows the code within that method that calculates the boundaries and loops through the objects.
Listing 15.1 GameScene updateSceneWithDelta: Method—Object Update
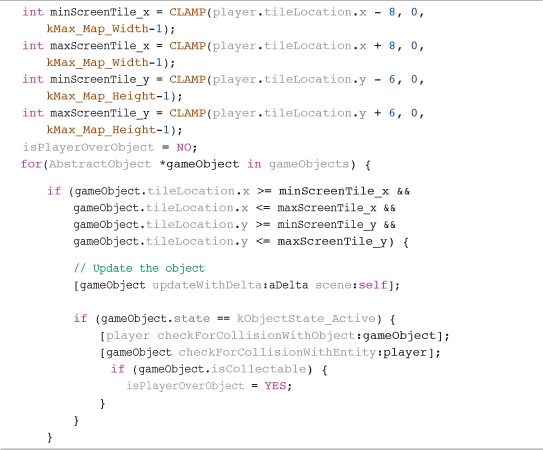
First, the min and max tile coordinates are calculated based on the player’s position. The CLAMP macro means that if the player reaches the edge of the map, the tile coordinates won’t fall below 0 or above the map’s bounds.
With the coordinates calculated, we then loop through all the objects in the gameObjects array. If we have an object that is located within those bounds, it is updated. This stops us from wasting time updating objects that are not visible. This implementation is specific to Sir Lamorak’s Quest. Other games may require entities that are not visible onscreen to still be updated. In this situation, you could update the entity but still not render it because it’s not visible anyway.
After the object is updated, we then check it to see if it has collided with the player. We could prune further by only performing the collision check on objects that are even closer to the player, but given there are never that many objects on screen at once, the performance boost would be minimal.
This same test is also used later in this method when updating doors. There are many doors within the map, so updating only those that are near the player helps improve performance.
Frame-Based Versus Time-Based
In Chapter 4, “The Game Loop,” you saw the problems caused by updating the game per-frame, as opposed to updating based on time. With a fast-moving object, it may have completely passed through a wall in between frames and the collision checks may miss that altogether.
Breaking the link between frame rate and update rate really helps us with collision detection. The game loop being used in Sir Lamorak’s Quest actually uses a fixed delta rather than calculating the amount of time between frames and using that value as the delta.
Instead, the game loop updates the game more than once per frame using this fixed delta. The render method is called only after the update has run enough times to meet the frame rate set. This means that the entities in the game move at a constant rate during each update.
As more updates are performed per frame, fast-moving entities are updated and checked more frequently, reducing the chances of missing a collision with another entity or map object.
A nice side effect of this is easier testing. Because the delta passed in is constant, you are able to step through the game one frame at a time and see how the entities move and the game reacts. Using a variable delta value doesn’t let you do this. It could be some seconds between updating frames when skipping through the code, so using a delta of this size would create some crazy situations with entities never spotting collisions.
Axis-Aligned Bounding Boxes
Axis-Aligned Bounding Boxes (AABB) are a popular way of managing simple collision detection in 2D games. It can even be used in a 3D game by extending the bounding box to be three-dimensional surrounding the 3D object. Figure 15.1 shows Sir Lamorak’s Quest with the entities’ bounding boxes being rendered.
Figure 15.1 Bounding boxes in Sir Lamorak’s Quest.
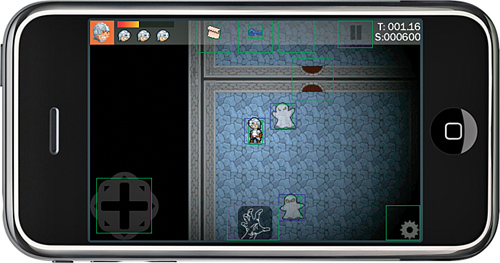
Two different bounding boxes are being rendered in Figure 15.1. The blue boxes around the player and ghosts show the movement bounds, and the green boxes indicate collision bounds. Each of these is an AABB (basically, a rectangle that has not been rotated).
As you saw in Chapter 14, “Game Objects and Entities,” each object and entity is responsible for providing its movement and collision bounds. These are simple CGRect structures that provide details of the rectangle to be used.
Tip
Although Sir Lamorak’s Quest uses boxes, it is possible to use other shapes as well. Bounding circles are another common approach to detecting if a collision has taken place. Some games also use multiple bounding boxes or circles for a single entity. This is useful if an entity is a complex shape. Having a single bounding box around a complex shape can cause large areas to be included in the bounding box that contain no part of the entity. This could cause collisions to occur that make no sense.
Using multiple shapes reduces the amount of dead space included in the bounding box. This is a technique 2D fighting games have used for years. The arms, legs, body, and head of each fighter have their own bounding box to make for more accurate “collisions” during a fight sequence.
Detecting Collisions
When using AABBs, it’s really easy to check if they intersect, and this intersection indicates they have collided. You could roll your own algorithm that checks for an intersection or, as I have done in Sir Lamorak’s Quest, use the CGRectIntersectsRect function provided by the SDK.
This function takes two rectangles and returns 1 if they intersect. Now this only handles AABBs if the bounding boxes being used have not been rotated.
If you wanted to check for Oriented Bounding Boxes (OBB; that is, rotated rectangles), you would need to roll your own algorithm. There are many different ways this can be done using things such as the separating axis theorem.2 This is beyond the scope of this book, but there is plenty of material and tutorials on the Internet.
If you wanted to be able to rotate a sprite, you could move to using circles to define the bounds of the entity. This doesn’t work on all shapes—only shapes that would fill the majority of the bounding circle—but using circles means that you can rotate the entity without worrying about rotating the bounds. The only problem left to solve is circles intersecting rectangles. Listing 15.2 shows a function that could be used for this test.
Listing 15.2 Circle-to-Rectangle Collision Detection Function

If you were using circles for all entities, you would need to also handle collisions between circles. Listing 15.3 shows a function that checks for intersections between circles.
Listing 15.3 Circle-to-Circle Collision Detection Function
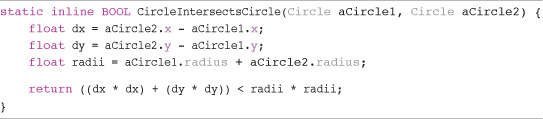
It is important that these functions are quick. They are likely to be called many times per second, so they need to be as speedy as possible. You’ll notice that we have stayed away from using the sqrtf function when calculating distances, as calculating the square root is an expensive task in terms of performance. Both of these functions have been included within the code for Sir Lamorak’s Quest in the Global.h file. They are not used within the game but are included for completeness. These functions have also been defined as static C functions to cut down on the messaging used to call them, again helping with performance.
The Circle structure used to hold details of a circle is included in the Structures.h file found in the Global Header group.
Collision Map
Detecting if an entity has collided with a blocked tile on the map is a core use case in Sir Lamorak’s Quest. We need to stop entities and the player walking through walls, tables, doors, and other items around the castle.
Tiles that are blocked are defined within the tile map. Inside the map for Sir Lamorak’s Quest, there is a layer called Collision. This layer is used to both define what tiles are blocked and where doors should be placed. Figure 15.2 shows this layer in the Tiled editor.
Figure 15.2 Tiled showing the collision layer in sqltsor.tmx.
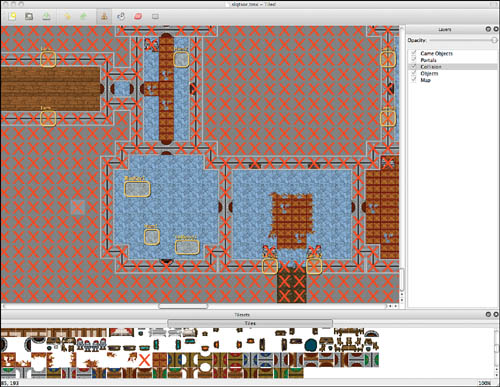
Any tile that contains a red cross is blocked. This is a nice visual aid when editing the map. You’ll notice that in the tile sheet at the bottom of the screen, there is a tile that contains a simple red cross. This is what I paint in the Collision layer to mark a blocked tile.
During game initialization, a collision map is built using a simple 2D array. This array simply holds 1 for a blocked tile and 0 for a clear tile. Listing 15.4 shows the initCollisionMapAndDoors: method inside GameScene.
Listing 15.4 GameScene initCollisionMapAndDoors: Method

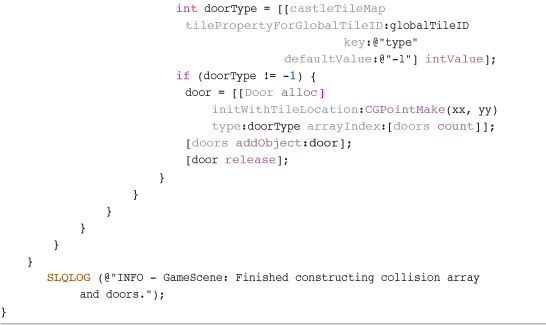
This method basically loops through the layer called Collision in the tile map. Any tile that has a globalTileID of 160 is marked as blocked. This is a little trick to speed things up. I could have easily added a property to the blocking tile image in Tiled. This would make changing the tile used much easier. The problem is that this is very slow. Querying the properties of each tile for an entire map is not quick, and I wanted to reduce the load times of the game as much as possible. To speed things up, I simply use the globalTileID instead. This requires no queries and speeds up processing time by over 300 percent!
Note
Another approach is to only parse the map file once. After the map file has been parsed, the first time the game is played, the contents of the map’s objects created could be saved. The next time the game is played, this pre-processed data could then be loaded, removing the need to parse the tile map again. This could even be a pre-process that you perform so only this parsed data is placed into the game, not the tmx file.
The same approach is used when parsing the doors. To identify that a tile is actually a door, I check the tiles globalTileID to see if it is within a set range. It does tie the tileset tightly to the code, but it really does improve performance.
Inside the GameScene class is a method called isBlocked:y:, which is used to identify whether a tile is blocked or not, as shown in Listing 15.5.
Listing 15.5 GameScene isBlocked:y: Method
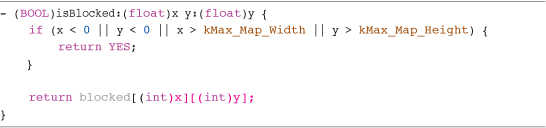
By passing in the tile coordinates, this method first checks that the coordinates are within the tile maps dimensions and then returns the contents of that location in the blocked array. You may remember from the last chapter that this method is used when moving the player to identify blocked tiles.
Entity-to-Map Collision Detection
Having the collision map, we can now test an entity’s collision bounds to see if they have entered a blocked tile. As you’ll remember, each entity has a defined collision bound, and these bounds can be the same size or smaller than a tile on the tile map. You can’t have collision bounds that are larger than a map tile because the collision testing being done checks the corners of the bounding rectangle. If a tile could lie between these corners, a collision would not be detected, as seen in Figure 15.3.
Figure 15.3 Bounding boxes on a tile map.
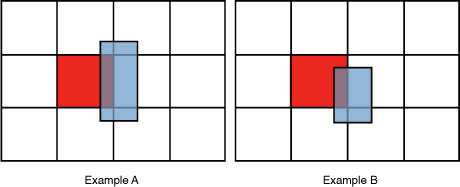
In Example A, checking if each corner of the blue bounding box has collided with a blocked red tile would fail because no corners are inside the blocked tile. We can clearly see, though, that the bounding box has collided with the tile.
In Example B, the bounding box has the same dimensions as a tile, and now no matter if the bounding box is slightly below or above the blocked tile, a collision will be registered.
There is nothing stopping us from altering the collision checks that are being done to not just focus on the corners, but also to look for intersection anywhere between the blocked tile and the collision bounds. This is, however, more complex and not implemented in Sir Lamorak’s Quest.
Listing 15.6 shows how to check if a collision bounds rectangle has collided with a blocked tile.
Note
To remove the constraint of a moving entity’s collision bounds not being larger than a map tile, the AABB collision check could be used when checking collisions with the tile map rather than the collision check shown in Listing 15.6.
Listing 15.6 Entity-to-Map Collision Check

First of all, an entity’s movement bounds are retrieved and the corners converted into tile map locations. Then each corner’s location is checked using the isBlocked:y: method to see if it is inside a blocked tile.
If a collision occurs, the entity needs to respond. In the case of the entities in Sir Lamorak’s Quest, this simply involves moving in a different direction. Each entity has an angle that specifies the direction in which they are moving. If they collide with a blocked tile, their angle is updated to move them in the opposite direction.
Entity-to-Entity Collision Detection
This is the most straightforward collision detection you’ll find in Sir Lamorak’s Quest. Given the collision bounds for the entity and also details of the entity we could be colliding with, the entities checkForCollisionWithEntity: method is called. Listing 15.7 shows this method inside the Ghost class.
Listing 15.7 Ghost checkForCollisionWithEntity: Method
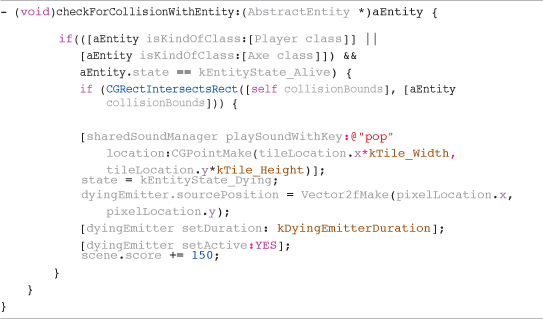
If the entity passed in is the player or the axe, a check is performed to see if the entity’s bounding boxes intersect. If they do, a sound effect is played at the entity’s position and their state is set to kEntityState_Dying. The dyingEmitter also has its position changed to match the entities position and is started. Finally, the player’s score is increased by 150. (This value could be different for each entity, allowing the player to score more points for killing specific entities.)
As noted earlier, collision detection and collision response need to be treated differently. Having detected a collision between two entities, the next step of the process is to determine what happens immediately following that collision. Listing 15.7 showed the action the Ghost entity will take, and Listing 15.8 shows the action the Player entity will take.
Listing 15.8 Player checkForCollisionWithEntity: Method
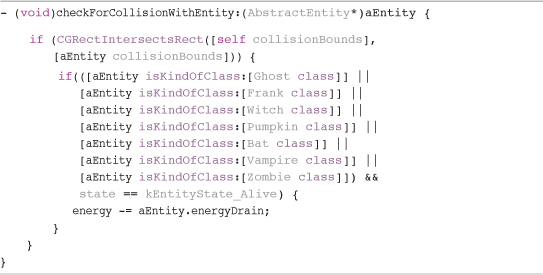
As you can see, how the Player deals with a collision is very different from how the Ghost deals with a collision. If the Ghost is hit, the ghost dies and Sir Lamorak gets 150 points. If the Player is hit, the player’s health is reduced using energyDrain, which defines for the entity that has been passed in.
Summary
In this chapter, we have reviewed the basics necessary for collision detection. We have seen how even the game loop has a role to play in terms of enabling us to perform updates that are either frame or time based. We have also seen how pruning the number of collision checks that need to be performed is important and can significantly improve performance when dealing with a large number of entities.
This chapter has also covered the common shapes that 2D games use for bounding sprites and the detection functions needed, such as rectangle-to-rectangle, rectangle-to-circle, and circle-to-circle.
More specifically for Sir Lamorak’s Quest, we also reviewed how a collision map is created using the tile map, and how to detect entity collisions with the map and entities colliding with other entities.
Chapter 16, “Pulling It All Together,” covers all the last details we need to review in Sir Lamorak’s Quest. These include the scoring system, saving game state, beta testing, and performance tuning.