8. Working with Layers
Photoshop Elements allows you to work on individual image layers, a feature that lets you make edits that don’t permanently alter your original image. You can create and name new layers, and then reorder, group, and even merge selected layers.
In this chapter, you’ll learn how layers are created, and then explore several methods and techniques to help you take advantage of one of Elements’ most powerful and creative features.
The chapter concludes with a comprehensive look at the Undo History panel. This helpful panel tracks and displays a record of every action you make (from selections, to layer creation, to retouching), and then lets you easily undo any action and return to different states in the history of your image creation.
Understanding Layers
When you first import or scan an image into Photoshop Elements, it consists of one default layer. In many cases, you’ll probably want to make a few simple changes to your photo and will have no need for multiple layers. But when you begin working with some of the more involved and complex image manipulation and retouching tools, you’ll find that layers can make things a whole lot easier.
Layers act like clear, transparent sheets stacked one on top of another, and yet, when you view a final image, they appear as one unified picture (Figure 8.1). As you copy and paste selections, you may notice these operations automatically create new layers in your image. You can edit only one layer at a time, which allows you to select and modify specific parts of your photo without affecting the information on other layers. This is the real beauty of layers: the ability to work on and experiment with one part of your image while leaving the rest of it completely untouched. One exception is the adjustment layer, which lets you make color and tonal corrections to individual or multiple layers without changing the actual pixels.
Layers appear in your image in the same order as they appear in the Layers panel. The top layer of your image is the first layer listed on the Layers panel, and the background layer is positioned at the bottom of the list.
Figure 8.1 Layers act like clear acetate sheets, where transparent areas let you see through to the layers below. (It’s a good thing I showed the layers, or else you might think the photo was undoctored!)
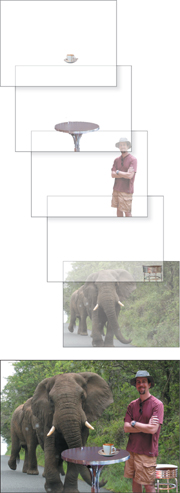
Figure 8.2 The Layers panel shows stacked layers exactly as they’re arranged in your image. This panel gives you complete control over the stacking order of your layers, whether they’re visible or hidden.
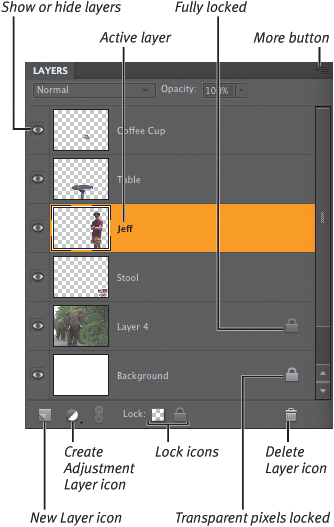
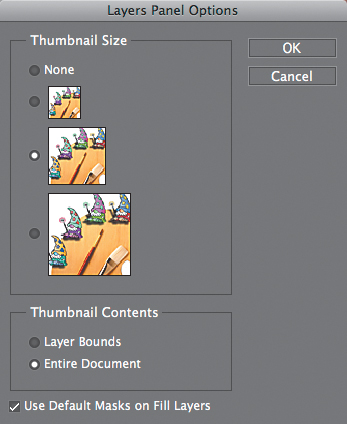
Figure 8.3 Change thumbnail views from the Layers Panel Options menu.
Using the Layers Panel
When you launch Photoshop Elements for the first time, the Layers panel automatically appears in the lower-right corner of your screen in the panel bin. You can use the Layers panel from within the panel bin, or drag it out into the work area.
You can select which layer to make the active layer, display and hide layers, and lock layers to protect them from unintentional changes (Figure 8.2). You can also change layer names, set the opacity (transparency) of individual layers, and apply blending modes.
The panel menu offers quick access to many of the same commands found on the Layer menu, plus options for changing the appearance of the panel thumbnails.
To view the Layers panel:
Do one of the following:
![]() Choose Window > Layers.
Choose Window > Layers.
![]() Double-click the Layers panel tab in the panel bin.
Double-click the Layers panel tab in the panel bin.
![]() Choose Window > Reset Panels to return all the panels to their default locations, including Layers, which appears in the lower right.
Choose Window > Reset Panels to return all the panels to their default locations, including Layers, which appears in the lower right.
To view the Layers panel menu:
![]() Click the More button in the top-right corner of the Layers panel.
Click the More button in the top-right corner of the Layers panel.
Once the Layers panel menu is open, you can select a command from the menu.
![]() Tip
Tip
![]() To change the appearance of the layer thumbnail views, choose Panel Options from the Layers panel menu and click the size you want (Figure 8.3). The smaller the icon, the more layers you’re able to view at one time on the panel.
To change the appearance of the layer thumbnail views, choose Panel Options from the Layers panel menu and click the size you want (Figure 8.3). The smaller the icon, the more layers you’re able to view at one time on the panel.
Layer Basics
To begin working with layers, you need to master just a few fundamental tasks. You can start by creating and naming a new layer, and then adding an image (or portion of an image) to it.
Once you’ve constructed an image file of multiple layers, you need to select the individual layer before you can work on that layer’s image. Keep in mind that any changes you make will affect only the selected, or active layer, and that only one layer can be active at a time.
To create a new layer:
1. From the Layer menu or from the Layers panel menu, select New > Layer, or press Command-Shift-N.
2. In the New Layer dialog, choose from the following options:
![]() Rename the layer with a more meaningful and intuitive name. The default names are Layer 1, Layer 2, Layer 3, and so on (Figure 8.4).
Rename the layer with a more meaningful and intuitive name. The default names are Layer 1, Layer 2, Layer 3, and so on (Figure 8.4).
![]() Choose a blending mode for the layer. The default blending mode is Normal, meaning that no change will be applied to the layer. You can experiment with other blending modes directly from the Layers panel.
Choose a blending mode for the layer. The default blending mode is Normal, meaning that no change will be applied to the layer. You can experiment with other blending modes directly from the Layers panel.
![]() Choose the level of opacity for the layer. Opacity can also be adjusted at any time from the Layers panel.
Choose the level of opacity for the layer. Opacity can also be adjusted at any time from the Layers panel.
![]() Apply a clipping mask over a previous (or lower) layer.
Apply a clipping mask over a previous (or lower) layer.
The lower layer acts as a window for the upper layer’s image to show through. For a detailed description of layer grouping, see “Creating Clipping Masks,” later in this chapter.
Figure 8.4 Default layer names are Layer 1 for the first layer you create, Layer 2, Layer 3, and so on. You can enter a new name when creating a layer, or you can rename it later.
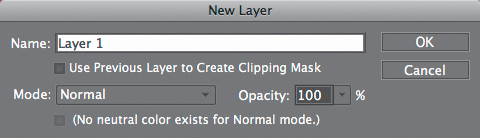
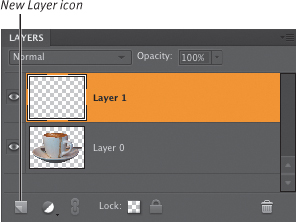
Figure 8.5 Click the New Layer icon to quickly create a new, blank layer.
![]() Tips
Tips
![]() You can also quickly create a new layer by clicking the New Layer icon near the bottom of the Layers panel (Figure 8.5). The new layer appears as the top layer in the panel with the default blending and opacity modes applied. To rename the new layer, double-click its name in the Layers panel and enter a new name.
You can also quickly create a new layer by clicking the New Layer icon near the bottom of the Layers panel (Figure 8.5). The new layer appears as the top layer in the panel with the default blending and opacity modes applied. To rename the new layer, double-click its name in the Layers panel and enter a new name.
![]() To work more easily on your image, you can choose to show or hide any of its layers from the Layers panel menu.
To work more easily on your image, you can choose to show or hide any of its layers from the Layers panel menu.
Figure 8.6 Click the layer name or thumbnail to make it the active (editable) layer.
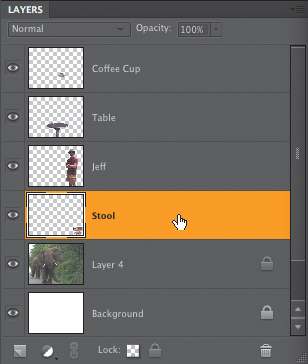
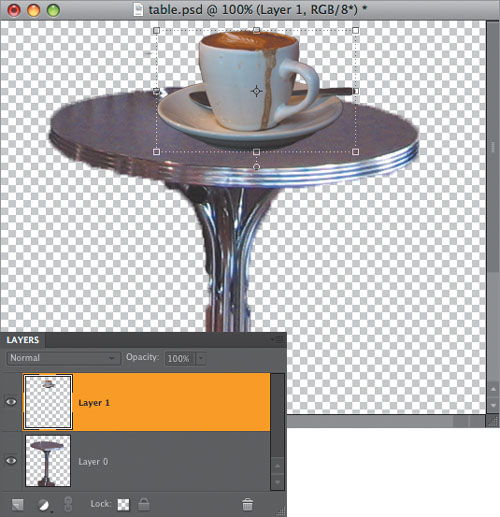
Figure 8.7 When you click a layer image in the image window, a bounding box appears to show you that it is the selected, active layer.
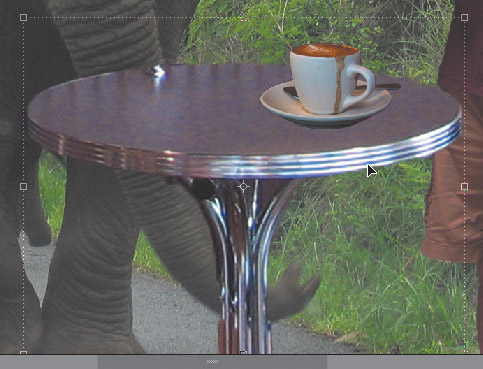
Figure 8.8 Click the eye icon to hide a layer; click again to make the layer visible.
To select a layer:
Do one of the following:
![]() On the Layers panel, click the Layer thumbnail or name to make that layer active (Figure 8.6).
On the Layers panel, click the Layer thumbnail or name to make that layer active (Figure 8.6).
If you’ve imported an image from a digital camera or scanner, by default it will have only one layer—the background layer, which is selected automatically.
![]() Select the Move tool and click directly on a layer image in the image window. A border with selection handles appears around the layer image to indicate that it’s selected (Figure 8.7).
Select the Move tool and click directly on a layer image in the image window. A border with selection handles appears around the layer image to indicate that it’s selected (Figure 8.7).
To show or hide a layer:
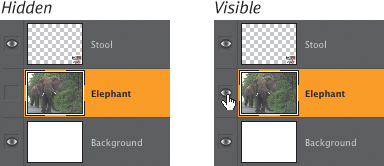
![]() On the Layers panel, click the eye icon to hide the layer (the eye disappears). Click again and the eye reappears, making the layer visible again in the image window (Figure 8.8).
On the Layers panel, click the eye icon to hide the layer (the eye disappears). Click again and the eye reappears, making the layer visible again in the image window (Figure 8.8).
![]() Tips
Tips
![]() When you try to select or make changes to an area in your image, you might encounter weird and unexpected results. For example, your selection can’t be copied, or you apply a filter but nothing happens. More often than not, this is because you don’t have the correct layer selected. Just refer to the Layers panel to see if this is the case. Remember that the active layer is always highlighted in the Layers panel.
When you try to select or make changes to an area in your image, you might encounter weird and unexpected results. For example, your selection can’t be copied, or you apply a filter but nothing happens. More often than not, this is because you don’t have the correct layer selected. Just refer to the Layers panel to see if this is the case. Remember that the active layer is always highlighted in the Layers panel.
![]() You can quickly show or hide multiple layers simply by clicking and dragging through the eye column.
You can quickly show or hide multiple layers simply by clicking and dragging through the eye column.
![]() To quickly display just one layer, Option-click its eye icon. The other layers become hidden. Option-click again to show all layers.
To quickly display just one layer, Option-click its eye icon. The other layers become hidden. Option-click again to show all layers.
1. Select a layer on the Layers panel.
2. Do one of the following:
![]() With the layer selected, click the Trash icon on the Layers panel (Figure 8.9) and then click Yes in the dialog that appears.
With the layer selected, click the Trash icon on the Layers panel (Figure 8.9) and then click Yes in the dialog that appears.
![]() From the Layer menu or from the Layers panel menu, choose Delete Layer (Figure 8.10).
From the Layer menu or from the Layers panel menu, choose Delete Layer (Figure 8.10).
![]() Drag the layer to the Trash icon on the Layers panel.
Drag the layer to the Trash icon on the Layers panel.
Figure 8.9 Clicking the Trash icon also removes the selected layer.
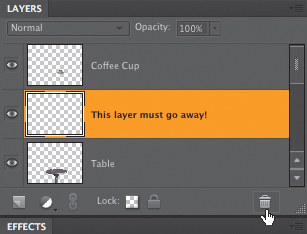
Figure 8.10 Choose Layer > Delete Layer from the Layer menu (or Layers panel menu) to delete the selected layer.
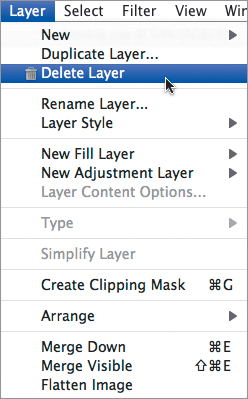
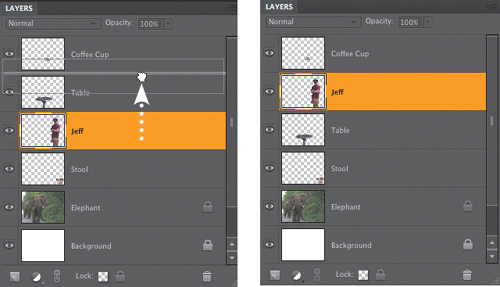
Figure 8.11 Drag a layer up or down on the Layers panel to change its stacking order.
Changing the Layer Order
The layer stacking order determines which layers are on top of others, and plays a big role in determining how your image looks. As you build a composition, you may decide you want to change the layer order, either to help you work more easily on a particular layer, or to get a particular result or effect. The actual, visible overlapping of elements is determined by the layer order, so you may need to reorder layers frequently when you work on complex images.
Elements provides two main ways to change the stacking order of your layers. The most common and versatile approach is to drag the layer within the Layers panel. The second way is to select the Layer > Arrange menu and then choose commands such as Bring to Front and Send to Back—a method similar to what you use to arrange objects in a drawing program.
To change the layer order by dragging:
1. On the Layers panel, select the layer you want to move.
2. Drag the layer up or down in the Layers panel (Figure 8.11).
You will see a thick double line between the layers, indicating the new layer position.
3. Release the mouse button when the layer is in the desired location.
To change the layer order by arranging:
1. Select the layer you want to move on the Layers panel.
2. From the Layer menu, choose Arrange, and then select one of the following options from the submenu; or use the keyboard shortcuts noted for each (Figure 8.12).
![]() Bring to Front (Command-Shift-]) moves the layer to the top of the Layers panel and the image (Figure 8.13).
Bring to Front (Command-Shift-]) moves the layer to the top of the Layers panel and the image (Figure 8.13).
![]() Bring Forward (Command-]) moves the layer up by one step in the stacking order (Figure 8.14).
Bring Forward (Command-]) moves the layer up by one step in the stacking order (Figure 8.14).
![]() Send Backward (Command-[) moves the layer down by one step in the stacking order.
Send Backward (Command-[) moves the layer down by one step in the stacking order.
![]() Send to Back (Command-Shift-[) makes the layer the bottom layer on the Layers panel.
Send to Back (Command-Shift-[) makes the layer the bottom layer on the Layers panel.
You can also Shift-click to select two layers in the Layers panel, and select Reverse to swap their order in the layer stack.
![]() Tip
Tip
![]() If your image contains a background layer and you choose the Send to Back command, you’ll find that the background layer stubbornly remains at the bottom of your Layers panel. By default, background layers are locked in place and can’t be moved. To get around this, just double-click and rename the background layer to convert it to a functional layer. Then you can move it wherever you like.
If your image contains a background layer and you choose the Send to Back command, you’ll find that the background layer stubbornly remains at the bottom of your Layers panel. By default, background layers are locked in place and can’t be moved. To get around this, just double-click and rename the background layer to convert it to a functional layer. Then you can move it wherever you like.
Figure 8.12 You can also change a layer’s position using the options on the Layer > Arrange menu.
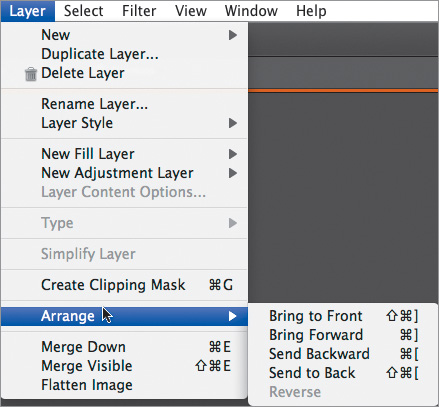
Figure 8.13 The Bring to Front command moves the layer to the top level in your image.

Figure 8.14 The Bring Forward command moves the layer up just one level.
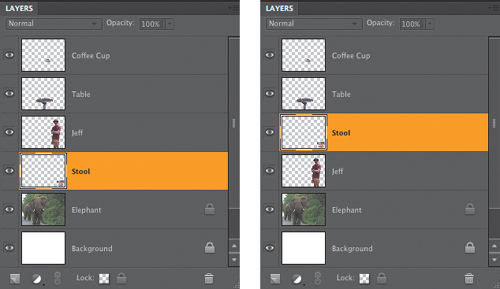
Figure 8.15 To rename a layer, just double-click its name on the Layers panel.
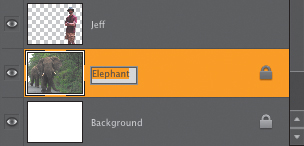
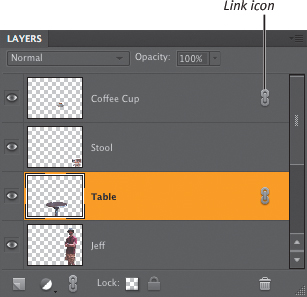
Figure 8.16 Link icons indicate which layers are linked together.
Managing Layers
As you add layers to an image, Elements assigns them a default numerical name (Layer 1, Layer 2, and so on). As your image becomes more complex, it’s much easier to find a cloud image on a layer called clouds than it is to remember that the clouds are on Layer 14, for example.
You can also link layers together, so that any changes, such as moving and resizing, happen to two or more layers together.
And you can protect layers from unwanted changes by locking them. All layers can be fully locked, so that no pixels can be changed, or you can lock just the transparent pixels, so that any painting or other editing happens only where opaque (nontransparent) pixels already are present. This partial locking is useful if you’ve set up your image with areas that you know you want to preserve as transparent (like for a graphic you want to incorporate into a Web page). And locking an image protects it in other ways, too: You can move a locked layer’s stacking position on the Layers panel, but the layer can’t be deleted.
To rename a layer:
1. Double-click the layer’s name on the Layers panel to display the text cursor and make the name editable (Figure 8.15).
2. Enter a new name for the layer and press the Enter key. The new name appears on the Layers panel.
To link layers:
1. Command-click to select the layers in the Layers panel that you want to link together.
2. Click the Link icon near the top of the Layers panel. The link icon will appear in each linked layer, to the right of the layer name (Figure 8.16).
To lock all pixels on a layer:
1. Select the layer on the Layers panel.
2. Click the Lock All icon near the top of the Layers panel.
The Lock All icon appears to the right of the layer name on the Layers panel (Figure 8.17).
To lock transparent pixels on a layer:
1. Select the layer on the Layers panel.
2. Click the Lock Transparent Pixels icon near the top of the Layers panel.
The Lock Transparent Pixels icon appears to the right of the layer name on the Layers panel (Figure 8.18).
Figure 8.17 The Lock All icon indicates that the layer’s pixels are completely locked.
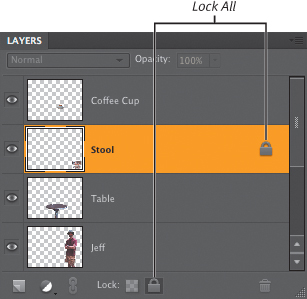
Figure 8.18 The Lock Transparent Pixels icon indicates that the transparent pixels are locked.
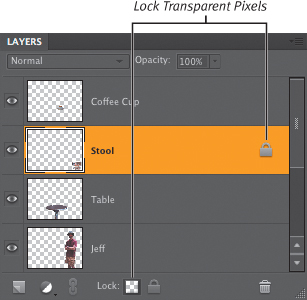
Figure 8.19 The top image is a composite of a number of layers from a 3D rendering program: a background layer, the pole, the sign’s shadow on the pole, and three layers for the sign itself. To simplify the file, the three sign layers were merged into a single layer, and the pole and the shadow were combined (lower right). The finished image will look the same, but because it’s composed of fewer layers, its file size will be significantly smaller.
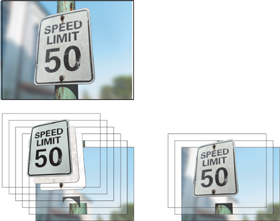
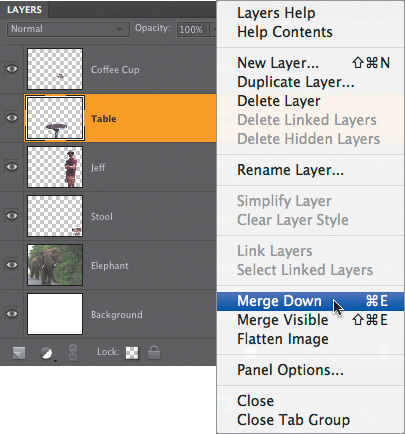
Figure 8.20 Combine a single layer with the layer below it by using the Merge Down command.
Merging Layers
Once you begin to create projects of even moderate complexity, the number of layers in your project can add up fairly quickly. Although Elements lets you create an almost unlimited number of layers, there are a couple of reasons why you may want to consolidate some or all of them into a single layer (Figure 8.19). For one thing, it’s just good housekeeping. It doesn’t take long before the Layers panel begins to fill, and you find yourself constantly scrolling up and down in search of a particular object or text layer. And every layer you add drains a little more from your system’s memory. Continue to add layers, and, depending on available memory, you may notice a decrease in your computer’s performance.
Photoshop Elements offers three approaches to merging image layers. You can merge just two at a time, merge multiple layers, or flatten your image into a single background layer.
To merge one layer with another:
1. On the Layers panel, identify the two layers you want to merge, and then select the topmost of the two.
Photoshop Elements will merge two layers only when one is stacked directly above the other. If you want to merge two layers that are separated by one layer or more, you’ll need to rearrange their order in the Layers panel before they can be merged.
2. From the More menu on the Layers panel, choose Merge Down (Figure 8.20), or press Command-E. The two layers are merged into one.
1. On the Layers panel, identify the layers you want to merge, checking that the Visibility (eye) icon is on for just the layers you want to merge.
2. From the More menu on the Layers panel, choose Merge Visible (Figure 8.21), or press Command-Shift-E.
All of the visible layers are merged into one layer.
![]() Tip
Tip
![]() You can create a new layer and then place a merged copy of all of the visible layers on that layer by holding the Option key while choosing Merge Visible from the Layers panel’s More menu. The visible layers themselves aren’t merged and so remain separate and intact (Figure 8.22). This technique offers you a way to capture a merged snapshot of your current file without actually merging the physical layers. It can be a handy tool for brainstorming and comparing different versions of the same layered file. For instance, take a snapshot of a layered file, change the opacity and blending modes of several layers, and then take another snapshot. You can then compare the two snapshots to see what effect the different settings have on the entire file.
You can create a new layer and then place a merged copy of all of the visible layers on that layer by holding the Option key while choosing Merge Visible from the Layers panel’s More menu. The visible layers themselves aren’t merged and so remain separate and intact (Figure 8.22). This technique offers you a way to capture a merged snapshot of your current file without actually merging the physical layers. It can be a handy tool for brainstorming and comparing different versions of the same layered file. For instance, take a snapshot of a layered file, change the opacity and blending modes of several layers, and then take another snapshot. You can then compare the two snapshots to see what effect the different settings have on the entire file.
Figure 8.21 Only the three visible layers will be merged into one using the Merge Visible command.

Figure 8.22 On the left, a new layer has been created at the top of the Layers panel. If you hold the Option key while selecting Merge Visible from the panel menu, all visible layers are merged and copied to the new layer, as shown on the right.
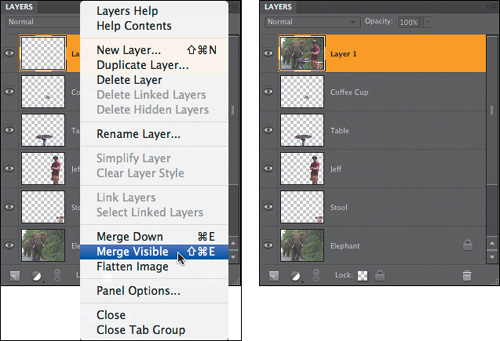
Figure 8.23 Use the Flatten Image command to combine all the layers in a project into a single layer.
To flatten an image:
1. In the Layers panel, click the More button to open the panel menu.
2. From the panel menu, select Flatten Image.
3. If any layers are invisible, a warning box appears asking if you want to discard the hidden layers. If so, click OK.
The entire layered file is flattened into one layer (Figure 8.23).
![]() Tip
Tip
![]() If there’s any chance you may eventually want to make revisions to your layered image, always create a duplicate file before flattening so the layers are safely preserved in your original. Once you’ve flattened, saved, and closed a file, there’s no way to recover those flattened layers.
If there’s any chance you may eventually want to make revisions to your layered image, always create a duplicate file before flattening so the layers are safely preserved in your original. Once you’ve flattened, saved, and closed a file, there’s no way to recover those flattened layers.
Often when you create a new image layer from a selection, you’ll find you’ve inadvertently selected pixels you didn’t want to include. This is a particularly common problem when you’re trying to remove an image from its background using the Magic Wand or Quick Selection tools. On close inspection, what you thought was a clean selection actually includes a halo of colored background pixels.
Once you’ve pasted your selection into its new layer, choose Adjust Color from the Enhance menu, and then choose Defringe Layer from the Adjust Color submenu. In the Defringe dialog, enter a pixel width to control how much of the border of your image you want to affect—for high-resolution images, I usually start around 5. Then, just click OK to see the results in the image window (Figure 8.24). If you’re not happy with the results, undo the operation by pressing Command-Z, then repeat the steps, entering a new pixel width in the Defringe dialog.
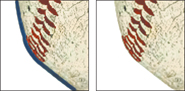
Figure 8.24 When zoomed in, it’s apparent that the old, weathered baseball I’ve cut and pasted carried with it a halo of the background it was resting on (left). After applying Defringe, the colored halo has disappeared (right).
Converting and Duplicating Layers
You now know you can create a new layer using the Layer > New command; in addition, Elements creates layers in all sorts of sneaky ways. For example, whenever you copy and paste a selection into an image, it’s automatically added to your image on a brand new layer.
When you start editing an image, you’ll often find it convenient to create a selection and convert it to a layer to keep it isolated and editable within your photo. It’s also quite easy to duplicate a layer, which is useful when you want to copy an existing layer as is, or use it as a starting point and then make additional changes.
The background layer is unique and by default can’t be moved, but sometimes you will need to move it, change its opacity, or apply a blending mode. To do any of those things, you’ll need to convert it to a regular layer. And sometimes you’ll want to convert an existing layer to the background. Although these conversions are not necessary for most simple photo projects, they are quite common when you combine or make composite images.
To convert a selection to a layer:
1. Make a selection using any of the selection tools (Figure 8.25).
2. From the Layer menu, choose New; then perform one of the following commands:
![]() Layer via Copy (Command-J). The selection is copied to a new layer, leaving the original selection unchanged (Figure 8.26).
Layer via Copy (Command-J). The selection is copied to a new layer, leaving the original selection unchanged (Figure 8.26).
![]() Layer via Cut (Command-Shift-J). The selection is cut to a new layer, leaving a gaping hole in the original layer, with the current background color showing through (Figure 8.27).
Layer via Cut (Command-Shift-J). The selection is cut to a new layer, leaving a gaping hole in the original layer, with the current background color showing through (Figure 8.27).
Figure 8.25 Any selected area can be converted to its own layer.
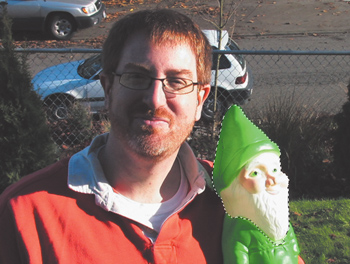
Figure 8.26 Copying a selection to a new layer leaves the original selection unchanged.
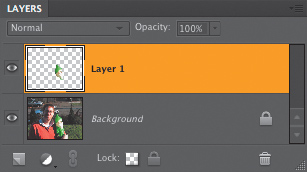
Figure 8.27 The Layer via Cut command cuts the selected pixels to a new layer. (The new layer has been hidden here to demonstrate that it’s actually cut, not copied.)
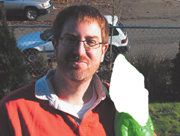
Figure 8.28 Use the Duplicate Layer dialog to rename your new duplicate layer.
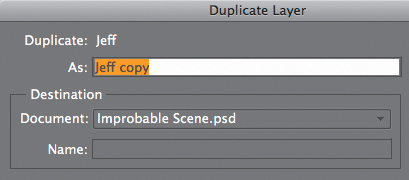
Figure 8.29 You can also duplicate a layer by dragging any existing layer to the New Layer icon on the Layers panel.
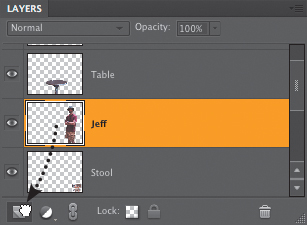
Figure 8.30 The new layer appears right above the original layer on the Layers panel.
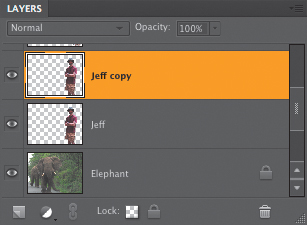
To duplicate a layer:
1. Select the layer on the Layers panel.
2. Duplicate the layer using one of the following methods:
![]() If you want to create a new name for the layer, choose Layer > Duplicate Layer.
If you want to create a new name for the layer, choose Layer > Duplicate Layer.
The Duplicate Layer dialog appears, where you can rename the layer (Figure 8.28). Note that you can also get to this dialog from the Layers panel menu.
![]() If you’re not concerned with renaming the layer right now, just drag the selected layer to the New Layer icon on the Layers panel (Figure 8.29).
If you’re not concerned with renaming the layer right now, just drag the selected layer to the New Layer icon on the Layers panel (Figure 8.29).
The new layer appears above the original layer with a “copy” designation added to the name (Figure 8.30).
To convert a background to a layer:
1. From the Layer menu, choose New > Layer from Background.
2. If desired, type a new name for the layer and click OK (Figure 8.31).
To convert a layer to a background:
1. Select a layer on the Layers panel.
2. From the Layer menu, choose New > Background From Layer (Figure 8.32).
3. The new background appears at the bottom of the Layers panel (Figure 8.33).
![]() Tips
Tips
![]() You can also convert the background by double-clicking the background on the Layers panel, which brings up the same New Layer dialog.
You can also convert the background by double-clicking the background on the Layers panel, which brings up the same New Layer dialog.
![]() The Type and Shape tools also each automatically generate a new layer when you use them, keeping those elements isolated on their own unique layers.
The Type and Shape tools also each automatically generate a new layer when you use them, keeping those elements isolated on their own unique layers.
![]() The Background From Layer command won’t work if you already have an existing background layer in your Layers panel. Why? Because no image can have two background layers at the same time. To get around this, create a duplicate of the current background layer (you can rename it later). You can then safely delete the background layer, and follow steps 1–2 to convert a regular layer into a background.
The Background From Layer command won’t work if you already have an existing background layer in your Layers panel. Why? Because no image can have two background layers at the same time. To get around this, create a duplicate of the current background layer (you can rename it later). You can then safely delete the background layer, and follow steps 1–2 to convert a regular layer into a background.
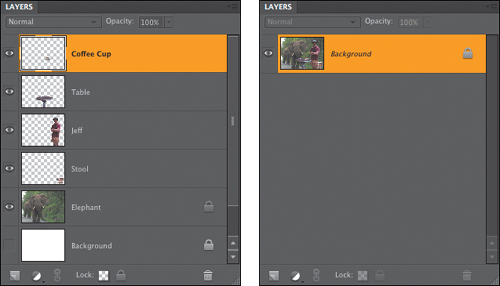
Figure 8.31 You can convert the background to a layer and rename it during the conversion.
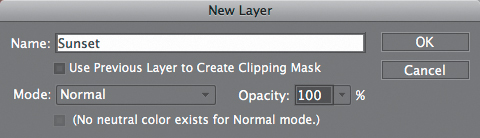
Figure 8.32 You can convert a layer to a background by choosing Layer > New > Background From Layer.

Figure 8.33 New background layers always appear at the bottom of the Layers panel.
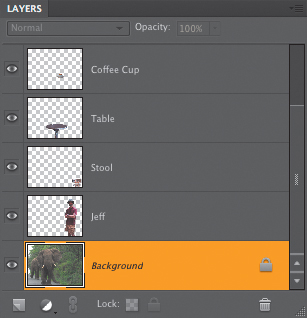
Figure 8.34 To copy a layer, just drag it from the Layers panel and drop it directly onto another image.

Figure 8.35 The new layer appears directly above the previously selected (active) layer in the destination image and in the Layers panel.
Copying Layers Between Images
It’s extremely easy to copy layers from one Elements document to another. If you’re used to the drag-and-drop technique, you’ll be glad to know this method works well for copying layers as well as selections. Remember, as you copy and paste selections they end up on their own layers. So, layers often contain unique objects you can easily share between photos.
To drag and drop a layer from the Layers panel:
1. Open the two images you plan to use.
2. In the source image, select the layer you want to copy by clicking it in the Layers panel.
3. Drag the layer’s name from the Layers panel into the destination image (Figure 8.34).
The new layer appears both in the image window and on the Layers panel of the destination image (Figure 8.35). When you drag a layer from one image into another, the original, source image is not changed. The layer remains intact.
To drag and drop a layer using the Move tool:
1. Open the two images you plan to use.
2. Select the Move tool, and then in the source image window, select the layer you want to copy by clicking it.
You can also select the layer by clicking its thumbnail in the Layers panel.
3. With the Move tool still selected, drag the actual image layer from the source image window to the destination image (Figure 8.36).
The copied layer appears on the Layers panel immediately above the previously active layer.
To copy and paste a layer between images:
1. In the source image, select the layer you want to copy from by clicking it either in the Layers panel or the image window.
2. Choose Select > All to select all of the pixels on the layer, or press Command-A.
3. Choose Edit > Copy to copy the layer to the clipboard, or press Command-C.
4. In the destination image, choose Edit > Paste, or press Command-V.
The contents of the copied layer will appear in the center of the destination image.
![]() Tips
Tips
![]() In some cases, the layer in your source image may be larger than the destination image, in which case not all of the layer will be visible. Just use the Move tool to bring the desired area into view.
In some cases, the layer in your source image may be larger than the destination image, in which case not all of the layer will be visible. Just use the Move tool to bring the desired area into view.
![]() If you’re viewing open documents in tabbed view, drag an item to the tab of the file to which you want it added.
If you’re viewing open documents in tabbed view, drag an item to the tab of the file to which you want it added.
Figure 8.36 The Move tool lets you select and duplicate a layer from within the image window.
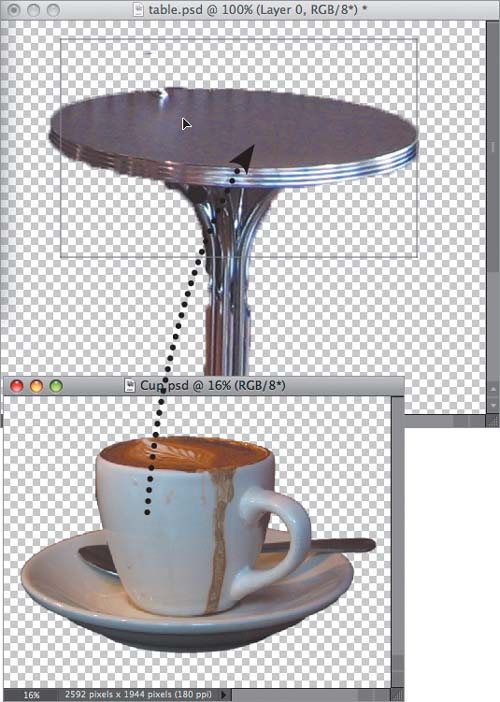
Figure 8.37 Precise scale and rotation values can be entered for any shape.
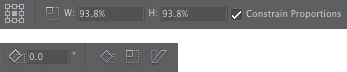
Figure 8.38 Both of these squares are being reduced in size by about half. The one on the left is scaled toward its upper-left corner, and the one on the right is scaled toward its center.
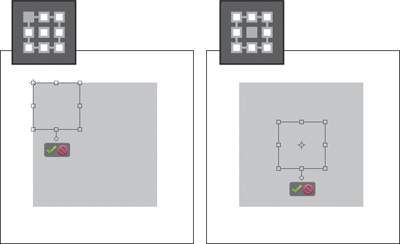
Figure 8.39 The Commit Transform button scales the layer image to the size you define.
![]()
Transforming Layers
You can also scale (resize), rotate, and distort layer images. They can be altered either numerically, by entering specific values on the options bar, or manually, by dragging their control handles in the image window. Constrain options, such as proportional scaling, are available for most transformations, and a set of keyboard shortcuts helps to simplify the process of adding distortion and perspective.
To scale a layer image:
1. Click a layer in the Layers panel to activate it; then from the Image menu, choose Transform > Free Transform, or press Command-T. The options bar displays the scale and rotation text boxes and the reference point locator (Figure 8.37).
2. On the options bar, click to set a reference point location.
The reference point determines what point your layer image will be scaled to: toward the center, toward a corner, and so on (Figure 8.38).
3. If you want to scale your layer image proportionately, click the Constrain Proportions check box.
4. Enter a value in either the height or width text box. The layer image is scaled accordingly.
5. At the lower-right corner of your layer image, click the Commit Transform button (Figure 8.39), or press Enter.
![]() Tip
Tip
![]() You can scale a layer image manually by selecting it with the Move tool and then dragging any one of the eight handles on the selection border. Constrain the scaling by holding down the Shift key while dragging one of the four corner handles.
You can scale a layer image manually by selecting it with the Move tool and then dragging any one of the eight handles on the selection border. Constrain the scaling by holding down the Shift key while dragging one of the four corner handles.
1. Click a layer in the Layers panel; then from the Image menu, choose Rotate > Free Rotate Layer (Figure 8.40).
The options bar changes to show the scale and rotation text boxes and the reference point locator.
2. On the options bar, click to set a reference point location (Figure 8.41).
3. Enter a value in the rotate text box. The image will rotate accordingly.
4. Click the Commit Transform button, or press Enter.
![]() Tips
Tips
![]() To rotate the image in 90- or 180-degree increments or to flip it horizontally or vertically, choose Image > Rotate; then choose from the list of five menu commands below the Free Rotate Layer command.
To rotate the image in 90- or 180-degree increments or to flip it horizontally or vertically, choose Image > Rotate; then choose from the list of five menu commands below the Free Rotate Layer command.
![]() You can rotate a layer image manually by selecting it with the Move tool and then moving the pointer outside of the selection border until it becomes a rotation cursor (Figure 8.42). Drag around the outside of the selection border to rotate the image. In addition, you can constrain the rotation to 15-degree increments by holding down the Shift key while dragging the rotation cursor.
You can rotate a layer image manually by selecting it with the Move tool and then moving the pointer outside of the selection border until it becomes a rotation cursor (Figure 8.42). Drag around the outside of the selection border to rotate the image. In addition, you can constrain the rotation to 15-degree increments by holding down the Shift key while dragging the rotation cursor.
![]() If you simply want to reposition a layer image in the image window, click anywhere inside the image with the Move tool and then drag the image to its new position.
If you simply want to reposition a layer image in the image window, click anywhere inside the image with the Move tool and then drag the image to its new position.
Figure 8.40 You can apply any of the layer rotation menu commands to a layer image.
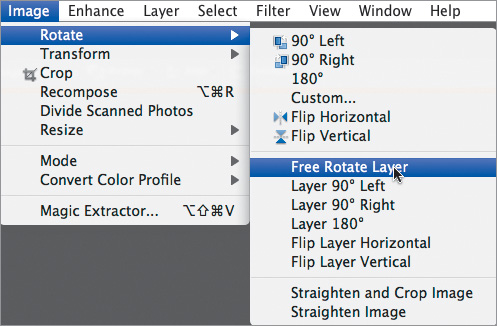
Figure 8.41 Both of these squares are being rotated about 20 degrees. The one on the left is rotated around its upper-left corner, and the one on the right is rotated around its center.
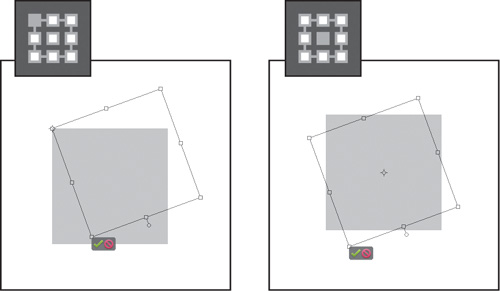
Figure 8.42 Rotate any layer image manually by dragging it around its reference point with the rotation pointer.
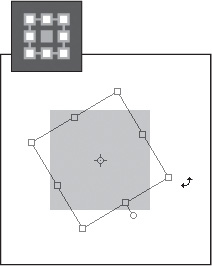
Figure 8.43 Choose one of the three specific transformation commands.
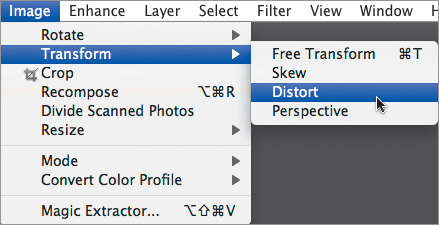
Figure 8.44 The same square layer image transformed using Skew (left), Distort (center), and Perspective (right).

Figure 8.45 You can align or distribute objects on different layers.
To distort a layer image:
1. Click a layer in the Layers panel to make it active. From the Image menu, choose Transform; then choose Skew, Distort, or Perspective (Figure 8.43).
2. On the options bar, check that the reference point location is set to the center.
The reference point can, of course, be set to any location, but the center seems to work best when applying any of the three distortions.
3. Drag any of the layer image’s control handles to distort the image.
Dragging the control handles will yield different results depending on the distort option you choose (Figure 8.44).
4. On the options bar, click the Commit Transform button, or press Enter.
5. Click the Commit Transform button a second time (or press Enter) to deselect the image layer and hide the selection border.
To align or distribute layer objects:
1. Select two or more layers in the Layers panel; the Distribute command requires three or more selected layers.
2. Select the Move tool from the toolbox.
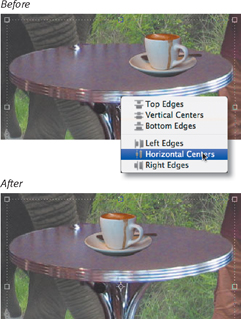
3. From the options bar, click the Align or Distribute drop-down menu and choose how you’d like the layer objects repositioned (Figure 8.45).
About Opacity and Blending Modes
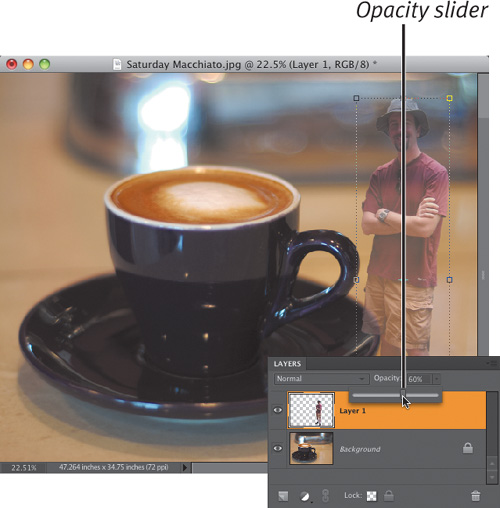
One of the most effective and simple ways to enhance your layered image is to create the illusion of combining one layer’s image with another by blending their pixels. This differs from merging layers because the layers aren’t actually combined, but rather appear to mix together. Photoshop Elements provides two easily accessible tools at the top of the Layers panel that can be used alone or in tandem for blending multiple layers: the Opacity slider and the Blending Modes drop-down menu. The Opacity slider controls the degree of transparency of one layer over another. If a layer’s opacity is set at 100 percent, the layer is totally opaque, and any layers beneath it are hidden. If a layer’s opacity is set to 30 percent, 70 percent of any underlying layers are allowed to show through (Figure 8.46).
Blending modes are a little trickier. Whereas Opacity settings strictly control the opaqueness of one layer over another, blending modes act by mixing or blending one layer’s color and tonal value with the one below it. The Difference mode, for example, combines one layer’s image with a second, and treats the top layer like a sort of negative filter, inverting colors and tonal values where dark areas blend with lighter ones (Figure 8.47).
Figure 8.46 Two separate layers (top) compose this image of me and a giant coffee cup. The lower-left image displays the top layer with an opacity setting of 100 percent. The lower-right image displays the top layer with an opacity setting of 50 percent.
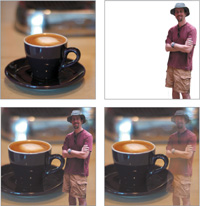
Figure 8.47 The image on the left contains no blending modes; the image on the right displays the top layer with the Difference blending mode applied.
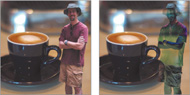
Figure 8.48 The top layer is selected on the Layers panel. Its opacity is set at 100 percent.

Figure 8.49 You can change a layer’s opacity from 0 to 100 percent by dragging the Opacity slider.
To set a layer’s opacity:
1. On the Layers panel, select the layer whose opacity you want to change (Figure 8.48).
2. To change the opacity, do one of the following:
![]() Enter a percentage in the Opacity text box, which is located at the top of the Layers panel.
Enter a percentage in the Opacity text box, which is located at the top of the Layers panel.
![]() Click the arrow to activate the Opacity slider and then drag the slider to the desired opacity (Figure 8.49).
Click the arrow to activate the Opacity slider and then drag the slider to the desired opacity (Figure 8.49).
![]() Tips
Tips
![]() You can change the opacity settings in 10-percent increments directly from the keyboard. With a layer selected on the Layers panel, press any number key to change the opacity: 1 for 10 percent, 2 for 20 percent, and so on. Also, pressing two number keys in rapid succession will work—for example, 66 percent. If this technique doesn’t seem to be working, make sure you don’t have a painting or editing tool selected in the toolbox. Many of the brushes and effects tools can be sized and adjusted with the number keys, and if any of those tools are selected, they take priority over the Layers panel commands.
You can change the opacity settings in 10-percent increments directly from the keyboard. With a layer selected on the Layers panel, press any number key to change the opacity: 1 for 10 percent, 2 for 20 percent, and so on. Also, pressing two number keys in rapid succession will work—for example, 66 percent. If this technique doesn’t seem to be working, make sure you don’t have a painting or editing tool selected in the toolbox. Many of the brushes and effects tools can be sized and adjusted with the number keys, and if any of those tools are selected, they take priority over the Layers panel commands.
![]() A background layer contains no transparency, so you can’t change its opacity until you first convert it to a regular layer (see “To convert a background to a layer,” earlier in this chapter).
A background layer contains no transparency, so you can’t change its opacity until you first convert it to a regular layer (see “To convert a background to a layer,” earlier in this chapter).
To apply a blending mode to a layer:
1. On the Layers panel, select the uppermost layer to which you want to apply the blending mode.
Remember, blending modes work by mixing (blending) the image pixels of one layer with the layers below it, so your project will need to contain at least two layers in order for a blending mode to have any effect.
2. Select the desired blending mode from the Blending Mode drop-down menu (Figure 8.50).
The image on the layer to which you’ve applied the blending mode will appear to mix with the image layers below.
![]() Tip
Tip
![]() You can apply only one blending mode to a layer, but it’s still possible to apply more than one blending mode to the same image. After assigning a blending mode to a layer, duplicate the layer and then choose a different blending mode for the duplicate. There are no hard-and-fast rules to follow, and the various blending modes work so differently with one another that getting what you want is largely an exercise of trial and error. But a little experimentation with different blending mode combinations (and opacities) can yield some very interesting effects that you can’t achieve any other way.
You can apply only one blending mode to a layer, but it’s still possible to apply more than one blending mode to the same image. After assigning a blending mode to a layer, duplicate the layer and then choose a different blending mode for the duplicate. There are no hard-and-fast rules to follow, and the various blending modes work so differently with one another that getting what you want is largely an exercise of trial and error. But a little experimentation with different blending mode combinations (and opacities) can yield some very interesting effects that you can’t achieve any other way.
Figure 8.50 Select a blending mode from the Layers panel’s Blending Mode menu.
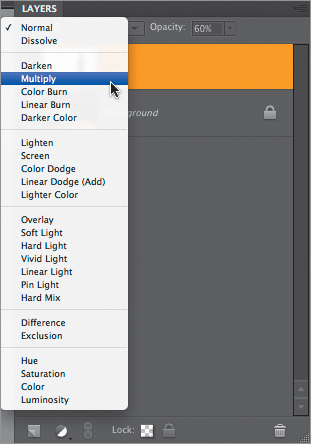
Figure 8.51 This project is composed of two layers: a photo of clouds and the CLOUDS text layer. The photo completely covers the text layer in the image on the left, but when made a clipping mask, the clouds peek through only where the text is visible.
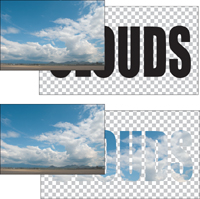
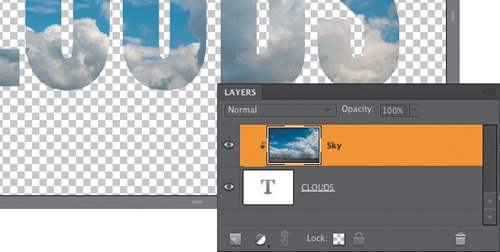
Figure 8.52 In this figure, the CLOUDS text layer serves as the base layer. It will soon be grouped with the Sky layer, which is directly above it.

Figure 8.53 A clipping mask appears indented.
Creating Clipping Masks
Clipping masks provide a simple and quite intuitive way to create a sophisticated masking effect. Any object placed on a layer, including photographic images and lines of editable text, can be used as the basis for masking any number of layer objects above it. Think of the lower, or base layer, as a window through which the upper layers are allowed to show through. So, for example, you could have a photograph of the sky placed within the word “CLOUDS” (Figure 8.51). Once applied, any layer mask can be repositioned independently of the others, or all masks can be linked and moved as a group.
To create a clipping mask:
1. On the Layers panel, identify the layer you want to use as your base layer (Figure 8.52). Your layers must be arranged so that the layer you want to mask is directly above the base layer.
2. Still on the Layers panel, select the layer above the base layer; then from the Layer menu choose Create Clipping Mask, or press Command-G. The two layers are now grouped, and the upper layer is visible only in those areas where the base layer object is present.
On the Layers panel, the base layer’s name is underlined, and the masked layer is indented (Figure 8.53).
To remove a clipping mask:
1. On the Layers panel, select the base layer.
2. From the Layer menu, choose Release Clipping Mask, or press Command-G.
![]() Tip
Tip
![]() For a faster way to create a layer group, Option-click the space between the two layers.
For a faster way to create a layer group, Option-click the space between the two layers.
Applying Effects with Layer Styles
With Layer styles, you can add editable effects to individual layers within an image, and you can be as conservative or as wild as your heart desires. For example, you can add a subtle drop shadow to an object, or you can go in the opposite direction and set your friend’s hair ablaze with the Fire layer style. Beveled edges, glowing borders, and even custom textures can all be applied to any object or text layer. The Layer Styles options in the Effects panel contains a series of style sets, grouped as galleries and accessed from the panel’s dropdown menu. Once you’ve applied a layer style, you can choose to keep it as an active element of a layer and return to and adjust it at any time; or you can choose to merge the layer object and style together to simplify the layer.
To apply a layer style:
1. On the Layers panel, choose the layer to which you want to apply the layer style (Figure 8.54).
2. To open the Effects panel, do one of the following:
![]() From the Window menu, choose Effects.
From the Window menu, choose Effects.
![]() Double-click the Effects panel tab in the panel bin.
Double-click the Effects panel tab in the panel bin.
3. Click the Layer Styles icon at the top of the panel (Figure 8.55).
4. From the Library drop-down menu, choose a style set (Figure 8.56). The set you choose presents a gallery from which you can select a specific style.
Figure 8.54 Select a layer to apply a layer style.
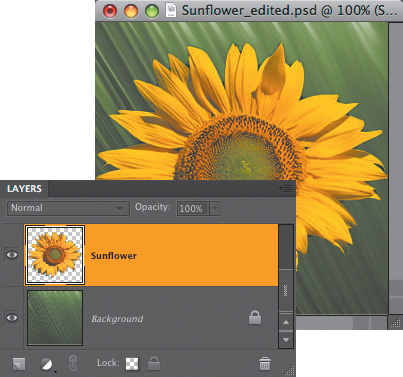
Figure 8.55 The Effects icons allow you to select Filters, Layer Styles, and Photo Effects (or All) from the same panel.
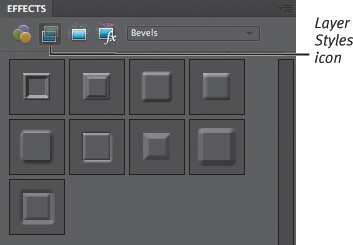
Figure 8.56 Layer styles are divided into different style sets.

Figure 8.57 Choose a style from the panel gallery and click Apply to make the style active.
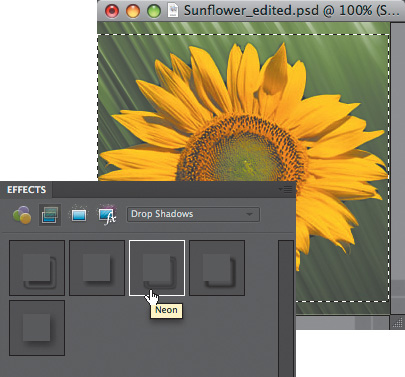
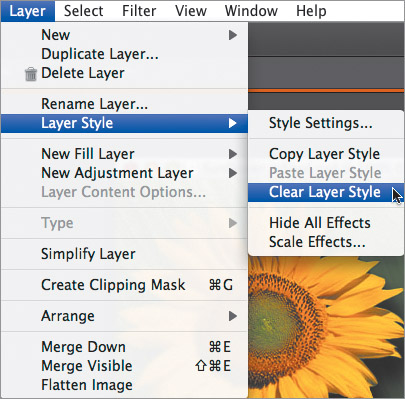
Figure 8.58 Clear all styles on a layer with the Clear Layer Style menu command.
5. In the style gallery, click the style you want to apply to your layer.
6. Click the Apply button (or double-click the chosen style). The style is applied to the layer object (Figure 8.57), and a Layer Style icon appears next to the layer name on the Layers panel.
To remove a layer style:
![]() From the Layer menu, choose Layer Style > Clear Layer Style (Figure 8.58). The Clear Layer Style command will remove all styles from the layer, no matter how many have been applied.
From the Layer menu, choose Layer Style > Clear Layer Style (Figure 8.58). The Clear Layer Style command will remove all styles from the layer, no matter how many have been applied.
![]() Tips
Tips
![]() Multiple layer styles can be assigned to a single layer; however, only one layer style from each set can be assigned at a time. In other words, you can assign a drop shadow, bevel, and outer glow style to the same layer all at once, but you can’t assign two different bevel styles at the same time.
Multiple layer styles can be assigned to a single layer; however, only one layer style from each set can be assigned at a time. In other words, you can assign a drop shadow, bevel, and outer glow style to the same layer all at once, but you can’t assign two different bevel styles at the same time.
![]() Layer styles can be applied only to images or text on a regular, transparent layer. If you try to apply a style to a background layer, a warning box asks if you want to first make the background a layer. Click OK and the background is converted to a layer; your chosen layer style will be applied automatically.
Layer styles can be applied only to images or text on a regular, transparent layer. If you try to apply a style to a background layer, a warning box asks if you want to first make the background a layer. Click OK and the background is converted to a layer; your chosen layer style will be applied automatically.
![]() Elements allows you to apply a layer style to a blank layer, but the layer style won’t have any effect until text or an image is placed on the layer. When you place something on a layer with a previously assigned layer style, it will display with the layer style’s attributes: drop shadow, beveled edge, and so on.
Elements allows you to apply a layer style to a blank layer, but the layer style won’t have any effect until text or an image is placed on the layer. When you place something on a layer with a previously assigned layer style, it will display with the layer style’s attributes: drop shadow, beveled edge, and so on.
1. On the Layers panel, double-click the Layer Style icon to the right of the layer name (Figure 8.59). The Style Settings dialog opens.
2. Make sure the Preview box is selected; then refer to the image window while dragging the Size, Distance, and Opacity sliders (Figure 8.60).
Figure 8.59 When a layer style is applied, a Layer Style icon appears to the right of the layer name.
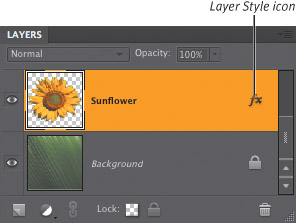
Figure 8.60 Use sliders in the Style Settings dialog to modify the shadow, glow, bevel, and stroke styles.
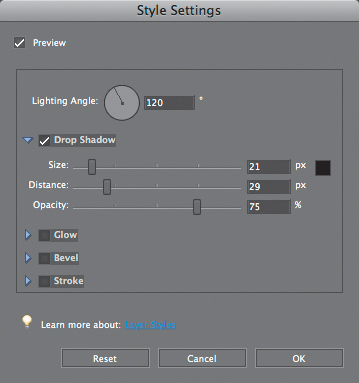
Figure 8.61 Please, please, please, never use all of these effects at once! I’m just showing all options.
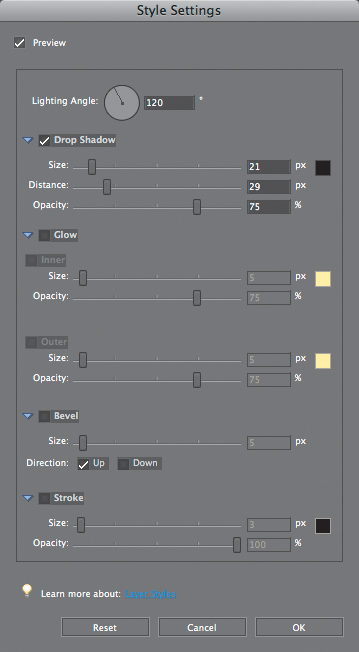
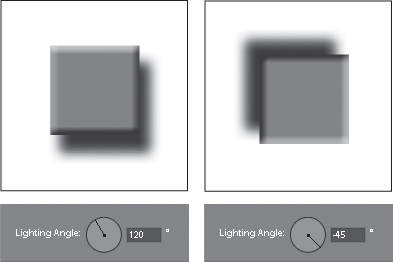
Figure 8.62 The Lighting Angle wheel sets a light source for any bevel or drop shadow styles you apply, and can be set to light any object from any angle.
The Style Settings Dialog
Not all of the layer styles can be adjusted. But using a series of sliders, a wheel, check boxes, and radio buttons, you can make adjustments to drop shadows, inner and outer glows, bevels, and stroke styles. Here’s a quick tour of the Style Settings dialog controls (Figure 8.61).
Except for Lighting Angle and Bevel, each section contains a slider to determine how opaque the effect appears, as well as a color well for changing the effect’s color. The distance and size slider values are all based on units of pixels. Click a style’s check box to enable it.
![]() The Lighting Angle wheel controls the direction of the light source when a bevel or shadow style is applied. Changing the light angle will change which beveled surfaces are in highlight and which are in shadow, and will also control where a drop shadow falls behind an object (Figure 8.62).
The Lighting Angle wheel controls the direction of the light source when a bevel or shadow style is applied. Changing the light angle will change which beveled surfaces are in highlight and which are in shadow, and will also control where a drop shadow falls behind an object (Figure 8.62).
![]() The Drop Shadow’s Distance slider quite simply controls the distance that a drop shadow is placed from an object. The larger the number, the more shadow is exposed from behind an object. If the distance is set to 0, the shadow is centered directly under the object and isn’t visible. The Size slider determines how large the shadow appears.
The Drop Shadow’s Distance slider quite simply controls the distance that a drop shadow is placed from an object. The larger the number, the more shadow is exposed from behind an object. If the distance is set to 0, the shadow is centered directly under the object and isn’t visible. The Size slider determines how large the shadow appears.
![]() The Inner Glow Size slider lets you increase or decrease the amount of glow radiating in from the edges of an object.
The Inner Glow Size slider lets you increase or decrease the amount of glow radiating in from the edges of an object.
![]() The Outer Glow Size slider lets you increase or decrease the amount of glow radiating out from the edges of an object.
The Outer Glow Size slider lets you increase or decrease the amount of glow radiating out from the edges of an object.
![]() The Bevel Size slider controls the amount of beveled edge on your object. An inside bevel of 3 will be almost imperceptible, whereas larger values create an increasingly more pronounced bevel effect.
The Bevel Size slider controls the amount of beveled edge on your object. An inside bevel of 3 will be almost imperceptible, whereas larger values create an increasingly more pronounced bevel effect.
![]() The Bevel Direction radio buttons control the appearance of a bevel style. If the Up button is selected, the bevel will appear to extrude or come forward; if the Down button is selected, the bevel will appear to recede (Figure 8.63).
The Bevel Direction radio buttons control the appearance of a bevel style. If the Up button is selected, the bevel will appear to extrude or come forward; if the Down button is selected, the bevel will appear to recede (Figure 8.63).
![]() The Stroke effect draws a solid line around elements on the layer. The size slider sets the line’s width.
The Stroke effect draws a solid line around elements on the layer. The size slider sets the line’s width.
Once you’ve applied a layer style, you can return to it at any time to modify it, but you also have the option of merging the layer style with its layer by simplifying. In effect, simplifying is like flattening an individual layer. Simplifying a layer permanently applies a layer style to its layer and can help to reduce the complexity and file size of your project.
To simplify a layer:
1. On the Layers panel, click to select the layer you want to simplify.
2. From the panel menu on the Layers panel, choose Simplify Layer (Figure 8.64).
The layer style is merged with the layer, and the Layer Style icon disappears from the layer on the Layers panel.
Figure 8.63 When the bevel direction is set to Up, the object bevel appears to come forward (left). When the bevel direction is set to Down, the object bevel appears to recede into the distance (right).

Figure 8.64 Once a style is set the way you like it, you can permanently apply it to a layer object by simplifying the layer.
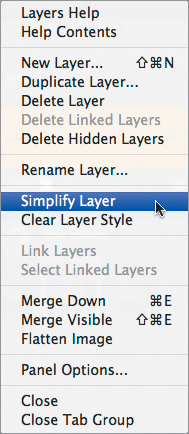
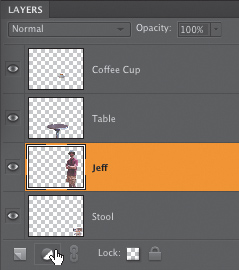
Figure 8.65 Once you’ve selected a layer, click the Create Adjustment Layer button at the top of the Layer menu.
Making Color and Tonal Changes with Adjustment Layers
Adjustment layers let you make color and tonal adjustments to your image (much like the commands discussed in Chapter 7, “Changing and Adjusting Colors”) without changing the actual pixels in your image. Adjustment layers work like filters, resting above the actual image layers and affecting any image layers below them. They can be especially useful when you want to experiment with different settings or compare the effects of one setting over another. Because you can apply opacity and blending mode changes to adjustment layers (just as you would to any other layer), they offer a level of creative freedom not available from their menu-command counterparts. For instance, you can create a Levels adjustment layer above an image, and then change the opacity of that adjustment layer to fine-tune the amount of tonal correction applied.
To create an adjustment layer:
1. On the Layers panel, identify the topmost layer to which you want the adjustment layer applied, and then select that layer. Remember that the adjustment layer affects all layers below it on the Layers panel, not just the one directly below it.
2. At the top of the Layers panel, click the Create Adjustment Layer button (Figure 8.65).
3. From the drop-down menu, choose from the list of adjustment layer options (Figure 8.66).
When you choose an adjustment layer option, its dialog opens, and a new adjustment layer is created above the selected layer (Figure 8.67).
4. Use the sliders to adjust the settings, and then click OK to close the dialog.
If you want to return to the adjustment layer dialog later, just double-click its layer thumbnail on the Layers panel.
By default, an adjustment layer affects all the layers below it in the Layers panel. But if you create a clipping mask, the effects of the adjustment layer will be limited to one specific layer.
To apply an adjustment layer to a single layer:
1. In the Layers panel, move the adjustment layer directly above the layer to which you want it applied.
2. With the adjustment layer still selected in the Layers panel, choose Create Clipping Mask from the Layer menu, or press Command-G.
The adjustment layer and the one directly below it are grouped, and the effects of the adjustment layer are applied only to that single layer (Figure 8.68).
![]() Tip
Tip
![]() A much faster way to create a clipping mask is to Option-click the space between the two layers.
A much faster way to create a clipping mask is to Option-click the space between the two layers.
Figure 8.66 Choose an adjustment command from the drop-down menu.
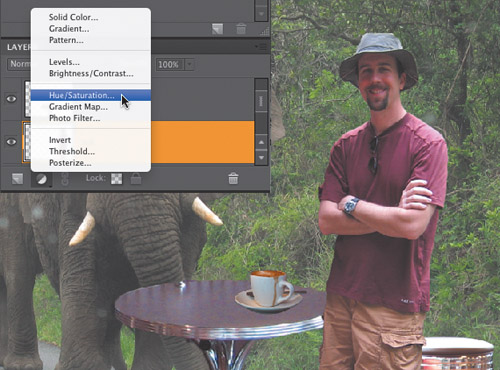
Figure 8.67 The edits you make in the adjustment dialog apply to all layers below the adustment layer, but do not change those layers’ pixels.
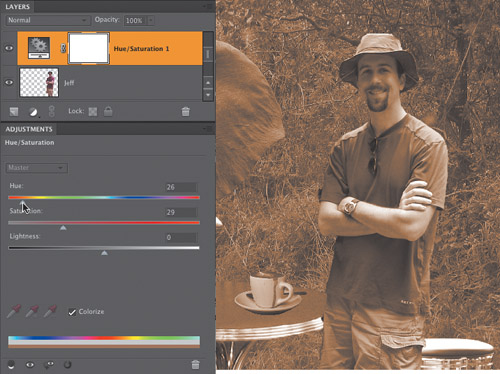
Figure 8.68 The adjustment layer has been grouped with the object layer directly below it.
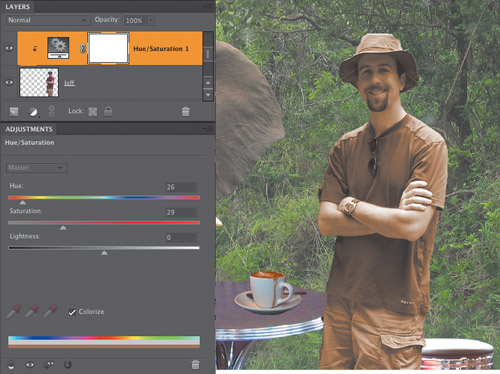
Figure 8.69 Use the panel slider to move to virtually any point in time in the creation of your project.
Using the Undo History Panel
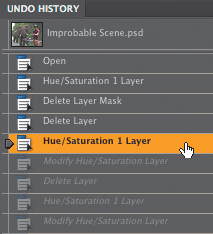
The Undo History panel lets you move backward and forward through a work session, allowing you to make multiple undos to any editing changes you’ve made to your image. Photoshop Elements records every change and then lists each as a separate entry, or state, on the panel. With one click, you can navigate to any state and then choose to work forward from there, return to the previous state, or select a different state from which to work forward.
To navigate through the Undo History panel:
1. To open the Undo History panel, do one of the following:
![]() From the Window menu, choose Undo History.
From the Window menu, choose Undo History.
![]() From the panel bin, click the arrow on the Undo History panel tab.
From the panel bin, click the arrow on the Undo History panel tab.
2. To move to a different state in the Undo History panel, do one of the following:
![]() Click the name of any state.
Click the name of any state.
![]() Drag the panel slider up or down to a different state (Figure 8.69).
Drag the panel slider up or down to a different state (Figure 8.69).
![]() Tip
Tip
![]() The default number of states that the Undo History panel saves is 50. After 50, the first state is cleared from the list, and the panel continues to list just the 50 most recent states. The good news is you can bump the number of saved states up to 1000, provided that your computer has enough memory. From the Photoshop Elements menu, choose Preferences > Performance; then in the History & Cache box enter a larger number in the History States field.
The default number of states that the Undo History panel saves is 50. After 50, the first state is cleared from the list, and the panel continues to list just the 50 most recent states. The good news is you can bump the number of saved states up to 1000, provided that your computer has enough memory. From the Photoshop Elements menu, choose Preferences > Performance; then in the History & Cache box enter a larger number in the History States field.
![]() Click the name of any state, then choose Delete from the panel menu (Figure 8.70). The selected state and all states following it are deleted.
Click the name of any state, then choose Delete from the panel menu (Figure 8.70). The selected state and all states following it are deleted.
To clear the Undo History panel:
Do one of the following:
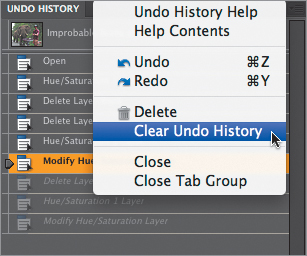
![]() From the panel menu, choose Clear Undo History (Figure 8.71).
From the panel menu, choose Clear Undo History (Figure 8.71).
This action can be undone, but it doesn’t reduce the amount of memory used by Photoshop Elements.
![]() Hold down the Option key, then choose Clear Undo History from the panel menu.
Hold down the Option key, then choose Clear Undo History from the panel menu.
This action cannot be undone, but it does purge the list of states from the memory buffer. This can come in handy if a message appears telling you that Photoshop Elements is low on memory.
![]() Tips
Tips
![]() Deletion of a state can be undone, but only if no changes are applied to the image in the interim. If you make a change to the image that creates a new state on the panel, all deleted states are permanently lost.
Deletion of a state can be undone, but only if no changes are applied to the image in the interim. If you make a change to the image that creates a new state on the panel, all deleted states are permanently lost.
![]() Sometimes—when you’re working on an especially complex piece, for instance—the Undo History panel may become filled with states that you no longer need to manage or return to, or that begin to take their toll on your system’s memory. At any time, you can clear the panel’s list of states without changing the image.
Sometimes—when you’re working on an especially complex piece, for instance—the Undo History panel may become filled with states that you no longer need to manage or return to, or that begin to take their toll on your system’s memory. At any time, you can clear the panel’s list of states without changing the image.
Figure 8.70 Delete any state by selecting it and choosing Delete from the panel menu.
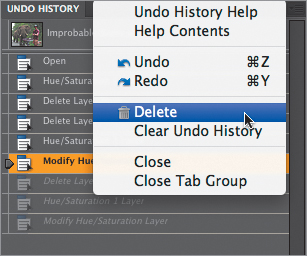
Figure 8.71 If system memory is a concern, you can periodically clear the panel of all states.