9. Loading and Controlling Flash Content
This lesson will take less than an hour to complete. If needed, remove the previous lesson folder from your hard drive and copy the Lesson09 folder onto it.
![]()

Use ActionScript to load external Flash content. By keeping Flash content modular, your projects remain more manageable and easier to edit.
Getting Started
You’ll start the lesson by viewing the finished movie.
1 Double-click the 09End.swf file in the Lesson09/09End folder to view the final movie.

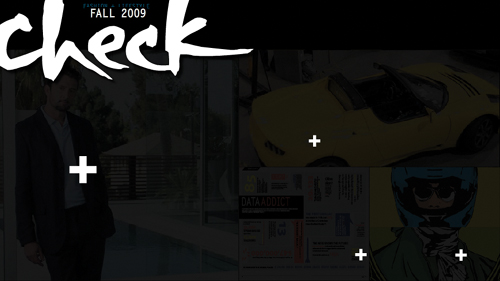
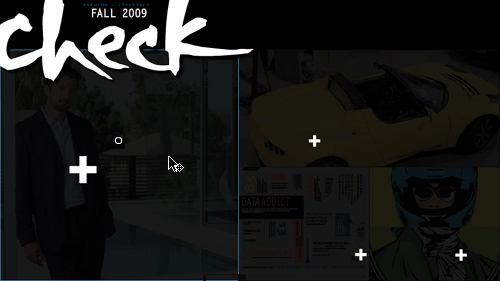
The project is a fictional online lifestyle magazine called Check. A jazzy animation appears on the front page showing four main sections of the magazine. Each section on the front page is a movie clip with a nested animation.
The first section is an article on the star of the upcoming movie called Double Identity (whose Web site you created in Lesson 4, “Adding Animation”), the second section is about a new car, the third section presents some facts and figures, and the fourth section is a self-improvement article.
You can click on each section on the front page to access the content. The inside content is not complete, but you can imagine that each section could contain more information. Click again to return to the front page.
2 Double-click the page1.swf, page2.swf, page3.swf, and page4.swf files in the Lesson09/09End folder.
Each of the four sections is a separate Flash file. Note that the front page, 09End.swf, loads each SWF file as needed.

3 Close all the SWF files and open the 09Start.fla file in the Lesson09/09Start folder.
Many of the images, graphic elements, and animations have already been completed in this file. You will add the necessary ActionScript to make the Flash file load the external Flash content.
4 Choose File > Save As. Name the file 09_workingcopy.fla and save it in the 09Start folder. Saving a working copy ensures that the original start file will be available if you want to start over.
Loading External Content
You’ll use ActionScript to load each of the external SWFs into your main Flash movie. Loading external content keeps your overall project in separate modules and prevents the project from becoming too bloated and difficult to download. It also makes it easier for you to edit, because you can edit individual sections instead of one, large, unwieldy file.
For example, if you wanted to change the article on the new car in the second section, you would simply open and edit the Flash file page2.fla, which contains that content.
To load the external files, you’ll use two ActionScript objects: one called a Loader and another called a URLRequest.
1 Insert a new layer at the top and rename it actionscript.
2 Press F9 (Windows) or Option+F9 (Mac) to open the Actions panel.
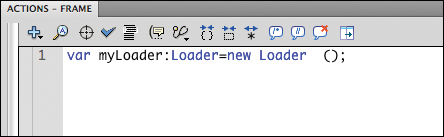
3 Type the following line exactly as it appears here:
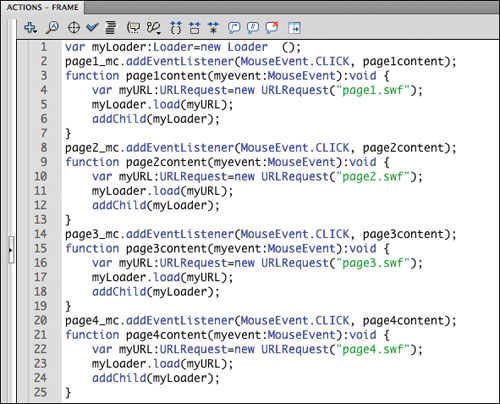
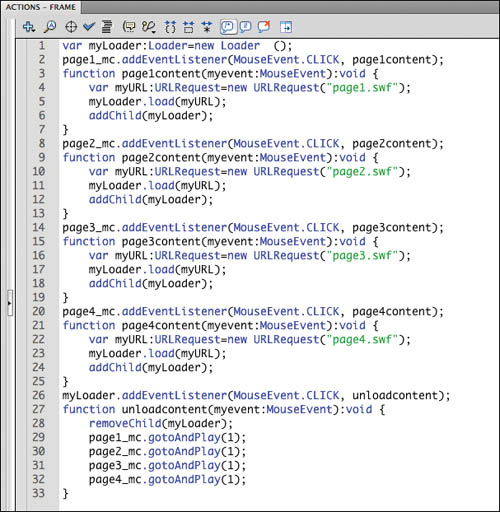
var myLoader:Loader=new Loader();
This code creates a Loader object and calls it myLoader.
Note
To compare punctuation, spacing, spelling, or any other aspects of the ActionScript, view the Actions panel in the 09End.fla file.
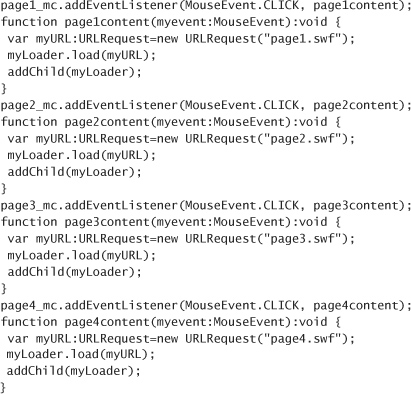
4 On the next line, type the following lines exactly as they appear here:
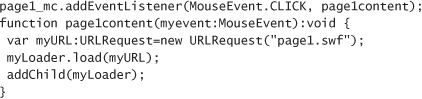
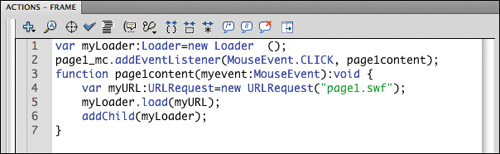
You’ve seen this syntax before in Lesson 6. On line two, you create a listener that detects a mouse click on the object called page1_mc. This is a movie clip on the Stage. In response, the function called page1content is executed.
The function called page1content does several things: First, it creates a URLRequest object with the name of the file you want to load. Second, it loads the URLRequest object into the Loader object. Third, it adds the Loader object to the Stage so you can see it.
5 Select the movie clip on the left side of the Stage with the movie star.
6 In the Properties inspector, name it page1_mc.
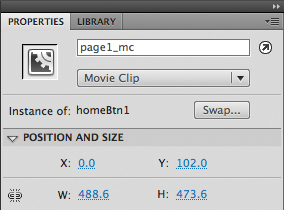
The ActionScript you entered refers to the object called page1_mc, so you need to provide the name to one of the movie clips on the Stage.
7 Choose Control > Test Movie > in Flash Professional to see your movie so far.
The front page plays its animation and stops. When you click on the movie star, the file called page1.swf loads and is displayed.

Note
You can also use the Loader and URLRequest objects to dynamically load image files. The syntax is identical. Simply replace the SWF filename with a JPEG filename, and Flash loads the specified image.
8 Close the SWF called 09_workingcopy.swf.
9 Select the first frame of the actionscript layer and open the Actions panel.
Note
Adding event listeners to movie clips can make them respond to mouse clicks, but your cursor doesn’t automatically change to a hand icon to indicate that it is clickable. In the Actions panel, set the property buttonMode to true for each movie clip instance to enable the hand cursor. For example, page1_mc.buttonMode=true makes the hand cursor appear when you move your mouse over that movie clip on the Stage.
10 Copy and paste the event listener and the function so you have four distinct listeners for each of the four movie clips on the Stage. The four listeners should appear as follows:
11 Click on each of the remaining three movie clips on the Stage and name them in the Properties inspector. Name the yellow car page2_mc, name the data section page3_mc, and name the self-improvement section on the lower left page4_mc.
Using the Code Snippets Panel
You can also use the Code Snippets panel to add the interactivity for loading external content. In the Code Snippets panel (Window > Code Snippets), click the Load and Unload folder to expand its contents. Select a movie clip on the Stage and double-click the option Click to Load/Unload SWF or Image from the Code Snippets panel.
Flash automatically names the selected movie clip and adds the necessary ActionScript code to load a SWF or an image. In the code, simply replace the path and filename in the sample code with your own.
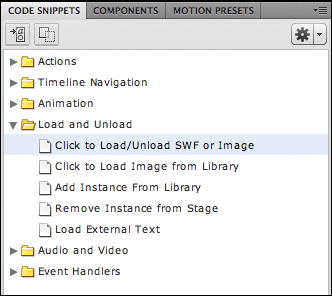
Using the Code Snippets panel can save you time and effort, but understanding how the code works and writing your own is the only way to begin building more sophisticated, customized projects.
Positioning of the Loaded Content
Loaded content is aligned with the registration point of the Loader object that it is loaded into. By default, the Loader object is positioned at the registration point of the Stage (the top-left corner). Since the four external Flash files (page1.swf, page2.swf, page3.swf, and page4.swf) all have the same Stage size as the Flash file that loads them, the Stage is completely covered.
However, you can position the Loader object wherever you want. If you want to place the Loader object in a different horizontal position, you can set a new X value for the Loader object with ActionScript. If you want to place the Loader in a different vertical position, you can set a new Y value for the Loader. Here’s how: In the Actions panel, enter the name of the Loader object, followed by a period, the property x or y, and then an equals symbol and a new value.
In the following example, the Loader object called myLoader is repositioned 200 pixels from the left edge and 100 pixels from the top edge.

When the external content loads, it shows up exactly 200 pixels to the right and 100 pixels down.

Removing External Content
Once an external SWF file is loaded, how do you unload it to return to the main Flash movie? The easiest way is to remove the Loader object from the Stage, so the audience can no longer see it. You will use the command removeChild() and specify the name of the Loader object in between the parentheses to remove it from the Stage.
1 Select the first frame of the actionscript layer and open the Actions panel.
2 Add the following lines to your code in the Script pane:

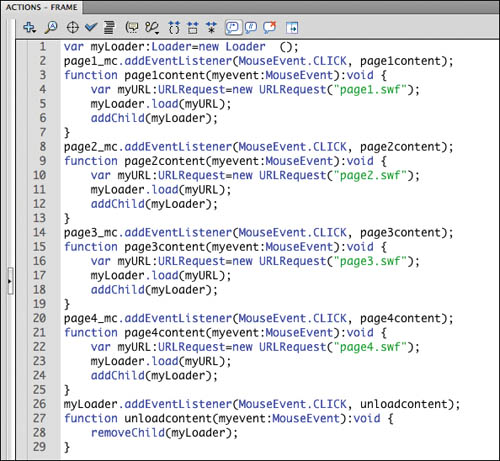
This code adds an event listener to the Loader object called myLoader. When you click on the Loader object, the function called unloadcontent is executed.
The function performs just one action: It removes the Loader object from the Stage.
Note
Another way to remove external content is to use the command, unload(). The code, myLoader.unload() removes the SWF that is loaded into the Loader object, but the Loader object remains on the Stage.
3 Choose Control > Test Movie > in Flash Professional to preview the movie. Click on any of the four sections, and then click on the loaded content to return to the main movie.
Controlling Movie Clips
When you return to the front page, you’ll see the four sections, so you can click another movie clip to load a different section. But wouldn’t it be nice to replay the initial animation? The initial animations are nested inside each movie clip, and you can control the four movie clips that are on the Stage. You can use the basic navigation commands that you already learned in Lesson 6 (gotoAndStop, gotoAndPlay, stop, play) to navigate the Timelines of movie clips as well as the main Timeline. Simply precede the command with the name of the movie clip and separate them with a dot. Flash targets that particular movie clip and moves its Timeline accordingly.
1 Select the first frame of the actionscript layer and open the Actions panel.
2 Add to the commands in the function called unloadcontent so the entire function appears as follows:
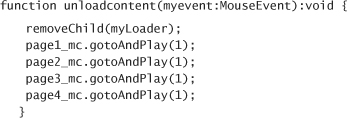
In this function, which is executed when the user clicks the Loader object, the Loader object is removed from the Stage, and then the playhead of each movie clip on the Stage moves to the first frame and begins playing.
3 Choose Control > Test Movie > in Flash Professional to preview the movie.
Click on any of the four sections, and then click on the loaded content to return to the main movie.
When you return to the main movie, all four movie clips play their nested animations.

Creating Masks
Masking is a way of selectively hiding and displaying content on a layer. Masking is a way for you to control the content that your audience sees. For example, you can make a circular mask and allow your audience to only see through the circular area, so that you get a keyhole or spotlight effect. In Flash, you put a mask on one layer and the content that is masked in a layer below it.
Masks can be animated, and the content that is masked can also be animated. So, the circular mask can grow bigger to show more content, or the content can scroll under a mask like scenery whizzing by a train window.
Define the Mask and Masked layers
You’ll create a rectangular mask that starts small and grows larger to cover the Stage. The resulting effect reveals the contents of the Masked layer slowly, similar to a sliding door opening.

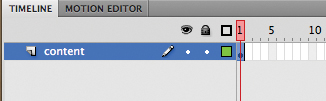
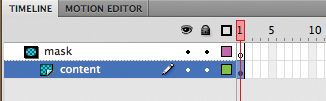
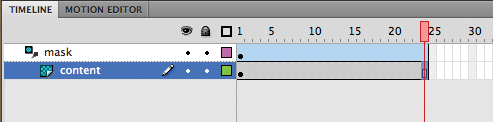
A single layer called content contains a movie clip of the second section about a new car.
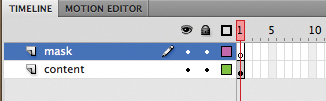
2 Insert a new layer above the content layer and rename it mask.
3 Double-click the icon in front of the layer name.
The Layer Properties dialog box appears.
4 Select Mask and click OK.
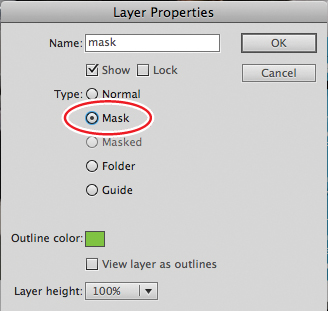
The top layer becomes a Mask layer. Anything that is drawn in this layer will act as a mask for a Masked layer below it.

5 Double-click the icon in front of the bottom layer named content.
The Layer Properties dialog box appears.
6 Select Masked and click OK.

The bottom layer becomes a Masked layer and is indented, indicating that it is affected by the mask above it.
Note
You can also simply drag a normal layer under a Mask layer, and Flash will convert it to a Masked layer.
Create the mask
The mask can be any filled shape. The color of the fill doesn’t matter. What’s important to Flash is the size, location, and contours of the shape. The shape will be the “peephole” through which you’ll see the content on the layer below. You can use any of the drawing tools to create your mask.
1 Select the Rectangle tool.
2 Choose any color for the Fill and no stroke for the Stroke.
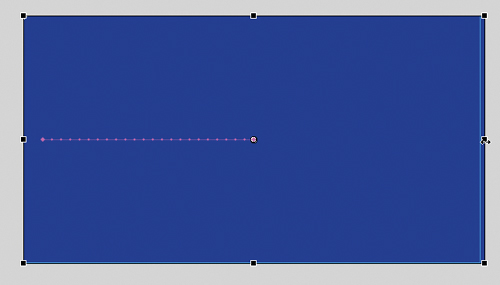
3 Select the top Mask layer and draw a thin rectangle just off to the left of the Stage. Make the height of the rectangle slightly larger than the Stage.

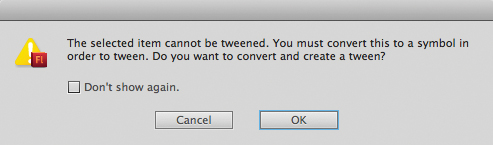
4 Right-click/Ctrl-click the rectangle and select Create Motion Tween.
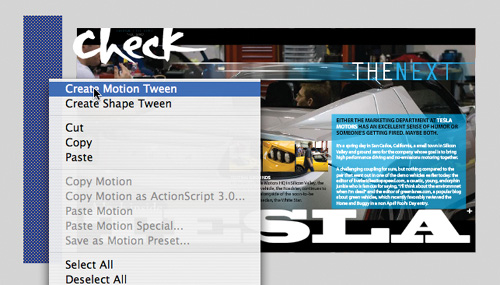
5 Flash asks to convert the rectangular shape to a symbol so you can apply a motion tween. Click OK.
The top layer becomes a Tween layer, and one second’s worth of frames is added to the Timeline.

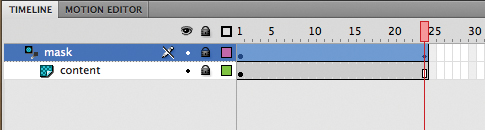
6 Insert the same number of frames in the bottom layer.
7 Move the playhead to the last frame, frame 24.
8 Select the Free Transform tool.
9 Click on the rectangular symbol.
The free transform handles appear around the rectangular symbol.

10 Hold down the Alt/Option key and drag the right edge of the free transform handle to expand the rectangle to cover the entire Stage.
The rectangle becomes wider at the last frame. The motion tween creates a smooth animation of the rectangle growing wider and covering the Stage.
11 To see the effects of the Mask layer on its Masked layer, lock both layers. Scrub the red playhead back and forth along the Timeline to see how the motion tween uncovers the content in the bottom layer.
12 Insert a new layer and rename it actionscript.
13 Insert a keyframe at frame 24 of the actionscript layer and open the Actions panel.
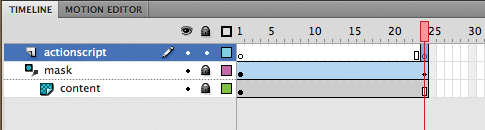
14 In the Script pane of the Actions panel, enter stop();.

15 Choose Control > Test Movie > in Flash Professional.

As the motion tween proceeds in the Mask layer, more of the Masked layer is revealed, creating a cinematic transition known as a wipe. If you open 09_workingcopy.fla and choose Control > Test Movie > in Flash Professional, and then click on the car movie clip, you’ll see that the masking effect is preserved even as it is loaded into another Flash movie.
Note
Flash does not recognize different Alpha levels of a mask. For example, a mask drawn with a fill at an Alpha value of 50% will still mask at 100%. However, with ActionScript you can dynamically create masks that will allow transparencies. Masks also do not recognize strokes.
Review Questions
1 How do you load external Flash content?
2 What are the advantages of loading external Flash content?
3 How do you control the Timeline of a movie clip instance?
4 What is a mask and how do you create one?
Review Answers
1 You use ActionScript to load external Flash content. You create two objects: a Loader and a URLRequest. The URLRequest object specifies the filename and file location of the SWF file that you want to load. To load the file, use the load() command to load the URLRequest object into the Loader object. Then display the Loader object on the Stage with the addChild() command.
2 Loading external content keeps your overall project in separate modules and prevents the project from becoming too bloated and difficult to download. It also makes it easier for you to edit, because you can edit individual sections instead of one, large, unwieldy file.
3 You can control the Timeline of movie clips with ActionScript by first targeting them by their instance name. After the name, type a dot (period), and then the command that you desire. You can use the same commands for navigation that you learned in Lesson 6 (gotoAndStop, gotoAndPlay, stop, play). Flash targets that particular movie clip and moves its Timeline accordingly.
4 Masking is a way of selectively hiding and displaying content on a layer. In Flash, you put a mask on the top Mask layer and the content in the layer below it, which is called the Masked layer. Both the Mask and the Masked layers can be animated. To see the effects of the Mask layer on the Masked layer, you must lock both layers.