
Chapter 5. Layout Managers
When a figure contains children, its layout manager is responsible for setting the bounds and location of each child. There is no implicit layout manager, so if no manager is provided, then the children are not displayed. Layout managers may use the preferred size of the figure as well as a constraint to position and size the children.
5.1 List Constraints
Constraints are extra data that the LayoutManager may require when positioning the children. For example, the XYLayout (see Section 5.3.7 on page 63) takes a Rectangle as its constraint which provides the location and size for the figure.
XYLayout layout = new XYLayout();
root.setLayoutManager(layout);
root.add(figures[0]);
layout.setConstraint(figures[0], new Rectangle(10, 10, 100, 60));
root.add(figures[1]);
layout.setConstraint(figures[1], new Rectangle(80, 100, 140, 60));
You can also use the more compact form to set the constraint when the figure is added to its parent figure.
XYLayout layout = new XYLayout();
root.setLayoutManager(layout);
root.add(figures[0], new Rectangle(10, 10, 100, 60));
root.add(figures[1], new Rectangle(80, 100, 140, 60));
Not all layouts require a constraint. For example, the ToolbarLayout (see Section 5.3.6 on page 62) positions figures in rows or columns in the order in which the figures are added to their parent.
5.2 Minimum, Maximum, and Preferred Size
Figures provide a range of size information that the layout manager may use when positioning each figure, including minimum, maximum, and preferred sizes:
• getMaximumSize()
• getMinimumSize()
• getMinimumSize(int wHint, int hHint)
• getPreferredSize()
• getPreferredSize(int wHint, int hHint)
The values returned are considered hints and, as such, may be ignored by the layout manager, depending on the layout algorithm and constraints used by the manager. For example, XYLayout requires a Rectangle constraint for each figure indicating the location and size of the figure (see Section 2.3 on page 9); any preferred size information provided by the figure is ignored. Other layout managers use the size recommendations of the figure, as a layout manager that doesn’t allocate enough height to a Label to allow the text to be legible wouldn’t be a very useful layout manager. You can set these values using methods provided by IFigure:
• setMaximumSize(Dimension size)
• setMinimumSize(Dimension size)
• setPreferredSize(Dimension size)
Tip
If setting the minimum or preferred size of a figure, such as Label, does not adjust the layout in the manner you desire, then try encapsulating that figure in an instance of Figure to obtain the desired layout.
5.3 Common Layout Managers
Draw2D provides a number of layout managers for use when positioning and sizing figures. Some of the more commonly used layouts are shown below, followed by the code used to create the drawing. The screenshots and code are taken from the BasicLayouts class (see Section 2.6 on page 20).
5.3.1 BorderLayout
BorderLayout positions children relative to the edges of the parent (see Figure 5–1).
Figure 5–1. Border layout showing children at the edges.
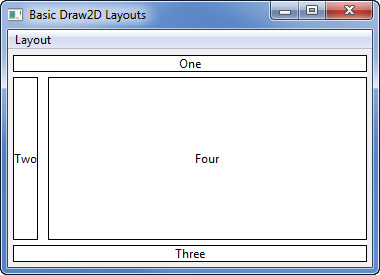
BorderLayout layout = new BorderLayout();
root.setLayoutManager(layout);
layout.setConstraint(figures[0], BorderLayout.TOP);
layout.setConstraint(figures[1], BorderLayout.LEFT);
layout.setConstraint(figures[2], BorderLayout.BOTTOM);
layout.setConstraint(figures[3], BorderLayout.CENTER);
layout.setHorizontalSpacing(10);
layout.setVerticalSpacing(5);
5.3.2 DelegatingLayout
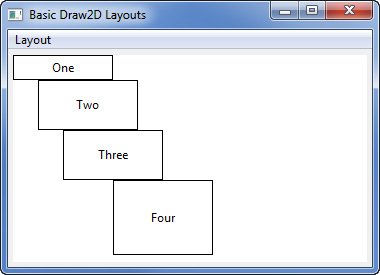
The DelegatingLayout delegates the responsibility for laying out the figure back onto the figure through the Locator constraint. With this layout, the required constraint is an instance of the Locator interface which overrides the method relocate(IFigure target), which is responsible for setting the bounds of the figure with absolute coordinates (see Figure 5–2). One common use of this layout manager is for positioning labels relative to a connection (see Section 6.5 on page 86).
Figure 5–2. Delegating layout positions figures based on their locators.
DelegatingLayout layout = new DelegatingLayout();
root.setLayoutManager(layout);
layout.setConstraint(figures[0], new Locator() {
public void relocate(IFigure target) {
target.setBounds(new Rectangle(0, 0, 100, 25));
}
});
layout.setConstraint(figures[1], new Locator() {
public void relocate(IFigure target) {
target.setBounds(new Rectangle(25, 25, 100, 50));
}
});
layout.setConstraint(figures[2], new Locator() {
public void relocate(IFigure target) {
target.setBounds(new Rectangle(50, 75, 100, 50));
}
});
layout.setConstraint(figures[3], new Locator() {
public void relocate(IFigure target) {
target.setBounds(new Rectangle(100, 125, 100, 75));
}
});
5.3.3 FlowLayout
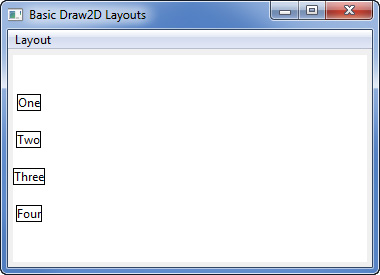
FlowLayout positions figures either horizontally (see Figure 5–3) or vertically (see Figure 5–4). If there is not enough space in the first row or column, the figures are wrapped into a second row or column. In addition, there are methods to configure the spacing and alignment along both the major and minor axes. The major axis is the axis that is parallel to the layout’s orientation, and the minor axis is perpendicular to it.
Figure 5–3. Flow layout showing figures positioned horizontally.
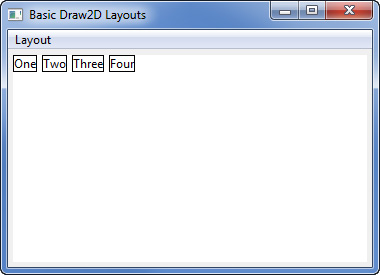
Figure 5–4. Flow layout showing figures positioned vertically.
root.setLayoutManager(new FlowLayout());
FlowLayout layout = new FlowLayout(false);
root.setLayoutManager(layout);
// Optional layout settings
layout.setMajorAlignment(FlowLayout.ALIGN_CENTER);
layout.setMajorSpacing(5);
layout.setMinorAlignment(FlowLayout.ALIGN_CENTER);
layout.setMinorSpacing(20);
5.3.4 GridLayout
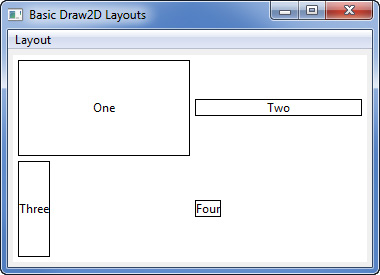
GridLayout positions figures in a grid pattern (see Figure 5–5). The constructor for GridLayout takes the number of columns for the grid, and the order the figures are added to the parent determines the cell where the figure will be placed. Each figure may have an associated GridData constraint (see Figure 5–6) specifying such things as
• Alignment within the cell
• Whether excess horizontal or vertical space should be used
• Horizontal and vertical span
• Width and height hints
Figure 5–5. Grid layout showing a two column grid.
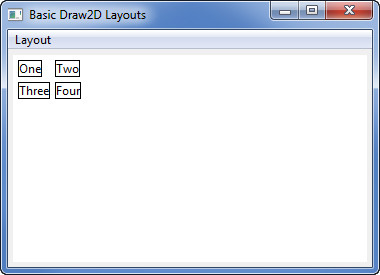
Figure 5–6. Grid layout showing figures with individual grid data.
root.setLayoutManager(new GridLayout(2, true));
GridLayout layout = new GridLayout(2, false);
root.setLayoutManager(layout);
layout.setConstraint(figures[0],
new GridData(GridData.FILL_BOTH));
layout.setConstraint(figures[1],
new GridData(GridData.FILL_HORIZONTAL));
layout.setConstraint(figures[2],
new GridData(GridData.FILL_VERTICAL));
layout.setConstraint(figures[3], new GridData());
5.3.5 StackLayout
StackLayout positions figures on top of one another with the same maximum size (see Figure 5–7 and an example using StackLayout on page 64). In our example, since Labels are not opaque by default, the texts, “One,” “Two,” “Three,” and “Four” are painted on top of each other.
Figure 5–7. Stack layout showing overlapping figures.
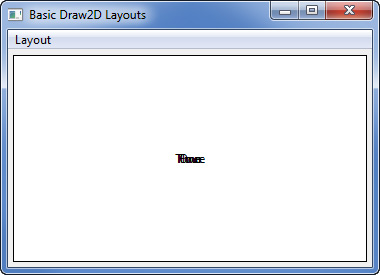
root.setLayoutManager(new StackLayout());
5.3.6 ToolbarLayout
ToolbarLayout is similar to FlowLayout but positions figures in a single row or column, never wrapping to a second row or column (see Figure 5–8 and an example using ToolbarLayout on page 66). Similarly to FlowLayout, spacing, alignment, and the stretching of the minor axis can be configured, although the default values are different. Also, the constraint is implicit, in the same manner as for FlowLayout.
Figure 5–8. Toolbar layout showing figures positioned in a single column.
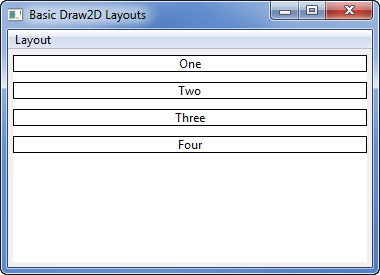
ToolbarLayout layout = new ToolbarLayout();
root.setLayoutManager(layout);
layout.setSpacing(10);
5.3.7 XYLayout
XYLayout positions figures as specified by the Rectangle constraint required for each figure (see Figure 5–9 and XYLayout in Section 2.3 on page 9).
Figure 5–9. XY layout showing figures positioned using rectangle constraints.
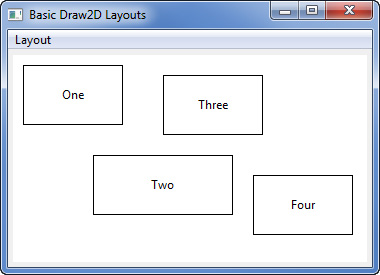
XYLayout layout = new XYLayout();
root.setLayoutManager(layout);
layout.setConstraint(figures[0], new Rectangle(10, 10, 100, 60));
layout.setConstraint(figures[1], new Rectangle(80, 100, 140, 60));
layout.setConstraint(figures[2], new Rectangle(150, 20, 100, 60));
layout.setConstraint(figures[3], new Rectangle(240, 120, 100, 60));
5.4 Using Layout Managers
We are using the XYLayout (see Section 2.3 on page 9) in the GenealogyView (see Section 2.4 on page 15), and the ToolbarLayout (see Section 5.3.6 on page 62) to position children in the PersonFigure, but the MarriageFigure has no children or layout manager. A natural piece of information that the MarriageFigure could display is the year when the two individuals got married. Modify the MarriageFigure’s constructor as shown below to display this additional information.
public MarriageFigure(int year) {
... existing code ...
setLayoutManager(new StackLayout());
add(new Label(Integer.toString(year)));
new FigureMover(this);
}
Next, modify the GenealogyView createDiagram(...) method to pass the additional information when the MarriageFigure is constructed.
IFigure marriage = new MarriageFigure(1942);
The GenealogyView now displays the marriage date (see Figure 5–10).
Figure 5–10. Genealogy view showing marriage date.

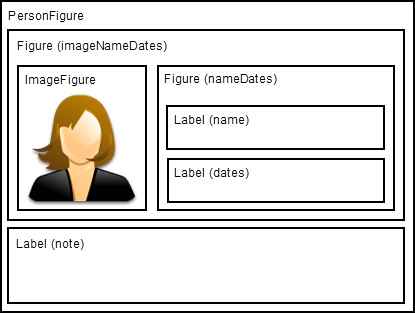
We want to add an image to PersonFigure that is displayed above the notes and to the left of the name and dates. We could create a custom layout manager for PersonFigure that performs this intricate layout, but the easier way is to create nested figures, each with its own layout (see Figure 5–11). In this way, we can use the standard figures and common layout managers to easily create a complex layout.
Figure 5–11. Person figure concept showing nested layouts.
Start by modifying PersonFigure to load images for male and female into static fields.
public static final Image MALE = new Image(Display.getCurrent(),
PersonFigure.class.getResourceAsStream("male.png"));
public static final Image FEMALE = new Image(Display.getCurrent(),
PersonFigure.class.getResourceAsStream("female.png"));
Next, modify the GenealogyView to statically import these images and use them when constructing instances of PersonFigure.
import static com.qualityeclipse.genealogy.figures.PersonFigure.MALE;
import static com.qualityeclipse.genealogy.figures.PersonFigure.FEMALE;
private Canvas createDiagram(Composite parent) {
... existing code ...
IFigure andy = new PersonFigure("Andy", MALE, 1922, 2002);
... existing code ...
IFigure betty = new PersonFigure("Betty", FEMALE, 1924, 2006);
... existing code ...
IFigure carl = new PersonFigure("Carl", MALE, 1947, -1);
... existing code ...
}
Finally, modify the PersonFigure’s constructor to add the Image argument and display the image. We use a GridLayout for the imageNameDates figure so that the image will appear on the left and the name/dates will take up all available space to the right of the image.
public PersonFigure(String name, Image image, int birthYear,
int deathYear) {
final ToolbarLayout layout = new ToolbarLayout();
layout.setSpacing(1);
setLayoutManager(layout);
setPreferredSize(100, 100);
setBorder(new CompoundBorder(
new LineBorder(1),
new MarginBorder(2, 2, 2, 2)));
// Display the image to the left of the name/date
IFigure imageNameDates = new Figure();
final GridLayout gridLayout = new GridLayout(2, false);
gridLayout.marginHeight = 0;
gridLayout.marginWidth = 0;
gridLayout.horizontalSpacing = 1;
imageNameDates.setLayoutManager(gridLayout);
add(imageNameDates);
imageNameDates.add(new ImageFigure(image));
// Display the name and date to right of image
IFigure nameDates = new Figure();
nameDates.setLayoutManager(new ToolbarLayout());
imageNameDates.add(nameDates,
new GridData(GridData.FILL_HORIZONTAL));
nameDates.add(new Label(name));
// Display the year of birth and death
String datesText = birthYear + " -";
if (deathYear != -1)
datesText += " " + deathYear;
nameDates.add(new Label(datesText));
new FigureMover(this);
}
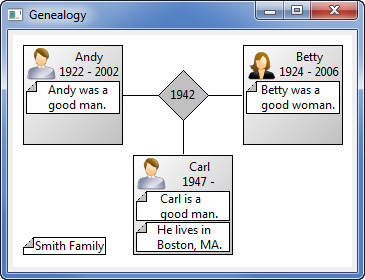
Once these steps are complete, the images appear in the GenealogyView (see Figure 5–12).
Figure 5–12. Genealogy view showing image and nested layout.
5.5 Summary
Layout managers are used in Draw2D to position children figures. Draw2D provides common layouts such as the grid, flow, and XY layouts. By using these layouts in nested figures you can easily design advanced layouts.
References
Chapter source (see Section 2.6 on page 20).
GEF and Draw2D Plug-in Developer Guide, Eclipse Documentation (see http://help.eclipse.org/).
Moore, Bill, David Dean, Anna Gerber, Gunnar Wagenknecht, and Philippe Vanderheyden, Eclipse Development Using the Graphical Editing Framework and the Eclipse Modeling Framework. IBM Redbooks, February 2004.