Before you begin working with any of the Microsoft Office programs, you must first open a program. When you finish your work, you can close the program. If applicable, you can save your work before exiting a program completely.
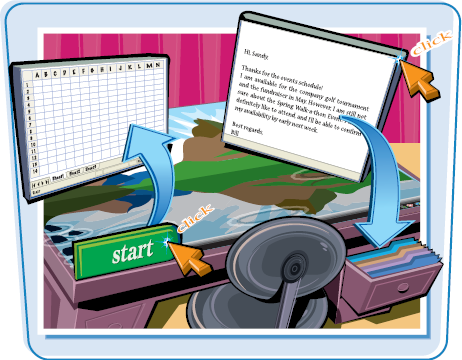
Start and Exit Office Applications
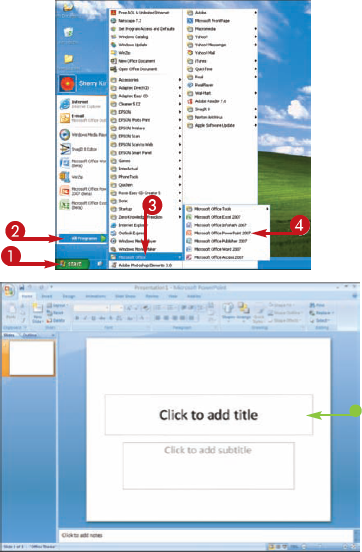
START AN OFFICE APPLICATION


Note
Depending on which programs you installed, not all of the Office programs may be listed in the menu.

Note
See the next task to learn how to identify different areas of the program window.

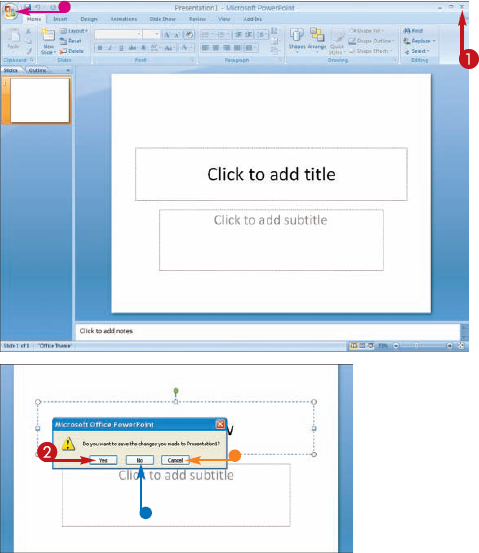
If you have not yet saved your work, the program prompts you to do so before exiting.
Note
Outlook does not prompt you to save anything before closing, unless you have unsaved e-mail messages that you were composing.
The program window closes.


Tip
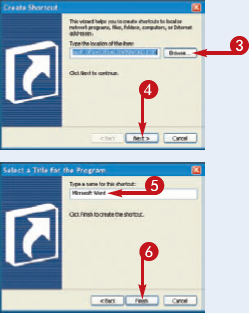
Can I create a shortcut icon for an Office application?
Yes. You can create a shortcut icon that appears on the Windows desktop. Whenever you want to open the program, you can simply double-click the shortcut icon. Follow these steps to create a shortcut icon:
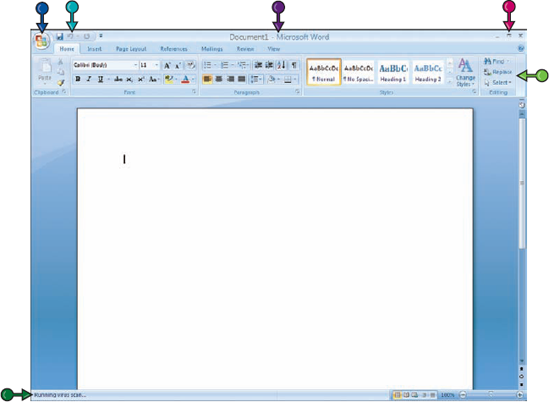
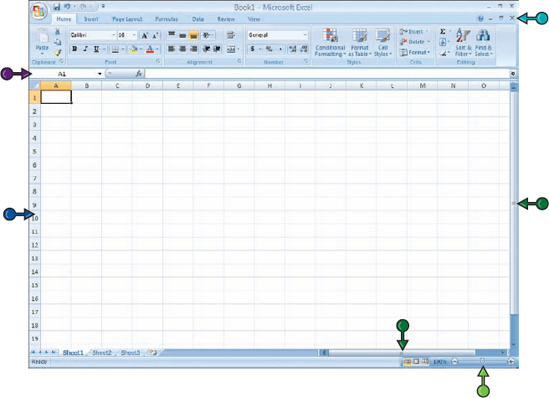
All of the Office programs share a common appearance and many of the same features, such as menu bars, toolbars, and scroll bars. When you learn your way around one program, you can easily use the same skills to navigate the other Office programs. If you are new to Office, you should take a moment and familiarize yourself with the types of on-screen elements that you can expect to encounter.
Displays the name of the open file and the Office program.
Click to display a menu of file commands, such as New and Open.
Displays quick access buttons to the Save, Undo, and Redo commands.
Displays groups of related commands in tabs. Each tab offers shortcut buttons to common tasks.
Displays information about the current worksheet or file.
Use these buttons to minimize the program window, restore the window to full size, or close the window.
This appears only in Excel. Use this bar to type and edit formulas and perform calculations on your worksheet data.
The area where you add, and work with, data in a program. Depending on the Office program, the work area may be a document, a worksheet, or a slide.
Document Window
Controls Use these buttons to minimize or restore the current document.
Use this feature to zoom your view of a document.
Use the vertical and horizontal scroll bars to scroll through the item displayed in the work area, such as a document or worksheet.
New to Office 2007, menus and toolbars in Word, Excel, PowerPoint, and Access are replaced by the new Ribbon feature. The Ribbon offers an intuitive way to locate commands that accomplish various program tasks. The Ribbon is grouped into tabs, and each tab holds a set of related commands. In addition, some tabs appear only when needed, such as when you are working with a particular object in a document.
Publisher and Outlook still use the familiar menu and toolbar features from previous versions of Office. However, some of the Outlook features, such as the Appointment window, use the new Ribbon features.
Work with the Ribbon
USE THE RIBBON
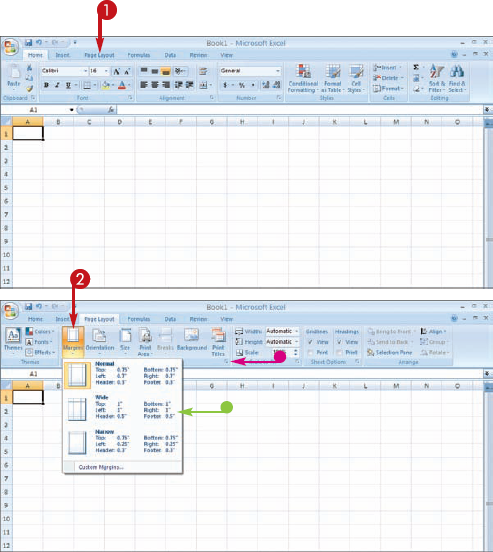
The tab organizes related tasks and commands into logical groups.
When you move the mouse pointer over Live Preview options on the Ribbon, you see the results in the document before applying the command.
The Ribbon is minimized.
Tip
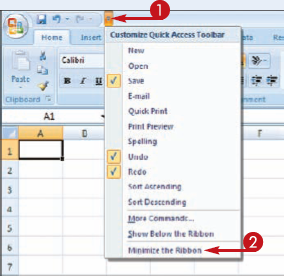
Is there a way I can keep the Ribbon minimized?
Yes. You can keep the Ribbon minimized and click a tab when you need to use a command. Follow these steps:
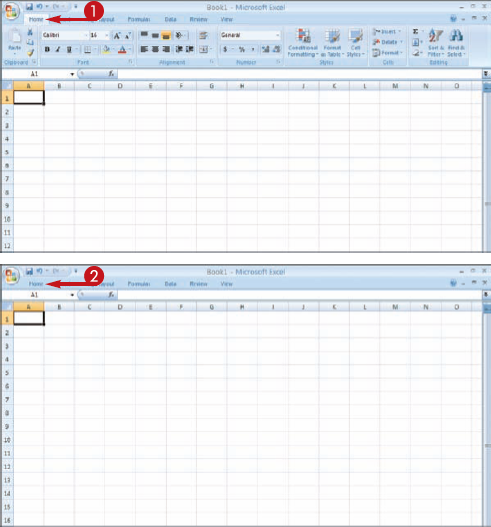
The program's Ribbon is minimized at the top of the screen.
To use a Ribbon while it is minimized, you can simply click the tab containing the tools that you want to access.
The Quick Access toolbar appears in the top-left corner of the program window. You can use the toolbar to quickly activate the Save, Undo, and Redo commands. You can customize the toolbar to include other commands that you need to keep in view at all times. For example, you might add the Quick Print command or another common command you use. You can also choose to display the toolbar above or below the Ribbon.
Customize the Quick Access Toolbar
Note
The Quick Access toolbar is not available in Publisher or Outlook.
The Options dialog box opens to the Customization tab.
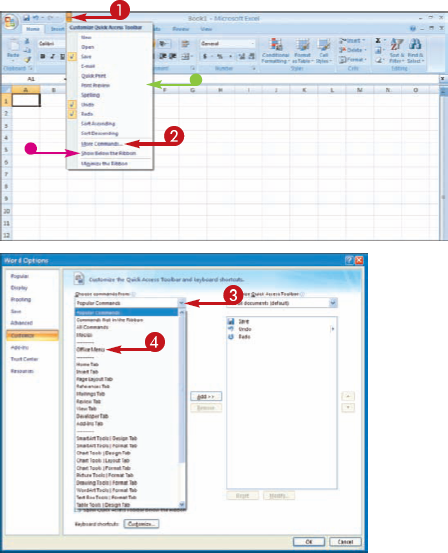


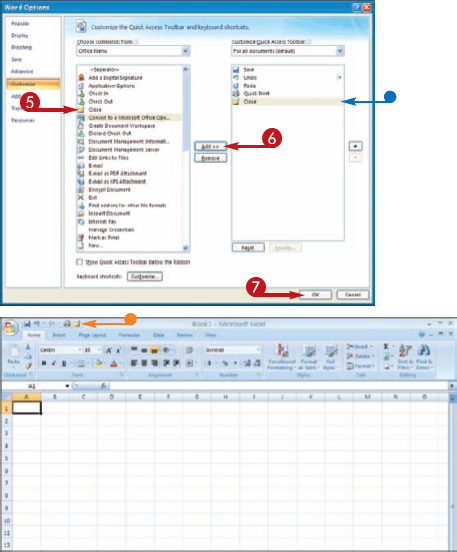
You can repeat Steps 5 and 6 to add additional buttons to the toolbar.

Tip
How do I remove a button from the Quick Access toolbar?
To remove a command, reopen the program's Options dialog box by following the steps in this task, click the command name in the list box on the right, and then click the Remove button. Click OK. The button no longer appears on the toolbar.
Are there other ways to customize the Quick Access toolbar?
Yes. You can add commands directly from the Ribbon and place them on the toolbar. Simply click the tab containing the command that you want to add, right-click the command, and then click Add to Quick Access Toolbar. The command is immediately added as a button on the toolbar.
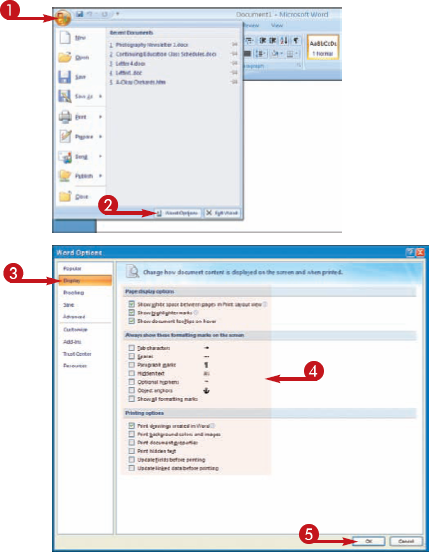
In previous versions of Office, you could customize the program window to suit the way you worked. You can do the same in Office 2007 using the Options dialog box. The dialog box features groups of settings that you can change to control how the program works, looks, and interacts with you.

Find Customizing Options
This example uses the Word Options button.
The program's Options dialog box appears.
Each tab displays sets of related controls that you can set for the program.
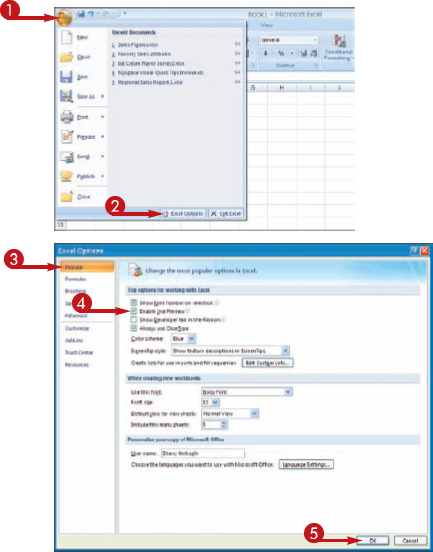
Live Preview allows you to preview the effects of a feature before committing to a particular selection. Many of the Ribbon's tools offer Live Previews. For example, when you move the mouse pointer over a gallery item on the Ribbon, the style is immediately reflected in the document. You can turn the feature off if you find it too distracting.
Turn Off Live Preview
This example uses the Excel Options button.
The program's Options dialog box appears.
The program turns off Live Preview.
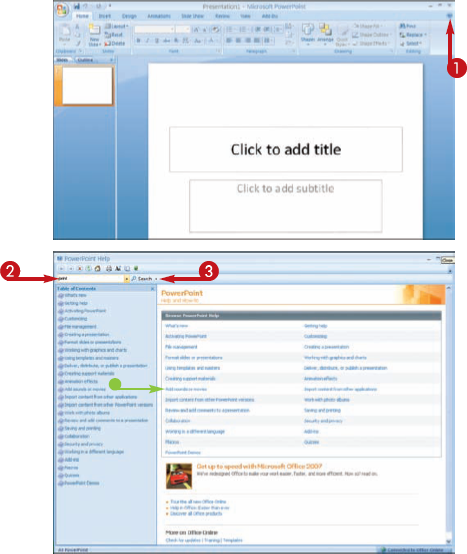
You can use the Office Help tools to assist you when you run into a problem or need more information about a particular task. With an Internet connection, you can use Microsoft's online Help files to quickly access information about an Office feature. The Help window offers tools that enable you to search for topics that you want to learn more about.
You must log on to your Internet connection in order to use the online Help files.

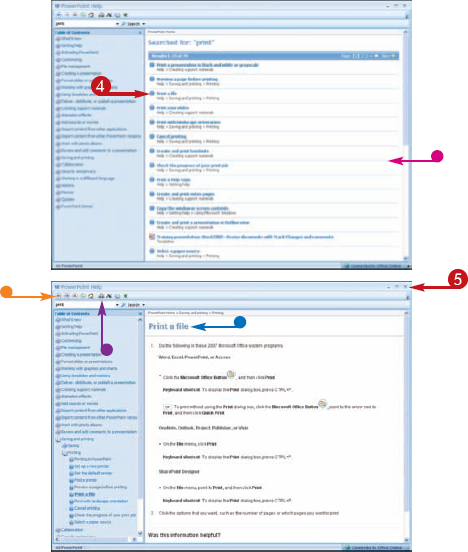
Find Help with Office
The Help window opens.
You can also press

Note
You must log on to the Internet to access Microsoft's online Help files.


Tip
Can I use the Help feature if I am offline?
Yes. You can still access the Help files that are installed with the program. However, the online resources offer you more help topics, as well as links to demos and other help tools.

Where can I find a table of contents for the Help files?
You can click the Home button (

You can add and remove Office components using the Office setup program. For example, you may choose to install two or three programs that you work with the most, and then add another component later. You might also decide to remove a program that you do not use.
Before you begin, you need the Office CD. Also, be sure to close any open programs.
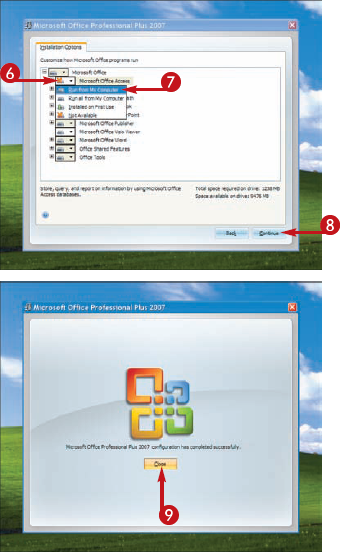
Add and Remove Office Components
Note
Depending on your computer's setup, the Office window may open automatically. If not, see the tip in this task.
The Microsoft Office window appears.
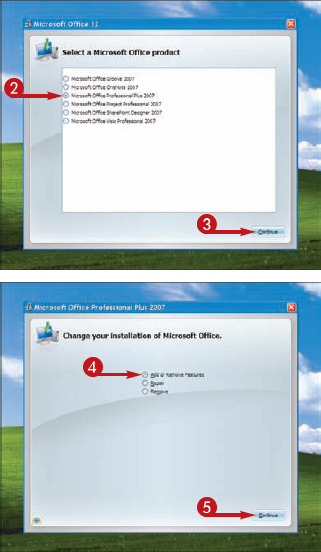
You can repeat Steps 6 and 7 to select additional programs.

Office installs or uninstalls the selected programs.

Tip
What do the various installation options do?
If you select the Run from My Computer option, Office installs the program directly onto your computer. If you choose the Run all from My Computer option, all of the add-ins and extra features are also installed. If you select the Installed on First Use option, Office prompts you to install the program the first time you attempt to use it. If you select the Not Available option, the program is uninstalled from your computer.

If my Office window does not open automatically, how do I open the setup program?
You can open the My Computer window and navigate to the CD drive to view the contents of the Office CD. When you open the drive, Windows displays all of the files located on the CD, and you can double-click the SETUP.EXE file to start the setup program.

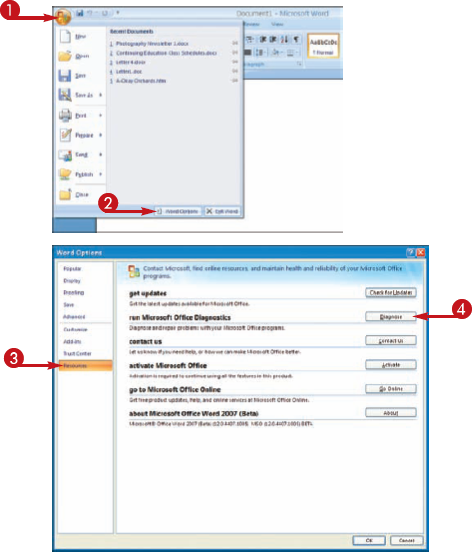
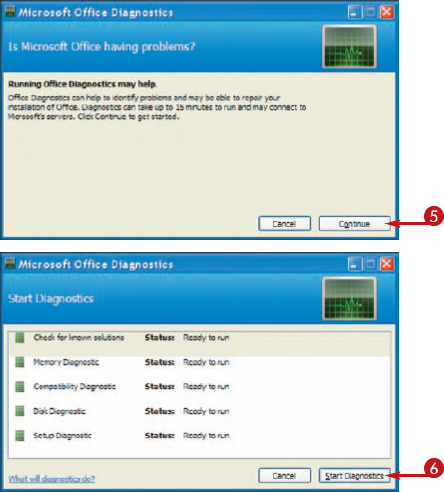
You can use the Office Diagnostics tool to diagnose and repair problems that you are having with any Office program. For example, a program may not work properly if an important program file is corrupted or accidentally deleted. You can run the diagnosis to check the problem and attempt to make any repairs. Microsoft Word's diagnostic tool is shown in this example.
Diagnose Office Programs
Tip
What if I am still having trouble with my Office programs?
You can also run the repair program with the Microsoft Setup feature. To do so, insert your Office CD and click the Repair option when prompted. Setup runs the repair tool, which may take a long time, depending on your computer's resources.

How do I update my Office program?
You can use the Resources tab in the Options dialog box to check for program updates. Open the dialog box as shown in this task, and click the Resources tab. Next, click the Check for Updates button. You must log onto your Internet connection in order to check for program updates.