
58.4. Version Control
You can open Source Control Explorer from your Team Explorer window or View ![]() Other Windows
Other Windows ![]() Source Control Explorer to get to the window shown in Figure 58-11. You will need to define mappings between paths on the server and local folders to configure your workspace. You could define a different local folder for each path, but a good practice would be to have only one mapping; this helps keep all the solutions and projects relative to each other even between different team projects. To define this mapping, open the workspace combobox and select Workspace.
Source Control Explorer to get to the window shown in Figure 58-11. You will need to define mappings between paths on the server and local folders to configure your workspace. You could define a different local folder for each path, but a good practice would be to have only one mapping; this helps keep all the solutions and projects relative to each other even between different team projects. To define this mapping, open the workspace combobox and select Workspace.
Figure 58.11. Figure 58-11
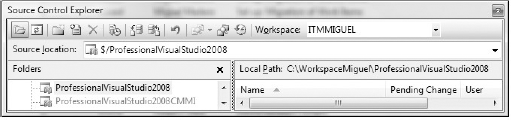
Now you can get the latest version of the source code and start working with it, add files, check out files (mark as edit) or check in (upload/persist) changes, view change history, and compare folders.
58.4.1. Working from Solution Explorer
When you create a new project you have the option to add it to Source Control. Team System will automatically bind it and add it according to the mapping previously defined. That's why you need to set the location to a folder inside your workspace (the local path you mapped to), as seen in Figure 58-12.
Figure 58.12. Figure 58-12

The Solution Explorer you are used to working with in Visual Studio will be the main place to interact with your Source Control System. Every time you add a new file to the solution, it will be added to Source Control; when you open a file and VS detects you're editing it, it will be automatically checked out for you. Once you are done working you can simply right-click the solution and choose Check In to persist your changes in the server.
58.4.2. Check Out
Files under Source Control are by default read-only; in TFS terms you would say the file is checked in. To start editing a file you need to check it out. This is done for you automatically when you modify it from VS. When the file is a text file (that is, a C#, VB, or XML file), the IDE will do a shared check-out; if it's a binary file (that is, a Word document, SQL Server Compact Edition Database, or another resource) an "exclusive check-out" will be made.
Shared check-outs will allow two or more developers to modify a file at the same time, whereas an exclusive check-out will prevent a second developer from checking it out. You can choose to do an exclusive check-out on a text file if you need to prevent anyone from modifying it. This is not a recommended practice, and I encourage you to only use it when you really need it. Martin Fowler has written an excellent article about Code Ownership (http://martinfowler.com/bliki/CodeOwnership.html).
Word, Excel, and other document types can be stored in a SharePoint document list. But you certainly want to version libraries in TFS, and I strongly recommend having strict policies about dealing with them.
58.4.3. Check In
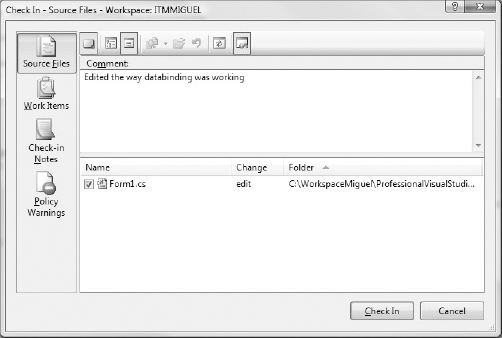
To preserve your changes in the server, you will need to check in the edited files. You can select which files to include in this change set, add comments to it, associate it with work items, and add check-in notes (Figure 58-13).
Figure 58.13. Figure 58-13
Depending on the policies defined for the team project, you might need to associate your check-in with a work item, run code analysis, have it pass tests, or at least successfully build the solution. To modify a team project's policies, open the Source Control Settings window (Team ![]() Team Project Settings
Team Project Settings ![]() Source Control) and go to the Check-in Policy tab. Once the policies are defined, you will get Policy Warnings (Figure 58-14); these can be overridden.
Source Control) and go to the Check-in Policy tab. Once the policies are defined, you will get Policy Warnings (Figure 58-14); these can be overridden.
Figure 58.14. Figure 58-14

58.4.4. History
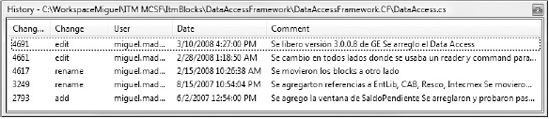
Every change you made is persisted in the server and you can get to any specific version of a file; a great way to do it is through the History window. Simply right-click a file in Source Control or Solution Explorer and select View History. From there you can see how a file has evolved over time (Figure 58-15). When you right-click any version, you can compare it to your version, open it, and view details of the change set (including the comments and related work items).
Figure 58.15. Figure 58-15
58.4.5. Annotate
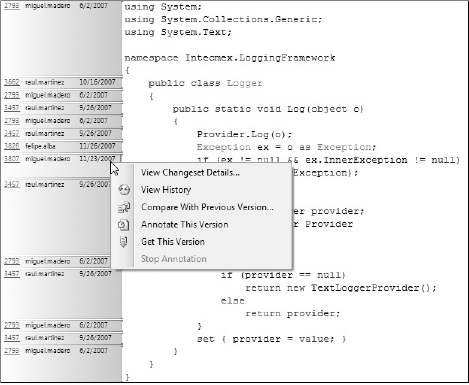
You can see when and who edited each line of code (Figure 58-16). From each of the changes made, you can get to each particular change set to see details, get that particular version, compare it to its previous version, locate the file in the History window, or annotate from that version.
Figure 58.16. Figure 58-16
58.4.6. Resolve Conflicts
Shared check-outs can lead to conflicts, and these can easily be resolved with the help of Visual Studio. From the Resolve Conflicts window (Figure 58-17) you can compare versions and look at all the changes to that file. To resolve it, you can use Auto Merge and let Visual Studio merge the changes for you, undo your local changes, discard server changes, or merge changes manually in the merge tool (Figure 58-18).
When the changes were made in different parts of the file (for example, two different methods), VS can automatically resolve changes, but if changes were made in the same line you have to either choose a version or manually merge both files using the Merge Changes Tool.
Visual Studio will compare text to determine if changes overlap, but this will not guarantee the resulting file will even compile or behave as expected. This option is really useful, but has to be used with caution. Over time, you will have more confidence in choosing which files to automerge to save time and which are worth a quick look just to be sure.
In the Merge Changes Tool (Figure 58-18), you will have a view of "their" version (that is, the server version), your version, and a merged version. You can navigate easily between changes and conflicts. In the case of conflicts, you can manually edit the offending lines or select a version to keep. When all conflicts are resolved, you can accept the changes, keep the new file as your current version, and proceed to check-in.
After resolving conflicts, I recommend running the automated tests again to ensure there are no breaking changes. As you will see in the "Team Build" section, this test can be run automatically in the server after each check-in.
Figure 58.17. Figure 58-17

Figure 58.18. Figure 58-18

58.4.7. Working Offline
Team Foundation Server uses HTTP and web services and can work perfectly through the Internet and allow for collaboration of distributed teams, but in case you don't have an available connection VS will allow you to work offline when you try to open a bound project.
All files under Source Control are read-only. When you save a file you will be warned and should simply choose Overwrite. When the connection with TFS can be reestablished, you can select to go online from Solution Explorer or by right-clicking the solution. VS will look for files in the solution without the read-only attribute; if those are not in Source Control it will add them, and if they exist it will check them out.
Files modified outside the solution won't be detected and you would have to manually check them out. To make this easier you can compare your local copy to the latest version by right-clicking a folder in Source Control Explorer.
58.4.8. Label
Labeling a specific version allows you to refer to it easily. To create a label you simply right-click a folder in Source Control Explorer that you want to mark, add additional files if necessary, and write a Name and optionally a Comment (Figure 58-19). Similarly, you can get to a specific version using the label. The perfect use for this is to release a version.
Figure 58.19. Figure 58-19

To get a labeled version right-click a file or folder in Source Control Explorer and select Get Specific Version from the context menu. On the Type combobox in the Get window (Figure 58-20) select Label. You can search for labels by name, team project, and owner. Once you find the label, to be sure you are getting the exact labeled version, you will probably choose to overwrite writable files.
I recommend undoing, shelving, or checking-in pending changes before getting a specific version, to separate the latest changes in your workspace from the labeled version.
If you want to get the version in a different location, you can create a branch. You will see this later in the chapter.
Figure 58.20. Figure 58-20

58.4.9. Shelve
When you check in a file, that change is automatically made available to others. Sometimes you need to persist your changes without affecting everyone — a scenario that can happen when you need to work from another computer and want to upload your changes and send them somewhere else, or when you are in the middle of something and are assigned a new task.
Shelving persists your changes in the server. You can associate a shelve set to WorkItems and add comments and check-in notes, much as you would when checking in. You can optionally evaluate check-in policies before shelving and choose to undo local changes after the shelve is done. The latter is useful when you need to work on some other work item without the shelved changes interfering with what you are doing. Shelving changes is also useful if you are moving to another machine and don't want to have to make the same change in both places. To get to the changes you can unshelve and your files will be checked out again.
58.4.10. Branch
Branch will allow you to create a parallel version of your code. This is useful for different purposes. Here are a couple of examples:
Hot fixes or bugs for stable versions while working on new ones. When you release 1.0 you label all your source code and start working on 2.0. Then a critical bug is found. (I know, this never happens — this is just to an example.) Version 2.0 is months away from being ready. You will branch from version 1.0 (you can get to this version using the label). Then you can fix the bug in the new branch and release version 1.1. Later you can merge the change made and integrate it with the main branch.
Creating a branch from the latest version to do a big refactoring or a change you are not sure will work and thus don't want to affect the main branch. If it works you can merge it with the main branch and if it doesn't you can simply delete it.
You have to choose wisely what branching strategy is better for your organization, type of product, and process, or when you could substitute by simply labeling a version or shelving a change. Abuse of branching can exponentially complicate source-code management. Codeplex hosts branching guidance that provides additional scenarios (http://www.codeplex.com/BranchingGuidance/).