
Using external references (XRefs), you can pull multiple scenes, objects, materials, and controllers together into a single scene. XRefs allow a diverse team to work on separate parts of a scene at the same time. They also provide a great way to reuse existing resources.
How often do you go into your garage during the winter months? Unless you have a pair of the warm overalls or a space heater, you probably just throw in any tools you use, the Christmas lights, spare quarts of oil, and the kids' bikes wherever they fit as you make a mad dash back into the warm house, and then when spring comes, you have a real mess on your hands.
Max projects can be the same. During an aggressive project, Max files, textures, and render passes get saved all over the network. By the time the project is finished, you may have a hard time reusing things simply because you can't find anything. This dilemma is compounded when you work on a team with several individuals throwing stuff all over the place.
An asset management system can help with this problem by introducing a system that acts as a little secretary logging every object thrown to the network. This little secretary is also smart enough to keep track of the latest updates of all files, making sure that each accessed file includes them. It also locks any file that is being used to keep unwanted fingers out of the pie.
No man is an island, and if Autodesk has its way, no Max user will be an island either. XRefs (which stands for eXternal References) make it easy for creative teams to collaborate on a project without having to wait for another group member to finish his or her respective production task. External references are objects and scenes contained in separate Max files and made available for reference during a Max session. This arrangement enables several artists on a team to work on separate sections of a project without interfering with one another or altering each other's work.
Max includes two different types of XRefs: XRef scenes and XRef objects. You also can use XRef for materials, modifiers, and controllers.
An externally referenced scene is one that appears in the current Max session, but that is not accessible for editing or changing. The scene can be positioned and transformed when linked to a parent object and can be set to update automatically as changes are made to the source file.
As an example of how XRef scenes facilitate a project, let's say that a design team is in the midst of creating an environment for a project while the animator is animating a character model. The animator can access the in-production environment as an XRef scene in order to help him move the character correctly about the environment. The design team members are happy because the animator didn't modify any of their lights, terrain models, maps, and props. The animator is happy because he won't have to wait for the design team members to finish all their tweaking before he can get started. The end result is one large, happy production team (if they can meet their deadlines).
Choose File
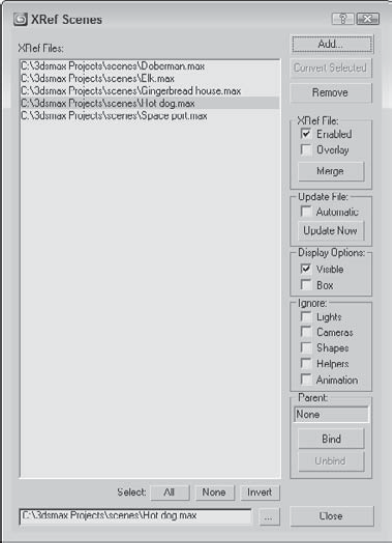
Figure 23.1. The XRef Scenes dialog box lets you specify which scenes to load as external references.
In the XRef Scenes dialog box are several options for controlling the appearance of the scene objects, how often the scene is updated, and to which object the scene is bound. This dialog box is modeless, and you can open and change the options in this dialog box at any time.
The pane on the left lists all XRef scenes in the current scene. These scenes are displayed using their full path unless the Convert Local File Paths to Relative option in the Files panel of the Preference Settings dialog box is enabled. To the right are the settings, which can be different for each XRef scene in the list. To view or apply a setting, you first need to select the scene from the list. You can remove any scene by selecting it from the list and clicking the Remove button.
Warning
If an XRef scene in the list is displayed in red, then the scene could not be loaded. If the path or name is incorrect, you can change it in the Path field at the bottom of the list.
The Convert Selected button converts any selected objects in the current scene to XRef objects by saving them as a separate file. This button opens a dialog box to let you name and save the new file. If no objects are selected in the current scene, then this option is disabled.
Use the Enabled option to enable or disable all XRef scenes. Disabled scenes are displayed in gray. The Merge button lets you insert the current XRef scene into the current scene. This button removes the scene from the list and acts the same way as the File
Automatic is a key option that can set any XRef scene to be automatically updated. Enable this option by selecting a scene from the list and checking the Automatic option box; thereafter, the scene is updated anytime the source file is updated. This option can slow the system if the external scene is updated frequently, but the benefit is that you can work with the latest update.
The Update Now button is for manually updating the XRef scene. Click this button to update the external scene to the latest saved version.
Other options let you decide how the scene is displayed in the viewports. You can choose to make the external scene invisible or to display it as a box. Making an external scene invisible removes it from the viewports, but the scene is still included in the rendered output. To remove a scene from the rendered output, deselect the Enabled option.
The Ignore section lists objects such as lights, cameras, shapes, helpers, and animation; selecting them causes them to be ignored and to have no effect in the scene. If an external scene's animation is ignored, then the scene appears as it does in frame 0.
Positioning an external scene is accomplished by binding the scene to an object in the current scene (a dummy object, for example). The XRef Scenes dialog box is modeless, so you can select the object to bind to without closing the dialog box. After a binding object is selected, the external scene transforms to the binding object's pivot point. The name of the parent object is also displayed in the XRef Scenes dialog box.
Transforming the object to which the scene is bound can control how the external scene is repositioned. To unbind an object, click the Unbind button in the XRef Scenes dialog box. Unbound scenes are positioned at the World origin for the current scene.
The Overlay option in the XRef Scenes dialog box makes the XRef visible to the current scene, but not to any other scenes that XRef the scene including the overlay. This provides a way to hide XRef content from more than one level. Overlay XRefs also make it possible to avoid circular dependencies. For example, in previous Max versions, Max wouldn't allow two designers to XRef one another's scenes, but if one of the scenes is an overlay, then this can be done.
You can't edit XRef scenes in the current scene. Their objects are not visible in the Select by Name dialog box or in the Track and Schematic Views. You also cannot access the Modifier Stack of external scenes' objects. However, you can make use of external scene objects in other ways. For example, you can change a viewport to show the view from any camera or light in the external scene. External scene objects are included in the Summary Info dialog box.
Tip
Another way to use XRef scenes is to create a scene with lights and/or cameras positioned at regular intervals around the scene. You can then use the XRef Scenes dialog box to turn these lights on and off or to select from a number of different views without creating new cameras.
You can also nest XRef scenes within each other, so you can have one XRef scene for the distant mountains that includes another XRef for a castle.
Note
If a Max file is loaded with XRef files that cannot be located, a warning dialog box appears, enabling you to browse to the file's new location. If you click OK or Cancel, the scene still loads, but the external scenes are missing.
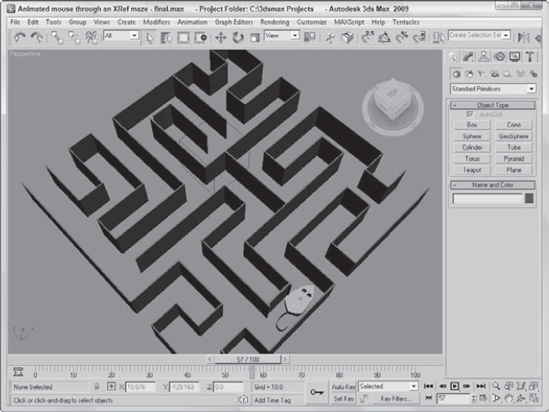
As an example of a project that would benefit from XRefs, I've created a maze environment. I open a new Max file and animate a simple mouse moving through this maze that is opened as an XRef scene.
To set up an XRef scene, follow these steps:
Create a new Max file by choosing File

Choose File
Click the Add button, locate the Maze.max file from the Chap 23 directory on the DVD, and click Open to add it to the XRef Scene dialog box list, but don't close the dialog box just yet.
Tip
You can add several XRef scenes by clicking the Add button again. You can also add a scene to the XRef Scene dialog box by dragging a .max file from Windows Explorer or from the Asset Manager window.
Select Create
In the XRef Scenes dialog box, click the Bind button and select the dummy object.
This enables you to reposition the XRef scene as needed.
Select the Automatic update option, and then click Close to exit the XRef Scene dialog box.
Now animate objects moving through the maze.
Figure 23.2 shows the Maze.max scene included in the current Max file as an XRef.
Tip
With the simple mouse animated, you can replace it at a later time with a detailed model of a furry mouse using the File
XRef objects are slightly different from XRef scenes. XRef objects appear in a scene and can be transformed and animated, but the original object's structure and Modifier Stack cannot be changed.
An innovative way to use this feature would be to create a library of objects that you could load on the fly as needed. For example, if you had a furniture library, you could load several different styles until you got just the look you wanted.
You can also use XRef objects to load low-resolution proxies of complex models in order to lighten the system load during a Max session. This method increases the viewport refresh rate.
Many of the options in the XRef Objects dialog box, shown in Figure 23.3, are the same as in the XRef Scenes dialog box.

Figure 23.3. The XRef Objects dialog box lets you choose which files to look in for external objects.
The interface buttons for the XRef Objects dialog box are listed in Table 23.1.
Table 23.1. XRef Objects Dialog Box
Button | Name | Description |
|---|---|---|
Create XRef Record from File | Opens the XRef Merge dialog box where you can select the XRef source file. | |
Remove XRef Record | Deletes the selected XRef record. | |
Combine XRef Record | Allows two or more selected XRef records pointing to the same file to be combined into a single record. | |
Update | Updates the content of all XRefs. | |
Merge in Scene | Makes all XRefs for the selected record part of the scene file. This also removes the XRef record from the dialog box. | |
Convert Selected Objects to Xrefs | Opens a save dialog box, and saves the selected scene objects as a separate scene file, which is an XRef in the current scene. | |
Select | Selects the objects that are part of the selected XRef record. | |
Select by Name | Opens the Select Objects dialog box listing all objects that are part of the selected XRef record. | |
Highlight Selected Object's XRef Records | Highlights the XRef record that contains the objects selected in the viewport. | |
Add Objects | Opens the XRef Merge dialog box where additional objects from the selected XRef record can be loaded. | |
Delete XRef Entity | Deletes the current object from the XRef record. | |
Merge in Scene | Merges the selected object to the current scene and removes its XRef. | |
List Objects | Filters the display to show the XRef objects. | |
List Materials | Filters the display to show the XRef materials. | |
List Controllers | Filters the display to show the XRef controllers. |
The XRef Objects dialog box is divided into two sections. The top section displays the externally referenced source files (or records), and the lower section displays the objects, materials, or controllers selected from the source file. If multiple files are referenced, then a file needs to be selected in the top pane in order for its objects and materials to be displayed in the lower pane.
The Convert Selected button works the same as in the XRef Scenes dialog box. It enables you to save the selected objects in the current scene to a separate file just like the File
In the XRef Objects dialog box, you can choose to automatically update the external referenced objects or use the Update button or you can enable the Automatic Update option. You can also enable or disable all objects in a file with the Enabled option. The Include All option skips the XRef Merge dialog box and automatically includes all objects in the source file.
If the Merge Transforms, Merge Materials, and Merge Manipulators options are enabled before an XRef file is added, then all transforms, materials, and manipulators are automatically combined with the current scene instead of being referenced. When merged, the link between the source file is broken so that changes to the source file aren't propagated.
When a source file is loaded into the XRef Objects dialog box, both its objects and materials are loaded and included. If the Merge Materials option is selected before the source file is loaded, then the materials are included with the objects, but if the Merge Materials option isn't enabled, then the objects and the materials appear as separate entities. You can use the List Objects and the List Materials buttons to list just one type of entity.
Materials also can be referenced from directly within the Material Editor. If you used a material in a previous scene that would be perfect in your current scene, you can just select the XRef Material from the Material/Map Browser. This material type includes fields where you can browse to an external scene file and select a specific object. The selected material is added automatically to the XRef Objects dialog box.
Note
You can learn more about applying materials and using the Material Editor in Chapter 14, "Exploring the Material Editor."
If the Merge Manipulators option is enabled before loading the XRef file, then any manipulator that is part of the XRef object is merged and loaded along with the object. You also can specify how modifiers are included with XRef objects, but you must select the option from the Modifier drop-down list before the file is selected. The XRef option loads all modifiers with the XRef object, but hides them from being edited. New modifiers can be added to the object. The Merge option adds all modifiers to the XRef object and makes these modifiers accessible via the Modifier Stack. The Ignore option strips all modifiers from the XRef object.
XRef objects appear and act like any other object in the scene. You may see a slight difference if you open the Modifier Stack. The Stack displays "XRef Object" as its only entry.
When an XRef object is selected in the viewport, all details concerning the XRef object—including its source file name, Object Name, and status—are listed in the Modify panel. The Modify panel also includes a Proxy Object rollout, where you can select a separate object in a separate file as a proxy object. The File or Object Name buttons open a file dialog box where you can select a low-resolution proxy object in place of a more complex object. This feature saves memory by not requiring the more complex object to be kept in memory. You also can select to enable or disable the proxy or use the proxy in rendering.
In addition to objects, materials, and modifiers, controllers also can be externally referenced. This means that you can borrow the controller motions of an object in a separate scene and save some animation time. To reference an external controller, select the Transform track and choose the XRef Controller option. This opens a File dialog box followed by a Select Object dialog box where you can choose with the controller the object that you want to reference. XRef controllers also appear as records in the XRef Objects dialog box.
Note
You can learn more about applying and using controllers in Chapter 21, "Animating with Constraints and Controllers."
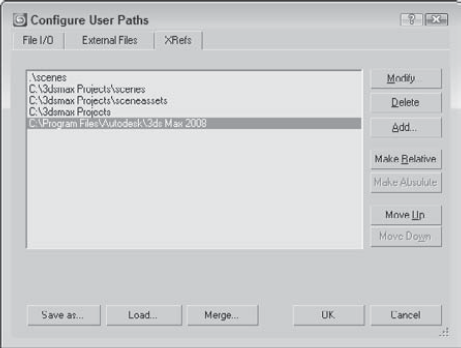
The Configure Paths dialog box includes an XRefs tab for setting the paths for XRef scenes and objects, shown in Figure 23.4. Choose Customize
Max keeps track of the path of any XRefs used in a scene, but if it cannot find them, it looks at the paths designated in the XRefs panel of the Configure Paths dialog box. For projects that use lots of XRefs, populating this list with potential paths is a good idea. Paths are scanned in the order they are listed, so place the most likely paths at the top of the list.
To add a new path to the panel, click the Add button. You can also modify or delete paths in this panel with the Modify and Delete buttons.
Max's asset tracking features provides support for several different systems, including Autodesk's Vault, Microsoft's Visual SourceSafe, CVS, and Perforce. Each of these systems can be accessed using Server
Note
In order for an asset tracking system to work with Max, it must conform to the MSSCC standard.
For project teams that don't currently use an asset tracking system, you'll be happy to know that Autodesk has included a copy of its Vault system on the 3ds Max 2009 install disc. Both the Vault Server and a Vault Client can be installed from the install discs. Vault installation requires a separate setup from the standard 3ds Max 2009 setup. Just locate the Vault setup link on the first page of the install wizard under the Install Tools & Utilities section.
Note
Installation and configuration of the Vault Server should be left to your network administrator. The administrator is also responsible for setting up user profiles, issuing usernames and passwords for accessing the system, and creating project folders.
For an asset tracking system, assets are defined as any file that is used as part of a project. This could include Max scene files, XRefs, bitmap textures, MAXScript files, and so on. One of the key benefits to the Vault asset management system is that it stores data in a hierarchical structure including files such as textures as dependents of the Max scene file.
Note
3ds Max 2009 includes support and installations for Vault 2008 and Vault 2009.
To request an asset from the asset tracking system, you "check out" the file. This command locks the file so you can edit it without worrying about others making changes at the same time. If another user tries to check out a file that is already checked out, he receives a polite message stating that the requested file is available for read-only access and lists you as the person who has the file checked out. The requested file can be loaded and viewed, but it cannot be edited.
When you're finished editing the file, you can "check in" the file, making it available for other users. As a file is checked in, a comment dialog box appears where you can enter a message about the latest changes. Over time, these comments are compiled into a historical list that marks the changes over the life of the file. The asset tracking system can also be used to recall the file at any point in its history.
Note
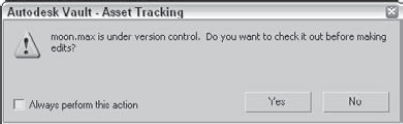
Asset tracking systems such as Vault are very good at reminding you to check out and check in files so changes aren't lost. For example, if you make changes to a checked out Vault file and try to open another file, a dialog box appears reminding you to check the file back in before opening another file.
The first step in using an asset tracking system is to log into the system. This lets the system know who you are, the access rights you have, and which name to place beside the assets you're editing. If you select either the File

The Vault Log In dialog box requires a username and password. It also includes drop-down lists for selecting the Server and Database. A production facility may have several different asset tracking instances running at the same time, and a separate database would be established for each project.
Tip
If you enable the Use these settings next session option, then the Vault Log In dialog box won't open again until Max is started again.
When files are checked out from the asset tracking system, they are copied to a local directory on your current machine where the changes are saved until the file is checked back in. The first time you try to check out a file from the asset tracking system, the system asks you to select a working folder. This folder is a temporary folder where the checked out files are saved while being worked on. You can manually set the working folder by selecting the Server
Max's asset tracking system, Vault, is a long-standing Autodesk product used extensively by AutoCAD teams around the world. It is a robust, stable product that fits well into any production pipeline that uses Max.
After a Vault server has been installed and configured on your network and you know your username, password, server, and project name, you can log in and access Vault files.
Any Vault project files can be opened using the File
Note
The Open from Vault menu command appears in the File menu only after the Vault client has been installed on your local computer.
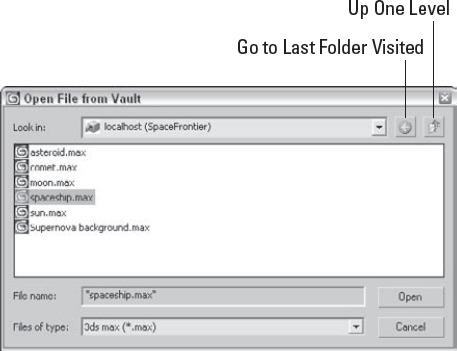
Opening a Vault file is different from checking the file out, but whenever a file is selected from the Open File from Vault dialog box, a warning dialog box, shown in Figure 23.7, opens and asks if you want to check out the file. This dialog box includes an option to Always perform this action. If this option is enabled, then the action of checking out when a Vault file is opened happens automatically.
You can set which warning dialog boxes appear and which are handled automatically using the Options
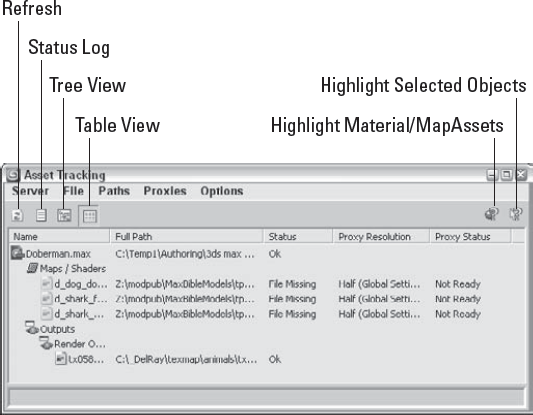
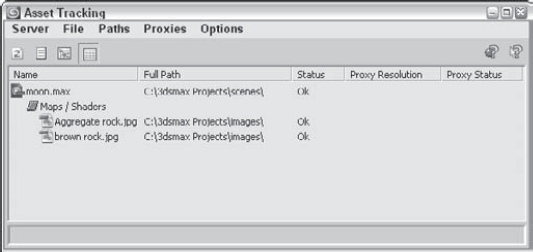
Although the Vault client, called Vault Explorer, can be installed using the install DVD and used to check out Vault files, the Asset Tracking interface, shown in Figure 23.8, is part of the Max interface and takes the place of the Vault client for Max users. The Asset Tracking interface is opened using the File
Vault files that are opened appear in this interface including all dependent files such as texture bitmaps, XRefs, photometric files, render files, and so on. Using the buttons at the top of the interface, you can Refresh the current list to see the latest updates, view the Status Log (which is a running list of all Vault commands), and change the view between a Tree view and a Table view.
To the left of each filename is a small icon that marks the status of the file. These icons are handy when the Tree view is enabled, or you can read the status as text in the Table view. The Table view includes separate columns for displaying the Name, Full Path, Status, Proxy Resolution, and Proxy Status of the various files.
On the left side of the interface are two buttons for filtering the assets. The first button highlights the material and map assets. The second button highlights the assets for the selected object.
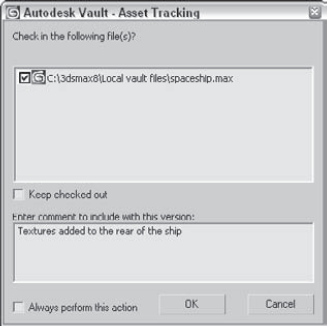
The Asset Tracking dialog box has commands for checking files in and out under the File menu. Each time a file is checked in, a confirmation dialog box appears, as shown in Figure 23.9. In this dialog box, you can enter a comment about the latest changes. The file is then saved to the Vault server with an incremented version number. The ability to save and keep track of different versions of a file is known as "version control" and is one of the key features of an asset management system.
An Undo Checkout command is available in the File menu that throws away the current changes and restores the current Vault file.
After a database is created for a project and you've logged in, you can add open files to the Vault server using File
The File
If you're missing files, such as a texture that has been moved to a different local folder, you can use the File
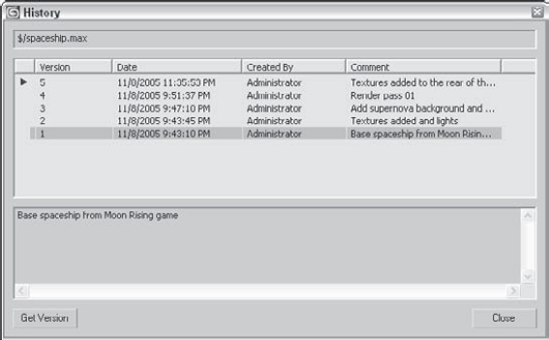
Each time a file is checked in, it is given a new version number. This makes it possible to load older versions of a file. For example, if you want to reuse a character made for a previous game, but you want to access the character before any textures were applied, you can locate and load the version saved just before textures were applied.
Older file versions can be found in the History dialog box, which is also found in the File menu. This dialog box, shown in Figure 23.10, lists all the different versions of a file along with their creation dates, their creator, and any comments entered when the file was checked in. To load an older version, simply select the file from the list and click the Get Version button.
The Path menu includes options for setting and changing the paths for the various assets. The Highlight Editable Assets command selects all assets in the Asset Tracking interface that have paths that can change. Typically, only the base Max file loaded from the Vault cannot be edited. The Set Path command opens a simple dialog box where you can browse to a new path for an asset. This is helpful if the asset has moved and is marked as missing. The Path menu also includes commands for retargeting the root path, which is the path that all assets have in common, stripping the path from an asset so that only the filenames are visible, making the path absolute or relative to the project folder, and converting paths to the Universal Naming Convention (UNC).
The Proxy System lets you use proxy texture maps in place of high-resolution maps across all objects in the scene. Using the Proxies menu, you can enable the use of proxies, set the global settings for the proxy system, and set the proxy resolution to use. The table view also displays the current proxy resolution for each asset and its status.
Note
Bitmap Proxies can be used outside of Vault. For information on using them, see Chapter 22, "Learning to Render a Scene."
The real advantage of an asset tracking system comes when a team is working on the same project. It allows only one person to work on an asset at a time, but still lets other view the file as needed.
To edit a Vault asset, follow these steps:
Select the File
In the Open File from Vault dialog box that appears, select the asset file that you want to edit and click the Open button. A dialog box appears asking if you want to check out the requested file. Click the Yes button, and the asset is loaded into the Max interface.
Select the File
Make the desired edits to the Max file, and save the file with the File
In the Asset Tracking interface, select the File
Working with XRefs lets you combine the work of several users and creatively collaborate across teams. This chapter covered the features typically found in an asset tracking system and looked at the specific features involved in setting up and using Autodesk's Vault asset tracking system. This chapter covered the following topics:
Using externally referenced scenes and objects to work on the same project at the same time as your fellow team members without interfering with their work (or them with yours)
Configuring XRef paths to help Max track your XRef Scenes and Objects
Understanding what an asset management system is
Setting up an asset tracking system to work with Max by logging in and selecting a working folder
Using the Open from Vault menu command and the Asset Tracking interface to work with Vault assets
The next chapter looks closely at a valuable tool in seeing the big picture of your scene. The Schematic View lets you see all scene objects as individual nodes that are easy to select and connect with other nodes.