In This Chapter
Creating a project
Working with Project Tasks
Tracking your project's progress
The Projects module is designed to create and manage projects for your organization. Working with the Projects module in SugarCRM is a three- step process and that's exactly how I organize this chapter. First, you create a Projects record, then you create the individual tasks necessary to complete the project, and finally, you track the progress of the project. In addition, this chapter looks at the additional tools for the Projects module that come with the Professional Edition of SugarCRM.
You've probably been involved in projects of some sort ever since you had to create your first science project back in the third grade. By the time you advanced to high school, you had probably moved on to group projects in which the various members of your group were responsible for different aspects of the project.
By definition, a project is a large or major undertaking that usually requires many steps. In the business world, most projects resemble your high school group projects because several players are needed to reach your goal. But, unlike high school group projects, business projects often involve considerable money, personnel, and equipment. Additionally, rather than receiving a report card, business projects are often graded by how much money the project makes — or loses. Ultimately, a poorly managed project may result in hearing those words made famous by Donald Trump: "You're fired!"
Although Sugar can't guarantee that you'll get an A on your report card, it can make sure that you stay on top of your projects — and that nothing falls through the cracks.
Creating a Projects record is your first step when working with the Projects module. You create a Projects record in just about the same way you create any other Sugar records, so you might have a vague feeling of d$eAj$aG vu as you follow along the steps:
Click Projects on the Module Tab bar.
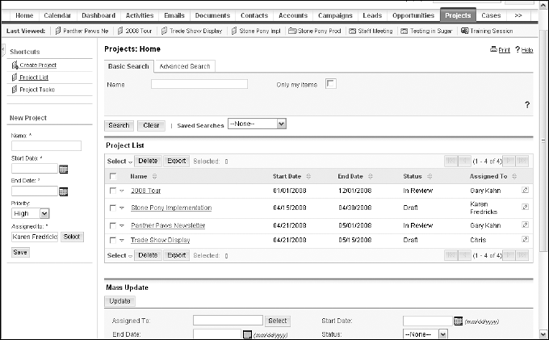
Expectedly, doing so opens the Projects Home page shown in Figure 6-1.
Choose Create Project from the Shortcuts menu on the left.
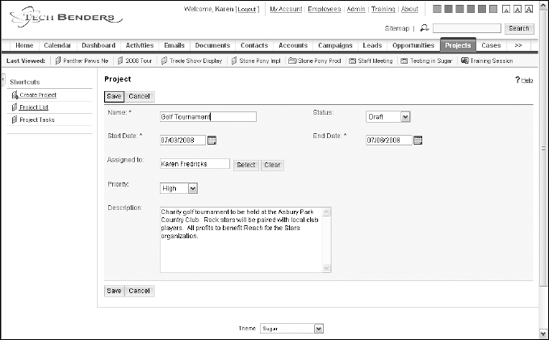
The new Projects record page opens; you can see it for yourself in Figure 6-2.
Fill in the Projects record's fields.
Although you can probably do this in your sleep, I want to give you the 411 on the Projects record's fields and tell you which ones are required.
Name (required): Enter a name for the project, hopefully one that will help identify the project to both you and your co-workers.
Status: From the drop-down list, choose the project status of Draft, In Review, or Published.
Tip
You might scratch your head wondering about the choices in the Status drop-down menu; feel free to skip over to Chapter 15 to find out how to change those wacky choices.
Start Date (required): Click the calendar icon and select the project start date.
End Date (required): Click the calendar icon and select the project end date.
Warning
Having an end date prior to the start date doesn't make much sense to anyone, including Sugar. If you try to forge ahead in this direction, Sugar will display an error message — and not allow you to save the Projects record.
Assigned To (required): Every Projects record is assigned to a user. The assigned user is the project manager. Enter the name of the user who has ownership of the project. By default, this is the user who created the Projects record. The assigned user can assign the Projects record to another user if he'd like to pass the buck.
Although Assigned To doesn't have the asterisk normally associated with a required field, it is required.
Priority: From the drop-down list, choose the importance of the project (Low, Medium, or High).
Description: Enter a brief description of the project if it needs a bit more explanation.
Click Save to create the Projects record.
You'll now see the Projects record's detail page.
(Optional) Associate the Projects record with other subpanel records.
You can associate a project with multiple Activities, Contacts, Accounts, Opportunities, Bugs, and Cases records by following these steps:
Scroll down to the appropriate subpanel.
Click Select.
The Record search page opens.
Fill in the parameters you are searching for.
For example, if you are attaching a Contacts record to the Projects record, you might search on last name.
Click Search.
If there are matches in your database, they appear at the bottom of the search page.
Click the hyperlink of the record you'd like to add to the Projects record.
The search page closes, and the record is added to the appropriate Projects record's subpanel.
Tip
Unfortunately, you can't associate a Projects record with multiple users; there's only one project manager, so everyone knows whom to blame should things not work as planned. However, you can associate multiple tasks to a Projects record — and those tasks can be the responsibility of various users, as you'll see in the next section.
Projects include lots of minute details that someone — usually you — has to take care of. So, after you've defined your Projects record, you'll probably be itching to jump into it a bit further to start taking care of business.
You can define multiple Project Tasks for each project. A Project Task differs from a plain vanilla Task in that you must associate a Project Task with a Projects record.
To create a Project Task:
Click Projects on the Module Tab bar and then choose Project List from the Shortcuts menu.
Click the name of the Projects record to which you want to add a Project Task.
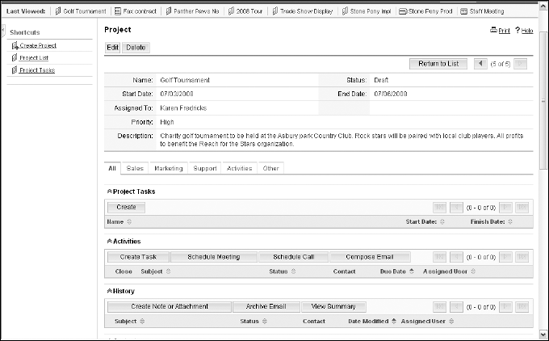
The Project Details view opens. Figure 6-3 shows you what it looks like.
Click Create in the Project Tasks subpanel.
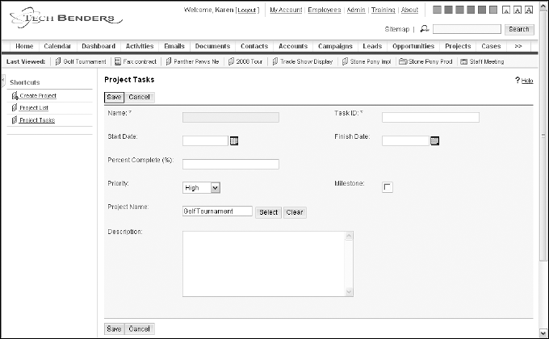
The new Project Tasks page opens, as shown in Figure 6-4.
Enter information on the Project Tasks page for the following fields:
Name (required): Enter a name for the task. Try something catchy like "get this done or else."
Task ID (required): I'm not sure why, but you need to include a number for the task. Guess you can refer to a task by its number instead of its name, as in "did you finish your twenty."
Start Date: Click the calendar icon and select a start date for the task.
Finish Date: Click the calendar icon and select the due date for task completion.
Percent Complete (%): Enter the percentage of the task that has been completed. You'll want to continue to edit this percentage while your task reaches its completion.
Priority: Choose a priority level, such as High, Medium, or Low from the drop-down list.
Milestone: Select this check box if the completion of this task is considered a milestone for project completion.
Project Name (Required): Fill in the name of the project.
Alternatively, you can click Select and search for the project name.
Warning
Although Project Name is missing the asterisk used to denote a required field, it is, indeed, required.
Description: If you feel that that name of the project isn't enough, enter a brief description of the task.
Click Save to create the task.
You return to the Project Detail view where you can add additional tasks if necessary.
After you define your Projects record — and create a handful of Project Tasks to help move you along to your final goal — it's time to kick back and relax, right? Wrong! Creating the Projects record is only half the fun — now you have to put your nose to the grindstone and start on that project. Fortunately for you, Sugar will be with you every step of the way.
You can edit or delete projects, or even export a list of your current projects to a non-Sugar user (if such an animal actual exists) on the Projects Home page.
Here's how you access the Projects Home page:
Click Projects on the Module Tab bar.
The Projects Home page opens. Refer to Figure 6-1 if you want to follow along at home.
Warning
Click any column title to change the sort order of the Projects Home page.
(Optional) Pick the Projects record you want to work with by selecting the corresponding Select check box.
This will allow you to perform one of the following operations:
Delete
Export
Mass Update
Click on a project name to edit it.
The Project Detail view opens.
Click Edit.
You are now free to roam around the cabin — or make whatever editing tweaks you feel are appropriate.
Click Save to save the Projects record changes.
As I mention in Chapter 1, the three flavors of Sugar are Community, Professional, and Enterprise. You might be very content with the functionality of the Sugar Community Edition. However, if your company is involved in lots of large projects, you'll want to move up to Sugar Professional where you have access to several additional project management tools.
One of the big differences between the SugarCRM Community and Professional editions — besides the price — is that the Professional version gears itself toward larger organizations. This doesn't necessarily mean that your company is part of the Fortune 500, but it generally means that your company has many users that interact with each other.
By definition, a project is a compilation of many tasks. If you're the head cook and bottle washer of your company — or need to have your head examined — then the sole responsibility for most projects rests smack dab on top of your head. However, if you've learned to delegate — or pass the proverbial buck — then you'll find a couple of the features found only in the Professional version to be quite appealing.
Relying on your resources
In Sugar-speak, a resource is a user of the Sugar database; one who can be added to a Projects record and in turn be responsible for Project Tasks.
Follow these steps to add resources to a Projects record:
Click the project's name on the Projects Home page.
The Projects Detail view opens.
Scroll to the Resources subpanel and then click Select User to add one of your users to the project.
The User panel (shown in Figure 6-5) opens.
Select the names of the users you want to add to the project (by selecting the corresponding check boxes) and then click Select.
The assigned users are now listed in the Resources subpanel.
(Optional) Click Select Contact in the Projects Detail view.
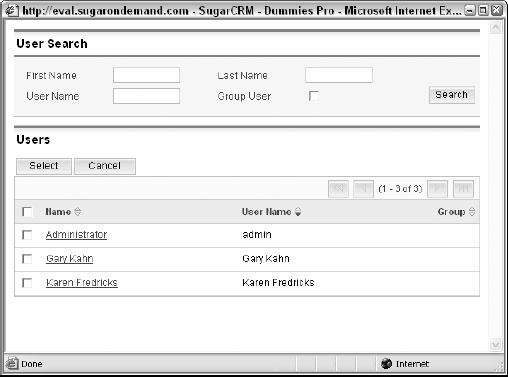
You can select the names of contacts using the exact same method that you do for users.
If you're working with a great big project, you just might need a great big team of folks to help you complete it. The Professional version allows you to create teams of users who work and play together happily for a unified goal. Chapter 14 shows you how to create a team. The Team field appears in the Projects Detail view when you create a new project.
A company that deals with project management generally will purchase special software to help organize the mountains of tasks associated with a large project. Most project management software includes the ability to create a Gantt chart. A Gantt chart is a chart that graphically depicts the progress of tasks and schedules as they relate to a project. If you're using SugarCRM Professional, you can save your pennies because you're able to create Gantt charts directly in Sugar.
Note
If you — or someone else on your team — has already invested in Microsoft Project you can save a Sugar project in MS Project format. Once saved, you can open the MPX file in MS Project. Simply click Export to MS Project in the Projects Detail view. When the message appears, opt to save the MPX file.
You create Projects records exactly the same way in both Sugar Community Edition and Sugar Professional. However, when you start creating Project Tasks, you use Gantt charts — and you have many more ways to track and view the progress of those tasks.
Follow these steps to create a Project Task in SugarCRM Professional:
Click Project on the Module Tab bar.
The Projects Home page appears.
Click the project's name in the Project List area of the Projects Home page.
The Projects Detail view opens.
Click the View Gantt butto in the Project Tasks subpanel.
You can view your Project Tasks in any one of the following ways:
Grid view: The Grid view displays such details as the task name, completion percentage, project start and end dates, estimated and actual duration time, dependencies, and assigned resources. You can view specific information (such as completed tasks or milestones) by choosing an option from the View drop-down list. Project managers can edit any task and add additional tasks as needed. Users can specify the completion percentage and actual duration for their assigned tasks. You can export the project tasks to a PDF file by clicking the Export to PDF button.
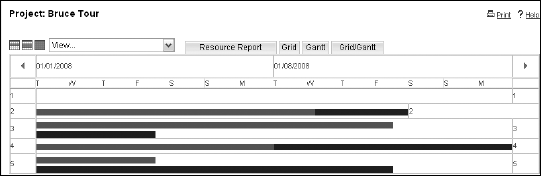
Gantt view: The Gantt view displays the total time needed for each task from start to finish. Figure 6-6 shows you a sample Gantt view.
Grid/Gantt view: As you might guess, the Grid/Gantt view is a combination of both the Grid and Gantt views.
Tip
You can view a project in Grid/Gantt, Grid, or Gantt view, but you can only create and edit Project Tasks in Grid/Gantt or Grid view.
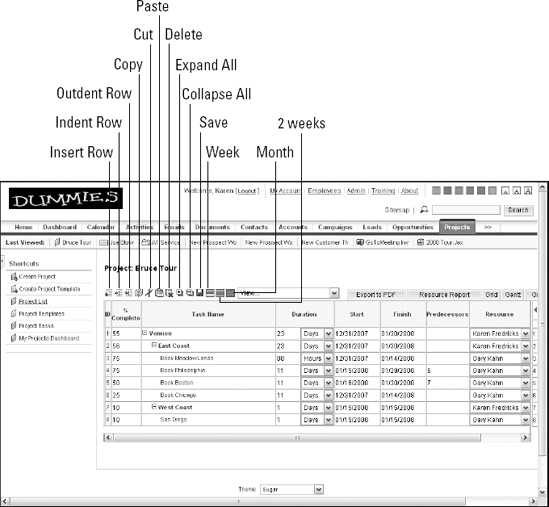
Click the Grid view button.
Although you can create your Project Tasks in the Grid/Gantt view, you might find the Grid view to be a bit less confusing. The various icons on the Grid view are labeled in Figure 6-7 to help you with the following instructions.
Tip
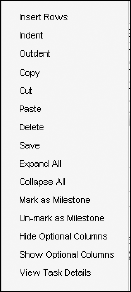
You can also right-click anywhere within the body of the grid to view the contextual menu shown in Figure 6-8.
Click the Insert Row icon to create a new Project Task.
A new row is added at the end of the grid. Tasks are listed in numerical order in the ID column.
Tip
To add a new row above an existing row, click the task ID number to select that row and then click the Insert Row icon.
(Optional) Select a row and then click the Indent icon on the toolbar.
Your project might be so large and complex that you need subtasks to help you manage it. By clicking the Indent icon, you can make the selected line item a subtask of the preceding task. You can then use the Expand All and Collapse All icons to view all or some of your tasks.
Double-click the Task Name cell and give the Project Task a name.
Add a Start and Finish Date.
A little calendar appears if you click either of the date fields so that you can click the date you want. Alternatively, you can type a date and ignore the calendar. In any event, Sugar automatically calculates the duration of the task.
(Optional) Specify any Predecessors.
When managing a project you might find that you can't complete one task prior to finishing another task. When you create Project Tasks, you can specify Predecessors. For example, if you need to receive inventory (Task 1) before barcoding (Task 2), you can specify Task 1 as the predecessor of Task 2.
(Optional) Choose a Resource from the drop-down list in the Resource column.
Warning
I know the naming convention seems a bit strange, but Resources are actually the users assigned to a project.
(Optional) Tweak your Project Tasks if necessary.
If you want to delete a task, select the task and then click the Delete icon. Or, if you're adding many similar tasks, you might want to select the task, click the Copy icon and then paste the task to another location
Click the Save icon to save your tasks.
You might be wondering about the last column in the Task Projects grid — Actual Duration. That column fills when you actually complete a task.
Many companies experience a sense of d$eAj$aG vu when creating projects. For example, swimming pool contractors might find that all their projects require pretty much the same steps in the same order. If you are very lazy — or extremely smart — you might turn to SugarCRM Professional, which includes the ability to create Project Templates.
You can create a Project Template for projects with similar tasks. When you create a Project Template, you can include the Project Tasks. You can also assign resources to a Project Template if the same loyal group of folks works on similar projects repeatedly. You can then use the saved Project Template to create new Projects records. And, once created, the Projects records you create based on a template can be edited exactly like any other project.
The two methods for creating Project Templates are
Create one from scratch.
Save an existing project as a template.
Cloning existing projects
You might prefer to create a Projects record first just to get comfortable with the process. You can then save it as a template after you have the opportunity to fine-tune the project. This procedure is extremely easy:
Click Projects on the Module Tab bar.
The Projects Home page opens.
Select the name of the Projects record you want to copy from the Project List subsection.
The Project Detail view displays.
Click the Save as Template button.
A new page opens, prompting you for a Template name.
Give the Template a name and then click the Save as New Template button.
Creating a new Project Template
As easy as it is to transform an existing Projects record into a template, sometimes you need to create a Project Template from scratch. Perhaps your company has already created project guidelines which you now need to capture in Sugar.
Creating a new Project Template from scratch isn't a whole lot harder than cloning an existing Projects record if you follow these steps:
Click Projects on the Module Tab bar.
The Projects Home page opens.
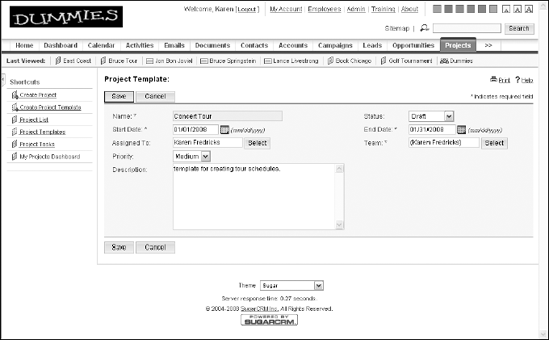
On the Projects Home page, choose Create Project Template from the Shortcuts menu.
The Project Template page opens as seen on stage, screen, and Figure 6-9.
Fill in the Project Template information.
You need to fill only a few fields. If you fail to add information to one of the required fields, SugarCRM has a hissy fit — or at least highlights the missing fields in bright red and stops you from continuing until you add information to the required fields:
Name (required): Enter a name for the template.
Status: Specify the template's status (Draft, In Review, or Published) from the drop-down list.
Start Date (required): Enter a start date for the project.
End Date (required): Enter an end date for the project.
Assigned To: Click Select to select an individual from the Users list. By default, it is assigned to you.
Team (required): Click Select to select a team from the Team List.
Priority: From the drop-down list, specify the project's priority, such as High, Medium, or Low.
Description: Feel free to write a book — or at least add a few words — to describe the Project Template.
Click Save to save the template.
Using Project Templates
After you save a template, it is added to the Project Template List. You can now edit the template by adding Project Tasks or use it to create a new Projects record.
Click Projects on the Module Tab bar to open the Projects Home page.
Choose Project Templates from the Shortcuts menu to open the Project Templates Home page.
Click the name of the Project Template from the Project Templates Home page to open the Project Template Detail view.
Click the View Gantt button to add Project Tasks to the Project Template in the same way that you add Project Tasks to a Projects record.
Click Save as Project to create a new Projects record from the Project Template. A new window opens. Give the Projects record a new name, click Save as New Project, and you have a new project waiting for you.
All work and no play makes most of us pretty cranky. Additionally, having two projects to complete at the same time might result in serious damage to any small inanimate objects that aren't firmly attached to your desk.
When you create a Projects record, you may need to take holidays into consideration. The project manager can create a Projects Holiday to account for someone's absence. Any holidays that you schedule appear in the Projects Holiday subpanel so panic doesn't set in when one of your teammates is MIA.
You can schedule a holiday for one of the following reasons:
A project team member takes a vacation.
A project team member takes time off from one project while working on other projects.
Although you aren't guaranteed an all-expense paid trip to the Caribbean, you will have a reprieve from your existing project(s) if the project manager follows these steps:
Click Projects on the Module Tab bar.
The Projects Home page opens.
Click a project name to view its details.
The Project Detail view opens.
Scroll to the Project Holidays subpanel and then click Create.
Tip
To avoid scrolling past a whole lot of subpanels, you might consider clicking the project's Other tab, which cuts to the chase and just displays the project's Resources, Project Tasks, and Project Holidays sub-panels.
A Holidays form opens, which looks very much like the one shown in Figure 6-10.
Enter information for the following fields:
Holiday Date: Enter the holiday or vacation date.
Description: Enter a description or reason for the holiday.
Resource Name: From the Resource Name drop-down list, choose the resource type (User or Contact) who is taking the holiday and then select the appropriate name in the second drop-down list.
Click Save to save the holiday.
The saved holiday is listed in the project's Holidays subpanel in the Projects Detail view.

SugarCRM Professional edition is the flavor of choice among small to mid-sized businesses. Larger companies thrive on cubicles, trips to the water cooler, and reports.
Project reporting is one of the areas in which Sugar shines. Chapter 14 shows you how to create custom reports — and you can create a custom project report if you wish. This section, however, shows you a couple of cool "out of the box" ways to help keep your grubby finger on the pulse of your projects.
Creating Project Resource Reports
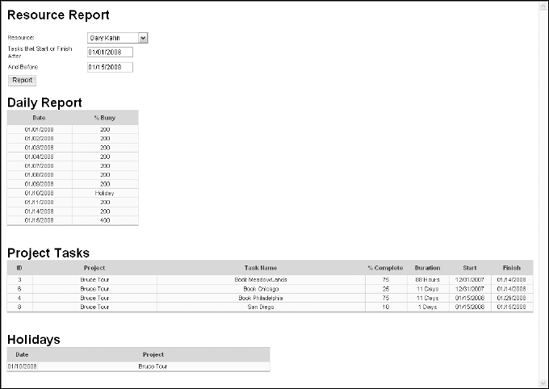
One of a project manager's main tasks is making sure that all the players are on task and completing their tasks according to schedule. You can run a Resource Report from either the Grid view or the Gantt view. The Resource Report displays all the Project Tasks along with other pertinent tidbits of information, including the project name, the workload percentage per project, duration of each project, and any scheduled holidays. The Resource Report not only breaks down a user's workload across projects but also lists the percentage of busy time for each day. This enables managers to better evaluate the status of ongoing projects.
Warning
Resources are either the users or contacts that you have associated with a project.
Here's how to create a Project Resource Report:
Click Project on the Module Tab bar.
The Projects Home page opens.
Click the name of the Projects record you'd like to report on in the Project List subpanel.
The Project Detail view opens.
Click the View Gantt button in the Project Tasks subpanel.
The Grid/Gantt view opens. If you prefer to work in the Grid or Gantt view, feel free to click the appropriate tab.
Click the Resource Report button.
The Resource Report form opens.
Choose the user from the Resource drop-down list.
Click the Tasks That Start or Finish After field and select the start date of the report.
You might find that the field name is a bit confusing — I know I did! The purpose of the Resource Report is to view the tasks scheduled to occur within a specific time frame.
Click the And Before field and select the end date of the report.
Click the Report button to run the report.
The report opens in a new window and displays the daily status, assigned Project Tasks, and any scheduled Holidays that occur during the specified period. As shown in Figure 6-11 the % Busy column indicates if the user has one (100%), two (200%), or even four (400%) tasks scheduled for a specific day.