In This Chapter
There is no need to put your data into the computer more than once. If you've entered your data in another program, you can copy it from there into SPSS — because every program worth using has some form of output that can serve as input to SPSS. This chapter discusses ways to transfer data into and out of SPSS.
SPSS has its own format for storing data and writes such files with the .sav extension. This file format contains special codes and usually can't be used to export your data to another application. It is used only for saving SPSS data that you want to read back into SPSS at a later time. Several example files in this format are copied to your computer as part of the normal SPSS installation. These files can be found in the same directory as your SPSS installation. You can load any one of them by choosing File
If you have SPSS filled with data, you can save it to a .sav file by choosing File
Warning
You can be fooled by the way SPSS help uses the word file. If you have defined data and variables in your program, the SPSS documentation often refers to it all as a file, even though it may have never been written to disk. They also refer to the material written to disk as a file, so watch the context.
When you write your file to disk, if you don't add the .sav (or .SAV) extension to the filename, SPSS adds it for you. When you use File
If your data is in an application that can't directly create a file of a type that SPSS can read, getting the data into SPSS may be easier than you think. If you can get the information out of your application and into a text file, however, it's fairly easy to have SPSS read the text file.
Tip
When it comes to writing information to disk, some applications are more obliging than others. Look for an Export menu option — it usually has some options that allow you to organize the output text in a form you want. (Read on for a description of possible organization schemes.)
If the application doesn't allow you to format text the way you want, look for printer options — maybe you can redirect printer output to a disk file and work from there. If you use the application's printer output, you may need to use your word processor to clean up the form of the data. I know this multistep operation sounds like a lot of work, but it's often easier than typing all your data in again by hand.
The data file you output from SPSS doesn't have to include the variable names, just the values that go into the variables. You can format the data in the file by using spaces, tabs, commas, or semicolons to separate data items. Such dividers are known as delimiters. Another method of formatting data avoids delimiters altogether. In that method, you don't have to separate the individual data items, but you must make each data item a specific length, because you have to tell SPSS exactly how long each one is.
The most intuitive format is to have one case (one row of data) per line of text. That means the data items in your text file are in the same positions they will be in when they are read into SPSS. Alternatively, you can have all your data formatted as one long stream, but you'll have to tell SPSS how many items go into each case.
Note
Always save this kind of raw data as simple text; the file you store it in should have the .txt (or .TXT) extension so SPSS can recognize it for what it is.
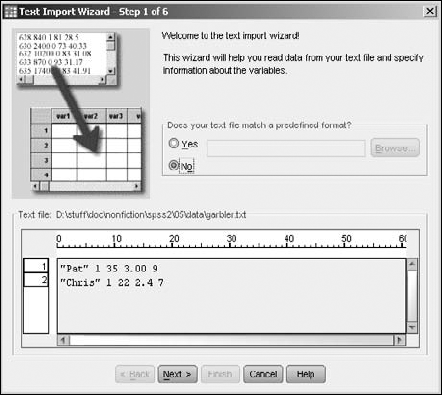
This section contains an example of a procedure you can follow to read data from a simple text file into SPSS. The file is a simple file named garbler.txt. It contains two cases (rows of data) as two lines of text, with the data items in the two lines separated by spaces. The content of the file is as follows:
"Pat" 1 35 3.00 9
"Chris" 1 22 2.4 7
The following example reads this text file and inserts it into the cells of SPSS. Along the way, SPSS keeps you informed about what's going on so there won't be any big surprises at the end.
Choose File
Read Text Data.
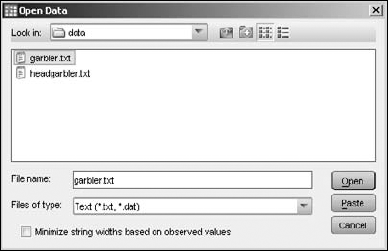
The file selection window shown in Figure 5-1 appears.
Select the
garbler.txtfile, and then click the Open button.The screen shown in Figure 5-2 appears, for loading and formatting your data.
Examine the input data.
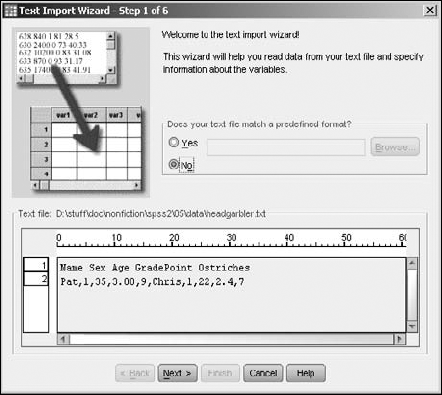
The screen lets you peek at the contents of the input file so you can verify that you've chosen the right file. Also, if your file uses a predefined format (which it doesn't, in this example), you can select it here and skip some of the later steps. If your data doesn't show up nicely separated into values the way you want, you may be able to correct it in a later step. Don't panic just yet.
Click the Next button.
The screen shown in Figure 5-3 appears.
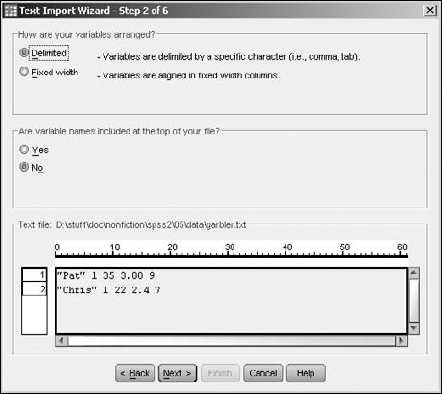
Specify that the data is delimited and the names are not included.
As you can see in this example, SPSS takes a guess, but you can also specify how your data is organized. It can be divided using spaces (as in this example), commas, tabs, semicolons, or some combination. Or your data may not be divided — it may be that all the data items are jammed together and each has a fixed width. If your text file includes the names of the variables (I'll show you how this works in a minute), you need to tell SPSS.
Click the Next button.
The screen shown in Figure 5-4 appears.
Specify how SPSS is to interpret the text.
For this example, the correct settings are shown in Figure 5-4. You can tell SPSS something about the file and which data you want to read:
Perhaps some lines at the top of the file should be ignored — this happens when you're reading data from text intended for printing and header information is at the top. By telling SPSS about it, those first lines can be skipped.
Also, you can have one line of text represent one case (one row of data in SPSS), or you can have SPSS count the variables to determine where each row starts.
And you don't have to read the entire file — you can select a maximum number of lines to read starting at the beginning of the file, or you can select a percentage of the total and have lines of text randomly selected throughout the file. Specifying a limited selection can be useful if you have a large file and would like to test parts of it.
Click the Next button.
The screen shown in Figure 5-5 appears.
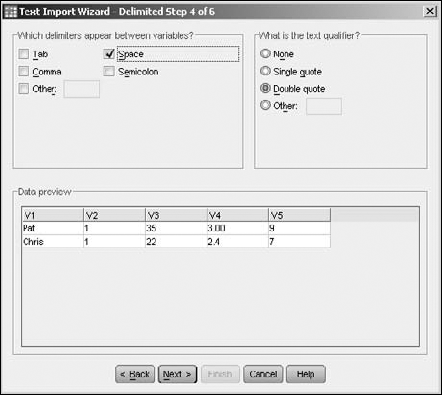
Specify space as the delimiters and double quotes as text qualifiers.
SPSS knows how to use commas, spaces, tabs, and semicolons as delimiting characters. You can even use some other character as a delimiter by selecting Other and then typing the character into the blank. You can also specify whether your text is formatted with quotes (as in our example) and whether you use single or double quotes. Strings must be surrounded in quotes if they contain any of the characters being used as delimiters.
Tip
You can specify that a data item is missing in your text file. Simply use two delimiters in a row, without intervening data.
Click the Next button.
The screen shown in Figure 5-6 appears.
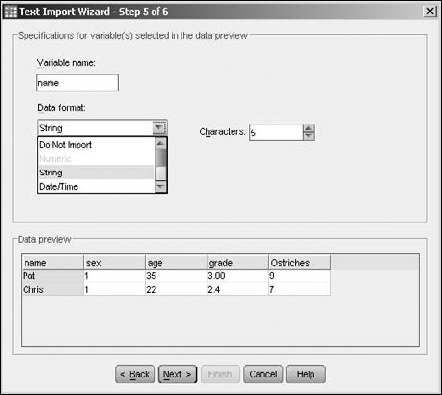
Change the variable names and types, if you wish.
SPSS assigns the variables the names V1, V2, V3, and so on. To change a name, select it in the column heading at the bottom of the window, and then type the new name in the Variable Name field at the top. You can select the format from the Data Format pull-down list, as shown in Figure 5-6. This is optional. If you need to refine your data types and whatnot, you can do so later in the Variable View window. The point here is to get the data into SPSS.
Click the Next button.
The screen shown in Figure 5-7 appears.
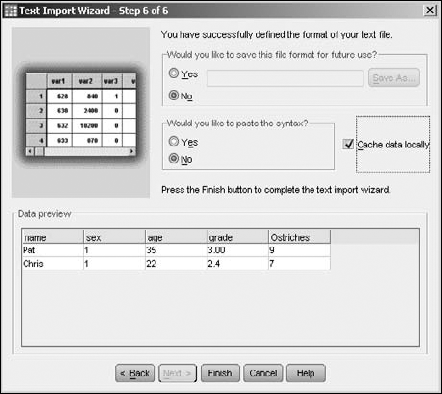
Choose "No" to not save this file format.
This is something you would do if you'll be loading more files of this same format into SPSS — it reduces the number of questions to answer and the amount of formatting to do next time. You also have the chance to grab a copy of the Syntax Language instructions that do all this, but unless you know about the Syntax Language (as described in Chapter 15 and 16), it's best to pretend that option doesn't exist. (For that matter, the Cache Data Locally option is a bit odd. I don't know why it's there, unless SPSS has some problem with huge files. SPSS seems to load data faster with it than without it, but it's strictly an internal thing and SPSS works just fine either way.)
Click the Finish button.
Depending on the type of data conversions and the amount of formatting, SPSS may take a bit of time to finish. But be patient; the SPSS Data View window will eventually display your data.
Look at the data. Correct your data types and formats, if necessary. Then save it all to a file by choosing File
Save As.You are instructed to enter a filename. You can just call it
garbler. The new file will have the.savextension, which indicates that it's a standard SPSS file.
The SPSS way of reading data is a lot more flexible than this simple example demonstrates. Another example can help show why. Here, a file named headgarbler.txt is that same data, formatted slightly differently:
Name Sex Age GradePoint Ostriches
Pat,1,35,3.00,9,Chris,1,22,2.4,7
This time the data in the file is preceded by the variable names listed on the first line, the data is all in one long line, and the data is separated by commas. To read this into SPSS, you start the same way you did before. However, SPSS can't figure it all out in Step 1 this time (as shown in Figure 5-8). SPSS can't even tell which is header and which is data.
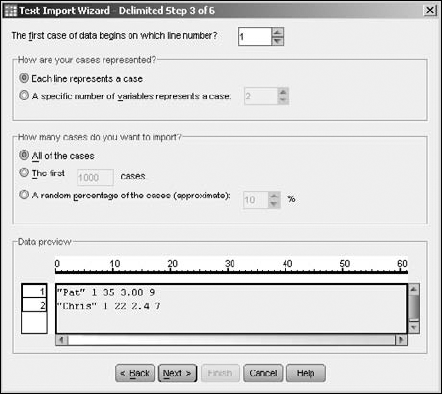
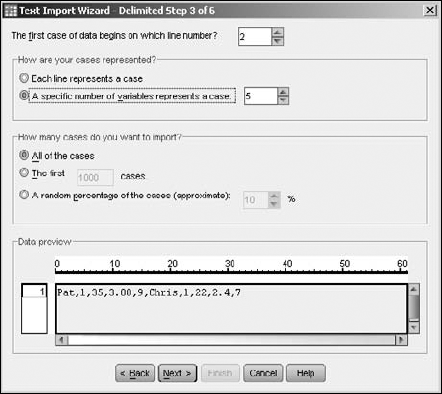
In Step 2 of 6, you select the option that informs SPSS that the variable names appear in the first line of text. Then, in Step 3 of 6 (as shown in Figure 5-9), you specify that the data begins on line 2 of the text file. It's possible for the data to begin several lines down in the input text file, but if variable names are present, they must be on the first line. Also, when you specify variable names, SPSS ignores the beginning and ending of lines, and counts the data values to determine when it has a complete row (case).
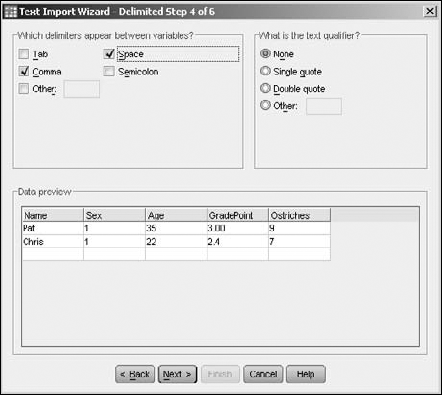
In Step 4 of 6 (shown in Figure 5-10), commas and spaces were chosen as delimiters. (Although no spaces appear in the data in this example, it doesn't hurt to include a space delimiter if it may occur somewhere in your data.) Also, None was chosen for the characters surrounding string values. In this example, SPSS figured the spacing out on its own and used these settings for its default. Also, by the time you reach Step 4 of 6, SPSS has started organizing the data according to your definitions. It has already read the variable names and included them as column headers.
In Step 5 of 6, you have the opportunity to change the variable names and specify their types. Here again, you see that SPSS has made a guess for the type of each one.
After you complete Step 6 of 6, click the Finish button and wait for the data to load, as shown in Figure 5-11.

You can see who has how many ostriches, but you still have a little work to do. For example, switch to Variable View, change the sex variable to a nominal data type, and assign the names "male" and "female" to the values 1 and 2. (You can't assume anything about sex by the names.) You might want to add some descriptive labels. For example, the variable named "ostriches" could be given the descriptive name "ostrich count in front yard". See how a good descriptive name can clear up a little mystery?
You can get your data into SPSS from a file created by another program, but it isn't always easy. SPSS knows how to read some file formats, but if you're not careful you'll find your data stored in an odd file format, and deciphering some file formats can be as confusing as Klingon trigonometry. SPSS can read only from file formats it knows.
SPSS recognizes the file formats of several applications. Following is a complete list:
IBM SPSS Statistics (
.sav): IBM SPSS Statistics data, and also the format used by the DOS program SPSS/PC+.dBase (
.dbf): An interactive database system.Excel (
.xls): Spreadsheet for performing calculations on numbers in a grid.Portable (
.por): A portable format read and written by other versions of SPSS, including other operating systems.Lotus (
.w): Spreadsheet for performing calculations with numbers in a grid.SAS (
.sas7bdat, .sdy, .sd2, .ssd, and.xpt): Statistical analysis software.Stata (
.dta): Statistical analysis and graphics software.Sylk (
.slk): A symbolic link file format for transporting data from one application to another.Systat (
.sydand.sys): Software that produces statistical and graphical results.
Although SPSS knows how to read any of these, you may still need to make a decision from time to time about how SPSS should import your data set. But you have some advantages: You know exactly what you want (the form of data appearing in SPSS is simple, and what you see is what you get), SPSS has some reasonable defaults and makes some good guesses along the way, and also you can always fiddle with things after you've loaded them.
You are only reading from the data file, so you can't hurt it. Besides, you have everything safely backed up, don't you? Just go for it. If the process gets hopelessly balled up, you can always call it quits and start over. That's the way I do it — I think of it as my learning process.
Here's an example. SPSS knows how to read Excel files directly. If you want to read the data from an Excel file, I suggest you read the steps in "Reading Simple Data from a Text File," earlier in this chapter, because the two processes are similar. If you understand the decisions you have to make in reading a text file, reading from an Excel file will be duck soup. Figure 5-12 shows the appearance of data displayed by Excel.
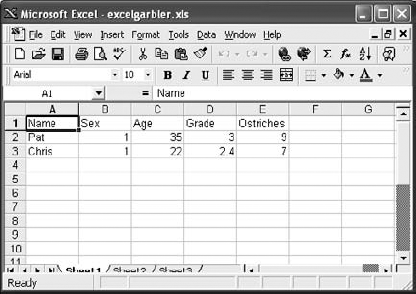
Do the following to read this data into SPSS:
Save the Excel data to a file.
In this example, the file is called
excelgarbler.xls. If you want to copy only a portion of the spreadsheet, make a note of the cell numbers in the upper-left and lower-right corners of the group you want.Close Excel.
You must stop the Excel program from running before you can access the file from SPSS.
Choose File
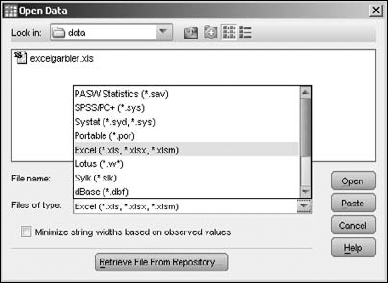
OpenData.Select the
.xlsfile type, as shown in Figure 5-13, and then click Open.Select the data to include.
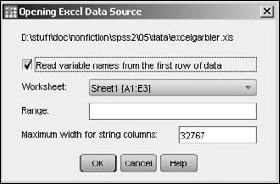
An Excel file can contain more than one sheet, and you can choose the one you want from the pull-down list, as shown in Figure 5-14. Also, if you've elected to read only part of the data, enter the Excel cell numbers of the upper-left and lower-right corners here. You specify the range of cells the same way you would in Excel — using two cell numbers separated by a colon. Don't worry about the maximum length for strings.
Click OK.
Your data appears in the SPSS window.
Check your variables and adjust their definitions as necessary.
SPSS makes a bunch of assumptions about your data, and it probably makes some wrong ones. Closely examine and adjust your variable definitions by switching to Variable View and making the necessary changes.
Save the file using your chosen SPSS name, and you're off and running.
Often you can transfer data from another application into SPSS by selecting, copying, and pasting the data you want, but that method has its drawbacks. The places you're copying from and to are usually larger than the screen, so highlighting and selecting can be tricky. You must be ready to choose Edit
A better method is to write the data to a file in a format understood by SPSS, and then read that file into SPSS. SPSS knows how to read some file formats directly. Using such a file as an intermediary means you have an extra backup copy of your data, and that's never a bad idea.
Writing data from SPSS is easier than reading data into SPSS. All you do is choose File
Tip
If you'll be exporting data from SPSS into another application, find out what kinds of files the other application can read, and then use SPSS to write in one of those formats.
A second form of output from SPSS is an image. If you've generated a graphic that you want to insert into your word processor or place on your Web site, SPSS is ready to help you do it. (I almost wish it were hard to do so I could look smart showing you how, but it's easy.)
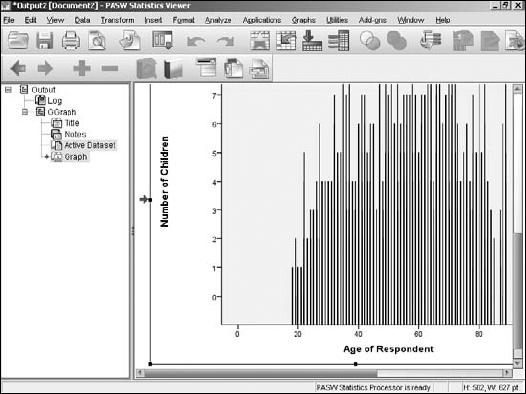
When you go through the steps to produce a graph, as explained in Part III, you'll be looking at the resulting graphics in the SPSS Viewer, which is shown in Figure 5-15.
From SPSS Viewer, you can export images (and do some other things too):
Produce a graph or table.
You can use any of the examples in Part III to produce a graphic display. SPSS Viewer pops up and displays the output.
Choose File
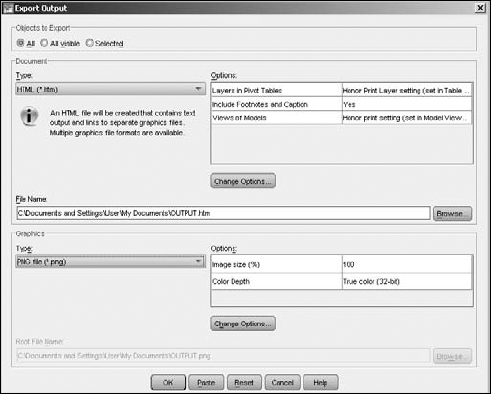
Export.The window shown in Figure 5-16 appears.
In the Objects to Export section, select which items to include in the output.
You can elect to have all objects output, all visible objects output, or only the ones you've selected. In Figure 5-15, for example, the panel on the left indicates that two items — Active Dataset and Graph — were selected. The visibility of an object refers to whether its name appears in the list — if you collapse the list so a particular name can't be seen, the item is not visible. You can select items by clicking the items themselves, or by selecting their names in the list on the left.
In the Document section, open the Type pull-down list and choose an output format.
Your choices vary according to what you decided to output as specified at the top of the window. Here is a list of the possible file formats:
Excel files can include text, tables, and graphics, with the graphics embedded in the workbook. The data can create a new file or be added to an existing workbook. No graphic options are available.
HTML files can be used for text both with and without graphics. If graphics are included, those will be exported separately, and they will be included as HTML links. The graphic file type must also be chosen.
PDF documents exported will include not only text but also any graphics existing in the original. No graphics options are available.
PowerPoint documents can be written as text with the graphics embedded in the TIFF format. No graphic options are available.
Text files can be output with graphic references included, and the graphics written to separate files. The reference is the name of the graphic file. The graphic file format is specified by choosing options in the lower section of this window.
UTF-8 is Unicode text encoded as a stream of 8-bit characters. Graphics are handled the same as they are for text files.
UTF-16 is Unicode text encoded as a stream of 16-bit characters. Graphics are handled the same as they are for text files.
RTF: Word documents are written in RTF (rich text format), which can be copied into a Word document. No graphic options are available.
None: When selected, this option means no text is output — only graphic images. The graphic file format is specified by options in the lower section of this window.
In the Graphics section, select the image file format, if one is needed, from the Type drop-down list.
You may be asked to select a format for your image file(s). You can select from PNG (
.png), bitmap (.bmp), enhanced metafile (.emf), encapsulated postscript (.eps), jpeg (.jpg), or tagged image file (.tif).Select the directory and root filename, and click Save.
Click the Browse button, and you can select the directory and the root name of the file(s) you want to create. Depending on what you chose to output, the actual output may be multiple files, and they will all have names derived from the root name you provide. The Save button does not write the file(s) — it only inserts your selected name into the Export Output window.
Click the OK button.
Doing so writes the file (or files) to disk — each in the chosen format, at the chosen location.