
Finding out all about iTunes
Setting up an account with the iTunes Store
Previewing and buying songs, TV shows, movies, and apps
Choosing Wi-Fi to go online
Downloading music, podcasts, and apps directly to your iPod touch
If the iPod touch were a spaceship, iTunes would be the space station it docks with to get its supplies. iTunes is the central repository of all content and iPod touch apps, and it's the gateway to the online iTunes Store and App Store from your computer.

The iTunes Store offers millions of songs you can copy and play on other devices for $0.69, $0.99, or $1.29, as well as albums with an immersive visual experience, called iTunes LP, that includes liner notes, pictures, video, animation, and lyrics. You can also buy audio books, TV episodes, and first-run movies. On top of that, iTunes offers tons of free content in the form of podcasts, which are similar to syndicated radio and TV shows. You can download podcasts into iTunes and play them at your convenience on your computer and on your iPod touch. iTunes even offers free lectures, language lessons, and audio books with educational content in its iTunes U section.
The iTunes Store includes the App Store, which offers free and commercial iPod touch applications by the tens of thousands. You can find apps in just about every category you can think of, including gaming, social networking, sports, business, and more. And after you've organized your content and apps in your iTunes library, you can put them on your iPod touch to carry around with you.
You can also download free or commercial content from the iTunes Store and apps from the App Store directly to your iPod touch, and then synchronize them with your iTunes library on your computer later.
This chapter gives you an overview of what you can do with iTunes, and it shows you how to sign in and take advantage of what the iTunes Store and App Store have to offer.
iTunes is the software that manages content on my iPod touch, all my other iPods, my iPhone, and even my Apple TV. Whether I buy content through my iPod touch, my iPhone, or my computer running iTunes, it all ends up in my iTunes library on my computer. I also bring content into iTunes from CDs and downloaded MP3 files. I then parcel the content out to various devices for playback.
All my content is stored in my main iTunes library on my computer, and backed up to another hard drive and to DVDs and CDs. You can manage all these activities with iTunes.
You can add videos to your iTunes library in a couple of ways: by choosing content from the iTunes Store (such as TV shows, feature-length high-definition movies, music videos, and even free movie trailers) or by downloading standard video files in the MPEG-4 format from other sources on the Internet. You can also create your own videos with a digital camcorder (or cameras built into computers, such as the iSight camera included with MacBooks and iMacs) and copy them to iTunes.
Note
Although you can't use iTunes to transfer video content from a DVD, you can use other software to convert DVDs to digital video files, and you can transfer video content from older VHS players by using a digital video camcorder. Visit my Tony's Tips site at www.tonybove.com/tonytips for more details.
As if that weren't enough, iTunes gives you the power to organize content into playlists. A playlist is a list of the items that you want in the sequence that you want to play them. For example, you can make a playlist of love songs from different albums to play the next time you need a romantic mood, or you can compile a playlist of surf songs for a trip to the beach. You can even combine videos and music in a playlist.
Tip
If you organize songs into playlists in iTunes, you can then easily synchronize those playlists with your iPod touch to be more selective about the music you copy. See Chapter 5 for sync details. (Also, see my other book, iPod & iTunes For Dummies, to find out all about iTunes.)
What's that you say? You're still not satisfied with what iTunes can do for you? Well, iTunes also has a built-in equalizer with preset settings for all kinds of music and listening environments, with the added bonus of being able to customize and save your own personalized settings with each item of content.
You can run iTunes anytime (with or without your iPod touch attached to your computer) to build and manage your library. You don't have to connect your iPod touch until you're ready to sync it (as I describe in Chapter 5).
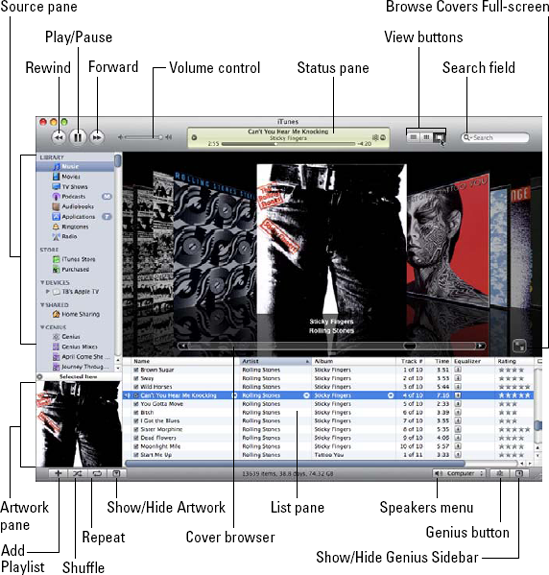
The Mac and Windows versions of iTunes look nearly identical and offer the same functions and viewing options, including the cover browser (also known as Cover Flow). Figure 4-1 shows the iTunes window on the Mac with the cover browser open, displaying the cover art for albums.
iTunes offers a view of your library and your sources for content, as well as controls for organizing, importing, and playing content, as follows:
Source pane: Displays the source of content, handily divided into the following sections:
Library: Includes your music, movies, TV shows, podcasts, audio books, applications and games, ringtones, and all available radio stations.
Store: Includes the iTunes Store and your Purchased or Downloads list (if you've purchased or recently downloaded items).
Devices: Includes audio CDs and any iPods, iPhones, and Apple TV devices (such as TB's Apple TV in Figure 4-1; TB being my initials) that are connected to your computer.
Shared: Includes iTunes libraries on your home network that you can share. (To learn more, see my other book, iPod & iTunes For Dummies.)
Genius: Includes Genius mixes and your Genius playlists, which I describe in Chapter 7.
Playlists: Includes iTunes DJ and your playlists.
Cover browser: Also called Cover Flow, the cover browser lets you flip through your cover art to choose songs. You can use the slider to move swiftly through your library, or you can click to the right or left of the cover in the foreground to move forward or backward in your library.
List pane: Depending on the source that's selected in the Source pane, the List pane displays a list of items.
Column Browser and Artwork Column: To see this view, click the leftmost View button for List view (see Figure 4-1) and then choose View

Player buttons — Forward/Next, Play/Pause, and Previous/Rewind: Use these buttons to control the playback of content in iTunes.
Volume control: You can change the volume level in iTunes by dragging the volume control slider in the upper-left section of the iTunes window to the right to increase the volume, or to the left to decrease it.
Status pane: When content is playing, you can see the artist name, piece title (if known), and the elapsed time displayed in this pane.
View buttons: The three buttons in the upper-right corner change your view of the List pane to show items in a list, show cover art thumbnail images in a grid, or show the cover browser.
Search field: Type in this field to search your library. You can also use the Search field to peruse a playlist or to look within the iTunes Store.
Playlist buttons — Add, Shuffle, Repeat: Use these buttons to add playlists and shuffle or repeat playback of playlists.
Show/Hide Artwork button: Use this button to display or hide artwork associated with your music or videos (either your own or the artwork supplied by the iTunes Store).
Speakers pop-up menu: Use this pop-up menu in the lower-right corner of the iTunes window to select a different speaker system than the computer's speakers. This pop-up menu appears only if you choose Preferences (from the iTunes menu on a Mac or the Edit menu in Windows), click the Devices tab, and turn on the Look for Remote Speakers Connected with AirTunes option. If iTunes locates remote speakers connected to an Airport Express or Apple TV using AirTunes (the technology for streaming music over a Wi-Fi or Ethernet local area network), the pop-up menu appears.
Genius button: The Genius button, located in the lower-right corner of the iTunes window to the left of the Show/Hide Genius Sidebar button, generates a playlist of songs from your library that go great with the song you selected. The Genius button appears only when you've selected music, movies, TV shows, or a playlist. (See Chapter 7 for details about creating Genius playlists.)
Show/Hide Genius Sidebar button: Use this button to display or hide the Genius Sidebar. The Genius Sidebar makes suggestions for what to get from the iTunes Store based on what you've selected.
Eject button: This button appears next to the name of an audio CD or iPod touch in the Source pane to eject the CD or iPod touch. Clicking the Eject button for a CD physically ejects the CD so that it pops out. Clicking Eject for an iPod touch removes (unmounts) the iPod touch from the system so that you can disconnect it.
One important task that you must do is set up your iTunes Store account. You can set it up in iTunes on your computer, or directly on your iPod touch (as I describe in "Shopping with Your iPod touch," later in this chapter). You need an account to purchase content or apps on your computer as well as to use the iTunes Store and App Store apps on your iPod touch. You can create as many accounts as you need — perhaps one for each family member. To create an iTunes Store account using iTunes on your computer, follow these steps:
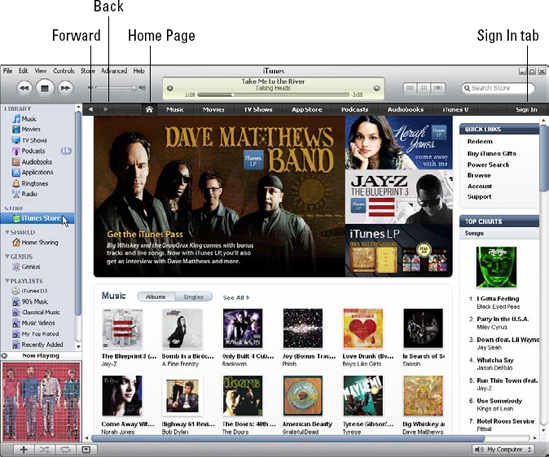
In iTunes, click the iTunes Store option in the Store section of the Source pane.
The iTunes Store home page appears, as shown in Figure 4-2, replacing the List pane.
Click the Sign In tab in the upper-right area of the window (refer to Figure 4-2) to either create an account or sign in to an existing account.
When you're logged in to an iTunes account, the account name appears in place of the Sign In tab.
After you click the Sign In tab, iTunes displays the account sign-in dialog.
Tip
If you already set up an account with the iTunes Store with the MobileMe (formerly .Mac) service or with other Apple services (such as the Apple Developer Connection), you're halfway there. Type your ID and password and then click the Sign In button. Apple remembers the personal information that you put in previously, so you don't have to re-enter it every time you visit the iTunes Store. If you forgot your password, click the Forgot Password? button, and iTunes provides a dialog so that you can answer your test question. If you answer correctly, iTunes e-mails your password to you.
Click the Create New Account button.
iTunes displays a new page that welcomes you to the iTunes Store.
Click Continue on the iTunes Store welcome page.
After you click Continue, the terms of use appear with the option at the end to agree to the terms. If you don't select the option to agree, the iTunes continues to display the terms until you agree or click Cancel.
Select the I Have Read and Agree to the iTunes Terms and Conditions option to agree with the legal terms. Then click Continue.
iTunes displays the next page of the setup procedure.
Fill in your personal account information.
You need to enter your e-mail address, password, test question and answer (in case you forget your password), birthdate, and privacy options. Don't forget your password — you need it to access the store from your iPod touch.
Click the Continue button to go to the next page of the account setup procedure and then enter your credit card information.
The entire procedure is secure, so you don't have to worry. The iTunes Store keeps your personal information (including your credit card information) on file, and you don't have to type it again.
Click Continue to finish the procedure.
The account setup finishes and returns you to the iTunes Store home page. You can now use the iTunes Store to purchase and download content to play in iTunes and use on any iPod, iPhone, or Apple TV.
If you have an iTunes Store account set up (see the previous section), you can buy and download content immediately, including movies for rent. I don't know of a faster way to purchase or rent content from the comfort of your home.
If you already have your iTunes program open, click iTunes Store in the Store section of the Source pane. The iTunes Store home page opens (refer to Figure 4-2).
The iTunes Store home page is loaded with specials and ads to peruse. To look at music in more depth, choose the Music tab in the dark gray bar above the List pane (refer to Figure 4-2). You can also pick a music genre by clicking the down-arrow button that appears next to the Music tab when you click it. iTunes displays more panels of ads and specials for music lovers, including iTunes LP albums that include liner notes, lyrics, videos, and other features.
Besides Music and other tabs, iTunes Store offers buttons on the dark gray bar just above the advertised content in the List pane (refer to Figure 4-2). The left and right triangle buttons work just like the Back and Forward buttons of a Web browser, moving back a page or forward a page, respectively. The button with the Home icon takes you to the iTunes Store home page.
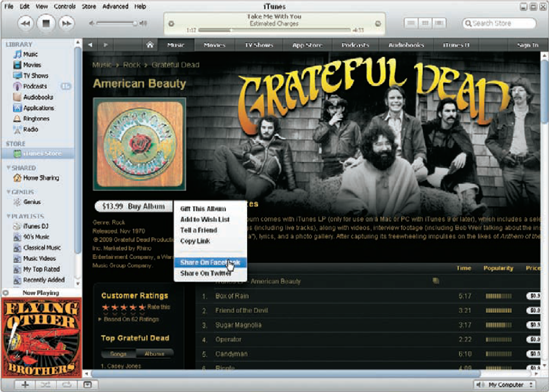
After selecting an advertisement for an album, for example, the album's page appears with a description and other links, as shown in Figure 4-3.
Tip
You can preview any song in the iTunes Store for up to 30 seconds. Some movies offer one-minute previews and movie trailers you can view for free, and TV shows and audio books can offer up to 90 seconds. To preview a song, TV show, movie, or music video, click the title in the list and then click the Play button (or press the spacebar).
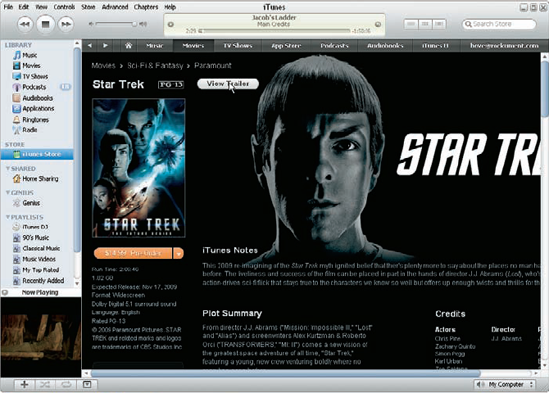
Videos play in the Artwork pane in the lower-left corner of the iTunes window, as shown in Figure 4-4. If the Artwork pane isn't visible, playing the video makes it appear. You can also make the Artwork pane appear or disappear by clicking the Show/Hide Artwork button. Click the iTunes player buttons to control playback, and use the iTunes volume slider to control the volume. To watch a video in a separate window, click the video while it plays in the Artwork pane. A separate window appears that includes a transparent QuickTime controls pane with buttons for controlling video playback.
As you browse items in the iTunes Store, you can purchase and download them to your computer immediately. All you need to do is click the Buy button, whether the item is a song, an album, a TV show episode, or an audio book.
For example, if you select a song in the List pane, click the Buy Song button in the far-right column for the song. (You might have to scroll your iTunes Store window to see the far-right column.) When you select a TV show episode, click the Buy Episode button in the far-right column. You can also click the Buy Album button in an album advertisement.
The iTunes Store may prompt you to log in to your account after you click the Buy button (unless you just recently logged in). It then displays a warning dialog to make sure that you want to buy the item, and you can then go through with it by clicking the Buy button, or cancel. After you click the Buy button, iTunes downloads the item and, after downloading, it appears in your iTunes library. You can continue buying items while downloading, and because you already logged in, the iTunes Store complies immediately without asking again for a password. The iTunes Store keeps track of your purchases over a 24-hour period and charges you for a total sum rather than for each single purchase.
You can see the list of all the items that you purchased (no matter which shopping method you used at the time) by selecting the Purchased playlist under the iTunes Store option in the Source pane. The List view and Browse view change to show the items you purchased.
Note
Each time you buy content, you get an e-mail from the iTunes Store with the purchase information. It's nice to know right away what you bought.
You can change iTunes Store preference settings by choosing iTunes
Automatically check for available downloads from the iTunes Store, such as downloads that were not completed and new episodes for a podcast subscription.
Automatically download prepurchased content, such as an iTunes Pass for TV show episodes. As the episodes become available, iTunes automatically downloads them.
Automatically download missing album artwork from the iTunes Store for albums and songs you've imported from other sources (such as audio CDs).
Use the full iTunes window for the iTunes Store (rather than just the List pane) so that you can see more of the store choices.
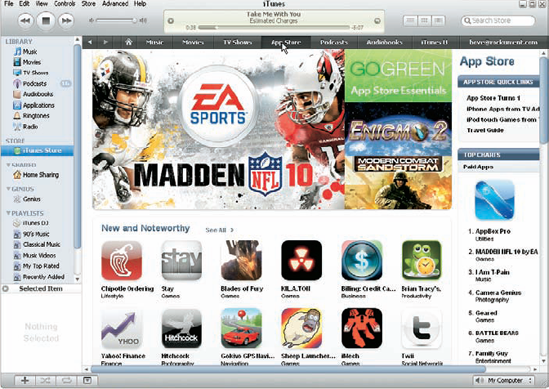
You can get loads of free and commercial apps that run on your iPod touch just like the built-in apps such as Map and Weather. (To no one's big surprise, many of the apps are games.) To find thousands of apps, click the App Store tab in the center of the dark gray bar at the top of the Store page (refer to Figure 4-2). The App Store page appears, as shown in Figure 4-5.
Click an app's icon to go to the information page for that app, which may also contain reviews and a slideshow depicting the app in all its glory. The information page offers the Buy App button (to purchase and download a commercial app), or the Get App button (to download a free app). Click the Buy App or Get App button to download the app to your iTunes library.
Downloaded apps appear in the Applications section of your iTunes library library — click Applications in the Library section of the Source pane to see their icons.
When an app you downloaded is updated, iTunes informs you — the message Update Available appears at the bottom of the Applications section with an arrow link that takes you to the My Apps Update page in the iTunes Store, with icons of the apps to update. Click the Get Update button next to each app to download the update, which automatically replaces the previous version of the app.
To use the iTunes Store and App Store on your iPod touch, you must first join a Wi-Fi network that's connected to the Internet. The iPod touch can join Wi-Fi networks at home, at work, or at Wi-Fi hotspots around the world. Although some public Wi-Fi networks are free, others require logging in first, and still others require logging in and supplying a credit card number. Still others are detected but locked — if you select a locked network, a dialog appears asking for a password.
If you don't have Wi-Fi at home but you do have a broadband Internet connection (such as cable or DSL), I recommend buying an AirPort Express or AirPort Extreme, available in the Apple Store — you can then connect your Internet connection to the AirPort to extend Internet access over Wi-Fi. AirPort Express is powerful enough to run a home Wi-Fi network yet portable enough to take on the road and use in hotel rooms that offer Internet connections, and it even plays music from your iTunes library through speakers connected to it. AirPort Extreme lets up to 50 users connect to Wi-Fi at once — perfect for a large family or small business. You can give your network a unique name, which appears in the list of networks on your iPod touch when your iPod touch is in range of it.
To turn Wi-Fi on, choose Settings
When Wi-Fi is turned on, your iPod touch detects and automatically acquires a Wi-Fi signal you've used before, or it can detect one or more signals in the area and present them in a list for you to choose. The list of available Wi-Fi networks appears below the Wi-Fi setting, as shown in Figure 4-6.
Tip
If your iPod touch isn't already connected to Wi-Fi, it's set by default to look for networks and ask whether you want to join them whenever you use something that requires the network (such as Safari, Weather, YouTube, Mail, and so on). You can stop your iPod touch from looking and asking: Scroll down to the end of the list of Wi-Fi networks on the Wi-Fi Networks screen and then tap the On button for the Ask to Join Networks option to turn it off. You can still join networks manually, but you won't be interrupted with requests to join networks.
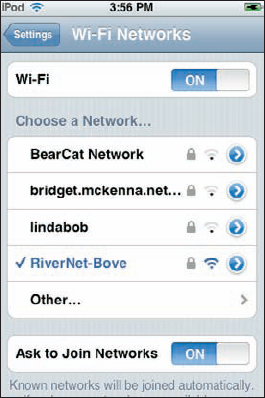
You can scroll the list of networks in the Wi-Fi Networks screen to choose one. (Refer to Figure 4-6.) You can scroll quickly by flicking your finger or scroll slowly by dragging up or down, but however you scroll, you choose a Wi-Fi network by tapping its name. Networks are named by their administrators. (If you set up your own home Wi-Fi, you get to name yours whatever you want.)
Note
When connected to a Wi-Fi network, your iPod touch displays the Wi-Fi icon in the status bar at the top of the display, which also indicates the connection strength — the more bars you see, the stronger the connection.
If a Lock icon appears next to the Wi-Fi network name (refer to Figure 4-6), it means the network is locked and you need a password. When you select a locked network, the iPod touch displays an Enter Password screen and the onscreen keyboard. Tap out the password using the keyboard. (For details on how to use the onscreen keyboard, see Chapter 2.) Tap Join to join the network or tap Cancel in the upper-right corner to cancel joining.
Tip
To join a Wi-Fi network that requires either a credit card or an account for you to log in, select the network and then use Safari to open the network's Web page. (For more on using Safari, see Chapter 10.) The first Web page you see is typically the log-in page for the service (for example, a commercial Wi-Fi service or a hotel service).
Your iPod touch remembers your Wi-Fi connections and automatically uses one when it detects it within your range. If you've used multiple Wi-Fi networks in the same location, it picks the last one you used.
Tip
You can also forget a network — such as a paid or closed Wi-Fi service that somehow got hold of your iPod touch and won't let you move on to other Web pages without typing a password. See Chapter 15 for the details about how to forget a network.
The music, movies, TV shows, music videos, podcasts, and audiobooks in the iTunes store as well as the entire App Store, are available right at your fingertips on your iPod touch. You can search for, browse, and preview content; make purchases; and download content directly to your iPod touch.
Whatever you buy on your iPod touch is automatically copied to your iTunes library the next time you synchronize it with your computer, as I describe in Chapter 5.
Be sure to set up an iTunes Store account first if you don't already have one, as I describe earlier in this chapter — and you'll need to remember your password. To download content and apps directly to your iPod touch, you can set up your iPod touch with iTunes, which basically means signing in to your iTunes Store account in iTunes on your computer, and then syncing your iPod touch to iTunes as I describe in Chapter 5. After doing that once, you shouldn't have to bother with it again, and you'll be able to download items from the iTunes Store and App Store on your iPod touch from then on. All you need to do is enter the password for your iTunes Store account when prompted.
You can also set up one or more iTunes Store accounts directly from your iPod touch: choose Settings
Tip
To sign into an existing account, choose Settings
To go to the iTunes Store on an iPod touch, tap the iTunes icon on the Home screen. The store screen appears with Music, Videos, Podcast, Search, and More icons along the bottom. Here's the lowdown on the icons.
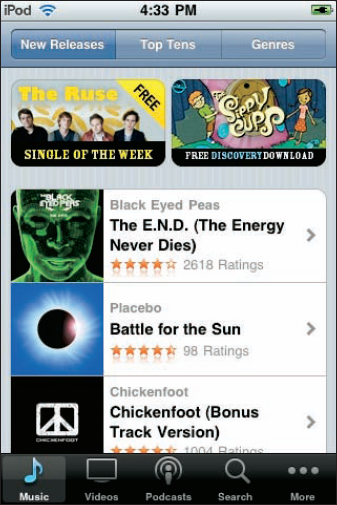
Tap the Music icon to see Music items, new releases, and store recommendations, as shown in Figure 4-7. The screen displays New Releases, Top Tens, and Genres buttons along the top. To search through genres, tap the Genres button and choose a genre. Tap the Top Tens button to see a list of the top ten choices in different genres. Choose iTunes in the Top Tens list to see the top ten songs throughout the iTunes Store. Tap Music in the top-left corner to return to the previous Music screen.
Tap the Videos icon and the screen displays Movies, TV Shows, and Music Videos buttons along the top. Tap Movies to see new movie releases; TV Shows to see new and noteworthy TV shows; or Music Videos to see the hottest music videos in the iTunes Store. Tap Videos in the top-left corner to return to the previous Videos screen.
Tap the Podcasts icon and the screen displays What's Hot, Top Tens, and Categories buttons along the top. Tap What's Hot to see the most popular podcasts; Categories to view categories of podcasts; or Top Tens to see the top ten in each category. Tap Podcasts in the top-left corner to return to the previous Podcasts screen.
Tap the Search icon to search the store and then tap the entry field to bring up the onscreen keyboard. Type the search term and tap the Search button to search the store.
Tap the More icon and then either select Audiobooks to buy audio books, iTunes U to download learning content, Downloads to see the progress of your downloads from the store, or Redeem to redeem gift certificates.
If this is your first time to the store on your iPod touch, the Music section appears with New Releases in a scrollable list. Tap any song to hear a preview. To buy and download a song, tap the button with the price tag. Enter your password and tap OK.
You can similarly preview and buy videos — tap the video, then tap the Preview button to see a preview, and tap the Buy (with price tag) button to buy it and download it.
After selecting a podcast, a list of episodes appears. Tap the Free button (or Buy button for paid podcasts) next to an episode, enter your password, and then tap OK to start downloading the podcast episode.
Purchased and downloaded items are added to a Purchased playlist on your iPod touch, and they're included in your Purchased playlist in iTunes as well as in a special Purchased on YourDeviceName playlist. iTunes automatically syncs items downloaded on your iPod touch to your iTunes library when you connect it to your computer so that you have a backup if you delete them from the iPod touch.
Some albums offer bonus content, such as liner notes, which are downloaded to your iTunes library on your computer, but not to your iPod touch. Also note that an alert appears on your iPod touch if you've previously purchased one or more songs from an album. Tap Buy if you want to purchase the entire album, or tap Cancel if you want to buy the remaining songs on the album individually.
Tip
If you lose your network connection or turn off your iPod touch while downloading, the download pauses and then resumes when you reestablish Wi-Fi. If you go back to your computer, iTunes can complete the download operation to your iTunes library. To make sure you received all your downloads from purchases on your iPod touch, use iTunes on your computer and choose Store
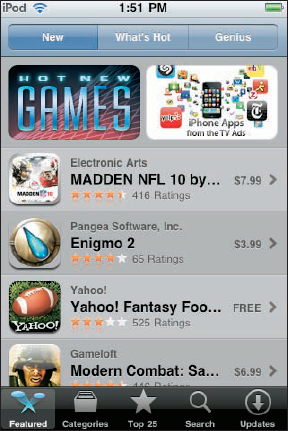
To use the App Store, tap the App Store icon on the Home screen. The Store screen appears with Featured, Categories, Top 25, Search, and More icons along the bottom. The following list tells you what's what when it comes to the icons:
Tap the Featured icon and then tap the What's Hot button at the top to see the most popular apps based on downloads, or tap the New button to see featured new apps, as shown in Figure 4-8. To see App Store recommendations based on apps you already own, tap the Genius button in the top-right corner, tap Turn On Genius if it isn't already on, and then tap Use Existing Account (meaning your iTunes Store account), or Create New Account (to set up an account), or Cancel. See Chapter 7 for details about using the Genius feature.
To browse by category, tap the Categories icon in the bottom menu and then tap a category, such as Games, to see a list of all games by popularity.
Tap the Top 25 icon in the bottom menu and then tap Top Paid to see the top 25 paid apps by popularity, or tap Top Free to see the top 25 free apps.
Tap the Search icon to search the store, and tap the entry field to bring up the onscreen keyboard. Type the search term and tap Search to search the store. Suggestions pop up right away; for example, if you search for "Tony" in the App Store, my app, Tony's Tips for iPhone Users Manual, appears in the list of suggestions.
Tap the More icon to select Redeem to redeem gift certificates, or Updates to ... er, I explain that one in the next section.
To view information and to purchase and download an app, tap the app in the list that appears after tapping the Featured, Categories, Top 25, or Search icon. You can then scroll the display to see more information about the app.
To download an app, tap the Price button (for a paid app) or Free button (for a free app). The Price or Free button changes to the Install button. Tap Install and then enter your password and tap OK.
The iPod touch displays the Home screen with the icon for the new app as it loads. As soon as the Loading message is replaced by the name of the app, the icon is ready to be tapped.
The App Store on your iPod touch notifies you if any of your apps have been updated — a number appears in the App Store icon. You should update an app when an update is available because updates fix bugs and introduce new features you may want.
Tap the More icon at the bottom-right corner of the App Store screen and then tap Updates to see the list of updated apps. To update an app, tap the app in the list to see the app's information screen and then tap the Update button. The Update button changes to the Install button. Tap Install and then enter your password and tap OK.
The update replaces the previous version of the app as it loads into your iPod touch. As soon as the Loading message is replaced by the name of the app, the app is ready to be tapped.
Now you're ready to sync with your iTunes library the apps and content you downloaded into your iPod touch — sink gently into the next chapter.