Checking your calendar and entering events
Entering and sorting your contacts
Connecting to social networks like Facebook and MySpace
As John Lennon once sang, "Life is what happens to you when you're busy making other plans." And while life happens to you in real time, you can consult your iPod touch Calendar app to view your appointments, change them, and make new ones. One of the major benefits of using an iPod touch is the onscreen keyboard, which you can use to enter text, such as calendar entries, as I describe in this chapter.

In this chapter, I also demonstrate how to look up contact names, addresses, and phone numbers with your iPod touch, change contact information, and add new contacts. Any changes you make to calendars and contacts are synchronized with your desktop applications (as I describe in Chapter 6).
To socialize and stay in contact with friends, relatives, and associates, you can use social networks such as Facebook and MySpace to share photos, thoughts, links, and profile information. The App Store offers social networking apps that link you directly to these networks, and to messaging sites such as Twitter. You'll find all this and more in this chapter on your social life with iPod touch.
The Calendar app isn't just for looking up dates (though it's quite good at that). If you see a blank calendar, it means you need to synchronize your iPod touch with your calendar files from iCal (Mac) or Outlook (Windows), as I describe in Chapter 6.
Tap the Calendar icon on the Home screen. Here's what happens:
If this is your first visit to the Calendar app and you've synchronized multiple calendars to your iPod touch, a list of your calendars appears (see Figure 13-1, left side). Tap All at the top to view all calendars merged into one or tap a specific calendar to see only that calendar. The calendar appears in a monthly view by default (see Figure 13-1, right side).
If you opened Calendar before, the app shows the calendar and view opened previously.
Tap any day to see the events on that day, which are displayed below the calendar view in a list.
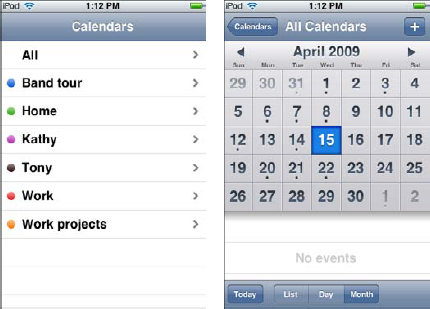
Tap the List, Day, or Month buttons to change the calendar view to a list of events, a full day of scheduled appointments, or a month view, respectively. If you roam around from day to day or month to month, tap the Today button in the lower-left corner of the display to see the calendar for today.
Change happens, and you'll want to change your schedule or even add new events as you learn about them. Although you can enter appointments and events on your computer and sync them with your iPod touch, as I show you in Chapter 6, you can also enter and change appointments and events directly in your iPod touch and keep changes and additions synced with your computer.
To add an event, follow these steps:
Open the Calendar app as described earlier.
The Calendar app opens (refer to Figure 13-1) — either the Calendar view appears, or if you have multiple calendars, the list of calendars appears — in which case you need to tap a calendar to use for the new event.
Tap the plus (+) sign in the upper-right corner of the Calendar screen.
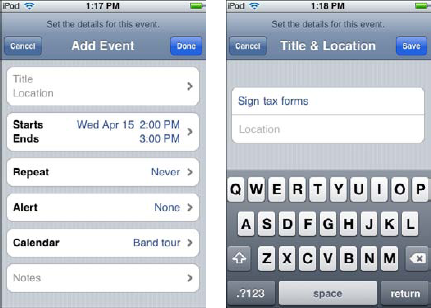
The Add Event screen appears, as shown in Figure 13-2 (left side).
Tap the Title Location button and enter the event's title and location using the onscreen keyboard.
The Title and Location fields appear along with the onscreen keyboard, as shown in Figure 13-2 (right side).
Tap Save in the upper-right corner to save the entry (or Cancel in the upper-left corner to cancel the entry).
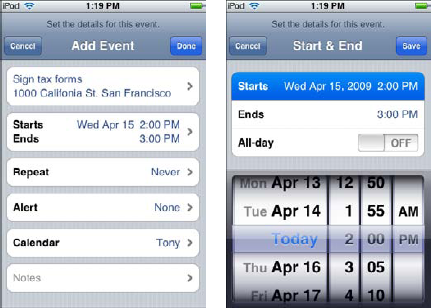
The Add Event screen appears again for selecting more options, as shown in Figure 13-3 (left side).
Tap the Starts Ends button to enter the starting and ending times and dates.
The Start & End screen appears, as shown in Figure 13-3 (right side), with a slot-machine-style number wheel to select the date and time.
Tap the Starts button and select the date and time or tap the Off button for All-Day to turn on the All-Day option.
Slide your finger up and down the slot-machine-style number wheel to select the date and time. If you turn on the All-Day option, the number wheel changes to show only dates; select a date for the all-day event and skip the next step.
Tap the Ends button and select the date and time as you did in Step 6.
Tap Save in the upper-right corner to save the entry (or Cancel in the upper-left corner to cancel the entry).
The Add Event screen appears again for selecting more options (refer to Figure 13-3, left side).
(Optional) Set the event to repeat by tapping Repeat and selecting a repeat time; then tap Save (or Cancel).
You can set the event to repeat every day, every week, every two weeks, every month, or every year (or none, to not repeat). After you tap Save or Cancel, the Add Event screen appears again for selecting more options.
(Optional) Set an alert for a time before the event by tapping Alert and choosing an alert time; then tap Save (or Cancel).
You can set the alert to occur from five minutes to two days before the event. You can also set a second alert time in case you miss the first one. After you tap Save or Cancel, the Add Event screen appears again for selecting more options.
(Optional) If you have multiple calendars synced with your iPod touch, you can change the calendar for the event by tapping Calendar and choosing a calendar.
The Calendars screen appears with a list of your calendars. Tap a calendar's name to choose it. After you tap Save or Cancel, the Add Event screen appears again for changing event options.
(Optional) Enter notes about the event by tapping Notes and using the onscreen keyboard to type notes.
The Notes field appears along with the keyboard so that you can type your notes. After you tap Save or Cancel, the Add Event screen appears again for changing event options.
Tap Done in the upper-right corner of the Add Event screen to save the event (or Cancel in the upper-left corner to cancel the event).
The new event now appears in your calendar in the lower portion of the Calendar screen when you select the day, as shown in Figure 13-4 (left side).
To edit an event, tap the event in the lower portion of the Calendar screen, and then tap Edit in the upper-right corner of the Event screen. The event information appears and is ready for editing or deleting, as shown in Figure 13-4 (right side). To edit the event information, follow Steps 3–13 in this section.
The Delete Event button appears only when you're editing an event. After tapping Delete Event, a warning appears to confirm the deletion — tap Delete Event again or tap Cancel. The Calendar screen appears.

You can set alerts for meeting invitations and choose how many weeks of events to sync back to (to clear out old events). Choose Settings
To set the option for how far back in time to sync your calendar events, tap Sync and choose a period of time (such as Events 2 Weeks Back).
If you have a Microsoft Exchange account set up with Calendars enabled, you can receive and respond to meeting invitations from others in your organization that also use Exchange. To set a sound as an alert for receiving a meeting invitation, tap the Off button for New Invitation Alerts to turn it on.
You can also turn time zone support on or off. When time zone support is on, event dates and times are displayed in the time zone of the city you selected. When time zone support is off, events are displayed in the time zone of your current location as determined by the network time. You might want to turn it on and select your home city so that dates and times are displayed as if you were in your home city, rather than where you actually are. For example, if you live in San Francisco and you're visiting New York, turning on Time Zone Support and selecting San Francisco keeps the dates and times in your calendars on San Francisco time. Otherwise, they would switch to New York time.
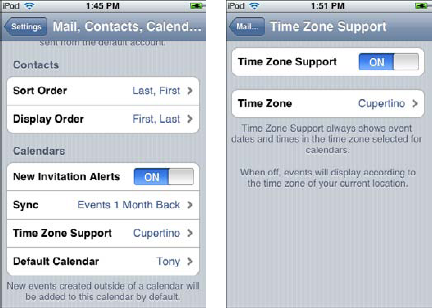
Figure 13.5. The Contacts and Calendars sections for settings (left) and the Time Zone setting (right).
To turn on time zone support, tap Time Zone Support, and on the Time Zone Support screen (refer to Figure 13-5, right side), tap Off to turn on Time Zone Support (or tap On to turn it off). Then tap Time Zone and enter the name of a major city. As you type, city names are suggested based on what you've typed. Select the city to return to the Time Zone Support screen and then tap the Mail button in the upper-left corner to return to the settings screen — or, if you're finished making changes, press the Home button to leave settings altogether and return to the Home screen.
Tip
You can set your iPod touch to play a beeping sound for your calendar alert. Choose Settings
The bits of information that you're most likely to need on the road are people's names, addresses, and phone numbers. You can use the Contacts app on your iPod touch to store this information and keep it all in sync with your computer. (For sync info, see Chapter 6.)
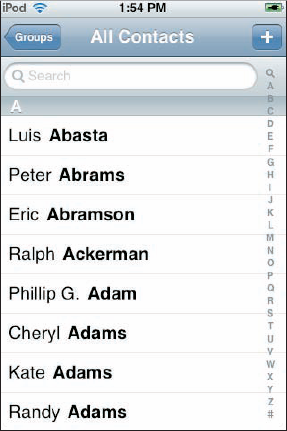
To view contacts on an iPod touch, tap the Contacts icon on the Home screen. The All Contacts screen appears. If you've organized contacts into groups, you can tap the Groups button in the upper-left corner of the screen to show the Groups screen, and then tap a group to see just that group, or tap All Contacts to return to the All Contacts screen.
The contact list is sorted automatically in alphabetical order by last name (in bold) but displayed so that the first name comes first, as shown in Figure 13-6. Scroll the list of contacts with your finger or tap a letter of the alphabet along the right side to go directly to names that begin with that letter. Then tap a contact to see that person's info screen.
The contact's info screen shows all the information about reaching that contact. Tap an e-mail address to bring up the Mail app and send an e-mail to that contact. Tap a Web site address to load that page into Safari. Tap a physical address (with a street address) to bring up the Maps app and locate the contact on the map.
You can change which way the contacts sort so that you can look up people by their first names (which can be time-consuming with so many friends named Elvis). Choose Settings
First, Last: Sorts the contact list by first name, followed by the last name, so that Brian Jones sorts under the letter B for Brian (after Brian Auger but before Brian Wilson).
Last, First: Sorts the contacts by last name, followed by the first name, so that Brian Jones sorts under the letter J for Jones. (Jones, Brian appears after Jones, Alice but before Jones, Norah.)
You can also display contacts with their first names followed by their last names, or last names followed by first names, regardless of how you sort them. Choose Settings
First Last: Displays the contacts list by first name and then last name, as in Paul McCartney.
Last, First: Displays the contacts list by last name followed by a comma and the first name, as in McCartney, Paul.
Can't remember the person's full name or last name? You can search for any part of a person's name in Contacts by tapping the Search entry field at the very top of the list of contacts. The Search entry field appears with the onscreen keyboard, as shown in Figure 13-7, and suggestions appear as you type.
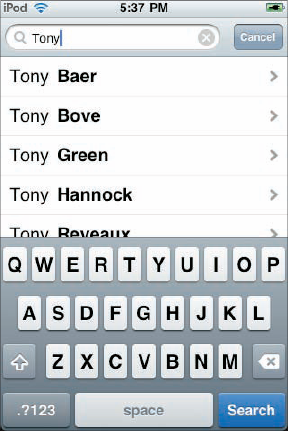
Tap a suggested name to open the Contacts record for that person. You can then edit or delete the contact information.
You meet people all the time, so why not enter their information immediately? You can enter new contacts, edit existing contacts, and even delete contacts directly on your iPod touch, and keep your contacts in sync with your computer. (For sync info, see Chapter 6.)
To add a contact, follow these steps:
Tap the Contacts icon on the Home screen.
Tap the plus (+) sign in the upper-right corner of the Contacts display.
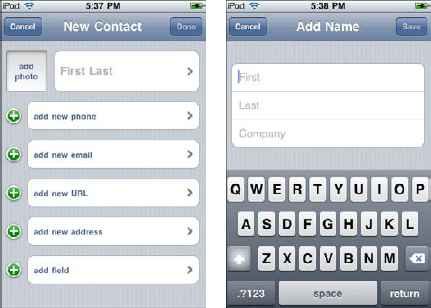
The New Contact screen appears, as shown in Figure 13-8 (left side).
Tap the First Last button and enter the contact's first and last name, as well as the company name, using the onscreen keyboard.
The First, Last, and Company fields appear in the Add Name screen (see Figure 13-8, right side) along with the keyboard.
Tap Save in the upper-right corner of the Add Name screen to save the name (or Cancel in the upper-left corner to cancel the name).
The New Contact screen appears again for selecting more options (refer to Figure 13-8, left side).
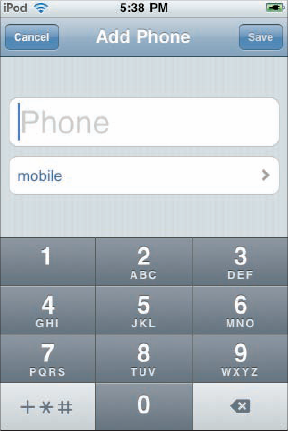
Tap the Add New Phone button and enter the phone number and label for the number.
The Add Phone screen appears, as shown in Figure 13-9, with a numeric keyboard for typing the number. Tap the field under the number to select a label for the type of phone (mobile, home, work, main, home fax, and so on).
Tap Save in the upper-right corner of the Add Phone screen to save the phone number (or Cancel in the upper-left corner to cancel the entry).
The New Contact screen appears again for adding more information.
Tap the Add New Email button to add an e-mail address using the onscreen keyboard and select a label for the type of e-mail address.
The Add Email screen appears with a field to enter the information, a button to set the label describing it, and the onscreen keyboard.
Tap Save in the upper-right corner to save the entry (or Cancel in the upper-left corner to cancel the entry).
The New Contact screen appears again for adding more information.
(Optional) Repeat Steps 7 and 8 with the Add New URL button to add a new URL (Web site address) for the contact.
Tap Add New Address on the New Contact screen, and add street (or P.O. Box) information, city, state, zip code, and country.
The keyboard appears with two entry fields for Street and one each for City, State, and Zip. Tap the country button to set the country, and the label button (set to home) for the type of address.
Tap Save in the upper-right corner to save the address (or Cancel in the upper-left corner to cancel it).
The New Contact screen appears again for adding more information.
(Optional) Tap Add Field to add more fields to the contact. When you're done, tap Save (or Cancel)
You can add a prefix, middle name, suffix, phonetic first and last names, nickname, job title, department, birthday, date, or note. Tap each field, and use the keyboard to type in the information. Tapping Save or Cancel returns you to the New Contact screen.
(Optional) Add a photo.
To add a photo, tap Add Photo in the upper-left corner of the New Contact screen. A pop-up menu appears for you to tap Choose Existing Photo (or Cancel). You're taken immediately to the Photos app, where you can tap a photo album and then tap a photo. Finally, tap Set Photo (or Cancel).
Tap Save in the upper-right corner of the New Contact screen to save the contact information (or Cancel in the upper-left corner to cancel the contact information).
Instant voice and text messaging
The iPhone gets all the glory for its communicating abilities with its phone and SMS text messaging services provided by the service carrier (AT&T in the U.S.), but the iPod touch is no slouch in this department — in fact, the iPod touch can make you carrier-free. All you need is a Wi-Fi connection that accesses the Internet.
Skype is a service that lets you make phone calls over the Internet. Calls to other Skype users are free, but calls to other landlines and mobile phones require some money on your part. The Skype for iPhone app (free) works on the iPod touch to give you phone service and instant text messages to anyone else on Skype. All you need is a Wi-Fi connection and a microphone for your iPod touch (for voice calls). You can use the Apple In-Ear Headphones with Remote and Mic (available in the Apple Store) or products from other companies, such as V-MODA Vibe II with Microphone Headphone/Headset for iPhone/iPod, or TouchMic Handsfree Lapel Microphone and Adapter, which adds a microphone and volume control to any regular headset.
If all you need is instant messaging, try the AOL Instant Messenger (AIM) app, which is popular in the U.S. You can send and receive instant messages on your iPod touch, view your buddy list, and rearrange the entries in groups or separate them as favorites. If you're using a lot of different chat clients, the IM+ app may be a better choice — it supports AIM, Yahoo! Messenger, MSN, Google Talk, Jabber, ICQ and MySpace. Palringo is another excellent multifunctional instant messaging app that supports MSN, Yahoo! Messenger, AIM, Gadu-Gadu, ICQ, Jabber, Google Talk, and iChat.
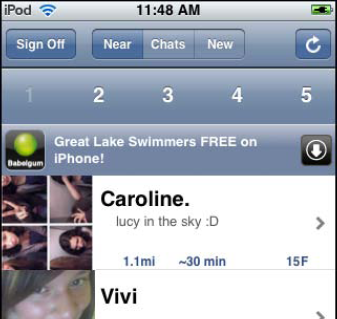
If you're looking for an iPod touch app that lets you chat with Yahoo! Messenger folks and also connects with various other social networks, check out the oneConnect! app, which lets you keep an eye on your Facebook, Flickr, Last.fm, Twitter, Bebo, Dopplr, MySpace and YouTube accounts. There are even a few social networks set up specifically for iPhone and iPod touch users — for example, WhosHere (see figure) is a social proximity application that connects you with people who are nearby or anywhere in the world. You can send unlimited, free text and image messages to other WhosHere participants.
To edit a contact, tap the contact to see the contact's Info screen, then tap Edit in the upper-right corner of the Info screen to show the circled minus (–) sign and plus (+) sign buttons.
You can edit or delete any information for a contact while leaving the rest of the information intact. Tap any field to edit the information in that field. Tap the circled minus (–) sign next to the information to reveal a Delete button; tap the Delete button to delete the information, or tap the circled minus sign again to leave it alone.
To change a photo, tap the existing photo in the upper-left corner of the Info screen. A pop-up menu appears for you to tap Choose Photo, Edit Photo, Delete Photo, or Cancel. Tap Choose Photo to choose a new photo as described in Step 13 earlier. To move or scale the photo, Tap Edit Photo to show the Move and Scale screen. Then pinch the image with your fingers to zoom out or unpinch to zoom in, and drag the image with your finger to show only a portion of it. Tap the Set Photo button in the bottom-right corner of the Move and Scale screen to save the edited image (or touch Cancel). You return again to the Info screen.
Tap Done in the upper-right corner of the Info screen to finish editing and return to the contact information.
To delete a contact entirely, tap Edit, scroll down to the bottom and then tap Delete Contact. Remember, if you do this, the contact will also be deleted from your contact list on your computer when you sync your iPod touch.
The Voice Memos app lets you record audio through an external microphone (such as the Apple In-Ear Headphones with Remote and Mic). You can then send recordings to others by e-mail, or sync them back to your computer's iTunes library. After syncing with iTunes (as I describe in Chapter 5), the recordings appear in the music portion of your iTunes library in the Voice Memos playlist (created for you if you don't already have one).
To start recording, tap the Voice Memos app on the Home screen and then tap the red dot button on the left side of the VU meter on the microphone recording screen. (You can also press the center button on the control capsule of the Apple In-Ear Headphones to start recording.) The red dot changes to a Pause button, as shown in Figure 13-10 (left side), and the list button on the right side of the VU meter changes to a Stop button. Tap the Pause or Stop button to stop recording.
Tap the list button on the right side of the VU meter to see the Voice Memos screen with your list of recordings, as shown in Figure 13-10 (center). Select a recording, and you can then tap Share to send it by e-mail, or tap Delete to delete it. After tapping Share, tap Email Voice Memo to open a new e-mail with the recording (or tap Cancel). See Chapter 11 for details on sending an e-mail.
You can also tap the Play button on the left of the recording to play it, and tap the right arrow on the far right side of the recording to open the Info screen for that recording, as shown in Figure 13-10 (right side).
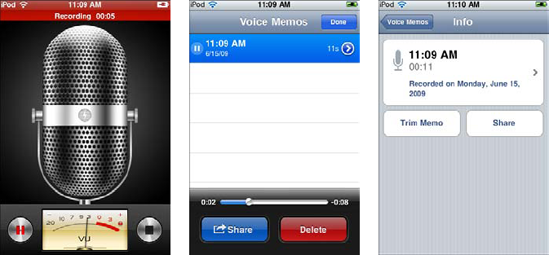
Figure 13.10. Record your voice (left), select a saved recording (center), and open the Info screen (right).
How can you specify what the recording is about, besides its date and time? You can assign a label to the recording by tapping the recording's information in the Info screen. A list of labels appears, including Interview, Lecture, and Memo, as well as Custom for setting your own label. Tap a label to assign the label and then tap Info in the top-left corner to return to the Info screen.
The Info screen also lets you trim the recording to be shorter — tap Trim Memo to view the playback timeline, as shown in Figure 13-11, and tap along the timeline to set a stop time. Then tap Trim Voice Memo (or Cancel to cancel).
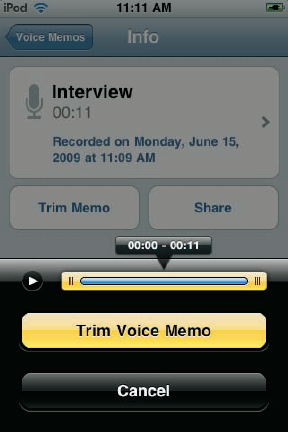
Tap Voice Memos in the top-left corner of the Info screen to return to the Voice Memos screen, and tap Done in the top-right corner to return to the microphone recording screen.
Connecting socially over a digital network isn't new — I connected to friends way back in the pre-Internet dark ages by using exotic-sounding networks such as Usenet, bulletin board systems (BBS), The Source, CompuServe, the WELL (Whole Earth 'Lectronic Link), and EIES (Murray Turoff's server-based Electronic Information Exchange Service). What's new is that more sophisticated social networks have appeared and gone mainstream very quickly, with MySpace, Facebook, and Twitter leading the pack.
You can use your iPod touch to stay in touch with your connections on these and many other social networks — viewing and typing messages, chatting, uploading and sharing photos, joining groups, and so on. All you need is a Wi-Fi connection so you can hop onto the Internet.
Facebook is the fastest-growing free-access social networking site as of this writing, with more than 200 million active users worldwide. If you're one of them (as I am), you already know that you can add friends, send them messages, and update your personal profile with photos, videos, links, and all sorts of Facebook widgets that extend the service's functions. Although you can do all this using a browser on your computer and using Safari on your iPod touch, the site itself is far too cumbersome for easy access on your iPod touch. What's needed is a "baby Facebook" on the iPod touch.
And that's exactly what Facebook for iPhone is: This app — which also runs on the iPod touch — lets you check your friends' status updates and photos, start a conversation in Facebook Chat, and upload images from your iPod touch.
After logging in, the Facebook app remembers your username and password so that you don't have to type them to log in again. (Of course, that means if anyone grabs your iPod touch they'll have access to your Facebook account — use a passcode to lock up your iPod touch, as I describe in Chapter 3, so that no one can use it without the passcode.) If you don't want the Facebook app to remember your login info, tap the profile icon to see your profile screen and then tap the Logout button in the upper-left corner of the profile screen.
The Facebook icons screen (see Figure 13-12, right) includes the Profile icon for showing your profile, the Friends icon to access a list of your Facebook friends, and the Inbox icon to check your messages. You can also tap Chat to chat directly with any of your friends who are online.
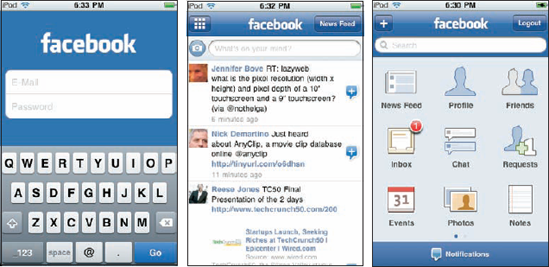
The Facebook app even lets you upload and share photos: Tap the Photos icon and add a new album (by typing its name and description). You can then tap the camera icon in the upper-right corner of the album's screen and tap Choose From Library to pick a photo from your iPod touch photo albums.
So you want to be a MySpace cowboy or cowgirl? MySpace, owned by Fox Interactive Media, was the most popular mainstream social networking site until Facebook came along. Today, it's the number-two service, and it's still an awesomely huge network. MySpace focuses on music, movies, and TV shows — just about every band in the universe has a MySpace page, and it's easy to add music to your profile.
You can use Safari on your iPod touch to access MySpace, but like most social networks, the home page you see is far too cumbersome for easy access on your iPod touch. The MySpace Mobile for iPhone app is much easier to use and works fine on your iPod touch as long as you have a Wi-Fi connection. It lets you send and receive messages, check status updates and photos, stay up-to-date on bulletins, and upload images from your iPod touch.
After you log in, your MySpace Home screen appears, as shown in Figure 13-13 (right side), with menu selections for viewing and editing your profile, checking the status and mood messages from your friends, checking friend updates, adding comments, reading bulletins, reading blogs, and changing your settings.

Along the bottom of the MySpace screen are the Home icon for returning to the Home screen, the Mail icon to check your messages, the Requests icon to view and respond to requests, the Friends icon for a list of your MySpace friends, and the Photos icon to upload photos to your MySpace page. To add photos, tap the Photos icon to see the photos already on your MySpace page and then tap the Add Photos button. You can then pick a photo from your iPod touch photo albums.
The most talked-about newcomer to the social network scene is Twitter, a free social messaging utility for staying connected with people in real time. With Twitter, you can post and receive messages that are 140 characters or less — called tweets. All public tweets are available to read on the public timeline, or you can read just the ones posted by the Twitter members you follow. You can post a tweet that can be read by all of your followers and by anyone reading the public tweets.
Members use Twitter to organize impromptu gatherings, carry on a group conversation, or just send a quick update to let people know what's going on. Companies use Twitter to announce products and carry on conversations with their customers. You can use Safari on your iPod touch to access Twitter, but there are alternatives that offer a better Twitter experience on your iPod touch.
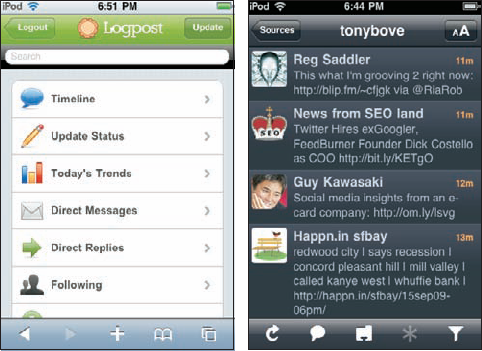
There are several iPod touch–compatible apps in the App Store for accessing Twitter, but my favorite as of this writing is Twitterific — the free version includes advertising (see Figure 13-14, right side), but a premium version is also available without ads. The free version of Twitterific does all the basic stuff you'd expect a Twitter client to do: You can read messages from people you follow, post messages of your own, and get alerted to private direct messages and public replies.
And wherever you go, "tweetness follows." Twitterific taps into the iPod touch's built-in location services so that, with your permission, it can let your followers know where you are and let you know when your followers are posting from a nearby location. You can set options for viewing messages, optimize the interface for left-handed operation, and use its own mini-browser to view linked Web pages without having to quit the app and run Safari. You can also copy a link to the last-opened Web page in Safari on your iPod touch into a tweet — a very useful trick if you like to include Web links with your tweets. Tweet dreams!