
CHAPTER GOALS
G To become familiar with common user-interface components, such as text components, radio buttons, check boxes, and menus
G To understand the use of layout managers to arrange user-interface components in a container
G To build programs that handle events from user-interface components
To learn how to browse the Java documentation
In this chapter, we will delve more deeply into graphical user interface programming. The graphical applications with which you are familiar have many visual gadgets for information entry: text components, buttons, scroll bars, menus, and so on. In this chapter, you will learn how to use the most common user-interface components in the Java Swing user-interface toolkit. Swing has many more components than can be mastered in a first course, and even the basic components have advanced options that can't be covered here. In fact, few programmers try to learn everything about a particular user-interface component. It is more important to understand the concepts and to search the Java documentation for the details. This chapter walks you through one example to show you how the Java documentation is organized and how you can rely on it for your programming.
We start our discussion of graphical user interfaces with text input. Of course, a graphical application can receive text input by calling the showInputDialog method of the JOptionPane class, but popping up a separate dialog box for each input is not a natural user interface. Most graphical programs collect text input through text fields (see Figure 1). In this section, you will learn how to add text fields to a graphical application, and how to read what the user types into them.
The JTextField class provides a text field. When you construct a text field, you need to supply the width—the approximate number of characters that you expect the user to type.
final int FIELD_WIDTH = 10;
final JTextField rateField = new JTextField(FIELD_WIDTH);
Note
Use JTextField components to provide space for user input. Place a JLabel next to each text field.
Users can type additional characters, but then a part of the contents of the field becomes invisible.
You will want to label each text field so that the user knows what to type into it. Construct a JLabel object for each label:
JLabel rateLabel = new JLabel("Interest Rate: ");You want to give the user an opportunity to enter all information into the text fields before processing it. Therefore, you should supply a button that the user can press to indicate that the input is ready for processing.
When that button is clicked, its actionPerformed method reads the user input from the text field, using the getText method of the JTextField class. The getText method returns a String object. In our sample program, we turn the string into a number, using the Double.parseDouble method. After updating the account, we show the balance in another label.
class AddInterestListener implements ActionListener
{
   public void actionPerformed(ActionEvent event)
   {
      double rate = Double.parseDouble(rateField.getText());
      double interest = account.getBalance() * rate / 100;
      account.deposit(interest);
      resultLabel.setText("balance: " + account.getBalance());
   }
}
The following application is a useful prototype for a graphical user-interface front end for arbitrary calculations. You can easily modify it for your own needs. Place other input components into the frame. Change the contents of the actionPerformed method to carry out other calculations. Display the result in a label.

ch18/textfield/InvestmentViewer3.java
1import javax.swing.JFrame;23/**4This program displays the growth of an investment.5*/6public class InvestmentViewer37{8public static void main(String[] args)9{10JFrame frame = new InvestmentFrame();11frame.setDefaultCloseOperation(JFrame.EXIT_ON_CLOSE);12frame.setVisible(true);13}14}
ch18/textfield/InvestmentFrame.java
1import java.awt.event.ActionEvent;2import java.awt.event.ActionListener;3import javax.swing.JButton;4import javax.swing.JFrame;5import javax.swing.JLabel;6import javax.swing.JPanel;7import javax.swing.JTextField;89/**10A frame that shows the growth of an investment with variable interest.11*/12public class InvestmentFrame extends JFrame13{14private static final int FRAME_WIDTH = 450;15private static final int FRAME_HEIGHT = 100;1617private static final double DEFAULT_RATE = 5;18private static final double INITIAL_BALANCE = 1000;1920private JLabel rateLabel;21private JTextField rateField;22private JButton button;23private JLabel resultLabel;24private JPanel panel;25private BankAccount account;26
27public InvestmentFrame()28{29account = new BankAccount(INITIAL_BALANCE);3031// Use instance variables for components32resultLabel = new JLabel("balance: " + account.getBalance());3334// Use helper methods35createTextField();36createButton();37createPanel();3839setSize(FRAME_WIDTH, FRAME_HEIGHT);40}4142private void createTextField()43{44rateLabel = new JLabel("Interest Rate: ");4546final int FIELD_WIDTH = 10;47rateField = new JTextField(FIELD_WIDTH);48rateField.setText("" + DEFAULT_RATE);49}5051private void createButton()52{53button = new JButton("Add Interest");5455class AddInterestListener implements ActionListener56{57public void actionPerformed(ActionEvent event)58{59double rate = Double.parseDouble(rateField.getText());60double interest = account.getBalance() * rate / 100;61account.deposit(interest);62resultLabel.setText("balance: " + account.getBalance());63}64}6566ActionListener listener = new AddInterestListener();67button.addActionListener(listener);68}6970private void createPanel()71{72panel = new JPanel();73panel.add(rateLabel);74panel.add(rateField);75panel.add(button);76panel.add(resultLabel);77add(panel);78}79}

2. If a text field holds an integer, what expression do you use to read its contents?
In the preceding section, you saw how to construct text fields. A text field holds a single line of text. To display multiple lines of text, use the JTextArea class.
When constructing a text area, you can specify the number of rows and columns:
final int ROWS = 10;
final int COLUMNS = 30;
JTextArea textArea = new JTextArea(ROWS, COLUMNS);
Note
Use a JTextArea to show multiple lines of text.
Use the setText method to set the text of a text field or text area. The append method adds text to the end of a text area. Use newline characters to separate lines, like this:
textArea.append(account.getBalance() + "
");
If you want to use a text field or text area for display purposes only, call the setEditable method like this
textArea.setEditable(false);
Now the user can no longer edit the contents of the field, but your program can still call setText and append to change it.
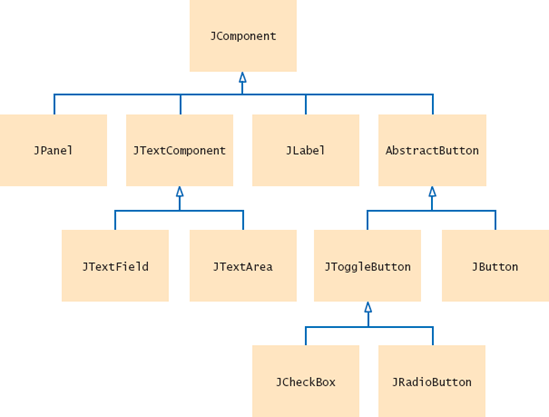
As shown in Figure 2, the JTextField and JTextArea classes are subclasses of the class JTextComponent. The methods setText and setEditable are declared in the JText-Component class and inherited by JTextField and JTextArea. However, the append method is declared in the JTextArea class.
To add scroll bars to a text area, use a JScrollPane, like this:
JTextArea textArea = new JTextArea(ROWS, COLUMNS);
JScrollPane scrollPane = new JScrollPane(textArea);
Note
You can add scroll bars to any component with a JScrollPane.
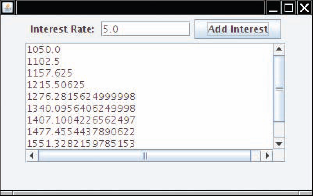
Then add the scroll pane to the panel. Figure 3 shows the result.
The following sample program puts these concepts together. A user can enter numbers into the interest rate text field and then click on the "Add Interest" button). The interest rate is applied, and the updated balance is appended to the text area. The text area has scroll bars and is not editable.
This program is similar to the previous investment viewer program, but it keeps track of all the bank balances, not just the last one.
ch18/textarea/InvestmentFrame.java
1import java.awt.event.ActionEvent;2import java.awt.event.ActionListener;3import javax.swing.JButton;4import javax.swing.JFrame;5import javax.swing.JLabel;6import javax.swing.JPanel;7import javax.swing.JScrollPane;8import javax.swing.JTextArea;9import javax.swing.JTextField;1011/**12A frame that shows the growth of an investment with variable interest.13*/14public class InvestmentFrame extends JFrame15{16private static final int FRAME_WIDTH = 400;17private static final int FRAME_HEIGHT = 250;1819private static final int AREA_ROWS = 10;20private static final int AREA_COLUMNS = 30;21private static final double DEFAULT_RATE = 5;22private static final double INITIAL_BALANCE = 1000;2324private JLabel rateLabel;25private JTextField rateField;26private JButton button;
27private JTextArea resultArea;28private JPanel panel;29private BankAccount account;3031public InvestmentFrame()32{33account = new BankAccount(INITIAL_BALANCE);34resultArea = new JTextArea(AREA_ROWS, AREA_COLUMNS);35resultArea.setEditable(false);3637// Use helper methods38createTextField();39createButton();40createPanel();4142setSize(FRAME_WIDTH, FRAME_HEIGHT);43}4445private void createTextField()46{47rateLabel = new JLabel("Interest Rate: ");4849final int FIELD_WIDTH = 10;50rateField = new JTextField(FIELD_WIDTH);51rateField.setText("" + DEFAULT_RATE);52}5354private void createButton()55{56button = new JButton("Add Interest");5758class AddInterestListener implements ActionListener59{60public void actionPerformed(ActionEvent event)61{62double rate = Double.parseDouble(rateField.getText());63double interest = account.getBalance() * rate / 100;64account.deposit(interest);65resultArea.append(account.getBalance() + " ");66}67}6869ActionListener listener = new AddInterestListener();70button.addActionListener(listener);71}7273private void createPanel()74{75panel = new JPanel();76panel.add(rateLabel);77panel.add(rateField);78panel.add(button);79JScrollPane scrollPane = new JScrollPane(resultArea);80panel.add(scrollPane);81add(panel);82}83}
3. What is the difference between a text field and a text area?
4. Why did the InvestmentFrame program call resultArea.setEditable(false)?
5. How would you modify the InvestmentFrame program if you didn't want to use scroll bars?
Up to now, you have had limited control over the layout of user-interface components. You learned how to add components to a panel. The panel arranged the components from the left to the right. However, in many applications, you need more sophisticated arrangements.
Note
User-interface components are arranged by placing them inside containers.
In Java, you build up user interfaces by adding components into containers such as panels. Each container has its own layout manager, which determines how the components are laid out.
By default, a JPanel uses a flow layout. A flow layout simply arranges its components from left to right and starts a new row when there is no more room in the current row.
Note
Each container has a layout manager that directs the arrangement of its components.
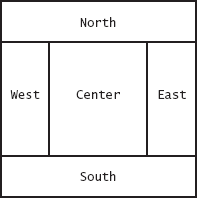
Another commonly used layout manager is the border layout. The border layout groups components into five areas: center, north, west, south, and east (see Figure 4). Not all of the areas need to be occupied.
The border layout is the default layout manager for a frame (or, more technically, the frame's content pane). But you can also use the border layout in a panel:
panel.setLayout(new BorderLayout());
Note
Three useful layout managers are the border layout, flow layout, and grid layout.
Now the panel is controlled by a border layout, not the flow layout. When adding a component, you specify the position, like this:
panel.add(component, BorderLayout.NORTH);
Note
When adding a component to a container with the border layout, specify the NORTH, EAST, SOUTH, WEST, or CENTER position.
The grid layout is a third layout that is sometimes useful. The grid layout arranges components in a grid with a fixed number of rows and columns, resizing each of the components so that they all have the same size. Like the border layout, it also expands each component to fill the entire allotted area. (If that is not desirable, you need to place each component inside a panel.) Figure 5 shows a number pad panel that uses a grid layout. To create a grid layout, you supply the number of rows and columns in the constructor, then add the components, row by row, left to right:
Note
The content pane of a frame has a border layout by default. A panel has a flow layout by default.
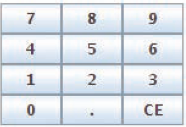
JPanel buttonPanel = new JPanel();
buttonPanel.setLayout(new GridLayout(4, 3));
buttonPanel.add(button7);
buttonPanel.add(button8);
buttonPanel.add(button9);
buttonPanel.add(button4);
...
Sometimes you want to have a tabular arrangement of the components where columns have different sizes or one component spans multiple columns. A more complex layout manager called the grid bag layout can handle these situations. The grid bag layout is quite complex to use, however, and we do not cover it in this book; see, for example, Cay S. Horstmann and Gary Cornell, Core Java 2 Volume 1: Fundamentals,8th edition (Prentice Hall, 2008), for more information. Java 6 introduces a group layout that is designed for use by interactive tools—see Productivity Hint 18.1 on page 757.
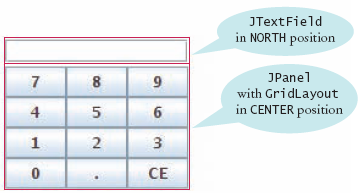
Fortunately, you can create acceptable-looking layouts in nearly all situations by nesting panels. You give each panel an appropriate layout manager. Panels don't have visible borders, so you can use as many panels as you need to organize your components. Figure 6 shows an example. The keypad buttons are contained in a panel with grid layout. That panel is itself contained in a larger panel with border layout. The text field is in the northern position of the larger panel. The following code produces this arrangement:
JPanel keypadPanel = new JPanel();
keypadPanel.setLayout(new BorderLayout());
buttonPanel = new JPanel();
buttonPanel.setLayout(new GridLayout(4, 3));
buttonPanel.add(button7);
buttonPanel.add(button8);
// ...
keypadPanel.add(buttonPanel, BorderLayout.CENTER);
JTextField display = new JTextField();
keypadPanel.add(display, BorderLayout.NORTH);
7. How can you stack three buttons on top of each other?
In the following sections, you will see how to present a finite set of choices to the user. Which Swing component you use depends on whether the choices are mutually exclusive or not, and on the amount of space you have for displaying the choices.
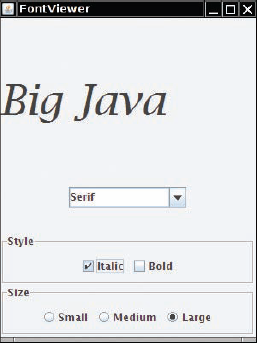
If the choices are mutually exclusive, use a set of radio buttons. In a radio button set, only one button can be selected at a time. When the user selects another button in the same set, the previously selected button is automatically turned off. (These buttons are called radio buttons because they work like the station selector buttons on a car radio: If you select a new station, the old station is automatically deselected.) For example, in Figure 7, the font sizes are mutually exclusive. You can select small, medium, or large, but not a combination of them.
Note
For a small set of mutually exclusive choices, use a group of radio buttons or a combo box.
To create a set of radio buttons, first create each button individually, and then add all buttons of the set to a ButtonGroup object:
JRadioButton smallButton = new JRadioButton("Small");
JRadioButton mediumButton = new JRadioButton("Medium");
JRadioButton largeButton = new JRadioButton("Large");

ButtonGroup group = new ButtonGroup();
group.add(smallButton);
group.add(mediumButton);
group.add(largeButton);
Note
Add radio buttons into a ButtonGroup so that only one button in the group is on at any time.
Note that the button group does not place the buttons close to each other on the container. The purpose of the button group is simply to find out which buttons to turn off when one of them is turned on. It is still your job to arrange the buttons on the screen.
The isSelected method is called to find out whether a button is currently selected or not. For example,
if (largeButton.isSelected()) { size = LARGE_SIZE; }Because users will expect one radio button in a radio button group to be selected, call setSelected(true) on the default radio button before making the enclosing frame visible.
If you have multiple button groups, it is a good idea to group them together visually. It is a good idea to use a panel for each set of radio buttons, but the panels themselves are invisible. You can add a border to a panel to make it visible. In Figure 7, for example, the panels containing the Size radio buttons and Style check boxes have borders.
Note
You can place a border around a panel to group its contents visually.
There are a large number of border types. We will show only a couple of variations and leave it to the border enthusiasts to look up the others in the Swing documentation. The EtchedBorder class yields a border with a three-dimensional, etched effect. You can add a border to any component, but most commonly you apply it to a panel:
JPanel panel = new JPanel();
panel.setBorder(new EtchedBorder());
If you want to add a title to the border (as in Figure 7), you need to construct a TitledBorder. You make a titled border by supplying a basic border and then the title you want. Here is a typical example:
panel.setBorder(new TitledBorder(new EtchedBorder(), "Size"));
A check box is a user-interface component with two states: checked and unchecked. You use a group of check boxes when one selection does not exclude another. For example, the choices for "Bold" and "Italic" in Figure 7 are not exclusive. You can choose either, both, or neither. Therefore, they are implemented as a set of separate check boxes. Radio buttons and check boxes have different visual appearances. Radio buttons are round and have a black dot when selected. Check boxes are square and have a check mark when selected.
You construct a check box by giving the name in the constructor:
JCheckBox italicCheckBox = new JCheckBox("Italic");Note
For a binary choice, use a check box.
Because check box settings do not exclude each other, you do not place a set of check boxes inside a button group.
As with radio buttons, you use the isSelected method to find out whether a check box is currently checked or not.
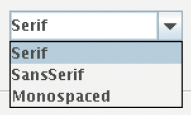
If you have a large number of choices, you don't want to make a set of radio buttons, because that would take up a lot of space. Instead, you can use a combo box. This component is called a combo box because it is a combination of a list and a text field. The text field displays the name of the current selection. When you click on the arrow to the right of the text field of a combo box, a list of selections drops down, and you can choose one of the items in the list (see Figure 8).
Note
For a large set of choices, use a combo box.
If the combo box is editable, you can also type in your own selection. To make a combo box editable, call the setEditable method.
You add strings to a combo box with the addItem method.
JComboBox facenameCombo = new JComboBox();
facenameCombo.addItem("Serif");
facenameCombo.addItem("SansSerif");
...
You get the item that the user has selected by calling the getSelectedItem method. However, because combo boxes can store other objects in addition to strings, the getSelectedItem method has return type Object. Hence you must cast the returned value back to String.
String selectedString = (String) facenameCombo.getSelectedItem();
You can select an item for the user with the setSelectedItem method.
Radio buttons, check boxes, and combo boxes generate an ActionEvent whenever the user selects an item. In the following program, we don't care which component was clicked—all components notify the same listener object. Whenever the user clicks on any one of them, we simply ask each component for its current content, using the isSelected and getSelectedItem methods. We then redraw the text sample with the new font.
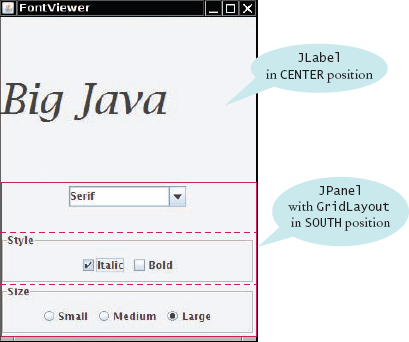
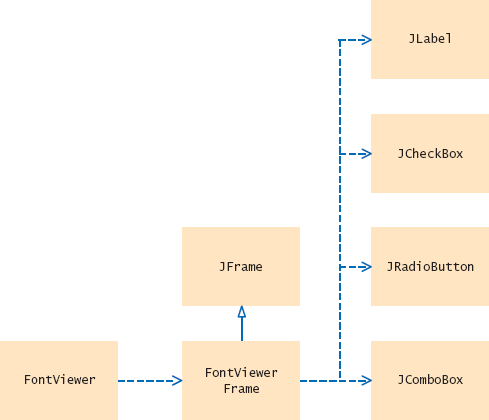
Figure 9 shows how the components are arranged in the frame. Figure 10 shows the relationships between the classes used in the font viewer program.
Note
Radio buttons, check boxes, and combo boxes generate action events, just as buttons do.
ch18/choice/FontViewer.java
1import javax.swing.JFrame;23/**4This program allows the user to view font effects.5*/6public class FontViewer7{8public static void main(String[] args)9{10JFrame frame = new FontViewerFrame();11frame.setDefaultCloseOperation(JFrame.EXIT_ON_CLOSE);12frame.setTitle("FontViewer");13frame.setVisible(true);14}15}
ch18/choice/FontViewerFrame.java
1import java.awt.BorderLayout;2import java.awt.Font;3import java.awt.GridLayout;4import java.awt.event.ActionEvent;5import java.awt.event.ActionListener;6import javax.swing.ButtonGroup;7import javax.swing.JButton;8import javax.swing.JCheckBox;9import javax.swing.JComboBox;10import javax.swing.JFrame;11import javax.swing.JLabel;12import javax.swing.JPanel;13import javax.swing.JRadioButton;14import javax.swing.border.EtchedBorder;15import javax.swing.border.TitledBorder;1617/**18This frame contains a text field and a control panel19to change the font of the text.20*/21public class FontViewerFrame extends JFrame22{23private static final int FRAME_WIDTH = 300;24private static final int FRAME_HEIGHT = 400;2526private JLabel sampleField;27private JCheckBox italicCheckBox;28private JCheckBox boldCheckBox;29private JRadioButton smallButton;30private JRadioButton mediumButton;31private JRadioButton largeButton;32private JComboBox facenameCombo;33private ActionListener listener;3435/**36Constructs the frame.37*/38public FontViewerFrame()39{40// Construct text sample41sampleField = new JLabel("Big Java");42add(sampleField, BorderLayout.CENTER);4344// This listener is shared among all components45class ChoiceListener implements ActionListener46{47public void actionPerformed(ActionEvent event)48{49setSampleFont();50}51}5253listener = new ChoiceListener();5455createControlPanel();56setSampleFont();57setSize(FRAME_WIDTH, FRAME_HEIGHT);58}
5960/**61Creates the control panel to change the font.62*/63public void createControlPanel()64{65JPanel facenamePanel = createComboBox();66JPanel sizeGroupPanel = createCheckBoxes();67JPanel styleGroupPanel = createRadioButtons();6869// Line up component panels7071JPanel controlPanel = new JPanel();72controlPanel.setLayout(new GridLayout(3, 1));73controlPanel.add(facenamePanel);74controlPanel.add(sizeGroupPanel);75controlPanel.add(styleGroupPanel);7677// Add panels to content pane7879add(controlPanel, BorderLayout.SOUTH);80}8182/**83Creates the combo box with the font style choices.84@return the panel containing the combo box85*/86public JPanel createComboBox()87{88facenameCombo = new JComboBox();89facenameCombo.addItem("Serif");90facenameCombo.addItem("SansSerif");91facenameCombo.addItem("Monospaced");92facenameCombo.setEditable(true);93facenameCombo.addActionListener(listener);9495JPanel panel = new JPanel();96panel.add(facenameCombo);97return panel;98}99100/**101Creates the check boxes for selecting bold and italic styles.102@return the panel containing the check boxes103*/104public JPanel createCheckBoxes()105{106italicCheckBox = new JCheckBox("Italic");107italicCheckBox.addActionListener(listener);108109boldCheckBox = new JCheckBox("Bold");110boldCheckBox.addActionListener(listener);111112JPanel panel = new JPanel();113panel.add(italicCheckBox);114panel.add(boldCheckBox);115panel.setBorder(new TitledBorder(new EtchedBorder(), "Style"));116117return panel;
118}119120/**121Creates the radio buttons to select the font size.122@return the panel containing the radio buttons123*/124public JPanel createRadioButtons()125{126smallButton = new JRadioButton("Small");127smallButton.addActionListener(listener);128129mediumButton = new JRadioButton("Medium");130mediumButton.addActionListener(listener);131132largeButton = new JRadioButton("Large");133largeButton.addActionListener(listener);134largeButton.setSelected(true);135136// Add radio buttons to button group137138ButtonGroup group = new ButtonGroup();139group.add(smallButton);140group.add(mediumButton);141group.add(largeButton);142143JPanel panel = new JPanel();144panel.add(smallButton);145panel.add(mediumButton);146panel.add(largeButton);147panel.setBorder(new TitledBorder(new EtchedBorder(), "Size"));148149return panel;150}151152/**153Gets user choice for font name, style, and size154and sets the font of the text sample.155*/156public void setSampleFont()157158// Get font name159String facename160= (String) facenameCombo.getSelectedItem();161162// Get font style163164int style = 0;165if (italicCheckBox.isSelected())166{167style = style + Font.ITALIC;168}169if (boldCheckBox.isSelected())170{171style = style + Font.BOLD;172}173174// Get font size175176int size = 0;
177178final int SMALL_SIZE = 24;179final int MEDIUM_SIZE = 36;180final int LARGE_SIZE = 48;181182if (smallButton.isSelected()) { size = SMALL_SIZE; }183else if (mediumButton.isSelected()) { size = MEDIUM_SIZE; }184else if (largeButton.isSelected()) { size = LARGE_SIZE; }185186// Set font of text field187188sampleField.setFont(new Font(facename, style, size));189sampleField.repaint();190}191}
9. Why do all user-interface components in the FontViewerFrame class share the same listener?
10. Why was the combo box placed inside a panel? What would have happened if it had been added directly to the control panel?
Laying Out a User Interface
A graphical user interface is made up of components such as buttons and text fields. The Swing library uses containers and layout managers to arrange these components. This How To explains how to group components into containers and how to pick the right layout managers.
Step 1 Make a sketch of your desired component layout.
Draw all the buttons, labels, text fields, and borders on a sheet of paper. Graph paper works best.
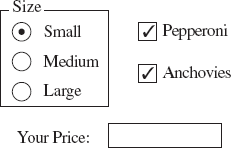
Here is an example—a user interface for ordering pizza. The user interface contains
Three radio buttons
Two check boxes
A label: "Your Price:"
A text field
A border
Step 2 Find groupings of adjacent components with the same layout.
Usually, the component arrangement is complex enough that you need to use several panels, each with its own layout manager. Start by looking at adjacent components that are arranged top to bottom or left to right. If several components are surrounded by a border, they should be grouped together.
Here are the groupings from the pizza user interface:
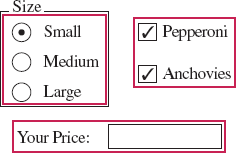
Step 3 Identify layouts for each group.
When components are arranged horizontally, choose a flow layout. When components are arranged vertically, use a grid layout with one column.
In the pizza user interface example, you would choose
A (3, 1) grid layout for the radio buttons
A (2, 1) grid layout for the check boxes
A flow layout for the label and text field
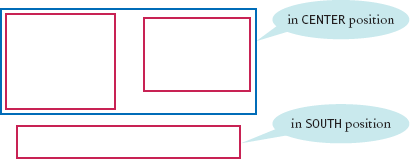
Step 4 Group the groups together.
Look at each group as one blob, and group the blobs together into larger groups, just as you grouped the components in the preceding step. If you note one large blob surrounded by smaller blobs, you can group them together in a border layout.
You may have to repeat the grouping again if you have a very complex user interface. You are done if you have arranged all groups in a single container.
For example, the three component groups of the pizza user interface can be arranged as:
A group containing the first two component groups, placed in the center of a container with a border layout.
The third component group, in the southern area of that container.
In this step, you may run into a couple of complications. The group "blobs" tend to vary in size more than the individual components. If you place them inside a grid layout, the grid layout forces them all to be the same size. Also, you occasionally would like a component from one group to line up with a component from another group, but there is no way for you to communicate that intent to the layout managers.
These problems can be overcome by using more sophisticated layout managers or implementing a custom layout manager. However, those techniques are beyond the scope of this book. Sometimes, you may want to start over with Step 1, using a component layout that is easier to manage. Or you can decide to live with minor imperfections of the layout. Don't worry about achieving the perfect layout—after all, you are learning programming, not user-interface design.
Step 5 Write the code to generate the layout.
This step is straightforward but potentially tedious, especially if you have a large number of components.
Start by constructing the components. Then construct a panel for each component group and set its layout manager if it is not a flow layout (the default for panels). Add a border to the panel if required. Finally, add the components to their panels. Continue in this fashion until you reach the outermost containers, which you add to the frame.
Here is an outline of the code required for the pizza user interface.
JPanel radioButtonPanel = new JPanel();
radioButtonPanel.setLayout(new GridLayout(3, 1));
radioButton.setBorder(new TitledBorder(new EtchedBorder(), "Size"));
radioButtonPanel.add(smallButton);
radioButtonPanel.add(mediumButton);
radioButtonPanel.add(largeButton);

JPanel checkBoxPanel = new JPanel();
checkBoxPanel.setLayout(new GridLayout(2, 1));
checkBoxPanel.add(pepperoniButton());
checkBoxPanel.add(anchoviesButton());

JPanel pricePanel = new JPanel(); // Uses FlowLayout by default
pricePanel.add(new JLabel("Your Price:"));
pricePanel.add(priceTextField);

JPanel centerPanel = new JPanel(); // Uses FlowLayout
centerPanel.add(radioButtonPanel);
centerPanel.add(checkBoxPanel);

// Frame uses BorderLayout by default
add(centerPanel, BorderLayout.CENTER);
add(pricePanel, BorderLayout.SOUTH);
Of course, you also need to add event handlers to the components. See How To 10.1.
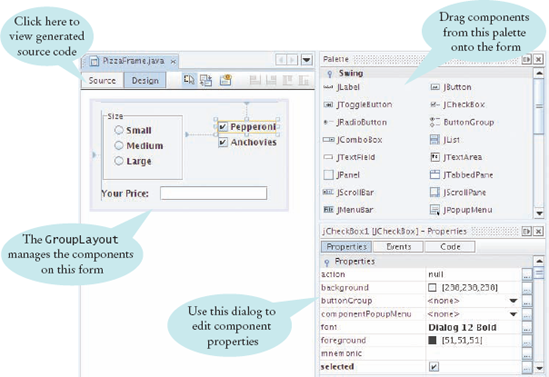
Use a GUI Builder
As you have seen, implementing even a simple graphical user interface in Java is quite tedious. You have to write a lot of code for constructing components, using layout managers, and providing event handlers. Most of the code is boring and repetitive.
A GUI builder takes away much of the tedium. Most GUI builders help you in three ways:
You drag and drop components onto a panel. The GUI builder writes the layout management code for you.
You customize components with a dialog box, setting properties such as fonts, colors, text, and so on. The GUI builder writes the customization code for you.
You provide event handlers by picking the event to process and providing just the code snippet for the listener method. The GUI builder writes the boilerplate code for attaching a listener object.
Java 6 introduced GroupLayout, a powerful layout manager that was specifically designed to be used by GUI builders. The free NetBeans development environment, available from http://netbeans.org, makes use of this layout manager—see Figure 11.
If you need to build a complex user interface, you will find that learning to use a GUI builder is a very worthwhile investment. You will spend less time writing boring code, and you will have more fun designing your user interface and focusing on the functionality of your program.
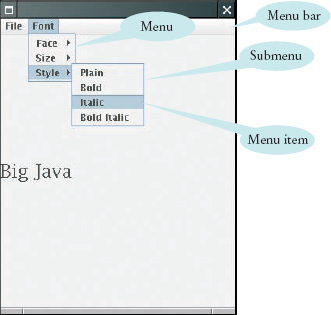
Anyone who has ever used a graphical user interface is familiar with pull-down menus (see Figure 12). In Java it is easy to create these menus.
The container for the top-level menu items is called a menu bar. A menu is a collection of menu items and more menus (submenus). You add menu items and sub-menus with the add method:
JMenuItem fileExitItem = new JMenuItem("Exit");
fileMenu.add(fileExitItem);
Note
A frame contains a menu bar. The menu bar contains menus. A menu contains submenus and menu items.
A menu item has no further submenus. When the user selects a menu item, the menu item sends an action event. Therefore, you want to add a listener to each menu item:
fileExitItem.addActionListener(listener);
You add action listeners only to menu items, not to menus or the menu bar. When the user clicks on a menu name and a submenu opens, no action event is sent.
The following program builds up a small but typical menu and traps the action events from the menu items. To keep the program readable, it is a good idea to use a separate method for each menu or set of related menus. Have a look at the create-FaceItem method, which creates a menu item to change the font face. The same listener class takes care of three cases, with the name parameters varying for each menu item. The same strategy is used for the createSizeItem and createStyleItem methods.
ch18/menu/FontViewer2.java
1import javax.swing.JFrame;23/**4This program uses a menu to display font effects.5*/6public class FontViewer27{8public static void main(String[] args)9{10JFrame frame = new FontViewer2Frame();11frame.setDefaultCloseOperation(JFrame.EXIT_ON_CLOSE);12frame.setVisible(true);13}14}
ch18/menu/FontViewer2Frame.java
1import java.awt.BorderLayout;2import java.awt.Font;3import java.awt.GridLayout;4import java.awt.event.ActionEvent;5import java.awt.event.ActionListener;6import javax.swing.ButtonGroup;7import javax.swing.JButton;8import javax.swing.JCheckBox;9import javax.swing.JComboBox;10import javax.swing.JFrame;
11import javax.swing.JLabel;12import javax.swing.JMenu;13import javax.swing.JMenuBar;14import javax.swing.JMenuItem;15import javax.swing.JPanel;16import javax.swing.JRadioButton;17import javax.swing.border.EtchedBorder;18import javax.swing.border.TitledBorder;1920/**21This frame has a menu with commands to change the font22of a text sample.23*/24public class FontViewer2Frame extends JFrame25{26private static final int FRAME_WIDTH = 300;27private static final int FRAME_HEIGHT = 400;2829private JLabel sampleField;30private String facename;31private int fontstyle;32private int fontsize;3334/**35Constructs the frame.36*/37public FontViewer2Frame()38{39// Construct text sample40sampleField = new JLabel("Big Java");41add(sampleField, BorderLayout.CENTER);4243// Construct menu44JMenuBar menuBar = new JMenuBar();45setJMenuBar(menuBar);46menuBar.add(createFileMenu());47menuBar.add(createFontMenu());4849facename = "Serif";50fontsize = 24;51fontstyle = Font.PLAIN;5253setSampleFont();54setSize(FRAME_WIDTH, FRAME_HEIGHT);55}5657/**58Creates the File menu.59@return the menu60*/61public JMenu createFileMenu()6263{64JMenu menu = new JMenu("File");65menu.add(createFileExitItem());66return menu;67}68
69/**70Creates the File->Exit menu item and sets its action listener.71@return the menu item72*/73public JMenuItem createFileExitItem()74{75JMenuItem item = new JMenuItem("Exit");76class MenuItemListener implements ActionListener77{78public void actionPerformed(ActionEvent event)79{80System.exit(0);81}82}83ActionListener listener = new MenuItemListener();84item.addActionListener(listener);85return item;86}8788/**89Creates the Font submenu.90@return the menu91*/92public JMenu createFontMenu()93{94JMenu menu = new JMenu("Font");95menu.add(createFaceMenu());96menu.add(createSizeMenu());97menu.add(createStyleMenu());98return menu;99}100101/**102Creates the Face submenu.103@return the menu104*/105public JMenu createFaceMenu()106{107JMenu menu = new JMenu("Face");108menu.add(createFaceItem("Serif"));109menu.add(createFaceItem("SansSerif"));110menu.add(createFaceItem("Monospaced"));111return menu;112}113114/**115Creates the Size submenu.116@return the menu117*/118public JMenu createSizeMenu()119{120JMenu menu = new JMenu("Size");121menu.add(createSizeItem("Smaller", −1));122menu.add(createSizeItem("Larger", 1));123return menu;124}125
126/**127Creates the Style submenu.128@return the menu129*/130public JMenu createStyleMenu()131{132JMenu menu = new JMenu("Style");133menu.add(createStyleItem("Plain", Font.PLAIN));134menu.add(createStyleItem("Bold", Font.BOLD));135menu.add(createStyleItem("Italic", Font.ITALIC));136menu.add(createStyleItem("Bold Italic", Font.BOLD137+ Font.ITALIC));138return menu;139}140141/**142Creates a menu item to change the font face and set its action listener.143@param name the name of the font face144@return the menu item145*/146public JMenuItem createFaceItem(final String name)147{148JMenuItem item = new JMenuItem(name);149class MenuItemListener implements ActionListener150{151public void actionPerformed(ActionEvent event)152{153facename = name;154setSampleFont();155}156}157ActionListener listener = new MenuItemListener();158item.addActionListener(listener);159return item;160}161162/**163Creates a menu item to change the font size164and set its action listener.165@param name the name of the menu item166@param ds the amount by which to change the size167@return the menu item168*/169public JMenuItem createSizeItem(String name, final int ds)170{171JMenuItem item = new JMenuItem(name);172class MenuItemListener implements ActionListener173{174public void actionPerformed(ActionEvent event)175{176fontsize = fontsize + ds;177setSampleFont();178}179}180ActionListener listener = new MenuItemListener();181item.addActionListener(listener);182return item;183}184
185/**186Creates a menu item to change the font style187and set its action listener.188@param name the name of the menu item189@param style the new font style190@return the menu item191*/192public JMenuItem createStyleItem(String name, final int style)193{194JMenuItem item = new JMenuItem(name);195class MenuItemListener implements ActionListener196{197public void actionPerformed(ActionEvent event)198{199fontstyle = style;200setSampleFont();201}202}203ActionListener listener = new MenuItemListener();204item.addActionListener(listener);205return item;206}207208/**209Sets the font of the text sample.210*/211public void setSampleFont()212{213Font f = new Font(facename, fontstyle, fontsize);214sampleField.setFont(f);215sampleField.repaint();216}217}
12. Why is the name parameter in the createFaceItem method declared as final?
In the preceding sections, you saw the basic properties of the most common user-interface components. We purposefully omitted many options and variations to simplify the discussion. You can go a long way by using only the simplest properties of these components. If you want to implement a more sophisticated effect, you can look inside the Swing documentation. You will probably find the documentation quite intimidating at first glance, though. The purpose of this section is to show you how you can use the documentation to your advantage without becoming overwhelmed.
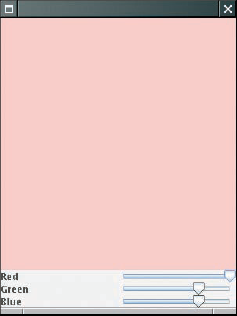
As an example, consider a program for mixing colors by specifying the red, green, and blue values. How can you specify the colors? Of course, you could supply three text fields, but sliders would be more convenient for users of your program (see Figure 13).
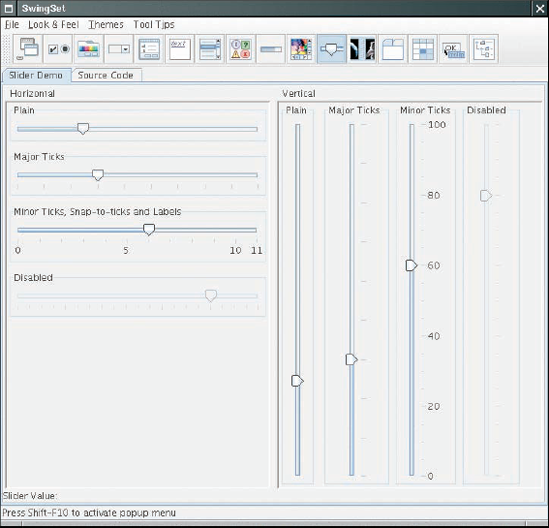
The Swing user-interface toolkit has a large set of user-interface components. How do you know if there is a slider? You can buy a book that illustrates all Swing components. Or you can run the sample application included in the Java Development Kit that shows off all Swing components (see Figure 14). Or you can look at the names of all of the classes that start with J and decide that JSlider may be a good candidate.
Note
You should learn to navigate the API documentation to find out more about user-interface components.
Next, you need to ask yourself a few questions:
How do I construct a
JSlider?How can I get notified when the user has moved it?
How can I tell to which value the user has set it?
When you look at the documentation of the JSlider class, you will probably not be happy. There are over 50 methods in the JSlider class and over 250 inherited methods, and some of the method descriptions look downright scary, such as the one in Figure 15. Apparently some folks out there are concerned about the valueIs-Adjusting property, whatever that may be, and the designers of this class felt it necessary to supply a method to tweak that property. Until you too feel that need, your best bet is to ignore this method. As the author of an introductory book, it pains me to tell you to ignore certain facts. But the truth of the matter is that the Java library is so large and complex that nobody understands it in its entirety, not even the designers of Java themselves. You need to develop the ability to separate fundamental concepts from ephemeral minutiae. For example, it is important that you understand the concept of event handling. Once you understand the concept, you can ask the question, "What event does the slider send when the user moves it?" But it is not important that you memorize how to set tick marks or that you know how to implement a slider with a custom look and feel.
Let us go back to our fundamental questions. In Java 6, there are six constructors for the JSlider class. You want to learn about one or two of them. You must strike a balance somewhere between the trivial and the bizarre. Consider
public JSlider()
     Creates a horizontal slider with the range 0 to 100 and an initial value of 50.
Maybe that is good enough for now, but what if you want another range or initial value? It seems too limited.
On the other side of the spectrum, there is
public JSlider(BoundedRangeModel brm)
     Creates a horizontal slider using the specified BoundedRangeModel.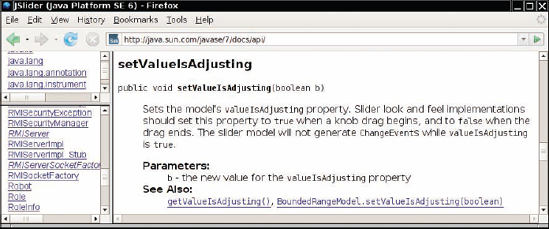
Whoa! What is that? You can click on the BoundedRangeModel link to get a long explanation of this class. This appears to be some internal mechanism for the Swing implementors. Let's try to avoid this constructor if we can. Looking further, we find
public JSlider(int min, int max, int value)
     Creates a horizontal slider using the specified min, max, and value.
This sounds general enough to be useful and simple enough to be usable. You might want to stash away the fact that you can have vertical sliders as well.
Next, you want to know what events a slider generates. There is no addAction-Listener method. That makes sense. Adjusting a slider seems different from clicking a button, and Swing uses a different event type for these events. There is a method
public void addChangeListener(ChangeListener l)
Click on the ChangeListener link to find out more about this interface. It has a single method
void stateChanged(ChangeEvent e)
Apparently, that method is called whenever the user moves the slider. What is a ChangeEvent? Once again, click on the link, to find out that this event class has nomethods of its own, but it inherits the getSource method from its superclass Event-Object. The getSource method tells us which component generated this event, but we don't need that information—we know that the event came from the slider.
Now let's make a plan: Add a change event listener to each slider. When the slider is changed, the stateChanged method is called. Find out the new value of the slider. Recompute the color value and repaint the color panel. That way, the color panel is continually repainted as the user moves one of the sliders.
To compute the color value, you will still need to get the current value of the slider. Look at all the methods that start with get. Sure enough, you find
public int getValue()
     Returns the slider's value.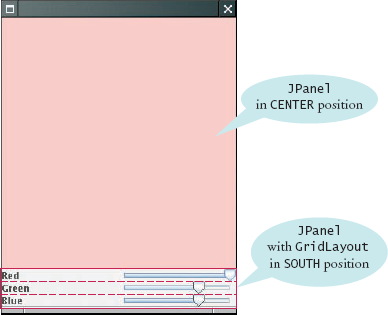
Now you know everything you need to write the program. The program uses one new Swing component and one event listener of a new type. After having mastered the basics, you may want to explore the capabilities of the component further, for example by adding tick marks—see Exercise P18.17.
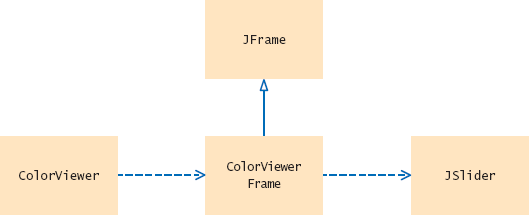
Figure 16 shows how the components are arranged in the frame. Figure 17 shows the UML diagram.
ch18/slider/ColorViewer.java
1import javax.swing.JFrame;23public class ColorViewer4{5public static void main(String[] args)6{7ColorViewerFrame frame = new ColorViewerFrame();8frame.setDefaultCloseOperation(JFrame.EXIT_ON_CLOSE);9frame.setVisible(true);10}11}
ch18/slider/ColorViewerFrame.java
1import java.awt.BorderLayout;2import java.awt.Color;3import java.awt.GridLayout;4import javax.swing.JFrame;5import javax.swing.JLabel;6import javax.swing.JPanel;7import javax.swing.JSlider;8import javax.swing.event.ChangeListener;9import javax.swing.event.ChangeEvent;1011public class ColorViewerFrame extends JFrame12{13private static final int FRAME_WIDTH = 300;14private static final int FRAME_HEIGHT = 400;1516private JPanel colorPanel;17private JSlider redSlider;18private JSlider greenSlider;19private JSlider blueSlider;
2021public ColorViewerFrame()22{23colorPanel = new JPanel();2425add(colorPanel, BorderLayout.CENTER);26createControlPanel();27setSampleColor();28setSize(FRAME_WIDTH, FRAME_HEIGHT);29}3031public void createControlPanel()32{33class ColorListener implements ChangeListener34{35public void stateChanged(ChangeEvent event)36{37setSampleColor();38}39}4041ChangeListener listener = new ColorListener();4243redSlider = new JSlider(0, 255, 255);44redSlider.addChangeListener(listener);4546greenSlider = new JSlider(0, 255, 175);47greenSlider.addChangeListener(listener);4849blueSlider = new JSlider(0, 255, 175);50blueSlider.addChangeListener(listener);5152JPanel controlPanel = new JPanel();53controlPanel.setLayout(new GridLayout(3, 2));5455controlPanel.add(new JLabel("Red"));56controlPanel.add(redSlider);5758controlPanel.add(new JLabel("Green"));59controlPanel.add(greenSlider);6061controlPanel.add(new JLabel("Blue"));62controlPanel.add(blueSlider);6364add(controlPanel, BorderLayout.SOUTH);65}6667/**68Reads the slider values and sets the panel to69the selected color.70*/71public void setSampleColor()72{73// Read slider values7475int red = redSlider.getValue();76int green = greenSlider.getValue();77int blue = blueSlider.getValue();78
79// Set panel background to selected color8081colorPanel.setBackground(new Color(red, green, blue));82colorPanel.repaint();83}84}
14. Why does a slider emit change events and not action events?
Use text fields for reading text input.
Use
JTextFieldcomponents to provide space for user input. Place aJLabelnext to each text field.
Use text areas for reading and displaying multi-line text.
Use a
JTextAreato show multiple lines of text.You can add scroll bars to any component with a
JScrollPane.
Learn how to arrange multiple components in a container.
User-interface components are arranged by placing them inside containers. Containers can be placed inside larger containers.
Each container has a layout manager that directs the arrangement of its components.
When adding a component to a container with the border layout, specify the
NORTH, EAST, SOUTH, WEST, orCENTERposition.The content pane of a frame has a border layout by default. A panel has a flow layout by default.
Select among the Swing components for presenting choices to the user.
For a small set of mutually exclusive choices, use a group of radio buttons or a combo box.
Add radio buttons into a
ButtonGroupso that only one button in the group is on at any time.You can place a border around a panel to group its contents visually.
For a binary choice, use a check box.
For a large set of choices, use a combo box.
Radio buttons, check boxes, and combo boxes generate action events, just as buttons do.
Implement menus in a Swing program.
A frame contains a menu bar. The menu bar contains menus. A menu contains submenus and menu items.
Menu items generate action events.
You should learn to navigate the API documentation to find out more about user-interface components.
java.awt.BorderLayout                     javax.swing.JMenuBar
   CENTER                                    add
   EAST                                   javax.swing.JMenuItem
   NORTH                                  javax.swing.JRadioButton
   SOUTH                                  javax.swing.JScrollPane
   WEST                                   javax.swing.JSlider
java.awt.Container                           addChangeListener
   setLayout                                 getValue
java.awt.FlowLayout                       javax.swing.JTextArea
java.awt.Font                                 append
java.awt.GridLayout                       javax.swing.JTextField
javax.swing.AbstractButton                javax.swing.border.EtchedBorder
   isSelected                             javax.swing.border.TitledBorder
   setSelected                            javax.swing.event.ChangeEvent
javax.swing.ButtonGroup                   javax.swing.event.ChangeListener
   add                                       stateChanged
javax.swing.ImageIcon                     javax.swing.text.JTextComponent
javax.swing.JCheckBox                        getText
javax.swing.JComboBox                        isEditable
   addItem                                   setEditable
   getSelectedItem                           setText
   isEditable
   setEditable
javax.swing.JComponent
   setBorder
   setFont
javax.swing.JFrame
   setJMenuBar
javax.swing.JMenu
   add
R18.1 What is the difference between a label, a text field, and a text area?
R18.2 Name a method that is declared in JTextArea, a method that JTextArea inherits from JTextComponent, and a method that JTextArea inherits from JComponent.
R18.3 Can you use a flow layout for the components in a frame? If yes, how?
R18.4 What is the advantage of a layout manager over telling the container "place this component at position (x, y)"?
R18.5 What happens when you place a single button into the CENTER area of a container that uses a border layout? Try it out, by writing a small sample program, if you aren't sure of the answer.
R18.6 What happens if you place multiple buttons directly into the SOUTH area, without using a panel? Try it out, by writing a small sample program, if you aren't sure of the answer.
R18.7 What happens when you add a button to a container that uses a border layout and omit the position? Try it out and explain.
R18.8 What happens when you try to add a button to another button? Try it out and explain.
R18.9 The ColorViewerFrame uses a grid layout manager. Explain a drawback of the grid that is apparent from Figure 16 on page 767. What could you do to overcome this drawback?
R18.10 What is the difference between the grid layout and the grid bag layout?
R18.11 Can you add icons to check boxes, radio buttons, and combo boxes? Browse the Java documentation to find out. Then write a small test program to verify your findings.
R18.12 What is the difference between radio buttons and check boxes?
R18.13 Why do you need a button group for radio buttons but not for check boxes?
R18.14 What is the difference between a menu bar, a menu, and a menu item?
R18.15 When browsing through the Java documentation for more information about sliders, we ignored the JSlider constructor with no parameters. Why? Would it have worked in our sample program?
R18.16 How do you construct a vertical slider? Consult the Swing documentation for an answer.
R18.17 Why doesn't a JComboBox send out change events?
R18.18 What component would you use to show a set of choices, just as in a combo box, but so that several items are visible at the same time? Run the Swing demo application or look at a book with Swing example programs to find the answer.
R18.19 How many Swing user-interface components are there? Look at the Java documentation to get an approximate answer.
R18.20 How many methods does the JProgressBar component have? Be sure to count inherited methods. Look at the Java documentation.
P18.1 Write a graphical application front end for a bank account class. Supply text fields and buttons for depositing and withdrawing money, and for displaying the current balance in a label.
P18.2 Write a graphical application front end for an Earthquake class. Supply a text field and button for entering the strength of the earthquake. Display the earthquake description in a label.
P18.3 Write a graphical application front end for a DataSet class. Supply text fields and buttons for adding floating-point values, and display the current minimum, maximum, and average in a label.
P18.4 Write an application with three labeled text fields, one each for the initial amount of a savings account, the annual interest rate, and the number of years. Add a button "Calculate" and a read-only text area to display the result, namely, the balance of the savings account after the end of each year.
P18.5 In the application from Exercise P18.4, replace the text area with a bar chart that shows the balance after the end of each year.
P18.6 Write a program that contains a text field, a button "Add Value", and a component that draws a bar chart of the numbers that a user typed into the text field.
P18.7 Write a program that draws a clock face with a time that the user enters in two text fields (one for the hours, one for the minutes).
Hint: You need to determine the angles of the hour hand and the minute hand. The angle of the minute hand is easy: The minute hand travels 360 degrees in 60 minutes. The angle of the hour hand is harder; it travels 360 degrees in 12 × 60 minutes.
P18.8 Write an application with three buttons labeled "Red", "Green", and "Blue" that changes the background color of a panel in the center of the frame to red, green, or blue.
P18.9 Add icons to the buttons of Exercise P18.8.
P18.10 Write a calculator application. Use a grid layout to arrange buttons for the digits and for the + – × ÷ operations. Add a text field to display the result.
P18.11 Write an application with three radio buttons labeled "Red", "Green", and "Blue" that changes the background color of a panel in the center of the frame to red, green, or blue.
P18.12 Write an application with three check boxes labeled "Red", "Green", and "Blue" that adds a red, green, or blue component to the background color of a panel in the center of the frame. This application can display a total of eight color combinations.
P18.13 Write an application with a combo box containing three items labeled "Red", "Green", and "Blue" that changes the background color of a panel in the center of the frame to red, green, or blue.
P18.14 Write an application with a Color menu and menu items labeled "Red", "Green", and "Blue" that changes the background color of a panel in the center of the frame to red, green, or blue.
P18.15 Write a program that displays a number of rectangles at random positions. Supply buttons "Fewer" and "More" that generate fewer or more random rectangles. Each time the user clicks on "Fewer", the count should be halved. Each time the user clicks on "More", the count should be doubled.
P18.16 Modify the program of Exercise P18.15 to replace the buttons with a slider to generate fewer or more random rectangles.
P18.17 In the slider test program, add a set of tick marks to each slider that show the exact slider position.
P18.18 Enhance the font viewer program to allow the user to select different fonts. Research the API documentation to find out how to find the available fonts on the user's system.
Project 18.1 Write a program that lets users design charts such as the following:
Use appropriate components to ask for the length, label, and color, then apply them when the user clicks an "Add Item" button. Allow the user to switch between bar charts and pie charts.
Project 18.2 Write a program that displays a scrolling message in a panel. Use a timer for the scrolling effect. In the timer's action listener, move the starting position of the message and repaint. When the message has left the window, reset the starting position to the other corner. Provide a user interface to customize the message text, font, foreground and background colors, and the scrolling speed and direction.
Then the text field is not labeled, and the user will not know its purpose.
Integer.parseInt(textField.getText())A text field holds a single line of text; a text area holds multiple lines.
The text area is intended to display the program output. It does not collect user input.
Don't construct a
JScrollPanebut add theresultAreaobject directly to the frame.First add them to a panel, then add the panel to the north end of a frame.
Place them inside a panel with a
GridLayoutthat has three rows and one column.If you have many options, a set of radio buttons takes up a large area. A combo box can show many options without using up much space. But the user cannot see the options as easily.
When any of the component settings is changed, the program simply queries all of them and updates the label.
To keep it from growing too large. It would have grown to the same width and height as the two panels below it.
When you open a menu, you have not yet made a selection. Only
JMenuItemobjects correspond to selections.The parameter variable is accessed in a method of an inner class.
JColorChooser.Action events describe one-time changes, such as button clicks. Change events describe continuous changes.