
Over the past couple of years, the adoption of cloud computing has really taken off with Google, Amazon, and a host of other providers entering the market. Microsoft's approach mirrors their own approach to desktop, mobile, and server computing, in so far as they are offering a development platform on top of which both ISVs and Microsoft itself can build great software. Without going into a formal definition of Cloud Computing, it is important to recognize that you might choose to run your application in the cloud for a number of reasons. These include the need for high availability, the ability to scale to meet the demand for your application, and of course, cost reduction.
This chapter is broken into three sections that cover the Windows Azure Platform, SQL Azure, and the AppFabric. The Windows Azure Platform hosts your web application, allowing you to dynamically vary the number of concurrent instances running. It also provides storage services in the form of tables, blobs, and queues. SQL Azure provides a true database service hosted in the cloud. Finally, you can use the AppFabric to authenticate users, control access to your application and services, and simplify the process of exposing services from within your organization.
As with most Microsoft technologies, getting started with the Windows Azure platform is as easy as creating a new application, building it, and then running it. You will notice that there is a new node in the New Project dialog entitled Cloud Service, which has a single project template, also called Cloud Service, as shown in Figure 25-1.

After selecting the Cloud Service project template you are prompted to add one or more Roles to your application. An Azure project can be broken into different Roles based on the type of work they are going to do and whether they accept user input. Simply put, Web Roles can accept user input via an inbound connection (for example, http on port 80), whereas Worker Roles cannot. A typical scenario would consist of a Web Role that is used to accept data. This may be a web site or a web service of some description. The Web Role would hand off the data, for example, via a queue, to a Worker Role, which would then carry out any processing that is to be done. This separation means that the two tiers can be scaled out independently, improving the elasticity of the application.
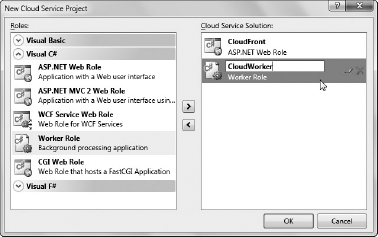
In Figure 25-2, both an ASP.NET Web Role and a Worker Role have been added to the cloud services solution by selecting the role and clicking the right arrow button. Clicking the edit symbol on the selected role allows you to rename the role before clicking OK to complete the creation of your application.
As you can see in Figure 25-3, the application created consists of a project for each role selected (CloudFront and CloudWorker, respectively) and an additional project, FirstCloudApplication, that defines the list of roles and other information about your Azure application.
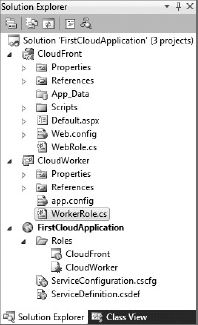
The CloudFront project is essentially just an ASP.NET web application project. In fact, if you right-click this project and select Set as Startup Project you can run this project as with any normal ASP.NET project. On the other hand, the CloudWorker project is simply a class library with a single class, WorkerRole, which contains the entry point for the worker.
To run your Azure application, make sure the FirstCloudApplication project is set as the Startup Project and then press F5 to start debugging. If this is your first time running an Azure application you will notice a dialog appears that initializes the Development Storage. This process takes a minute or two to complete; once done you will notice that two icons have been added to the Windows taskbar. The first allows you to control the Development Storage services, a set of three local services that mirror the table, blob, and queue storage available in the Azure platform. The second allows you to monitor the Development Fabric, a local replica of the Azure hosting environment in which you can run, debug, and test your application.
After the Development Storage has been initialized you should notice that the Default.aspx page of the CloudFront project launches within the browser. Although you will only see a single browser instance, in fact, multiple instances of the web role are all running in what's called the Development Fabric.
In the FirstCloudApplication project are two files that define attributes about your Azure application. The first, ServiceDefinition.csdef, defines the structure and attributes of the roles that make up your application. For example, if one of your roles needs to write to the file system you can stipulate a LocalStorage property, giving the role restricted access to a small amount of disk space in which to read and write temporary files. This file also defines any settings that the roles will require at run time. Defining settings is a great way to make your roles more adaptable at run time without having to rebuild and publish them.
The second file is the ServiceConfiguration.cscfg file, which defines the run time configuration of the roles. This includes the number of instances of each role that should be running, as well as any settings that you have defined in the ServiceDefinition file. If you modify values in this configuration file, for example, changing the count attribute of the Instances element to 4 for both roles, and re-run your application, it will run with the new configuration values in the local Development Fabric.
If you right-click the Development Fabric icon in the Windows taskbar and select Show Development Fabric UI, you will see a hierarchical representation of the running applications within the Development Fabric, as shown in Figure 25-4. As you drill down into the deployments you can see the FirstCloudApplication and then the two roles, CloudFront and CloudWorker.
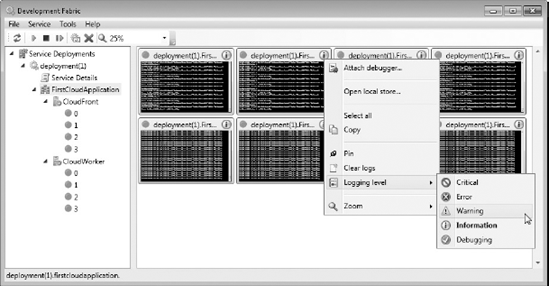
Within each of the roles you can see the number of running (green dot) instances, which in Figure 25-4 is 4. In the right pane you can see the log output for each of the running instances. Clicking the title bar on any of the instances toggles that instance to display in the full pane. The icon in the top-right corner of each instance indicates the logging level. You can adjust this by right-clicking the title and selecting the desired value from the Logging Level menu item.
So far you have a web role with no content and a worker role that doesn't do anything. You can add content to the web role by simply adding controls to the Default.aspx page in the same way that you would for a normal web application. Start by adding a textbox called JobDetailsText and a button called SubmitJob. Double-click the button to bring up the code-behind file.
You can pass data between web and worker roles by writing to table (structured data), blob (single binary objects), or queue (messages) storage. You work with this storage within the Azure platform via its REST interface. However, as .NET developers this is not a pleasant or efficient coding experience. Luckily, the Azure team has put together a wrapper for this functionality that makes it easy for your application to use Windows Azure storage. If you look at the references for both the Web and Worker Role projects, you will see a reference for Microsoft.WindowsAzure.Storage.dll, which contains the wrapper classes and methods that you can use from your application.
In the code-behind file for the Default.aspx page, enter the following code, which obtains a queue reference and then adds a simple message. Note that you may need to add using statements to your code file where necessary.
- C#
protected void SubmitJob_Click(object sender, EventArgs e){
    // read account configuration settings
    var storageAccount = CloudStorageAccount.
                       FromConfigurationSetting("DataConnectionString");
// create queue to communicate with worker role var queueStorage = storageAccount.CreateCloudQueueClient(); var queue = queueStorage.GetQueueReference("sample"); queue.CreateIfNotExist(); queue.AddMessage(new CloudQueueMessage(this.JobDetailsText.Text)); }
- VB
Protected Sub SubmitJob_Click(ByVal sender As Object,
                              ByVal e As EventArgs) Handles SubmitJob.Click
    ' read account configuration settings
    Dim storageAccount = CloudStorageAccount.
                      FromConfigurationSetting("DataConnectionString")

    ' create queue to communicate with worker role
    Dim queueStorage = storageAccount.CreateCloudQueueClient()
    Dim queue = queueStorage.GetQueueReference("sample")
    queue.CreateIfNotExist()
    queue.AddMessage(New CloudQueueMessage(Me.JobDetailsText.Text))
End Sub
This code takes the value supplied in the JobDetailsText textbox and adds it to the queue, wrapped in as a message.
You also need to update the worker role to pop messages off the queue and carry out the appropriate actions. The following code retrieves the next message on the queue, and simply writes the response out to the log, before deleting the message off the queue. If you don't delete the message from the queue it is pushed back onto the queue after a configurable timeout, so as to ensure all messages are handled at least once even if a worker role dies mid-processing.
- C#
private CloudQueue queue;
public override bool OnStart(){
    DiagnosticMonitor.Start("DiagnosticsConnectionString");

    Microsoft.WindowsAzure.CloudStorageAccount.
                SetConfigurationSettingPublisher((configName, configSetter) =>{
            configSetter(Microsoft.WindowsAzure.ServiceRuntime.RoleEnvironment.
                 GetConfigurationSettingValue(configName));
                });

    Trace.TraceInformation("Worker entry point called");

    // read account configuration settings
    var storageAccount = CloudStorageAccount.
                      FromConfigurationSetting("DataConnectionString");
// create queue to communicate with web role var queueStorage = storageAccount.CreateCloudQueueClient(); var queue = queueStorage.GetQueueReference("sample"); queue.CreateIfNotExist(); return base.OnStart(); } public override void Run(){ Trace.TraceInformation("CloudWorker entry point called"); while (true){ try{ // Pop the next message off the queue CloudQueueMessage msg = queue.GetMessage(); if (msg != null){ // Parse the message contents as a job detail string jd = msg.AsString; Trace.TraceInformation("Processed {0}", jd); // Delete the message from the queue queue.DeleteMessage(msg); } else{ Thread.Sleep(10000); } Trace.TraceInformation("Working"); } catch (Exception ex){ Trace.TraceError(ex.Message); } } }- VB
Private queue As CloudQueue
Public Overrides Function OnStart() As Boolean
    DiagnosticMonitor.Start("DiagnosticsConnectionString")

    CloudStorageAccount.SetConfigurationSettingPublisher(
               Function(configName, configSetter)
                     configSetter(RoleEnvironment.
                         GetConfigurationSettingValue(configName)))
    Trace.TraceInformation("Worker entry point called")

    ' read account configuration settings
    Dim storageAccount = CloudStorageAccount.
                     FromConfigurationSetting("DataConnectionString")
    ' create queue to communicate with web role
    Dim queueStorage = storageAccount.CreateCloudQueueClient()
    queue = queueStorage.GetQueueReference("sample")
    queue.CreateIfNotExist()
    Return MyBase.OnStart()
End Function
Public Overrides Sub Run() Trace.TraceInformation("CloudWorker entry point called.") Do While (True) Try ' Pop the next message off the queue Dim msg As CloudQueueMessage = queue.GetMessage() If (msg IsNot Nothing) Then ' Parse the message contents as a job detail Dim jd As String = msg.AsString Trace.TraceInformation("Processed {0}", jd) ' Delete the message from the queue queue.DeleteMessage(msg) Else Thread.Sleep(10000) End If Trace.TraceInformation("Working") Catch ex As StorageClientException Trace.TraceError(ex.Message) End Try Loop End Function
You will notice that this code overrides two methods, OnStart and Run. The former is used to load configuration values and set up local variables for working with Windows Azure storage, whereas the Run method contains an infinite while loop that continues to process messages off the queue.
Before you can run your modified roles you need to specify the location of the queue storage that you are going to be using. Though this will eventually be an Azure storage account, during development you need to specify the details of the local Development Storage. You do this in the ServiceConfiguration file:
<?xml version="1.0"?>
<ServiceConfiguration serviceName="FirstCloudApplication"
xmlsn="http://schemas.microsoft.com/ServiceHosting/2008/10/ServiceConfiguration">
<Role name="CloudFront">
<Instances count="2" />
<ConfigurationSettings>
<Setting name="DataConnectionString" value="UseDevelopmentStorage=true" />
<Setting name="DiagnosticsConnectionString" value="UseDevelopmentStorage=true" />
<!-- <Setting name="DeploymentConnectionString" value="DefaultEndpointsProtocol=
https;AccountName=[YOUR_ACCOUNT_NAME];AccountKey=[YOUR_ACCOUNT_KEY]" /> -->
</ConfigurationSettings>
</Role>
<Role name="CloudWorker">
<Instances count="2" />
<ConfigurationSettings>
<Setting name="DataConnectionString" value="UseDevelopmentStorage=true" />
<Setting name="DiagnosticsConnectionString" value="UseDevelopmentStorage=true" />
</ConfigurationSettings>
</Role>
</ServiceConfiguration>
You will notice that for both the CloudWorker and CloudFront roles, settings for DataConnectionString and DiagnosticsConnectionString have been defined. In this case, the value has been set to use the development storage account. When you go to deploy to Windows Azure, you will need to replace this with a connection string that includes the account name and key, in the format illustrated by the DeploymentConnectionString. Before these values will be accessible to your roles you also need to update the ServiceDefinition file to indicate which settings are defined for each role:
<?xml version="1.0" encoding="utf-8"?>
<ServiceDefinition name="FirstCloudApplication"
xmlsn="http://schemas.microsoft.com/ServiceHosting/2008/10/ServiceDefinition">
<WebRole name="CloudFront" enableNativeCodeExecution="false">
<InputEndpoints>
<!-- Must use port 80 for http and port 443 for https when running in the cloud -->
<InputEndpoint name="HttpIn" protocol="http" port="80" />
</InputEndpoints>
<ConfigurationSettings>
<Setting name="DataConnectionString" />
<Setting name="DiagnosticsConnectionString" />
</ConfigurationSettings>
</WebRole>
<WorkerRole name="CloudWorker" enableNativeCodeExecution="false">
<ConfigurationSettings>
<Setting name="DataConnectionString" />
<Setting name="DiagnosticsConnectionString" />
</ConfigurationSettings>
</WorkerRole>
</ServiceDefinition>
With these changes, try running your Azure application and noting that when you hit the Submit button you will see a "Processed" message appear in one of the running instances of the worker role in the Development Fabric UI.
Once you have built your Azure application using the Development Fabric and Development Storage, you will want to deploy it to the Windows Azure Platform. Before doing so you will need to provision your Windows Azure account with both a hosting and a storage service. Start by going to http://www.azure.com and signing in using your Live Id to your Windows Azure account. After logging in, click on the "Go to the Windows Azure Developer portal" link. This opens the Windows Azure portal, which looks similar to Figure 25-5.
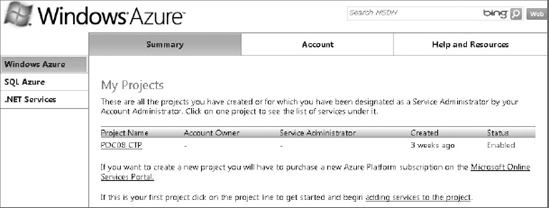
Click the project name, followed by the New Service button, and then select the type of service you want to add. The FirstCloudApplication requires both hosting and storage so you will need to add one of each. Once you have added a Storage Account service you should see a configuration screen similar to Figure 25-6.
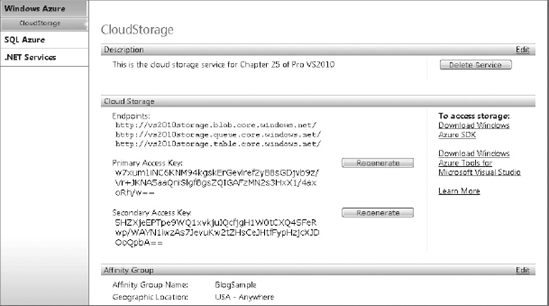
You will need to copy the account information and storage endpoints across into your ServiceConfiguration file. Once you have done this you can again run your Azure application. This time it will still run within your local Development Fabric but it will use the Azure storage instead of the Development Storage. This is a good test to ensure your application will deploy correctly to the cloud.
Once you have set up your hosting service account you will see a screen similar to Figure 25-7.
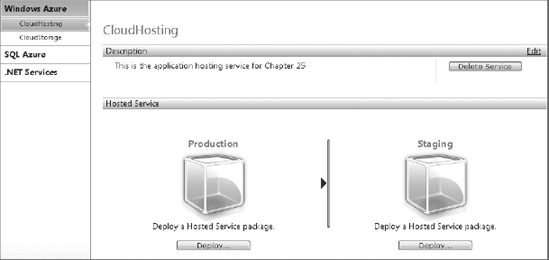
In Figure 25-7 you can see that you in fact have two environments into which you can deploy: Production and Staging. As with all good deployment strategies, Azure supports deploying into Staging and then once you are comfortable, migrating that into Production.
Return to Visual Studio 2010, right-click the FirstCloudApplication project, and select Publish. This builds your application and generates a deployment package and a configuration file. These are displayed in a Windows Explorer dialog once completed. Return to Windows Azure and click the Deploy button under the Staging node (in Figure 25-7). You are prompted to select the deployment package and configuration file. Once you complete the upload you are returned to the hosting service page where you will see that the Staging environment has been updated, as in Figure 25-8.
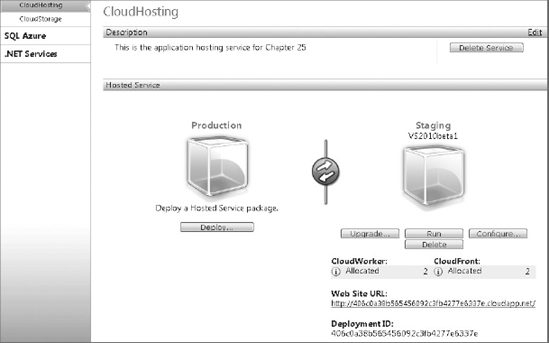
Unlike other ASP.NET web applications that start running as soon as they are completely deployed, Azure applications need to be started. You do this by clicking the Run button. The screen will refresh with all roles stating that they are initializing. Eventually, they will update to Started, at which point all roles are ready to receive input or do work.
The last stage in this process is to promote what's running in the Staging environment into Production. The word "promote" is important because this transition is all handled by an intelligent router. Because the cut over from one to the other will at some point (depending on how quickly the router effects the change) be close to instantaneous, there should never be any time at which someone hitting the site receives a 404 or missing page. To promote Staging into Production, select the round rotating button situated in between the product and staging areas of the Azure portal.
Over time, demand for your application may vary, or you may need to adjust application settings specified in the ServiceConfiguration file. You can do this dynamically by clicking the Configure button (see the Staging deployment in Figure 25-8). Figure 25-9 shows the configuration screen where you can modify the configuration XML, or upload an alternative configuration file. You should only modify your staging deployment using this method because you don't want to affect the running of your Production deployment. The recommend approach is to start with identical Production and Staging deployments, modify the Staging configuration, allow it to initialize and start, then switch that deployment into Production. You can then modify the second deployment so that they are in sync.
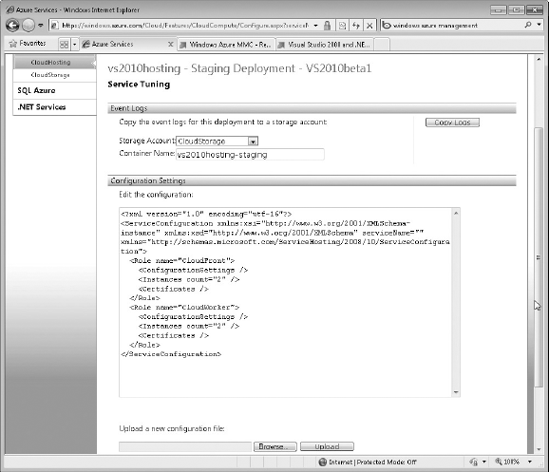
This screen also allows you to export logs generated by the roles within your application to a storage account. After copying the logs you will then need to retrieve the logs from the relevant storage account. You can do this using the CloudDrive sample in the Azure SDK, which can be used to map a storage account as a local drive that you can query in Powershell.
In addition to Azure table, blob, and queue storage, the Windows Azure Platform offers true relational data hosting in the form of SQL Azure. You can think of each SQL Azure database as being a hosted instance of a SQL Server 2008 database that is running in high-availability mode. This means that at any point in time there are three synchronized instances of your database. If one of these instances fails, a new instance is immediately brought online and the data is synchronized to ensure the availability of your data.
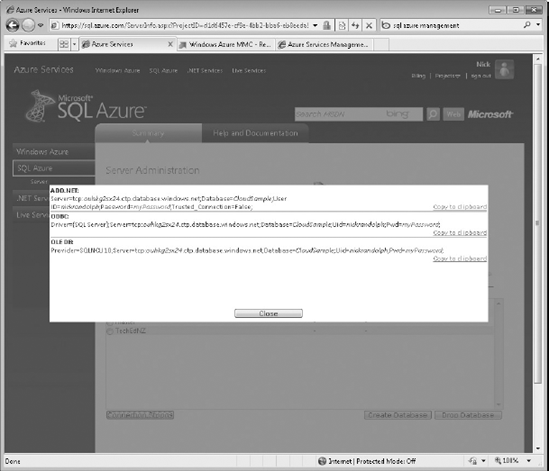
To create a SQL Azure database, sign into the Windows Azure portal and navigate to the SQL Azure tab. Once there you can manage your SQL Azure accounts, where you can create and delete databases. After creating a database you can retrieve the connection string that you need in order to connect to the database by selecting the database and clicking the Connection String button, as shown in Figure 25-10.
At the time of writing you have a number of ways to interact with a SQL Azure database. Although SQL Azure is based on SQL Server 2008, a number of limitations exist that prevent most graphical tools, such as SQL Server Management Studio (Object Browser) and Visual Studio 2010, from working properly. You can, however, connect a SQL Server Management Studio Query Window to a SQL Azure database and execute T-SQL statements against your database. Some third-party tools and Visual Studio 2010 add-ins, such as the SQL Azure Migration Wizard, the SQL Azure Manager, and the SQL Azure Explorer, are available that can assist with working with SQL Azure.
From your application you can connect to SQL Azure using the connection string retrieved from the Windows Azure portal page. You can use most frameworks that are based on top of ADO.NET such as LINQ to SQL, Entity Framework, or simply plain ADO.NET to create, update, read, or delete data in your SQL Azure database.
The third component of the Windows Azure Platform is the AppFabric. This in turn is made up of the Service Bus and the Access Control Service. In an environment where organizations are increasingly looking to host some or all of their applications in the cloud, significant challenges are posed around connectivity and security. The AppFabric provides a solution to allow enterprises to connect applications and unify application security.
Though most organizations have connectivity to the Internet, connectivity between offices or with individuals on the road is often the cause of frustration. Increasingly, companies operate behind one or more firewall devices that not only restrict the flow of traffic but also do network address translation. This means that computers sitting behind these devices cannot be easily addressable from outside the company network. In addition, as the number of public IPv4 addresses dwindles, more connections are dynamically allocated an IP address. This makes hosting an application within the company network that is publicly accessible almost impossible.
The Service Bus allows a service to be registered at a specific publicly addressable URL via the service registry. Requests made to this URL are directed to the service via an existing outbound connection made by the service itself. Working with the Service Bus can be as simple as changing your existing WCF bindings across to the new relay bindings. As part of running your service it registers with the service registry and initiates the outbound connection required for all further communications.
Where an organization wants to integrate multiple cloud-based applications and/or an on-premise application there needs to be some way of controlling who (authentication) has access to particular resources (authorization). This is the function of the Access Control Service (ACS). Though still in its infancy, the ACS is capable of verifying a user's identity through the validation of input claims, performing claims translation, and the supply of output claims for specific applications. For example, you could sign into an application providing your e-mail address and a password. These input claims would be used to authenticate you, as well as determine that you belong in the fancy-hat group in application xyz that you are trying to access. The output claims may consist of your e-mail address and the fancy-hat group. Note that because there is a previously established trust relationship between application xyz and ACS (validated through signing of the output claims), application xyz can trust the output claims.
In this chapter you learned about the Windows Azure Platform and how it represents Microsoft's entry into the cloud computing space. Using Visual Studio 2010, you can adapt an existing, or create a new, application or service for hosting in the cloud. The local Development Storage and Fabric provide a great local testing solution, which means when you publish your application to Windows Azure you can be confident that it will work without major issues.
Even if you don't want to migrate your entire application into the cloud, you can use SQL Azure and the AppFabric offerings to host your data, address connectivity challenges, or unify your application security.