
So far, you’ve seen how to interact directly with an EDM using snippets of code in a console application. Although there is much more to learn about the Entity Framework, at this point it’s time to see how you can use the Entity Framework as part of your applications.
In this chapter, you will explore basic data-binding scenarios in
Windows Forms and Windows Presentation Foundation (WPF). You’ll see how
the Entity Framework objects work with Visual Studio’s data-binding
features in much the same way that DataTables and DataSets do, without having to explicitly set
and retrieve the values of each control. The data binding’s change
notification mechanism works automatically with the Entity Framework’s
change tracking, so editing data that was queried through the Entity Data
Model does not require a lot of extra coding. In the examples here, you’ll
bind directly to the results of Entity Framework queries as you learn the
concepts. In Chapter 20,
after you have learned much more about the Entity Framework, I will
address n-tier Windows Forms applications.
The chapter will begin with data binding in Windows Forms and will then move on to the WPF techniques.
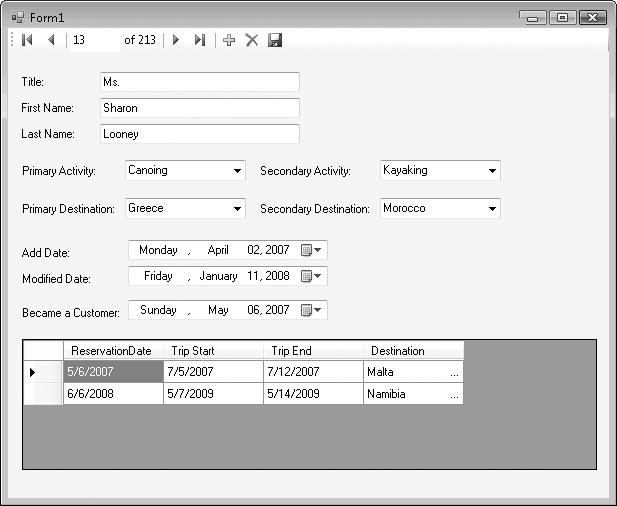
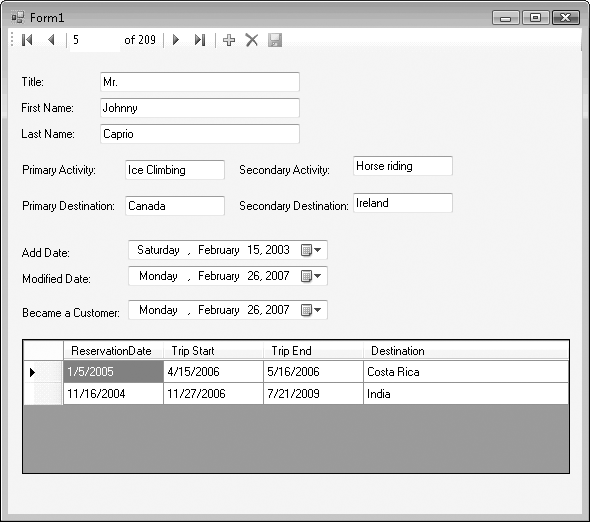
To demonstrate data binding of an EDM to a Windows form, let’s
build a small application to let you view customers and their
reservations as well as edit the customers and add new reservations.
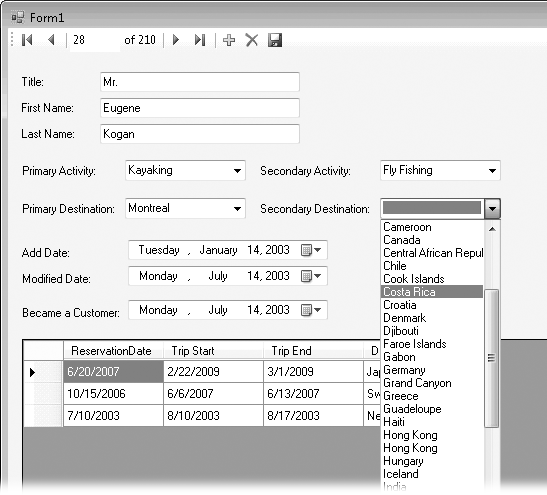
Figure 8-1 shows this
form with a DataGridView to work with
the customers, a ListBox control for
reservations, and a ComboBox for
selecting new trips to add to a customer’s reservations.
Note
This chapter will not presume that you are familiar with Windows Forms or WPF data-binding techniques in the IDE. So, you’ll get a step-by-step walkthrough to be sure that the UI tasks don’t trip you up.
You’ll be building up the form in stages, adding a little more functionality in each stage and then testing what you’ve built so far.
The first task is to create a Windows Forms project. In our example, we’ll use the BreakAwayModel project you created in Chapter 7. You should add this new Windows Forms project into the same solution that contains the BreakAwayModel project. In that way, you can easily reference the model and make changes to it as needed.
Note
If you did not follow the walkthroughs in Chapter 7, you can download the completed BreakAwayModel project from the Downloads page of the book’s website.
Add a new Windows Forms Application project to the solution and give it the name BreakAwayWinForms.
Add a reference to the BreakAwayModel project. To do this, right-click the BreakAwayWinForms project in the Solution Explorer and select Add Reference. In the Add Reference dialog, select the Projects tab, then select BreakAwayModel and click OK. This will allow the new application to use everything in the model as well as the generated entity classes.
Add a reference to
System.Data.Entityunder the .NET tab of Add References.When you created the model in the BreakAwayModel project, the Entity Data Model Wizard automatically pulled in the necessary references to the Entity Framework APIs. Your new application will need this particular reference as well, which is why you need to add them manually.
Copy the app.config file from the BreakAwayModel project into the new Windows Forms project.
Because you are using the model in the BreakAwayModel project,
this Windows Forms project will need access to the entity connection
string. By default, no app.config
file is created for a Windows Forms project. If you had already
created an app.config file, you
only need to copy the BAEntities
connection string element from the model’s app.config to this project’s app.config. In this case, since the
app.config doesn’t exist yet, you
can cheat by just copying the whole file.
Data sources have been a feature of Windows Forms since Visual Studio 2005 and are a very convenient way to perform data binding. They provide a bridge between your data and the controls to which you are binding your data. There are three types of data sources: those that bind directly to a database, those that bind to a service, and those that bind to objects.
In this application, you will be creating data sources that bind
to objects—specifically, to entity classes that were dynamically
generated by an EDM. An Object data source won’t bind to the entire
EntityContainer; it will bind to
only one individual class. Additionally, although a data source that
is derived from a database will trigger the interaction with the
database, an Object data source will not. It provides the schema of
the classes to the controls to which you are binding data, and it
provides the ability to interact with the objects. You will have to
write the actual code that populates the data source at
runtime.
Using data sources is a great example of how the EDM and the Entity Framework work seamlessly with existing tools in Visual Studio.
Note
This is not to say that the Entity Framework works with all of
the existing features of Visual Studio. You will find that some gaps
still exist, such as the inability of the Microsoft Report control to work with hierarchical
data that comes from the EDM.
In the following walkthrough you will create an Object data
source that binds to the Customer
entity. Then, using the properties that are exposed through the Data
Sources window, you will add controls to the form so that the controls
are automatically bound to these properties. After adding a simple
query to the form’s code, you will be able to run the application and
scroll through the customers’ data. With a few more minor changes to
the form, you will also be able to edit the data.
The first step is to create the data source that will help you
to create the data-bound controls on the form. The Object data source
you will need is for the Customer
class. Here’s how to create it:
From the Visual Studio menu, select the Data menu item, and then select Show Data Sources from that menu’s drop-down, to open the Data Sources window (Figure 8-2).
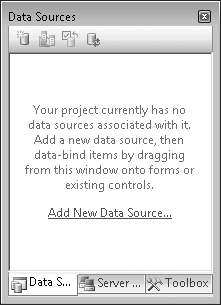
Click the Add New Data Source hyperlink to open the Data Source Configuration Wizard.
Select Object in the Choose Data Source Type window, and then click Next.
The next window will present you with the available assemblies in the current solution. Expand the
BreakAwayModelassembly to reveal theBAGAnamespace, and then expand that to reveal the entity classes, as shown in Figure 8-3.
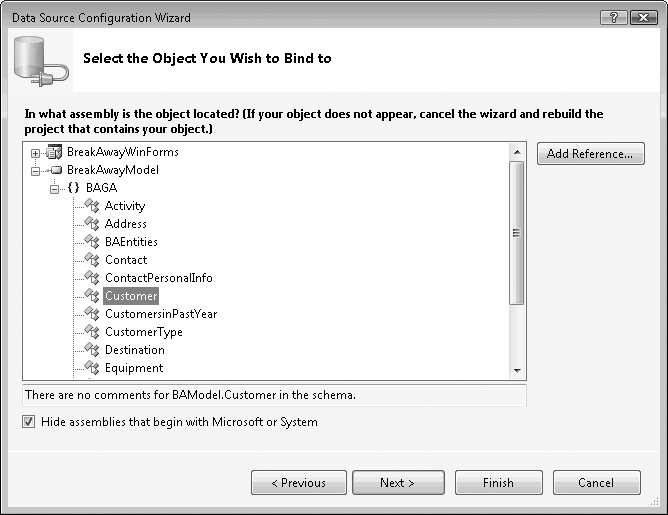
Select Customer and then click Next.
Click Finish.
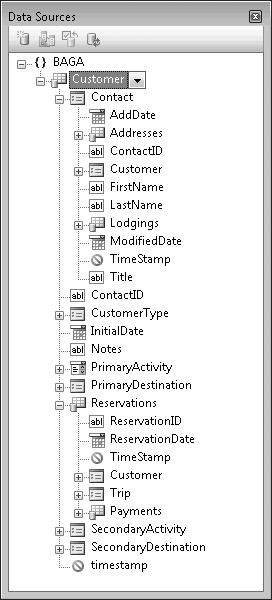
The Customer data source will now display in the Data Sources
window. Expand the Customer data source to see its properties. Notice
that the navigation properties are there, including Reservations with its properties, as shown
in Figure 8-4. Entity
Framework classes are built to expose their navigation properties for
data binding.
What’s interesting about the Customer entity and class is that the most
critical information—the customer’s name, address, reservations, and
preferences—is not available in its scalar properties. You need to
navigate to other entities to get this data. Although the Customer entity represents contacts who are
customers, it depends on the related Contact entity to provide name information
and to give you access to the contact’s addresses. Customer relies on its relationship to
Reservations to supply details
about what makes each customer a customer—all of the trips they have
taken or are planning to take. Even their Activity and Destination preferences are navigation
properties.
If you were to create a DataGridView from the Customer data source,
the only properties that would display by default are the scalar
properties. Instead, you can leverage the related contact and
reservations details to build a more useful form.
Data sources allow for some very convenient drag-and-drop
operations that make it easy to specify which properties of an object
are displayed on a Windows form. You don’t want to drag the entire
Customer object, because, by
default, that will result in a DataGridView with the scalar properties and
the IDs of the entity reference properties. Instead, you’ll want to
drag the properties, and you can do those only one at a
time.
Note
Later in this chapter, you’ll see the problem of the default
DataGridView
when you data-bind to the EntityCollection. But if you are curious
now, nothing is stopping you from dragging the entire Customer object onto
the form so that you can see the effect.
Since in this example we’ll want most of the customer’s contact
details on the form, you can select Contact in the Data Sources window
and drag it onto the form. Because Contact is a property, all of its details
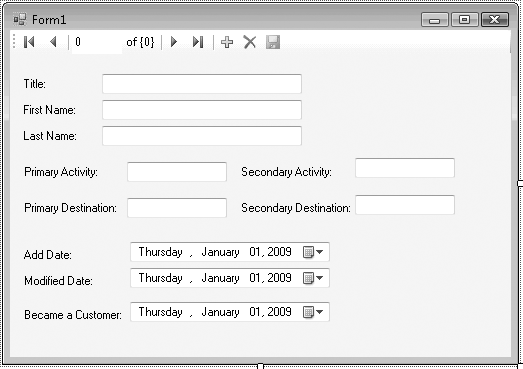
will come over to the form at once. The impact of dragging the
properties onto the form is that a new navigation toolbar will be
created, as well as the appropriate controls for the various
properties—TextBox controls for the
integers and strings, and DateTimePicker controls for the date
properties. Additionally, on the perimeter of the design window,
you’ll see that a CustomerBindingSource and a CustomerBindingNavigator were added. These
are components that work hand in hand with the data sources in Windows
Forms. The BindingSource will
coordinate the form fields with the data. The BindingNavigator coordinates the actions of
the toolbar (navigation, inserts, deletes, and updates) with the
BindingSource. Remember that these
are not Entity Framework features, but standard functionality in
Windows Forms.
Next, expand the PrimaryActivity property and drag its
ActivityName to the form. You’ll
need to modify the label so that it reads “Primary Activity”. Do the
same for the other preferences.
Finally, add the Customer.InitialDate field. This represents
the first date the contact became a customer, which is useful in case
the person was on a mailing list for a while before finally becoming a
customer.
If you care to line up and organize the fields on the form, your form will look something like Figure 8-5 after you have added these fields.
You’ll need to execute a query when the form loads to retrieve
the customers along with their related data from the database. You
will bind these query results with the BindingSourceControl that was created for
the Customer data source.
You’ll get to take advantage of eager loading, which you learned
about in Chapter 4, by
using a number of Include methods
in this query. This is because the form relies on five navigation
properties.
In the form’s Load event, add
the code from Example 8-1. I will explain
the use of ObjectResult and
Execute shortly.
Example 8-1. Querying for customers in the form load
VB
Dim context = New BAGA.BAEntities
Dim customers As ObjectResult(Of BAGA.Customer) = _
    context.Customers _
    .Include("Contact") _
    .Include("PrimaryActivity") _
    .Include("SecondaryActivity") _
    .Include("PrimaryDestination") _
    .Include("SecondaryDestination") _
    .Include("Reservations.Trip.Destination") _
    .Execute(Objects.MergeOption.AppendOnly)
CustomerBindingSource.DataSource = customers
C#
var context = new BAGA.BAEntities();
ObjectResult<BAGA.Customer> customers=
context.Customers.Include("Contact")
.Include("PrimaryActivity")
.Include("SecondaryActivity")
.Include("PrimaryDestination")
.Include("SecondaryDestination")
.Include("Reservations.Trip.Destination")
.Execute(Objects.MergeOption.AppendOnly);
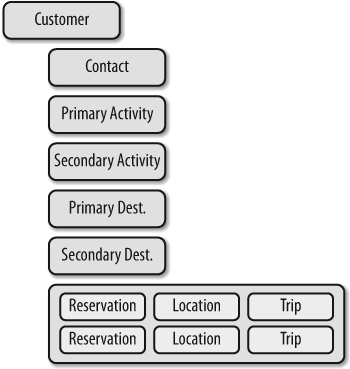
customerBindingSource.DataSource = customers;The query is written to ensure that all of the necessary related
information is retrieved from the data store. Each Customer in the results will be a graph
shaped as shown in Figure 8-6.
This particular query is not designed for efficiency, but rather
to give you an idea of how the Include method works and how the data
binding implements related data. Notice that the query does not even
bother to filter the data. The SQL query that results and the amount
of data returned may make you gasp. So, although it’s very important
to be aware that this is not a best practice, it’s a handy query for
this lesson based on what you’ve learned so far.
The query contains a lot of Include methods. Most of the related
entities are small. Activity and
Destination have only an ID field and a Name field. Reservations and Trip don’t have a lot of fields, either. But
a lot of redundant data will be sent back to the application. For
example, each customer who has Madagascar selected as her primary or
secondary destination will cause that row of data to be transmitted
back to the application. If 100 people favor that locale, 100 copies
of that row will be returned.
As Object Services materializes objects from those rows, it will recognize the redundancy and will not create multiple copies of that particular object in memory, so on the application side the query results will be efficient.
Later in this chapter, we’ll look at more efficient ways to return the related data without this redundancy.
Go ahead and run what you’ve built so far. As you use the navigation toolbar to move from one customer to another, you’ll be able to see that all of the navigation properties automatically change as well (see Figure 8-7).
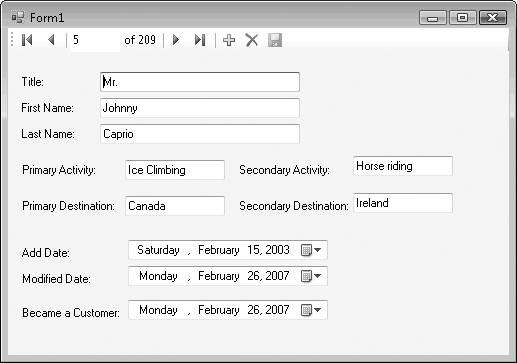
When you bind query results to a BindingSource, the BindingSource will act as an agent to
coordinate among the entities, the fields, and the navigation toolbar.
The BindingSource will update the entities
when a change is made in the form’s fields. In this example, when it’s
time to have the Entity Framework send the entity changes to the data
store, all of the change information will be available.
But the code in Example 8-1 follows a very
specific rule: the Customer query
uses the Execute method.
I introduced the Execute
method in Chapter 3, with a
teaser about using it in data binding. Execute returns an ObjectResult(Of T); in our example, it
returns an ObjectResult(Of Customer).
Note
Although most of the code samples you have seen so far have
taken advantage of implicitly typed variables, the customers variable was explicitly typed in
this code so that you would be clear about the fact that the type is
an ObjectResult.
ObjectResult is an enumerable
collection that has special features to enhance data binding and the
binding’s ability to interact with the ObjectContext. Although you may find that
some updates and additions will work properly even if you returned a
List(Of Customer), you may also get
unexpected results. One bad result that you can count on is that when
you delete an item, no delete command will be sent to the database.
With an ObjectResult, the delete
will work as expected.
Note
As you dig deeper into Object Services in the next chapter, you’ll have a better understanding of why the delete command won’t reach the database in this scenario.
Execute takes a MergeOption parameter. MergeOption specifies what to do if the
query results already exist in the context. It’s possible to execute
many queries against the same context (or even to execute one query
multiple times). If duplicate data is pulled down from the data store,
you can control how those duplicates are handled. In this case, the
AppendOnly option tells the context
only to add entities that don’t already exist in the context. In this
way, you won’t have to worry about overwriting changes you have made.
You’ll learn more about MergeOptions in Chapter 9.
Warning
There’s also another caveat with using ObjectResults, which you will learn about
when you encounter it in the upcoming WPF sample.
If you bind a LINQ query or an ObjectQuery directly to a BindingSource.DataSource property,
you’ll get your data, but the query will execute every single time
the user moves to a new customer. Imagine querying for 100 customers
every time the user moves to a new customer.
If you work with highly concurrent data and want to be sure
that each record has fresh data, you would be better off using a
query that returns a single customer. Then you can bind the query
directly to the BindingSource.DataSource property and
have the query automatically execute each time the user moves to
another Customer record.
Now it’s time to get the reservations onto the form. The
Reservation entity presents the
same problem as the Customer entity
in that most of the best information is in its navigation property,
Trip. If you were to drag the
Reservations property onto the
form, the default control, DataGridView, will display the reservations
as shown in Figure 8-8 when the
application is run. This is the same problem that I alluded to earlier
regarding dragging the entire Customer object onto the form.
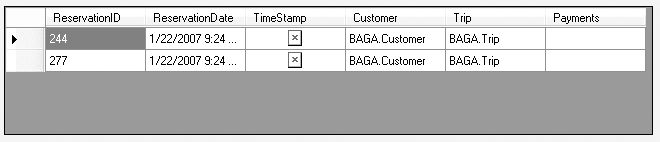
The control is not able to work out the navigations to the
Reservation’s Customer and Trip references and therefore displays only
the type name for each. Even if you edited the DataPropertyName property of the Trip column to be Trip.StartDate, Windows Forms will not be
able to navigate into Trip to find
its StartDate. This problem is not
specific to the Entity Framework, but a result of how the DataGridView functions.
There is a way to display properties of related objects in
DataGridView, and you can take
advantage of that here. The grid will be useful if it displays the
reservation date, the start and end dates of the trip, and the
destination of the trip. Destination comes from a navigation
property of the Trip entity, so
first we’ll need to modify the columns in the grid.
Edit the grid’s columns. You can make the ReservationID’s Visible property false, and then remove the TimeStamp, Customer, Trip, and Payments columns. Add three new TextBox columns named tripStartColumn, tripEndColumn, and destinationColumn. Make sure their
ReadOnly property is True.
The trick to displaying the navigation properties is in the
code. You must override the individual cells as the grid is being
rendered for display, and the place to do this is in the DataGridView.RowPrePaint event. Example 8-2 shows how to
do this.
Note
In C#, you can access the DataGridView.RowPrePaint event from the
Events page of the grid’s Properties window. In VB, you can do the
same or access the event in the code window by choosing
ReservationsDataGridView from the Class Name drop-down and then
RowPrePaint from the Method Name drop- down.
Example 8-2. Forcing the DataGridView to display navigation properties
VB
Private Sub ReservationsDataGridView_RowPrePaint _
 (ByVal sender As Object, ByVal e As _
  System.Windows.Forms.DataGridViewRowPrePaintEventArgs) _
  Handles ReservationsDataGridView.RowPrePaint

 'get a reference to the reservation currently being painted
  Dim res = _
      CType(ReservationsBindingSource.Item(e.RowIndex),BAGA.Reservation)
 'push the reservations's navigation properties into the correct cells
  With ReservationsDataGridView
    .Rows(e.RowIndex).Cells(tripStartColumn.Index).Value = _
     res.Trip.StartDate.ToShortDateString
    .Rows(e.RowIndex).Cells(tripEndColumn.Index).Value = _
      res.Trip.EndDate.ToShortDateString
    .Rows(e.RowIndex).Cells(destinationColumn.Index).Value = _
      res.Trip.Destination.DestinationName
  End With
End Sub
C#
private void reservationsDataGridView_RowPrePaint
(object sender, DataGridViewRowPrePaintEventArgs e)
{
//get a reference to the reservation currently being painted
var res = (BAGA.Reservation)(reservationsBindingSource[e.RowIndex]);
//push the reservations's navigation properties into the correct cells
var grid = reservationsDataGridView;
grid.Rows[e.RowIndex].Cells[tripStartColumn.Index].Value =
res.Trip.StartDate.ToShortDateString();
grid.Rows[e.RowIndex].Cells[tripEndColumn.Index].Value =
res.Trip.EndDate.ToShortDateString();
grid.Rows[e.RowIndex].Cells[destinationColumn.Index].Value =
res.Trip.Destination.DestinationName;
}Notice that you don’t have to add any additional querying or
binding code into the form load. The fact that you have already
bound the customers to the BindingSource is enough. The BindingSource will work out all of the
relationships. In the form, as you navigate from one customer to the
next, that customer’s reservations will be displayed in the grid
(see Figure 8-9).
The trip start and end dates were formatted in the RowPrePaint event using ToShortDateString. To
format the ReservationDate
column, you’ll need an additional line of code in the Form Load event. After renaming the column
to resDateColumn, the formatting
code is as follows:
VB
ReservationsDataGridView _
.Columns(resDateColum.Index) _
.DefaultCellStyle.Format = "d"
C#
reservationsDataGridView
.Columns[resDateColumn.Index]
.DefaultCellStyle.Format = "d";Note
Because of the convenient but inefficient query, all of the
Customer objects with all of
their reservations and related trip data are in memory. So, in
this example, the application does not need to return to the
database to retrieve
additional data as you move from one customer to the next. In a
properly designed application, you will need to be more diligent
about retrieving only the data that the user will need, and you’ll
need to be considerate about balancing the client-side resources
with the trips to the server and the amount of data being
transmitted based on your scenario.
So far, you have been using the form to view data. What about
adding or editing data? BindingSource supports editing, but you’ll
need to make a few small modifications to the form and the code to get
this functionality. We’ll start with editing, and in the next section
you’ll enable adding.
By default, the navigation toolbar disables the Save button when the toolbar is first created. Right-click the button and check the Enabled property in the context menu.
Before you can add the method to save data, you have to make
an important change in the existing code. Currently, you are
instantiating the BAEntities
ObjectContext in the Form
Load event. The context is not available outside the
event.
When you query data with the context, by default the entities
that result are managed by the context that keeps track of changes
made to those entities. You can then use the ObjectContext.SaveChanges method to save
those changes back to the data store. Although you will learn much
more about this later in the book, here you’ll need to be aware of
the fact that only the context that is tracking the changes is able
to save them. You can’t instantiate a new context and expect it to
save changes to the entities that you’re working with in the form.
It won’t know anything about them.
Therefore, it is important to be sure that when you call
SaveChanges, you are working with
the same context you used to retrieve the data.
To do this in the form, you need to declare the context in the
form declarations, not within a method. In this way, all of the
form’s methods can work with the same context and you will be able
to call SaveChanges in the
Click event of the Save
button.
Just beneath the line of code that declares the form, add the following code to declare the context:
VB
Public Class Form1
  Private context As BAGA.BAEntities
C#
public partial class Form1 : Form
{
BAGA.BAEntities context;In the form’s Load event,
change the code that declared and instantiated the context so that
it instantiates only the context, as shown in the following code
snippet:
VB
context = New BAGA.BAEntitiesC#
context = new BAGA.BAEntities();In the form’s Design view, double-click the Save button to get
to its Click event handler. Then
add the SaveChanges code into the
Click event, as shown in the
following code:
VB
context.SaveChangesC#
context.SaveChanges();That is the complete code for saving all of the entity
changes! There is no connection code, no need to build commands, and
no need to worry about what entities are being saved or what types
of changes are being made. Object Services reads all of the change
information that it has kept track of for the entities that it is
managing, and works out the proper commands (Insert, Update, or Delete) and then executes them.
If the model had any function mapping, Object Services would use stored procedures to perform the changes on the entities that have functions mapped to them.
The next stage of building up the functionality in this form is to make it possible to edit the other navigation properties.
You are already able to edit the Contact navigation property because it has a
one-to-one relationship with the customer. It is essentially an
extension of the customer. The preference properties—PrimaryActivity, among others—are values
selected from a list of possible items. You’ll need two things to be
able to change the selections. You will need access to a complete list
of the items (activities and destinations). Therefore, the first thing
you will need is queries in the code, which will retrieve these lists.
The second thing you’ll need is some type of selection control, for
example, a drop-down list, on the form to display the lists.
Currently, the only activities and destinations in memory are those that are attached to the customers, and this may not even be all of the available options.
Instead, we’ll need the full lists, so we’ll need a new query to retrieve all of the activities and another for all of the destinations.
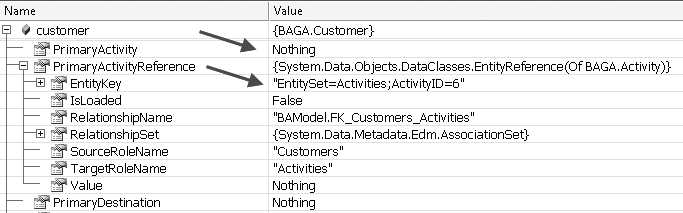
This will add a big benefit to the application. When the
activities and destinations are queried, their objects are stored in
memory. More specifically, they will be managed by the ObjectContext. This means it won’t be
necessary to include the activity and destination data in the
Customers query. When the
customers are queried, they will still have the reference EntityKeys even if they don’t have the
actual related entities. Figure 8-10 shows the
PrimaryActivity and PrimaryActivityReference properties of a
Customer that was queried without
any of its related data.
When the context creates the Customer, if the Activity object with that same EntityKey is already
in the context, the two will be hooked up. The same happens if you
were to query the customers first and then the activities.
So, now you can add the new queries and trim down the Customers query so that it doesn’t pull
all of that extra data out of the database and over to the
application. The new queries will be method queries so that you can
keep your various querying skills tuned up.
At the same time, we’ll create two new form-level variables to contain the activities and destinations.
Add the new activities and
destinations variables to the
form declarations, as shown in Example 8-3.
Example 8-3. Adding variables to hold the new lists
VB
Public Class Form1
Private context As BAGA.BAEntities
Private activities As List(Of BAGA.Activity)
Private destinations As List(Of BAGA.Destination)C#
public partial class Form1 : Form
{
BAGA.BAEntities context;
List<BAGA.Activity> activities;
List<BAGA.Destination> destinations;Next, add the new queries shown in Example 8-4 into the form load and
modify the existing Customers
query to remove the extraneous navigations. Notice that Destination is also
removed from the Reservations.Trip navigation path.
Trip will also be able to find
its related destinations in the context after they are created from
the Destinations query.
Example 8-4. Querying for the list data
VB
Private Sub Form1_Load _
(ByVal sender As Object, ByVal e As System.EventArgs) Handles Me.Load
context = New BAGA.BAEntities
activities = context.Activities _
.OrderBy(Function(a) a.ActivityName).ToList
destinations = context.Destinations _
.OrderBy(Function(d) d.DestinationName).ToList
Dim customers = context.Customers.Include("Contact") _
.Include("Reservations.Trip") _
.Execute(Objects.MergeOption.AppendOnly)C#
private void Form1_Load(object sender, EventArgs e)
{
context = new BAGA.BAEntities();
activities = context.Activities
.OrderBy((a) => a.ActivityName).ToList();
destinations = context.Destinations
.OrderBy((d) => d.DestinationName).ToList();
var customers = context.Customers.Include("Contact")
.Include("Reservations.Trip")
.Execute(Objects.MergeOption.AppendOnly);Note
You can run the application again if you want to see that all of the reference properties are still intact.
Notice that the example uses ToList on the new queries instead of
Execute. This data will be used
only for pick lists and will not be edited directly, so you don’t
have to worry about the BindingSource being able to pass along
change information for activities and destinations to the
context.
Now that the data for the lists exists, you can change the
controls for PrimaryActivity and the other
navigation properties to ComboBoxes so that it will be possible to
edit a customer’s preferences.
You can bind the ComboBox
controls in code or in the UI. Since there are four properties to
change, let’s do both methods so that you can learn each one.
Replace the TextBox
controls for the four target properties with ComboBox controls, giving them names to
help you differentiate them. The FillCombos method in Example 8-5 performs the
standard bindings for a ComboBox
and additionally binds them to the Customer’s PrimaryActivity and PrimaryDestination navigation properties.
Notice that the first argument for the new binding is SelectedItem. You may be more familiar
with using Text in that argument.
SelectedItem will cause the
control to read the entire Activity object attached to the Customer and will work out how to match it
up with the items in the ComboBox.
Example 8-5. Code for filling two of the ComboBoxes
VB
Private Sub FillCombos()
With PrimaryActivityComboBox
.DisplayMember = "ActivityName"
.ValueMember = "ActivityID"
.DataSource = activities
.DataBindings.Add _
(New Binding("SelectedItem", CustomerBindingSource, _
"PrimaryActivity", True))
End With
With PrimaryDestinationComboBox
.DisplayMember = "DestinationName"
.ValueMember = "DestinationID"
.DataSource = destinations
.DataBindings.Add _
(New Binding("SelectedItem", CustomerBindingSource, _
"PrimaryDestination", True))
End With
End SubC#
private void FillCombos()
{
PrimaryActivityComboBox.DisplayMember = "ActivityName";
PrimaryActivityComboBox.ValueMember = "ActivityID";
PrimaryActivityComboBox.DataSource = activities;
PrimaryActivityComboBox.DataBindings.Add
(new Binding("SelectedItem",customerBindingSource,
"PrimaryActivity", true));
PrimaryDestinationComboBox.DisplayMember = "DestinationName";
PrimaryDestinationComboBox.ValueMember = "DestinationID";
PrimaryDestinationComboBox.DataSource = destinations;
PrimaryDestinationComboBox.DataBindings.Add
(new Binding("SelectedItem",customerBindingSource,
"PrimaryDestination", true));Insert a call to the FillCombos method
(FillCombos for VB or
FillCombos(); for C#) into the form’s Load event
You can put this line at the end of the existing code. Run the
application again if you want to see how the ComboBoxes have been populated so
far.
The other ComboBoxes will
be bound in the UI. To do this, you will need to create one new
Object data source for the BAGA.Activity class and one for the
BAGA.Destination class. Then, in
the form load, you will bind those new DataSources to the list variables, as
shown in the following code:
VB
ActivityBindingSource.DataSource = activities
DestinationBindingSource.DataSource = destinationsC#
activityBindingSource.DataSource = activities;
destinationBindingSource.DataSource = destinations;Using the ComboBox Tasks window, you can fill out three of the
four properties for each ComboBox. Figure 8-11 shows the
combo properties for the SecondaryActivity navigation
property.
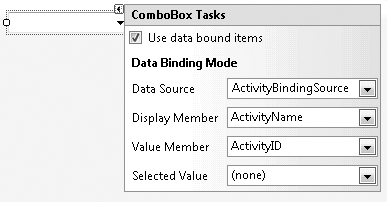
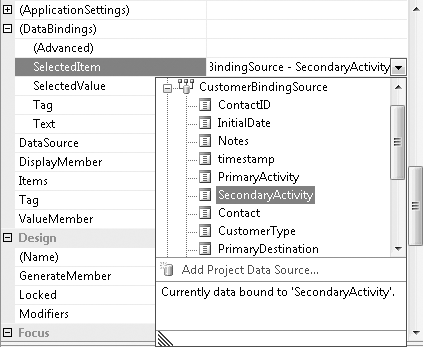
The last property is not filled because you will need to set
the SelectedItem property, not
the SelectedValue property. Do
this in the Properties window, as shown in Figure 8-12.
Now you can view, edit, and save these properties along with the rest of the customer data, as shown in Figure 8-13.
We’ll take on one last task in this Windows form before moving on: adding new customers.
The data sources don’t handle the related entities quite as seamlessly when adding as they do when editing, so we’ll have to add a little bit of code to make this work.
When you click the plus sign icon to add a new customer, a new
customer is added to the CustomerBindingSource. But you also need a
new Contact entity to be created at
the same time. The BindingSource
has an AddingNew event, but this
occurs before the new entity is created. The next event to fire is
CurrentChanged as the BindingSource moves its pointer to the newly
created Customer. In the CurrentChanged event, you can add the new
contact and set any other properties that are necessary.
Here you will have your first opportunity to see how to create new entities in code, to create a relationship, and to be sure the new entity is being managed by the context.
We’ve established that clicking the plus sign icon adds a new
Customer to the BindingSource, and that the CurrentChanged event is your first
opportunity to work with the new Customer entity. But the CurrentChanged event is hit anytime the
BindingSource points to a
different Customer. You’ll need a
way to discern the newly added Customer from those that already existed
in the BindingSource.
One way might be to check the Customer’s ContactID, because it will not have been
created yet. But if the user has added a number of customers prior
to saving, ContactID=0 will not necessarily mean
that the user just clicked the Add New icon.
Until you have more tools in your Entity Framework tool belt,
the best way to determine a newly added Customer at this point is to use a flag to
identify that a new Customer is
being added to the BindingSource.
We’ll employ a Boolean variable named adding for the flag.
Once that is in place, you will need to do the following for new customers:
Create a new contact object.
Add the contact to the new customer.
Set necessary defaults on the contact.
Set necessary defaults on the customer.
Set the
addingflag tofalse.
Let’s see how to implement these steps.
Note
In Chapter 10, you will learn how to add business logic to entities and these types of steps won’t be necessary, especially not in the user interface.
Add the Boolean variable in
Example 8-6 to the
form’s declarations.
Example 8-6. Placing the adding variable into the form’s declarations
VB Public Class Form1 Private context As BAGA.BAEntities Private activities As List(Of BAGA.Activity) Private destinations As List(Of BAGA.Destination) Private adding As Boolean
C#
public partial class Form1 : Form
{
  BAGA.BAEntities context;
List<BAGA.Activity> activities;
List<BAGA.Destination> destinations;
bool adding;In the CustomerBindingSource.AddingNew event, set
the adding flag to True, as shown in Example 8-7.
Example 8-7. Setting the adding flag to True
VB
Private Sub CustomerBindingSource_AddingNew _
 (ByVal sender As Object, _
  ByVal e As System.ComponentModel.AddingNewEventArgs)
 Handles CustomerBindingSource.AddingNew
    adding = True
End Sub
C#
private void customerBindingSource_AddingNew
(object sender, AddingNewEventArgs e)
{
adding = true;
}In the CurrentChanged
event, check the adding flag. If
it is true, perform the steps
outlined earlier on the new Customer. If adding is false, this logic will be skipped, as
shown in Example 8-8. In this
example, CustomerBindingSource.EndEdit is called
prior to adding the related entities to the Customer. This method will trigger the
BAEntities context to add the new
Customer and therefore the
context will also manage the new Contact entity properly. Without this
method call here, you will experience problems when it comes time to
call SaveChanges. Finally, note
that the CustomerType is assigned
with an EntityKey. You’ll learn
more about assigning EntityReference.EntityKey in the next
chapter.
Example 8-8. Filling out the defaults for a new Customer
VB
Private Sub CustomerBindingSource_CurrentChanged _
 (ByVal sender As Object, ByVal e As System.EventArgs) _
 Handles CustomerBindingSource.CurrentChanged
  If _adding Then
    CustomerBindingSource.EndEdit()
    Dim newcust = CType(CustomerBindingSource.Current, BAGA.Customer)
    If newcust.Contact Is Nothing Then
       newcust.Contact = New BAGA.Contact
       newcust.Contact.ModifiedDate = Now
       newcust.Contact.AddDate = Now
    End If
    newcust.InitialDate = Now
    newcust.CustomerTypeReference.EntityKey = _
     New EntityKey("BAEntities.CustomerTypes", "CustomerTypeID", 1)
     adding = False
  End If
End Sub
C#
private void customerBindingSource_CurrentChanged
(object sender, EventArgs e)
{
if (adding)
{
customerBindingSource.EndEdit();
var newcust = (BAGA.Customer)customerBindingSource.Current;
if (newcust.Contact == null)
{
newcust.Contact = new BAGA.Contact();
newcust.Contact.ModifiedDate = DateTime.Now;
newcust.Contact.AddDate = DateTime.Now;
}
newcust.InitialDate = DateTime.Now;
newcust.CustomerTypeReference.EntityKey =
new EntityKey("BAEntities.CustomerTypes", "CustomerTypeID", 1);
adding = false;
}
}You’ll need one last line of code for saving newly added
customers. It’s not uncommon for the BindingSource to leave its current item in
the “edit state.” With entities, this means that the changes in the
UI won’t be pushed into the entities, and therefore SaveChanges will not see the need to do
any updates to the database. BindingSource.EndEdit will ensure that the UI
changes are registered with the entities. Add this method to the
Save Item button’s Click event,
just before SaveChanges is
called, as shown in Example 8-9.
Example 8-9. Using EndEdit to ensure that BindingSource completes the current edit process
VB
Private Sub CustomerBindingNavigatorSaveItem_Click _
 (ByVal sender As System.Object, ByVal e As System.EventArgs) _
 Handles CustomerBindingNavigatorSaveItem.Click
  CustomerBindingSource.EndEdit()
  context.SaveChanges()
End Sub
C#
private void customerBindingNavigatorSaveItem_Click
 (object sender, EventArgs e)
{
  customerBindingSource.EndEdit();
  context.SaveChanges();
}
Run the form again and add a new customer. You’ll be able to enter name and preference information and save the record. Because the context is keeping track of additions and edits, it is possible to make changes to multiple records before clicking the Save button. When you do, all of the changes you have made to the list of customers, whether they were additions or edits, will be sent to the database. The best way to ensure that the code is working is to stop the application after you have saved your changes, and then start it again. This will force it to requery the database, and you can verify that the changes were definitely persisted to the store.
Not all of the form features will work. For instance, you will run into problems if you attempt to delete a customer, because of constraints in the database that we have not yet addressed. In upcoming chapters, you will learn how to perform this and other types of functions with your entities, how to add business logic, how to write layered applications, and more.
You could add plenty of features to this form to make it even more functional, but it’s time to move on to a different type of client-side data binding: data binding in WPF.
For the WPF data-binding example in this section, you’ll focus on interacting with trips and their details: destination, lodging, and activities. You will also get a chance to see how many-to-many relationships work both for data retrieval and for updates.
If you’ve never created a WPF application before, this will be a useful, albeit simple, introduction. It will be a bit of a dive into the not-so-shallow end of the WPF pool, but the code samples should provide sufficient buoyancy. If you are looking for tips on how to make WPF perform its many shiny tricks, a data access book is not the place to look.
Note
Quite a number of wonderful WPF books, articles, and other resources are available—too many to list here. For a good first look at WPF, I recommend MSDN’s “How Do I?” videos at http://msdn.microsoft.com/en-us/bb629407.aspx#wpf/.
Currently, no data-binding controls for WPF are available “in the box” with Visual Studio 2008. Third-party control developers are a great source for WPF data-binding controls. But for this walkthrough, we’ll stick to what’s available directly with Visual Studio.
Note
WPF is a much younger technology than Windows Forms, and therefore it does not have the suite of data-binding controls available for Windows Forms. The WPF sample in this chapter will use controls that are available in Visual Studio 2008.
Microsoft is committed to providing WPF controls, and currently
provides a DataGrid in the WPF
Toolkit, available on its code-sharing site, CodePlex, at http://codeplex.com/wpf/. A number of third-party
providers have also written controls for WPF, including DataGrids and others that do data
binding.
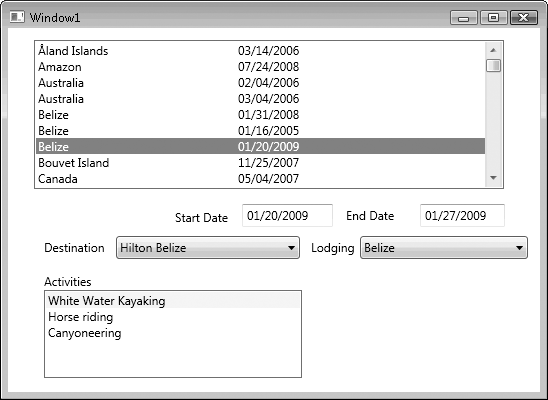
The purpose of this form will be to edit trips that exist in the BreakAway catalog. Trips are defined by a destination, a start and end date, a price, lodging, and a list of activities. Figure 8-14 shows the form you will build.
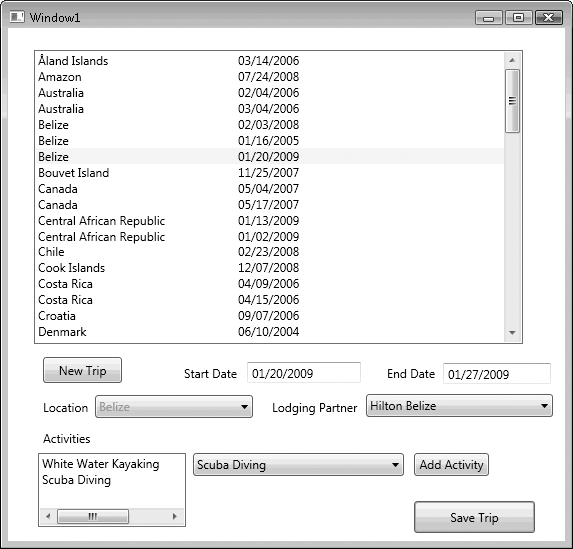
A slew of controls are involved in this form. You’ll learn how
to bind ListBoxes and TextBoxes and how to have them interact with
one another, as well as some tricks that you’ll need to know for doing
all of this with the Entity Framework.
We’ll begin by creating a new WPF project, adding the references to use the model, and getting all of the controls onto the form:
Create a new WPF project in the same solution where you created the model and the Windows Forms application.
Add a reference to the BreakAwayModel project and to
System.Data.Entityas you did for the previous application.Copy the app.config file from the Model project into this project.
Remember, this is just a cheat to quickly get the
ConnectionStringinto the current application.Drag a WPF
ListBoxcontrol from the Controls Toolbox onto the default form. This will be theListBoxfor displaying the trips.Change the
ListBox’s name tolstBoxTrips.
Adding events to WPF is the same as for Windows Forms. In C#, you can use the Events page of the Properties windows. In VB, you can do the same or use the Class Name and Method Name drop-downs in the Code window.
Declare variables for the form.
As in the previous application, you’ll need a context and some variables to contain the selection lists. You can add an
Importsorusingstatement for theBAGAnamespace so that you don’t have to type it repeatedly. While you’re at it, add theSystem.Data.Objectsnamespace as well. This will reduce some typing later on. (See Example 8-10.)Example 8-10. Adding the necessary namespaces and variables for the form
VB
Imports BAGA
Imports System.Data.Objects
Class Window1
  Private context As BAEntities
  Private activities As List(Of Activity)
  Private destinations As List(Of Destination)
  Private lodgings As List(Of Lodging)
  Private trips As List(Of Trip)
C# using BAGA; using System.Data.Objects; using System.Collections.ObjectModel; namespace BreakAwayWPFCSHarp { public partial class Window1 : Window { private BAEntities context; private List<Activity> activities; private List<Destination> destinations; private List<Lodging> lodgings; private List<Trip> trips;In the
Window.Loadedevent handler, add the code for retrieving the trips as well as the related selection lists (see Example 8-11).You can return the selection lists as generic lists, but you should use the
Executemethod to return trips asObjectResultsbecause the trips will be edited as well as data-bound.Note
Later on in the book, you’ll learn how to create a generic method that you can use to query for any reference lists so that it won’t be necessary to have separate queries for selection lists such as Destinations, Lodgings, and Activities.
Example 8-11. Querying for lists that will be needed by the form
VB
Private Sub Window1_Loaded _
 (ByVal sender As Object, ByVal e As System.Windows.RoutedEventArgs) _
 Handles Me.Loaded

  context = New BAEntities

  activities = context.Activities _
               .OrderBy(Function(a) a.ActivityName).ToList
  destinations = context.Destinations _
                 .OrderBy(Function(d) d.DestinationName).ToList
  lodgings = context.Lodgings _
             .OrderBy(Function(l) l.LodgingName).ToList
  Dim tripResults = context.Trips _
                    .OrderBy("it.Destination.DestinationName") _
                    .ToList
  lstBoxTrips.ItemsSource = tripResults
End Sub
C# private void Window_Loaded (object sender, System.Windows.RoutedEventArgs e) { context = new BAEntities(); activities = context.Activities .OrderBy(a => a.ActivityName).ToList(); destinations = context.Destinations .OrderBy(d => d.DestinationName).ToList(); lodgings = context.Lodgings .OrderBy(l => l.LodgingName).ToList(); trips = context.Trips . .OrderBy("it.Destination.DestinationName").ToList() lstBoxTrips.ItemsSource = trips; }
There are a few things to note about the code in Example 8-11. First, it
doesn’t use the Execute method.
Since we’re no longer using the Object data source, we can go back to
using ToList.
The other notable code is the ItemsSource property. This is the method
that WPF uses to bind lists to controls, rather than using DataSource.
Although the code identifies the ItemsSource, the Designer will need to know
some more information about how to present the data. Data binding in
WPF is very different from data binding in Windows Forms. On the
design side, WPF is made of controls within controls within
controls.
To get the first ListBox to
display the data that you set to its ItemsSource property, you’ll need to do a
few things to the XAML. For first-time WPFers, the following section
will build up the XAML for the ListBox step by step to explain all of the
working parts.
The XAML for the ListBox that
you put on the form starts out with only the name and its
margins:
<ListBox Margin="26,12,36,137" Name="lstBoxTrips" />
Note
Your XAML may be a little different from what’s displayed in
these examples because the positioning will not be the same. Not
only will your margin values be different, but also, depending on
the placement of your controls, you may have attributes such as
VerticalAlignment or HorizontalAlignment. Don’t worry about
those positioning differences from the examples you’ll see here.
Focus on the binding.
Next, you will need to define what the rows will look like. You
do this with a control called an ItemTemplate:
<ListBox Margin="25,22,42,197" Name="lstBoxTrips">
  <ListBox.ItemTemplate>
  </ListBox.ItemTemplate>
</ListBox>
Within the ItemTemplate, you
will use a DataTemplate because you
are binding to a set of data:
<ListBox Margin="25,22,42,197" Name="lstBoxTrips">
  <ListBox.ItemTemplate>
    <DataTemplate >
    </DataTemplate>
  </ListBox.ItemTemplate>
</ListBox>
Inside the DataTemplate, you
will need two TextBlocks: one to
display the DestinationName and
another to display the StartDate. A
DataTemplate can contain only a
single child. Therefore, we’ll use a StackPanel (container) control as the single
child and then place the TextBlock
controls inside the StackPanel.
This seems a little tricky, but it is the commonly used
method.
<ListBox Margin="25,22,42,197" Name="lstBoxTrips">
  <ListBox.ItemTemplate>
    <DataTemplate >
      <StackPanel Orientation="Horizontal">
        <TextBlock Width="200" />
        <TextBlock />
      </StackPanel>
    </DataTemplate>
  </ListBox.ItemTemplate>
</ListBox>StackPanels are vertical by
default. Since we want the destination and date to be side by side,
Orientation is explicitly set to
Horizontal.
Finally, you need to display data in the TextBlocks. This is where the data binding
finally comes in. The Text value
uses specific syntax. Binding
indicates that it will be getting its data by way of binding, rather
than having it hardcoded into the list. Path refers to the name of the property
within whatever it is bound to, and StringFormat defines how to format the
string if you don’t want to see the default format:
<ListBox Margin="25,22,42,197" Name="lstBoxTrips">
  <ListBox.ItemTemplate>
    <DataTemplate >
      <StackPanel Orientation="Horizontal">
        <TextBlock Width="200"
                   Text="{Binding Path=Destination.DestinationName}"/>
        <TextBlock Text="{Binding
                         Path=StartDate, StringFormat=MM/dd/yyyy}"/>
      </StackPanel>
    </DataTemplate>
  </ListBox.ItemTemplate>
</ListBox>
Notice that the Path of the
first TextBlock is Destination.DestinationName. WPF will read
the Trip.Destination navigation
property and get to the DestinationName.
Add the ItemTemplate and all
of its children shown in the preceding code to the XAML in Design
view. You can type it directly into the XAML or drag the controls from
the Toolbox. You can type the TextBlock text values directly into the
XAML.
You’ve got enough to see some action already. Run the form to
see the trip destinations and start dates listed in the ListBox.
Warning
All of the typing you’ve done in the XAML may result in some typos. Although the consequences of some typos will be exceptions thrown at runtime, often you won’t see the results you expect even if there are no typos highlighted by IntelliSense in the code. If you’re testing the code, and controls are empty when they shouldn’t be, ensure that you typed in the correct control names and property names.
The next step is to view the trip details. On the form shown in Figure 8-14, you can see that the start and end dates appear in text boxes on the form, and the destination and lodging information is displayed in combo boxes. Eventually, you will use combo boxes for editing trips as well.
WPF’s binding goes far beyond binding data to controls. You can
also bind controls to each other, creating dependencies between them.
We’ll use this feature to link the TextBox controls to the ListBox. The TextBox controls will obtain their content
from the ListBox’s selected
trip.
Drag two TextBox controls
(not TextBlocks) and two ComboBox controls onto the form. Arrange
them similar to the example and change their names to txtStart, txtEnd, cboDestination, and cboLodging.
The original XAML of the txtStart controls will look like
this:
<TextBox Height="23" Width="85" Margin="124,0,207,101" Name="txtStart"
         VerticalAlignment="Bottom" Grid.Column="0"/>
You’ll be adding a Binding
element as a child of each TextBox, which means you’ll need to remove
the slash at the end of the control so that you can add the TextBox closing element after the
binding.
Example 8-12
shows what the txtStart and
txtEnd controls will look like
after you add the Binding
elements.
Example 8-12. The txtStart and txtEnd controls after adding the Binding element
<TextBox Height="23" Width="85" Margin="124,0,207,101" Name="txtStart"
         VerticalAlignment="Bottom" Grid.Column="0">
  <Binding ElementName="lstBoxTrips"
           Path="SelectedItem.StartDate"
                StringFormat="{}{0:MM/dd/yyyy}" />
</TextBox>

<TextBox Height="23" Width="85" Margin="0,0,54,101" Name="txtEnd"
         VerticalAlignment="Bottom" Width="120" >
  <Binding ElementName="lstBoxTrips"
           Path="SelectedItem.EndDate"
                 StringFormat="{}{0:MM/dd/yyyy}" />
</TextBox>Binding a WPF ComboBox is
similar to binding a Windows Forms ComboBox in that you need to set the
source (ItemsSource) to a set of
data, identify the value and display properties, and identify what
source provides its value. We’ll bind to the ItemsSource in code, just as you did for
the ListBox. Then we’ll use XAML
to provide the rest of the information as you just did for the
TextBox.
First, the code.
In the Window.Loaded event,
bind the results of the Destinations and Lodgings queries to the ComboBoxes. You can add this right beneath
the code for binding the lstBoxTrips control:
VB
cboDestination.ItemsSource = destinations
cboLodging.ItemsSource = lodgings
C#
cboDestination.ItemsSource = destinations;
cboLodging.ItemsSource = lodgings;In the XAML, add more attributes to the ComboBox controls, rather than adding a
child element as you did for the TextBoxes, as shown in Example 8-13.
Example 8-13. Adding more attributes to the ComboBox controls
Before:
<ComboBox Height="23" Margin="0,0,36,72" Name="cboLodging" Width="198"/>

After:
<ComboBox Height="23" Margin="0,0,36,72" Name="cboLodging" Width="198"
          DisplayMemberPath="LodgingName"
          SelectedValuePath="LodgingID"
          SelectedValue="{Binding ElementName=lstBoxTrips,
                         Path=SelectedItem.Lodging.LodgingID}"/>
The DisplayMemberPath and
SelectedValuePath attributes
refer to the properties of the list of lodgings to which you bound
the ComboBox in code. SelectedValue gets the LodgingID from the
currently selected trip in the ListBox.
Example 8-14
shows the XAML for the ComboBox
that displays the selected trip’s destination.
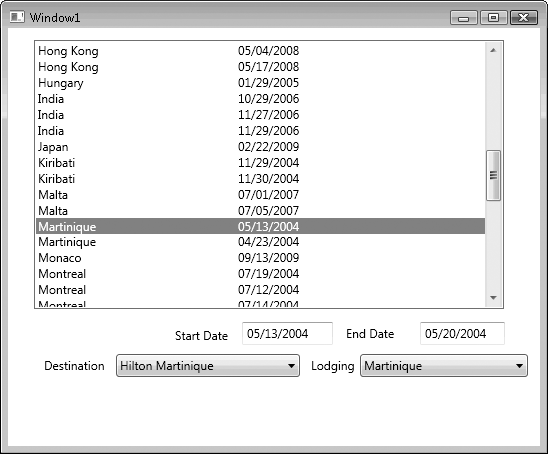
Now your form is starting to get interesting. When you run the
application, the Start Date and End Date text boxes and the
Destination and Lodging combo boxes should sync up to whatever trip
is selected in the ListBox, as
shown in Figure 8-15.
You still have three more tasks to complete: viewing the activities for a trip, editing trip details, and adding new trips.
The Activities property is an
EntityCollection and you need to
display it in a control that can display sets. For that, we’ll use
another ListBox.
Activities and trips are joined in a many-to-many
relationship. Although the Entity Framework can query across this
type of relationship and coordinate inserts, updates, and deletes
without you having to work directly with the Join table, there is one thing that the
Entity Framework is unable to do with this type of relationship,
which is explained in the following paragraphs.
In previous examples, you saw how Object Services can
automatically wire up related objects that are in the context. It
will find entities that are related and build graphs between them.
You took advantage of this in the Windows Forms application earlier.
Because the activities and destinations were being returned in their
own queries, you were able to remove the Include paths to the Customer preference properties.
In the Window.Loaded event
for this WPF form, you have a query that returns a list of
activities. You will use this as a pick list when you create a new
trip. So, since those activities are already in the cache, it would
make sense that they will automatically be wired up to the existing
trips. But they aren’t. This is expected behavior and you’ll need to
either load the related data with Include or Load, or manually attach the entities. In
this example, you will use an Include. You’ll learn more about this in
Chapter 15.
Note
Object Services can automatically wire related entities only
when one of the ends of the relationship has an EntityReference property that points to
the other end of the relationship. Because both the Activities property
of Trip and the Trips property of Activity are EntityCollections, the relationship
information that is needed to bind them doesn’t exist within
either entity. That is why you need to explicitly create the graph
with one of the Object Services methods for joining related
entities.
The bottom line is that you need to change the Customer query in the Window.Loaded event. To do this, add an
Include method to pull in the
activities, as shown in the following code:
VB
trips = context.Trips.Include("Activities") _
               .OrderBy("it.Destination.DestinationName") _
               .ToList
C#
trips = context.Trips.Include("Activities")
.OrderBy("it.Destination.DestinationName")
.ToList()Drag another ListBox onto
the Window you are designing. You can take advantage of binding to
get its data from the Trips
ListBox just as you have done with the TextBoxes and
ComboBoxes. The syntax is a
little different because of the nature of the control.
The ListBox will look
similar to when it is first added to the Window:
<ListBox Height="88" Margin="36,0,238,12" Name="lstActivities" />
You need to use a number of attributes to data-bind in a
ListBox. For example, DataContext performs
the binding to the source—in this case, lstBoxTrips. ItemsSource points to the actual
items that will be used to populate the ListBox. You want the Activities EntityCollection of the
selected trip for this attribute. Next, DisplayMemberPath identifies which
property of the ItemsSource will
be displayed in the box. ActivityName will do the trick here.
Finally, the ListBox needs a
little extra help syncing up with the source ListBox. You need to set IsSynchronizedWithCurrentItem to True.
Example 8-15 shows the modified
ListBox with all of the
data-binding attributes in place.
Example 8-15. The modified ListBox
<ListBox Height="88" Margin="36,0,238,12" Name="lstBoxActivities"
DataContext="{Binding ElementName=lstBoxTrips, Path=SelectedItem}"
ItemsSource="{Binding Path=Activities}"
DisplayMemberPath="ActivityName"
IsSynchronizedWithCurrentItem="True"
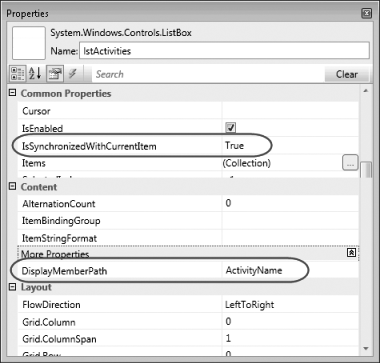
/>Don’t forget that you can set some of these values in the
Properties window for the control. Figure 8-16 shows the
IsSynchronizedWithCurrentItem and
DisplayMemberPath properties. The
other binding attributes are not available in the Properties window,
so you’ll have to type them manually.
Once you have the ListBox
control configured, you should be able to see the effect of having
each trip’s activities displayed in this ListBox as you select different trips from
the main ListBox. Figure 8-17 shows the
application performing its newest trick.
Now it’s time for some editing.
In the Windows Forms application, the BindingSource coordinated user actions with
entities. If a user edited data on the form, the BindingSource automatically pushed that
change into the entity, even for the related entities.
Not so with WPF. Although the scalar properties, such as the
StartDate and EndDate properties, will be updated with no
more effort than calling SaveChanges, you’ll need to do a little
extra coding to get the related entities to update.
Add a new button to the form and change its Content property to Save. Then double-click the button to get to
the Click event handler, the
button’s default event, and add a call to SaveChanges in the event handler, as shown
in Example 8-16.
Example 8-16. Enabling saves
VB
Private Sub btnSave_Click _
(ByVal sender As System.Object, _
ByVal e As System.Windows.RoutedEventArgs) Handles btnSave.Click
context.SaveChanges()
End SubC#
private void btnSave_Click
(object sender, System.Windows.RoutedEventArgs e)
{
context.SaveChanges();
}Run the form and edit one of the trips, changing a date and the lodging. Close the form and then run it again. When you select that trip again, you’ll see that the date was updated but not the lodging.
The problem isn’t that it’s related data, but that the ComboBox does not support updating. It is
not sending the change back to the object. You’ll have to do that
manually using the control’s SelectionChanged event. SelectionChanged is the default event, so
you can get to it by double-clicking the ComboBox in the Designer.
Do this for the Lodging and Destination combo boxes and then add
the code in Example 8-17 to change the
currently selected trip’s Lodging
and Destination properties to the
ComboBox selections.
Example 8-17. Changing the currently selected trip’s Lodging and Destination properties to the ComboBox selections
VB
Private Sub cboLodging_SelectionChanged _
(ByVal sender As System.Object, _
ByVal e As System.Windows.Controls.SelectionChangedEventArgs) _
Handles cboLodging.SelectionChanged
Dim selectedTrip = CType(lstBoxTrips.SelectedItem, Trip)
selectedTrip.Lodging = CType(cboLodging.SelectedItem, Lodging)
End Sub
Private Sub cboDestination_SelectionChanged _
(ByVal sender As System.Object, _
ByVal e As System.Windows.Controls.SelectionChangedEventArgs) _
Handles cboDestination.SelectionChanged
Dim selectedTrip = CType(lstBoxTrips.SelectedItem, Trip)
selectedTrip.Destination = _
CType(cboDestination.SelectedItem, Destination)
End SubC#
private void cboLodging_SelectionChanged
(object sender, System.Windows.Controls.SelectionChangedEventArgs e)
{
var selectedTrip = (Trip)lstBoxTrips.SelectedItem;
selectedTrip.Lodging = (Lodging)cboLodging.SelectedItem;
}
private void cboDestination_SelectionChanged
(object sender, System.Windows.Controls.SelectionChangedEventArgs e)
{
var selectedTrip = (Trip)lstBoxTrips.SelectedItem;
selectedTrip.Destination = (Destination)cboDestination.SelectedItem;
}You might prevent destinations from being edited on existing
trips, but you’ll need to use that ComboBox for new trips. If the user
changes the trip’s destination, you won’t see the change on the
ListBox.
WPF provides a way to sort the items of list controls with a
SortedDescriptions collection. If
you re-sort the list after the user selects a destination from the
combo box, the list will be refreshed, the new destination name will
appear, and the item will be properly sorted using the new
name.
Note
WPF’s sorting features are very different from what you may
be used to. You can read more about SortedDescriptions in the MSDN documentation.
Add the code in Example 8-18 to the end of the
cboDestination’s SelectionChanged event.
Example 8-18. Allowing the List to be sorted
VB
lstBoxTrips.Items.SortDescriptions.Add _
(NewSortDescription("Destination.DestinationName", _
ListSortDirection.Ascending))
lstBoxTrips.Items.SortDescriptions.Add _
(New SortDescription("StartDate", ListSortDirection.Descending))C#
lstBoxTrips.Items.SortDescriptions.Add
(new SortDescription("Destination.DestinationName",
ListSortDirection.Ascending));
lstBoxTrips.Items.SortDescriptions.Add
(new SortDescription("StartDate", ListSortDirection.Descending));Next, we’ll add the ability to add activities to a trip. To do this, you’ll need a way to select a new activity to add.
Add a new ComboBox to the
form with the name cboActivities.
In the Window.Loaded event, you
have already queried for the list of activities. Now you need to bind
those results to this new ComboBox.
Add the following binding beneath the binding for cboLodgings:
VB
cboActivities.ItemsSource = activitiesC#
cboActivities.ItemsSource = activities;Next, the ComboBox needs to
know which property to display and which to use as the value. You can
set both of these in the Properties window for the ComboBox.
Change SelectedValuePath to
ActivityID and DisplayMemberPath to ActivityName. Unlike the other combo boxes,
no additional bindings need to be typed directly into the XAML.
The ComboBox has a SelectionChanged event, but it’s not useful
for reacting to a user selection. Instead, add another button to the
form. We’ll use that to read the selected item in the cboActivities ComboBox and add it to the
current trip’s Activities EntityCollection. The
ListBox that shows the activities
will update automatically because of its bindings.
Add the code in Example 8-19 to the new
button’s Click event.
Example 8-19. Adding Activities to the selected trip entity
VB
Private Sub btnAddActivity_Click _
(ByVal sender As System.Object, _
ByVal e As System.Windows.RoutedEventArgs) _
Handles btnAddActivity.Click
Dim selectedActivity = CType(cboActivities.SelectedItem, Activity)
If Not selectedActivity Is Nothing Then
Dim selectedTrip = CType(lstBoxTrips.SelectedItem, Trip)
If Not selectedTrip Is Nothing Then
selectedTrip.Activities.Add(selectedActivity)
End If
End If
End SubC#
private void btnAddActivity_Click
(object sender, System.Windows.RoutedEventArgs e)
{
Activity selectedActivity = (Activity)cboActivities.SelectedItem;
if (selectedActivity != null)
{
var selectedTrip = (Trip)lstBoxTrips.SelectedItem;
if (selectedTrip != null)
{
selectedTrip.Activities.Add(selectedActivity);
}
}
}This code ensures that an activity and a trip are selected
before it tries to perform the main task. Notice how the new activity
is added to the trip’s Activities
collection with the Add method. You
will likely use the EntityCollection.Add method quite a lot in
your Entity Framework-based applications. Chapter 15 drills into this
functionality in detail.
Run the application, select a trip, and add some activities.
You’ll see the Activities ListBox
react. You can save the changes with your existing Save method. Note that since the data is
not refreshed, again you’ll want to stop and start the application
for proof that the change was saved.
Adding new trips will take a bit more code to implement. Not only will you need to set some defaults on the new trip entity, but also you’ll have to use a few tricks to make the user interface flow properly.
Start by adding a new button to the form that will be the user’s
New Trip button. That’s all you need to do in the UI. In the button’s
Click event, you’ll create a new
trip and set some defaults.
Before modifying the new button’s Click event, you’ll need to make two
changes that are related to WPF’s data binding and are not
specifically related to the Entity Framework.
In the Windows form, you had a BindingSource to coordinate between the
controls and the data. WPF has no such control; however, it does
have another mechanism, called the ObservableCollection. Without getting too
sidetracked, if you use an ObservableCollection of trips as the
source for the Trip ListBox
control, as you add and remove items from this collection the
ListBox will respond by adding or
removing the items from the display.
It’s worth the effort to use this rather than a ListBox so that you won’t have to write
the extra code to stuff your new trip into the ListBox.
To pull this off, you’ll need a new variable that is scoped to
the whole Window class. Add this
to the Window’s declarations.
We’ll instantiate it in the declaration so that it’s ready to use in
the Window.Loaded event.
VB
Private ObservableTrips As New ObservableCollection(Of Trip)C#
private ObservableCollection ObservableTrips = new ObservableCollection();In the Window.Loaded event,
after the Trips query has been
executed, transfer the trip results into the new collection. Then
change the ItemsSource of the
Trips ListBox to this new
collection, as shown in the following code:
VB
For Each t In trips
  ObservableTrips.Add(t)
Next
lstBoxTrips.ItemsSource = ObservableTrips
C#
foreach (var t in trips)
{
ObservableTrips.Add(t);
}
lstBoxTrips.ItemsSource = ObservableTrips;Now when you add new trips to the collection, they will
automatically pop into the ListBox. But they’ll be at the bottom and
will remain there until you run the application again. That’s no
good. You can get the ListBox to
sort on the DestinationNames and
StartDates using this WPF code,
which is very different from what you might be used to with Windows
Forms or ASP.NET applications.
You can copy the sorting code from the Destination ComboBox’s SelectionChanged event into the Window.Loaded event to benefit from the
sorting early on. In this way, if you add a new trip before you hit
the other location where the sort is applied, the new trip will drop
into the correct position in the ListBox. With the ListBox controlling the sort, you can
remove the OrderBy method in the
Trips query.
With that functionality in place, you can now add a new trip and have the form respond in an expected manner.
The Click event of the New
Trip button will add a new trip, set some default values, and add
the trip into the ListBox’s items
(see Example 8-20).
Example 8-20. The Click event of the New Trip button
VB
Private Sub btnNewTrip_Click _
 (ByVal sender As System.Object, _
  ByVal e As System.Windows.RoutedEventArgs) Handles btnNewTrip.Click

 'create a new Trip object with default date values
  Dim newtrip = New Trip
  newtrip.StartDate = Today
  newtrip.EndDate = Today

 'add a default destination. Sorting will fail if Destination is null
   newtrip.Destination = destinations[0]

 'add the trip to the context so that its changes will get tracked
   context.AddToTrips(newtrip)

 'add the new trip to the bound collection
   ObservableTrips.Add(newtrip)
 'select the new trip so that the bound controls will be tied to it
   lstBoxTrips.SelectedItem = newtrip

End Sub
C#
private void btnNewTrip_Click
(object sender, System.Windows.RoutedEventArgs e)
{
//create a new Trip object with default System.DateTime values
var newtrip = new Trip();
newtrip.StartDate = System.DateTime.Today;
newtrip.EndDate = System.DateTime.Today;
//add a default destination. Sorting will fail if Destination == @null
newtrip.Destination = destinations[0];
//add the trip to the context so that its changes will get tracked;
context.AddToTrips(newtrip);
//add the new trip to the bound collection
ObservableTrips.Add(newtrip);
//select the new trip so that the bound controls will be tied to it
lstBoxTrips.SelectedItem = newtrip;
}You may want to consider using one last bit of code: validation code for the new trip.
You can call the short method shown in Example 8-21 prior to calling SaveChanges to prevent your demo from
blowing up if the user gets click-happy. It just checks to make sure
that any new trips have a destination and valid start and end dates.
If it returns False, it displays
some type of message and doesn’t call SaveChanges.
Example 8-21. Validating the new trip’s data
VB
Private Function validateNewTrips() As Boolean
  Dim newtrips = From t In ObservableTrips _
                 .Where(Function(t) t.TripID = 0)
  For Each Trip In newtrips
    If Trip.Lodging Is Nothing Then
        Return False
    ElseIf Trip.StartDate < Today Then
      Return False
    ElseIf Trip.EndDate < Trip.StartDate Then
      Return False
    End If
  Next
  Return True 'when newTrips.Count=0 or all trips validate
End Function
C#
private bool validateNewTrips()
{
var newtrips =
from t in ObservableTrips.Where(t => t.TripID == 0)
select t;
foreach (var Trip in newtrips)
{
if (Trip.Lodging == null)
return false;
else if (Trip.StartDate < System.DateTime.Today)
return false;
else if (Trip.EndDate < Trip.StartDate)
return false;
}
return true; //when newTrips.Count==0 or all trips validate
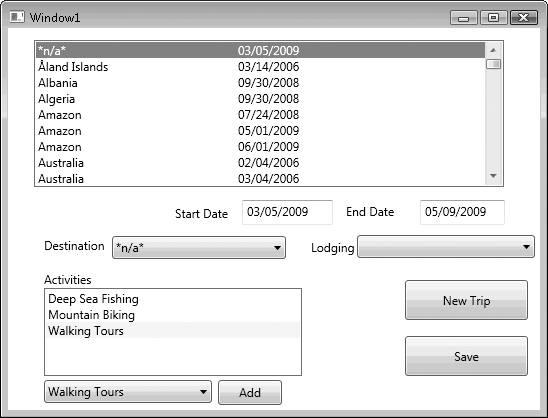
}Run the demo again and check out the new features. When you
add a new trip, watch how smoothly the bound Trip ListBox displays the new trip at the
top of the ListBox. When you change the default
destination, the trip will reappear alphabetically sorted in the
ListBox, but still selected. Add
some activities to the new trip. Save your changes and restart the
application to prove that it all really worked (see Figure 8-18).
The Entity Framework has a number of levels of entry. In this chapter, you got a chance to apply much of what you learned in previous chapters in creating two starter client-side applications. The Windows Forms application leaned heavily on drag-and-drop data binding, whereas the WPF application let you get your hands a little dirtier as you interacted with the entities in code.
The applications in this chapter went beyond typical Hello World introductory demos and gave you an opportunity to learn some of the nuances of data binding with entity objects. At the same time, you learned how to perform some good data-binding tricks in Windows Forms and WPF that will make life with entities a little easier.
In the next chapter, you will dive into a little more theory as we go into much more detail regarding how Object Services manages entity objects.