
In Chapter 10, you learned how to extend code-generated entity classes using partial classes and methods. However, this still may not provide enough extensibility for you to insert your own business logic. You may have an existing application with existing classes in which you would like to take advantage of the Entity Data Model (EDM) and the Entity Framework APIs. You may feel too limited by the classes that the EDM Designer generates from the model, and prefer to write your own classes to have true business objects that can integrate into the framework. You may even want to have classes that leverage the Entity Framework, but are not bound to it.
You can create custom classes in two ways. The first is to have your
objects inherit from EntityObject. This
brings along everything you need to have your class integrate with Object
Services. The second method is to implement some key interfaces that will
allow your objects to take advantage of the state management and
relationship management features of Object Services.
In this chapter, you’re going to get a little break from the BreakAway model. The examples here will be against a modified version of Microsoft’s sample database, AdventureWorksLT, which is based on the imaginary AdventureWorks Cycles company. The database contains information for tracking customers, orders, and products. The SQL script for creating this modified version of the database, AdventureWorksSuperLT, is available on the book’s website.
Be aware that in version 1 of the Entity Framework, you cannot completely separate entity classes from the API. You’ll minimally need to implement some interfaces for your classes to work with Object Services. This will be the focus of the second part of this chapter.
Regardless of which method you choose to implement custom classes,
the classes must fit into the EDM that they support, or vice versa. The
EDM Designer’s code generator creates one class for each entity in the
model. If you don’t use the generated code, you must supply all of the
classes the model expects, including the EntityContainer class, which returns the
EntitySets.
If you have preexisting classes, you’ll need to modify the model to make it line up with your classes. Not only should the entity names match up with the class names, but also the properties and their attributes need to be the same as those in your classes.
Each class must do the following:
Each property of each class must use the EdmScalarPropertyAttribute attribute. Use
the attributes parameters to note
EntityKeys and non-Nullable values.
As stated earlier, one of the ways to create custom classes that
will interact with Object Services is to inherit from EntityObject.
The classes that the EDM Wizard generates inherit from EntityObject. By looking closely at the
generated code, you can learn what is required when building your own
custom classes in this way. As you read through this chapter, you
might find it helpful to reference an open file that was generated
from an EDM.
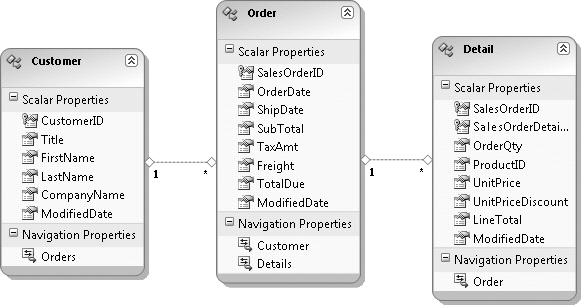
Figure 19-1
shows a simple model created from the Customer, SalesOrderHeader, and SalesOrderDetail tables in the
AdventureWorksSuperLT database. In the modified database, I removed
many of the non-Nullable fields to
simplify the example.
A section of the Order class
follows, which will allow you to see how the critical pieces are
constructed.
To keep you focused on the changes you need to make to your
classes, the only business logic implemented here is to update the
Order class’s TotalDue property anytime the SubTotal, Freight, or TaxAmt is changed. TotalDue becomes a read-only property in the
class, and in the model the TotalDue property’s Setter property is Internal. Look for the UpdateTotalDue method at the end of the
sample.
You’ll want to import these three namespaces to simplify your coding:
System.DataSystem.Data.Objects.DataClassesSystem.Data.Metadata.Edm
Attributes from the System.Data.Metadata.Edm namespace are used
to provide the mapping between your class and the entity in the model.
Two attributes that you will need to use throughout your classes:
EdmRelationshipAttributeEdmEntityTypeAttribute
EdmRelationshipAttribute is
required for each association. The wizard combines all of the EdmRelationshipAttributes at the top of the
generated code file. You can put them all together in one class or
module as well. Visual Studio creates an AssemblyInfo file for every project. In VB,
it’s inside the default My
Project folder. In C#, it’s in the Properties folder. This file is a standard
place for assembly attributes.
You could also distribute the EdmRelationshipAttributes among their
relevant classes, putting them in the file where the class is defined.
However, if you go this route, you have a choice to make. Each
relationship involves two classes, but you can’t duplicate an assembly
attribute in a project. Therefore, you’ll have to pick which of the
two classes will contain the attribute. As long as it’s somewhere in
the project, the compiler will find it when the project is
built.
The EdmRelationshipAttribute
attribute shown in Example 19-1 describes the
association that exists between Order and Detail.
Example 19-1. Attributes defining model associations
VB
<Assembly: EdmRelationshipAttribute("AWModel", _
    "FK_OrderDetail_Order_SalesOrderID", "Order", _
    RelationshipMultiplicity.One, GetType(Order), "Detail", _
    RelationshipMultiplicity.Many, GetType(Detail))>
C#
[assembly: EdmRelationshipAttribute("AWModel",
"FK_OrderDetail_Order_SalesOrderID", "Order",
RelationshipMultiplicity.One, typeof(Order), "Detail",
RelationshipMultiplicity.Many, typeof(Detail))]As shown in Example 19-2, each entity
class needs to have the EdmEntityTypeAttribute with the model’s
namespace and the name of the entity in the model to which it binds.
It also needs to inherit from EntityObject.
Example 19-2. A class inheriting from EntityObject and using an attribute to identify which entity in the model it maps to
VB
<EdmEntityTypeAttribute(NamespaceName:="AWModel", Name:="Order")> _
Public Class Order
  Inherits EntityObject
C#
[EdmEntityTypeAttribute(NamespaceName = "AWModel", Name = "Order")]
public class Order : EntityObjectFollowing that is a list of the local variables. You may have
additional variables that are not in the Order entity in the model, but minimally,
you need one for each property of the entity—both scalar and
navigation properties (see Example 19-3).
Example 19-3. Creating a local variable for each property in the entity
VB
Private _SalesOrderID As Integer
Private _orderDate As Date
Private _shipDate As Date
Private _subTotal As Decimal
Private _taxAmt As Decimal
Private _freight As Decimal
Private _totalDue As Decimal
Private _modifiedDate As Date
Private _customer As Customer
Private _details As Detail
C#
private int _SalesOrderID;
private DateTime _orderDate;
private DateTime _shipDate;
private decimal _subTotal;
private decimal _taxAmt;
private decimal _freight;
private decimal _totalDue;
private DateTime _modifiedDate;
private Customer _customer;
private Detail _details;As you define the properties of your class, the EdmScalarProperty attribute points the
property to a property of the entity in the model (see Example 19-4). EdmScalarProperty takes
two parameters: EntityKey and
IsNullable. The parameters are not
required. Because EntityKey
defaults to False and IsNullable to True, if your scalar property is Nullable and is not the EntityKey, you can skip this
attribute.
In the Order entity, SalesOrderID is an EntityKey and is not Nullable, so those attributes need to be
specified, and therefore the property needs this attribute.
Example 19-4. Using the EdmScalarProperty for scalar properties
VB
  <EdmScalarProperty(EntityKeyProperty:=True, IsNullable:=False)> _
   Public Property SalesOrderID() As Integer
    Get
      Return _SalesOrderID
    End Get
    Set(ByVal value As Integer)
      ReportPropertyChanging("SalesOrderID")
      _SalesOrderID = value
      ReportPropertyChanged("SalesOrderID")
    End Set
  End Property
C#
[EdmScalarProperty(EntityKeyProperty=true, IsNullable=false)]
public int SalesOrderID
{
get
{
return _SalesOrderID;
}
set
{
ReportPropertyChanging("SalesOrderID");
_SalesOrderID = value;
ReportPropertyChanged("SalesOrderID");
}
}For C#, you should not use auto-implemented properties. For the
entity to be change-tracked, you’ll need to report property changes to
the object. EntityObject has
built-in functionality for that, with the ReportPropertyChanging and ReportPropertyChanged methods. If you want
to take advantage of those, you’ll need the set clause, which you won’t have with an
auto-implemented property. If, however, you plan to report changes
using a different mechanism, the auto-implemented property will
suffice, and you won’t need the local variable for the property
either.
TaxAmt is a non-Nullable field, so you need to include the
IsNullable parameter in the
attribute to indicate that the value is false. It also calls the
UpdateTotalDue method, which is the
only way to set the TotalDue
property.
TotalDue is a ReadOnly property. In the database, it’s a
calculated field, so the application doesn’t update it. However, in
the application, you certainly don’t want to go to the database to
have the calculation performed. Each time one of the three
properties—TaxAmt, SubTotal, or Freight—changes, UpdateTotalDue will be called and the
_totalDue
variable will be recalculated. Even though it’s read-only, you’ll need
to have the setter for the C# code. See Example 19-5.
Example 19-5. Calling a method in one property that updates a ReadOnly property
VB
<EdmScalarProperty(IsNullable:=False)> _
Public Property TaxAmt() As Decimal
  Get
    Return _taxAmt 'could be calculated also
  End Get
  Set(ByVal value As Decimal)
    _taxAmt = value
    UpdateTotalDue()
  End Set
End Property

<EdmScalarProperty(IsNullable:=False)> _
  Public ReadOnly Property TotalDue() As Decimal
  Get
    Return _totalDue
  End Get
End Property

Private Sub UpdateTotalDue()
  _totalDue = _subTotal + _taxAmt + _freight
End Sub
C#
[EdmScalarProperty(IsNullable=false)]
public decimal TaxAmt
{
get
{
return _taxAmt; //could be calculated also;
}
set
{
_taxAmt = value;
UpdateTotalDue();
}
}
[EdmScalarProperty(IsNullable=false)]
public decimal TotalDue
{
get
{ return _totalDue;
}
Set
{
_totalDue = value;
}
}
private void UpdateTotalDue()
{
_totalDue = _subTotal + _taxAmt + _freight;
}The other scalar properties for Order are not listed, as they don’t
demonstrate anything new.
For navigation properties to take advantage of the Entity Framework, you’ll want to emulate the way the framework’s code generator builds them. Let’s first take a look at the code-generated properties and then you’ll see how to create your own.
Navigation properties get a different attribute:
EdmRelationshipNavigationPropertyAttribute
This attribute needs to know the name of the association as well as the name of the role on the other end. This comes from the properties of the association, which you can see right in the Designer, shown in Figure 19-2.

Details is an EntityCollection. To modify the collection
you need to call Add, Attach, and Remove, but you never set the property
directly. Therefore, the Details
property must be Read-Only.
Notice that this property does not return a variable, but creates
the EntityCollection on the fly
using the entity’s RelationshipManager. You may recall
working directly with the RelationshipManager in Chapter 15.
Example 19-6
demonstrates how to define the Details navigation property for the
Order class.
Example 19-6. Defining a navigation property for an EntityCollection
VB
<EdmRelationshipNavigationPropertyAttribute("AWModel", _
   "FK_OrderDetail_Order_SalesOrderID", "Detail")> _
Public ReadOnly Property Details() As EntityCollection(Of Detail)
  Get
    Return CType(Me, IEntityWithRelationships).RelationshipManager _
                 .GetRelatedCollection(Of Detail) _
           ("FK_OrderDetail_Order_SalesOrderID", "Detail")
  End Get
End Property
C#
[EdmRelationshipNavigationPropertyAttribute("AWModel",
"FK_OrderDetail_Order_SalesOrderID", "Detail")]
public EntityCollection<Detail> Details
{
get
{
return ((IEntityWithRelationships)this).RelationshipManager
.GetRelatedCollection<Detail>
("FK_OrderDetail_Order_SalesOrderID", "Detail");
}
}If you want to take full advantage of Object Services, you
will want not just the navigation property (Customer in this case), but also an
EntityReference. Here’s how to
construct both of them.
Note
I cheated a little here and stole code from a generated file so that you can see how the navigation properties work by default in the Entity Framework. Your custom classes may already have navigation logic that you don’t want or need to replace.
Customer is a property in
the model, so to map back to the model, it uses the EdmRelationshipNavigationPropertyAttribute.
If you recall the Value
property of EntityReference, you
will recognize it here. And here is where you can truly see how the
EntityReference uses its Value property to supply the value object
to the navigation property. In other words, Order.Contact is fulfilled by Order.ContactReference.Value. As you saw
in Chapter 17, when
you call ContactReference, Object Services
uses the RelationshipEntry to
find the correct Customer entity to return.
Example 19-7
shows how you can create an EntityReference navigation property in
your custom class.
Example 19-7. Defining a navigation property for the value of an EntityReference
VB
<EdmRelationshipNavigationPropertyAttribute("AWModel", _
         "FK_Order_Customer_CustomerID", "Customer")> _
Public Property Customer() As Customer
  Get
    Return CType(Me, IEntityWithRelationships) _
           .RelationshipManager.GetRelatedReference(Of Customer) _
           ("FK_Order_Customer_CustomerID", "Customer").Value
    End Get
  Set(ByVal value As Customer)
    CType(Me, IEntityWithRelationships) _
    .RelationshipManager.GetRelatedReference(Of Customer) _
    ("FK_Order_Customer_CustomerID", "Customer").Value = value
  End Set
End Property
C#
[EdmRelationshipNavigationPropertyAttribute("AWModel",
"FK_SalesOrder_Customer_CustomerID", "Customer")]
public Customer Customer
{
get
{
return ((IEntityWithRelationships)(this))
.RelationshipManager.GetRelatedReference<Customer>
("AWModel.FK_SalesOrder_Customer_CustomerID", "Customer")
.Value;
}
set
{
((IEntityWithRelationships)(this))
.RelationshipManager.GetRelatedReference<Customer>
("AWModel.FK_SalesOrder_Customer_CustomerID", "Customer").Value
= value;
}
}The CustomerReference
EntityReference does not map back to the model; therefore,
it does not need an Edm property
attribute. This property gets and sets the EntityReference using the GetRelatedReference and InitializeRelatedReference methods of the
RelationshipManager (see Example 19-8).
Example 19-8. Defining a navigation property for an EntityCollection
VB
Public Property CustomerReference() As EntityReference(Of Customer)
  Get
    Return CType(Me, IEntityWithRelationships) _
           .RelationshipManager.GetRelatedReference(Of Customer) _
           ("FK_Order_Customer_CustomerID", "Customer")
  End Get
  Set(ByVal value As EntityReference(Of Customer))
    If (Not (value) Is Nothing) Then
      CType(Me, IEntityWithRelationships) _
         .RelationshipManager.InitializeRelatedReference(Of Customer) _
         ("FK_Order_Customer_CustomerID", "Customer", value)
    End If
  End Set
End Property
C#
public EntityReference<Customer> CustomerReference
{
get
{
return ((IEntityWithRelationships)(this))
.RelationshipManager.GetRelatedReference<Customer>
("AWModel.FK_SalesOrder_Customer_CustomerID", "Customer");
}
set
{
if ((value != null))
((IEntityWithRelationships)(this)).
RelationshipManager.InitializeRelatedReference<Customer>
("AWModel.FK_SalesOrder_Customer_CustomerID", "Customer", value);
}
}
Custom Classes and Graph SerializationThe default code generator adds serialization attributes to the entity classes and their properties. If you are planning to use these objects in services or in other scenarios where serialization is required, you need these attributes in your custom classes.
The first serialization attribute ensures that a class will be included if it is part of a graph that is being serialized with WCF:
System.Runtime.Serialization.DataContractAttribute(IsReference:=true)
The second serialization attribute allows the class to be either XML or binary serialized:
System.Serializable()
Example 19-9 shows what these look like in the class declaration.
Example 19-9. Making entities serializable for web and WCF services
VB
<DataContractAttribute(IsReference = true), _
 Serializable()> _
Public Partial Class Order
 Inherits EntityObject
C#
[DataContractAttribute(IsReference = true)]
[Serializable()]
public partial class Order : EntityObjectAs you learned in Chapter 14 when building
WCF services, if you want any of the properties to be part of the
contract you need to mark them as DataMembers, as shown in Example 19-10.
You’ll find that mapping is an all-or-nothing affair. If you have relationships in the model, you will get errors when trying to query the model until you have all of the related entities mapped to classes.
You’ll need to have some way to refer to the EntityContainer and the EntitySets within it so that you can query
and update. If you don’t already have a mechanism to do this, the
simplest solution is to let the Entity Framework design tools generate
the EntityContainer class and then grab
that code. You can do this in the Designer or by using the EDM
Generator command-line tool.
If your custom classes have the same names as any of the
entities, they will also have the same names as the default classes
the Designer creates. The simplest solution here is to prevent the
Designer from generating any classes. You can do this by removing the
model’s Custom Tool property, which by default is EntityModelCodeGenerator. This is available
in the Properties window when you select the model in your
solution.
Once you have the classes mapped to the model you should be able
to perform LINQ to Entities and ObjectQuery queries against the model. You
may find that until you have everything properly in place, the
debugger will help you find where you need to apply more mappings. Be
patient and read the error messages carefully. They generally include
all the information you’ll need to fix each problem.
You may not even want your existing or new classes to inherit from
EntityObject. You can still take
advantage of the change-tracking and relationship management
capabilities in Object Services by applying some key
interfaces.
Even with the interfaces, you still need to use the model-mapping attributes, as described in Inheriting from EntityObject.
The three interfaces are as follows:
IEntityWithKeyIEntityWithChangeTrackerIEntityWithRelationships
As the interface names indicate, each gives your custom class the
capabilities of the EntityKey, change
tracking within the ObjectContext,
and relationship management with the ObjectContext.
We’ll use an Order class again
as an example.
IEntityWithKey is an optional
interface that allows the ObjectContext to easily identify the
EntityKey of your class. Without
it, you will have to explicitly provide the EntityKey property for various
functions.
To implement this interface you need to do three things. First, implement it in the class declaration, as shown in Example 19-11.
Example 19-11. Implementing the interface in the class declaration
VB
<EdmEntityTypeAttribute(NamespaceName:="AWModel", Name:="Order")> _
Public Class Order
  Implements IEntityWithKey
C#
[EdmEntityTypeAttribute(NamespaceName="AWModel", Name="Order")]
public class Order : IEntityWithKeyNext, you need to implement the interface’s EntityKey property. The EntityKey property is not the same as the
properties for OrderID or CustomerID in the classes. The value of this
property is an actual EntityKey
object with one or more KeyValuePairs identifying the name and value
of each property that makes up the EntityKey.
This property depends on a class-level variable, _entityKey, which needs to be declared, as
shown in Example 19-12.
Example 19-12. Declaring the _entityKey class-level variable
VB
Private _entityKey As EntityKey

Property EntityKey() As EntityKey Implements IEntityWithKey.EntityKey
  Get
    Return _entityKey
  End Get
  Set(ByVal value As EntityKey)
    _entityKey = value
  End Set
End Property
C#
public EntityKey EntityKey
{
get
{
return _entityKey;
}
set
{
_entityKey = value;
}
}The IEntityWithChangeTracker
interface allows your class to interact with the ObjectStateManager so
that you can get change tracking on your object. Implement it in the
class declaration along with IEntityWithKey, as shown in Example 19-13.
Example 19-13. Implementing the IEntityWithChangeTracker interface
VB
<EdmEntityTypeAttribute(NamespaceName:="AWModel", Name:="Order")> _
Public Class Order
Implements IEntityWithKey,IEntityWithChangeTracker
C#
[EdmEntityTypeAttribute(NamespaceName="AWModel", Name="Order")]
public class Order : IEntityWithKey, IEntityWithChangeTrackerYou’ll need to implement this interface’s SetChangeTracker method so that Object
Services can associate your objects with the proper ObjectContext, as it is possible to have
multiple contexts in memory at the same time (see Example 19-14).
Example 19-14. Implementing the private _changeTracker as IEntityWithChangeTracker
VB
Public Sub SetChangeTracker(ByVal changeTracker _
    As IEntityChangeTracker) _
    Implements IEntityWithChangeTracker.SetChangeTracker
  _changeTracker = changeTracker
End Sub
C#
public void SetChangeTracker(IEntityChangeTracker changeTracker)
{
_changeTracker = changeTracker;
}Note
If you have any properties that are complex types in the entity, you will need to set the change tracker for those as well. See the Entity Framework documentation for an example.
With the change tracker in place, you’ll need to be sure that it
is aware of changes to any properties, including the EntityKey. You can do this by calling the
change tracker’s EntityMemberChanged and Changing methods before and after the value
is being changed.
Example 19-15
shows the EntityKey property after
you have implemented these changes. The code needs to check that the
change tracker has been set before calling these methods.
Example 19-15. The EntityKey property after implementing the EntityMemberChanged and Changing methods
VB
Property EntityKey() As EntityKey _
   Implements IEntityWithKey.EntityKey
  Get
    Return _entityKey
  End Get
  Set(ByVal value As EntityKey)
    If Not _changeTracker Is Nothing Then
      _changeTracker.EntityMemberChanging _
          (StructuralObject.EntityKeyPropertyName)
      _entityKey = value
      _changeTracker.EntityMemberChanged _
          (StructuralObject.EntityKeyPropertyName)
    Else
      _entityKey = value
    End If
  End Set
End Property
C#
public EntityKey EntityKey
{
get
{
return _entityKey;
}
set
{
// Set the EntityKey property, if it is not set.
// Report the change if the change tracker exists.
if (_changeTracker != null)
{
_changeTracker.EntityMemberChanging
(StructuralObject.EntityKeyPropertyName);
_entityKey = value;
_changeTracker.EntityMemberChanged
(StructuralObject.EntityKeyPropertyName);
}
else
_entityKey = value;
}
}The scalar properties in your IPOCO class also need to implement
the change tracker. Example 19-16 shows OrderDate as an example of how the scalar
properties should look.
Example 19-16. OrderDate implementing the change tracker
VB
<EdmScalarPropertyAttribute(IsNullable:=False)> _
Public Property OrderDate() As Date
  Get
    Return _orderDate
  End Get
  Set(ByVal value As DateTime)
    If Not _changeTracker Is Nothing Then
      _changeTracker.EntityMemberChanging("OrderDate")
      _orderDate = value
      _changeTracker.EntityMemberChanged("OrderDate")
    Else
      _orderDate = value
    End If
  End Set
End Property
C#
[EdmScalarPropertyAttribute(IsNullable = false)]
public System.DateTime OrderDate
{
get
{
return _orderDate;
}
set
{
if (_changeTracker != null)
{
_changeTracker.EntityMemberChanging("OrderDate");
_orderDate = value;
_changeTracker.EntityMemberChanged("OrderDate");
}
else
_orderDate = value;
}
}Note that because these objects do not inherit from EntityObject, the EntityState property is not readily
exposed. A quick peek at the EntityObject.EntityState property in
Reflector shows you how to get that into your class. It’s exposed
through the change tracker. You can create your own EntityState property on your object in the
same way:
VB
Public ReadOnly Property EntityState() As EntityState
  Get
    Return _changeTracker.EntityState
  End Get
End Property
C#
public EntityState EntityState
{
get
{
return _changeTracker.EntityState;
}
}The IEntityWithRelationships
interface is necessary only for classes that have any relationships
involved. It lets the ObjectContext
create and maintain relationships when you have graphs in its cache.
The IEntityWithRelationships
interface provides the RelationshipManager, which can do its work
silently in the background or, as you saw in Chapter 15, can be
explicitly coded against.
Add the IEntityWithRelationships interface to the
other interfaces in the class declaration, as shown in Example 19-17.
Example 19-17. Implementing the IEntityWithRelationships interface
VB
<EdmEntityTypeAttribute(NamespaceName:="AWModel", Name:="Order")> _
Public Class Order
  Implements IEntityWithKey, IEntityWithChangeTracker, _
             IEntityWithRelationships
C#
[EdmEntityTypeAttribute(NamespaceName = "AWModel", Name = "Order")]
public class Order : IEntityWithKey, IEntityWithChangeTracker,
IEntityWithRelationshipsThen implement its RelationshipManager property, which is
ReadOnly (see Example 19-18).
Example 19-18. Enabling the RelationshipManager
VB
Dim _relManager As RelationshipManager

ReadOnly Property RelationshipManager() As RelationshipManager _
    Implements IEntityWithRelationships.RelationshipManager
  Get
    If _relManager Is Nothing Then
      _relManager = RelationshipManager.Create(Me)
    End If
    Return _relManager
  End Get
End Property
C#
public RelationshipManager RelationshipManager
{
get
{
if (_relManager == null)
_relManager = RelationshipManager.Create(this);
return _relManager;
}
}With the interfaces in place, querying data should work no
differently than with classes that inherit from EntityObject. The code in Example 19-19 calls the custom EntityState
property.
Example 19-19. Querying for orders
VB
Using context = New IPOCO_Objects.AWEntities
  Dim ords = context.Orders
    For Each o In ords
      Console.WriteLine("{0}: {1}", o.OrderDate, o.EntityState)
    Next
End Using
C#
using (var context = new IPOCO_Objects.AWEntities())
{
var orders = context.Orders;
foreach (var o in orders)
Console.WriteLine("{0}: {1}", o.OrderDate, o.EntityState);
}Deferred loading also functions correctly because of the
IEntityWithRelationships interface,
as shown in Example 19-20.
Example 19-20. Navigating relationships and loading related data
VB
Using context = New IPOCO_Objects.AWEntities
  Dim custs = context.Customers _
     .Where(Function(c) c.Orders.Any().ToList
  For Each c In custs
    c.Orders.Load()
    If c.Orders.Count > 0 Then
      Console.WriteLine(c.Orders.Count)
    End If
  Next
End Using
C#
using (var context = new IPOCO_Objects.AWEntities())
{
var custs = context.Customers.Where(c => c.Orders.Any()).ToList();
foreach (var c in custs)
{
c.Orders.Load();
if (c.Orders.Count > 0)
Console.WriteLine(c.Orders.Count);
}
}Thanks to the IEntityWithChangeTracker and IEntityWithRelationships interfaces, not
only do you get the benefit of change tracking and SaveChanges on these custom objects, but
also the RelationshipManager is
able to automatically build the graphs for you just as it does with
POEOs, that is, Plain Old Entity Objects (which is not an official
term but one I invented for your entertainment value).
Most likely, you’ll compile your custom classes into their own assembly or assemblies. What happens to the model in this case?
By default, the model files (the .csdl, .msl, and .ssdl files) are embedded into the assembly
of the project where the EDMX is contained. And by default, the assembly
would normally contain the code-generated classes as well. Even if you
have an assembly referenced in a project, .NET will only discover
assemblies that your code leads to. Because your application will be
using classes in the model’s assembly, System.Reflection can find the assembly and,
therefore, the embedded resources as well.
However, when you’re using custom classes, where is your model? If you keep your model in its own project and use the default build method of embedding it into an assembly, the embedded files will not be found. Why? Without an actual class to call in the assembly, the assembly will never be found through the code path, and therefore it will not be considered a referenced assembly. Even if you explicitly loaded the assembly, it still won’t be a referenced assembly.
Remember that embedding the model files into their project assembly is an option, but not a requirement. If you change the model’s Metadata Artifact Processing property to Copy to Output Directory, you will have access to the actual files. Now you can place them anywhere in the filesystem, and have the metadata attribute of the connection string point directly to the file path (see Example 19-21).
Example 19-21. A ConnectionString to find the EDM files in the file path
connectionString=
"metadata=C:EDMFilesAWModel.csdl|C:EDMFilesAWModel.ssdl|
          C:EDMFilesAWModel.msl;
 provider=System.Data.SqlClient;
 provider connection string = 'Data Source=MyServer;
                               Initial Catalog=AdventureWorksLT;
                               Integrated Security=True;
                               MultipleActiveResultSets=True'"
Although the default code generation creates entity classes with no business logic, you do have a lot of opportunities to customize entities and add that logic. If you are happy to use the generated classes, you can take advantage of partial classes, partial methods, and a handful of public events to insert your own business logic.
If you need more independence from the generated classes but still
want your objects to interact directly with the ObjectContext, you still have a number of
options: you can build your own code generator, inherit EntityObject in your own custom classes, or
implement the IPOCO interfaces on your objects. The last two options
also allow you to use existing classes; though you need to be sure you
follow all of the rules for mapping them properly to your
model.