
Excel has much in common with database programs. Both kinds of software keep track of a list of records (like cards in a card catalog—or rows of a spreadsheet), and let you browse through those records and even perform some calculations on them. No wonder Excel is so adept at incorporating database files into its spreadsheets; Excel 2008 can access data in Web pages and FileMaker Pro databases, and may be able to use open database connectivity to access data from additional databases such as Microsoft SQL Server. Open database connectivity, usually called ODBC (pronounced “oh-dee-bee-see”), is a standard set of rules for transferring information among databases, even if the databases are in different programs from different companies.
Excel loves to import data from FileMaker Pro databases directly into its worksheets—no muss, no fuss, no messy translation workarounds.
Here’s how to go about it:
You can import a FileMaker Pro database in either of two ways. First, you can bring the data into Excel once, where you continue to work on it (this is called a one-time import). Second, the data can remain connected to FileMaker, and updates itself in Excel when it’s updated in FileMaker (this is called an updating import).
For a one-time import, which puts data into Excel as a list sheet (a sheet containing nothing except a list object, as described on Excel, the List Maker), choose File → Open, then navigate to, and double-click, the FileMaker file’s icon in the Open dialog box.
If you make changes in FileMaker and want the changed data to come into Excel, you have to reimport the entire database.
For an updating import, which places data in an Excel worksheet and lets you control how often cells update (reflecting changes made in FileMaker), choose Data → Get External Data → Import from FileMaker Pro. (You need to have a workbook open in Excel for this menu option to be available.)
In either case, an amazing thing happens: Excel triggers FileMaker Pro to launch, opening the specified database. Then the FileMaker Pro Import Wizard window appears. On the first screen, specify which of the FileMaker file’s fields you want to import (Name, Address, Phone, or whatever). You can also specify the end order for them to appear in Excel, as shown in Figure 14-10.
Click Next to continue.
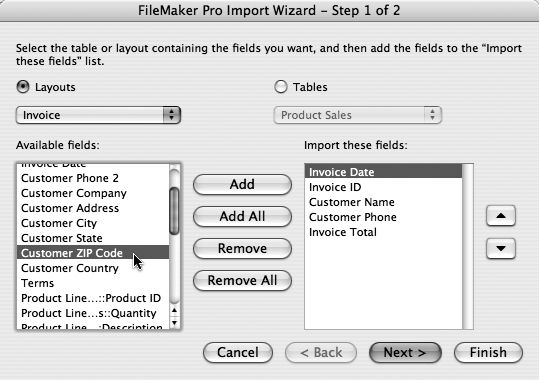
Figure 14-10. If one of the FileMaker file’s layouts contains the fields you want, click the Layouts button and select its name from the pop-up menu. Otherwise, click the Tables button and select the database file name from its pop-up menu (which also displays the names of other linked FileMaker files) to display the list of every field in the database. Next, choose the fields you want by double-clicking each in the “Available fields” pane on the left. (Move all fields at once by clicking the Add All button.) This action adds each selected field to the pane on the right. You can then rearrange the order of the fields in the right-hand list by selecting one and then clicking the up and down arrow buttons on the right.
The next screen in the FileMaker Import Wizard offers to filter (screen out) the records that you import into your Excel workbook (see Figure 14-11). The wizard lets you specify three criteria to help eliminate unwanted data from the import process. (If you want all of the data, skip this step by clicking Finish.)
Click Finish to continue. Excel launches into importing the data from your FileMaker file.
Note
This process may take a long time (depending, in part, on how much data you’re importing). Because there’s no progress bar, spinning cursor, or any other sign that Excel is working, you might assume that the program has crashed. Go brew a fresh pot of coffee or stick your head out the door for some air, but don’t switch out of Excel; the program is communicating with the database and constructing the spreadsheet.
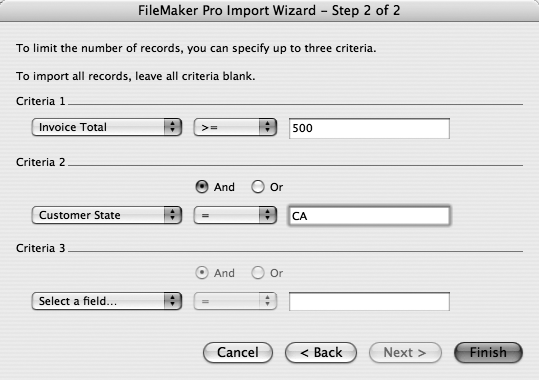
Figure 14-11. Suppose you want to import only the records for clients who have spent more than $500 and live in California, so that you can thank them and invite them to your annual goal-setting retreat. Set the Criteria 1 pop-up menu to Invoice Total, set the middle pop-up menu to >=, and type 500 into the final field. After filling in Criteria 1, you can set up additional requirements in the Criteria 2 and Criteria 3 rows, such as Customer State = CA.
If you began this process by choosing File → Open, you’re all set; Excel produces a new listsheet, a worksheet with the database’s contents embedded in it as a list object. Listsheets also display the List toolbar (see Delete a row or column).
If, on the other hand, you chose Data → Get External Data → Import from FileMaker Pro, Excel now asks you exactly where you’d like the imported data to be placed. You can specify a cell or opt to create a new worksheet (Figure 14-12).
After telling Excel where and how to place the data, click Finish. Excel imports the data and shows the External Data toolbar. If you turned on the “Use List Manager” checkbox in the properties section of the FileMaker Import Wizard, it also shows the List toolbar. The External Data toolbar lets you quickly change options on incoming database information, set special query criteria, and refresh data from a database.
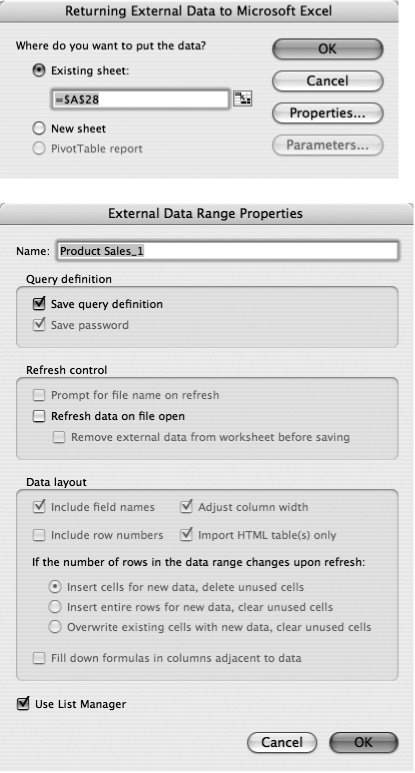
Figure 14-12. The last step in bringing in FileMaker Pro data is choosing where the data goes (top). With the click of a radio button, it can be delivered into the worksheet currently open or into a new worksheet. Clicking Properties brings up the External Data Range Properties dialog box (bottom), whose options include “Refresh data on file open” (sets whether Excel receives fresh data every time the file opens) and “Use List Manager” (puts data into a list object). The list object offers easy sorting and filtering. But to use the data layout controls in this dialog box, you have to first turn off “Use List Manager” and forgo the extra features it provides. (See Excel, the List Maker for List Manager info.)
Note
You may encounter an error message when Excel attempts to open a FileMaker database: “Microsoft Office is not able to run FileMaker Pro at this time.” Of course, there are many reasons why Office might not be able to run FileMaker—it’s not installed, it’s compressed, or it’s out on a lunch break. You can solve the problem, though, by launching FileMaker on your own—just double-click its icon in the Finder.
If pulling data from a database on your computer or network isn’t exciting enough, Excel also has the ability to grab data from certain Web sites (and FTP or intranet sites). Excel comes with three sample Web queries that help show the power of this little-known feature. To see how it works, give the sample queries a try (actually, they can be very useful if you’re creating spreadsheets to track your portfolio).
MSN MoneyCentral Currencies. This query grabs the current currency value for about 50 countries on an open exchange. Check it before you head out on an international trip, so you’ll know what to expect when you exchange your currency—and help you understand why you only paid
 5 for a beer.
MSN MoneyCentral Major Indices. This query grabs data for around 20 stock exchanges, including the Dow, S&P 500, FTSE 100, and NASDAQ.
MSN MoneyCentral Stock Quotes. This query looks up data including last value, close value, volume, and change for a stock symbol you specify (Figure 14-13). (If you’re among the thousands of people who use Excel to track your stock market holdings, behold the dawn of a new era—you no longer need to type in the latest stock prices. Your software can do it automatically.)
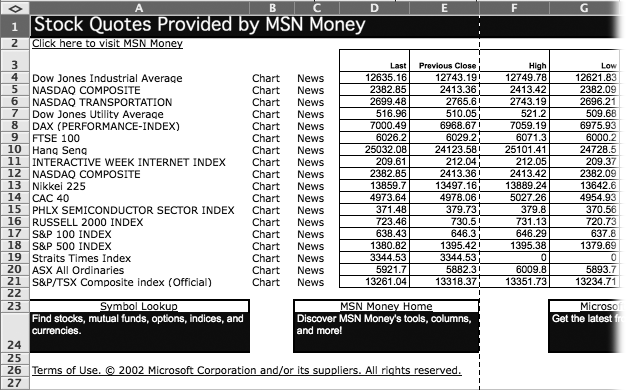
Figure 14-13. Using the saved MSN MoneyCentral Major Indices Web query, you can call up current information on a number of major stock market indices directly in your Excel worksheet. Now you can work with those numbers just like any others in your spreadsheet—except these numbers will stay up-to-date with the markets.
To use one of these predesigned Web queries, choose Data → Get External Data → Run Saved Query, which brings up an Open dialog box. Double-click one of the queries listed here. (You can find the saved queries in the Microsoft Office 2008 → Office → Queries folder.)
Excel then asks you where in the spreadsheet you want to put the information that it downloads from the Web. (This modest dialog box calls itself Returning External Data to Microsoft Excel.) After you select a location and click OK, Excel connects to the Internet, downloads the information, and inserts it into the spreadsheet.
Databases and the World Wide Web both make effective data sources, but sometimes you just want to pull some information out of a text file and into your Excel worksheet. For example, you might have a tab-delimited list of contacts that your marketing guru emailed you, and you’d like to get it into Excel. Here’s how to do it:
Choose Data → Get External Data → Import Text File; in the resulting Open dialog box, navigate to, and double-click, the text file that you want to import. Alternatively, choose File → Import, click the Text file button, and click Import. Either way, the Text Import Wizard appears and walks you through a three-step process to choose the delimiter type, choose which columns to import, and set the column data format before Excel sucks the data into the current worksheet