
The outliner is an excellent tool for creating the text and the overall flow of your slideshow. But sooner or later, you’ll want to work on the slides themselves—to add charts or other graphics, modify text that doesn’t fit quite right—and perhaps edit your concluding slide when new data becomes available five minutes before your meeting.
Creating a PowerPoint slide is much like creating a page in a page-layout program. In fact, it’s very similar to creating a page in Word 2008’s Publishing Layout View.
Starting off, PowerPoint lets you set a background color, gradient, pattern, or graphic for your slide or you can create a backdrop by adding shapes and importing graphics. Then on top of that background you’ll add text boxes, pictures, tables, charts, and other graphics—and possibly movies and sounds. PowerPoint shares many of the techniques for creating and manipulating layout objects with Word, as discussed in Chapter 8.
Every slide begins life with a backdrop, courtesy of its slide master. If you’d like to override or enhance that backdrop on a particular slide, however, choose Format → Slide Background, or Control-click (or right-click) the slide and choose Format Background from the pop-up menu, to summon the Format Background dialog box (Figure 16-8). Click the Fill tab on the left and the Solid tab at the top to change the background color. Click the pop-up menu and choose any color variation from the palette of Theme Colors; one of the ten more-intense Standard Colors; or click More Colors to choose any color at all, via the Color Picker (Fill Color: Standard palette). You can tone down the background by using the Transparency slider.
PowerPoint adjusts the slide as you make your choices. The checkbox marked “Hide background objects” lets you hide any objects, such as background pictures or text, that may be present on the slide master. Click Apply to apply your changes to the background of the selected slide only, or “Apply to All” to change the backgrounds for all the slides in the presentation.
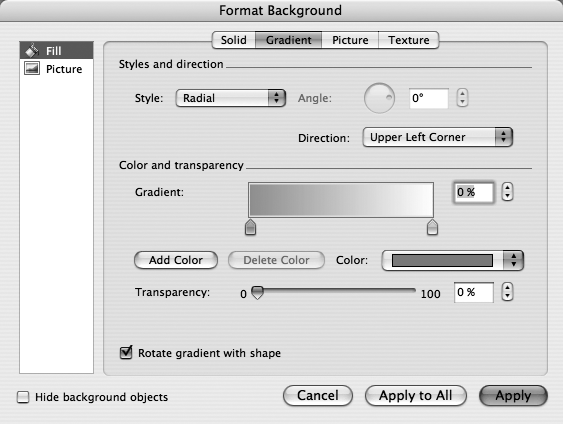
Figure 16-8. The Format Background dialog box lets you add or change background colors or add gradients, pictures, or textures to the background. Working with the Transparency slider is essential—especially with pictures and textures—to ensure your text is still readable.
Tip
The Background dialog box has two buttons: Apply changes only the background of the current slide; Apply to All changes every slide in the presentation, even slides with customized backgrounds—use it with caution.
If you want something more elaborate than a solid background color, choose one of the Format Background dialog box’s other three tabs: Gradient (a smoothly shifting color blend), Picture (a graphics file from your hard drive), Texture (a realistic image of some natural material, such as wood grain, marble, or burlap). See Chapter 19 for much more on these special tabs.
There are two straightforward ways to add text to your slides. First, if your slide master includes text placeholders, as shown in Figure 16-6, you can click the individual placeholder text items (which typically read something like “Click to Add Text”), and then type in your own words. Because these placeholders are linked to the slide master, they reflect its font characteristics.
The other method is to add new text boxes (with no corresponding placeholders on the master) to a particular slide. Simply click the Text Box button on the Standard toolbar (Figure 16-9), and then click the slide where you want to add text (the text box grows as you type). Alternatively, drag on the slide to create a text box of the desired size before you start typing.
Adjusting the type characteristics of any kind of text box is easy—click the text you want to adjust. You’ve just activated the text box. Now you can select part or all of the text to change its font, size, or style, using the Formatting Palette or the Format menu.
Note
The outline only shows text inside placeholders (titles, subtitles, and bullet points), so it doesn’t display text that you add using the Text Box tool. You can change the formatting of text in the outline, but the changes appear only on the slide—after all, an outline with 72-point bold text would look really odd.

Figure 16-9. Click the Toolbar’s Text Box button and drag to position a text box on your slide. Text boxes begin life only one line tall, but expand as you type more. Drag the box to reposition it, drag one of its handles to resize it, or drag its green stalk to rotate it.
When you select a text box, the Formatting Palette unfurls its entire array of text and object adjustments. You can use Quick Styles; Shadows; Reflections; Colors, Weights, and Fills (for the text box background); and Size, Rotation, and Ordering—in addition to the font and alignment controls. All these object controls function exactly like they do in Word, and are described in detail in Chapter 8.
Traditionally, bullet-point lists play a huge role in business presentations. And just as being able to prescribe the silver bullet is an important CEO’s skill, learning how to format bullets is a key PowerPoint skill.
To change the bullet style, click to put the insertion point in the text where you want the change to happen. Next, open the “Bullets and Numbering” pane of the Formatting Palette, and choose a bullet style from the Style pop-up menu you find there.
You needn’t be content with the mundane dot, box, or checkmark as your bullet symbol. Choose “Bullets and Numbering” from the Style pop-up menu of the “Bullets and Numbering” pane (or choose Format → “Bullets and Numbering”) to call up the “Bullets and Numbering” section of the Format Text dialog box. Here you can choose from an assortment of other preset buttons or click the Custom Bullet pop-up menu to see others. Choose Character from that menu to reveal the Character Palette, from which you can choose any character—including all the optional symbols and dingbats—from any font on your Mac (see Figure 16-10).

Figure 16-10. The Formatting Palette’s “Bullets and Numbering” pane (left) lets you choose the style, color, and size of your bullets. Choose “Bullets and Numbering” from its Style pop-up menu to open the “Bullets and Numbering” section of the Format Text dialog box. And from its Custom bullet pop-up menu choose Character to reveal the Character palette (right). This window gives you access to every possible character in all of your fonts, including all the optional characters like checkboxes, pointers, hearts, and smiley faces. Choose any one of these for your custom bullet.
You can even use a little graphic as the bullet—a JPEG file showing a flag, a map, or your boss’s head, for example.
To specify a graphics file on your hard drive that you want to use as a bullet, proceed like this:
Click the text of the bullet that you want to modify.
The insertion point flashes next to the bullet point.
Choose Format → “Bullets and Numbering” → Bullets and select Picture from the “Custom bullet” pop-up menu.
The Choose a Picture dialog box appears.
Navigate to and double-click the graphic you want to use as a bullet.
PowerPoint replaces the bullet with your chosen picture at the same size as the text. To adjust the bullet size, enter a new percentage in the “Size: _% of text” box or use its up- and down-arrow button.
Even if you’re delivering the greatest news, a text-only presentation is a surefire way to put your audience to sleep. By inserting graphics, charts, tables, movies, and other objects into your presentations, PowerPoint lets you add visual information to spice up your slideshow. After all, you’ll probably be speaking along with your presentation, so the slides need to reinforce your spoken message and display information you can’t put into words For example, you may want to insert a video clip of your company president explaining why this year’s sales numbers are so much higher than the forecast. Or, you want to include pictures of your products when giving a marketing presentation, along with the all-important tables and graphs. Here’s how to go about using these specialized objects.
PowerPoint gives you lots of options for bringing graphics into your slides. The Elements Gallery and the Toolbox’s Object Palette house most of your choices, while the Insert menu holds the rest. Using these access points, you can insert photos or other pictures, clip art from office’s Clip Art collection, charts, tables, AutoShapes, SmartArt graphics, movies, and sounds. For the most part, working with objects in PowerPoint is exactly the same as working with objects in Word’s Publishing Layout View; Chapter 20 covers object manipulation in depth. The following sections detail what’s different about objects in PowerPoint.
Not surprisingly, building tables in PowerPoint is very similar to making tables in Word. But PowerPoint makes formatting tables much easier thanks to the new Elements Gallery and its Table Styles tab. Click the tab to reveal a whopping array of preformatted table colors and styles, displayed as thumbnails. When you click one of them, PowerPoint displays the pint-sized Insert Table dialog box, which awaits your designation of the number of columns and rows for your table. Click OK, and PowerPoint plops the table of your chosen style onto your slide, sporting a thick blue selection frame and a flashing insertion point in the upper-left cell. (If you choose Insert → Table instead of using the Elements Gallery, after you designate the number of columns and rows, PowerPoint creates a table in the Theme color and style.)
You can begin typing in that cell, or use the tab key to move from cell to cell. If you continue to tab after reaching the lower-right cell, PowerPoint adds another row to the table.
A third method of table creation uses the Table button in the Standard toolbar. Click it and drag through the cells in its pop-up menu to create a table of the desired dimensions (see Figure 16-11). As you drag, the menu grid expands to a maximum of 25x25—in case you need to create a crossword puzzle on your slide. When you release the mouse button, PowerPoint inserts the table—again in the Theme color and style.
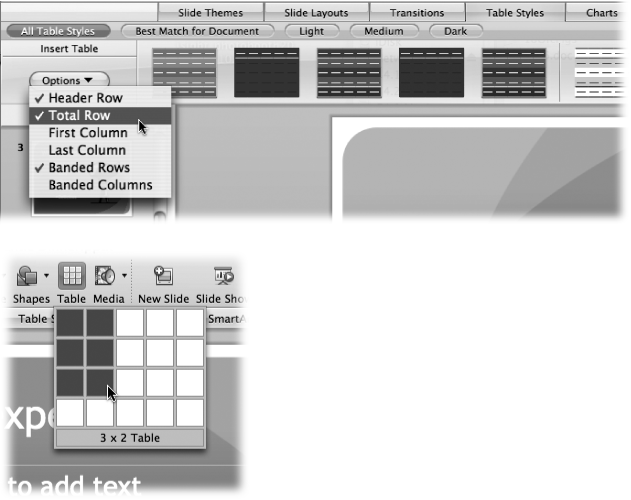
Figure 16-11. Top: The Table Styles gallery includes dozens of predesigned tables you can insert with a single click. The buttons immediately above the thumbnails let you narrow your choices to see just those tables that PowerPoint thinks are the best match for your document—light ones, medium ones, or dark ones. The Options button pop-up menu at the left end of the Gallery gives you control over how PowerPoint formats the rows and columns, including or excluding a header row, total row, row and column banding, and so on. Bottom: You can create a table very quickly using the Insert Table pop-up button on the Standard toolbar. Drag downward from this icon to specify how many rows and columns you want. PowerPoint creates it in the theme colors, and drops it into your slide.
You can easily change the appearance of a table once it’s in your slide by clicking it once to select it, and then clicking one of the thumbnails in a Table Styles gallery. You can continue clicking your way down the Gallery until you find the ideal table color and style.
Once the table appears, you can adjust its size by dragging the resize handles at each corner, and you can move it or rearrange its interior by dragging the table’s borders.
Tip
You can also draw a table directly on your slide by calling up the Table toolbar (View → Toolbars → “Tables and Borders”) and then using the Draw Table tool. It works just like its Word counterpart, detailed on Charts and Spreadsheets.
Choose View → Toolbars → "Tables and Borders” to reveal the “Tables and Borders” toolbar. These tools along with those found in the Table and “Borders and Shading” panes of the Formatting Palette cover the basics for making changes like these to your PowerPoint table.
Change border lines. To change a border’s style, width, or color, make your selections using the Border Style, Border Width, and Border Color controls in either the toolbar or the Formatting Palette’s “Borders and Shading” pane, and then click the borders you want to change using the Draw Table tool.
Change text alignment. To change how text is aligned in a cell, select the cell (or cells); then click the Text Alignment buttons in the Formatting Palette’s “Alignment and Spacing” pane, which let you align text at the top, center, or bottom of the cell; as well as left, right, center, justified, or distributed horizontal alignment.
Merge or split cells. By erasing the line between two cells using the Eraser tool, you can tear down the barrier between them, creating one larger cell. (Another method: Select the cells that you want to merge by Shift-clicking them, and then click the Merge Cells button.)
On the other hand, you can also split a cell in two—PowerPoint’s version of cellular mitosis. Click the Draw Table tool and then drag to “draw in” the new border (Figure 16-12). Alternatively, select the cell you want to split and then click the Split Cell button, which vertically divides the cell.
Add or remove columns and rows. The menu commands in the Table pop-up button (see Figure 16-12) let you insert columns and rows as well as delete them. They also let you merge and split cells, set how borders look, and specify how cells are filled.
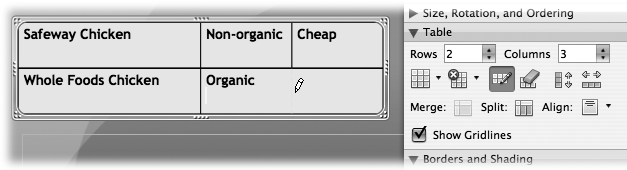
Figure 16-12. The Formatting Palette’s Table pane features commands that let you insert and remove columns and rows as well as split and join cells. You can also draw new cell borders to split cells, or you race cell borders to join cells by using the Draw Table and Table Eraser tools.
Use the Formatting Palette’s “Quick Styles and Effects” pane to add preset shadows, glows, reflections, and 3-D effects to a table or individual cells. Select an entire table by clicking its frame—the insertion point disappears. The next formatting change you make applies to the whole table. If the insertion point is blinking in a table cell, the formatting change you make applies only to that cell.
For the last word in Table formatting, select a table, cell, or group of cells and choose Format → Table. This dialog box duplicates commands found in the Formatting Palette, but it also provides the only way to change cell fill colors, gradients, pictures, or textures (see Colors and Lines Tab).
PowerPoint makes inserting movies and sounds just as easy as inserting still pictures, making it a cinch to insert a short movie of a climactic raffle drawing, a 360° view of your latest prototype, or a morale-building snippet from Scrubs. Via the Insert menu, PowerPoint can import movies and sounds in six different formats—from the Clip Gallery, from files, and from CD audio tracks. You can also record your own sounds directly into PowerPoint.
Movie from File. Choose Insert → Movie (or choose Insert Movie from the Toolbar’s Media button) to open the Insert Movie dialog box. Navigate to a QuickTime-compatible movie file and click Choose.
When you insert a movie, PowerPoint asks if you want it to play automatically when the slide comes up during the slideshow. If you click No, the movie won’t play until you click it.
Inserting a movie displays the Formatting Palette’s Movie pane, whose checkboxes let you hide the movie, play the movie full-screen, make the movie loop over and over, and rewind the movie after playing. The pop-up menus let you choose to play the movie automatically as soon as you land on the slide, only after you click it, or across slides—which keeps the movie playing even as you move on to other slides. Finally, the Play button lets you play the movie in the slide while you’re editing, and the Show or Hide Controller button determines whether or not PowerPoint displays QuickTime’s movie controls (see Figure 16-13).
Tip
Be careful when you embed movies in your PowerPoint presentation. These movies are not saved inside your PowerPoint presentation. Instead, the presentation maintains a link to the movie on your hard drive. If you copy your presentation to, say, your laptop, but forget to copy the movie file as well, you’ll be in for a rude surprise when the conference-room lights dim. The slide will appear showing the first frame placeholder of the movie, but nothing happens when you click it.
Avoid this problem by saving your multimedia PowerPoint presentation as a package—a single folder that contains the PowerPoint file and every linked file it needs, ready for backing up, burning to CD, copying to your laptop, and so on. Choose File → Save As, and then, in the Format pop-up menu, choose PowerPoint Package.
Because these sound clips don’t take up much space, PowerPoint generally embeds them directly in the PowerPoint file. This time, you generally don’t have to worry about bloating your presentation or losing the link to the sound file when you move the presentation to a different disk. (If you choose PowerPoint → Preferences → General, you’ll see that you can specify the sound-file threshold for automatic embedding. For example, PowerPoint makes sounds smaller than 100 K part of your presentation’s file, but it leaves larger ones on the hard drive, like the movies described in the previous tip.)

Figure 16-13. The small filmstrip icon in the lower-left corner of an embedded movie (top) is actually a switch that, when clicked, reveals the simple QuickTime movie controller (bottom).
Sound from File. Click the Toolbar’s Media button and choose “Insert Sound and Music” from its pop-up menu (or choose Insert → “Sound and Music” → From File) to call up the Insert Sound dialog box. Navigate to and double-click any sound file. PowerPoint can make use of any sound file format that QuickTime can understand—AIFF, SND, WAV, MP3, AAC, and lots more. Once again, PowerPoint asks if you want the sound to play automatically when its slide appears during your slideshow. If you click No, you’ll have to click the sound icon (a small speaker) to make it play.
You can drag this icon anywhere on the slide.
Note
Planting a large sound file on a slide is like planting a movie there: you’re actually installing a link to the sound file on your hard drive, not the file itself. This feature keeps the size of your presentation much smaller, but it also means that you have to remember to move the sound file when you move the presentation to another machine. Otherwise, you’ll find yourself with a soundless presentation.
Once again, the best way to be sure your sounds travel with you is to save your show as a PowerPoint package (see the Tip on the previous page). To do so, choose File → Save As, name your show, and choose PowerPoint Package from the Format pop-up menu.
Play CD Audio Track. You can also grab a track from a music CD to serve as a soundtrack for your slideshow. This vestigial feature is mostly pointless in the age of iTunes—perhaps a tad more useful than a command called “Play 45 rpm recording”—but it still works. When you select Insert → “Sound and Music” → Play CD Audio Track, PowerPoint displays the Play Options dialog box is, where you can set the start and end points for your sound. When this slide appears during the actual presentation, the song begins to play automatically (or when you click it, at your option).
Note
The music won’t play unless the actual audio CD is already inserted in your Mac at the time of your presentation. Avoid all the hassle by ripping the track to iTunes and dragging it to your PowerPoint project folder. See the box on Making Text Boxes or Sidebars for details of how to export just part of an iTunes song.
Record Sound. The Insert → “Sound and Music” → Record Sound command lets you record your own sounds to insert into the presentation. You’ll find this most useful for recording narration—or voice-over as it’s called. (See Adding Narration for more details on recording narration and the importance of using a good microphone.)
Before you record, you have to verify that your microphone or other sound input device is working. Open the Sound System Preferences panel and click the Input tab. Make sure that the correct device is selected, and adjust the input volume if necessary. Quit System Preferences.
Now, in PowerPoint, choose Insert → “Sound and Music” → Record Sound. PowerPoint presents a Record Sound dialog box (see Figure 16-14). Click Record, speak or sing or squawk into your Mac’s microphone, and then click Stop. You can play back the sound by clicking Play to make sure it’s just what you want. If so, click Save.
You’ll find a little speaker icon on your PowerPoint slide; click it during a presentation to hear your recording. (Unlike imported sounds and movies, these sounds are part of the PowerPoint file rather than links to separate files on your hard drive. Be aware that sound files can greatly inflate the size of your PowerPoint document.)

Figure 16-14. Choose Insert → “Sound and Music” → Record Sound to open PowerPoint’s built-in voice-over studio, where you can record narration, music, or any other sound to play back automatically with the slide, or only when you can click the loudspeaker icon. The “Max record time” notation refers to the amount of space available on your entire hard drive.
If your presentation is just crying out for a chart—and what presentation isn’t?—click the Element Gallery’s Charts tab and choose any of the chart styles by clicking one of the thumbnails. Doing so launches Excel, and opens a spreadsheet containing a small amount of dummy information. Replace it with your own data and close the spreadsheet. Excel doesn’t prompt you to save your spreadsheet, because PowerPoint embeds your chart and its data into the current slide. (Embedding puts the output of one program into a document belonging to another. In this case, Excel’s output is appearing in a PowerPoint document.)
When you return to PowerPoint, you’ll see your newly minted chart resting gracefully on your slide. Since it is, in fact, an Excel chart, you can double-click its various elements to change their appearance, size, or remove them all together. You can also change to a different chart type by clicking another thumbnail in the Chart Gallery—exactly as you would in Excel, and exactly as described starting on Chart Parts.
If you need to change your chart’s data, Control-click (or right-click) the chart and choose Edit Data from the pop-up menu—again launching the Excel spreadsheet containing your data. (The fact that you can edit it again in its parent program is the gift of an embedded object.)
You can also insert a graph that you’ve already created in Excel. Open the Excel document containing the chart and simply drag the chart from Excel onto the slide in PowerPoint. Alternatively, you can select the chart in Excel, choose Edit → Copy, switch back to PowerPoint and choose Edit → Paste. Either way, the chart ends up embedded in your current slide. If you later change the data in your Excel spreadsheet PowerPoint reflects the change in its copy of the graph.
The Insert → Object command is the first step to embedding several other kinds of visuals onto a PowerPoint slide. The objects can come from such other Office programs as Equation Editor, Excel, Microsoft Graph, Organization Chart, or Word.
As shown in Figure 16-15, the resulting dialog box lets you either choose an existing document to install onto your slide, or create a new one. If you plan to insert an existing file into your slide, first choose the object type and then click “Create from file.” The instant you turn on “Create from file,” the standard Mac OS X Open File dialog box appears so that you can select the document you want.
What happens next depends on what you do in the Import Object box:
“Create new” with “Display as icon” turned on. An appropriate icon now appears on the slide. You can click the icon to open the corresponding program and create a new document. If you’re inserting a Word or Excel document into the slide, choose File → Close & Return to [Your PowerPoint file’s name] when you’re done. (The other Office programs—Graph, Equation Editor, and Organization Chart—have different commands for returning to PowerPoint, but they’re all under the Application or File menu.)
“Create new” with “Display as icon” turned off. The appropriate program opens so that you can create your new object. Choose File → Close & Return to [Your PowerPoint file’s name] when you finish. Your new object appears on the slide.
“Create from file” with “Display as icon” turned on. PowerPoint takes you back to your slide, where an icon for your embedded object appears. Double-click the icon should you ever want to edit or display the object.
“Create from file” with “Display as icon” turned off. The chart, equation, or document appears on the slide. (For Word or Excel files, you see only the first page or worksheet.) Double-click to edit or view the object in its parent program.
You may reasonably scratch your head at the prospect of placing an entire Word or Excel document onto a slide, especially if the document is larger than the slide itself.
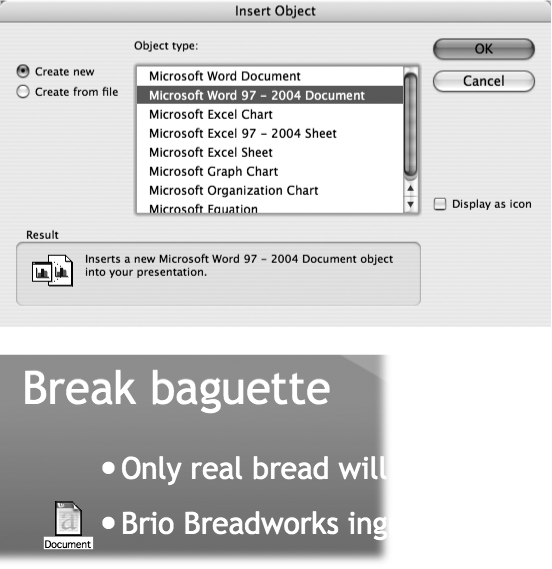
Figure 16-15. Top: In the Insert Object dialog box, you can choose whether you want to bring in an existing document or create a new one on the spot. (If you click “Create from file,” the “Choose a File” dialog box opens immediately, which is a bit disconcerting.) Bottom: Turning on “Display as icon” plants a document icon on your slide instead of the document itself. Click it to open the document in the program that created it.
After scratching for a few moments, though, you’ll probably realize that Microsoft has provided a dandy way to link supporting documents and reference materials to your PowerPoint presentation. When, during your pitch, some shortsighted co-worker objects, “I don’t recall the marketing plan we talked about last month being quite so ambitious,” you can click the Word document’s icon that you’ve placed on the slide in anticipation of just such a protest—and smugly open the actual Word file, in Word, for all to see.
Note
Unfortunately, the “Display as icon” and, indeed, this whole object-embedding business, relies on a message technology called Object Linking and Embedding (abbreviated OLE and often pronounced “o-LAY”). As noted in the more complete discussion on 3-D Rotation, Object Linking and Embedding has a reputation for behaving oddly. It works best when linking to very small documents on computers that have lots of memory.
The Insert → Hyperlink turns the selected text or graphic into a clickable link, capable of opening another PowerPoint file, any other Macintosh file, a specified Web page on the Internet, or a pre-addressed email message. You’ll find a complete description of this feature on Paste as Hyperlink.