
After you’ve created all your slides and put them in the proper order, the content part of your creation is done. Now it’s time to add slide transitions to supply sophisticated smoothness—or gee-whiz glitz—as you move from slide to slide. You can also add object builds—animations within a slide. Besides adding some visual excitement to your slideshow, transitions and builds can help you present your information more clearly, add drama, signal changes in topic, and—if you use them wisely—give your slideshow a much more professional, polished appearance.
If you don’t add a transition, PowerPoint changes slides instantly—or cuts—from one slide to another. Besides the simple cut, PowerPoint has 64 other slide transition styles to choose from. They range from simple dissolves (where one slide melts into the next) and wipes (where one slide moves across the screen to replace the other) to striking pinwheels, checkerboards, and twirling 3-D cubes. You owe it to yourself to sample all the transitions once just so you know what’s available. Even with all this variety, though, it’s a good idea to rely on simple transitions and use the pyrotechnics sparingly. You don’t want your audience to walk away impressed by your fancy transitions—and unable to remember your message.
Transitions serve two very different purposes in a slideshow: They can either create smooth segues from one slide to another, or they can provide a dramatic punctuation to highlight the break between slides. When you choose transitions, consider carefully whether you’re trying to just move smoothly to the next slide, provide a noticeable break between topics, or startle the audience with your visual prowess. Always consider your message and your audience as you choose transitions. If your presentation is a pep booster for the cheerleading team, you almost can’t have too much color and action. But if you own a funeral home and your presentation to the bereaved describes the various services you offer, stay away from the goofy pinwheel, checkerboard, or news flash transitions. Transitions are like fonts—you usually need only one or two styles in a single document. If you have any doubt about which transition to use, err on the side of simplicity.
Tip
When you add a transition to a slide, you’re creating the transition into the current slide from the previous slide. You can’t create a transition out of the last slide of a presentation. If you want to end with a transition—to fade to black, for example—you need to create a black slide for the ending of the show and transition from the last slide to the black slide.
Transitions, as the term implies, appear in the spaces between slides in a show. To add a transition in PowerPoint, you first need to specify the location by selecting the slide that ends the switcheroo. If, for example, you want to insert a transition between the fourth and fifth slides in a show, select slide five in one of the following ways:
In Normal view, click in the outline heading or the slide thumbnail.
In Slide Sorter view, click the slide thumbnail.
After selecting a slide, add a transition by choosing one from the Elements Gallery’s Transitions tab (see Figure 17-1, top) which you can reveal in any of the following ways:
Click the Elements Gallery’s Transitions tab and click the transition you want to use.
Choose Slide Show → Transitions to open the Transitions Gallery, and then click the transition you want to use.
Control-click (or right-click) a slide in any view, and choose Transitions from the pop-up menu to open the Transitions Gallery. Then click the transition you want to use.
When you add a transition to a slide, PowerPoint highlights the selected transition in the Transitions Gallery with an orange border and indicates its presence by placing a small transition icon beneath the lower-left corner of the slide thumbnail—in Slide Sorter view only (see Figure 17-1, top). You can add transitions in Normal view, but you have to do so with blind faith. When doubts surface, switch to Slide Sorter view for reassurance.
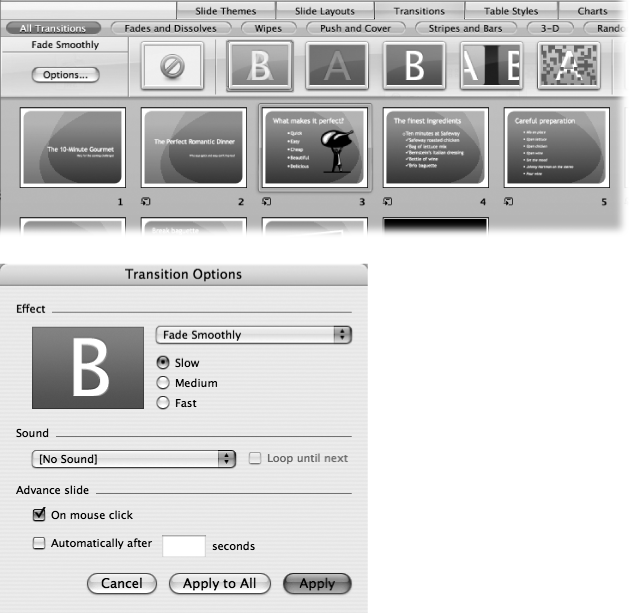
Figure 17-1. Top: The Elements Gallery’s Transitions tab is home to PowerPoint’s salmagundi of transitions. When you click one to apply it to a slide, PowerPoint reminds you of what you’ve done by displaying a small icon at the lower-left corner of the slide in Slide Sorter view. Bottom: Click the Options button at the left end of the Transitions Gallery for more complete control via the Transition Options dialog box. Here you can specify a sound effect, adjust the transition speed, and time the slide to advance automatically.
You can apply the same transition to several selected slides at once. Press ⌘ as you click an assortment of slides, or Shift-click to select a contiguous group of slides. You can even choose Edit → Select All to select all the slides in your presentation. Now when you click a transition, PowerPoint applies it to all those slides at once.
Although your future audience members are crossing their collective fingers hoping that you’ll end up using simple cuts and cross-fades over the course of your slideshow career, PowerPoint dangles before you a mouth-wateringly-long list of special effects. When you click the Elements Gallery’s Transitions tab PowerPoint displays transition thumbnails. Hover over one of them with your cursor to display its name at the left end of the gallery. Directly above, category buttons narrow down the bewildering array.
Along with the simple cut (essentially, no transition) and the zany Random (every possible transition in no particular order), PowerPoint gives you a total of 65 transitions, grouped into six basic categories (described here by their visual effects):
Fade Smoothly. The first slide fades away as the second one appears; what most people call a cross-fade or a dissolve.
Fade Through Black. Here, the first slide fades out to black, and then the next one materializes in its place.
Cut. The next slide in the show simply pops in place of the previous one. No frills, no fireworks. This is the most basic, and therefore the most useful, of all the transition types; it’s also the “transition” you get if you don’t specify any transition.
Cut through Black. The first slide disappears, there’s a brief period of total black, and the next slide appears. Kind of like blinking your eyes—or having a momentary power outage.
Dissolve. One slide fizzles out and morphs into another in a pixelated, fairy-dust fashion. Think of Captain Kirk beaming up and you’ve got the idea.
Wipe. The incoming slide squeegees the previous slide off the screen as it comes into view. Like a talented window washer, you can wipe from any direction.
Wedge. Invisible clock hands rotate in opposite directions to wipe away the current slide and reveal the one after it.
Uncover. The existing slide moves offscreen to expose the next image lying behind it. Choose to uncover from any direction.
Box. The incoming slide wipes over the previous image with an expanding or contracting box, opening from either the center or the edges.
Wheel. Similar to Wedge, but rotating wheel spokes erase the current frame and show the next slide.
Split. The first image splits into doors that open either horizontally or vertically to reveal the next slide. Or, doors showing the second image close in over the first image.
Strips. As seen in countless old movies, the incoming image wipes across the screen diagonally from one corner to the opposite corner.
Circle. An expanding circle reveals the next slide.
Diamond. Like the Circle, but in the shape of a diamond.
Plus. Another geometric transition, like Circle, but in the shape of a cross.
Newsflash. The spinning-page effect from old-style newsreels.
Push. The second slide pushes the first one away—from whichever direction you choose.
Cover. The new slide scoots in from offscreen to cover the previous image with a framed, three-dimensional effect. The eight variations in this group match the directions from which the incoming slide can enter: top, bottom, left, right, and the four corners. The reverse of Uncover.
Blinds. The first slide closes like a set of Venetian blinds, either horizontally or vertically. As that image moves out, the next one emerges in its place.
Checkerboard. The first image breaks up into a pattern of adjacent squares, which turns into the next image as it sweeps across or down the screen.
Comb. The second slide comes into view as interlocking strips that approach from opposite sides of the frame.
Cube. The slide becomes the face of a 3-D cube, which rotates to reveal the upcoming slide.
Flip. Think of a chalkboard that pivots horizontally or vertically and you’ll know what this one does.
Random Bars. Irregular horizontal or vertical slats appear across the image, quickly disintegrating and giving way to the next slide.
Random Transition. If you just can’t make up your mind—or are out to seriously annoy your audience—this transition reaches blindly into PowerPoint’s transition grab-bag and pulls out a plum. Suitable only for audiences in the three- to five-year-old age group.
Once you’ve chosen a transition effect, you can tinker with its settings to add variety or to make them conform to your presentation’s overall style. Customizing transitions is also an effective way to set your slideshow apart from the efforts of other PowerPoint fans.
To summon the Transition Options dialog box, select a slide and click the Options button at the left end of the Transitions Gallery. Here you can control all aspects of how transitions behave. Some of the things you can manipulate in this box (see Figure 17-1, bottom) are:
Effect. Use this section to preview transition effects by choosing a new transition from the pop-up menu or selecting a new speed. PowerPoint responds by playing your new effect in the preview box. This is an extremely useful feature, because most transition types have several, sometimes subtle, variations; and the names of some transitions give little clue to their exact function. Also, most effects, especially the more intricate ones, look more impressive at slower speeds.
Sound. In the gratuitous-bells-and-whistles department, nothing beats the Sound section. Using this pop-up menu, you can add a sound effect to your transition: applause, breaking glass, the ever-popular slide projector, or anything else you find in this lengthy pop-up menu. (You can also choose Other Sound to use a sound located elsewhere. PowerPoint recognizes sounds in many common file formats; search for “sound” in the online help to see the full list.)
Tip
You can add new sounds to the pop-up menu by dropping your own WAV (.wav) sound files into the Microsoft Office 2008 → Office → Media → Sounds folder.
The occasional explosion or whoosh can bring comic relief, help you underscore a point, or draw special attention to an image. But for the sanity of those viewing your slideshow, go easy on the noise. Please resist applying sound to every transition, or the next sound you hear will be the silence of an empty auditorium. Avoid turning on the checkbox marked “Loop until next” which keeps the sound-effect snippet playing over, and over, and over, and over until you change the slide. Please.
Note
Don’t confuse these sound effects with background music. For background sound, insert a sound object in a given slide using the Insert command, as described on Movies and sounds.
Advance slide. Here’s where you tell PowerPoint the method you want to use for advancing to the next image in your slideshow. You have two basic choices: advance when you click the mouse (or remote control, or arrow key, or spacebar), or advance automatically after a number of seconds that you specify (the preferred choice if you’re designing a presentation to run unattended). You can also turn on both options, thereby instructing the program to change slides after a number of seconds unless you click the mouse first.
PowerPoint puts at your disposal a Spielbergian selection of special effects. In addition to the transitions you insert between slides, the program lets you animate particular elements in an image. It also lets you add a soundtrack or voice narration to your slideshow—features that are especially useful if you want to save the presentation as a standalone presentation or movie.
While slide transitions create animations between slides, animations (or builds), add animation within a slide. You can use animations to do things like make bullet points appear one by one; bring pictures, shapes, or other objects into the slide (singly, or in groups); or display a chart element by element. You can control animations with the mouse or spacebar during a presentation; or you can automate them, bringing in each object or element in a timed sequence.
You can choose from a variety of impressive animation styles that PowerPoint can apply when moving text or objects into a slide, or moving them out. As with transitions, discretion is advised when creating animations. It’s nice to have all these options available, but not every slide needs its text to appear as if it’s been shot from a machine gun or whirled in a Cuisinart.
Warning
You’ve been warned: Animations may not show up when you export your PowerPoint presentation as a QuickTime movie (as described on Saving Presentations as QuickTime Movies), especially if you’ve also created transitions between slides.
Since every element of a PowerPoint slide—text boxes, pictures, shapes, and so on—is an object, you employ the same techniques to build pictures into or out of a slide as you do to build shapes into or out of a slide, for example. PowerPoint also gives you further building possibilities for text and charts—all of which are objects made up of many individual elements.
The basic procedure for creating animations on a slide is to select the objects on the slide—text boxes, pictures, shapes, and so on—one at a time, and use the Custom Animation pane in the toolbox to determine how and when each object appears on the slide, whether it does something special while it’s on the slide, and then how and when each object disappears from the slide. The Entrance Effect (when objects appear on the slide), Emphasis Effect (what objects do for special emphasis while they’re on the slide), and Exit Effect (when objects disappear from the slide) are completely separate operations. You can have any one, two, or all of them.
You can create dramatic animated effects by controlling the Entrance Effect, Emphasis Effect, and Exit Effect order, timing, and direction for various slide elements. Switch to Normal View and click the Custom Animation tab of the toolbox to get started (see Figure 17-2).
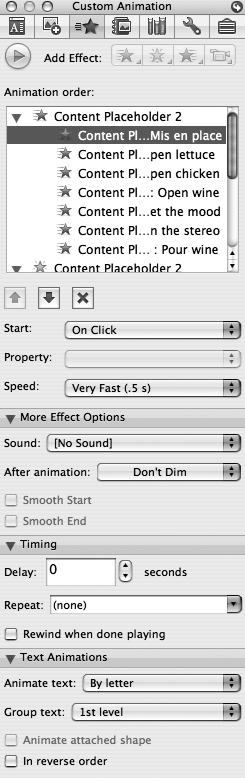
Figure 17-2. The Custom Animation palette in the toolbox is animation headquarters, your personal DreamWorks studio. Its panes and pop-up menus give you access to umpteen animation effects and options. To change the order of animations, select one and use the arrow buttons to move it up or down the list—or the X button to delete it. As you work, click the large Play button to preview the animation.
Note
You can only create animations in the Normal View—the only view that lets you click the various slide elements.
After you choose the text or graphic you want to give life to, click one of the Add Effect button pop-up menus in the Custom Animation palette. Each menu shows the nine effects you’ve used most recently; choose one to apply it to the current object. If you instead choose More Effects at the bottom of the menu, the Animation Effects window appears, a long scrolling list of effects grouped into four categories—Basic, Subtle, Moderate, and Exciting—that describe how stridently the effect demands attention.
Entrance Effect. Use this tab to select how the element makes its appearance on the slide. If an effect is grayed out, it’s not an option for that element.
Emphasis Effect. This option lets you choose an effect that calls attention to an element that already appears on the slide. For example, Change Font Color changes the font to a contrasting color.
Exit Effect. This tab lets you choose an effect to apply when an element disappears from the slide. Other than those options that don’t apply to disappearing objects—and a few extra ones that do—the list is identical to the one in the Entrance tab.
Tabs at the top of the Animation Effects window let you switch between entrance, emphasis, and exit effects, just in case you inadvertently clicked the wrong Add Effect button to open this window.
Note
You can apply as many animations to an object as you like, so an element can appear in the Animation Order box more than once.
The Animation Effects window offers dozens of effects, ranging from the wild and wacky to the basic and restrained. A representative few from the restrained end of the spectrum include the following:
Appear. In this, the simplest of all PowerPoint’s animations, the selected item just pops into its predetermined spot on the slide.
Dissolve. The selected object gradually materializes before your eyes, in a sparkly, pixelated way.
Fly In. The selected object shoots in and comes to rest at its rightful spot in the layout.
Fly Out. The selected object rockets off the slide.
Flash Once. The selected object simply flashes once in a silent, subliminal kind of way.
When you click one of the animations in the Animation Effects window, PowerPoint previews it for you on the slide in the slide pane—assuming the “Show preview” checkbox at the bottom of the window is turned on. Continue clicking effects until you strike the perfect balance between your playful yin and your business-like yang. Click OK to add the animation to the slide and display it in the Animation order window. This list shows not only the animations you’ve applied, but the order in which they happen. To change the sequence, select an element and click the up or down arrow buttons beneath. You can also delete one or more animations by selecting them and clicking the X button. To change an animation effect, double-click it to bring back the Animation Effects window, click the new effect, and click Replace.
Three pop-up menus beneath the Animation order window control the three basic options for animations:
Start lets you choose when the effect happens. The standard setting is On Click: the effect happens when you click your mouse or remote control. With Previous causes the effect to begin simultaneously with the effect directly above it in the list. If it’s the first effect in the list, the effect happens as soon as the slide appears. After Previous triggers the effect automatically after the previous effect is finished.
Property determines the main option for the animation itself, such as which side of the screen does it start from, or how much larger or smaller does it make the item. Many effects don’t have an adjustable property.
Speed lets you choose one of five durations for the effect, from Very Fast (.5 seconds) to Very Slow (5 seconds).
Yet more animation options await in the lower panes of the Custom Animation palette.
More Effect Options. Use the Sound pop-up menu to choose a sound effect to accompany the animation effect or stop a previous sound playing from a previous effect. Select No Sound to maintain glorious silence.
The “After animation” pop-up menu lets you turn the selected item a solid color when animation finishes, make it disappear from the slide after the animation (Hide After Animation), or disappear as soon as the next animation begins (Hide on Next Animation). The standard setting, Don’t Dim, keeps it onscreen after the animation—in other words, does nothing.
Timing. This section lets you set a Delay of so many seconds before the animation begins, and a Repeat for how many times the animation plays over again. Turning on the “Rewind when done playing” checkbox immediately returns the slide to its appearance just before the animation began playing.
Text Animations. If you selected a text object, you’ll see this pane appear in the Custom Animation palette. Use the “Animate text” pop-up menu to choose whether the text appears in the animation all at once, by the word, or by the letter. The “Group text” pop-up menu determines whether your lines of text appear as one object, or one line at a time (according to their level in the outline.) You can also determine whether the lines below a certain level in the outline appear as a group by choosing “2nd level,” “3rd level,” and so on.
If the object you’re animating is a shape with text inside (see Editing Lines) turn on the “Animate attached shape” checkbox to make the shape and its text remain stuck to one another during the animation. Finally, if the text you’re animating contains several lines, you can turn on the “In reverse order” checkbox to make the lines appear on screen from last to first.
Chart Animations. When you animate a chart object, this pane appears in the Custom Animation palette to give you control over how the chart appears on your slide. The “Group graphic” pop-up menu lets you choose whether the chart simply appears all at once (As one object), or by series or category, or by element in series or category. Turn on the checkbox at the bottom of the pane if you’d like the chart animation to begin with the appearance of the empty chart background.
If you need to jump to various parts of your slide show during a presentation, or if you’re creating self-paced learning modules that students run on their own computers, consider adding navigation buttons to the slides. When you require this kind of control, you can embed a host of useful command buttons—for advancing slides, jumping to the end of the show, and so on—right on the slide when you’re preparing the show. You can place buttons on individual slides or many slides at once:
If you want to add a button to just one slide, switch into Normal view and bring up the slide in question.
If you want to add a button to the same location in a group of slides—or all of them—place it on the slide master. Start by choosing View → Master → Slide Master. (See Slide master for a refresher on working with the slide master.)
Note
Don’t try this shortcut if you’ll be saving your presentation as a QuickTime movie. For QuickTime movies, you have to put the buttons on each slide individually.
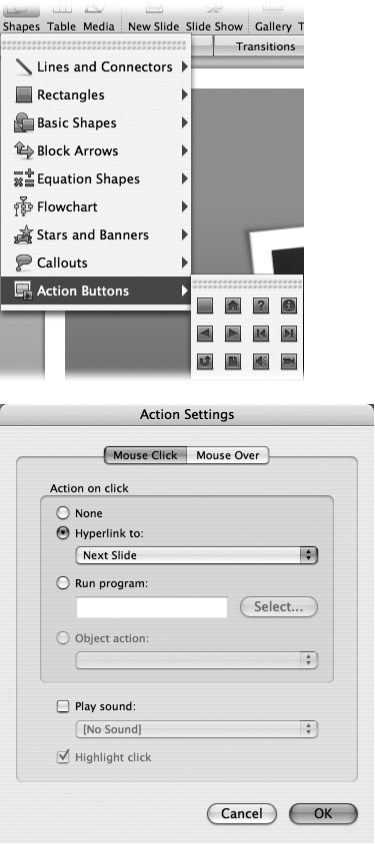
Once the slide where you want to stick your button is displayed, click the Shapes pop-up menu in the Standard Toolbar (or use the Shapes tab in the Object Palette) and make a selection from the Action Buttons submenu as shown in Figure 17-3 (or do the same thing via the Insert Shapes menu in the Drawing toolbar).
The Action Buttons palette has 12 buttons. The four in the middle help you jump around during the show: Previous Slide, Next Slide, First Slide, and Last Slide.
To put an Action Button on your slide, click the button you want. (Alternatively, choose a button name from the Slide Show → Action Buttons submenu.) Then drag diagonally on the slide. PowerPoint draws the button for you, and then opens up the Action Settings dialog box shown in Figure 17-3.
In this box, you can specify exactly what your newly created button will do. The proposed settings are fine for most purposes, so you can generally just click OK. It’s worth noting, however, that you can use these controls to make your button do much fancier tricks, as described in Figure 17-3. (Normally, your action is triggered when you click the corresponding button. But if you click the Mouse Over tab in the Action Settings dialog box, you can also specify that something happens when you just point to it instead.)
Later, when the slideshow is running, press the A key to make the arrow cursor appear, and then click your newly created button to trigger the associated event.
Warning
Planning to save your show as a QuickTime movie? Watch out for action settings that don’t work well with movies! For example, Microsoft recommends that you not use mouseovers, since they won’t work. Also, don’t set a button to run another program or to play a sound.
You can put any of eight other Action Buttons on your slides. Some come with preset icons and some have preset Action Settings that match their individual functions.
Custom lets you customize your own action button (to launch a program, for example).
Home zips back to the first slide in the show.
Help lets you create a link to a help slide that you’ve designed.
Information creates a link to an information slide that you’ve added.
Figure 17-3. Top: From the Drawing toolbar, choose AutoShapes → Action Buttons and then click an action button to load your cursor with it. Drag to draw the shape of the button on your slide; when you release the mouse, PowerPoint presents you with the Action Settings dialog box. Bottom: You can use the “Hyperlink to” pop-up menu to specify that a click of your button transports you to another slide, a Web site, or even another Macintosh file. Or you can check “Play sound” to create a button that, when clicked, plays the thunderous applause the occasional heartless audience may not provide.
Return takes you back to the last slide you saw (which, if you’ve been jumping around, isn’t necessarily the slide before this one in sequence).
Document launches a Macintosh file or program that you specify.
Sound triggers a sound, and its cousin Movie starts rolling a movie that you’ve set up beforehand.
If you want to change the appearance of an Action Button—or any other AutoShape—double-click the button to bring up the Format AutoShape dialog box. To change a button’s action, control-click (or right-click) it and choose Action Settings from the pop-up menu.
If you’re worried about laryngitis on the day of your presentation, if you’re creating a self-running kiosk show, or if you have an unnatural fear of public squeaking, you might want to record voice narration for your slideshow ahead of time. This way, you can sit back and relax while your confident, disembodied voice (or the voice that you hired) plays along with the show.
To get your voice into the Macintosh you’ll need a microphone, of course. Some Macs have built-in microphones—but don’t be tempted to use them to record narration. The quality is poor and they pick up a lot of noise from the operation of the computer. Some Macs have an analog audio input jack, suitable for a microphone—and some don’t. For those that don’t, you’ll require a USB audio adapter like the iMic from Griffin Technology (www.griffintechnology.com).
Tip
Whether you plug directly into your Mac or go through a USB adapter, there’s any number of microphones you could use—at any price you can imagine. One good choice in the less-than-$100 range is the Model 33-3013 tie-clip microphone from RadioShack at $25, which delivers surprisingly good voice quality at a very low price.
When you’ve got your microphone hooked up, visit the Sound panel of System Preferences (click the Input tab) to make sure that you’ve selected the correct microphone for input. Quit all other sound-recording programs, if any are running. Then:
Choose Slide Show → Record Narration to bring up the Record Narration dialog box.
This box shows the current recording settings, including your maximum recording time based on your free hard-drive space. Since sound files can be huge, the “Link narrations” checkbox lets you save your narration files to any location you like, such as an external hard drive with plenty of free space, rather than embedding them in the presentation file. Click Set to choose where PowerPoint saves linked narrations. When you finish recording, that location will contain one AIFF sound file for each slide in your presentation.
Note
If you link your narrations, moving your presentation to another machine will break the links. The PowerPoint Package format avoids this problem, as discussed in the Tip on Movies and sounds.
Click Record.
PowerPoint starts running through your presentation. As you advance through the slides, PowerPoint makes a separate, linked AIFF sound file for each slide. Or, if you didn’t link the recording, PowerPoint attaches the audio you recorded as a sound object on each slide.
There’s no easy way to re-record just one flubbed slide; for most purposes, it’s simplest to start a new take. To start over, end the slideshow using whatever method you normally use (press Esc, for instance). Then, choose Slide Show → Record Narration and begin again. (And if you’re really having trouble, you can always record individual sound files for each slide, then attach them as described in the box above.)
Record whatever you want to say for each slide, advancing the slides as you normally would (by clicking the mouse, for example).
When you reach the end of the slideshow, PowerPoint asks if you want to save the timings (to record the amount of time you spent on each slide) along with your narration. If you click No, PowerPoint saves only the narration. If you click Yes, PowerPoint saves the timings along with the narration, overwriting any existing timings.
If you choose not to include the timings, each sound will play when you manually advance to a given slide. This way, you can let the narration play, and then discuss each slide, moving on only when you’re ready.
Note
Voice recordings can eat up a lot of disk space, so be sure you have enough room on your hard drive to hold the sound. If not, consider saving your voice files to an external hard drive or some other industrial-strength storage area.
Once you’re done recording your narration, you’ve got a self-contained slideshow, suitable for parties or board meetings.
Instead of adding sound to each slide, you may want to add a soundtrack to an entire slideshow. For example, you may want background music or sound, which doesn’t need to be synchronized with the slides, playing through the entire slideshow. On the other hand, you could also use a single soundtrack for an unattended kiosk-type presentation where you’ve set each slide to advance automatically.
To create a soundtrack, use the Insert → “Sound and Music” → From File command (select the sound file and choose whether you want it to start Automatically or When Clicked) to insert the soundtrack on the first slide or the selected slide. If your soundtrack is shorter than your show, you can loop it so it plays continuously. Click the loudspeaker icon to select the soundtrack, and turn on the checkbox marked Loop Until Stopped in the Formatting Palette’s Sound pane.
Then click the Custom Animation palette, select the sound in the “Animation order” list, and click the “After… slides” button in the Media Options pane. Finish by entering the total number of slides in the slideshow—or the number of slides you’d like accompanied by your soundtrack.
When you add a soundtrack in this fashion, it plays right along with any other sounds, narration, or sound effects you’ve attached to your slides or transitions.