
There are two kinds of drawings in Word: those you make yourself using Word’s drawing tools (see Pictures and Drawings), and those Word makes for you, via features such as AutoShapes, SmartArt graphics, and WordArt.
An AutoShape is a ready-made drawing object. As with the simple circle, square, and triangle of times past, you simply drag to size and place them in your document. However, you now have a plethora of new choices, courtesy of Office 2008.
To use an AutoShape in your document, click the AutoShapes button on the Drawing toolbar. (If it’s not already open, choose View → Toolbars → Drawing.) Or click the Toolbox button in the Standard toolbar and click the Object Palette’s Shapes tab.
As shown in Figure 19-2, each AutoShape menu (or category in the Object Palette’s pop-up menu) provides a palette of choices. Click one, then release the mouse; now drag in your document to place the AutoShape—you can always resize or move it later.
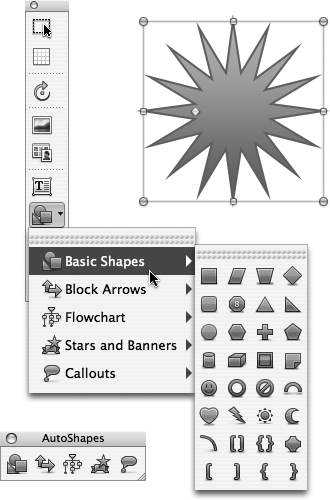
Figure 19-2. Top Left: The tools on the Drawing toolbar give you (top to bottom): Select Objects, Grid Options, Free Rotate, Insert Picture, Clip Art, Text Box, AutoShapes, Lines, and 3-D. Bottom Left: You can keep a mini-palette (bottom) of Auto Shapes and Lines open by dragging the palette off the Drawing toolbar. Right: Called the “adjustment handle,” the yellow diamond on some AutoShapes lets you adjust some aspect of the shape—such as the spikiness of a star.
Note
As you drag to create an AutoShape, press Shift to keep the shape in equal length-to-height proportion. For instance, select the rectangle shape and Shift-drag to create a square, or select the oval and Shift-drag to create a perfect circle. As noted earlier, you can also press Shift when dragging to resize such an object without distorting its original proportions.
Even with the immense variety of AutoShapes and WordArt, some days your own creative juices are flowing. With Office’s line tools, you can draw free-form lines and combine them with arrows and AutoShapes to build your own masterpieces.
To get started, summon the Drawing toolbar by choosing View → Toolbars → Drawing, or by right-clicking a toolbar divider line and then selecting Drawing from the Toolbars submenu. Click the Lines toolbar icon, as shown in Figure 19-3. Choose a line type from the Line Style pop-up menu; then drag in your document to place the line you’ve selected. (As with AutoShapes and WordArt, lines lie on top of text in Word—and are invisible in Draft view—unless you wrap them around the text, as described on Layering text with graphics.)
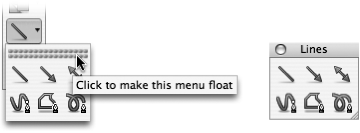
Figure 19-3. When a toolbar menu has a strip of dotted lines at the top, you can drag it off the toolbar (left) to create a floating palette (right). The Lines palette contains tools for straight lines, arrows, double arrows, curved lines, free-form shapes, and scribbled lines.
You’ll find that each of the options in the Lines pop-up button menu works a bit differently:
Line. Drag for the position and length of the straight line you want; the cursor turns into a tiny cross. To resize the newly drawn line, drag the handles on each side, or reposition it by dragging the line itself (at which time the cursor turns into the four-arrow move cursor).
Arrow and Double Arrow work just like lines. When you draw a single arrow, the point appears where you stop dragging; a double arrow automatically springs points on both sides.
Curve. Unlike lines, you draw curves by clicking, not dragging. Click to create a starting point; as you move the mouse, the curve follows. When you click a second time, the line gently curves from the first point to the second. Continue in this same manner. (The curve tool works best for wiggles and waves rather than closed shapes.) When you’re done, double-click to finish off the curve. To enclose the shape, click as close as you can to your starting point.
The Freeform tool is a two-in-one special. When you drag with it, the cursor turns into a pencil and works like a pencil—you can draw lines with any bend and direction without the limitations of the Curve tool. The instant you let go of the mouse button, the cursor turns into a cross and becomes a line tool. Clicking the mouse again now draws a straight line, just as with the Line tool. Hold down the mouse button again to go back to freehand drawing.
The Scribble tool is exactly like Freeform without the straight-line feature. You drag it to draw a freehand line; the line ends when you let go of the mouse button.
To change the color and thickness of lines you’ve drawn, use the Line formatting tools on the Formatting Palette. Two other line options await only if you Control-click (or right-click) the line and choose them from the shortcut menu:
Edit Points. Don’t worry if your line or drawn object doesn’t come out perfect on the first try. Just do the best you can, and then Control-click (or right-click) the shape and choose Edit Points from the shortcut menu. You can then drag the little dots to resize and reshape the line. This trick is especially useful for the Curve, Freeform, and Scribble tools.
Open Curve. This unusual command (available on the shortcut menu only) “disconnects” the point where you closed a Curve, Freeform, or Scribble object. Now you can use the edit points to reshape the object. Should you ever want to close the gap again, Control-click the shape again and choose Close Curve.
Office 2008 introduces a new member to the Office graphics gang: SmartArt graphics. Like collections of AutoShapes choreographed by Busby Berkeley, SmartArt graphics let you visually communicate information in lists, processes, cycles, hierarchies, relationships, and so on. Starting with these graphical templates, you can fill in your text information, refine the formatting, and experiment with different layouts.
Click the SmartArt Graphics tab of the Elements Gallery (or choose Insert → SmartArt Graphic) to display the SmartArt gallery (see Figure 19-4, top). Use the row of style buttons to narrow your choices to List styles, Process styles, Relationship styles, and so on; and then use the scroll buttons at the right end of the Gallery to view all your choices. When you click one of the thumbnails, the graphic appears in your document surrounded by a blue selection frame and accompanied by the dark gray Text Pane (see Figure 19-4, bottom).
You can type directly on the graphic, or in the Text Pane. As you type, you’ll see your words appear in the graphic. The Text Pane operates like a little outline. You can make a list of items of equal importance, or you can use the Demote button to move an item down one level of importance, or use the Promote button to elevate an item in importance. As you do, the text in your graphic reflects the new arrangement, with added or removed bullet points. Two more buttons let you add or remove items from your outline—which you can also accomplish with the Return key and the Delete key.
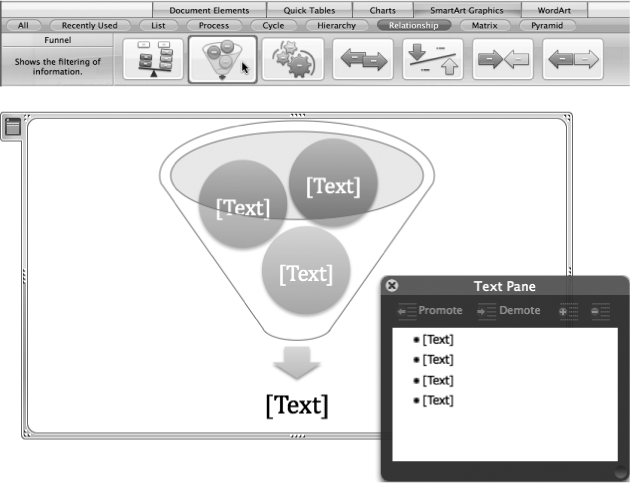
Figure 19-4. Top: As you hold your cursor over a SmartArt thumbnail in the Elements Gallery, a short description of the diagram appears at the left. Click a thumbnail to insert it in your document. Bottom: You can enter text either directly in the diagram or in the Text Pane. The button on the upper-left corner of the selection frame hides or reveals the Text Pane.
As you add text to your outline, SmartArt’s canniness becomes evident, as it automatically adjusts container size and font size to accommodate your words—always keeping the entire group balanced and in proportion.
When you’re working with SmartArt graphics, the SmartArt Graphic Styles pane joins the Formatting Palette. By clicking its various Styles Buttons, you can instantly transform your flat graphic into a variety of 3-D configurations. Similarly, the Colors tab gives a selection of colorization schemes, based on your Document Theme colors.
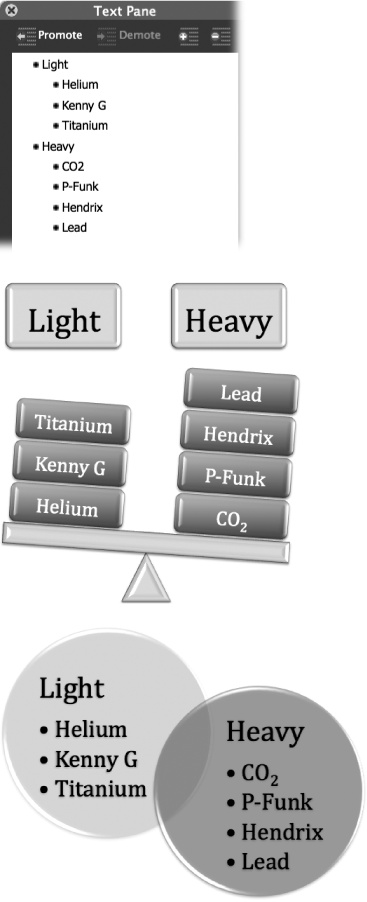
As you work with a SmartArt graphic, you can click other SmartArt thumbnails in the Elements Gallery to see how your information would look in a different format—and always come back to your original design. For example, you might start out thinking your relationship comparison data would work well in a Balance diagram, but then discover a simple Venn diagram gets your point across much more clearly (see Figure 19-5, bottom).
Although it appears in your document as one unit, a SmartArt graphic is actually collection of regular graphic objects. And like other graphic objects, you can select and modify them just as you would any other graphic—as described later in this chapter and in Chapter 8.
Like an AutoShape, a piece of WordArt is a type of ready-made drawing object. In this case, it’s used for special text effects—3-D, wavy, slanting, colored, and various other permutations—that would be just right on a movie poster (but should be used sparingly in other situations). Figure 19-6 shows some examples.
To create some WordArt, click the Elements Gallery’s WordArt tab or choose Insert → WordArt. Then proceed as shown in Figure 19-6.
When you click a piece of WordArt, the Formatting Palette’s WordArt pane appears. This pane contains three basic text tools for spacing and alignment that format the actual text of your WordArt. The Format WordArt button opens the Format dialog box where you can change color, transparency, wrapping, and so on. The most powerful button here is the first one, Format as Shape, which takes the WordArt and makes it conform to one of the 40 different shapes you can choose from the pop-up palette. Stack Text Vertically strings the text downward, so that one letter appears below the other. Equalize Character Height stretches the short letters of the selected WordArt so that all letters line up, top and bottom (except for letters with descenders—g, j, p, q, y—which are strangely unaffected). Double-clicking the WordArt itself takes you to the Edit WordArt dialog box.
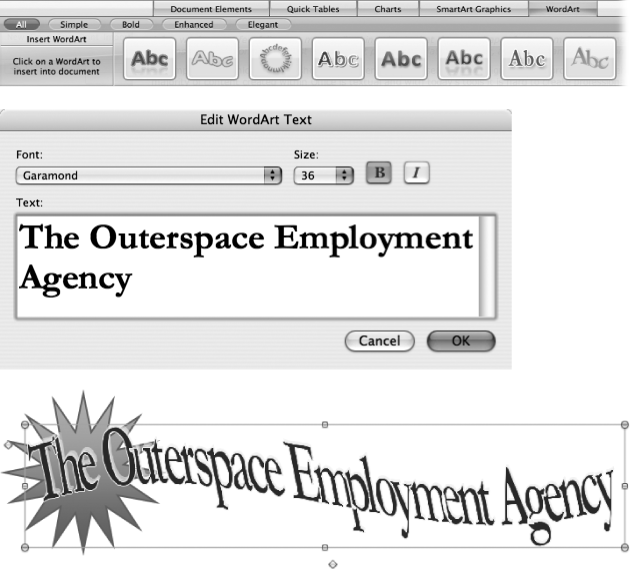
Figure 19-6. Top: In the WordArt Gallery, click a text design that strikes your fancy, and it appears in your document with “Your Text Here” as stand-in text. Click another style in the gallery to replace your first choice. Middle: Double-click the text box to open the Edit WordArt Text dialog box. Choose a typeface, then type your text banner message; click OK when you’re finished. Bottom: Your new WordArt appears in your document. You can fine-tune its appearance by dragging the yellow adjustment handles, or by stretching or compressing the text box.
When you have multiple objects on a page, you may want them to be equally spaced or evenly aligned by their top edges. Instead of working out the measurements and aligning them manually, use Office’s built-in alignment features.
To do so, select the objects that you need to line up or arrange (Shift-click each one). Then choose one of the following options from the Align or Distribute menu buttons of the Formatting Palette’s Size, Rotation, and Ordering pane. Use the tiny icons on this menu as a visual clue to their functions.
Align Left, Align Center, or Align Right. These commands bring the selected objects into perfect vertical alignment by their left or right edges, or centerlines.
Align Top, Align Middle, or Align Bottom. These commands bring the selected objects into perfect horizontal alignment by their top or bottom edges, or centerlines.
Distribute Horizontally or Distribute Vertically. Use these commands to spread your drawing objects across the page or from top to bottom—with an equal amount of space between each one.
You can also use the above commands on a single object, to place it at either side or in the center of a page.
Even without using the alignment commands, you might have noticed that it’s fairly easy to pull objects into alignment with one another just by dragging. That’s because each Word page has an invisible alignment grid that objects “snap to,” as if pulled into line by a magnetic force.
To see the grid, click Grid Options on the Drawing toolbar. In the Grid Options dialog box: turn on “Display gridlines on screen;” specify a gridline separation in the “Horizontal every” box (and the “Vertical every” box too, if you like); and then click OK. Now you can see the grid’s faint gray lines superimposed on your document.
Note
In Excel, the gridlines are the cell boundaries themselves. You can either snap to these gridlines or snap “To Shape” (see Chart Parts).
Now that you know what the grid looks like, here’s how to use the other Grid Options settings:
To turn the grid off so that you can drag objects around with no spatial restriction whatsoever, turn off the appropriate option under the “Snap objects” section.
You can use the “Snap objects to other objects” box with or without snapping to the grid. When this box is turned on, a dragged object snaps into alignment with the edges of the closest nearby object. If the grid is on, the nearest object overrides the grid.
Change the default grid spacing (an eighth of an inch) by changing the measurements in the “Grid settings” boxes.
Click OK to apply the grid changes to your document.
You can rotate drawing objects in either of two ways: freely with the mouse, or in precise 90-degree increments.
To rotate something, click the object, and then click the Free Rotate button (a curved-around arrow) on the Drawing toolbar. The handles on the object become green dots. Drag any dot to rotate the object on its own axis. The object jumps into its new orientation when you let go of the mouse button. (Option-drag to rotate the object on its end instead.)
To rotate in 90-degree increments, click the object, and then in the Formatting Palette’s Size, Rotation, and Ordering pane, choose Rotate Left or Rotate Right from the Rotate menu. Repeat the process to continue rotating the object a quarter turn at a time.
To flip a selected drawing object, click the object, and then in the Formatting Palette’s Size, Rotation, and Ordering pane, choose Flip Horizontal or Flip Vertical from the Rotate menu. Flip Horizontal reverses the object from side to side; Flip Vertical turns it head-over-heels.
Note
Pictures and clip art feature a stalk with a green handle sprouting from their top. Drag the green handle to rotate these objects, as described on Rotating objects.
Besides arranging an object’s size and placement on the page, you can also adjust the way each object looks by adjusting its various properties. Object properties include things like fill color, line color and style, drop shadow, and object opacity. The Formatting Palette, the Format dialog box, and the Color Picker have the commands for making all of these adjustments.
The Formatting Palette. When you click an object, the Formatting Palette provides a plethora of graphics controls (Fill, Line, Size, and so on), the assortment of which varies depending on the type of object at hand. You’ll find all of the Formatting Palette’s commands duplicated in the Format dialog box—with the exception of the Quick Styles and Effects pane (see Figure 19-7).
The Format dialog box. When you double-click an object (other than a text box) or use one of the variations of the Format → Object (Picture, Text Box, and AutoShape) command, this massive, multitab dialog box appears (see Figure 19-7). Its various panes let you specify every conceivable aspect of the selected object.
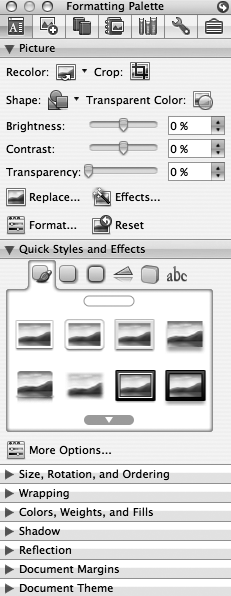
Figure 19-7. The Format Picture dialog box lets you massage the appearance of your inserted pictures in great detail, but using it takes time. Enter the Picture, and Quick Styles and Effects panes of the Formatting Palette. By clicking one of the six buttons across the top, you can enhance your picture with Quick Styles, Shadows, Glows, Reflections, and 3-D Effects. (Perhaps in a future Word version the Text Transforms button will actually do something.) The Picture pane gives an array of controls found in the Formatted Picture dialog box plus the vital Crop button, which lets you crop your pictures visually instead of numerically.
The Format dialog box is Office 2008’s way of giving you a sneak peek at the future. Double-click a picture to see what all Format dialog boxes will look like one day (see Figure 19-8). (Apparently Microsoft didn’t have time to update everything they’d planned to—and still get the software out in time for Macworld 2008. For now, the Format Picture dialog box features a nonfunctional Text Box tab; the other Format dialog boxes sport a nonfunctional Picture tab.)
On this tab of the Format dialog box, you can specify a color, picture, or pattern that will fill in the interior of your picture or drawing.
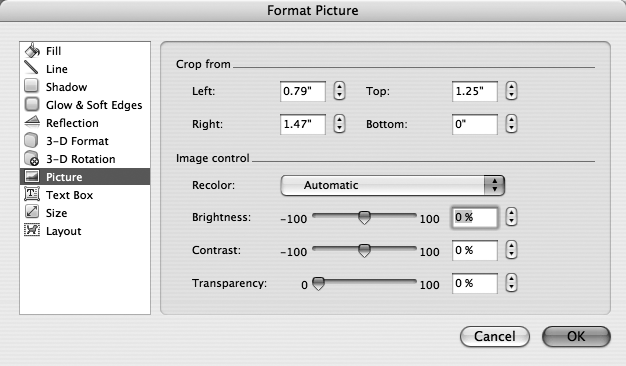
Figure 19-8. The look of Format dialog boxes to come—available now in a Picture dialog box near you—which feature tabs in a sidebar. The Format dialog boxes for other types of objects still use Word’s traditional style with the tabs on top, like the Format Text Box dialog box shown back on Layering text with graphics.
Note
The "Colors and Lines” tab Fill control is designed to fill in the background of drawing objects and Office clip art. The corresponding Fills tab in the new Format Picture dialog box has no visible effect on normal pictures, but can provide a background layer that shows through if the picture has transparent areas, or if you’ve added Transparency in the Fill tab.
Click one of the Color pop-up menus and Word displays its array of Theme Colors—an assortment chosen to coordinate with your template, or a different collection you’ve chosen in the Formatting Palette’s Document Theme pane—and 10 standard colors. This colorful palette appears any time you have the option to change a color in Office. You can also use it to change font color (as shown back in Figure 3-4 on Character Spacing, for example). Click the color you want to apply.
If none of the 70 colors meets with your artistic standards, choose More Colors from the Fill Color pop-up menu to open the Mac OS X color picker, which offers five different ways to select almost any color in existence. First of all, you can choose any color that you currently see on the monitor—like a sample from a favorite picture—by clicking the magnifying glass icon and then clicking anywhere on screen, as discussed in Figure 19-9.
The five square buttons at the top of the color picker reveal different panels, each of which provides a unique way to see and even blend colors. Choose the one that best matches how you’re used to looking at color. Here are the various color pickers you can try:
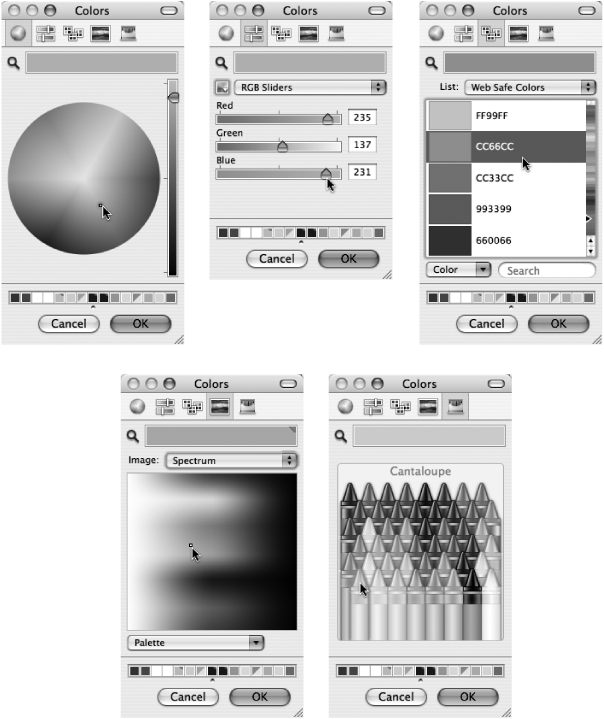
Figure 19-9. The many faces of the Color Picker, selected from the row of buttons at its top, give you five different ways to choose colors. Click any of the color displays, or use the sliders to pick a color. You can also copy a color from anywhere on your screen in order to do things like match a text box color to that captivating blue of your baby’s eyes. Click the magnifying glass and Word turns the arrow cursor into a magnifying glass. Drag it over any color on your screen and click to load that color into the swatch display at the top of the color picker. Save a favorite color by dragging it to one of the row of boxes at the bottom of the color picker—and when you fill up one row, drag the tiny button beneath the row downward to expose more empty squares.
On the Color Wheel panel, you can click anywhere in the circle to choose a color from the spectrum. Use the slide on the right to make the hues brighter or darker.
The Color Sliders panel gives you access to traditional color systems, like CYMK, which lets you blend the ink color used in the printing business—Cyan, Yellow, Magenta, and Black; or RGB, the system computers use to describe colors with Red, Green, and Blue. Choose your favorite color system from the pop-up menu near the top of the panel, and then click the ColorSync pop-up menu (under the magnifying glass) to fine tune your color palette for various devices—scanners, printers, and so on—or paper stocks.
The Color Palettes panel lets you choose, from the pop-up menu, lists of color swatches such as Apple’s standard palette or the set of colors that you can use on Web pages. Scroll through the list and click your desired color.
Image Palettes lets you select colors from the spectrum in the big square on the panel. You can also choose to import a graphics file into the square and then pick colors from it—helpful if you want to match colors for your interior design scheme or latest spring sportswear collection.
Crayons is the simplest one to use—as easy as picking a Crayola out of a box. (The names—Asparagus, Spindrift, Bubblegum—are lots of fun, too.)
If you choose Fill Effects from the Fill Color pop-up menu (or use the Gradient, Picture, and Texture tabs in the new Format Picture dialog box), you get the secret dialog box shown in Figure 19-10. It has four tabs of its own, each offering a dramatic way to fill in the background of the selected object.
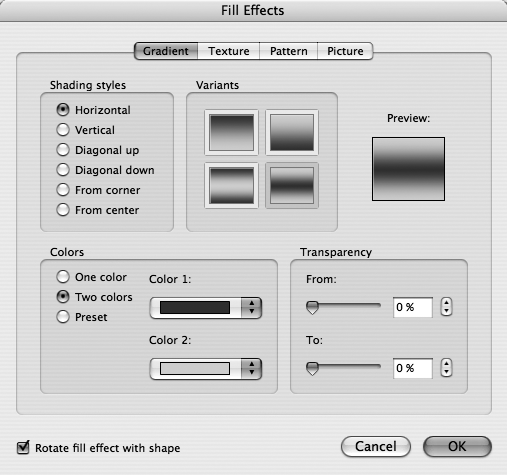
Figure 19-10. Choosing Fill Effects lets you use something other than a solid color for a fill. Clicking the Colors radio buttons on the Gradient tab lets you use any of Word’s color-picking tools to choose the colors to apply to the gradient effects. The Preset choice gives you a list of preinstalled custom color combinations with poetic names such as Late Sunset and Fog. The Transparency sliders add transparency to either end of the gradient effect. And if you turn on “Rotate fill effect with shape” then your gradients maintain their alignment with your object while you rotate it.
For example, the Gradient tab lets you apply smoothly shifting colors within the interior of the drawing object—for rainbowlike, shimmery effects. Use the top controls to specify the colors you want to shift from and to; use the bottom controls to indicate the direction of shifting. Once you set the colors, style, and direction, you can apply transparency to the gradient by using the sliders at the lower right.
The Texture tab is your personal Home Depot for marble, granite, burlap, and other building materials. When you need to dress up, say, a title or heading by mounting it on a stately, plaque-like rectangle, these squares are just the ticket. (Click Other Texture to choose a graphics file on your Mac that you’d like to use instead as a tiled, repeating background pattern.)
The Pattern tab has a variety of two-color patterns. Using the pop-up menus at the bottom of the dialog box, you can specify which is the dark color and which is the light one.
Finally, when you click the Picture tab, you’ll find no pictures to choose from—at first. Click Select Picture to choose any picture file on your Mac, including, but not limited to, Office clip art. Click Insert to bring the picture into the Picture tab, where you can see what it will look like. Click OK to use the picture as a fill for your object.
This slider, found on the Colors and Lines tab and the Formatting Palette, changes whatever color you’ve chosen into a transparent version. The text or objects layered above or below it remain visible through the color, courtesy of Mac OS X’s Quartz graphics technology.
In the Line section of the Colors and Lines tab, you can choose colors, dash and dot patterns, styles (single, double, and so on), weight or thickness, and transparency. All of it applies to the lines that constitute the selected object, or the frame around a text box or picture.
Choosing the eyedropper tool on the Line or Fill Color menu buttons in the Formatting Palette’s Colors, Weights, and Fills pane (not the Format dialog box) lets you click anywhere on your Mac’s screen to pick a color. It can be in any open window, such as a Web page in your browser. When you click a color with the eyedropper, the line or fill takes on that exact color. Word then adds that color to the bottom of all Office color palettes to provide consistent color for your future use.
While you can always resize an object right in your document by dragging its handles, the Size tab has other invaluable features. For example:
Height, Width. These sections let you specify precise measurements for the height and width of your object, in hundredths of an inch.
Rotate. This option lets you rotate an object (not a text box) to any angle.
Note
The size tab of the former Format dialog box features a Reset button which, in the olden days of previous Word versions, lets you quickly recover from sizing mistakes. Alas, the poor Reset button has lost all its powers, and does nothing when you click it. Indeed, the new Format Picture dialog box removes all memory of this useful button.
Scale. These controls let you enlarge or shrink a selected graphic by a specified percentage. (If you turn on Lock aspect ratio before adjusting size, the drawing’s original height-to-width proportions remain the same. The Relative to original picture size box applies only to pictures, not drawings; it lets you use the boxes in the Scale section to change the picture’s size by a percentage of the original size. Thus, by changing the percentage to 200, you can double a picture’s size without calculating the exact measurements.)
Note
Making bitmapped images (like digital photos) larger than they originally appear is a recipe for blotchiness, since you can’t have more dots per inch than the image’s original resolution. And if you intend to print such graphics, be aware that their standard screen resolution of 72 dots per inch looks good on the screen but isn’t fine enough to produce high-quality prints. So if your document is destined for the printer, use digital images of 150 dots per inch or higher.
The Picture tab and the following special effects tabs appear only in the new Format Picture dialog box, and in the Formatting Palette when you’ve selected a picture. The tools on the Picture tab, as shown in Figure 19-11, provide you precision tools to perfect your image:
Use the Crop from boxes to specify, in hundredths of an inch, how much you’d like to trim off each side of a picture.
The Recolor menu lets you turn your color graphic into grayscale, black and white, or washout. (The washout setting produces an extremely faint image, light enough that you can still read text that flows over it.) In addition, you can choose from a batch of dark and light variations to colorize your picture based on the Document Theme colors (see Slide master).
These choices affect only the image itself, not the fill. You adjust the fill on the Fill tab as described on Fill Color: Standard palette.
Brightness and Contrast are mainly useful for touching up photographs, but they do affect clip art and other images. Increase contrast for a crisper look; decrease it for a softer effect.
The Transparency control lets you make a picture completely—or just slightly—transparent, so that whatever is behind it shows through. Combining transparency with a fill color is a good way to make a tinted background image.

Figure 19-11. Use the Formatting Palette’s Picture pane to crop a picture within your document. Click the Crop button and drag any of the eight crop handles that appear. When you’re satisfied with your cropping, just click outside the picture to finalize it. If you decide later you’ve made a mistake, select the picture again and click the Reset button to return it to its original, as-imported, state.
If you change your mind about anything you’ve done to a picture, remember you can undo your changes one by one by choosing the Edit → Undo command, or click the Reset button in the Formatting Palette’s Picture pane to take your picture all the way back to square one.
Turning on the Shadow checkbox in this tab activates the shadowy world you control to instantly add a third dimension to your page:
Use the Style pop-up menu to choose Outer, the traditional drop shadow style; Inner, to create a shadow that falls within the picture; or Perspective, to make it look like your picture object is illuminated by a Klieg light far above and to your right.
Twist the Angle knob, enter the exact number of degrees, or use the up- and down-arrow button to determine the direction in which the shadow falls.
Click the Color pop-up menu if you’d like your shadow to be something other than black or gray.
The Size slider adjusts the size of the shadow, relative to the picture.
Adjust the Blur control to affect the shadows and softness, mimicking the range from harsh, direct sun to soft window light.
The Distance control determines how far from the picture the shadow falls.
Adjust the Transparency control to affect the darkness of the shadow. If you have black selected as the shadow color, for example, this slider creates shadows from pure black, to gray, all the way to nonexistent.
The two effects in this tab both soften the edges of a picture—but do it in very different ways.
The Glow effect adds a soft frame of color around a picture—another technique to make a picture stand out on the page. Use the Color pop-up menu to choose a glow color, the Size slider to determine how wide a glowing frame to create, and the Transparency slider to soften the effect.
The Soft Edges effect creates a soft or feathered edge to the picture, so it blends gradually into the page background. You’ll see this technique often used in collages where one picture blends into another. Set the Glow pop-up menu to No Glow and then adjust the Soft Edges slider to see the effect.
Feel free to experiment using the Glow and Soft Edges effects together.
Turn on the Reflection checkbox to make your pictures appear to be standing on a highly polished surface, with a reflection extending from the bottom of the picture. A modern look with which are no doubt familiar if you’ve been hanging around Mac OS X—or especially Steve Jobs’ keynote presentations—for very long.
The Transparency control determines the intensity, or density of the reflection.
Use the Size slider to control how much of the picture is reflected below it, from none at zero, to the entire picture at 100%.
When you slide the Distance adjustment to the right, reflection moves away from the bottom of the picture—the same effect you’d see if you were to raise the picture above the reflective surface.
Pixar it isn’t, but Word does its best to simulate three dimensionality by giving you the option of adding 3-D effects to your pictures. Using these tools, you can transform a flat picture into what looks like a very thick picture, or a box with the picture wrapped around every side.
The Bevel tab controls what the virtual sides and edges of the 3-D picture look like. Since the picture is turning into a 3-D “box,” use the two pop-up menus to determine the kind of edge treatment for the top and bottom of the box. The Width settings control how far that edge intrudes into the picture; while the Height settings control the thickness or depth of the edge treatment.
The Depth & Surface tab’s Depth & Contour section controls the edge color and “thickness” of your 3-D box. Use the Depth Color pop-up menu to apply a color to the 3-D sides of your picture, and use the Depth setting to determine its thickness.
You can use the Contour Color pop-up menu and Size box to apply a color to all the edges of your box as an additional way to highlight your picture’s three-dimensionality.
The Surface section of the Depth & Surface tab lets you choose the material that your virtual 3-D object is built from. Use the pop-up menu to choose from shiny metal, clear glass, a matte surface, and so on. Then use the Lighting pop-up menu to control the virtual illumination for your virtual object. Choose from simple flat lighting, warm sunset light, harsh contrast lighting, and many others; and then choose the direction for your light source using the Angle control.
Once you’ve built a 3-D object from a picture using the 3-D Format tab, make the most of it by using the 3-D Rotation tab to orient it on the page.
Use the Rotation section’s Type pop-up menu to choose how your 3-D object appears as you rotate it. Choose Parallel to keep the sides of your object parallel with one another; choose perspective to make it look like the rotated object is receding into space. Then use the Perspective up- and down-arrow buttons to vary the perspective amount.
The four Oblique settings determine which corner your object rotates around. After choosing the type of rotation, then use the X, Y, or Z buttons to perform the rotation. Click these rotation buttons to rotate 5-degree in the direction indicated on the button, or use the up-and down-arrow button to move in 1-degree increments. Of course, you can also enter a measurement directly in the box.
You can move the rotation axis away from the plane of the object by the amount you enter in the “Distance from center” box—an effect that’s especially visible if you’ve turned on the shadow or reflection options.
The Text section provides hope that Microsoft has plans for rotating 3-D text boxes in a future version. For now, it remains a tantalizing enigma.