
Linked and embedded objects are both chunks of data, like drawings or spreadsheets, nestled within a document in one Office program, but actually created by another.
You edit them in whatever program created them, but behind the scenes, there’s a big difference in where their data is stored. A linked object’s data is stored in a separate file (what Microsoft calls the source file). An embedded object, on the other hand, is an integral part of the file in which it appears. All its data is stored right there in the document. That’s why an embedded object bloats the file size of the document containing it. However, embedding an object means that you’ll never have to endure that sickening jolt when you realize you’re missing an important speech that you copied to your laptop (as you might if you had only used linking).
The whole process is called Object Linking and Embedding, or OLE for short. You can’t get very far on a Microsoft newsgroup or discussion board without seeing that acronym. At user group meetings, the preferred pronunciation is “olé”.
To add a linked object to your Office document, you first have to create that object in a program that offers OLE features. On the Mac, that includes Word, Excel, and Power-Point 2008. For example, you can use linking to incorporate a drawing, spreadsheet, or chart into a Word document; weirdly enough, even another Word document can be incorporated into a Word document.
When you’ve created the source document, save the file, open the destination Word document, and choose Insert → Object. Besides the usual Office suspects—Excel charts and sheets, and Word documents—the Object window lets you choose from three other object types:
Microsoft Equation. The place to come to create mathematical formulae. You can use its 19 pop-up menus for operators, radicals, Greek letters, and other doodads to create anything from simple fractions to complex equations. When you’re done, close the window and the equation appears in your document. Since these typographically impressive equations are graphic objects instead of text, you can resize or manipulate them like any object. If you discover an error in your equation, double-click it to return to the Equation Editor
Microsoft Graph Chart. Office’s aged, proto-Excel graphing tool. Very basic, but it does work (see teh box on Other objects).
Microsoft Organization Chart. Though it gazes in awe at SmartArt’s organization charts, this basic org-chart maker can still help you visualize your career ladder.
In the Object window, highlight the Object type you’re after, and click From File to open the Insert as Object dialog box (Figure 19-12), where you can navigate to the source document.
When you’ve located the source document, select it, turn on Link to File, and click Insert. The entire contents of the source file appear in the destination document inside a resizable border. You can format this object using Word’s picture-formatting tools—but to edit the content of the linked object, you have to open the actual source file.
To edit a linked object, simply double-click it. (If you have many linked objects in one document, choose Edit → Links, and then click the link you want to edit in the list box. Links can be identified by the name of the source file.)
If it isn’t already running, the source program launches, and the source document opens. Now you can edit the story, rotate the drawing, or revise the numbers in the spreadsheet. When you close the source document, the linked object is automatically updated.

Figure 19-12. Checking the “Display as icon” box in the Object dialog box creates an icon that links to the source document. Both linked and embedded objects can be displayed as icons.
It’s easy to see the limitation of linked objects: Without the source file and the destination file on the same Mac, you can’t edit the linked object. If you copy a document containing a linked object to a USB flash drive, email it, or transfer it to your MacBook Air, you’ll be able to see, but not edit, the linked object. The bottom line: If you have to edit it on the road, be sure to copy the source file onto the same disk or laptop.
If Office can’t find the source file for a linked object—perhaps because you’ve moved or renamed it—there’s a way to remind Office of its location. Choose Edit → Links and select the link in question; click Change Source. An Open dialog box appears where you can choose the source file; this is what tells Office to reconnect it to that link. Navigate to the file and double-click it.
You can use the same technique to change a linked object to a new source file altogether—such as a different graphic or a new fiscal year’s ledger. Bear in mind that the new source file has to be in the same program as the original one.
Tip
This is also the technique to use if you want to create a link to only a certain part of a source file—for example, a range of cells in an Excel spreadsheet or an excerpt of a Word document that you’ve marked with a bookmark. (See Bookmarks for details on bookmarks.) Type the name of the range or bookmark in the Range/Bookmark box.
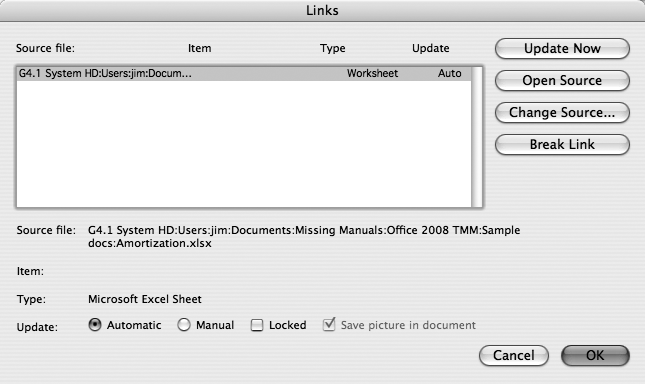
Office automatically updates linked objects every time you edit the source document. If, however, you want the linked object to remain unchanged (permanently or temporarily), there are a number of ways to go about it. Begin by choosing Edit → Links to open the Links dialog box (Figure 19-13).
Break Link. This button uncouples the connection between source document and object. (Because this choice is irrevocable, Office asks if you’re sure.) From now on, editing the source document does nothing at all to the destination document.
Figure 19-13. When you click a link in the “Source file” box, the full file name and location appear just under the box.
You can’t even repair the link, since the object no longer is a link. It becomes a picture, however, and still can be formatted as such (see Building Pages with Objects).
Locked. This box prevents changes to the source document from affecting the destination object. You can still double-click the link to open the source document, but any editing you perform there won’t have any effect until you turn off the Locked box again and click the Update Now button in the Links dialog box.
Manual Updating. Automatic is Office’s default way of updating linked documents. When you choose the Manual radio button at the bottom of the Links dialog box, Word updates the linked object only when you click Update Now.
Creating an embedded object from an existing file is the same as creating a linked object, except you do not turn on “Link to File”.
To bring in an external file using this technique, choose Insert → Object. In the dialog box, proceed like this:
If the file you want to embed already exists: Choose the type of file and then click From File. Navigate to and open the source document to embed a copy of it in your Office document.
To create a new file (for embedding) on the spot: In the list box, double-click the kind of object you want to create: Chart, Worksheet, Picture, or whatever. A new window opens, complete with menus and toolbars, where you can begin creating the object. When you’re done, close the window; the object appears in your document.
Tip
When creating an embedded picture, you can use any of Word’s drawing tools, as described earlier in this chapter. However, when you close the window, the result is a picture, not a drawing—you can no longer edit it as you would a drawing.
If, on the other hand, you simply want to insert a drawing object in a Word, Excel, or PowerPoint document, just open the Drawing toolbar (see Pictures and Drawings) and draw away!
Like a linked object, an embedded object has a surrounding frame. You can format it using Office’s picture tools (see Pictures and Drawings).
To edit it, though, you have to double-click it. (Or click it and choose Edit → Object → Edit. The Edit menu changes to specify the type of object you’ve selected—Document Object, Worksheet Object, and so on.) The object opens in a separate document window, where you can edit it using the appropriate menus and toolbars.
You can edit an embedded object in any compatible program on your Mac. Just click the object and then choose Edit → Object → Convert. Choose a program in the list that appears, and then click OK. (Most of the time, the Microsoft Office programs will be the only ones available.)