
When editing a document, sometimes you know exactly what you want to revise, but just don’t know where it is. For instance, you want to go back and reread the paragraph you wrote about mansions, but you don’t remember what page it’s on. Or suppose you’ve found out that you misspelled Sarah’s name all the way through an article. Now you have to replace every occurrence of Sara with Sarah—but how do you make sure that you’ve got them all?
That’s where “Find and Replace” comes in.
If you just want to find a certain word (or even part of a word), choose Edit → Find (or press ⌘-F). The “Find and Replace” dialog box opens, as shown in Figure 2-7. Type the word you’re looking for, and then click Find Next (or press Return or ⌘-F).
Tip
If you turn on “Highlight all items found in Main Document,” the Find Next button changes to say Find All. Now Word will select all occurrences of the search term simultaneously. At that point, you can bold them all, italicize them all, cut them all, or perform other kinds of neat global maneuvers.
Now Word searches for your search term, starting from the position of the insertion point. If it finds what you’re seeking, it scrolls to and highlights each occurrence of that word or phrase in your document. (If it doesn’t find any occurrences, an error message tells you so.)
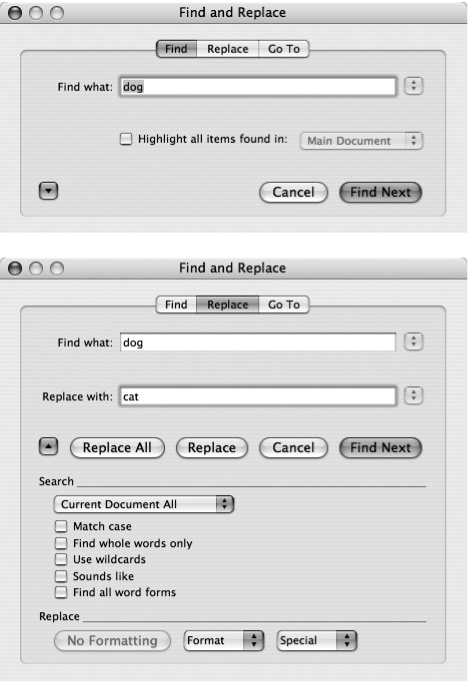
Figure 2-7. Top: The Find dialog box. Bottom: The expanded Replace box. The Format and Special menus at the bottom of this dialog box let you search for a font, typestyle, paragraph break, and so on. If you’d like to find all your italics and change them to boldface, or find all the dashes and delete them, these menus let you do it.
If Word finds an occurrence, but it’s not the one you had in mind, you can keep clicking Find or hitting Return to find successive occurrences. When Word reaches the end of your document, it starts searching again from the beginning. When it finally wraps around so far that it finishes searching the whole file, another dialog box lets you know.
The Find box remains onscreen throughout the process, but don’t let that stop you; you can pause and edit your document at any time. Just click in your document window, sending the Find box to the background. To resume your search, click the Find dialog box to bring it forward, then click Find Next.
Although you can do edits and replacements in conjunction with the Find command as explained above, Word has a more streamlined process for making the same replacement over and over. Choosing Edit → Replace (Shift-⌘-H) opens the Replace tab of the “Find and Replace” dialog box.
Note
Before the dawn of Mac OS X, Word’s Replace keystroke was just ⌘-H. Of course, Apple has now claimed ⌘-H as its universal Hide command, so Microsoft was forced to change the Replace keystroke to Shift-⌘-H.
It takes the Word veteran some time to unlearn ⌘-H for Replace. However, a few dozen shocks of seeing all your open Word windows disappear (and having to bring them back by clicking the W icon in the Dock) should train you to use the new protocol.
Once again, start by typing the word or phrase you want to replace in the “Find what” box. This time, however, you press Tab to jump into the “Replace with” box; now type the new, improved replacement text. When you click Find Next or press Return, Word searches the document and stops at the first match. Now there’s a decision to make. After examining the highlighted phrase in context, click one of these buttons:
Replace. This button means, “Replace this search term with my replacement text, then find the next occurrence of the search term.”
Replace All. If you don’t need this occurrence-by-occurrence interview, and you’re sure you want to replace every occurrence of the search term in the entire document, click Replace All (or press ⌘-A).
Be very careful, however: In most cases, it’s safer to check each case to make sure the replacement is appropriate. For instance, if you’re replacing “rite” with “right,” Word will change even “criteria” to “crightria,” giving quite an unexpected surprise to your editor, professor, or boss. Use Replace All only when there’s little chance for that kind of confusion. Even so, you should proofread carefully afterward.
Find Next. Suppose that, as you’re searching for every occurrence of “Sara” to replace it with “Sarah,” Word finds and highlights the first four letters of the word Saratoga. Clearly, you don’t want Word to change this occurrence. In that case, just click Find Next (or press Return) to leave this occurrence alone and jump to the next one.
Clicking the Expand button (the blue button with the down arrow on it) at the bottom of the Find or Replace tab makes the dialog box sprout an additional panel. (Pressing ⌘-M does the same thing.) It gives you the following precision controls for narrowing your search even further:
The Search pop-up menu tells Word where to search. Current Document All starts the Find function from the very beginning of the document. Current Document Down and Document Up search forward and backward from the insertion point, and All Open Documents searches from the beginning of each document in the order that you opened them, moving automatically from one to the next.
Turn on Match case when you want to find or change words only when they’re capitalized a certain way; for instance, when you want to find the name Mike but skip over words like “mike.”
Find whole words only (⌘-Y) is a very powerful safety option. It tells Word to only look for the search term if it’s separated from surrounding text by a space or punctuation mark—if it’s a whole word unto itself, in other words. If you’re searching for the word “men,” for instance, turning on this box prevents Find from stopping on (or, worse, replacing) “menu” and “document.”
Checking Use wildcards (⌘-U) lets you use special characters to stand in for actual letters, in cases where you’re unsure of the right letter or want to look for more than one spelling at a time. For example, ? stands in for any one letter or character. Entering f?r in the “Find what “box finds occurrences of “far,” “for,” “ferry,” and so on. You can use * to represent any string of one or more letters (or other characters). Thus, entering c*r would find words like “car,” “clear,” and “quick brown.”
When you’d settle for finding any one of several specified characters, put them in brackets. For instance, use c[au]nning to find all occurrences of both “canning” and “cunning” in your document.
Finally, an exclamation point indicates that you want to find any character except the one in the brackets. For example, [!f]unk finds “hunk,” and “spunk,” but not “funk.”
Sounds like(⌘-S). Turn on this box and enter a phonetic spelling for the word or words you’re hunting for. Entering “thare” finds every occurrence of “there,” and “their,” but not “they’re.” Go figure. This option really comes in handy when you can’t remember the spelling of a name; enter “lee” to find Ms. Li, for example.
Find all word forms. This rather intelligent option finds all those irregularly spelled English nouns and verbs. For instance, if you’re trying to find all the places where your article mentions running, type run and turn on this box. Word finds “ran,” “runs,” and “running”—but not “runner.”
Word is sometimes described as the Feature List That Ate Cleveland. Dozens or hundreds of features lie untapped by the vast majority of its owners.
But here’s a buried feature that’s well worth noticing: It’s the Format pop-up button at the bottom of the Find dialog box, which lets you search for text according to its formatting (alone, or in combination with words typed in the “Find what” box). By opening this Format menu (or pressing ⌘-O), you’ll see that Word lets you search for:
Font. Finds occurrences of, say, Times or Palatino, as well as font characteristics like bold, italic, blue, 12-point, double-underline, shadow, and so on—in any combination.
Paragraph. Locates paragraphs according to their indentation, line spacing, leading, outline level, page breaks, and so on.
Tabs. Searches for tab stops by position and type.
Language. Searches for text you’ve designated as being in a certain language (by highlighting the text and then choosing Tools → Language).
Frame. Locates any frame, according to any of its attributes. (These days, most people use Word’s text boxes instead of frames; see Creating Text Boxes.)
Style. Lets you search for, or replace, any of your document’s styles (see Styles).
Highlight. Finds text you or a colleague has highlighted using the Highlighter tool on the Reviewing toolbar (Comments).
Tip
Once you’ve popped open the menu with ⌘-O, you can “walk” down its commands with the arrow keys. Press Enter when you’ve snagged the one you want.
This powerful feature is instrumental in dozens of situations. Sometimes it’s useful when you just want to find something, like this:
Type, for example, the in the “Find what” box. Choose Format → Style and choose one of the heading styles you’ve used in your document. (See Styles for more on styles.) Word finds the word “the” only when it appears in a heading.
Click inside the empty “Find what” box; choose Format → Font. In the resulting dialog box, click Italic, and then click OK. Word will now find every italicized word or group of words in the document, one by one.
The uses of this feature become even more amazing when you use the Replace function at the same time:
Suppose that, in keeping with your newspaper’s style guide, you decide to put Microsoft’s company name in bold type, everywhere it occurs. Type Microsoft Corporation in the “Find what” box. Click in the “Replace with” box, choose Format → Font, choose Bold in the Font Style box, and click OK. Now, when you click Replace All, Word changes all occurrences of the phrase “Microsoft Corporation” to boldface.
You want to create a quick table of contents document. You decide that the easiest way is to remove all the words in your document that aren’t bold, leaving behind only what appears in bold type (your headings, that is).
Leave both the “Find and Replace” boxes empty. Click in the “Find what” box, choose Format → Font, click Not Bold, and click OK. By leaving the “Replace with” box empty, you’re telling Word to delete every occurrence of the specified “Find what” item (in this case, text that’s not bold). When you click Replace All, Word vaporizes all the body text of your document, leaving behind only the boldface type.
Click in the “Find what” box and choose Format → Tabs. Word displays a dialog box similar to the one where you set tabs (see Tabs). Type .5 in the “Tab stop position” box and click OK. Use the radio buttons in the “Find Tabs” dialog box to tell Word what kind of tab you’re searching for. Word won’t find tabs if the alignment doesn’t match. Click in the “Replace with” box, choose Format → Tabs, and type 1 in the “Tab stop position box.”
Finally, click OK. Word finds all the paragraphs with half-inch tabs and changes them to one-inch tabs.
Someone has given you an article that contains headings. But rather than using the Heading 1 style (see Styles), the author used simple boldface formatting for the headings. As a result, you can’t use Word’s Outline view to see just the headings.
The solution is simple: Click in the empty “Find what” box. Choose Format → Font, choose Bold in the “Font style” box, and click OK. Now click in the empty “Replace with” box; choose Format → Style, select the Heading 1 style, and click OK. Now, when you click Replace All, Word changes all bolded paragraphs to the Heading 1 style.
Your formatting selections are displayed just below the “Find what” box. Click No Formatting to erase them (in readiness for a different search, for example).
The Special menu at the bottom of the “Find and Replace” dialog box lets you incorporate non-alphanumeric characters into your search. It also lets you search for document features that have nothing to do with words, such as column breaks, paragraph breaks, and hyphens.
When you choose one of these items from the Special menu, Word places its character code in the “Find what” box. You can use more than one of these choices and use them with wildcards, as described on Advanced Find.
Tip
Once again, you can manipulate this list with the keyboard. Press ⌘-E to open the Special pop-up menu, and then use the arrow keys to highlight the commands on it.
The Special menu really demonstrates its power in “Find and Replace” operations. Some examples:
Suppose your document is filled with typographically correct dashes, which may turn into gibberish if posted on a Web page or emailed. To convert them into double hyphens, click in the “Find what” box and choose Special → Em Dash (for a long dash, like this—) or En Dash (for a shorter dash, like this –). Click in the “Replace with” box and type two hyphens (--). When you click Replace All, Word replaces dashes with hyphens.
To take out column breaks and let the text reflow, click in the “Find what” box and choose Special → Column Break. Click in the “Replace with” box and choose Special → Paragraph Mark to ensure that the paragraphs in the newly joined columns don’t run into each other.
A Word document may look fine if there’s just one press of the Return key after each paragraph, as the style in question may have built-in “blank lines” between paragraphs. But if you try to paste the document’s text into an email message, you’ll lose the blank lines between paragraphs.
The solution is to replace every paragraph mark with two paragraph marks before copying the document into your email program. Click in the “Find what” box and choose Special → Paragraph Mark; then click in the “Replace with” box and choose Special → Paragraph Mark twice. Word replaces every paragraph mark (which Word represents with the code ^p) with two consecutive paragraph breaks (^p^p).
To reduce typing, insert abbreviation codes into a Word document, then replace them with much longer passages of boilerplate text. Before searching, copy the replacement text to the Scrapbook, type the abbreviation code into the “Find what” box, click in the “Replace with” box, and choose Special → Clipboard Contents. Finally, click Replace All.
Tip
You’ll see the Special → Clipboard Contents command only when you’ve clicked in the “Replace with” box. In other words, you can’t search for something you’ve copied to the clipboard. That’s unfortunate, since almost everyone, sooner or later, comes across a Word document filled with some strange symbol—little white squares, Symbol-font squiggles, or some other mysterious character. It would be nice if you could copy one instance to the Scrapbook, so that you could replace all instances with, say, nothing.
In such situations, you can usually get away with pasting the copied mystery symbol directly into the “Find what” box.
To undo selections you’ve made from the Special menu in the “Find and Replace” dialog box, select and delete the characters that Word placed in the “Find what” or “Replace with” boxes.