
At first glance, the Word window looks much like any computer screen. You type, and letters appear, just as in that classic Mac word processor, TextEdit. But there’s actually much more to it than that. While you’re typing, Word is constantly thinking, reacting, doing things to save you precious keystrokes.
As noted earlier, for example, Word corrects obvious spelling errors as you go along. But it also lets you create your own typing shortcuts, and even tries to anticipate your next formatting move, sometimes to the frustration of people who don’t understand what the program’s doing. The more you know what Word is thinking (it means well, it really does), the more you can let Word do the work, saving those precious brain cells for more important stuff—like writing or remembering to get the kids to soccer practice.
In olden days, our screens gave us a continually blinking insertion point, located in the upper-left corner of the screen. That’s where you typed, no questions asked or answers given. If you wanted to type in the middle of the page—for example, to create a title page of a report—you couldn’t just click there and start typing.
Instead, you had to take the ludicrously counterintuitive step of moving the insertion point over and down by tapping the Space bar, Tab key, or Return key until it was where you wanted it.
But in Word 2008, "Click and Type” assists location-challenged typists the world over by letting them reach their desired insertion point just by double-clicking. Here’s how it works:
Switch to Web Layout view or Print Layout view.
These are the only views where “Click and Type” is available; choose from the View menu to change views.
Move the cursor around on the blank page, letting it hover for a second at the point where you’d like to place some text.
In some cases, you’ll see the cursor change to indicate that Word is about to provide some free formatting help. If your cursor is near the left or right margin, Word assumes that you want your text to be left- or right-aligned; you’ll see tiny left- or right-justified lines appear next to the hovering insertion point (see Figure 2-13). When you hover in the middle of the page, the insertion-point icon changes to centered text. If your cursor is near the top or bottom of the page, the cursor changes shape again to show that you’re about to edit the document’s header or footer (see Headers and Footers).
If Word guesses wrong about the alignment, you can always adjust the text alignment later using the “Alignment and Spacing” tools in the Formatting Palette (Alignment and Spacing).
Double-click.
The insertion point turns into a standard blinking bar, and you’re ready to begin typing. (If the insertion point doesn’t end up quite where you wanted it, just double-click again.)
Note
Behind the scenes, Word actually fills the page with Tabs and Returns, exactly as you did manually in the old days; that’s how it gets your insertion point to the spot where you double-clicked. Knowing that (or seeing that, by clicking the ¶ button on the Standard toolbar) makes troubleshooting or adjusting Click-and-Typed text much easier.
To turn “Click and Type” on and off, choose Word → Preferences → Edit panel. Turn the “Enable click and type” box on or off.
Word seems psychic at times. You type teh, and Word changes it to “the” before you even have a chance to hit Delete. You start to type the name of the month, and all of a sudden today’s date pops up on the screen—and you didn’t even know what day it was.
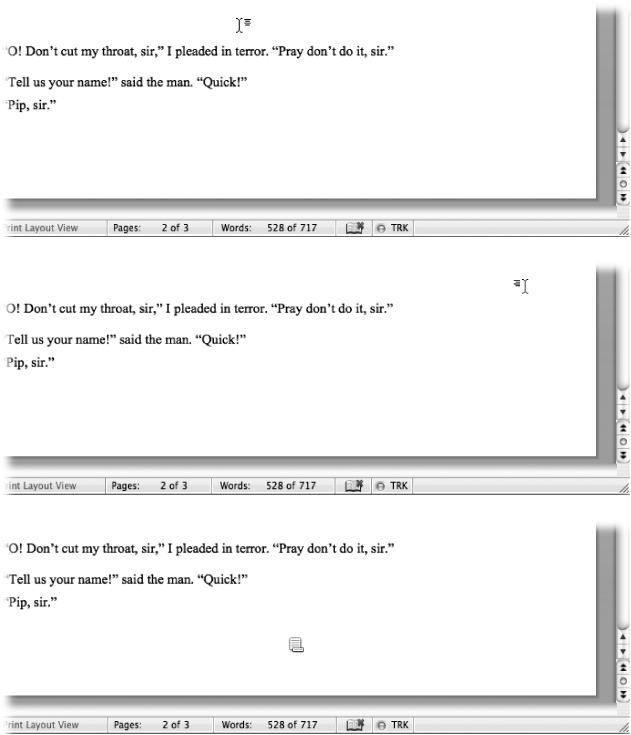
Figure 2-13. Top: The “Click and Type” I-beam cursor is poised to click and type centered text. Middle: The “Click and Type” I-beam cursor is ready to click and type right-justified text. Bottom: This special cursor appears to let you know you’re about to create a footer using “Click and Type”. (A similar cursor appears at the top of a page for headers.)
You’re witnessing Word’s AutoCorrect and AutoType features at work—two of the least understood and most useful tools in Word’s arsenal. They can be frustrating if you don’t understand them, and a writer’s best friend if you do.
Think of AutoCorrect as Word’s substitution feature. All it does is replace something you’re typing (the typo) with a replacement that Word has memorized and stored (the correct spelling). The correction takes place as soon as you type a space or punctuation mark after the incorrect word; no further action is required from you. And it happens so fast that you may not notice you’ve just been autocorrected unless you’re watching for the blue bolt that slides under the word as Word analyzes it. If the correction isn’t what you were expecting, hover your cursor under the word to reveal the AutoCorrect smart button, as shown in Figure 2-14.
Note
Crucial tip: If you retain one tip from this book’s advice about Microsoft Word, remember this: You can undo any automatic change Word makes, under any circumstance, by pressing ⌘-Z or F1 just after Word makes it. That goes for automatic capitalization help, spelling help, formatting help, curly quote help, and so on. (It’s also even faster than using the smart button shown below.)
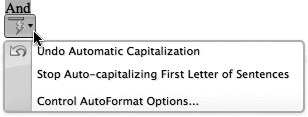
Figure 2-14. Hover your mouse over text Word autocorrects to display the AutoCorrect smart button. The provided options are contextual, but include undoing the action that Word has done, a heartfelt offer to stop doing it in the future, and a link to the AutoCorrect dialog box.
Word maintains a file of common misspellings and their corrections. That’s why Word makes certain corrections and not others: Not all possible error/correction combinations that you need come installed on the list. To see this list, choose Tools → AutoCorrect and click the AutoCorrect tab (Figure 2-15). (Here you’ll also find the most important checkbox in the world of AutoCorrect: the master on/off switch, called “Replace text as you type.”)
The first three checkboxes cover capitalization errors; they save you from the errant ways of your pinky fingers on the Shift keys. When the first two boxes are turned on (see Figure 2-15), Word makes sure that you get a capital letter at the beginning of every sentence, whether you hold the Shift key down too long (“Correct TWo INitial CApitals”) or not long enough (“Capitalize first letter of sentences”).
Tip
Efficiency-addicted Word fans eventually stop capitalizing the first letters of sentences altogether. Word does it automatically, so why twist your pinkies unnecessarily?
If you turn on “Capitalize first letter of sentences,” bear in mind that Word assumes every period is the end of a sentence. So why doesn’t it auto-cap the first word after you type U.N. or Jan.? Because it’s smart enough not to auto-cap after all-cap abbreviations (U.N.), and because it maintains a list of lowercase abbreviations that shouldn’t be followed by capitals. (To see the list, choose Tools → AutoCorrect, click Exceptions, then click the First Letter tab; you can add your own abbreviations to this list, too.)
If you turn on “Automatically use suggestions from the spelling checker,” AutoCorrect will go above and beyond the list of substitution pairs in this dialog box. It will use Word’s main dictionary as a guide to proper spelling and automatically change words that almost, but not quite, match ones in the dictionary. (When Word can’t decide on a match, it simply squiggly-underlines the misspelled word in the document.)
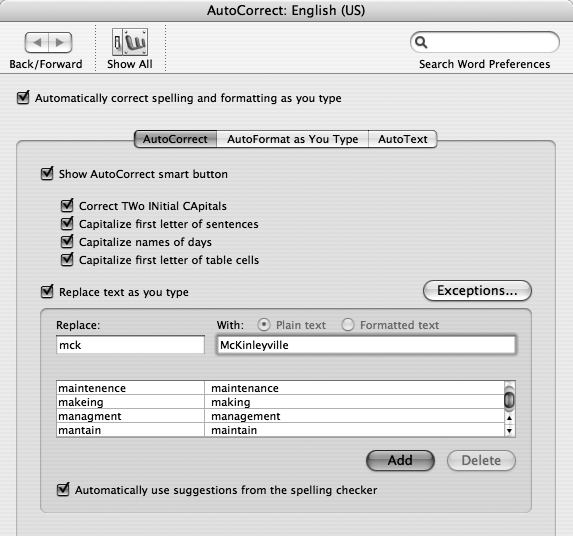
Figure 2-15. You can open this dialog box by choosing Tools → AutoCorrect or clicking Control AutoCorrect Options whenever the smart button (see previous page) pops up. Feel free to add your own word combinations here, too. Put the typo in the Replace box, and the replacement version in the With box, then click Add. Think beyond typos, too—remember, you can make Word expand anything into anything. Make it replace “int” with “Internet,” your initials with your full name, and so on.
AutoText is another Word feature that automatically changes what you’ve typed, once again delighting the expert and driving novices batty. In short, it’s an abbreviation expander. Figure 2-16 shows AutoText in action.
Figure 2-16. You’re typing along. Suddenly you see a floating yellow screen tip just above the insertion point. That’s Word’s AutoText feature in action. It’s proposing a replacement for what you just typed—a month, in this case. If you want to accept the suggestion, press Return or Enter; if not, just keep typing and pretend the screen tip never happened.
AutoText works by maintaining a preinstalled list of commonly typed terms and their replacements. You can also add your favorite terms to the list—the name of your company, your phone number, email address, and so on (see Figure 2-17). You can also add longer items—entire paragraphs, full addresses, lists, and even graphics, as described on AutoText graphics.
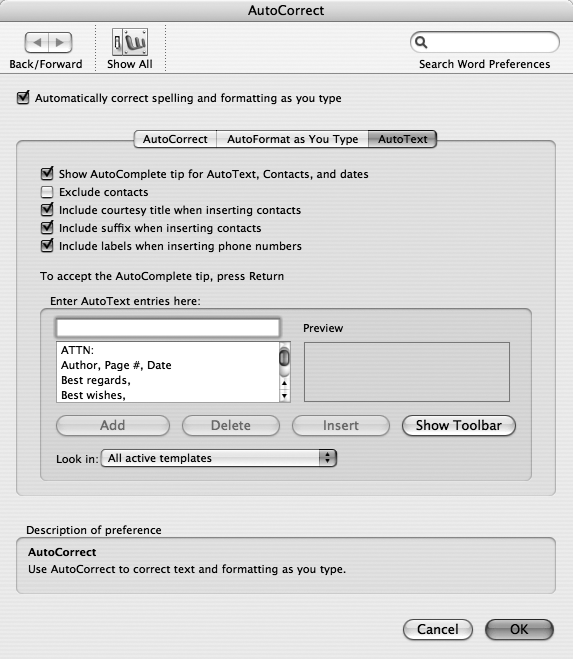
Figure 2-17. This tab (Insert → AutoText → AutoText tab, or Tools → AutoCorrect → AutoText tab) is where you choose words, phrases, and fields to insert into your document without typing. You can also add your own items to the list by typing them into the “Enter AutoText entries here” box and clicking Insert. Select and click Delete to banish from your list any items you never use. You can also insert AutoText items into your document from this tab. Press the down arrow or Page Down key to scroll down until your desired entry appears in the Preview box (you can also use the scroll bar). Hit Return to drop the entry into your document; it lands wherever your insertion point has been blinking.
Word comes set up with dozens of ready-to-use AutoText entries. It completes not only the names of days of the week and months of the year, but also today’s date and names from your Entourage address book (see Chapter 10).
But the real joy of becoming an AutoText addict is creating your own abbreviations. You can use AutoText to save form letters or contracts that go on for pages and pages, and then dump them into your documents just by typing a few keys. If you’re a lawyer, realtor, or medical professional who’s not using AutoText to save time on boilerplate copy, you’re missing out on a great timesaver.
To create a new entry, select a block of text (from a word or two to many paragraphs) and choose Insert → AutoText → New. (If the AutoText toolbar is visible—to make it so, choose View → Toolbars → AutoText—you can just click its New button.) Name your selection carefully, since the name you choose is the abbreviation that will trigger the expansion. Choose something easy to remember, but not something that you might type unintentionally. And, it has to be at least four characters long. Click OK.
Tip
If you’ve carefully formatted the paragraph you want to use as AutoText—with alignment, indentation, and line spacing, for example—you can preserve that formatting no matter what the style of the document you eventually use it in. Click the Show/Hide button (a ¶ symbol) on the Standard toolbar. Now when you select the text, select the ¶ symbol at the very end along with it; the selection’s formatting will come along into AutoText.
You can drop any item in the list into your document in one of two ways.
AutoComplete. It doesn’t get any less labor-intensive than this. When you type the first four letters of any word on the AutoText menu, AutoComplete, if turned on, shows you the full, expanded version in a pop-up screen tip (see Figure 2-16), hovering above the area where you’re typing.
To accept it, just hit Return; Word finishes the typing for you. If you don’t want the choice that AutoComplete is giving you, just keep typing (or hit Esc). If you inadvertently accept a completion that you didn’t want, just press ⌘-Z to undo it. You can also choose Edit → Undo AutoComplete.
There’s little downside to leaving AutoComplete turned on. After all, you can ignore all of its screen tip suggestions, if you dislike the feature. But to turn off even these suggestions, you’ll find the on/off switch by choosing Tools → AutoCorrect → AutoText tab. It’s the “Show AutoComplete tip for AutoText, Contacts and dates” box (see Figure 2-17).
Choosing from AutoText menu. Choose Insert → AutoText. The current AutoText items are listed in the submenus that have arrows. Drag through the submenus until you find the entry you want to avoid typing, and click it to drop it into your document. Your choice appears wherever you left your insertion point, and it inherits whatever text style and formatting is in place at that point (unless the AutoText includes paragraph formatting as described in the Tip on Triggering AutoText entries).
Despite its name, AutoText can automate more than just text. It can easily store frequently used graphics, as well. Create a drawing in Word (see Chapter 18), or paste a graphic from another program into a Word document—a logo that you’ve created in a drawing or painting program, your scanned signature, or a favorite photograph, perhaps. Click the graphic to select it, then choose Insert → AutoText → New (or click the New button on the AutoText tab or toolbar).
You can’t insert an AutoComplete graphic by typing. So, to drop it into a document, you have to choose its name from the Insert → AutoText submenu (or the AutoText toolbar).
Some of the preinstalled AutoText entries are fields: placeholders that, when you print, Word fills in with the date, type, page number, and so on. Word lists them in the Header/Footer section of the AutoText submenu, because that’s where you’re most likely to use them.
For example, you can place a page number at the top of each page by putting a—PAGE—AutoText field in the header. To remind yourself (and everyone else) who wrote a particular document and when, place the “Author, Page #, Date” AutoText in the footer. (Word uses the name you entered when first setting up Office. To override that name, enter a different name in the Word → Preferences → User Information panel.)
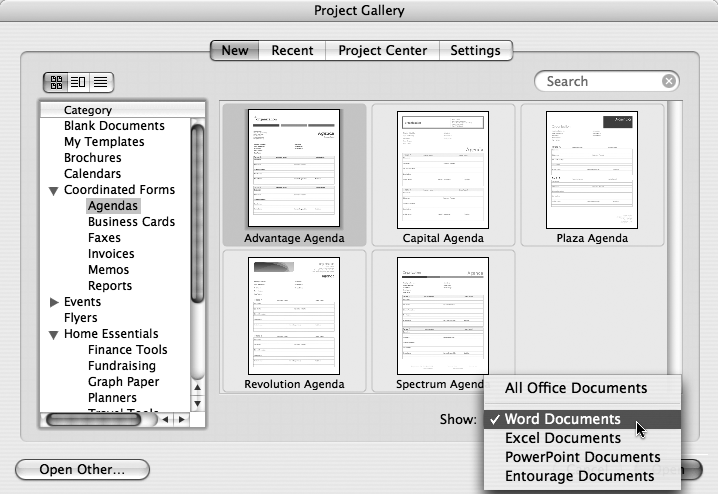
When you launch Word, or when you choose File → Project Gallery, the Project Gallery appears, one of the two places in Office 2008 giving you access to a library of document templates and document-creation wizards (see Figure 2-18). (See Chapter 8 to learn about the other place: Office 2008’s new Elements Gallery, which features Publication Templates when you’re working in Word’s Publishing Layout view.)
A template is like Word stationery: It’s a special kind of document with formatting and preference options set the way you like them. A wizard, on the other hand, is Microsoft’s term for a series of interview-style dialog boxes that request information from you, process your responses, and produce a document based on your answers.
The Project Gallery templates create not only Word documents, but documents for Excel, PowerPoint, and Entourage as well. Use the Show pop-up menu to narrow the field to only Word documents—and then use the Category list to display the type of the document you’re after. With the advent of Word 2008’s Publishing Layout view, several wizards have been put out of work. Only three remain: the Mailing Label Wizard, the Envelope Wizard, and the Letter Wizard.
Note
Many of these Word templates use the new Word Publishing Layout View—though you can’t tell which by looking at their thumbnails in the Project Gallery. Choose one of these Publication Templates, and Word opens in Publishing Layout View, ready for you to begin replacing the template’s placeholder text and pictures with your own. See Chapter 8 for the full story on Word’s new page layout abilities.
The offerings in Office 2008’s Project Gallery combine wizards and templates, with the ultimate aim of, once again, saving you much of the grunt work of typing and formatting. Here’s how you might use one of these wizards to create a business letter:
Choose File → Project Gallery.
The Project Gallery opens, as described on The Project Gallery. Except for Blank Documents and My Templates, all the Groups in the list box at the left have lists of built-in templates (Figure 2-18).
Click Stationery.
Word displays a list of prefab stationery designs. (If you’re not seeing the thumbnail images, click the icon-view button at the upper-left corner of the Project Gallery window and click the New tab.)
Scroll down and double-click the Letter Wizard.
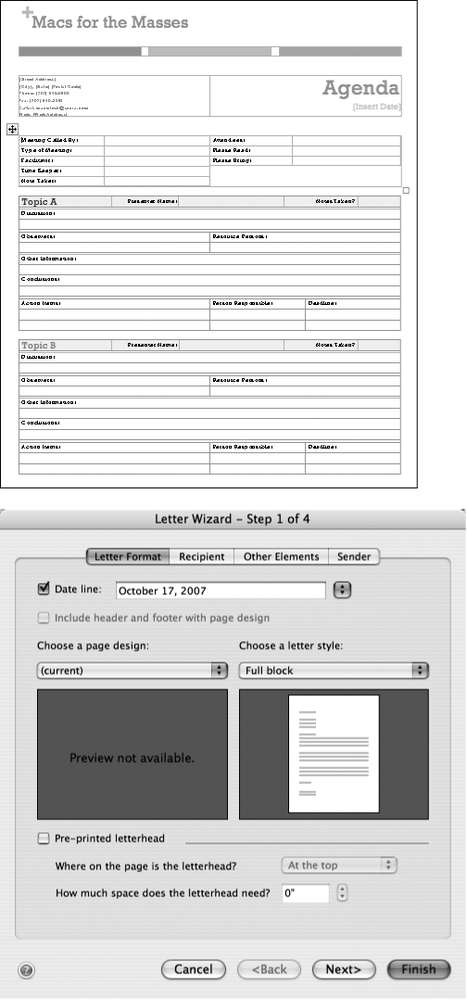
The Letter Wizard window appears (Figure 2-19). Here you choose a page design, a letter style, and whether or not to include a date or leave space for a preprinted letterhead. When you’ve made your selections, click Next.
Fill in the blanks with the recipient’s name and address—or click the address book icon to choose a name and address from your Entourage address book.
Continue by choosing the salutation style using the pop-up menu or the radio buttons marked Informal, Formal, Business, or Other. Click Next to move to the Other Elements tab.
Figure 2-19. Top: A template is a canned Office document filled with “dummy” text. You could, if you wish, simply drag through it and replace it with new text of your own. Bottom: The Letter wizard, on the other hand, presents a series of dialog box tabs to fill in, partially automating the process of creating a letter.
Use the checkboxes to include any of the optional elements such as Reference line or Attention, and then use the associated pop-up menu to choose the style for those elements.
Finish this section by choosing an address to include in the cc field, if desired, either by typing at in directly, or choosing an address by clicking the Address book icon. Then click Next again to move to the final Sender page of the wizard.
Use the address book icon or the pop-up menu to add your (or the sender’s) name and address.
Or turn on the Omit checkbox if you don’t want to include the return address—for example, if you’re sending the letter on preprinted letterhead.
In the final section use the pop-up menus to add to your closing, a job title, company, or typist initials. Finally, turn on the checkbox for enclosures and enter a number in that field if you’ll be enclosing other sheets with your letter.
At this point you’ve completed all the steps of the wizard—but you can still use the tabs at the top of the window to go back and make any changes to your setup.
When the document looks the way you want it, click Finish.
Word transfers your setup to a new document in Print Layout view with the words Type your text here highlighted so you can immediately begin typing the body of your letter.
You type a numbered list, and suddenly the next number in sequence appears on its own.
You type a Web address, and suddenly Word turns it into a blue, underlined, working hyperlink (that you can’t edit, since clicking inside it opens your Web browser).
You type an email smiley—which looks like :)—and Word, on its own, decides to replace your punctuation symbol with an actual graphic smiley face, like
 .
.
Tip
Remember: Just because Word steps in and formats something for you doesn’t mean you’re stuck with it. You don’t even have to backspace over it; just press ⌘-Z or F1 (or choose the “change back” from the smart button menu). Whatever it is that Word just did—making a smiley face, turning a URL into blue underlined text, numbering a list—is restored to the way you originally typed it.
All of these behaviors—considered helpful by Microsoft and unspeakably rude by many Word fans—are triggered by a technology called AutoFormat. This tool doesn’t have to be annoying. In fact, once you learn the workings behind AutoFormat, you can control and use it to your own advantage.
There are two ways to use AutoFormat: You can have Word autoformat words and paragraphs as you type them, or you can autoformat manually, in one pass, after the typing is complete.
To turn AutoFormat on and off, choose the Tools → AutoCorrect → AutoFormat As You Type tab. There they are: the master on/off switches for all of Word’s meddlesome behavior (see Figure 2-20).
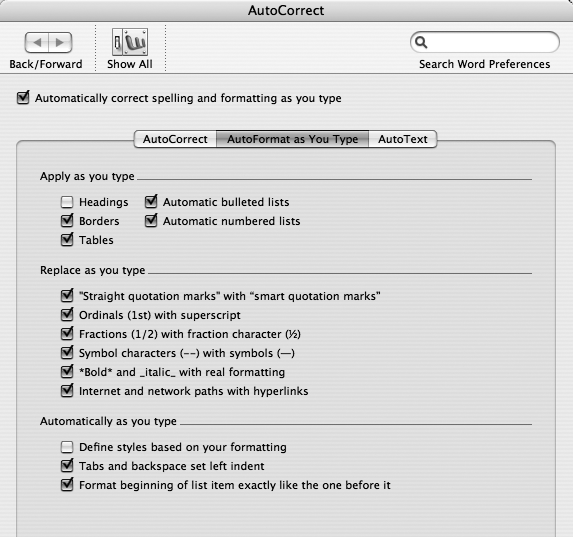
Figure 2-20. The center tab of the AutoCorrect dialog box is called “AutoFormat as you Type”. Here you can turn on and off the formatting-on-the- fly changes that Word offers to make. (As with the AutoCorrect feature described on AutoCorrect, this box may open when you click “Control Auto-Correct Options” on the smart button menu.)
To turn AutoFormat off completely, uncheck all the boxes and click OK.
You should also turn AutoFormat off if your document is destined for plain text, or if you’re going to paste and format it in a different program anyway. Also, be aware that curly quotes and bullets can turn into funny characters when pasted into an email. (They look fine in Entourage email, but your recipient’s email program may not translate them properly. And borders don’t work at all.) Later, you can turn the same plain text into a nicely formatted Word document by conducting a single Auto Format pass, as described below.
There’s a checkbox for each feature that Word can autoformat. Here’s what each AutoFormat option does:
Headings. If you type a short phrase with no ending punctuation and press Return twice, Word interprets it as a heading and applies a big, bold style (Heading 1) to it.
Borders. Word draws a bold horizontal line across the page when you type three hyphens in a row (or three underlines) and press Return—a handy way to break up sections in a document, if that’s indeed what you want.
AutoFormat also creates a double line if you type three equal signs (===); a dotted line for asterisks (***); a wavy line for tildes (~~~); and a triple, picture frame-like line for number signs (###). (Press Return after the symbols.) Later, you can reformat the line or turn it into a frame by clicking in the paragraph and using the “Borders and Shading” tools on the Formatting Palette (Applying tabs to paragraphs and styles).
Tables. This feature lets you create Word tables (see Charts and Spreadsheets) by using typed characters instead of the Draw Table tool. Type a plus sign (+) to start the table, a row of hyphens (---) to set the width for the first cell, another + sign to end the cell, more hyphens, and so on. The line has to begin and end with + signs. You can also switch to using Word’s table tools to reformat or expand the table at any time.
Note
Because Word’s table feature is so easy to use, it’s hard to imagine why anyone would create a table using + signs and hyphens. The answer is that tables sent by email, as well as those posted on Web pages and newsgroups, already use this format. By pasting them into Word and performing an AutoFormat pass, you turn existing Internet tables into proper Word tables. Few people build a fresh table using this method.
Automatic bulleted lists. When you type a common “bullet” character, such as *, -, >, or =>, and follow it with a space or a tab, then some text, and then press Return, Word changes the character to its proper bullet symbol (• or
 , for example). It also switches to the ListParagraph style in your document’s template (Styles). When you type a return at the end of a line, Word continues with the next bullet. Press Return twice to end the list.
You can even use pictures as bullets; just choose Format → “Bullets and Numbering” → Bulleted, click one of the bullet thumbnails to modify, and click Customize. In the “Customize bulleted list” dialog box click Picture, choose a picture from your hard drive, and click Insert. The picture bullet appears on your page, scaled to match your font size, and ready to begin your list.
Automatic numbered lists. When you type a number followed by a period (or a hyphen, close parenthesis, or close angle bracket [>]) and a space or tab, Word understands that you’re starting a numbered list. After you press Return, Word automatically types the next number in the series and applies a ListParagraph style (Styles) from your document’s template. Pressing the Return key twice in a row instructs Word to end the list.
“Straight quotes” with “smart quotes.” When you type a quotation mark (Shift-apostrophe), Word replaces the double-apostrophe straight quotes with more attractive, typographically correct curly quotes.
Most of the time, this is a useful option. If you’re going to email the document, however, turn this feature off. (See Finding by Format for details.)
Ordinals (1st) with superscript. If you type “1st,” Word instantly changes it to 1st.
Symbol characters (--) with symbols (—). When you turn on this box, Word changes two hyphens to an em dash, like this—. It’s a handy feature, especially because the keystroke for dashes is so hard to remember (Shift-Option-hyphen).
Tip
Typographically speaking, an en dash is used to indicate a range or gap in a sequence (“The poetry reading went from 6:30 p.m.–11:00 p.m., and featured a reading from pages Printing–Creating Text Boxes of Letters My Father Never Wrote Me”). The em dash is the real dash, which indicates a pause for impact (“I can’t stand readings—especially poetry”).
*Bold* and _italic_ with real formatting. When Word encounters words bounded by asterisks and underscores, it changes them to boldface and italics, respectively.
You may already be familiar with the use of asterisks and underscores for emphasis on the Internet. For the same reason, you can use this feature during a final AutoFormat pass (see below) to reformat text you’ve copied from an email or chat room. (Few people use this feature while typing, since it’s easier to press ⌘-B for bold or ⌘-I for italics. Most people use it only when massaging text from the Internet.)
Internet paths with hyperlinks. When this box is checked, Word changes URLs that you type (for instance) into working hyperlinks. Hyperlinks are usually formatted in blue and underscored, unless you change these settings in the Format → Style dialog box (see Selecting and Editing Hyperlinks).
Format the beginning of list item exactly like the one before it. This option combines automation with the freedom of doing your own formatting.
For example, suppose you want to start each item in your list with a Roman numeral, followed by a period and a space, followed by the first word in bold, followed by a period and the rest of the sentence in plain text. To begin, type the first item that way and press Return. Word starts a new list item every time you hit Return. Press Return twice to end the list.
The key is to start the first item with a number or bullet to let Word know that you’re starting a list. If you want the first word or words to appear in, for example, bold (like the first sentences in this bulleted list), you have to follow it with a period, colon, hyphen, dash, or other punctuation mark.
Define styles based on your formatting. Here’s the most powerful option on the AutoFormat tab. It tells Word to update the document’s styles (see Styles), based on the formatting done directly in the document. For example, if you change your first heading to 14-point Helvetica Bold, Word applies that font to all occurrences of that style; you’ve just redefined the style, in fact. This option overrides any formatting you’ve done in the Styles dialog box, so use it with caution.
Tip
Consider memorizing AutoFormat “cues” for other AutoFormat options, too (in addition to using asterisks for bold and underlines for italic). For instance, if you frequently make bulleted lists, try to get in the habit of typing an asterisk for a bullet, knowing that Word will automatically change it to • (Or use a ListBullet style—see Styles).
Even if you don’t like Word making changes as you type, you can still benefit from AutoFormat—by running your finished document through what you might call its AutoFormat-O-Matic. For instance, you can take text that uses the Internet style for *bold* and _italic_ and have Word change them into proper boldface and italics. AutoFormat can also clean up a document by changing URLs into live hyperlinks or adding attractive bullets to lists, all at once.
First, choose Tools → AutoCorrect → AutoFormat As You Type and turn off all the boxes; now Word won’t make any of these corrections during your typing.
When you’re ready to autoformat, choose Format → AutoFormat → Options; the checkboxes here correspond, for the most part, to those described above. You’re given only a couple of new ones here. They are as follows:
Other Paragraphs. Ordinarily, Word’s AutoFormat feature applies a Heading style to whatever it recognizes as a heading, and a List style to anything it recognizes as a list. But if you turn on this option, Word also applies other styles when autoformatting. For example, Word can format plain text to your default Body Text font and paragraph style.
Word does this by comparing the text in the document to the styles in your Normal template (see Normal and Global Templates) and automatically applying the closest matching style. If this box is turned on and the document appears to be a letter, Word also applies letter features such as Inside Address.
Preserve Styles. Turn on this box if you’ve already done some formatting of your own in the document before starting the AutoFormat pass. Word won’t change the style of any text you’ve manually formatted.
When you click OK, you return to the AutoFormat dialog box. So far, you’ve just specified what happens when Word conducts its editorial pass through your document. To trigger that event later, choose Format → AutoFormat—which opens this dialog box. Choose a document type from the pop-up menu—General document, Letter, or Email—which tells Word what kind of document it’s going to be autoformatting. For instance, if the document is a letter, Word knows to apply letter styles such as Inside Address and Closing. If you choose Email, Word eliminates formatting options that usually don’t work in email, such as first-line indents. (Clicking Options returns you to the AutoFormat tab described above.)
If you choose “AutoFormat and review each change,” Word opens a dialog box showing each change Word is about to make; you can choose to accept or reject it. You can also click Style Gallery to apply one of Word’s document templates (see Modifying a Template), with all its colors and fonts, to the finished document. If you choose “AutoFormat now,” Word goes through the document and prepares all autoformatting changes without pausing.