
A header or footer is a special strip showing the page number—as well as your book title, chapter title, name, date, and other information—at the top or bottom of every printed page in your document (or a section of it).
Adding headers and footers to your document is now easier than ever thanks to Word 2008’s assortment of preconfigured Document Elements. Click Document Elements in the toolbar to reveal the Elements Gallery (if it’s not already showing), and then click the Header or Footer button. As shown in Figure 7-2, Word displays its gallery of preformatted header or footer styles. Use the pop-up menu to determine whether this header or footer will appear on odd pages, even pages, or all pages. Then click one of the thumbnails in the gallery and watch as Word inserts it in your document and switches to “Header and Footer” view.
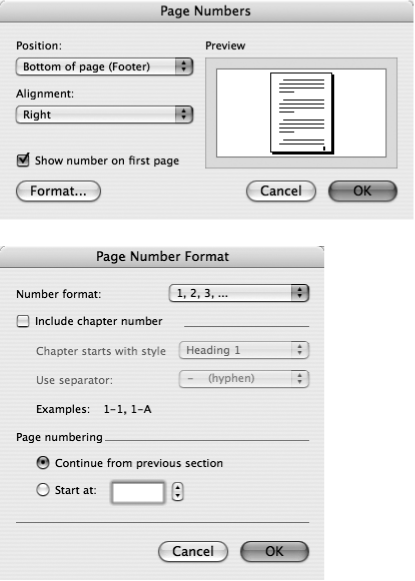
Figure 7-1. Word 2008’s new Elements Gallery lets you insert a header or footer by choosing one of the preformatted styles. Set the pop-up menu at the left to determine which pages receive your header or footer, then simply click your style choice to make it so.
Word treats the header and footer as a special box at the top or bottom of the page. To view these special text areas, choose View → “Header and Footer”. Word switches to Print Layout view (if you weren’t there already) and a blue line appears separating the header and footer areas from the rest of your document. Meanwhile, back in the document body, the rest of your text fades to gray. (If you find that faded representation of your body text distracting, hide it by clicking the Show/Hide Document Text icon on the “Header and Footer” pane of the Formatting Palette.)
Tip
If you’re already working in Print Layout view, you don’t have to bother with the View → “Header and Footer” command. Just move the cursor to the top or bottom of the page; when the cursor turns into this shape ![]() double-click. The header and footer outlines appear.
double-click. The header and footer outlines appear.

Figure 7-2. Choose Insert → Page Numbers for the shortcut method using this dialog box (top). Click the Format button to summon the Page Number Format dialog box (bottom) to fine-tune your numbering style or to choose a starting number other than 1.
If you haven’t used the Elements Gallery to start with, fill your header or footer by typing inside it and clicking icons in the “Header and Footer” pane of the Formatting Palette. If you have begun with one of Words preformatted styles, now’s your chance to modify that formatting to your taste. For your convenience, Word places a centered tab stop in the middle of the typing area, and a right-aligned tab stop at the right. You can choose View → Ruler and adjust these tab stops, of course (see Tabs), but they’re especially handy when you want to produce a header like the one shown in Figure 7-3.
Make sure the cursor is at the left margin. Type the chapter title.
After typing Chapter 1: The Beginning, you can highlight and format it; for example, italicize it by pressing ⌘ -I.
Press Tab.
The cursor jumps to the center-aligned tab in the middle of the header or footer.
Insert the date.
Click the Insert Date icon on the Formatting Palette, as shown in Figure 7-4. (Word inserts the date as a field, which is continuously updated; whenever you open this document, the date will be current.)
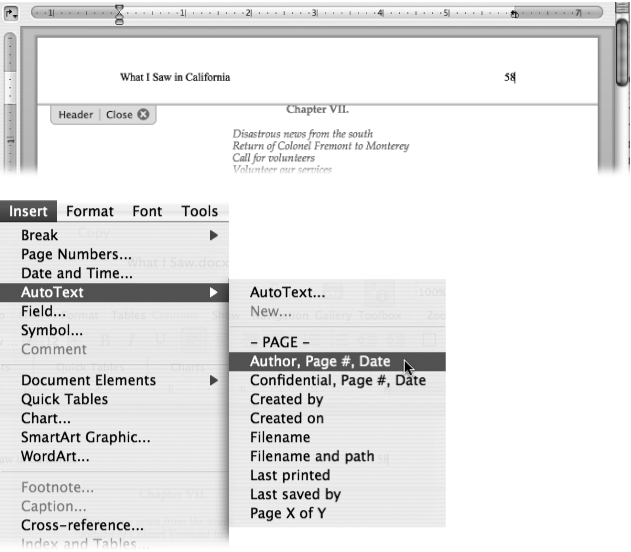
Figure 7-3. Top: When you’re editing your header or footer, the main part of your document appears in gray, and a blue line appears separating the header or footer area from the rest of the document. A helpful tab hangs from the line, reminding you that you’re working on a header or footer, and containing a close button you can click when you’re ready to move back to the body of the document. Bottom: To insert AutoText items into a header or footer, choose Insert → Auto Text and select an item from the submenu. Word will keep them automatically updated. To return your document to its normal condition, click the close button on the header or footer tab, double-click the body of your document, or choose View → “Header and Footer” again.
Now your cursor is aligned at the right margin.
Type Page, and a space; insert the page number by clicking the Insert Page Number icon on Formatting Palette (Figure 7-4); type of; insert the total number of pages by clicking the Insert Number of Pages icon.
(Of course, most people don’t use the “Page X of Y” notation; if you want just the page number to appear, simply click the Insert Page Number icon and be done with it.)
Word inserts placeholder fields (indicated by a nonprinting, gray background) into your header or footer, so that it says Opening Documents with the Open Command of 15, for example. When you print or scroll through your document, you’ll see that each page is correctly labeled in this way.
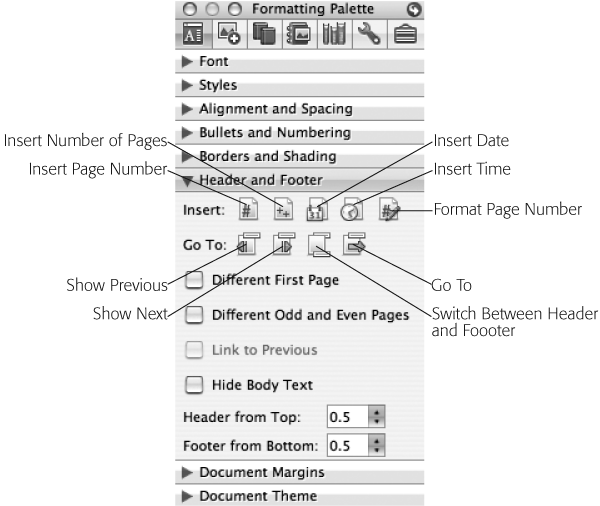
Figure 7-4. The buttons you used to find in the “Header and Footer” toolbar in earlier versions of Word now reside in their own section of the Formatting Palette. Here you can insert and format page numbers, dates, and times; move from one header or footer to another; and control the other “Header and Footer” options.
Double-click the dimmed body portion of your document (or click the Close button on the toolbar) to exit the header/footer editing area.
If, at this point, you want more control over page numbering, click the Format Page Number button on the “Header and Footer” pane of the Formatting Palette In the dialog box that appears, you can specify how you’d like the page numbers to appear (a, b, c, or in Roman numerals, or with chapter numbers included). You can also indicate that you’d like them to begin with some number other than 1, which is ideal when your document is the continuation of a document you’ve already printed.
Tip
Headers and footers don’t appear or print when you save your Word files as Web pages. But leave them in–they’ll appear and print (if you chose the “Save entire file into HTML” option) if you return to using the same file as a Word document.
Headers and footers automatically extend from the left margin to the right margin. To make them wider than the text and extend them into the margins, give the header or footer a hanging or negative indent (see Indentation).
To move a header or footer higher or lower on the page, choose Format → Document → Margins tab; adjust the numbers in the “From edge” boxes. (Higher numbers move the header or footer text closer to the middle of the page.) Alternatively, you can adjust it visually by clicking in the header or footer and then dragging its margin up or down in the vertical ruler at the left side of the page. This adjusts the distance between the header or footer and the body of the text. If the ruler isn’t visible, click Word → Preferences → View → Window → Vertical Ruler.
If your term paper has a title page (featuring the name of the paper centered on an otherwise blank page), it would look a little silly if the paper’s title also appeared in a footer at the bottom.
Fortunately, you can give your first page a different header or footer—or none. To do so, go to the first page of your document. Choose Format → Document → Layout tab, click “Different first page,” and click OK. Alternatively, click the Different First Page button on the “Header and Footer” pane of the Formatting Palette. (The “first page” setting applies only to the section that contains your insertion point. In other words, you can control the header/footer’s appearance independently for each section in your document. See Inserting and Removing Section Breaks for more detail on sections.)
Or, you can bypass the title-page footer-formatting by using one of the pre-designed title pages in the Elements Gallery (Figure 7-5). When you add one of these pages to your document, Word knows you don’t want headers and footers on that page and makes the change to the Document Layout dialog box for you.
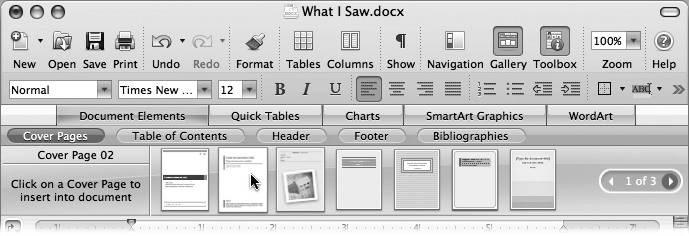
Figure 7-5. Click Document Elements to reveal the Elements Gallery, then click Cover Pages to display the variety of title-page designs Word puts at your disposal. No matter what page you’re on when you make this choice, Word always inserts the cover page at the beginning of the document.
Now you can edit and format the unique header and footer for your first page, or just leave them blank. (You can also apply this technique to the first page of each section of your document; see Inserting and Removing Section Breaks.) If you haven’t formatted the header and footer for the rest of the document, click the Show Next button on the “Header and Footer” toolbar; Word takes you to the second page, where you create the headers and footers for the rest of the pages.
If your document is going to be bound like a book, you’ll probably want different headers and footers on odd and even pages, exactly like those on these book pages (book name on left-side pages, chapter name on right-side pages).
To create these mirror-image headers and footers, choose Format → Document → Layout tab, click “Different odd and even,” and click OK. (Alternatively, click the Different Odd and Even Pages icon on the “Header and Footer” pane of the Formatting Palette.) Then edit the headers and footers for the odd and even pages in your document; when you edit any single odd or even page, Word applies the changes to all of them. If you began your header or footer foray in the Elements Gallery, then you made this pagination choice back then. If you have a change of heart, you can use this technique to change it.
If you’ve divided your document into sections (see Inserting and Removing Section Breaks), you can type, for example, different chapter names or numbers in the headers and footers for each section—a very common technique when you want to break your document into chapters.
By default, all headers and footers in a document are the same, even when you insert section breaks, so the trick is to sever the connection between the headers and footers in consecutive sections. For instance, if you want a different header in each of your document’s three sections, go to a page in the second section and choose View → “Header and Footer”. Click in the header and click the Same as Previous button in the Formatting Palette’s “Header and Footer” pane. (This button breaks or rejoins the header/footer connection between each section and the one before it. You can use it to restore the header and footer connections if you change your mind, and once again make them uniform throughout the document.)
Repeat the process for the third section, and so on.