
Long, technical, or scholarly documents—or computer manuals—frequently contain phrases like “see Chapter 12" or “see Figure 8, on Setting tabs.” These are cross-references—words that refer the reader to another place in the document. Of course, you can always type your own cross-references—but what a mess you’ll have when you decide to cut a few pages from the first chapter, and all 1,424 of your cross-refs now point to the wrong page numbers!
Word stands ready to create smarter cross-references that update themselves no matter how you edit your document. What starts out saying “See Copies and Pages" will change automatically to say “See Printing Envelopes and Labels" after you insert a 10-page introduction.
Remember these two principles as you start on the road to cross-reference nirvana:
Word thinks of cross-references as pointing to objects in your document, not places.
In other words, a cross-reference has to be connected to a figure, a bookmark, or a heading.
Cross-references can only refer to something within the same document.
If you’re creating a document with multiple chapters, you have to combine them into one Master Document (see Master Documents) before working with cross-references.
When creating a cross-reference, start by typing appropriate lead-in text into your document: See, Turn to, As shown in, or whatever you like. Then it’s time to get Word involved.
Here, for example, is how you might build a cross-reference that reads, “See Figure 1, below” (see Figure 7-22).
Type See Figure; then choose Insert → Cross-reference.
The Cross-reference dialog box appears.
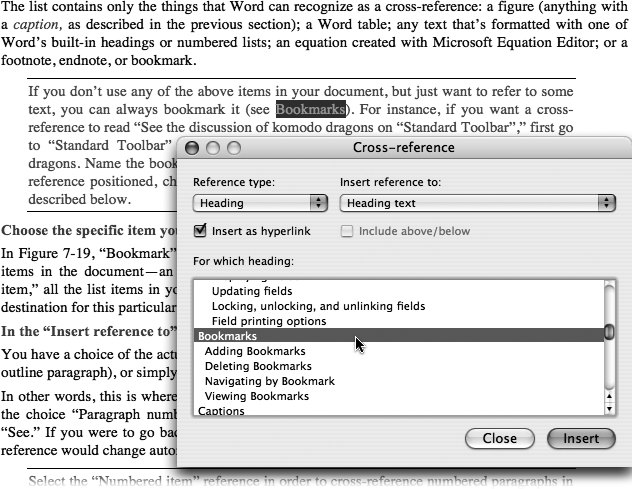
Figure 7-22. Top: A clickable cross-reference in place. When you click the phrase “Field Printing Options,” your document scrolls automatically to the corresponding paragraph. Right: The Cross-reference dialog box displays all the headings, bookmarks, figures, or other landmarks in your document. Clicking the “Insert as hyperlink” box turns the cross-reference text into a clickable link.
Make a selection from the “Reference type” pop-up menu.
The list contains only the things that Word can recognize as a cross-reference: a figure (anything with a caption, as described in the previous section); a Word table; any text that’s formatted with one of Word’s built-in headings or numbered lists; an equation created with Microsoft Equation Editor; or a footnote, endnote, or bookmark.
Tip
If you don’t use any of the above items in your document, but just want to refer to some text, you can always bookmark it (see Bookmarks). For instance, if you want a cross-reference to read “See the discussion of komodo dragons on Print Preview,” first go to Print Preview and bookmark the paragraph where you talk about komodo dragons. Name the bookmark “komodo dragons.” Now go to where you want the cross-reference positioned, choose Bookmark in the “Reference type” menu, and continue as described below.
Choose the specific item you’re cross-referencing in the"For which” list box.
In Figure 7-22, “Heading” is the chosen reference type; the “For which” box lists all the heading items in the document—a computer software manual in this case. If you had chosen “Numbered item,” all the list items in your document would appear, and so on. From this list, choose the correct destination for this particular cross-reference.
In the “Insert reference to” menu, specify what type of item you want the reference to point to.
This is where you tell Word what you want the cross-reference to say. In Figure 7-22, the choice “Heading” places the selected heading text in the cross-reference after the typed word “See.” If you were to go back and rewrite that heading in the manual, the text in the cross-reference would change automatically.
Note
Select the “Numbered item” reference in order to cross-reference numbered paragraphs in legal documents. The “Paragraph number (no context)” and “Paragraph number (full context)” options in the “Insert reference to” menu were created just for you. “Full context” names a cross-referenced paragraph by the entire string of outline numbers: 1. (a) (i), and so on. Use “no context” to refer to the same paragraph simply as (i).
You have a choice of the actual text (of the caption or paragraph), the number (of the page, list item, or outline paragraph), or simply “above” or “below.”
If above/below isn’t one of the choices on the “Insert reference to” menu, turn on the “Include above/below box” to add “above” or “below” to the end of the cross-reference, as shown in Figure 7-22.
Thereafter, no matter where you move the referenced item—as long as it’s within the same document—Word will change “above” to “below,” or vice versa, as necessary.
Click Insert or press Return when you’re done creating the cross-reference.
Word inserts the cross-reference field in your document; it appears as See Figure 1, below in a gray box, an indication of its field status.
To change a cross-reference (perhaps you’ve changed a figure or divided your document into two shorter ones), just select it, choose Insert → Cross-reference, and modify the settings. You can, for example, change a cross-reference to “Figure 2” instead of “Figure 1”.
To delete a cross-reference, select it and press Delete. (When selecting a cross-reference, drag over only the shaded part, as shown in Figure 7-22; don’t include any additional text you’ve typed.)
Note
You can’t create a cross-reference to anything inside a text box(see Text Boxes).
Like captions, cross-references are a type of field (see Fields), and also like captions, cross-references can sometimes spontaneously combust. Similarly, you fix them as you would broken captions. For example, if you see some cryptic characters like { REF_Ref372221765 p } instead of the cross-reference you were expecting, Control-click the shaded part of the cross-reference and select Toggle Field Codes from the shortcut menu.
Again like captions, Word sometimes misses a few—despite the fact that the program updates cross-references automatically when you move text in your document. Therefore, as part of the finishing touches on any document where you’ve used cross-references, press ⌘-A and then press Shift-Option-⌘-U. You’ve just signaled Word to update all cross-references (and captions, for that matter).