
To perform its page-layout wizardry, Word views the various elements you can incorporate on your page—pictures, movies, text boxes, shapes, tables, and so on—as objects. Word approaches objects in two ways:
In-line objectsbehave like a text character in a line of text. If you add more text to your document in front of this kind of object, it gets pushed along with the text, always remaining tied to the words next to it. You’ll find in-line objects a good choice for text boxes containing a small image that needs to stay connected to the surrounding text. See Figure 8-6 for an example.
Fixed objectsare standalone entities. Instead of being tied to the document’s text, they’re bolted into the page at a specific spot. Most people prefer fixed objects when they’re adding pictures or charts to the page layout. Adding text to the page doesn’t affect the objects’ placement, and you can drag and resize these kinds of objects to precisely position them on the page (Figure 8-7).
When you insert a fixed object on a text-filled page, you can determine whether the text flows under the object, over the object, or wraps around it—flowing around the object so the text neither overlaps the picture nor is hidden by it (see Wrapping).
Since fixed objects are separate items, you can stack them in layers—just like you can arrange paper snapshots on a scrapbook page. One picture is on top, overlapping portions of other pictures underneath. Besides shifting the position of each object, you can also shift its layer—moving it in front of or behind other objects it overlaps.
Tip
You choose an object’s fixed or in-line status when you add it to the page, but you can convert it from fixed to in-line or vice versa at any time (see Converting object style).
In-line objects always remain on the same layer as the text in which they’re embedded. When you adjust the arrangement of layers in your document, you can only move fixed objects in front of or behind the text layer. Unlike scrap-booking with paper snapshots, Word also lets you adjust the opacity of each object, so you can see through to the objects in the layers below (see Transparency).
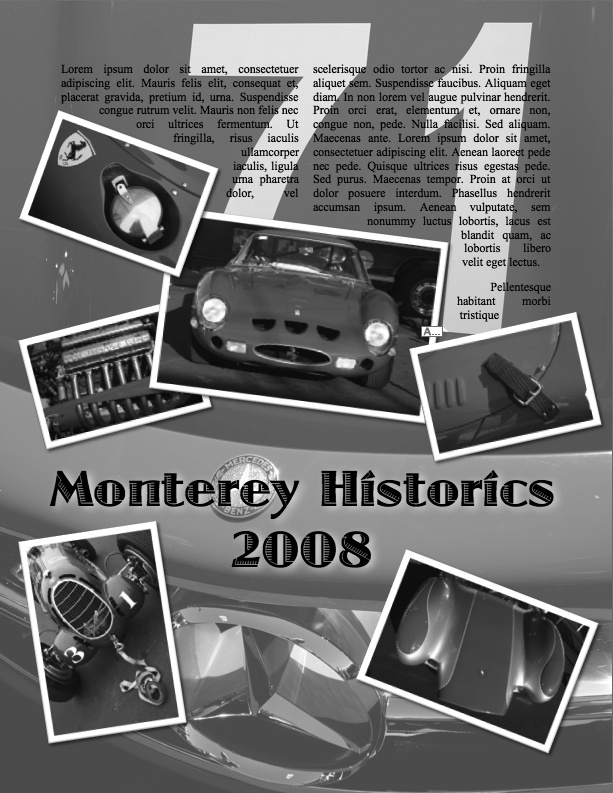
Figure 8-7. Publishing Layout view documents are built with fixed objects. Every element on this page is, in fact, a fixed object. The background picture’s opacity is reduced to make the text readable. Linked text boxes have two columns of text that wrap around the pictures, while another text box displays the headline. The small pictures are arranged in overlapping layers and feature white borders, drop shadows, and rotation.
After you place objects on the page, you can crop, resize, rotate, and layer them on top of one another. You can add shadows, adjust their opacity, or group several objects together in order to reposition them simultaneously. For the full story on object manipulation, see “Moving Objects Around” on Moving Objects Around.
The Publishing Layout View is no different from other Word views when you adjust various parts of your document—just use the Toolbox. Along with the Formatting Palette’s familiar text controls, Publishing Layout view makes use of the Wrapping, Text Box, Colors, Weights, and Fills, and Shadow panes. (These controls are covered in depth starting on Wrapping.)
The four tabs of the Object Palette let you drag to place shapes, clipart, symbols, and photos onto your page (see Figure 8-8).
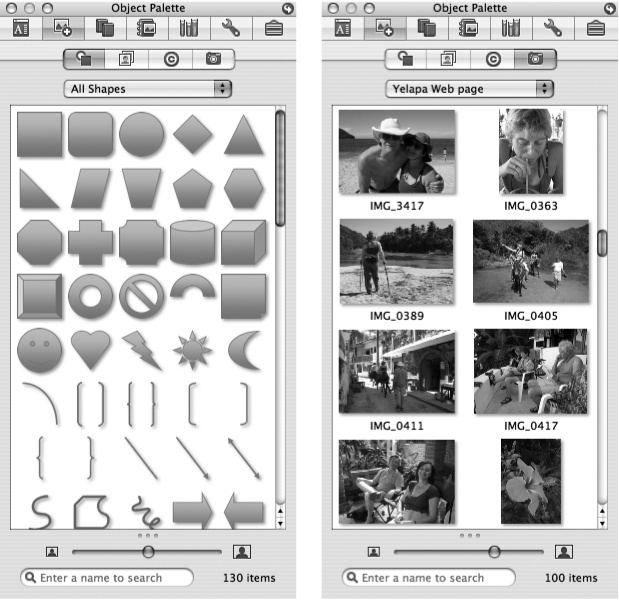
Figure 8-8. The Object Palette’s four tabs provide a quick way to insert shapes (left), clip art, symbols, and photos (right) by simply dragging a thumbnail into your document. Use the slider at the bottom to control the thumbnail size; narrow down your choices by using the pop-up menu at the top or by typing into the search box.
Shapes. The Object Palette’s first tab provides easy access to AutoShapes (which you can also access from the Drawing toolbar or from the Insert → Picture → AutoShapes command). Use the palette’s pop-up menu to view all the shapes or to narrow your view down to a certain type, like Lines, Stars and Banners, Arrows, and so on. Place one of these shapes on your page by dragging it in. Word inserts the shape at a standard size, which you can then resize to your liking. Alternatively, click your desired shape in the Object Palette and move your cursor back to your document—where it now appears as a crosshair. Start dragging, and the shape appears—stop dragging when it’s about the right size. You can constrain the proportions of a shape—to draw a perfect square or a perfect circle, for example—by pressing Shift while you drag a shape’s corner handle.
Many of the shapes have one or more yellow, diamond-shaped adjustment handles that control one of the shape’s attributes—like the sharpness of a star’s points, the shape of a bracket, the angle of a triangle, or the smile or frown of a smiley face. Figure 8-9 shows a couple of examples.

Figure 8-9. If a shape features a yellow, diamond-shaped handle, you can drag it to adjust the appearance of the shape, dulling or sharpening a star’s points, or reshaping a ribbon, for example. By experimenting, you can achieve radically different looks.
Tip
When you choose Callouts from the Object Palette’s pop-up menu, you access a special variety of shape that acts like a mini text box. You can type inside these shapes, using all of Word’s font-formatting controls, in order to add explanatory notes to pictures or diagrams, or cartoon-like thought and speech bubbles to your photographs.
Clip Art. Click the Object Palette’s second tab for access to Word’s collection of clip art and stock photos. You can access the much more complete and searchable Clip Gallery by choosing Insert → Picture → Clip Art (see The Clip Gallery), but the Object Palette gives you a quick and easy way to access your clip art collection. Use the pop-up menu to view the entire collection of all images, or choose one of the categories like Business or People. Drag one of the thumbnails into your document to place it, and then use the corner handles to resize it.
Symbols. The Object Palette’s Symbols tab lets you insert special characters right into your text—musical notes, Greek letters, fractions, and Currency symbols, among others. As with all of the Object Palette tabs, you can use the pop-up menu to view all of the symbols, or only certain categories, such as Math, Shapes, Checkmarks, and so on. Just click one of the symbols to place it in your document at the insertion point. (Unlike shapes, clip art, and photos, Word inserts symbols as text characters—not objects.)
Photos. The final tab in the Object Palette gives you a peek into your photo collection, be it in iPhoto or some other folder (see The Toolbox Redux). The pop-up menu lets you choose from recently used folders or select any other iPhoto library or folder on your computer or network. Drag a thumbnail into your document and then use the corner handles to resize it. If you drop a photo into a picture placeholder, it assumes the placeholder’s attributes—size, border, shadow, rotation, and so on.
After you decide what to insert in your document, the next question is how: as a fixed or an in-line object. Fixed objects are glued to a spot on the page (although you can always move them later) while the text flows around or over them, whereas in-line objects are attached to the text and move along with it.
Think of in-line objects like another character or word in a sentence. In-line objects enter the page at the insertion point—just like a typed character. Although you can use in-line objects in Publishing Layout view, they’re usually more useful in longer text documents, where you want a picture to remain close to a certain paragraph no matter how much editing you do to the document before that paragraph.
To create an in-line object, double-click the text box containing text where you want to insert it, so you see its blinking insertion point. Then drag a photo or clip art thumbnail from the Object Palette (or drag an image file from a folder) into the text box. As you move your cursor over the text box, the insertion point follows along at the tip of the arrow. Guide the insertion point to the spot in the text where you’d like the in-line object to appear, and release the mouse button.
Word then copies the image to your chosen point in the text box. Click the image to display its selection handles, and drag any of them to resize the image.
You can also add an in-line object by first placing your insertion point at the spot you want it to appear, and then choosing Insert → Picture → and choosing Clip Art, or From File, from the submenu. (AutoShapes is another choice, but they always appear in your document as fixed objects.) Choosing Clip Art opens the Clip Gallery, from which you can choose a picture (The Clip Gallery), while choosing From File summons the Open dialog box, allowing you to navigate to any picture file on your computer.
Fixed objects are married to a spot on the page rather than within a line of text. To add a fixed object, first make sure you’re not inside a text box. Clicking the margin of the document or the “virtual tabletop” around the document is a reassuring move that closes any text boxes and deselects any objects. Then drag the image or file into your document. Click the image to call up its selection handles and drag any of them to resize it. Click inside the picture to drag it into position.
You can also add fixed pictures via the Insert → Picture menu: clip art from the Clip Gallery, pictures from any file, or AutoShapes from their tiny toolbar.
After you insert an object in your document you can change it from an in-line to fixed object or vice versa. Double-click the object to open the Format dialog box, click the Layout tab, and choose “In line with text” or one of the other fixed object wrapping styles.
Note
Tiger fans beware: The wrapping controls in the Format dialog box won’t let you convert the object style. Instead, select the picture and choose Edit → Cut (or press ⌘-X). Then, to convert it to an in-line object, place your insertion point within a line of text and choose Edit → Paste (or press ⌘-V). To convert it to a fixed object, make sure the text-editing insertion point is not present inside a text box, and choose Edit → Paste.
The Object Palette provides a quick way to insert shapes, clip art, and photos—the type of objects you’ll often want in a printed document. However, Word’s mixed-media abilities also let you include sounds and movies in your page layout if your oeuvre is destined to be viewed on a computer.
Insert a movie or sound in your document by dragging the video or sound file from a folder onto the page. Movies appear on the page displaying their first frame—and the usual object selection handles which you can use to change the size. Sounds appear on the page as a loudspeaker icon (see Figure 8-10). Both movies and sounds display a small filmstrip icon in the lower-left corner. Clicking it brings up the movie controller for starting and stopping the movie or sound, and adjusting the volume.
Word uses QuickTime to display movies and sounds, so any format that QuickTime can handle is fair game: MOV, Flash, MP3, MPEG-4, AAC, AIFF, and lots more. If you open a movie in iMovie, you can also drag individual clips from iMovie into your Word document.
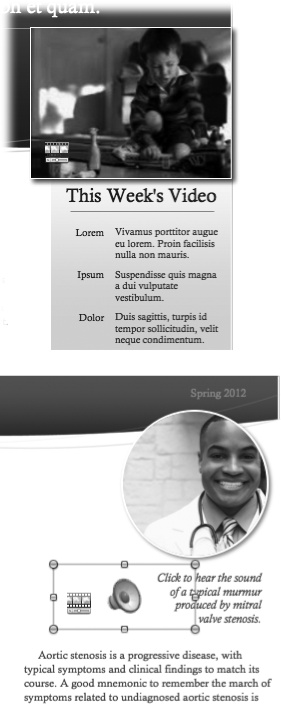
Figure 8-10. Top: Movies appear like a picture in your document, except they bear a filmstrip icon in the lower-left corner. Double-click this icon to bring up the playback controls. If your movie starts with a black frame—as many do—you can use QuickTime Pro to set a different frame as the poster frame, the frame that displays before the movie plays. Bottom: Sound files display a loudspeaker icon and the same QuickTime filmstrip. They also respond to a double-click by displaying the playback controls.
Tip
Word doesn’t let you drag a song or sound file into your document directly from iTunes. You can avoid the tedium of navigating deep into iTunes’ folder structure to insert a sound by dragging it from iTunes to the desktop (which copies it to the desktop) and then dragging it into your Word document. Tidy up when you’re done by trashing the redundant sound file on the desktop.
If you prefer, you can use the menus instead of drag-and-drop to insert audio and video files. Choose Insert → Movie, navigate to the movie or sound file you want to insert, and double-click it (or click once to select it and then click Choose) to bring it into your document.
Text boxes, callouts, pull quotes, and sidebars are common elements of page-layout design. These kinds of text boxes are useful for highlighting or isolating some text from the rest of your document. In Word’s Publishing Layout view, all text resides in text boxes—even if it’s a full page of text.
Sidebars usually hold a paragraph or several paragraphs that are related to, but not really part of, the flow of your main text. Sidebars can stand alone as a little chapter or chunk of information. (This book, for example, uses gray sidebars to hold these kinds of digressions.)
Callouts or pull quotes highlight an important point in the main text. Since they relate directly to part of the text, they need to be placed near the relevant text. Magazine articles often have pull quotes to add visual interest to the page and break up columns of plain text.
You can insert a new text box in a document by choosing Insert → Text Box, or by clicking the Text Box icon in the toolbar, or by pressing ⌘-2. Voilà —your arrow cursor sprouts a crosshair and a blue ball labeled T—for text. Start dragging, and a text box outline appears. When it fills as much space as you need, release the mouse button; the insertion point begins blinking within your new text container. That’s your signal to begin typing or to paste in the text box’s contents. If you type more than the box can hold, a clipping indicator appears at the bottom of the box to show you that some of your text is clipped off or hidden (see Figure 8-11). Resize the box to reveal the hidden text or link it to another text box (see Linking text boxes).
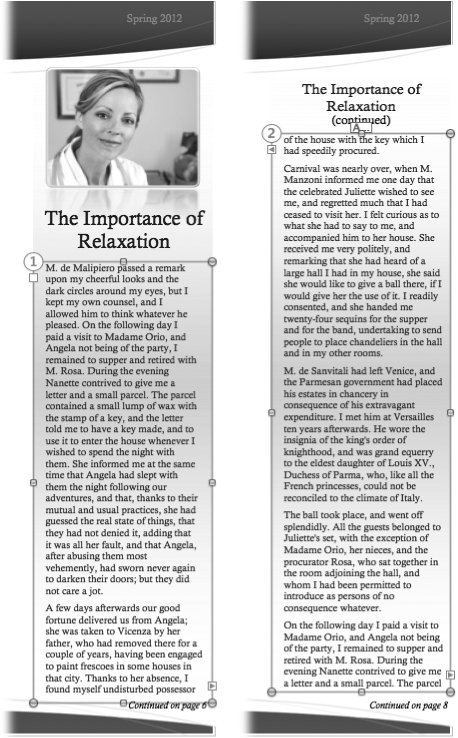
Figure 8-11. Linked text boxes display a number in their upper-left corner indicating their position in the chain of linked boxes. Additionally, the link tabs near the upper-left and lower-right corners display an arrow if the text box is linked from one to another. Clicking one of those arrows takes you directly to the previous or next text box in the series. To help you track multiple sets of linked text boxes, Word paints the selection rectangles of linked text boxes with matching colors.
Tip
Word can automatically create a text box from copied text. Copy some text from another document or from another place in the current document. Click the margin of the document to be sure nothing is selected, then choose Edit → Paste Special, and choose Unformatted Text. A new text box appears in the upper-left corner of the current page, filled with the contents of your clipboard in your document’s default body text style—just waiting for you to drag it into position.
When you’re typing in a text box, click the border of the text box to switch from text-entry mode back to object mode, and then drag the box to reposition it or drag one of its handles to resize it. If you’re not typing in a text box, a single click selects the box so you can resize or reposition it, while a double-click takes you into its text-entry mode.
Tip
If you like to use shapes to contain text for callouts or captions—a favored method—you’ll find that only some of the shapes allow you to fill them with text. Only shapes in the Callout category are ready and willing to act as specialized text boxes. But actually, creativity rules: you can use any of the other shapes as text boxes by Control-clicking (or right-clicking) the shape and choosing Add Text. From now on that shape behaves just like one of the official Callout shapes.
If you have more text than will fit in one text box, want your text to flow from one column to another, or want to break up a sidebar into two or more portions, Word can link the text boxes to the text flows from one to another. Linked text boxes can be on the same page or on several different pages. Magazines often use this technique for a running sidebar that occupies, for example, the right column on the right page for several pages running. Linked text boxes behave as one virtual text box—if you add extra text to the first box any displaced text flows into the next linked text box. Or, if you use Select All, Word selects the text in all the linked text boxes.
To make a linked text box, create the first text box and type or paste text into it; then click the box’s forward link tab (see Figure 8-11). Your cursor again assumes the text box–drawing shape with a crosshair and the blue “T” ball. Use it to draw your next text box—which Word immediately fills with any of the overflow text from your first box. Repeat the process if you need more linked text boxes. Once you’ve created a link, Word changes the color of the linked box’s outlines, using different colors for each set of linked boxes. Additionally, the text box’s two linking tabs reveal if the box is linked to another text box (an arrow in the right-side link tab), or linked from another text box (an arrow in the left-side link tab). When you hover your mouse over a linked text box, Word briefly displays a number in the upper left corner of the box indicating its position in the linking line-up.
You can create a chain of as many linked text boxes as you require. When Word creates a linked text box, it establishes that box’s order in the chain for the flow of text. But Word doesn’t prevent you from dragging linked text boxes into any order you want within your document—though your readers may wish it had.
You can select all the text in a series of linked text boxes to change font formatting or to copy the text to another document, for example, by placing the insertion point in any of the text boxes and pressing ⌘-8 (or choosing Edit → Select All).
If you need to move a set of linked text boxes at once, press Shift as you click the other boxes in order to select the whole set. Then you can drag them to a new location in your document. Have patience, however, when dragging text boxes. Even on a fast computer, it can take several seconds for the boxes to catch up with your cursor, especially when dragging from one page to another. Eventually they’ll arrive at their new destination, links intact.
Tip
If you need to drag linked text boxes to a spot in your document several pages away, use the Zoom control in the toolbar to reduce your view to 25 or even 10 percent. Then you can carefully drag your text boxes to a distant page, return your zoom control to its normal setting, and get back to work.
If you’re relocating an individual text box or any other kind of object, you’ll find it more convenient to use cut and paste. Select the text box or other object, and then choose Edit → Cut. Scroll to the page in your document where you’d like to relocate the object, click that page’s margin to be sure nothing is selected, and then choose Edit → Paste. The text box or object reappears. This method works with multiple objects as well, but not with linked text boxes.
You can also create a link to a text box that already exists. Select the first text box and then click the Link button in the toolbar. Your cursor sprouts a blue ball emblazoned with a chain link icon. Click an empty text box to create a link to it. (In an effort to help you keep your prose under control, Word only lets you link to empty text boxes.)
If you’ve created a link and wish you hadn’t, you can unlink the text box, removing all the text from any boxes farther down the chain. To do so, select a text box which links forward to another, and click the Break icon in the toolbar. Doing so breaks the chain and removes any text from the boxes you’ve linked to. That text reverts to being overflow text for the first text box—which you can expand or link to another text box to contain it.
Tip
If you’re a mathematician, you’ll notice that the Insert → Object → Microsoft Equation command is missing in Publishing Layout view. Don’t let that stop you. Open the Equation Editor directly by choosing Applications → Microsoft Office 2008 → Office → Equation Editor. (If you use equations regularly, save your sanity by adding the Equation Editor to your Dock.) Create your equation, then copy it from the Equation Editor and paste it into your page layout. Once you’ve added an equation in Publishing Layout View, you can double-click it to bring the Equation Editor back in case you need to modify your math. (See Creating Linked Objects for more on the Equation Editor.)
Think of text boxes as little documents within your document. And just like a word processing document, you can fill a text box with plain text, or you can dress it up at will with a background color or image, borders, shadows, tables, charts, pictures, and so on (Figure 8-11).
You can add a solid color, a gradient (a fill color that gradually blends one color into another), or an image to the background of the text box; you can also choose to have border, a drop shadow, or adjust its opacity. The Formatting Palette’s Colors, Weights, and Fills, and Shadow sections provide controls for most of these options. Or choose in Format → Text Box to someone the Format Text Box dialog box, the headquarters for all text-box formatting options.
You can add other objects—images, shapes, or tables—within a text box as in-line objects. To do so, place the insertion point in the text at the spot you want to insert the object, and choose a type of object from the Insert menu or from the Object Palette.
You can use fixed objects within a text box as well, but when you do, you’re actually creating two or more layered objects on the page. To add a fixed object, click the margin of the document so the insertion point disappears, and then choose the type of object from the Insert menu or from the Object Palette. Resize the object and drag it into the text box. If necessary, open the Formatting Palette’s Wrapping pane to adjust the type of wrapping and the wrapping margin (see Wrapping). You can attach the object to the text box—so it moves along with it if you reposition the text box—by grouping the two objects. Select the object, hold down the Shift key, and then select the text box. With both items selected, choose Group from the Group button in the toolbar. Now if you move the text box the object comes along for the ride.
Note
When you group a text box with another object, you can’t resize the box without also resizing the object it contains. In order to independently resize either the text box or the object inside it, select the group object, choose Ungroup from the Group button in the toolbar, and then make your changes. To tie them together again, select both items and choose Group from the toolbar Group button.
Word controls the way text in the neighboring text boxes wraps around a text box just as it does with other objects. You can adjust those settings in the Formatting Palette’s Wrapping section.
The way Word displays the text inside a text box depends on the normal font and paragraph formatting controls. However, you need to visit the Formatting Palette’s Text Box pane to adjust the box’s Internal Margin—the space between the text box’s text and the border of the box. Word lets you set the four side margins independently.
When you’re working in Publishing Layout view with pictures, text boxes, shapes, tables, and so on, Word sees them all as objects and handles them in similar ways. Once you master resizing, rotating, and text wrapping around, say, a picture, you’re ready to do the same operations on shapes, tables, text boxes, and other objects.
Select an object by clicking it. Its selection handles appear, in effect saying, “I’m ready and waiting—mold me to your whim!” The most basic object maneuvers are moving and resizing.
You can drag fixed objects anywhere on the page or to another page on your document. In-line objects, however, refuse to be dragged anywhere. Instead, select the in-line object and choose Edit → Cut (or Control-click the object and choose Cut from the pop-up menu), reposition your insertion point within the text where you’d like the picture to appear, and choose Edit → Paste (or Control-click and choose Paste from the shortcut menu).
If you have to move an object very far—to another page or to the other end of your document—use this same cut-and-paste method. You can shift-click to select more than one object to move at the time.
Note
This cut and paste method won’t work with multiple linked text boxes (see Linking text boxes).
When you place your arrow pointer over one of an object’s six selection handles (tables only have two), the cursor changes into a double-headed arrow, which means you can resize the object by dragging that handle. When you drag one of the square handles in the center of each side, you can stretch or squish the object—even if it’s a photograph. However, if you use the round corner handles, Word preserves the picture or movie’s aspect ratio as you drag, preventing you from accidentally stretching or widening your subject’s natural proportions. You’re free to alter the proportions of other objects—like shapes and tables—while you drag their corner selection handles. Or, to force Word to preserve their proportions, hold down the Shift key while you resize.
If for some reason you want to change this behavior, making a picture stretchable with its corner handles or preventing a carefully designed AutoShape from being stretched, open the Formatting Palette’s Size, Rotation, and Ordering pane and turn off or on the “Lock aspect ratio” checkbox.
While you’re in that part of the Formatting Palette, you’ll notice the other method of changing an object’s size: numerically, by entering numbers in the height and width boxes or by using the up- and down-arrow button to gradually change those numbers. This ability is especially useful when you need to match the dimensions of two or more pictures. Select two or more objects and enter the width and/or height measurements. Presto: All your selected objects are now the same size. (If “Lock aspect ratio” is turned on you can enter only one of the dimensions; turn off that checkbox in order to enter both.)
The static alignment guides—Word’s virtual T-square—help you to precisely align objects with text and with each other. You can create as many non-printing vertical or horizontal alignment guides as you need. To do so, click and drag from either ruler onto the page. Word changes your cursor to a double-bar between double arrows, displays the blue alignment guides, and a box showing the distance from the edge of the page to the guide. Drop the guide when you get it into the correct position.
Page alignment guides show only on one page. You can reposition them by dragging—your arrow cursor again takes on the shape of the double bar with arrows, indicating it’s ready to reposition the guideline. When you’re done lining things up, remove a guide by dragging it back to the ruler or off of the page. Or remove all guides from the page by choosing View → Show → Clear Static Guides.
Objects also have built-in alignment guides. Alignment guides appear when you drag an object so that its center crosses the horizontal or vertical center of the page. Alignment guides also show up between objects as you drag one object, causing its center to align vertically or horizontally with the center of another object on the same page. In addition, guides appear when you drag an object so that one of its edges crosses the horizontal or vertical center of the page, or aligns vertically or horizontally with the edge of another object on the same page. All this alignment guide stuff is a little difficult to conceptualize if you’ve never seen these kinds of guidelines in action. But guidelines are worth learning because they can be enormously helpful if you’re trying to place an object just so; Figure 8-12 shows how these lines work and what they look like.
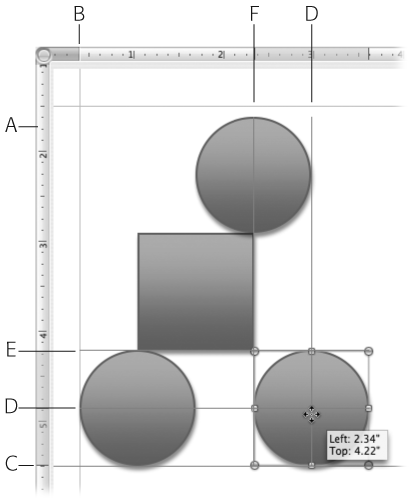
Figure 8-12. Drag from any spot on the ruler into the document to add alignment guides wherever you need them (A). Choose View → Show and turn on Static guides, Dynamic guides, and Margin Guides to create the most alignment options. When you drag an object, its alignment guides appear whenever it aligns with another object. The left circle’s left edge is aligned with an alignment guide (B). The selected circle’s bottom edge is aligned with the automatic half-page guide (C); its center is aligned with this the center of the circle to its left, and with the edge of the circle above (D); its top edge is aligned with the bottom of the square and the top of the neighboring circle (E); and its left edge is aligned with the edge of the square and the center of the upper circle (F).
Finally, you can turn on a rectangular alignment guide to display your document’s margins. Choose View → Show → Margin Guides to turn this feature on or off.
All of these various guidelines exhibit a magnetic attraction that makes them snap to one another. As you drag an object, and its invisible center or edge guidelines approach another guideline—the page center guidelines, another object’s edge or center guidelines, or alignment guides you you’ve added to the page—the object’s alignment guides appear and the object snaps into position, perfectly aligned with the guideline.
Sometimes however you may need to position an object very close to, but not exactly on, a guideline. In this case, Word’s guideline magnetism thwarts your positioning efforts. Temporarily turn off this feature by pressing ⌘while you drag, and you can position the object as you wish, without fear of it snapping to a nearby guideline.
Word can automatically align two or more objects either by their edges or their center lines. To align several objects, select them, open the Formatting Palette’s Size, Rotation, and Ordering pane, and choose one of the options in the Align button’s pop-up menu. The Left, Center, and Right commands align the objects vertically along their left side, vertical center lines, or right sides. The Top, Middle, and Bottom commands align objects horizontally along their tops, horizontal centerlines, and bottom sides. Figure 8-13 shows the effect. If you turn on the Align to Page option at the bottom of the menu and then choose one of the other menu commands, the selected objects align to the centerline or edges of the page.
Sometimes being spaced out is a good thing. Perhaps you have four objects and you want them evenly spaced across the page. Drag the objects into the approximate arrangement you want, placing the first and last objects in the series precisely. Click one object and then press Shift as you click to select each of the others. When you’ve selected all of them, open the Formatting Palette’s Size, Rotation, and Ordering pane, and choose Distribute Horizontally or Distribute Vertically from the Distribute pop-up menu. Word adjusts the objects, equalizing the space between them. Finish up by using the Align command described earlier to straighten out the line. If you turn on the Aligned to Page option at the bottom of the menu and then choose one of the Distribute commands, Word distributes the selected objects evenly, centered on the page.
If you’re distributing objects horizontally (or left to right), they don’t have to be aligned vertically (or up-and-down), and vice versa. Figure 8-13 shows the situation.
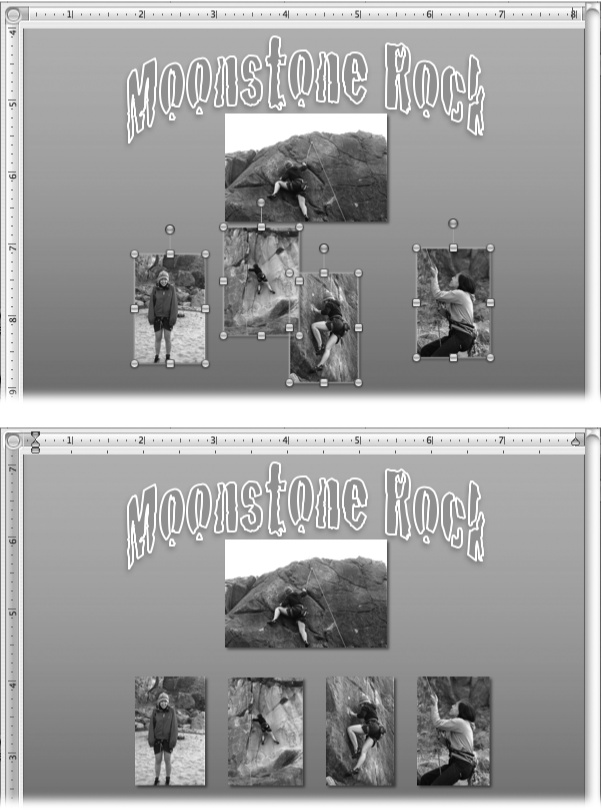
Figure 8-13. You can perfectly align and space a group of objects horizontally or vertically. Insert them into the document in their approximate positions. Place the two end objects where you want the row to begin and end—in this case the left side and the right side. Select all the objects and choose Align Middle from the Align button’s pop-up menu to first get them all in a straight line. Next choose Distribute Horizontally from the Distribute button’s pop-up menu to space them equally between the two end objects.
Word always adds new objects (except lines) to the page so that they’re perfectly aligned with the rectangular margins of your document. If you’ve ever had to lay out a document the old-fashioned way—using paste or wax to hold pictures and columns of text in place—this feature alone is cause for a few hosannas. Yet there are times you prefer a picture, table, or shape to appear on your document at a jaunty angle—instantly imparting an air of excitement, action, or even intentional sloppiness. Or perhaps you’d like to run your newsletter’s headline vertically along the side or put an answer to this week’s anagram upside down at the bottom of the page. All this is possible, but the method you use to accomplish the task differs depending on the type of object involved.
Pictures and clip art arrive on your page ready to rotate—simply drag the green handle that extends from the top of their selection box. Alternatively, double-click the picture or clip art to open the Format Picture window. Click Size in the list and use the Rotation knob, or its up- and down-arrow button, or enter an angle measurement in the box directly. Instead of spinning the Rotate knob with your mouse, you can also just click the knob to move its angle indicator to that position. Unlike a compass where zero degrees occupies the top (North) position, Word puts the zero degrees indicator at the right (East) position to indicate horizontality.
Tip
You’ll find it very difficult to use the Rotation knob precisely with your cursor right on the knob. However, you can twist the knob with one-degree precision if you start rotating with your cursor on the knob, and then move the cursor several inches away from the knob—in effect creating a much larger knob that you can adjust more precisely.
To rotate a shape, select it and then open the Size, Rotation, and Ordering pane of the Formatting Palette. Choose Free Rotate from the Rotate pop-up menu. Word replaces the standard selection handles with four green ones, and changes your arrow cursor into a rotate icon. Use it to grab one of the green handles and drag to rotate the shape. You can also use the Rotate Left or Rotate Right commands in this menu to rotate in 90° increments. The Rotate menu also houses commands to flip the object vertically or horizontally, so you get a mirror image of the original.
Note
Once you add text to a shape, Word sees it as a text box and refuses to rotate it. See Wrapping for the workaround.
When you rotate a shape using the Rotate menu, or a photo or clip art using the rotate handle, you can hold the Shift key to rotate in 15 degree increments.
Word lives up to Microsoft’s reputation of being a rather straight-laced, button down, all-business software company when it comes to rotating text—you can’t. You can run text horizontally or vertically—but that’s it. At least, those are the only clear options Word provides. However, by utilizing a sneaky workaround, you can rotate and even flip text to your heart’s content.
Using the Microsoft method, select a text box and then use the Orientation buttons in the Formatting Palette’s “Alignment and Spacing” pane to twist the text 90° to the left or right, running it vertically up the page or down the page. When you choose one of the vertical text directions, the horizontal text alignment buttons also swivel—becoming, in effect, vertical text alignment buttons—allowing you to align to the top of the text box, the bottom, the center, or to justify. When a text box is vertically oriented, all the rest of the paragraph formatting controls—line spacing, paragraph spacing, indentation, and so on—continue to work in this vertical world.
In order to rotate text other than just 90° to the left or right, you have to think outside the box—the text box, that is. Since Word refuses to rotate text boxes, you have to transform the text box into a picture—which is exactly what happens when you paste a text box insideanother text box.
Start by creating your text box exactly as you want it to appear when it’s rotated.
Do all your font formatting, line spacing, borders, fills, shadows, and so on. However, don’t include any Returns—they don’t make the transition.
When you’re satisfied with the look of your text box, select the box (not just the text, the whole box) and choose Edit→ Copy or press ⌘-C.
When you copy a text box, Word actually copies an image of the box.
Click the Text Box tool in the toolbar or choose Insert → Text Box and draw a new text box considerably larger than the one you just copied.
You need to make this text box—which will become the container for your rotated text box—large enough to hold the other text box after you’ve finished rotating it.
With the insertion point blinking in your new text box, press ⌘-V or choose Edit → Paste.
Word pastes your first text box inside the empty container text box.
Click once on the text to select the inner text box, which is now a picture, and therefore sports the green rotating handle at the top. Drag that handle to rotate the text.
Note
Word has one other type of rotatable text container: WordArt. Creating a bit of WordArt text results in a drawing object that you can flip or rotate like any other drawing object. However, all the WordArt text styles are designed for eye-catching display purposes, not for body text. If you can find a style that’s not too garish, WordArt can work well for headlines, labels, or short captions. See WordArt for the full WordArt story.
When you use objects—whether in-line or fixed—on a page containing text, you have to determine if and how that text is going to flow or wrap around the object. You can choose to have the text run directly over the object—not wrapping at all—or wrap tightly, loosely, just on the top and bottom, or just on one side of the object. The Formatting Palette’s Wrapping pane and the Format → Picture or Object dialog box provide a veritable “wrappers delight” of options for controlling this effect (Figure 8-14).
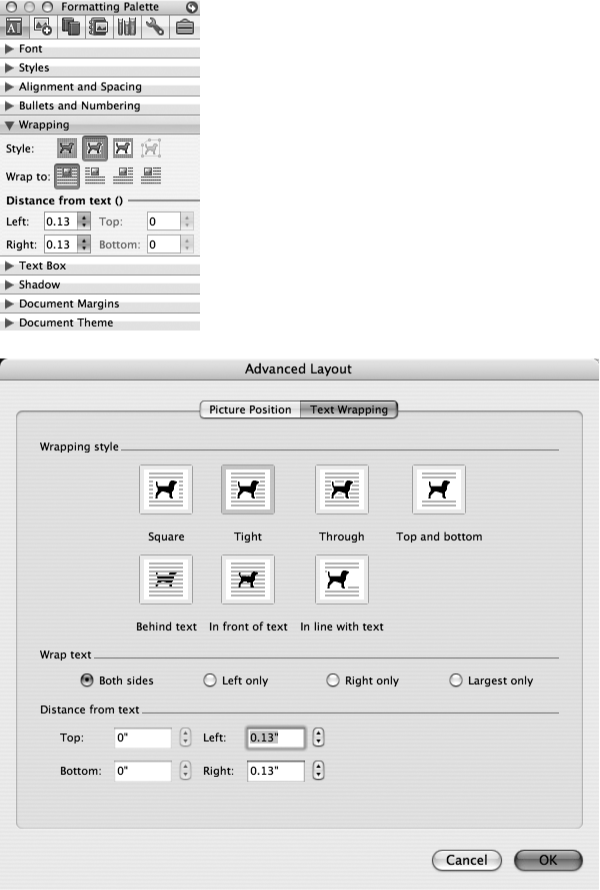
Figure 8-14. Top: The Formatting Palette’s Wrapping pane features buttons to set the wrapping style for selected objects: None, Tight, Square, and Edit Wrap Boundary (which only functions with Tight wrapping; see Figure 8-15). The four “Wrap to” buttons determine how the text flows around the sides of the object, while the “Distance from text” settings let you set the margin between the object and the surrounding text. Bottom: The Format dialog box’s Layout tab has an Advanced button which provides all the same controls—minus the Edit Wrap Boundary button and plus a “Top and bottom” button which keeps the sides of your object text free. The “In line with text” button doesn’t function in the Publishing Layout view, but in the Print Layout view it lets you change a fixed object into an in-line object.
To wrap or not to wrap: that is the question Word asks of every object in your document. Answer it by selecting an object, opening the Formatting Palette’s Wrapping pane, and choosing from among the Style and “Wrap to” buttons. Word handles text wrapping differently on in-line and fixed objects. All the wrapping adjustments in the Formatting Palette apply only to fixed objects. If you click the first of the wrapping style buttons, you turn wrapping off—the picture floats on top of the text, obscuring whatever’s underneath. You might choose to not wrap text around a fixed object when you’re using an image as a background on the page, for example—in which case you’d use the Arrange command (see the following section) to move the picture behind the text. Designers often use this technique with an image whose opacity is set very low, so it appears as the faded out background (see Figure 8-7). By contrast, you can’t turn off text wrapping for an in-line object. The text can’t run over the top of it, since an in-line object acts like a character in the line of text.
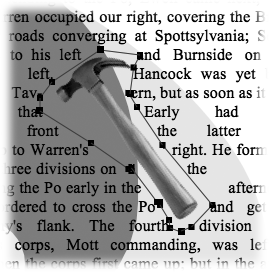
Figure 8-15. Use the Tight wrapping style for irregularly shaped objects with transparent backgrounds. You can further adjust the wrapping boundary for this type of object if you click the Edit Wrap Boundary button and drag the handles of the invisible wrapping boundary.
If you choose to use text wrapping on a fixed object, your next decision is which of the wrapping styles to use. Click the Formatting Palette’s wrapping Style and “Wrap to” buttons in turn to see their effect on the text around or object (see Figure 8-16 for a comparison of wrapping styles).
Note
Word gives you just one wrapping style for in-line objects. The object always sits on the baseline in the line of text, just like any other text character—and stays tied to its neighboring text, as would a text character. If you want to move the object up out of its line of text, just add returns before or after the object.
You can use the “Distance from text” controls in the Wrapping pane to determine how tightly text wraps around an object. Use the up and down arrow buttons or enter a number in the boxes.
After you’ve garnished your document with objects—modified, resized, positioned, and wrapped them—you may still not be finished with object manipulations. Word offers a few more options to control how an object relates to the page and to other objects around it.
Layering objects. Anytime objects overlap one another, or whenever a fixed object appears within a block of text, one object has to be in front of the other. Word manages multiple objects by placing each object, and each text box, on its own invisible layer. In this way, objects are free to overlap one another—even obscure underlying objects completely—without harming the individual objects.
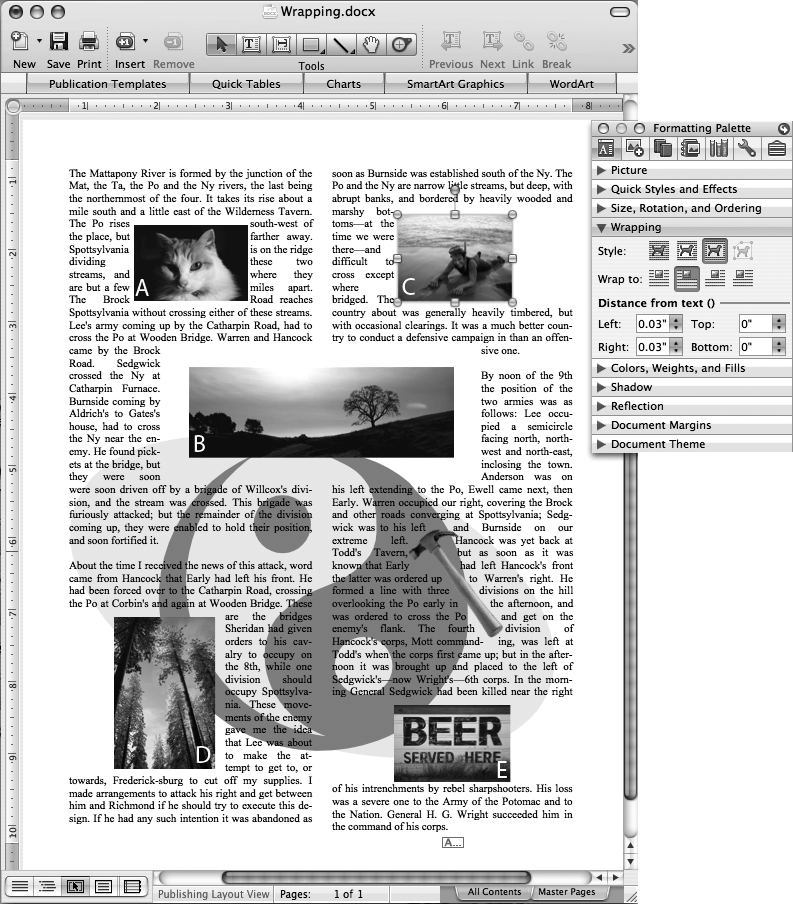
Figure 8-16. You can determine exactly how text wraps around objects—or have your text ignore objects completely and plow right over them—using controls in the Formatting Palette’s Wrapping pane. The low-opacity background image (yin- yang) lies behind the text with wrapping turned off. Two pictures (A, B) use the standard wrapping style, where the text flows around all sides of the object. Use the “Distance from text” settings to wrap the text tightly or loosely. The next two of the “Wrap to” buttons allow you to wrap text around only the left or right side of an object (C). The fourth of those buttons wraps the text to whichever side of the object has more space (D). To keep the column free of text on both sides of the object (E) set the left and right measurements of the “Distance from text” as high as you need to—or use the Advanced Layout tab of the Format Picture dialog box to choose “Top and bottom.”
As you add objects to your document, Word places them on the top layer; the new object covers up any portion of another object it overlaps. Text boxes (which also contain any in-line objects) occupy a layer just like any other object. You can move objects forward or backward through the layers by visiting the toolbar and using the Arrange button’s pop-up menu to choose Bring Forward or Send Backward (see Figure 8-17). Move a selected object all the way to the front or back of the pile by choosing Bring to front or Send to back from the Arrange button’s menu. Better yet, Control-click a selected object (or right-click) and from the pop-up menu choose your preferred layering style. Or, if you’re Formatting Palette–inclined, open the Size, Rotation, and Ordering pane and use the Arrange pop-up menu.
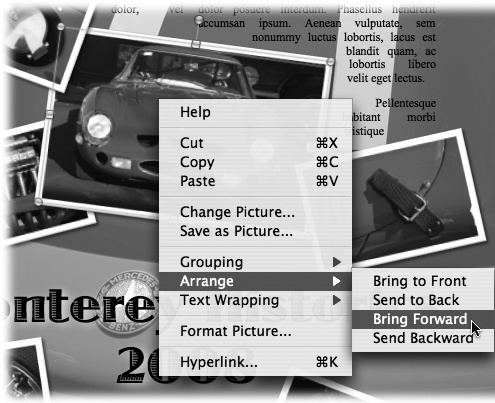
Figure 8-17. Control-click (or right-click) and choose one of the four commands in the Arrange submenu to move an object in front of or behind other objects. Parts of eight layers are visible in this document: a background image, text boxes, and pictures, each on their own layer.
If you add an object to a text box and turn off wrapping (Wrapping), Word places the object on top of the text. However, you can move objects behind the text—to run text over a background image, for example—by selecting it and using the arrange commands. But once you place an object behind the text, it’s difficult to select the object in order to resize or reposition it, since clicking it only selects the text in the layer above it. You can circumvent this problem by temporarily sending the text box to the back, returning your object to the land of the clickable where you can modify it as you wish and then send it to the back once more.
Should you decide to make a global change to the objects on your page, select one object and then press ⌘-A (or choose Edit → Select All). With all the objects selected you can, for example, delete them all, or shift their position using the arrow keys. If you Shift-click several objects of the same type—pictures, or shapes, for example—you can make simultaneous adjustments of their object properties such as transparency, shadows, or reflections.
Grouping objects. After going to the trouble of precisely positioning fixed objects relative to one another, you may find it useful to move, rotate, or copy them as if they were a single object. Word gives you the power to group objects in this way—and later, if you need to adjust them individually, ungroup them.
Hold down the Shift key as you click the objects you want to group, selecting them all (all objects have to be on the same page). Control-click (or right-click) and choose Grouping → Group from the pop-up menu (or use the toolbar’s Group menu). Word replaces the individual selection handles with just one set enclosing the whole group (Figure 8-18).
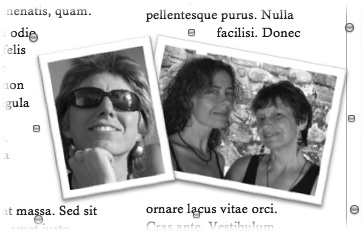
Figure 8-18. When you Control-click (or right-click) two or more selected objects and then choose Grouping → Group from the pop-up menu, Word staples the two together and they become a single object you can manipulate as one. Grouped objects lose their rotation selection handle, but you can still rotate them using the Formatting Palette’s Rotate menu—or ungroup them and manipulate them individually.
Tip
If you group pictures, you’ll notice the green rotate handle disappears. Fear not—you can still rotate by using the Formatting Palette’s Size, Rotation, and Ordering pane’s Rotate menu. However, if you group a text box with a picture you’ll lose that ability since text boxes are fundamentally non-rotatable.
When you group items, even if they’re all pictures, Word turns off the “Lock aspect ratio” option in the Formatting Palette’s Size, Rotation, and Ordering pane. So when resizing, keep grouped pictures in proportion by either turning on that checkbox in the Formatting Palette or just press Shift key while you drag one of the corner handles.
Select an object group and Control-click (or right-click) and choose Grouping → Ungroup to restore the objects’ individuality so you can, for example, resize or delete one of the group members. When you’re ready to tie the group together again, select any one of the group members and use the Regroup command. Word remembers which objects were in that group and binds them together for you. You’ll also find the grouping commands in the Formatting Palette’s Size, Rotation, and Ordering pane’s Grouping menu.
Once you create a group, Word sees it as a single object—meaning that you can add it to another group, and on and on—wheels within wheels.
Word reserves a special foundation layer for Publishing Layout view documents. The Master Page contains objects that appear on every page of your document, or on every page of a section if you’ve broken your document into sections (Inserting and Removing Section Breaks). You’ll find master pages very useful in order to do things like place a watermark, logo, or background image—usually at a very reduced opacity—on every page. Master pages are also the place to insert headers and footers in your Publishing Layout view document.
Click the Master Pages tab in the lower-right corner of the document window. Word hides all the page content that’s not part of the master page and displays a tag in the upper left corner of each page to remind you that you’re working on the master page and show what type of master page you’re looking at.
A Master Pages pane appears in the Formatting Palette with the three checkboxes you can use to determine master page attributes:
Different First Page.Choose this option if your document or section’s first page is a title page or cover page and you’d like it to display different master objects than the rest of your document or section. For example, title pages usually don’t have headers and footers.
Different Odd and Even Pages.Turn on this checkbox if your document will be printed and bound and you want different master objects on the left and right pages.
Same As Previous.If you’ve broken your document up into more than one section, Word makes this option available. Turn it on if you want the master objects from the previous section to continue through the current one. If you also turn on Different First Page, then the first page of the current section matches the first page of the preceding one.
You can add objects and text boxes to master pages just as you would normally. The only difference is that they’ll show up on the first page, or every page, of that section.
To add headers or footers to a Master page, turn on the margin guides (View → Show → Margin Guides) and add text boxes outside of the margins. Choose Format → Document → Margins if you need to adjust the margins to accommodate a taller header or footer.
After making changes to your master pages, click the All Contents tab in the lower-right corner of the document window to return to the normal document view, showing the regular page elements plus the master page elements. When you’re in All Contents view, you can’t select any of the Master page objects. To do so, just click the Master Pages tab again.
Tip
You can easily transfer an object from the normal page to the master page by selecting it and choosing Edit → Copy. Then switch to the Master Pages tab and choose Edit → Paste. Word places the object in the same position on the Master page. The same technique works in reverse to move an object from the master page to a normal page.