
When you first launch Entourage (or when you create a new identity, as described on Multiple Identities), the Entourage Setup Assistant presents itself. The Setup Assistant presents a long series of question-and-answer screens that give you the opportunity to set up your email accounts, import your address book information from whatever mail program you used to use, and so on.
Any email program requires a number of technical details that define your particular email account. If you have another email program that’s been working fine, you may be able to import all the details from the older program, along with your collection of saved mail and addresses. It’s easier to import from some programs than others. If you’re bringing in mail from Apple Mail or Eudora (version 5.0 or later) it’s a cinch—just follow the instructions in the Entourage Setup Assistant. If you’re importing from other email programs, see the box on Setting Up Entourage.
If you’ve never used your Mac for email before, however, or if you’re using a Mac that doesn’t have a functioning email program, you’ll need to type these email settings into Entourage directly. Unless you’re quite a technical person, your sole source of this information is your Internet Service Provider’s help line (or instruction sheet). You need the account information your ISP gave you in order to receive or send email, so have this info on hand as you set about getting Entourage ready.
Then let the Setup Assistant take you by the hand like this:
Import your calendar, address book information, and email from your older programs, if you like.
As part of Entourage’s campaign to serve as the only communication and organization program you’ll ever need, the Setup Assistant now offers to import email and address book information from another email program, calendar program, or address book program that you used to use before the great day of Entourage’s arrival.
This feature saves you astronomical amounts of time. Since all of your familiar data is instantly available, you can get comfortable with Entourage—your new email/calendar/address book program—in record time.
The assistant gives you three choices: to import nothing at all; to import information from an earlier version of Entourage; or to import from another program.
If you choose to import from another program, the Setup Assistant presents you with a short list of email programs from which it can import information: Apple Mail or Qualcomm Eudora (5.0 or later). You can also tell Entourage that your email program isn’t listed, at which point it explains that Entourage can import mail messages in the MBOX format; or contacts from a comma- or tab-delimited text file.
Finally, you’ll choose from a list of individual items to import: your mail messages, addresses, account information, filters, signatures, calendar items, tasks, notes, and so on. Your choices vary depending on the program you’re importing from. Once you’ve selected the items to import, click the right arrow to start the process, which can take a long time depending on the volume of your saved messages. (Better grab a snack.)
When the importing is complete, click Finish. If you didn’t previously indicate that you wanted Entourage to be your default email program, the Setup Assistant will ask you again. Tell this eager-beaver software Yes or No.
Once you’ve successfully imported your email account’s settings, you’re ready to start using Entourage. Skip to the next section.
If you didn’t import settings from an existing email program, however, or if the importing didn’t go smoothly, you may now have to type in the email settings for your account.
Tell Entourage your email address.
Type your email address in the box provided. Click the right arrow to continue.
Note
If you’re part of a large organization, your email account may run on Exchange server, a centralized system that keeps track of email, calendars, and contact information on a centralized server. That way, you can access it from any computer and share calendars and other information with your coworkers. Turn on the checkbox for “My account is on an Exchange server” if this applies to you, and ask your network administrator for the Exchange server settings you’ll need to complete the Setup Assistant.
If your email account is on a popular system that Entourage has in its memory banks—like EarthLink, Hotmail, or Gmail—it automatically fills in the mail server settings for you and displays a window saying “Automatic Configuration Succeeded.” It also reports that you can verify these settings in the next window by clicking the right arrow.
If Entourage is not familiar with your email provider, the Assistant’s window says “Automatic Configuration Failed” and alerts you that you’ll have to manually fill in the rest of the account settings after you click the right arrow to continue.
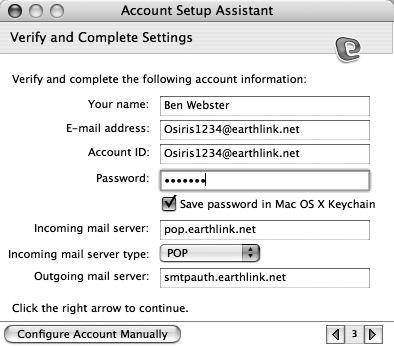
The Set up Assistant displays its “Verify and Complete Settings” window (Figure 10-4). If Entourage recognized your email account in the last window, your job is just to check its work and type your password in the appropriate field. Otherwise, continue with the following steps to enter your account information.
Note
For years AOL existed in its own private universe, forcing you to use only AOL software to access its email. But in recent years AOL realized that if it was going to continue to compete in cyberspace, it would have to open its email portals. Now you can set up AOL for either POP or IMAP.
Figure 10-4. If you don’t import your settings from another email program or an earlier Entourage, the Entourage Setup Assistant walks you through the process of entering the pertinent information. If, for security reasons, you’d rather enter your password every time you check for email, then turn off the option to save your password in the Mac OS X Keychain.
Type the name you want to use to sign your email and newsgroup messages.
The “Your name” text box probably already contains the name that you entered in Word as your user name, but you can put any name you like here—Buddha Boy, if you like. (Again, though, read up on etiquette on Step 7: Send your email on its way.)
Enter your email account ID and password.
In this step, you’ll need to enter your email account ID and the password for your account. Your account ID is usually the portion of your email address that comes before the @ symbol, although some email systems require your complete email address in this box.
Entourage is willing to store your password in the Mac OS X Keychain (a handy Mac OS X feature that memorizes all of your email and file-sharing passwords for you). Turn off the “Save password in my Mac OS X keychain” box only if you want to have to type your password every time Entourage checks your email—which gets old very quickly but may be comforting if shady characters have access to your computer.
Tell Entourage what kind of incoming mail server you’ll be using, and type in your incoming and outgoing mail server addresses.
As noted above, you need to consult the account information your ISP gave you when you signed up (or ask your network administrator, if you’re on a corporate network) to figure out what settings to use. The choice here in the pop-up menu for the incoming mail server type is between POP and IMAP.
Not shown in this Setup Assistant window are the advanced server options for alternative ports, security, and authentication. If your ISP requires them, you’ll have to enter those manually after you complete the Setup Assistant (see Configuring Your Account Manually). Click the right arrow button to continue.
Click Verify My Settings.
Assuming you’re connected to the Internet, Entourage tests the server settings you’ve just entered and shows what it finds out in the Results box. Click the left arrow if you need to go back and change any of your settings. Otherwise, click the right arrow to continue.
Name your account.
Entourage needs a name for your brand-new account, such as Earthlink Account or Comcast Account. Turn on the top checkbox to enter this email address in your “Me” contact card in the Entourage Address Book.
A word about the other checkbox here: The Entourage toolbar has a button called Send/Receive. If you have more than one email account, clicking this single button can check all your email accounts. Turn off the “Include this account in my Send & Receive All schedule” option on this screen if you don’t want this account to be checked automatically. Additionally, you can configure Entourage to Send & Receive All on a schedule—every five minutes for example. This checkbox also determines whether the account is included in those scheduled connections.
Click Finish to wrap things up.
Entourage now has all the basic information it needs to start work. Its final question is whether you’d like to make Entourage your default email program. If you click the Make Default button, Entourage opens whenever, for example, you click an email link on a Web page or in a program’s online help.
Note
If you decide later that you’d prefer to use a different email program, you have to open Apple’s own Mail program, choose Mail → Preferences, and then select your default mail reader. Not surprisingly, Apple runs the show—so you have to use this procedure even if you don’t want to use Mail.
The Account Setup Assistant just described is a relatively painless procedure for setting up your main email account. But if you have additional accounts to set up, you can return to the Setup Assistant like this:
With Entourage open, choose Tools → Accounts.
This brings up the Accounts window, the central point for dealing with email, newsgroups, and directory services accounts in Entourage.
With the Mail tab selected, click the New button.
Entourage’s Account Setup Assistant reappears. Continue with step 6 of the previous instructions.
Note
If you have more than one email account set up in Entourage, one of these accounts is the default account. The default account is the one that’s automatically used to send and receive mail, unless you specify otherwise. To specify the default account, choose Tools → Accounts and click the Mail tab in the resulting window. The current default account is shown in bold. Select the account that you want to make the default, click Make Default, and close the window.
If you’ve got all the necessary settings for a new account on a slip of paper in front of you, then the screen-by-screen assistant may seem unnecessarily slow; or you may need to add some advanced mail-server options that the Account Setup Assistant didn’t offer. Here’s how to create a new email account without any setup assistant help.
Choose Tools → Accounts to open the Accounts window. Then, with the Mail tab selected, click New. When the Account Setup Assistant appears, click Configure Account Manually. Entourage now asks what kind of account you want to set up: POP, IMAP, Exchange, or Windows Live Hotmail. Choose the account flavor you want from the pop-up menu, and click OK (or click Set up Assistant if you wish to go back to Entourage’s step-by-step hand-holding). The Edit Account dialog box opens displaying three or more tabs (depending on the account type you’ve chosen) where you can enter all of your relevant information (see Figure 10-5).
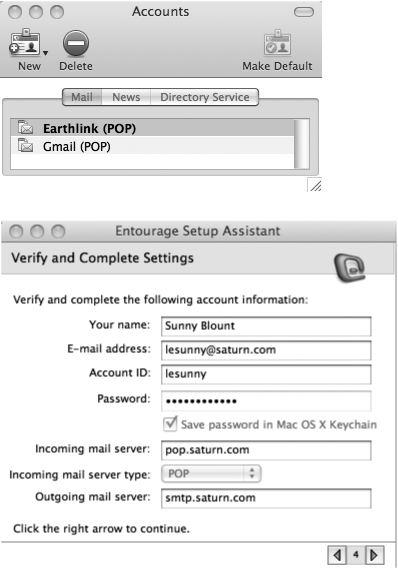
Figure 10-5. Top: Choose Tools → Accounts to summon the Accounts dialog box. Use the toolbar buttons to create or delete an account, or double-click an account to edit its settings. Bottom: The Account Settings tab of the Edit Account window has the same basic information as the Account Setup Assistant, but in a much more compact form.
Note
Setting up an account manually has another payoff: It gives you advanced control over how Entourage sends and receives mail. These are options most people can and should ignore (unless your ISP requires them).
Under the Account Settings tab (see Figure 10-5, bottom), click “Click here for advanced receiving options.” You get a window where you can specify a secure connection, choose a different port for your POP or IMAP connections, or force Entourage to use a secure password.
If you click the Options tab (Figure 10-6, top), you can specify the default signature for this account (Step 5: Adding a signature), additional headers you want added (for geeks only), and whether you want to limit message sizes (Offline access).
If you have an IMAP account, you’re also given some additional options, which are described on Send and Receive All.
Warning
Other than the name you give your account, there’s absolutely no room for creativity in any of the account settings. Misplaced punctuation, an erroneously capitalized password, or an invisible space at the beginning of your account ID or mail server address will put the kibosh on your email account. If you’re troubleshooting email problems, it’s often helpful to select the entire contents of the field and re-enter it—removing any invisible spaces in the process.