
Chapter 12. Maven Assemblies
Introduction
Maven provides plugins that are used to create the most common archive types, most of which are consumable as dependencies of other projects. Some examples include the JAR, WAR, EJB, and EAR plugins. As discussed in Chapter 10, these plugins correspond to different project packaging types, each with slightly different build processes. Although Maven has plugins and customized lifecycles to support standard packaging types, there are times when you’ll need to create an archive or directory with a custom layout. Such custom archives are called Maven Assemblies.
There are any number of reasons why you may want to build custom archives for your project. Perhaps the most common is the project distribution. The word “distribution” means many different things to different people (and projects), depending on how the project is meant to be used. Essentially, these are archives that provide a convenient way for users to install or otherwise make use of the project’s releases. In some cases, this may mean bundling a web application with an application server like Jetty. In others, it could mean bundling API documentation alongside source and compiled binaries like JAR files. Assemblies usually come in handy when you are building the final distribution of a product. For example, products such as Nexus (introduced in Chapter 16) are the result of large, multimodule Maven projects, and the final archive you download from Sonatype was created using a Maven Assembly.
In most cases, the Assembly plugin is ideally suited to the process of building project distributions. However, assemblies don’t have to be distribution archives; assemblies are intended to provide Maven users with the flexibility they need to produce customized archives of all kinds. Essentially, assemblies are intended to fill the gaps between the standard archive formats provided by project package types. Of course, you could write an entire Maven plugin simply to generate your own custom archive format, along with a new lifecycle-mapping and artifact-handling configuration to tell Maven how to deploy it. But the Assembly plugin makes this unnecessary in most cases by providing generalized support for creating your own archive recipe, so you don’t have to spend so much time writing Maven code.
Assembly Basics
Before we go any further, it’s best to take a minute and talk
about the two main goals in the Assembly plugin:
assembly:assembly and the single
mojo. We list these two goals in different ways to
reflect the difference in how they’re used. The assembly:assembly goal is designed to
be invoked directly from the command line and should never be bound to
a build lifecycle phase. In contrast, the single
mojo is designed to be a part of your everyday build and should be
bound to a phase in your project’s build lifecycle.
The main reason for this difference is that the
assembly:assembly goal is what Maven terms an
aggregator mojo—that is, a mojo
that is designed to run at most once in a build, regardless of how
many projects are being built. It draws its configuration from the
root project, usually the top-level POM or the
command line. When bound to a lifecycle, an aggregator mojo can have some nasty side
effects. It can force the execution of the package
lifecycle phase to execute ahead of time, and it can result in builds
that end up executing the package phase
twice.
Because the assembly:assembly goal is an
aggregator mojo, it raises some
issues in multimodule Maven
builds, and it should be called only as a standalone mojo from the
command line. Never bind an assembly:assembly execution to a
lifecycle phase. assembly:assembly was the original goal
in the Assembly plugin and was never designed to be part of the
standard build process for a project. As it became clear that assembly
archives were a legitimate requirement for projects to produce, the
single mojo was developed. The single mojo assumes
that it has been bound to the correct part of the build process so
that it will have access to the project files and artifacts it needs
to execute within the lifecycle of a large multimodule Maven project.
In a multimodule environment, it will execute as many times as it is
bound to the different module POMs. Unlike
assembly:assembly, single will
never force the execution of another lifecycle phase ahead of
itself.
The Assembly plugin provides several other goals in addition to
these two. However, discussion of these other Mojos is beyond the
scope of this chapter, because they serve exotic or obsolete use
cases, and because they are almost never needed. Whenever possible,
you should definitely stick to using
assembly:assembly for assemblies generated from the
command line, and to single for assemblies bound to
lifecycle phases.
Predefined Assembly Descriptors
Although many people opt to create their own archive recipes—called assembly descriptors—this isn’t strictly necessary. The Assembly plugin provides built-in descriptors for several common archive types that you can use immediately without writing a line of configuration. The following assembly descriptors are predefined in the Maven Assembly plugin:
binThe
bindescriptor is used to bundle project LICENSE, README, and NOTICE files with the project’s main artifact, assuming this project builds a JAR as its main artifact. Think of this as the smallest possible binary distribution for completely self-contained projects.jar-with-dependenciesThe
jar-with-dependenciesdescriptor builds a JAR archive with the contents of the main project JAR, along with the unpacked contents of all the project’s runtime dependencies. Coupled with an appropriateMain-ClassManifest entry (discussed in “Plugin Configuration” later in this chapter), this descriptor can produce a self-contained, executable JAR for your project, even if the project has dependencies.projectThe
projectdescriptor simply archives the project directory structure as it exists in your file system and, most likely, in your version control system. Of course, the target directory is omitted, as are any version-control metadata files such as the CVS/ and .svn/ directories we’re all used to seeing. Basically, the point of this descriptor is to create a project archive that, when unpacked, can be built using Maven.srcThe
srcdescriptor produces an archive of your project source and pom.xml files, along with any LICENSE, README, and NOTICE files that are in the project’s root directory. This precursor to the project descriptor produces an archive that can be built by Maven in most cases. However, because of its assumption that all source files and resources reside in the standard src/ directory, it has the potential to leave out nonstandard directories and files that are nonetheless critical to some builds.
Building an Assembly
The Assembly plugin can be executed in one of two ways: you can invoke it directly from the command line, or you can configure it as part of your standard build process by binding it to a phase of your project’s build lifecycle. Direct invocation has its uses, particularly for one-off assemblies that are not considered part of your project’s core deliverables. In most cases, you’ll probably want to generate the assemblies for your project as part of its standard build process. Doing this has the effect of including your custom assemblies whenever the project is installed or deployed into Maven’s repositories, so they are always available to your users.
As an example of the direct invocation of the Assembly plugin,
suppose that you want to ship off a copy of your project that people
can build from source. Instead of just deploying the end product of
the build, you’ll want to include the source as well. You won’t need
to do this often, so it doesn’t make sense to add the configuration
to your POM. Instead, you can use the following
command:
$ mvn -DdescriptorId=project assembly:single
...
[INFO] [assembly:single]
[INFO] Building tar : /Users/~/mvn-examples-1.0/assemblies/direct-invocation/
                      target/direct-invocation-1.0-SNAPSHOT-project.tar.gz
[INFO] Building tar : /Users/~/mvn-examples-1.0/assemblies/direct-invocation/
                      target/direct-invocation-1.0-SNAPSHOT-project.tar.bz2
[INFO] Building zip: /Users/~/mvn-examples-1.0/assemblies/direct-invocation/
                      target/direct-invocation-1.0-SNAPSHOT-project.zip
...
Suppose you want to produce an executable JAR from your project. If your project is totally self-contained with no dependencies, you can achieve this with the main project artifact using the archive configuration of the JAR plugin. However, most projects have dependencies, and those dependencies must be incorporated in any executable JAR. In that case, you want to make sure that every time the main project JAR is installed or deployed, your executable JAR goes along with it.
Assuming the main class for the project is
org.sonatype.mavenbook.App, the
POM configuration shown in Example 12-1 will create an executable
JAR.
<project xmlns="http://maven.apache.org/POM/4.0.0"
  xmlns:xsi="http://www.w3.org/2001/XMLSchema-instance"
  xsi:schemaLocation="http://maven.apache.org/POM/4.0.0
       http://maven.apache.org/maven-v4_0_0.xsd">

  <modelVersion>4.0.0</modelVersion>
  <groupId>org.sonatype.mavenbook.assemblies</groupId>
  <artifactId>executable-jar</artifactId>
  <version>1.0-SNAPSHOT</version>
  <packaging>jar</packaging>
  <name>Assemblies Executable Jar Example</name>
  <url>http://sonatype.com/book</url>
  <dependencies>
    <dependency>
      <groupId>commons-lang</groupId>
      <artifactId>commons-lang</artifactId>
      <version>2.4</version>
    </dependency>
  </dependencies>
 <build>
    <plugins>
      <plugin>
        <artifactId>maven-assembly-plugin</artifactId>
        <version>2.2-beta-2</version>
        <executions>
          <execution>
            <id>create-executable-jar</id>
            <phase>package</phase>
            <goals>
              <goal>single</goal>
            </goals>
            <configuration>
              <descriptorRefs>
                <descriptorRef>
                  jar-with-dependencies
                </descriptorRef>
              </descriptorRefs>
              <archive>
                <manifest>
                  <mainClass>org.sonatype.mavenbook.App</mainClass>
                </manifest>
              </archive>
           </configuration>
          </execution>
        </executions>
      </plugin>
    </plugins>
  </build>
</project>
You should notice two things about the configuration just
shown. First, we’re using the descriptorRefs
configuration section instead of the descriptorId
parameter we used previously. This allows multiple assembly types to
be built from the same Assembly plugin execution, while still
supporting our use case with relatively little extra configuration.
Second, the archive element under
configuration sets the
Main-Class manifest attribute in the generated
JAR. This section is commonly available in
plugins that create JAR files, such as the
JAR plugin used for the default project package
type.
Now you can produce the executable JAR simply by executing mvn package. Afterward, we’ll also get a directory listing for the target directory, just to verify that the executable JAR was generated. Finally, just to prove that we actually do have an executable JAR, we’ll try executing it:
$ mvn package
... (output omitted) ...
[INFO] [jar:jar]
[INFO] Building jar: /Users/~/mvn-examples-1.0/assemblies/executable-jar/target/
                     executable-jar-1.0-SNAPSHOT.jar
[INFO] [assembly:single {execution: create-executable-jar}]
[INFO] Processing DependencySet (output=)
[INFO] Building jar: /Users/~/mvn-examples-1.0/assemblies/executable-jar/target/
                     executable-jar-1.0-SNAPSHOT-jar-with-dependencies.jar
... (output omitted) ...
$ ls -1 target
... (output omitted) ...
executable-jar-1.0-SNAPSHOT-jar-with-dependencies.jar
executable-jar-1.0-SNAPSHOT.jar
... (output omitted) ...
$ java -jar
        target/executable-jar-1.0-SNAPSHOT-jar-with-dependencies.jar
Hello, World!
From this output, you can see that the normal project build
now produces a new artifact in addition
to the main JAR file. The new one has a
classifier of jar-with-dependencies. Finally, we
verified that the new JAR actually is executable,
and that executing the JAR produced the desired
output of “Hello, World!”
Assemblies as Dependencies
When you generate assemblies as part of your normal build
process, those assembly archives will be attached to your main
project’s artifact. This means they will be installed and deployed
alongside the main artifact, and are then resolvable in much the
same way. Each assembly artifact is given the same basic coordinate
(groupId, artifactId, and
version) as the main project. However, these
artifacts are attachments, which in Maven means they are derivative
works based on some aspect of the main project build. To provide a
couple of examples, source assemblies contain the
raw inputs for the project build, and
jar-with-dependencies assemblies contain the
project’s classes plus its dependencies. Attached artifacts are
allowed to circumvent the Maven requirement of “one project, one
artifact” precisely because of this derivative quality.
Since assemblies are (normally) attached artifacts, each must
have a classifier to distinguish it from the main artifact, in
addition to the normal artifact coordinate. By default, the
classifier is the same as the assembly descriptor’s identifier. When
using the built-in assembly descriptors, as shown earlier, the
assembly descriptor’s identifier is generally also the same as the
identifier used in the descriptorRef for that
type of assembly.
Once you’ve deployed an assembly alongside your main project
artifact, how can you use that assembly as a dependency in another
project? The answer is fairly straightforward. Recall the
discussions in the earlier sections Maven Coordinates” in Chapter 3 and More on Coordinates” in Chapter 9 about project dependencies in Maven.
Projects depend on other projects using a combination of four basic
elements, referred to as a project’s coordinates:
groupId, artifactId,
version, and packaging. In
Platform Classifiers” in Chapter 11, we explained that multiple platform-specific
variants of a project’s artifact are available, and the project
specifies a classifier
element with a value of either win or
linux to select the appropriate dependency
artifact for the target platform. Assembly artifacts can be used as
dependencies using the required coordinates of a project plus the
classifier under which the assembly was installed or deployed. If
the assembly is not a JAR archive, we also need to declare its
type.
Assembling Assemblies via Assembly Dependencies
How’s that for a confusing section title? Let’s try to set up
a scenario that explains the idea of assembling
assemblies. Imagine you want to create an archive that itself
contains some project assemblies. Assume you have a multimodule
build, and you want to deploy an assembly that contains a set of
related project assemblies. In this section’s example, we will
create a bundle of “buildable” project directories for a set of
projects that are commonly used together. For simplicity, we’ll
reuse the two built-in assembly descriptors discussed
earlier—project and
jar-with-dependencies. In this particular
example, it is assumed that each project creates the
project assembly in addition to its main
JAR artifact. Assume that every project in a
multimodule build binds the
single goal to the package
phase and uses the project
descriptorRef. Every project in a multimodule
will inherit the configuration from a top-level pom.xml, whose
pluginManagement element is shown in Example 12-2.
<project>
  ...
  <build>
    <pluginManagement>
      <plugins>
        <plugin>
          <artifactId>maven-assembly-plugin</artifactId>
          <version>2.2-beta-2</version>
          <executions>
            <execution>
              <id>create-project-bundle</id>
              <phase>package</phase>
              <goals>
                <goal>single</goal>
              </goals>
              <configuration>
                <descriptorRefs>
                  <descriptorRef>project</descriptorRef>
                </descriptorRefs>
              </configuration>
            </execution>
          </executions>
        </plugin>
      </plugins>
    </pluginManagement>
  </build>
  ...
</project>
Each project POM references the managed plugin configuration from Example 12-2 using a minimal plugin declaration in its build section, as shown in Example 12-3.
<build>
  <plugins>
    <plugin>
      <artifactId>maven-assembly-plugin</artifactId>
    </plugin>
  </plugins>
</build>
To produce the set of project assemblies, run mvn install from the top-level directory. You should see Maven installing artifacts with classifiers in your local repository:
$ mvn install
...
[INFO] Installing ~/mvn-examples-1.0/assemblies/as-dependencies/project-parent/
       second-project/target/second-project-1.0-SNAPSHOT-project.tar.gz to
   ~/.m2/repository/org/sonatype/mavenbook/assemblies/second-project/1.0-SNAPSHOT/
       second-project-1.0-SNAPSHOT-project.tar.gz
...
[INFO] Installing ~/mvn-examples-1.0/assemblies/as-dependencies/project-parent/
       second-project/target/second-project-1.0-SNAPSHOT-project.tar.bz2 to
   ~/.m2/repository/org/sonatype/mavenbook/assemblies/second-project/1.0-SNAPSHOT/
       second-project-1.0-SNAPSHOT-project.tar.bz2
...
[INFO] Installing ~/mvn-examples-1.0/assemblies/as-dependencies/project-parent/
       second-project/target/second-project-1.0-SNAPSHOT-project.zip to
   ~/.m2/repository/org/sonatype/mavenbook/assemblies/second-project/1.0-SNAPSHOT/\
       second-project-1.0-SNAPSHOT-project.zip
...
When you run install, Maven
will copy each project’s main artifact and each assembly to your
local Maven repository. All of these artifacts are now available for
reference as dependencies in other projects locally. If your
ultimate goal is to create a bundle that includes assemblies from
multiple projects, you can do so by creating another project that
will include other project’s assemblies as dependencies. This bundling project (aptly named project-bundle) is responsible for
creating the bundled assembly. The POM for the
bundling project would resemble the XML document shown in Example 12-4.
<project xmlns="http://maven.apache.org/POM/4.0.0"
  xmlns:xsi="http://www.w3.org/2001/XMLSchema-instance"
  xsi:schemaLocation="http://maven.apache.org/POM/4.0.0
       http://maven.apache.org/maven-v4_0_0.xsd">
  <modelVersion>4.0.0</modelVersion>
  <groupId>org.sonatype.mavenbook.assemblies</groupId>
  <artifactId>project-bundle</artifactId>
  <version>1.0-SNAPSHOT</version>
  <packaging>pom</packaging>
  <name>Assemblies-as-Dependencies Example Project Bundle</name>
  <url>http://sonatype.com/book</url>
  <dependencies>
    <dependency>
      <groupId>org.sonatype.mavenbook.assemblies</groupId>
      <artifactId>first-project</artifactId>
      <version>1.0-SNAPSHOT</version>
      <classifier>project</classifier>
      <type>zip</type>
    </dependency>
    <dependency>
      <groupId>org.sonatype.mavenbook.assemblies</groupId>
      <artifactId>second-project</artifactId>
      <version>1.0-SNAPSHOT</version>
      <classifier>project</classifier>
      <type>zip</type>
    </dependency>
  </dependencies>
  <build>
    <plugins>
      <plugin>
        <artifactId>maven-assembly-plugin</artifactId>
        <version>2.2-beta-2</version>
        <executions>
          <execution>
            <id>bundle-project-sources</id>
            <phase>package</phase>
            <goals>
              <goal>single</goal>
            </goals>
            <configuration>
              <descriptorRefs>
                <descriptorRef>
                  jar-with-dependencies
                </descriptorRef>
              </descriptorRefs>
            </configuration>
          </execution>
        </executions>
      </plugin>
    </plugins>
  </build>
</project>
This bundling project’s POM references the
two assemblies from first-project and
second-project. Instead of referencing the main
artifact of each project, the bundling project’s
POM specifies a classifier of
project and a type of zip.
This tells Maven to resolve the ZIP archive that
was created by the project assembly. Note that
the bundling project generates a
jar-with-dependencies assembly.
jar-with-dependencies does not create a
particularly elegant bundle; it simply creates a
JAR file with the unpacked contents of all of the
dependencies. jar-with-dependencies is really
just telling Maven to take all of the dependencies, unpack them, and
then create a single archive that includes the output of the current
project. In this project, it has the effect of creating a single
JAR file that puts the two project assemblies
from first-project and
second-project side by side.
This example illustrates how the basic capabilities of the
Maven Assembly plugin can be combined without the need for a custom
assembly descriptor. It achieves the purpose of creating a single
archive that contains the project directories for multiple projects
side by side. This time, the
jar-with-dependencies is just a storage format,
so we don’t need to specify a Main-Class manifest
attribute. To build the bundle, we just build the
project-bundle project normally:
$ mvn package
...
[INFO] [assembly:single {execution: bundle-project-sources}]
[INFO] Processing DependencySet (output=)
[INFO] Building jar: ~/downloads/mvn-examples-1.0/assemblies/as-dependencies/
    project-bundle/target/project-bundle-1.0-SNAPSHOT-jar-with-dependencies.jar
To verify that the project-bundle assembly contains the
unpacked contents of the assembly dependencies, run jar tf:
$ java tf
  target/project-bundle-1.0-SNAPSHOT-jar-with-dependencies.jar
...
first-project-1.0-SNAPSHOT/pom.xml
first-project-1.0-SNAPSHOT/src/main/java/org/sonatype/mavenbook/App.java
first-project-1.0-SNAPSHOT/src/test/java/org/sonatype/mavenbook/AppTest.java
...
second-project-1.0-SNAPSHOT/pom.xml
second-project-1.0-SNAPSHOT/src/main/java/org/sonatype/mavenbook/App.java
second-project-1.0-SNAPSHOT/src/test/java/org/sonatype/mavenbook/AppTest.java
After reading this section, the title “Assembling Assemblies via Assembly Dependencies” should make more sense. You’ve assembled assemblies from two projects into an assembly using a bundling project that has a dependency on each of the assemblies.
Overview of the Assembly Descriptor
When the standard assembly descriptors introduced earlier in the section Assembly Basics” are not adequate, you will need to define your own assembly descriptor. The assembly descriptor is an XML document that defines the structure and contents of an assembly. See Figure 12-1.
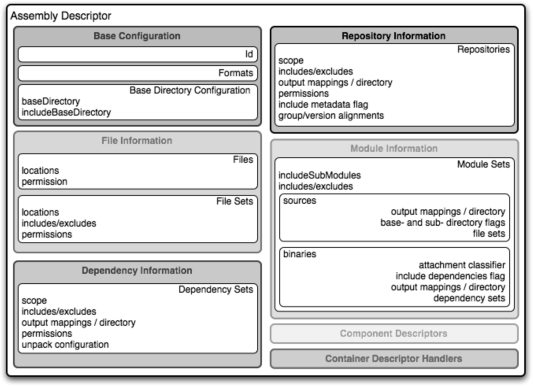
The assembly descriptor contains five main configuration sections, plus two additional sections: one for specifying standard assembly-descriptor fragments, called component descriptors, and another for specifying custom file processor classes to help manage the assembly-production process. These five sections are:
- Base configuration
This section contains the information required by all assemblies, plus some additional configuration options related to the format of the entire archive, such as the base path to use for all archive entries. For the assembly descriptor to be valid, you must at least specify the assembly ID, at least one format, and at least one of the other sections shown in this list.
- File information
The configurations in this segment of the assembly descriptor apply to specific files on the file system within the project’s directory structure. This segment contains two main sections:
filesandfileSets. You usefilesandfileSetsto control the permissions of files in an assembly and to include or exclude files from an assembly.- Dependency information
Almost all projects of any size depend on other projects. When creating distribution archives, project dependencies are usually included in the end product of an assembly. This section manages the way dependencies are included in the resulting archive, and allows you to specify whether dependencies are unpacked, added directly to the lib/ directory, or mapped to new file names. This section also allows you to control the permissions of dependencies in the assembly as well as which dependencies are included in an assembly.
- Repository information
At times, it’s useful to isolate the sum total of all artifacts necessary to build a project, whether they’re dependency artifacts, POMs of dependency artifacts, or even a project’s own POM ancestry (your parent POM, its parent, and so on). This section allows you to include one or more artifact-repository directory structures inside your assembly, with various configuration options. The Assembly plugin does not have the ability to include plugin artifacts in these repositories yet.
- Module information
This section of the assembly descriptor allows you to take advantage of these parent-child relationships when assembling your custom archive, and to include source files, artifacts, and dependencies from your project’s modules. This is the most complex section of the assembly descriptor, because it allows you to work with modules and submodules in two ways: as a series of
fileSets(via thesourcessection) or as a series ofdependencySets(via thebinariessection).
The Assembly Descriptor
This section is a tour of the assembly descriptor, which contains some guidelines for developing a custom assembly descriptor. The Assembly plugin is one of the largest plugins in the Maven ensemble, and one of the most flexible.
Property References in Assembly Descriptors
Any property discussed in the section Maven Properties” in Chapter 13 can be referenced in an assembly descriptor. Before any assembly descriptor is used by Maven, it is interpolated using information from the POM and the current build environment. All properties supported for interpolation within the POM itself are valid for use in assembly descriptors, including POM properties, POM element values, system properties, user-defined properties, and operating-system environment variables.
The only exceptions to this interpolation step are elements in
various sections of the descriptor
named outputDirectory,
outputDirectoryMapping, or outputFileNameMapping. The reason
these are held back in their raw form is to allow artifact- or
module-specific information to be applied when resolving expressions
in these values, on a per-item basis.
Required Assembly Information
Two essential pieces of information are required for every
assembly: the id and the list of
archive formats to produce. In practice, at least one other section
of the descriptor is required, since most archive format components
will choke if they don’t have at least one file to include. But
without at least one format and an
id, there is no archive to create. The
id is used both in the archive’s file name, and
as part of the archive’s artifact classifier in the Maven
repository. The format string also controls the archiver-component instance that will create
the final assembly archive. All assembly descriptors must contain an
id and at least one format.
See Example 12-5.
<assembly>
  <id>bundle</id>
  <formats>
    <format>zip</format>
  </formats>
  ...
</assembly>
The assembly id can be any string that does
not contain spaces. The standard practice is to use dashes when you
must separate words within the assembly id. If
you were creating an assembly to create an interesting unique
package structure, you would give your assembly an
id of something like
interesting-unique-package. The Maven Assembly
plugin also supports multiple formats within a single
assembly descriptor, allowing
you to create the familiar .zip, .tar.gz, and .tar.bz2 distribution archive set with
ease. If you don’t find the archive format you need, you can also
create a custom format. Custom formats are discussed in the section
componentDescriptors and containerDescriptorHandlers,” later in this
chapter. The Assembly plugin supports several archive formats natively,
including:
jarziptarbzip2gziptar.gztar.bz2rarwarearsardir
The id and format are
essential because they will become a part of the coordinates for the
assembled archive. The example from Example 12-5 will create an assembly artifact
of type zip with a classifier of
bundle.
Controlling the Contents of an Assembly
In theory, id and format
are the only absolute requirements for a valid assembly
descriptor; however, many assembly archivers will fail if they do not
have at least one file to include in the output archive. The task of
defining the files to be included in the assembly is handled by the
five main sections of the assembly descriptor:
files, fileSets,
dependencySets, repositories,
and moduleSets. To explore these sections most
effectively, we’ll start by discussing the most elemental section:
files. Then, we’ll move onto the two most commonly
used sections, fileSets and
dependencySets. Once you understand the workings of
fileSets and dependencySets,
it’s easier to understand repositories and
moduleSets.
Files Section
The files section is the simplest part of
the assembly descriptor. It is designed for files that
have a definite location relative to your project’s directory. Using
this section, you have absolute control over the exact set of files
that are included in your assembly, exactly what they are named, and
where they will reside in the archive. See Example 12-6.
<assembly>
  ...
  <files>
    <file>
      <source>target/my-app-1.0.jar</source>
      <outputDirectory>lib</outputDirectory>
      <destName>my-app.jar</destName>
      <fileMode>0644</fileMode>
    </file>
  </files>
  ...
</assembly>
Assuming you were building a project called
my-app with a version of 1.0,
Example 12-6 would include your project’s
JAR in the assembly’s lib/ directory, trimming the version from
the filename in the process so the final filename is simply
my-app.jar. It would then make the
JAR readable by everyone and writable by the user
who owns it (this is what the mode 0644 means for files, using Unix
four-digit octal permission notation). For more information about
the format of the value in fileMode, see the Wikipedia entry on
four-digit octal notation (http://en.wikipedia.org/wiki/File_system_permissions#Octal_notation_and_additional_permissions).
You could build a very complex assembly using file entries, if
you knew the full list of files to be included. Even if you didn’t
know the full list before the build started, you could probably use
a custom Maven plugin to discover that list and generate the
assembly descriptor using references like the one just shown.
Although the files section gives you fine-grained
control over the permission, location, and name of each file in the
assembly archive, listing a file element for
every file in a large archive would be a tedious exercise. For the
most part, you will be operating on groups of files and dependencies
using fileSets. The remaining four file-inclusion
sections are designed to help you include entire sets of files that
match a particular criteria.
fileSets Section
Similar to the files section, fileSets are intended for files
that have a definite location relative to your project’s directory
structure. However, unlike the files section,
fileSets describe sets of
files, defined by file and path patterns they match (or don’t
match), and the general directory structure in which they are
located. The simplest fileSet just specifies the
directory where the files are located:
<assembly>
  ...
  <fileSets>
    <fileSet>
      <directory>src/main/java</directory>
    </fileSet>
  </fileSets>
  ...
</assembly>
This fileset simply includes the contents of the src/main/java directory from our project. It takes advantage of many default settings in the section, so let’s discuss those briefly.
First, you’ll notice that we haven’t told the file set where
within the assembly matching files should be located. By default,
the destination directory (specified with outputDirectory) is the same as the
source directory (in our case, src/main/java). Additionally, we haven’t
specified any inclusion or exclusion file patterns. When these are
empty, the file set assumes that all files within the source
directory are included, with some important exceptions. The
exceptions to this rule pertain mainly to source-control metadata files and
directories, and are controlled by the
useDefaultExcludes flag, which defaults to
true. When active,
useDefaultExcludes will keep directories such as
.svn/ and CVS/ from being added to the assembly
archive. The section Default Exclusion Patterns for fileSets,”
later in this chapter, provides a detailed list of the default
exclusion patterns.
If we want more control over this file set, we can specify it
more explicitly. Example 12-7 shows a
fileSet element with all of the default elements
specified.
<assembly>
  ...
  <fileSets>
    <fileSet>
      <directory>src/main/java</directory>
      <outputDirectory>src/main/java</outputDirectory>
      <includes>
        <include>**</include>
      </include>
      <useDefaultExcludes>true</useDefaultExcludes>
      <fileMode>0644</fileMode>
      <directoryMode>0755</directoryMode>
    </fileSet>
  </fileSets>
  ...
</assembly>
The includes section uses a list
of include elements, which contain
path patterns. These patterns may contain wildcards, such as
**, which matches one or more
directories, or *, which matches
part of a filename, and ?, which
matches a single character in a filename. Example 12-7 uses a fileMode
entry to specify that files in this set should be readable by all,
but only writable by the owner. Since the fileSet
includes directories, we also have the option of specifying a
directoryMode that works in much the same way as
the fileMode. Since a directory’s execute
permission is what allows users to list its contents, we want to
make sure directories are executable in addition to being readable.
Like files, only the owner can write to directories in this
set.
The fileSet entry offers some other options
as well. First, it allows for an excludes section
with a form identical to the includes
section. These exclusion patterns allow you to exclude specific file
patterns from a fileSet. Include patterns take
precedence over exclude patterns. Additionally, you can set
the filtering flag to true if you want to substitute property
values for expressions within the included files. Expressions can be
delimited either by ${ and }
(standard Maven expressions such as ${project.groupId}) or by
@ and @ (standard Ant
expressions such as @project.groupId@). You can
adjust the line ending of your files using the lineEnding
element. Valid values for lineEnding are:
keepPreserve line endings from original files (this is the default value)
unixUnix-style line endings
lfOnly a line feed character
dosMS-DOS-style line endings
crlfCarriage return followed by a line feed
Finally, if you want to ensure that all file-matching patterns
are used, you can use the useStrictFiltering
element with a value of true (the default is
false). This can be especially useful if unused
patterns may signal missing files in an intermediary output
directory. When useStrictFiltering is set to
true, the Assembly plugin will fail if an
include pattern is not satisfied. In other words,
if you have an include pattern that includes a
file from a build, and that file is not present, setting
useStrictFiltering to true
will cause a failure if Maven cannot find the file to be
included.
Default Exclusion Patterns for fileSets
When you use the default exclusion patterns, the Maven
Assembly plugin is going to be ignoring more than just
SVN and CVS information. By
default, the exclusion patterns are defined by the DirectoryScanner
(http://svn.codehaus.org/plexus/plexus-utils/trunk/src/main/java/org/codehaus/plexus/util/DirectoryScanner.java)
class in the plexus-utils project (http://plexus.codehaus.org/plexus-utils/)
hosted at Codehaus. The array of exclude patterns
is defined as a static, final String array
named DEFAULTEXCLUDES in
DirectoryScanner. The contents of this
variable are shown in Example 12-8.
   public static final String[] DEFAULTEXCLUDES = {
        // Miscellaneous typical temporary files
        "**/*~",
        "**/#*#",
        "**/.#*",
        "**/%*%",
        "**/._*",

        // CVS
        "**/CVS",
        "**/CVS/**",
        "**/.cvsignore",

        // SCCS
        "**/SCCS",
        "**/SCCS/**",

        // Visual SourceSafe
        "**/vssver.scc",

        // Subversion
        "**/.svn",
        "**/.svn/**",

        // Arch
        "**/.arch-ids",
        "**/.arch-ids/**",

        //Bazaar
        "**/.bzr",
        "**/.bzr/**",

        //SurroundSCM
        "**/.MySCMServerInfo",

        // Mac
        "**/.DS_Store"
    };
This default array of patterns excludes temporary files from
editors such as GNU Emacs (http://www.gnu.org/software/emacs/)
and other common temporary files from Macs and a few common source
control systems (although Visual SourceSafe is more of a curse than
a source control system). If you need to override these default
exclusion patterns, you set useDefaultExcludes to
false and then define a set of
exclusion patterns in your own
assembly descriptor.
dependencySets Section
One of the most common requirements for assemblies is the
inclusion of a project’s dependencies in an assembly
archive. Where files and
fileSets deal with files in your project,
dependency files don’t have a location in your project. The
artifacts your project depends on have to be resolved by Maven
during the build. Dependency artifacts are abstract; they lack a
definite location and are resolved using a symbolic set of Maven
coordinates. Whereas file and
fileSet specifications require a concrete source
path, dependencies are included or excluded from an assembly using a
combination of Maven coordinates and dependency scopes.
The simplest dependencySet is an empty
element:
<assembly>
  ...
  <dependencySets>
    <dependencySet/>
  </dependencySets>
  ...
</assembly>
The dependencySet just shown will match all
runtime dependencies of your project (runtime scope includes the compile scope implicitly), and it will add
these dependencies to the root directory of your assembly archive.
It will also copy the current project’s main artifact into the root
of the assembly archive, if it exists.
Note
Wait… I thought dependencySet was about
including my project’s dependencies, not my project’s main
archive? This counterintuitive side effect was a widely used bug
in the 2.1 version of the Assembly plugin, and because Maven puts
an emphasis on backward compatibility, this counterintuitive and
incorrect behavior needed to be preserved between a 2.1 and 2.2
release. You can control this behavior by changing the
useProjectArtifact flag to
false.
Although the default dependency set can be quite useful with
no configuration whatsoever, this section of the assembly descriptor
also supports a wide array of configuration options, allowing you to
tailor its behavior to your specific requirements. For example, the
first thing you might do to the dependency set shown previously is
exclude the current project artifact by setting the
useProjectArtifact flag to
false (again, its default value is
true for legacy reasons). This will allow you to
manage the current project’s build output separately from its
dependency files. Alternatively, you might choose to unpack the
dependency artifacts by setting the unpack flag
to true (it is false by
default). When unpack is set to true, the Assembly plugin will
combine the unpacked contents of all matching dependencies inside
the archive’s root directory.
From this point, there are several things you might choose to do with this dependency set. The upcoming sections discuss how to define the output location for dependency sets and how to include and exclude dependencies by scope. Finally, we’ll expand on the unpacking functionality of the dependency set by exploring some advanced options for unpacking dependencies.
Customizing dependency output location
Two configuration options are used in concert to define the
location for a dependency file within the assembly
archive: outputDirectory and
outputFileNameMapping. You may want to
customize the location of dependencies in your assembly using
properties of the dependency artifacts themselves. Let’s say you
want to put all the dependencies in directories that match the
dependency artifact’s groupId. In this case,
you would use the outputDirectory element of
the dependencySet, and you would supply
something like this:
<assembly>
  ...
  <dependencySets>
    <dependencySet>
      <outputDirectory>${artifact.groupId}</outputDirectory>
    </dependencySet>
  </dependencySets>
  ...
</assembly>
This would have the effect of placing every single
dependency in a subdirectory that matches the name of each
dependency artifact’s groupId.
If you want to perform a further customization and remove
the version numbers from all dependencies, you can customize the
output file name for each dependency using the
outputFileNameMapping element as
follows:
<assembly>
  ...
  <dependencySets>
    <dependencySet>
      <outputDirectory>${artifact.groupId}</outputDirectory>
      <outputFileNameMapping>
        ${module.groupId}-${module.artifactId}.${module.extension}
      </outputFileNameMapping>
    </dependencySet>
  </dependencySets>
  ...
</assembly>
In the example just shown, a dependency on
commons:commons-codec version 1.3 would end up
in the file
commons/commons-codec.jar.
Interpolation of properties in dependency output location
As mentioned in the Property References in Assembly Descriptors” section, earlier in this chapter, neither of these elements are interpolated with the rest of the assembly descriptor because their raw values have to be interpreted using additional, artifact-specific expression resolvers.
The artifact expressions available for these two elements
vary only slightly. In both cases, all of the
${project.*}, ${pom.*}, and
${*} expressions that are available in the
POM and the rest of the assembly descriptor are
also available here. For the outputFileNameMapping element, the
following process is applied to resolve expressions:
If the expression matches the pattern
${artifact.*}:Match against the dependency’s
Artifactinstance (resolves:groupId,artifactId,version,baseVersion,scope,classifier, andfile.*).Match against the dependency’s
ArtifactHandlerinstance (resolves:expression).Match against the project instance associated with the dependency’s artifact (resolves: mainly POM properties).
If the expression matches the patterns
${pom.*}or${project.*}, match against the project instance (MavenProject) of the current build.
If the expression matches the pattern
${dashClassifier?}and the artifact instance contains a nonnull classifier, resolve to the classifier preceded by a dash (-classifier). Otherwise, resolve to an empty string.Attempt to resolve the expression against the project instance of the current build.
Attempt to resolve the expression against the POM properties of the current build.
Attempt to resolve the expression against the available system properties.
Attempt to resolve the expression against the available operating-system environment variables.
The outputDirectory value is interpolated
in much the same way, the difference being that there is no
available ${artifact.*} information, only the
${project.*} instance for the particular
artifact. Therefore, the expressions just shown associated with
those classes (numbers 1a, 1b, and 3 in the process listing) are
unavailable.
How do you know when to use
outputDirectory and
outputFileNameMapping? When dependencies are
unpacked, only the outputDirectory is used to
calculate the output location. When dependencies are managed as
whole files (not unpacked), both outputDirectory and
outputFileNameMapping can be used together.
When used together, the result is the equivalent of:
<archive-root-dir>/<outputDirectory>/<outputFileNameMapping>
When outputDirectory is missing, it is
not used. When outputFileNameMapping is
missing, its default value is:
${artifact.artifactId}-${artifact.version}${dashClassifier?}.${artifact.extension}Including and excluding dependencies by scope
In Chapter 9, we noted that
all project dependencies have one scope or another.
Scope determines when in the build process that dependency
normally would be used. For instance, test-scoped dependencies are not
included in the classpath during compilation of the main project
sources, but they are included in the classpath when compiling
unit test sources. This is because your project’s main source code
should not contain any code specific to testing, since testing is
not a function of the project (it’s a function of the project’s
build process). Similarly, provided-scoped dependencies are assumed
to be present in the environment of any eventual deployment.
However, if a project depends on a particular provided dependency, it is likely to
require that dependency in order to compile. Therefore, provided-scoped dependencies are present
in the compilation classpath, but not in the dependency set that
should be bundled with the project’s artifact or assembly.
Also from Chapter 9, recall that
some dependency scopes imply others. For instance, the
runtime dependency scope implies the
compile scope, since all compile-time
dependencies (except for those in the provided
scope) will be required for the code to execute. A number of
complex relationships exist between the various dependency scopes
that control how the scope of a direct dependency affects the
scope of a transitive dependency. In a Maven Assembly descriptor,
we can use scopes to apply different settings to different sets of
dependencies accordingly.
For instance, if we plan to bundle a web application with
Jetty (http://www.mortbay.org/jetty-6/)
to create a completely self-contained application, we’ll need to
include all provided-scope dependencies
somewhere in the Jetty directory structure we’re including. This
ensures those provided
dependencies actually are present in the runtime environment.
Non-provided, runtime dependencies will still land in
the WEB-INF/lib directory, so these two dependency
sets must be processed separately. These dependency sets might
look similar to the XML shown in Example 12-9.
<assembly>
  ...
  <dependencySets>
    <dependencySet>
      <scope>provided</scope>
      <outputDirectory>lib/${project.artifactId}</outputDirectory>
    </dependencySet>
    <dependencySet>
      <scope>runtime</scope>
      <outputDirectory>
        webapps/${webContextName}/WEB-INF/lib
      </outputDirectory>
    </dependencySet>
  </dependencySets>
  ...
</assembly>provided-scoped
dependencies are added to the lib/ directory in the assembly root,
which is assumed to be a libraries directory that will be included
in the Jetty global runtime classpath. We’re using a subdirectory
named for the project’s artifactId in order to
make it easier to track the origin of a particular library.
runtime dependencies are
included in the WEB-INF/lib
path of the web application, which is located within a
subdirectory of the standard Jetty webapps/ directory that is named using
a custom POM property called
webContextName. What we’ve done in Example 12-9 is separate
application-specific dependencies from dependencies that will be
present in a Servlet that contains global classpath.
However, simply separating according to scope may not be
enough, particularly in the case of a web application. It’s
conceivable that one or more runtime dependencies will actually be
bundles of standardized, noncompiled resources for use in the web
application. For example, consider a set of web applications that
reuse a common set of JavaScript, Cascading Style Sheets (CSS),
SWF, and image resources. To make these resources easy to
standardize, it’s common practice to bundle them up in an archive
and deploy them to the Maven repository. At that point, they can
be referenced as standard Maven dependencies—possibly with a
dependency type of zip—that are normally
specified with a runtime scope. Remember, these are resources, not
binary dependencies of the application code itself; therefore,
it’s not appropriate to blindly include them in the WEB-INF/lib
directory. Instead, these resource archives should be separated
from binary runtime dependencies and unpacked into the web
application document root somewhere. In order to achieve this kind
of separation, we’ll need to use inclusion and exclusion patterns
that apply to the coordinates of a specific dependency.
In other words, say you have three or four web application
that reuse the same resources, and you want to create an assembly
that puts provided dependencies
into lib/, puts runtime dependencies into webapps/<contextName>/WEB-INF/lib,
and then unpacks a specific runtime dependency into your web
application’s document root. You can do this because the assembly
allows you to define multiple include and exclude patterns for a given
dependencySet element. Read the next section
for more
development of this idea.
Fine-tuning: dependency includes and excludes
A resource dependency might be as simple as a set of
resources (CSS, JavaScript, and images) in a project that has
an assembly that creates a ZIP archive.
Depending on the particulars of our web application, we might be
able to distinguish resource dependencies from binary dependencies
solely according to type. Most web applications are going to
depend on other dependencies of type jar, and
it is possible that we can state with certainty that all
dependencies of type zip are resource
dependencies. Or we might have a situation where resources are
stored in jar format, but have a classifier of
something like resources. In either case, we
can specify an inclusion pattern to target these resource
dependencies and apply logic different than that used for binary
dependencies. We’ll specify these tuning patterns using the
includes and excludes
sections of the dependencySet.
Both includes and excludes are list sections, meaning they
accept the subelements include and
exclude respectively. Each
include or exclude element
contains a string value, which can contain wildcards. Each string
value can match dependencies in a few different ways. Generally
speaking, three identity pattern formats are supported:
groupId:artifactId—version-less keyYou would use this pattern to match a dependency by only the
groupIdand theartifactId.groupId:artifactId:type[:classifier]—conflictidThe pattern allows you to specify a wider set of coordinates to create a more specific
include/excludepattern.groupId:artifactId:type[:classifier]:version—full artifact identityIf you need to get really specific, you can specify all the coordinates.
All of these pattern formats support the wildcard character
*, which can match any
subsection of the identity and is not limited to matching single
identity parts (sections between : characters). Also, note that the
classifier section is optional, because patterns matching
dependencies that don’t have classifiers do not need to account
for the classifier section in the pattern.
In the example given earlier, where the key distinction is
the artifact type zip, and none of the
dependencies have classifiers, the following pattern would match
resource dependencies, assuming that they were of type
zip:
*:zip
This pattern makes use of the second dependency identity:
the dependency’s conflict id.
Now that we have a pattern that distinguishes resource
dependencies from binary dependencies, we can modify our
dependency sets to handle resource archives differently, as shown
in Example 12-10.
<assembly>
  ...
  <dependencySets>
    <dependencySet>
      <scope>provided</scope>
      <outputDirectory>lib/${project.artifactId}</outputDirectory>
    </dependencySet>
    <dependencySet>
      <scope>runtime</scope>
      <outputDirectory>
        webapps/${webContextName}/WEB-INF/lib
      </outputDirectory>
      <excludes>
        <exclude>*:zip</exclude>
      </excludes>
    </dependencySet>
    <dependencySet>
      <scope>runtime</scope>
      <outputDirectory>
        webapps/${webContextName}/resources
      </outputDirectory>
      <includes>
        <include>*:zip</include>
      </includes>
      <unpack>true</unpack>
    </dependencySet>
  </dependencySets>
  ...
</assembly>
In this example, the runtime-scoped dependency set from our
previous example has been updated to exclude resource
dependencies. Only binary dependencies (non-zip dependencies) should be added to the
WEB-INF/lib directory of the
web application. Resource dependencies now have their own
dependency set, which is configured to include these dependencies
in the resources directory of the web application. The
includes section in the last
dependencySet reverses the exclusion from the
previous dependencySet, so that resource
dependencies are included using the same identity pattern (i.e.,
*:zip). The last
dependencySet refers to the shared resource
dependency, and it is configured to unpack the shared resource
dependency in the document root of the web application.
Example 12-10 was based on the
assumption that our shared resources project dependency had a type
that differed from all the other dependencies. What if the shared
resource dependency had the same type as all the other
dependencies? How could you differentiate the dependency? In that
case, if the shared resource dependency had been bundled as a JAR
with the classifier resources, you could change
to the identity pattern and match those dependencies
instead:
*:jar:resources
Rather than matching on artifacts with a type of
zip and no classifier, we’re matching on
artifacts with a classifier of resources and a
type of jar.
Just like the fileSets section,
dependencySets support the
useStrictFiltering flag. When enabled, any
specified patterns that don’t match one or more dependencies will
cause the assembly—and consequently, the build—to fail. This can
be particularly useful as a safety valve to make sure your project
dependencies and assembly descriptors are synchronized and
interacting as you expect them to. By default, this flag is set to
false for the purposes of backward compatibility.
Transitive dependencies, project attachments, and project artifacts
The dependencySet section supports two
more general mechanisms for tuning the subset of
matching artifacts: transitive selection options and options for
working with project artifacts. Both of these features are a
product of the need to support legacy configurations that applied
a somewhat more liberal definition of the word “dependency.” As a
prime example, consider the project’s own main artifact.
Typically, this would not be considered a dependency, yet older
versions of the Assembly plugin included the project artifact in
calculations of dependency sets. To provide backward compatibility
with this “feature,” the 2.2 releases (currently at 2.2-beta-2) of
the Assembly plugin support a flag in the
dependencySet called
useProjectArtifact, whose default value is
true. By default, dependency sets will attempt
to include the project artifact itself in calculations about which
dependency artifacts match and which don’t. If you’d rather deal
with the project artifact separately, set this flag to
false.
Tip
We recommend that you always set useProjectArtifact to
false.
As a natural extension to the inclusion of the project
artifact, the project’s attached artifacts can also be managed
within a dependencySet using the useProjectAttachments flag (whose
default value is false). Enabling this flag
allows patterns that specify classifiers and types to match on
artifacts that are “attached” to the main project artifact; that
is, they share the same basic
groupId/artifactId/version
identity, but differ in type and
classifier from the main artifact. This could
be useful for including Javadoc or source JARs in an
assembly.
Aside from dealing with the project’s own artifacts, it’s
also possible to fine-tune the dependency set using two
transitive-resolution flags. The first, called useTransitiveDependencies (and set
to true by default), simply specifies whether
the dependency set should consider transitive dependencies at all
when determining the matching artifact set to be included. As an
example of how this could be used, consider what happens when your
POM has a dependency on another assembly. That
assembly (most likely) will have a classifier that separates it
from the main project artifact, making it an attachment. However,
one quirk of the Maven dependency-resolution process is that the
transitive-dependency information for the main artifact is still
used when resolving the assembly artifact. If the assembly bundles
its project dependencies inside itself, using transitive
dependency resolution here would effectively duplicate those
dependencies. To avoid this, we simply set
useTransitiveDependencies to
false for the dependency set that handles that
assembly dependency.
The other transitive-resolution flag is far more subtle.
It’s called useTransitiveFiltering
and has a default value of false. To understand
what this flag does, we first need to understand what information
is available for any given artifact during the resolution process.
When an artifact is a dependency of a dependency (that is, removed
at least one level from your own POM), it has
what Maven calls a “dependency trail,” which is maintained as a list of
strings that correspond to the full artifact identities
(groupId:artifactId:type:[classifier:]versionuseTransitiveFiltering is set to
true, the entries in an artifact’s dependency trail can cause the
artifact to be included or excluded in the same way its own
identity can.
If you’re considering using transitive filtering, be careful! A given artifact can be included from multiple places in the transitive-dependency graph, but as of Maven 2.0.9, only the first inclusion’s trail will be tracked for this type of matching. This can lead to subtle problems when collecting the dependencies for your project.
Advanced unpacking options
As we discussed previously, some project dependencies may
need to be unpacked in order to create a working
assembly archive. In the examples we have shown, the decision to
unpack or not was simple. We didn’t take into account what needed
to be unpacked or, more importantly, what should not have been
unpacked. To gain more control over the dependency unpacking
process, we can configure the unpackOptions
element of the dependencySet. Using this
section, we have the ability to choose which file patterns to
include or exclude from the assembly, and whether included files should be
filtered to resolve expressions using current
POM information. In fact, the options available
for unpacking dependency sets are fairly similar to those
available for including files from the project directory
structure, using the filesets descriptor section.
To continue our web application example, suppose some of the resource dependencies have been bundled with a file that details their distribution license. In the case of our web application, we’ll handle third-party license notices by way of a NOTICES file included in our own bundle, so we don’t want to include the license file from the resource dependency. To exclude this file, we simply add it to the unpack options inside the dependency set that handles resource artifacts, as shown in Example 12-11.
<asembly>
  ...
  <dependencySets>
    <dependencySet>
      <scope>runtime</scope>
      <outputDirectory>
        webapps/${webContextName}/resources
      </outputDirectory>
      <includes>
        <include>*:zip</include>
      </includes>
      <unpack>true</unpack>
      <unpackOptions>
        <excludes>
          <exclude>**/LICENSE*</exclude>
        </excludes>
      </unpackOptions>
    </dependencySet>
  </dependencySets>
  ...
</assembly>
Notice that the exclude we’re using looks
very similar to those used in fileSet
declarations. Here, we’re blocking any file starting with the word
LICENSE in any directory
within our resource artifacts. You can think of the unpack options
section as a lightweight fileSet applied to
each dependency matched within that dependency set. In other
words, it is a fileSet by way of an
unpacked dependency. Just as we specified an
exclusion pattern for files within resource dependencies in order
to block certain files, you can also choose which restricted set
of files to include using the includes section. The same code that
processes inclusions and exclusions on fileSets
has been reused for processing
unpackOptions.
In addition to file inclusion and exclusion, the unpack
options on a dependency set also provides a
filtering flag, whose default value is false.
Again, this should be familiar from our earlier discussion of
filesets. In both cases, expressions using either the Maven syntax
of ${property} or the Ant syntax of
@property@ are supported. However, filtering is
a particularly nice feature to have for dependency sets, since it
effectively allows you to create standardized, versioned resource
templates that are then customized to each assembly as they are
included. Once you start mastering the use of filtered, unpacked
dependencies that store shared resources, you will be able to
start abstracting
repeated resources into common resource projects.
moduleSets Sections
Multimodule builds are generally stitched together using
the parent and modules sections of
interrelated POMs. Typically, parent
POMs specify their children in a modules section that, under normal
circumstances, causes the child POMs to be
included in the build process of the parent. Exactly how this
relationship is constructed can have important implications for the
ways in which the Assembly plugin can participate in this process,
but we’ll discuss that later. For now, it’s enough to keep in mind
this parent-module relationship as we discuss the
moduleSets section.
Projects are stitched together into multimodule builds because
they are part of a larger system. These projects are designed to be
used together, and a single module in a larger build has little
practical value on its own. In this way, the structure of the
project’s build is related to the way in which we expect the project
(and its modules) to be used. If we consider the project from the
user’s perspective, it makes sense that the ideal end goal of that
build would be a single, distributable file that the user can
consume directly with minimum installation hassle. Since Maven
multimodule builds typically follow a top-down structure, where
dependency information, plugin configurations, and other information
trickles down from parent to child, it seems natural that the task
of rolling all of these modules into a single distribution file
should fall to the topmost project. This is where the
moduleSet comes into the picture.
Module sets allow the inclusion of resources that belong to
each module in the project structure into the final assembly
archive. Just as you can select a group of files to include in an
assembly using a fileSet and a
dependencySet, you can include a set of files and
resources using a moduleSet to refer to modules
in a multimodule build. They achieve this by enabling two basic
types of module-specific inclusion: file-based and artifact-based.
Before we get into the specifics and differences between file-based
and artifact-based inclusion of module resources into an assembly,
let’s talk a little about selecting which modules to process.
Module selection
By now, you should be familiar with
includes and excludes
patterns as they are used throughout the assembly descriptor to
filter files and dependencies. When you are referring to modules
in an assembly descriptor, you will also use the
includes and excludes
patterns to define rules that apply to different sets of modules.
The difference in moduleSet
includes and excludes is
that these rules do not allow for wildcard patterns. (As of the
2.2-beta-2 release, this feature has not really seen much demand,
so it hasn’t been implemented.) Instead, each
include or exclude value is
simply the groupId and
artifactId for the module, separated by a
colon, like this:
groupId:artifactId
In addition to includes and
excludes, the moduleSet also
supports an additional selection tool: the includeSubModules flag (whose
default value is true). The parent-child
relationship in any multimodule build structure is not strictly
limited to two tiers of projects. In fact, you can include any
number of tiers, or layers, in your build. Any project that is a
module of a module of the current project is considered a
submodule. In some cases, you may want to deal with each
individual module in the build separately (including submodules).
For example, this is often simplest when dealing with
artifact-based contributions from these modules. To do this, you
would simply leave the useSubModules flag set to the
default of true.
When you’re trying to include files from each module’s
directory structure, you may wish to process that module’s
directory structure only once. If your project directory structure
mirrors that of the parent-module relationships that are included
in the POMs, this approach would allow file
patterns such as **/src/main/java to apply not only to
that direct module’s project directory, but also to the
directories of its own modules as well. In case you don’t want to
process submodules directly (they will instead be processed as
subdirectories within your own project’s modules), you should set
the useSubModules flag to
false.
Once we’ve determined how module selection should proceed
for the module set in question, we’re ready to
choose what to include from each module. As mentioned earlier,
this can include files or artifacts from the module
project.
Sources section
Suppose you want to include the source of all modules in
your project’s assembly, but you would like to exclude a
particular module. Maybe you have a project named
secret-sauce that contains secret and sensitive
code that you don’t want to distribute with your project. The
simplest way to accomplish this is to use a
moduleSet that includes each project’s
directory in ${module.basedir.name} and that
excludes the secret-sauce module from the
assembly. See Example 12-12.
<assembly>
  ...
  <moduleSets>
    <moduleSet>
      <includeSubModules>false</includeSubModules>
      <excludes>
        <exclude>
          com.mycompany.application:secret-sauce
        </exclude>
      </excludes>
      <sources>
        <outputDirectoryMapping>
          ${module.basedir.name}
        </outputDirectoryMapping>
        <excludeSubModuleDirectories>
          false
        </excludeSubModuleDirectories>
        <fileSets>
          <fileSet>
            <directory>/</directory>
            <excludes>
              <exclude>**/target</exclude>
            </excludes>
          </fileSet>
        </fileSets>
      </sources>
    </moduleSet>
  </moduleSets>
  ...
</assembly>
In this example, since we’re dealing with each module’s
sources, it’s simpler to deal only with direct modules of the
current project, handling submodules using filepath wildcard
patterns in the file set. We set the
includeSubModules element to
false so we don’t have to worry about
submodules showing up in the root directory of the assembly
archive. The exclude element will take care of
excluding the secret-sauce module. We’re not
going to include the project sources for the
secret-sauce module; they’re, well,
secret.
Normally, module sources are included in the assembly under
a subdirectory named after the module’s
artifactId. However, since Maven allows modules
that are not in directories named after the module project’s
artifactId, it’s often better to use the
expression ${module.basedir.name} to preserve
the module directory’s actual name (${module.basedir.name} is the same
as calling
MavenProject.getBasedir().getName()). It
is critical to remember that modules are not required to be
subdirectories of the project that declares them. If your project
has a particularly strange directory structure, you may need to
resort to special moduleSet declarations that
include specific projects and account for your own project’s
idiosyncrasies.
Warning
Try to minimize your own project’s idiosyncracies. Although Maven is flexible, if you find yourself doing too much configuration, there is likely an easier way.
Continuing through Example 12-12, since we’re not
processing submodules explicitly in this module set, we need to
make sure submodule directories are not excluded from the source
directories we consider for each direct module. By setting the
excludeSubModuleDirectories flag to
false, this allows us to apply the same file
pattern to directory structures within a submodule of the one
we’re processing. Finally in Example 12-12, we’re not interested in
any output of the build process for this module set. We exclude
the target/ directory from
all modules.
It’s also worth mentioning that the
sources section supports
fileSet-like elements directly within itself, in addition
to supporting nested fileSets. These
configuration elements are used to provide backward compatibility
to previous versions of the Assembly plugin (versions 2.1 and
under) that didn’t support multiple distinct file sets for the
same module without creating a separate module
set declaration. They are deprecated and should not be
used.
Interpolation of outputDirectoryMapping in moduleSets
In the section Customizing dependency output location,”
earlier in this chapter, we used the element outputDirectoryMapping to change
the name of the directory under which each module’s sources would
be included. The expressions contained in this element are
resolved in exactly the same way as the
outputFileNameMapping, used in dependency sets.
(See the explanation of this algorithm in the section dependencySets Section,” earlier in this
chapter.)
In Example 12-12, we used
the expression ${module.basedir.name}. You
might notice that the root of that expression,
module, is not listed in the mapping-resolution
algorithm from the dependency sets section; this object root is
specific to configurations within moduleSets.
It works in exactly the same way as the
${artifact.*} references available in the
outputFileNameMapping element, except it is
applied to the module’s MavenProject,
Artifact, and
ArtifactHandler instances instead of those
from a dependency artifact.
Binaries section
Just as the sources section is primarily
concerned with including a module in its source
form, the binaries section is primarily
concerned with including the module’s build output, or its
artifacts. Though this section functions primarily as a way of
specifying dependencySets that apply to each
module in the set, a few additional features unique to module
artifacts are worth exploring: attachmentClassifier and includeDependencies. In addition,
the binaries section contains options similar
to the dependencySet
section that relate to the handling of the module artifact itself.
These are: unpack,
outputFileNameMapping,
outputDirectory,
directoryMode, and fileMode.
Finally, module binaries can contain a
dependencySets section to specify how each
module’s dependencies should be included in the assembly archive.
First, let’s take a look at how the options mentioned here can be
used to manage the module’s own artifacts.
Suppose we want to include the Javadoc JARs for each of our
modules inside our assembly. In this case, we don’t care about
including the module dependencies; we just want
the Javadoc JAR. However, since this particular JAR is always
going to be present as an attachment to the main project artifact,
we need to specify which classifier to use to retrieve it. For
simplicity, we won’t cover unpacking the module Javadoc JARs,
since this configuration is exactly the same as what we used for
dependency sets earlier in this chapter. The resulting module set
might look similar to Example 12-13.
<assembly>
  ...
  <moduleSets>
    <moduleSet>
      <binaries>
        <attachmentClassifier>javadoc</attachmentClassifier>
        <includeDependencies>false</includeDependencies>
        <outputDirectory>apidoc-jars</outputDirectory>
      </binaries>
    </moduleSet>
  </moduleSets>
  ...
</assembly>
In this example, we don’t explicitly set the includeSubModules flag, since
it’s true by default. However, we definitely
want to process all modules—even submodules—using this module set, since we’re
not using any sort of file pattern that could match on submodule
directory structures within. The attachmentClassifier grabs the
attached artifact with the javadoc classifier for each module
processed. The includeDependencies element tells
the Assembly plugin that we’re not interested in any of the
module’s dependencies, just the javadoc attachment. Finally,
the outputDirectory element tells
the Assembly plugin to put all of the Javadoc JARs into a
directory named apidoc-jars/
off the assembly root directory.
Although we’re not doing anything too complicated in this
example, it’s important to understand that the same changes to the
expression-resolution algorithm discussed for the
outputDirectoryMapping element of the sources
section also apply here. That is, whatever was available as
${artifact.*} inside a
dependencySet’s outputFileNameMapping configuration
is also available here as ${module.*}. The same
applies for outputFileNameMapping when used
directly within a binaries section.
Finally, let’s examine an example where we simply want to
process the module’s artifact and its runtime dependencies. In this case, we
want to separate the artifact set for each module into separate
directory structures, according to the module’s
artifactId and version. The
resulting module set is surprisingly simply, and it looks like the
listing in Example 12-14.
<assembly>
  ...
  <moduleSets>
    <moduleSet>
      <binaries>
        <outputDirectory>
          ${module.artifactId}-${module.version}
        </outputDirectory>
        <dependencySets>
          <dependencySet/>
        </dependencySets>
      </binaries>
    </moduleSet>
  </moduleSets>
  ...
</assembly>
In this example, we’re using the empty
dependencySet element, since that should
include all runtime
dependencies by default, with no configuration. With the outputDirectory specified at the
binaries level, all dependencies should be included alongside the
module’s own artifact in the same directory, so we don’t even need
to specify that in our dependency set.
For the most part, module binaries are fairly straightforward. In both parts—the main part, concerned with handling the module artifact itself, and the dependency sets, concerned with the module’s dependencies—the configuration options are very similar to those in a dependency set. Of course, the binaries section also provides options for controlling whether dependencies are included and which main-project artifact you want to use.
Like the sources section, the
binaries section contains a couple of
configuration options that are provided solely for backward
compatibility and that should be considered deprecated. These
include the includes and
excludes subsections.
moduleSets, parent POMs, and the binaries section
Finally, we close the discussion about module handling with
a strong warning. There are subtle interactions
between Maven’s internal design as it relates to parent-module
relationships and the execution of a module-set’s
binaries section. When a POM
declares a parent, that parent must be resolved in some way or
other before the POM in question can be built.
If the parent is in the Maven repository, there is no problem.
However, as of Maven 2.0.9, this can cause big problems if that
parent is a higher-level POM in the same build,
particularly if that parent POM expects to
build an assembly using its modules’ binaries.
Maven 2.0.9 sorts projects in a multimodule build according to their dependencies, with a given project’s dependencies being built ahead of itself. The problem is that the parent element is considered a dependency, which means the parent project’s build must complete before the child project is built. If part of that parent’s build process includes the creation of an assembly that uses module binaries, those binaries will not exist yet, and therefore cannot be included, causing the assembly to fail. This is a complex and subtle issue that severely limits the usefulness of the module binaries section of the assembly descriptor. In fact, it has been filed in the bug tracker for the Assembly plugin at http://jira.codehaus.org/browse/MASSEMBLY-97. Hopefully, future versions of Maven will find a way to restore this functionality, since the parent-first requirement may not be completely necessary.
Repositories Section
The repositories section represents a
slightly more exotic feature in the assembly descriptor, since few applications
other than Maven can take full advantage of a Maven-repository
directory structure. For this reason, and because many of its
features closely resemble those in the
dependencySets section, we won’t spend too much
time on the repositories section of the assembly
descriptor. In most cases, users who understand dependency sets
should have no trouble constructing repositories via the Assembly
plugin. We’re not going to motivate you to use the
repositories section; we’re not going to go
through the business of setting up a use case and walking you
through the process. We’re just going to bring up a few caveats for
those of you who find the need to use the
repositories section.
Having said that, two features particular to the
repositories section deserve some mention. The
first is the includeMetadata flag. When set to
true, it includes metadata such as the list of
real versions that correspond to -SNAPSHOT
virtual versions, and by default it’s set to
false. At present, the only metadata included
when this flag is true is the information
downloaded from Maven’s central repository.
The second feature is called groupVersionAlignments. Again,
this section is a list of individual
groupVersionAlignment configurations, whose
purpose is to normalize all included artifacts for a particular
groupId to use a single
version. Each alignment entry consists of two
mandatory elements—id and
version—along with an optional section called
excludes that supplies a list of
artifactId string values that are to be excluded
from this realignment. Unfortunately, this realignment doesn’t seem
to modify the POMs involved in the
repository—neither those related to realigned artifacts nor those
that depend on realigned artifacts—so it’s difficult to imagine what
the practical application for this sort of realignment would
be.
In general, it’s simplest to apply the same principles you
would use in dependency sets to repositories when adding them to
your assembly descriptor. Although the repositories section does support the
extra options mentioned earlier, they are mainly provided for
backward compatibility and will probably be deprecated in future
releases.
Managing the Assembly’s Root Directory
Now that we’ve made it through the main body of the assembly descriptor, we can close the discussion of content-related descriptor sections with something lighter: root-directory naming and site-directory handling.
Some may consider it a stylistic concern, but it’s often
important to have control over the name of the root directory for
your assembly, or to decide whether the root directory is there at
all. Fortunately, two configuration options in the root of the
assembly descriptor make managing the archive root directory simple:
includeBaseDirectory and baseDirectory. In cases such as
executable JAR files, you probably don’t want a root directory at
all. To skip it, simply set the
includeBaseDirectory flag to
false. (It’s true by default.)
This will result in an archive that, when unpacked, may create more
than one directory in the unpack target directory. Although this is
considered bad form for archives that are meant to be unpacked
before use, it’s not so bad for archives that are consumable as
is.
In other cases, you may want to guarantee the name of the
archive root directory regardless of the POM’s
version or other information. By default, the
baseDirectory element has a value equal to
${project.artifactId}-${project.version}.
However, we can easily set this element to any value that consists
of literal strings and expressions that can be interpolated from the
current POM, such as
${project.groupId}-${project.artifactId}.
This could be very good news for your documentation team! (We all
have those, right?)
Another configuration available is the
includeSiteDirectory flag, whose default value is
false. If your project build has also constructed
a web site document root using the site lifecycle or the Site plugin goals,
that output can be included by setting this flag to
true. However, this feature is a bit limited,
since it includes only the outputDirectory from
the reporting section of the current POM (by
default, target/site) and
doesn’t take into consideration any site directories that may be
available in module projects. Use it if you want, but a good
fileSet specification or
moduleSet specification with sources configured
could serve equally well, if not better. This is yet another example
of legacy configuration currently supported by the Assembly plugin
for the purpose of backward compatibility. Your mileage may vary. If
you really want to include a site that is aggregated from many
modules, you’ll want to consider using a fileSet
or moduleSet instead of
setting includeSiteDirectory to
true.
componentDescriptors and containerDescriptorHandlers
To round out our exploration of the assembly descriptor, we
should touch briefly on two other sections:
containerDescriptorHandlers and
componentDescriptors. The containerDescriptorHandlers section
refers to custom components that you use to extend the capabilities
of the Assembly plugin. Specifically, these custom components allow
you to define and handle special files that may need to be merged
from the multiple constituents used to create your assembly. A good
example of this might be a custom
container-descriptor handler that merged web.xml files from constituent WAR or
WAR-fragment files included in your assembly, in order to create the
single web-application descriptor required for
you to use the resulting assembly archive as a WAR file.
The componentDescriptors section allows you
to reference external assembly-descriptor fragments and
include them in the current descriptor. Component references can be
any of the following (in this order):
Relative filepaths, e.g., src/main/assembly/component.xml
Artifact references, e.g.,
groupId:artifactId:version[:type[:classifier]]Classpath resources, e.g., /assemblies/component.xml
URLs, e.g., http://www.sonatype.com/component.xml
Incidentally, when resolving a component descriptor, the Assembly plugin tries those different strategies in that exact order. The first one to succeed is used.
Component descriptors can contain many of the same
content-oriented sections available in the
assembly descriptor itself, with the exception of
moduleSets, which is considered so specific to
each project that it’s not a good candidate for reuse. Also included
in a component descriptor is the
containerDescriptorHandlers section, which we
briefly discussed earlier.
Component descriptors cannot contain formats, assembly IDs, or any
configuration related to the base directory of the assembly archive,
all of which are also considered unique to a particular assembly
descriptor. Though it may make sense to allow sharing of the
formats section, this has not been implemented as
of the 2.2-beta-2 Assembly plugin release.
Best Practices
The Assembly plugin provides enough flexibility to solve many problems in a number of different ways. If your project has a unique requirement, there’s a good chance that you can use the methods documented in this chapter to achieve almost any assembly structure. This section of the chapter details some common best practices that, if adhered to, will make your experiences with the Assembly plugin more productive and less painful.
Standard, Reusable Assembly Descriptors
Up till now, we’ve been talking mainly about one-off solutions for building a particular type of assembly. But what do you do if you have dozens of projects that all need a particular type of assembly? In short, how can we reuse the effort we’ve invested to get our assemblies just the way we like them across more than one project without copying and pasting our assembly descriptor?
The simplest answer is to create a standardized, versioned
artifact out of the assembly descriptor, and deploy it. Once that’s
done, you can specify that the Assembly plugin section of your
project’s POM include the
assembly-descriptor artifact as a
plugin-level dependency, which will prompt Maven
to resolve and include that artifact in the plugin’s classpath. At that point, you
can use the assembly descriptor via the descriptorRefs configuration section
in the Assembly plugin declaration. To illustrate, consider this
example assembly descriptor:
<assembly>
  <id>war-fragment</id>
  <formats>
    <format>zip</format>
  </formats>
 <includeBaseDirectory>false</includeBaseDirectory>
  <dependencySets>
    <dependencySet>
      <outputDirectory>WEB-INF/lib</outputDirectory>
    </dependencySet>
  </dependencySets>
  <fileSets>
    <fileSet>
      <directory>src/main/webapp</directory>
      <outputDirectory>/</outputDirectory>
      <excludes>
        <exclude>**/web.xml</exclude>
      </excludes>
    </fileSet>
  </fileSets>
</assembly>
Included in your project, this descriptor would be a useful
way to bundle the project contents so that they could be unpacked
directly into an existing web application, so you can add to it (an
extending feature, say). However, if your team builds more than one
of these web-fragment projects, the team will
likely want to reuse this descriptor rather than duplicate it. To
deploy this descriptor as its own artifact, we’re going to put it in
its own project, under the src/main/resources/assemblies
directory.
The project structure for this
assembly-descriptor artifact will look similar to
the following:
|-- pom.xml
`-- src
    `-- main
        `-- resources
            `-- assemblies
                `-- web-fragment.xml
Notice the path of our web-fragment
descriptor file. By default, Maven includes the files from the
src/main/resources directory
structure in the final JAR, which means our assembly descriptor will
be included with no extra configuration on our part. Also notice the
assemblies/ path prefix: the
Assembly plugin expects this path prefix on all descriptors provided
in the plugin classpath. It’s important that we put our descriptor
in the appropriate relative location, so it will be picked up by the
Assembly plugin as it executes.
Remember, this project is separate from your actual
web-fragment project now; the assembly descriptor
has become its own artifact with its own version and, possibly, its
own release cycle. Once you install this new project using Maven,
you’ll be able to reference it in your
web-fragment projects. For clarity, the build
process should look something like this:
$ mvn install
(...)
[INFO] [install:install]
[INFO] Installing (...)/web-fragment-descriptor/target/
          web-fragment-descriptor-1.0-SNAPSHOT.jar
       to /Users/~/.m2/repository/org/sonatype/mavenbook/assemblies/
          web-fragment-descriptor/1.0-SNAPSHOT/
          web-fragment-descriptor-1.0-SNAPSHOT.jar
[INFO] ---------------------------------------------------------------
[INFO] BUILD SUCCESSFUL
[INFO] ---------------------------------------------------------------
[INFO] Total time: 5 seconds
(...)
Since there are no sources for the
web-fragment-descriptor project, the resulting
jar artifact will include nothing but our
web-fragment assembly descriptor. Now, let’s use
this new descriptor artifact:
<project>
  (...)
  <artifactId>my-web-fragment</artifactId>
  (...)
  <build>
    <plugins>
      <plugin>
        <artifactId>maven-assembly-plugin</artifactId>
        <version>2.2-beta-2</version>
        <dependencies>
          <dependency>
            <groupId>org.sonatype.mavenbook.assemblies</groupId>
            <artifactId>web-fragment-descriptor</artifactId>
            <version>1.0-SNAPSHOT</version>
          </dependency>
        </dependencies>
        <executions>
          <execution>
            <id>assemble</id>
            <phase>package</phase>
            <goals>
              <goal>single</goal>
            </goals>
            <configuration>
              <descriptorRefs>
                <descriptorRef>web-fragment</descriptorRef>
              </descriptorRefs>
            </configuration>
          </execution>
        </executions>
      </plugin>
      (...)
    </plugins>
  </build>
  (...)
</project>
Two things are special about this Assembly plugin configuration:
We have to include a plugin-level dependency declaration on our new
web-fragment-descriptorartifact in order to have access to the assembly descriptor via the plugin’s classpath.Since we’re using a classpath reference instead of a file in the local project directory structure, we must use the
descriptorRefssection instead of thedescriptorsection. Also, notice that although the assembly descriptor is actually in the assemblies/web-fragment.xml location within the plugin’s classpath, we reference it without the assemblies/ prefix. This is because the Assembly plugin assumes that built-in assembly descriptors will always reside in the classpath under this path prefix.
Now, you’re free to reuse the POM
configuration above in as many projects as you like, with the
assurance that all of their web-fragment
assemblies will turn out the same. As you need to make adjustments
to the assembly format—maybe to include other resources, or to
fine-tune the dependency and file sets—you can simply increment the
version of the assembly descriptor’s project and release it again.
POMs referencing the assembly-descriptor artifact can then
adopt this new version of the descriptor as they are able.
One final point about assembly-descriptor
reuse: you may want to consider sharing the plugin configuration
itself as well as publishing the descriptor as an artifact. This is
a fairly easy step; you simply add the configuration listed earlier
to the pluginManagement
section of your parent POM, and then reference
the managed plugin configuration from your module
POM, like this:
(...)
  <build>
    <plugins>
      <plugin>
        <artifactId>maven-assembly-plugin</artifactId>
      </plugin>
(...)
If you’ve added the rest of the plugin’s configuration—listed
in the previous example—to the
pluginManagement section of
the project’s parent POM, then each project inheriting from that
parent POM can add a minimal entry (such as the
one just shown) and take advantage of an advanced assembly format in
their own builds.
Distribution (Aggregating) Assemblies
As we mentioned, the Assembly plugin provides multiple ways
of creating many archive formats. Distribution archives
are typically very good examples of this, since they often combine
modules from a multimodule build, along with their dependencies and,
possibly, other files and artifacts besides these. The distribution
aims to include all these different sources into a single archive
that the user can download, unpack, and run with convenience.
However, we also examined some of the potential drawbacks of using
the moduleSets section of the assembly
descriptor—namely, that the parent-child relationships between
POMs in a build can prevent the availability of
module artifacts in some cases.
Specifically, if module POMs reference as their parent the POM that contains the Assembly plugin configuration, that parent project will be built ahead of the module projects when the multimodule build executes. The parent’s assembly expects to find artifacts in place for its modules, but these module projects are waiting on the parent itself to finish building. A gridlock situation is reached, and the parent build cannot succeed (since it’s unable to find artifacts for its module projects). In other words, the child project depends on the parent project, which in turn depends on the child project.
As an example, consider the following assembly descriptor, designed to be used from the top-level project of a multimodule hierarchy:
<assembly>
  <id>distribution</id>
  <formats>
    <format>zip</format>
    <format>tar.gz</format>
    <format>tar.bz2</format>
  </formats>

  <moduleSets>
    <moduleSet>
      <includes>
        <include>*-web</include>
      </includes>
      <binaries>
        <outputDirectory>/</outputDirectory>
        <unpack>true</unpack>
        <includeDependencies>true</includeDependencies>
        <dependencySets>
          <dependencySet>
            <outputDirectory>/WEB-INF/lib</outputDirectory>
          </dependencySet>
        </dependencySets>
      </binaries>
    </moduleSet>
    <moduleSet>
      <includes>
        <include>*-addons</include>
      </includes>
      <binaries>
        <outputDirectory>/WEB-INF/lib</outputDirectory>
        <includeDependencies>true</includeDependencies>
        <dependencySets>
          <dependencySet/>
        </dependencySets>
      </binaries>
    </moduleSet>
  </moduleSets>
</assembly>
Given a parent project called app-parent with three modules called
app-core, app-web, and
app-addons, notice what happens when we try to
execute this multimodule build:
$ mvn package
[INFO] Reactor build order:
[INFO]   app-parent <----- PARENT BUILDS FIRST
[INFO]   app-core
[INFO]   app-web
[INFO]   app-addons
[INFO] ---------------------------------------------------------------
[INFO] Building app-parent
[INFO]    task-segment: [package]
[INFO] ---------------------------------------------------------------
[INFO] [site:attach-descriptor]
[INFO] [assembly:single {execution: distro}]
[INFO] Reading assembly descriptor: src/main/assembly/distro.xml
[INFO] ---------------------------------------------------------------
[ERROR] BUILD ERROR
[INFO] ---------------------------------------------------------------
[INFO] Failed to create assembly: Artifact:
org.sonatype.mavenbook.assemblies:app-web:jar:1.0-SNAPSHOT (included by
  module) does not have an artifact with a file. Please ensure the
  package phase is run before the assembly is generated.
...
The parent project (app-parent) builds
first. This is because each of the other projects lists
POM as its parent, which causes it to be forced
to the front of the build order. The app-web
module, which is the first module to be processed in the assembly
descriptor, hasn’t been built yet. Therefore, it has no artifact
associated with it, and the assembly cannot succeed.
One workaround for this is to remove the
executions section of the Assembly plugin
declaration that binds the plugin to the package
lifecycle phase in the parent POM, keeping the
configuration section intact. Then, execute Maven with two
command-line tasks: the first, package, to build the multimodule project
graph, and a second, assembly:assembly, as a direct invocation
of the assembly plugin to consume the artifacts built on the
previous run and create the distribution assembly. The command line
for such a build might look like this:
$ mvn package assembly:assembly
However, this approach has several drawbacks. First, it makes the distribution-assembly process more of a manual task that can increase the complexity and potential for error in the overall build process significantly. Additionally, it could mean that attached artifacts—which are associated in memory as the project build executes—are not reachable on the second pass without resorting to file-system references.
Instead of using a moduleSet to collect the
artifacts from your multimodule build, it often makes more sense to
employ a low-tech approach: using a dedicated distribution project
module and interproject dependencies. In this approach, you create a
new module in your build whose sole purpose is to assemble the
distribution. This module POM contains dependency
references to all the other modules in the project hierarchy, and it
configures the Assembly plugin to be bound the
package phase of its build lifecycle. The
assembly descriptor itself uses the
dependencySets section instead of the
moduleSets section to collect module artifacts
and determine where to include them in the resulting assembly
archive. This approach escapes the pitfalls associated with the
parent-child relationship discussed earlier, and has the additional
advantage of using a simpler configuration section within the
assembly descriptor itself to do the job.
To do this, we can create a new project structure that’s very
similar to the one used for the module-set approach. With the
addition of a new distribution project, we might end up with five
POMs in total: app-parent,
app-core, app-web,
app-addons, and
app-distribution. The new
app-distribution POM looks
similar to the following:
<project>
  <parent>
    <artifactId>app-parent</artifactId>
    <groupId>org.sonatype.mavenbook.assemblies</groupId>
    <version>1.0-SNAPSHOT</version>
  </parent>
  <modelVersion>4.0.0</modelVersion>
  <artifactId>app-distribution</artifactId>
  <name>app-distribution</name>

  <dependencies>
    <dependency>
      <artifactId>app-web</artifactId>
      <groupId>org.sonatype.mavenbook.assemblies</groupId>
      <version>1.0-SNAPSHOT</version>
      <type>war</type>
    </dependency>
    <dependency>
      <artifactId>app-addons</artifactId>
      <groupId>org.sonatype.mavenbook.assemblies</groupId>
      <version>1.0-SNAPSHOT</version>
    </dependency>
    <!-- Not necessary since it's brought in via app-web.
    <dependency> [2]
      <artifactId>app-core</artifactId>
      <groupId>org.sonatype.mavenbook.assemblies</groupId>
      <version>1.0-SNAPSHOT</version>
    </dependency>
    -->
  </dependencies>
</project>
Notice that we have to include dependencies for the other
modules in the project structure, since we don’t have a
modules section to rely on in this
POM. Also, notice that we’re not using an
explicit dependency on app-core. Since it’s also
a dependency of app-web, we don’t need to process
it (or avoid processing it) twice.
Next, when we move the distro.xml assembly descriptor into the
app-distribution project, we must also change it
to use a dependencySets section, like
this:
<assembly>
  ...
  <dependencySets>
    <dependencySet>
      <includes>
        <include>*-web</include>
      </includes>
      <useTransitiveDependencies>false</useTransitiveDependencies>
      <outputDirectory>/</outputDirectory>
      <unpack>true</unpack>
    </dependencySet>
    <dependencySet>
      <excludes>
        <exclude>*-web</exclude>
      </excludes>
      <useProjectArtifact>false</useProjectArtifact>
      <outputDirectory>/WEB-INF/lib</outputDirectory>
    </dependencySet>
  </dependencySets>
  ...
</assembly>
This time, if we run the build from the top-level project directory, we get better news:
$ mvn package
(...)
[INFO] ---------------------------------------------------------------
[INFO] Reactor Summary:
[INFO] ---------------------------------------------------------------
[INFO] module-set-distro-parent ...............SUCCESS [3.070s]
[INFO] app-core .............................. SUCCESS [2.970s]
[INFO] app-web ............................... SUCCESS [1.424s]
[INFO] app-addons ............................ SUCCESS [0.543s]
[INFO] app-distribution ...................... SUCCESS [2.603s]
[INFO] ---------------------------------------------------------------
[INFO] ---------------------------------------------------------------
[INFO] BUILD SUCCESSFUL
[INFO] ---------------------------------------------------------------
[INFO] Total time: 10 seconds
[INFO] Finished at: Thu May 01 18:00:09 EDT 2008
[INFO] Final Memory: 16M/29M
[INFO] ---------------------------------------------------------------
As you can see, the dependency-set approach is much more stable and—at least until Maven’s internal project-sorting logic catches up with the Assembly plugin’s capabilities—involves fewer opportunities for things to go wrong when running a build.
Summary
As we’ve seen in this chapter, the Maven Assembly plugin offers quite a bit of potential for creating custom archive formats. Although the details of these assembly archives can be complex, they certainly don’t have to be in all cases, as we saw with built-in assembly descriptors. Even if your aim is to include your project’s dependencies and selected project files in some unique, archived directory structure, writing a custom assembly descriptor doesn’t have to be an arduous task.
Assemblies are useful for a wide array of applications, but they
are most commonly used as application distributions of various sorts.
And, though there are many different ways to use the Assembly plugin,
using standardized assembly-descriptor artifacts
and avoiding moduleSets when creating distributions
containing binaries are two sure ways to avoid
problems.