
ActionScript is the internal programming language that Flash designers and developers use to add interactivity to projects. Sometimes a linear progression through the Timeline with animations that never vary is not enough. ActionScript can add variety, randomness, and user input and control to the mix.
Introduced in Flash 2, interactive control of Flash has been around for a long time. Flash 4 included support for written scripts. Flash 5, unveiled in 2000, contained the first reasonably full-featured version of a scripting language. This language was called ActionScript and was retroactively named ActionScript 1.0 (AS1) later on.
Since that time, there have been two major architectural changes to the language. Flash MX 2004 (actually released in September of 2003) included ActionScript 2.0 (AS2), a more robust iteration of ActionScript and the first to introduce formal object-oriented programming capabilities to Flash. Later, in 2007, Flash CS3 rebuilt ActionScript from scratch when it let ActionScript 3.0 (AS3) out of the cage.
Rather than enhancing the codebase of AS1 and AS2, and continuing with any baggage or flaws ActionScript adopted through its early existence, the code was reinvented for AS3. The prior code base was just too entrenched to accommodate sweeping improvements without breaking backward compatibility.
Instead, an entirely new codebase was developed and added to Flash Player alongside the legacy player code. The split codebases mean that AS3 can’t intermingle with older versions of ActionScript in a single FLA, but it also means that current Flash Players still support projects created in any version of the language. Projects that use AS1 or AS2 will play back on virtually every Flash-enabled computer, while files that rely on ActionScript 3.0 require a contemporary player (version 9 or later) to function.
Although AS3 is a restart of sorts, it still shares some characteristics with AS1 and AS2, and even with other languages based on ECMAScript, the standard from which ActionScript evolved. ECMAScript actually began its life as JavaScript so, if you have any experience coding web pages with JavaScript, you have a leg up when it comes to learning AS3.
In many ways, however, AS3 is entirely different. Here a few examples of changes and improvements that have reshaped AS3 into the fastest and most powerful version of ActionScript in any Flash release to date:
Consistent syntax makes AS3 easier to pick up as you go along. Many rambling issues from prior versions of the language have been clarified and conventions followed more reliably. For example, in prior versions of ActionScript, properties (ways of describing objects, such as width and height) were sometimes preceded by underscores, and sometimes not.
Once you gain a little bit of experience writing basic scripts, you’ll find yourself hunting for specific, task-related solutions. At that point, you’ll find the language consistent enough that you can actually start guessing at syntax and finding yourself right a lot of the time. This consistency also makes using help and other resources easier.
More detailed error reporting makes finding problems in AS3 programs significantly easier. No longer will your code silently fail at runtime, leaving you to wonder where your troubles lay. Instead, AS3 not only improves runtime error reporting, it also introduces error and warning reports when your file is compiled to SWF for distribution. By learning about these errors at authoring time, you can usually catch and fix your bugs prior to introducing your application into the wild.
Stronger data typing is the greatest aid to better error reporting. By declaring the type of your data as a number, for instance, you’ll be notified if you accidentally use a text string instead. The consistent use of strong data typing makes AS3 more verbose than prior versions of the language but, again, this enables better error reporting and more reliably sound projects.
New display architecture features consolidate and simplify the many ways that prior versions of ActionScript controlled visual assets. Using the new display list, it’s now much simpler to control the visual stacking order of visual assets and to manipulate the familial relationships—parent, child, and sibling—between these assets.
New event architecture features unify a method of processing events. All events are now handled with event listeners, which listen for specific events and react when those events occur. For example, a listener assigned to listen for a mouse event will ignore keyboard events. This makes event handling more efficient.
Improved handling of external assets simplifies the task of loading data at runtime. Consistent approaches to loading assets can be applied to images, text, sound, video, and even other SWF files. It’s much easier to work with XML in AS3, and you can even work with raw data, such as the bytes that make up a JPEG or sound.
Better sound management provides greater control over sound playback in 32 discrete sound channels. You can also poll data from sounds during playback to visualize sounds with waveforms and similar graphics.
There are several more compelling attributes of AS3 that are likely of interest to intermediate to advanced coders; however, these fall outside the scope of this chapter. Some of these topics are discussed in the companion volume, Learning ActionScript 3.0: A Beginner’s Guide (O’Reilly), described in the next section.
AS3 is a robust language with significant breadth and depth. It also has a learning curve steeper than those associated with other versions of ActionScript. In this author’s humble opinion, it’s unrealistic to cover both the Flash authoring application and the ActionScript language simultaneously with any degree of effectiveness.
As such, this book is one of a pair that has been conceived to focus on these two areas of interest. Each volume is organized to make it easy to acquire and digest the material most appropriate for your needs. The book you’re reading now focuses primarily on the Flash authoring application, while its companion volume, Learning ActionScript 3.0, focuses almost exclusively on ActionScript.
However, despite dividing this material into two separate volumes, ActionScript can’t be ignored in the pages herein. Unless you intend to use Flash strictly for linear animations, you’ll need a minimum amount of ActionScript to expand your Flash skills. You certainly need ActionScript to add interactivity, and you need at least one line of code just to stop a Timeline animation from looping forever.
Furthermore, this book is project-based, teaching topics both with isolated examples and the ongoing development of a single portfolio. The isolated examples require no long-term investment to grasp the ideas behind them, and the project allows you to apply your newly learned skills to an example real-world application.
Therefore, this chapter aims to provide an ActionScript primer, of sorts. It consists of material condensed from several chapters of Learning ActionScript 3.0, as well as content directly related to the portfolio project. This primer will cover the basic skills required to support each topic and project task through the remainder of this book. Additional ActionScript will be introduced periodically to cover chapter-specific content.
Try to remember that this material is here to get you started. Don’t expect to learn the language from a primer, and don’t worry if it seems like a lot to take in upon first reading. Feel free to use this chapter as a small reference, reading it in segments and coming back to it when you need additional help with language fundamentals.
You can then decide whether you’d like to explore ActionScript further, and whether to acquire this book’s companion volume. Learning ActionScript 3.0 covers a great deal more coding concepts, has considerably more detail, and is supported by its own companion website.
Although much of the Flash interface was covered in Chapter 1, ActionScript-related interface elements have been reserved for discussion in this chapter. At the entry level, we’ll focus on two primary panels for ActionScript development: the Actions panel and the Output panel.
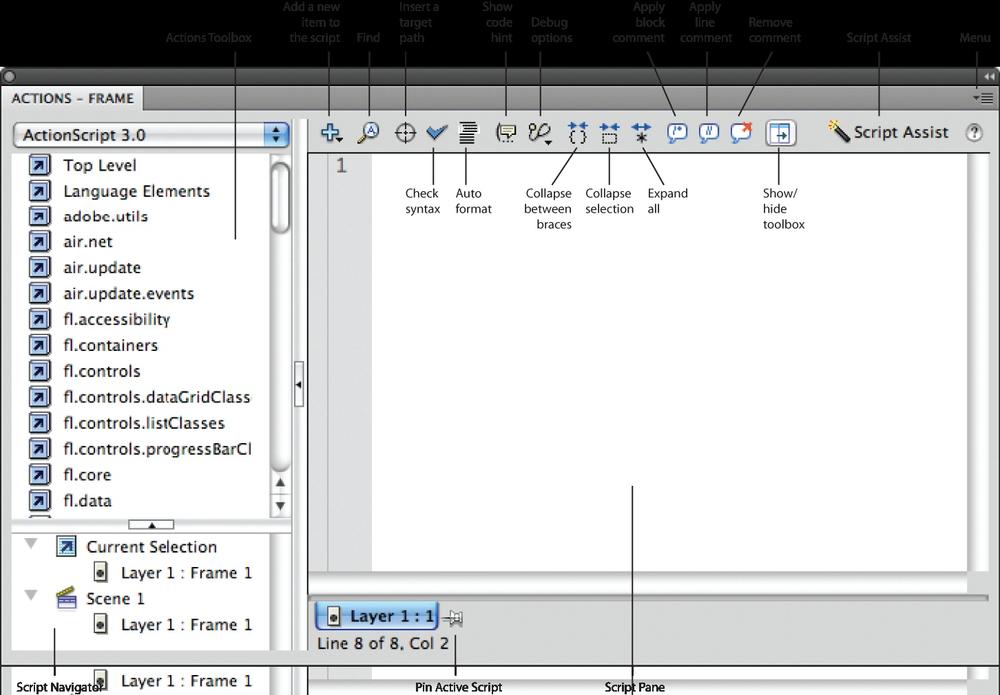
The Actions panel is where you’ll be writing your scripts (Figure 6-1). While it’s also possible to write scripts in external files (discussed at length in the companion volume Learning ActionScript 3.0), this book concentrates on originating your scripts in the Flash Timeline, so the Actions panel will be your home.
Here’s an overview of tools found within the Actions panel. In some cases, their functionality may not be self-explanatory, but relevant topics will be explained later in the chapter:
- Panel panes
The main pane on the right is the Script pane where you write your scripts. The pane in the lower-left corner is the Script Navigator, used to select any script written in your FLA. The pane in the upper-left corner is the Actions Toolbox. From here, you can drag or double-click to add ActionScript to your script in progress. The left two panes can be minimized to provide more room for the Script pane.
- Add a new item to the script
This menu provides access to the content in the Actions Toolbox for use when that pane is minimized.
- Find
This button opens a find and replace dialog for editing your script.
- Insert a target path
This button opens a graphical browser for selecting objects in your FLA such as movie clips. It will insert a path to that object in your script.
- Check syntax
This button checks your scripts for errors.
- Auto format
This button formats error-free scripts, or alerts you to problems in your code.
- Show code hint
When possible, this button shows you a floating syntax tip for the ActionScript surrounding the cursor while editing your script.
- Debug options
Here you can insert, remove, or enable/disable break points for use in the ActionScript debugger. This is a tool for intermediate users and beyond and requires a bit of comfort and experience to use.
- Code Collapse Controls
Using these three tools, you can temporarily hide code by collapsing multiple lines into one closed marker. You can collapse between braces ({}), collapse selected code, or expand all previously collapsed segments.
- Comment Controls
These three tools help to add comments, or disable/enable code in blocks of multiple lines, or in a single line, as well as uncomment selected commented code.
- Show/hide toolbox
- Pin Active Script
Each time you change scripts, the previous script is replaced in the Script pane. This button will force script to stay in tabs at the bottom of the panel, allowing you to switch between them easily.
- Script Assist
This button launches a rigid interface-driven script authoring system that is not discussed in this book.
- Menu
This button opens the Actions panel menu, discussed later in this chapter.
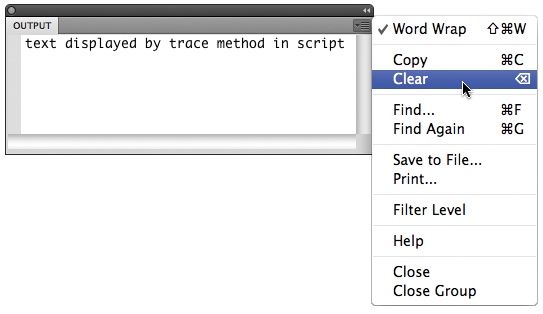
The Output panel is a very simple, but very useful, text output panel that can be used to monitor your own understanding of a script (Figure 6-2). Its sole purpose is to display text generated by a script at authortime. You can’t enter a script in the Output panel, and the panel doesn’t exist at runtime.
You will use the Output panel only as a means of getting quick feedback from an example, or as a testing and debugging technique when writing scripts. You’ll likely find the trace command very helpful, both in this book and in your own scripts, to send information to the panel.
Because AS3 is a vast language, it can sometimes be a bit difficult to explain in a strictly linear fashion. For example, to understand how to effectively manipulate visual assets, you must learn about properties, methods, events, and event listeners. These are the basic building blocks of most scripted tasks that allow you to get and set characteristics of, issue instructions to, and react to input from many Flash objects.
To go into a reasonable depth, particularly with real-world samples, you typically must discuss two or more of these topics at the same time. For example, to create an interactive exercise that allows you to experiment with properties or methods, you need events. Similarly, to understand events, you usually need to set properties or call methods.
Therefore, this section will introduce you to some basic terms and an example use or two of these topics. Later, you’ll follow up with more examples and additional discussions. For all three of these introductory passages, code samples will be provided for a movie clip that has been given an instance name of mc.
Properties are somewhat akin to adjectives in that they describe the object being modified or queried. For example, you can check or set the width of a movie clip. Most properties are read-write, meaning that you can both get and set their values. Some properties, however, are read-only, which means you can ask for, but not change, their values.
Here are examples of setting the width, height, and rotation of a movie clip. You can see these properties in use in the properties.fla source file.
mc.width = 100;
mc.height = 50;
mc.rotation = 90;
Methods are a bit like verbs. They are used to tell objects to do something, such as play and stop. In some cases, methods can simplify the setting of properties. You might use a method called setSize(), for example, to simultaneously set the width and height of something. Other methods are more unique, such as navigateToURL(), which will instruct a browser to display a web page.
Here are examples of telling a movie clip to play, stop, and go to the next frame. You can see these in use in the methods.fla source file.
mc.play();
mc.stop();
mc.nextFrame();
Events are the catalysts that trigger the actions you write, such as setting properties and calling methods. For instance, a user might click the mouse button, which results in a mouse event. That event then causes a function to execute, performing the desired actions. Event handlers are the ActionScript middlemen that trap the events and actually call the functions. ActionScript 3.0 unifies event handling into a consistent system of event listeners, which are set up to listen for the occurrence of a specific event and react accordingly.
Here is an example of an event listener, designed to listen for a mouse up event. You can see this in use in the events.fla source file:
mc.addEventListener(MouseEvent.MOUSE_UP, doIt);
function doIt(evt:MouseEvent):void {
    trace("do it");
}
You’ll learn more about some important concepts in action here, such as how the block of code called a function works, what’s inside the parentheses of the function name, and what void means, but here is the basic idea.
An event listener is listening for a specific mouse event—a mouse up event only, or when the mouse button is released after being pressed. The listener is attached to the movie clip, so when the movie clip is clicked, a mouse up event will be detected. When that happens, the function called doIt() is executed, and the letters “do it” are displayed in the Flash Output panel.
This flow of information—from the click of the mouse, to the trapping (receipt) of the event, to the execution of the function and the eventual output of the text message—is the cycle of event processing. Additional details will be discussed later in this chapter, but this is the mechanism by which interactivity is controlled.
The infrastructure beneath a programming language is often overlooked, but understanding what may seem like smaller topics will make it easier for you to adapt to ActionScript and form good habits.
If you look over the code examples earlier in the Basic Script Grammar section, you’ll see that a dot (.) separates the movie clip instance name from its properties and methods. This is sometimes referred to as dot syntax or dot notation. Essentially, this system strings together a series of items, from highest to lowest in the object hierarchy, including only items relevant to the task at hand. In this case, the first relevant item is the movie clip instance and the last is the property or method. Considering another example, in which you want to check the width of a movie clip that is inside another movie clip, the first item will be the parent, or container movie clip, then comes the nested movie clip, and then comes its width:
mc1.mc2.width;
This dot syntax will be used in virtually every example for the rest of this book, and it will soon become as familiar as your own language.
Simply put, ActionScript is case-sensitive. For any word that is already part of the ActionScript lexicon, you must replicate that case exactly. For example, neither “True” nor “TRUE” will work when you’re trying to represent the Boolean (true/false) value of true. Another example is keyboard input. When you want to verify a user’s key input, “Claire” and “CLAIRE” are not the same.
For words you make up, such as variable names (a variable is a container for storing data, discussed later in the chapter), you must be consistent. If you name a variable myMovieClip, you can’t refer to it later as MyMovieClip.
Although you can use any case you like for your own names, a few conventions exist to make code more readable—particularly among multiple programmers working on the same project, where standardized practices really help. A few examples of conventions that are widely adopted include:
- Camel Case
This is a naming convention in which variable names are lowercase, except for the first letter of compound words. For example, “movie” is lowercase, but “myMovieClip” capitalizes the second and third words. Camel case is typically the default naming convention, and the next two examples are exceptions to the rule.
- Classes
Classes are often used to create instances of objects, such as movie clips, for a net result similar to dragging a movie clip from the Library to the Stage. Classes are, essentially, collections of related code responsible for the creation and behavior of objects. You’ll learn more about classes throughout this chapter and use them throughout this book. The first letter of a class name is capitalized to set it apart from other possible variable or instance names. For example, instead of using “movieClip” as the name of the class responsible for movie clip behavior, the actual class is called MovieClip.
- Constants
Constants are variables that don’t change their values. Constants are typically written in all uppercase. Constants that represent keys on the keyboard, for example, include SPACE and TAB. In ActionScript 3.0, constants are usually organized into classes and are referenced through the class name. The aforementioned keyboard constants, for instance, are part of the Keyboard class and are referred to by the usage Keyboard.SPACE and Keyboard.TAB.
In general, ActionScript executes in a top-to-bottom, left-to-right order. That is, each line executes one after another, working from left to right. While this is typically a reliable rule of thumb, several things can change this order in subtle ways. For example, subroutines of one type or another can be called in the middle of a script. This causes the execution order of the original script to pause while the remote routine is executed. When the subroutine has completed, the execution of the original script continues where it left off. Execution flow will be explained in context in all scripts in this book.
The official use of the semicolon in most ECMAScript languages is simply to allow execution of more than one instruction on a single line. This is rare in the average script, and we will look at this technique when discussing loops.
However, the semicolon is also used to indicate the end of a line. Typically, this is not required, but there are cases in AS3 that rely on the semicolon to indicate the end of a line. These are cases in which a single line would be too difficult to read, so the line is broken up by carriage returns, even though it’s essentially a single execution.
A good example of this is writing XML in a human-readable form in a script. The ActionScript compiler is smart enough to understand that line breaks in XML are just for readability, and it looks for the semicolon to indicate the end of a line.
For this reason, and because forging this habit makes it easier to transition into learning other languages where the semicolon is required, place a semicolon at the end of every line.
It’s helpful to note that you are usually not solving an equation when you see an expression with like values on the left and right of an equals sign. For example, if you see something like x = x + 1, it’s unlikely that you will be solving for the value of x. Instead, this line is assigning a new value to x by adding 1 to its previous value.
Much like a computer operating system’s directory or the file structure of a website, ActionScript refers to the location of its objects in a hierarchical fashion. You can reference an object, such as a movie clip, using an absolute or relative path. Absolute paths can be easy because you most likely know the exact path to any object starting from the main Timeline. However, they are quite rigid and will break if you change the nested relationship of any of the referenced objects. Relative paths can be a bit harder to call to mind at any given moment, but they are more flexible. Working from a movie clip and going up one level to its parent and down one level to a sibling will work from anywhere, be it in the main Timeline, another movie clip, or nested even deeper, because the various stages aren’t named.
Table 6-1 and Table 6-2 draw parallels to the operating system and website analogies. Table 6-1 references the root, which in this case is another way to refer to the main Timeline. The companion website has more information about how to use root.
Comments are lines of text within your scripts that are not executed and are invaluable programmer’s tools. The obvious purpose of a comment is to add a brief descriptive note that will explain the purpose, expected outcome, or possibly a caveat of a segment of your script. Comments are really important when working with other programmers, but they’re also very helpful when archiving your own code. It’s not uncommon to revisit code long after writing it and have to figure out what it does for your project. A single-line comment begins with two slashes:
//set width to size of left column
mc.width = 100;
There’s another, possibly lesser-known purpose of comments, however. It’s quite convenient to use comments to temporarily disable code. For example, you may want to quickly disable ActionScript sound playback or change navigation options. You can also use comments to try two different approaches to a programming task without deleting and rewriting. By completing two alternate versions of a code segment, you can test either at any time by commenting one out and the other back in. Symmetrical slash-asterisk pairs surround multiline comments:
/*
mc.width = 100;
mc.height = 50;
*/
mc.width = 50;
mc.height = 100;
This is obviously a very simple example just to demonstrate the comment toggling process. In this case, it may be as easy to switch the values each time you test, but it’s also easy to become distracted and lose track of the values you tested. As a proof of concept, this example switches a movie clip between horizontal and vertical sizes. To try this code the other way, you could uncomment the first block and comment the second block:
mc.width = 100;
mc.height = 50;
/*
mc.width = 50;
mc.height = 100;
*/
As you write your scripts, it’s helpful to check your progress. As Adobe’s John Dowdell likes to say, “test early, test often.” There are a few tools built into Flash’s interface that can help you quickly examine the health of your scripts:
- Checking syntax
A quick and easy way to see if your script is in good shape is to click the Check Syntax button at the top of the Actions panel (see Figure 6-1). If your script is OK, a dialog will tell you as much. If there are problems, the compiler will alert you via the Compiler Errors panel.
- Errors and warnings
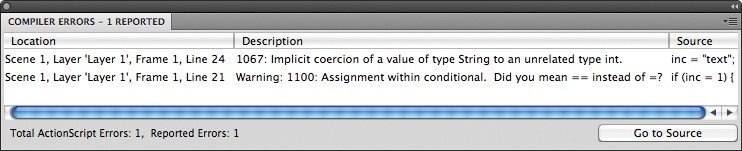
When the compiler detects errors or warnings, it will add them to the Compiler Errors panel (Figure 6-3) so you can try to find the problem and correct it. Error reports include the error, a brief description of the problem, and even a line number where the error is thought to have occurred. If you double-click the error, the Flash interface will switch to the Actions panel and scroll to the errant line number.
Note
If you ever want to learn more about the warnings or errors that may appear during development or runtime, here are a few resources to explore:
http://help.adobe.com/en_US/AS3LCR/Flash_10.0/compilerWarnings.html http://help.adobe.com/en_US/AS3LCR/Flash_10.0/compilerErrors.html http://help.adobe.com/en_US/AS3LCR/Flash_10.0/runtimeErrors.html - Formatting scripts
As insignificant as it sounds, formatting a script can help you find problems. Formatting can help because Flash will check the integrity of your scripts before proceeding. If errors exist, formatting will be abandoned. In this way, you’re giving your code a once-overy ever time you format it. In addition, formatting a script will indent it properly, place braces and spaces where specified, and more. These assists help you to spot lines of code that may be out of place.
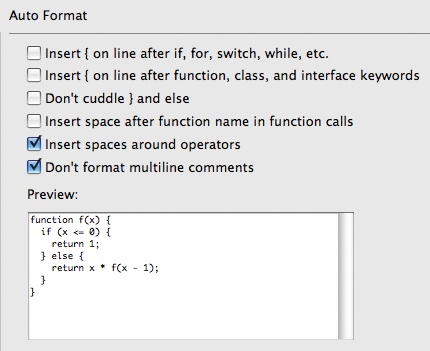
To format a script, click the Auto Format button at the top of the Actions panel (see Figure 6-1). Flash’s Preferences (Flash→Preferences on Mac, Edit→Preferences on Windows) allow you to customize (to some extent) how the script is formatted (Figure 6-4). Additional basic options, such as word wrapping, are available from the Actions panel’s menu (Figure 6-5), accessible from the upper-right corner of the panel.
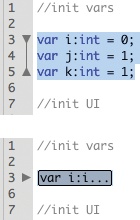
- Code collapse
To hone in on a particular segment of a longer script, improving focus and clarity, you can use the code collapse feature (Figure 6-6). Highlight the lines of code you want to hide temporarily and click on the open arrow next to the first or last selected line number. To show the code again, click on the closed arrow.

Variables are best described as containers into which you place information for later recall. Imagine if you were unable to store any information for later use. You would not be able to compare values against previously described information (such as usernames or passwords), your scripts would suffer performance lags due to repeated unnecessary calculations, and you wouldn’t be able to carry any prior experiences through to the next possible implementation of a task. In general, you wouldn’t be able to do anything that required data that your application had to “remember.”
Note
You’ll learn on the next page that variables used for the first time must be declared with the var keyword.
Variables make all this and more possible, and are relatively straightforward. In basic terms, you need only create a variable with a unique name so it can be referenced separately from other variables and the ActionScript language itself, and then populate it with a value. Ignoring usage for a moment, a simple example is remembering the number 1 with the following:
myVariable = 1;
There are just a few rules and best practices to consider when naming variables. They must:
Be one word
Include only alphanumeric characters, dollar signs ($), or underscores (_)
Not start with a number
Not already be a keyword or reserved word in ActionScript
To help you catch bugs and unexpected uses of data, ActionScript can monitor what’s placed into variables. You can tell the ActionScript compiler that you want a certain type of data to be stored in a variable, and when your file is compiled into a SWF, you will be warned if the variable contains a different kind of data.
This compile-time error checking can prevent problems from sneaking into your projects and is one of the best things about AS3. For example, if you try to perform a mathematical operation on a passage of text, Flash will issue a warning so you can correct the problem before you distribute your work to a client or the public.
To make this work, you must indicate what you intend to store in each variable—this is called declaring the variable. To declare a variable, precede its first use with the var keyword and use the syntax <variable name>:<data type> to specify the type of data to be stored. For instance, the previous example of remembering the number 1 should be written this way:
var myVariable:Number = 1;
There are several native data types including, but not limited to, those listed in Table 6-3.
Table 6-3. Variable types
Data type | Example | Description |
|---|---|---|
|
| Any number, including floating point values (decimals) |
|
| Any integer or whole number |
|
| Unsigned integer or any nonnegative whole number |
|
| Text or a string of characters |
|
| True or false |
|
| More than one value in a single variable |
|
| The basic structure of every ActionScript entity, but also a custom form that can store multiple values as an alternative to |
There are also dozens of additional data types that describe which kind of object is used. For example, the following line of code uses the MovieClip class (the built-in code that makes a movie clip behave the way it does) to create an empty movie clip at runtime:
var myMC:MovieClip = new MovieClip();
It’s impractical to list every possible data type here, but this book will reference data types frequently, and using them will soon become second nature to you.
In some cases, you will need to change one data type to another. This is called casting. A good example of the need for casting data types is when using a text field to capture numeric input from the user. When a user types into a text field, the data captured is, logically, text. However, when the intended use of that information is mathematical, you must convert the input from text data to numeric data.
There are two ways to cast from one data type to another. The first is by using the as operator. Applying the as operator to existing data, followed by the desired data type, will make the conversion.
var num:Number = userAnswer.text as Number;
The second method is to use the desired data type class as a method and place the original data inside the parentheses. The following code, for example, converts a number to an integer:
var num2:int = int(num);
An important basic idea in any programming language is that of operators. Operators are symbols that represent action taken upon objects, such as setting, comparing, or testing values. Some operators will seem like common sense, such as arithmetic operators: addition (+), subtraction (−), multiplication (*), division (/), and more. Others, however, may not be as obvious.
For example, did you know that, in addition to adding two numbers, the plus operator (+) can join two strings of text? A single equals sign (x = 1) is an assignment operator, because it is used to assign a value to something, but did you know there is also a double equals sign (==) operator? The latter is used to compare two values to determine whether they are equal.
There are also a few categories of operators that you may never have seen before:
- Shortcut arithmetic operators
Shortcut arithmetic operators combine two tasks into one operator. The following are standard operators:
x++meansx = x + 1(add 1 to current value)x--meansx = x − 1(subtract 1 from current value)x += nmeansx = x + n(add value on right of equals sign)x -= nmeansx = x − n(subtract value on right of equals sign)x *= nmeansx = x * n(multiply by value on right of equals sign)x /= nmeansx = x / n(divide by value on right of equals sign)- Comparison operators
Comparison operators are typically used in conditional (
if) statements for comparing values. The following examples include equal to, not equal to, greater than, greater than or equal to, less than, and less than or equal to.if (x == 1) { } if (x != 1) { } if (x > 1) { } if (x >= 1) { } if (x < 1) { } if (x <= 1) { }- Logical operators
Logical operators are also used in conditional statements. They group tests together using and (
&&), or or (||) to create a new test. The combined test relies on either one or the other original tests passing (or) or both tests passing (and). Another logical operator tests for falsehood using not (!). You’ll learn about conditionals later, but it’s good to be able to recognize these operators:if (x == 1 && y == 2) { } if (x == 1 || y == 2) { } if (!myClip.visible) { }
Scope is the realm or space within which an object lives. As you learn more about ActionScript, particularly when you start using writing classes, you’ll find scope a more central issue. Scope is still notable when you’re just starting out, however, when it comes to use of this.
The keyword this is essentially shorthand for, “whichever object or scope you’re working with now.” For example, think of a movie clip inside Flash’s main timeline. Both of the movie clips have a unique scope, so a variable or function defined inside the movie clip will not exist in the main timeline, and vice versa.
It’s easiest to understand the usage of this in context, but here are a couple of examples to get you started. If you want to refer to the width of a movie clip, from within that same movie clip, you write:
this.width;
The this identifier refers to the movie clip in which the script was written. Similarly, if you want to check the width of the movie clip’s parent, this is still the basis of the code:
this.parent.width;
In both cases, this is a reference point from which you start your path. It’s fairly common to drop the keyword when going down the chain of objects from the current scope (as in the first example), but it’s usually used, or even required, when going up to a higher scope (as in the second example). This is because Flash must understand which ancestor is needed when traversing through the hierarchy. Imagine a family reunion in which several extended family members, including cousins and multiple generations, are present, and you are looking for your mother, father, or grandparent. If you just said “parent,” any number of parents might answer. If you instead said “my parent” or “my mother’s parent,” that would be specific enough to get you headed in the right direction.
Functions are an indispensable part of programming in that they wrap code into blocks that can be executed only when needed. They also allow you to reuse and edit code blocks efficiently, without having to copy, paste, and edit repeatedly. Without functions, all code would be executed in a linear progression from start to finish, and edits would require changes to every single occurrence of any repeated code.
Creating a basic function requires little more than surrounding the code you wish to trigger with a wrapper that allows you to give the block a name. Triggering that function later requires only that you call the function by name. The following syntax shows a function that traces a string to the Output panel. The function is defined and then, to illustrate the process, immediately called. In a real-world scenario, the function is usually called at some later time or from some other place, such as when the user clicks a button with the mouse. The output is depicted in the comment that follows the function call:
function showMsg() {
    trace("hello");
}
showMsg();
//hello
If efficiently reusing code and executing code only when needed were the only advantages of functions, you’d already have a useful improvement over linear execution of a script. This allows you to group your code into subroutines that you can trigger at any time and in any order. However, you can do much more with functions to gain even greater power.
Assume you need to vary the purpose of the previous function slightly. Let’s say you need to trace 10 different messages. To do that using only what you’ve learned so far, you’d have to create 10 functions and vary the string that is sent to the Output panel in each function.
However, you can accomplish this more easily using arguments. Arguments are like variables that have life only within their own functions. By adding an argument to the parenthesis next to the function name, you can pass a value into that argument when you call the function. In the following case, the argument is called msg and is expected to contain a data type of String:
function showMsg(msg:String) {
    trace(msg);
}
showMsg("goodbye");
//goodbye
By using msg in the body of the function, it takes on the value that is sent into the argument. In this example, the function no longer traces “hello” every time it’s called. Instead, it traces the text sent into its argument when the function is called. When using arguments, it’s ideal to type the data coming in so Flash knows how to react and can issue any warnings or errors.
It’s also possible to return a value from a function, increasing its usefulness. Returning a value to the script from which it was called means a function can vary its input and its output. The following examples convert temperature values from Celsius to Fahrenheit and Fahrenheit to Celsius. In both cases, a value is sent into the function and a calculated value is returned to the script. The first example immediately traces the result sent back from the function, while the second example stores the value returned from the function in a variable. This mimics real-life usage in that you can immediately act upon the returned value or store and process the data at a later time.
function celToFar(cel:Number):Number {
    return (9 / 5) * cel + 32;
}
trace(celToFar(20));
//68

function farToCel(far:Number):Number {
    return (5 / 9) * (far - 32);
}
var celDeg:Number = farToCel(68);
trace(celDeg);
//20
When returning a value from a function, you should also declare the data type of the return value. As with applying other data types, use a colon followed by the type specific to that function, but place the data type between the argument’s close parenthesis and the opening function brace. Once you get used to this practice, it’s best to specify void as a return type when your function does not return a value. This will cause an alert if you attempt to return a value after originally planning not to do so.
You will often need to make a decision in your script, choosing to do one thing under one circumstance and another thing under a different circumstance. These situations are usually addressed by conditionals. Put simply, a conditional is a test that determines whether a particular condition is met. If the condition is met, the test evaluates to true, and specific code is executed accordingly. If the condition is not met, either no further action is taken or an alternate set of code is executed.
The most common form conditional is the if statement. The structure of the statement’s basic structure is the if keyword, followed by the conditional test in parentheses and the code to be executed (if the statement evaluates to true) in braces. The first three lines in the following example establish a set of facts. The if statement evaluates the given facts (this initial set of facts will be used for this and subsequent examples in this section).
var a:Number = 1;
var b:String = "hello";
var c:Boolean = false;

if (a == 1) {
    trace("option a");
}
To evaluate the truth of the test inside the parentheses, conditionals often make use of comparison and logical operators. A comparison operator compares two values, such as equals (==), less than (<), and greater than or equal to (>=), to name a few.
Note
The test in the preceding example uses a double equals sign. This is a comparison operator that asks, “Is this equal to?” This distinction is very important because the accidental use of a single equals sign will cause unexpected results. A single equals sign is an assignment operator that assigns the value on the right side of the equation to the object on the left side of the equation. Because this assignment occurs, the test will always evaluate to true.
A logical operator evaluates the logic of an expression. Included in this category are and (&&), or (||), and not (!). These allow you to ask if “this and that” are true, or if “this or that” is true, or if “this” is not true.
For example, the following code would return false because both conditions must be true. The value of a is 1, but the value of b is “hello.” Because the second test fails, the combined test fails. As a result, nothing would appear in the Output panel.
if (a == 1 && b == "goodbye") {
    trace("options a and b");
}
In the next example, the test would evaluate to true, because one of the two conditions (the first) is true. As a result, “option a or b” would appear in the Output panel.
if (a == 1 || b == "goodbye") {
    trace("option a or b");
}
Finally, the following would also evaluate to true because the not operator correctly determines that c is not true (remember that every if statement, at its core, is testing for truth).
if (!c) {
    trace("not option c");
}
You can also use the not operator in a comparison. When combined with a single equals sign, the pair means “not equal to.” Therefore, the following will fail because a does equal 1, and nothing will appear in the Output panel:
if (a != 1) {
    trace("a does not equal 1");
}
Additional power can be added to the if statement by adding an unconditional alternative (true no matter what). In this case, an alternative set of code is executed no matter what the value being tested is, simply because the test did not pass. With the following new code added to the previous example, the second (else) trace will occur:
if (a != 1) {
    trace("a does not equal 1");
} else {
    trace("a does equal 1");
}
Finally, you can make the statement even more robust by adding a conditional alternative (or an additional test) to the structure. In this example, the second trace will occur:
if (a == 2) {
    trace("a does not equal 1");
} else if (a == 1) {
    trace("a does equal 1");
}
The if statement requires one if. You can use only one optional else, but you can use any number of optional additional else if tests. In all cases, however, only one result can come from the structure. Consider the following example, in which all three results could potentially execute—the first two because they are true, and the last because it’s an unconditional alternative:
if (a == 1) {
    trace("option a");
} else if (b == "hello") {
    trace("option b");
} else {
    trace("option other");
}
In this case, only “option a” would appear in the Output panel, because the first truth would exit the if structure. If you needed more than one execution to occur, you would need to use two or more conditionals. The following structure, for example, executes the first trace in each if, by design:
if (a == 1) {
    trace("option a");
}
if (b == "hello") {
    trace("option b");
} else {
    trace("option other");
}An if statement can be as simple or as complex as needed. However, long if structures can be difficult to read and are sometimes better expressed using the switch statement. The switch statement also has a unique feature that lets you control which, if any, instructions are executed, even when a test evaluates to false.
Imagine an if statement asking if a variable is 1, else if it’s 2, else if it’s 3, and so on. A test like that can become difficult to read quickly. An alternate structure appears as follows:
switch (a) {
    case 1 :
        trace("one");
        break;
    case 2 :
        trace("two");
        break;
    case 3 :
        trace("three");
        break;
    default :
        trace("other");
        break;
}
In this case, “one” would appear in the Output panel. The switch line contains the object or expression you want to test. Each case line offers a possible value. Following the colon are the instructions to execute upon a successful test, and each break line prevents any following instructions from executing. When not used, the next instructions in line will execute, even if that test is false.
For example, if a equals 1, the following will place both “one” and “two” in the Output panel, even though a does not equal 2:
switch (a) {
    case 1 :
        trace("one");
    case 2 :
        trace("two");
        break;
}
This break feature does not exist with the if statement and, if used with care, makes switch an efficient alternative to a more complex series of multiple if statements. Switch statements must have one switch and one case, an optional unconditional alternative in the form of default, and an optional break for each case and default. The final break is not needed, but you may prefer to include it for consistency.
It’s quite common to execute many repetitive instructions in your scripts. However, including them line by line, one copy after another, is inefficient and difficult to edit and maintain. Wrapping repetitive tasks in an efficient structure is the role of loops. A programming loop is probably just what you think it is: you use it to go through the structure and then loop back to the start and do it again. There are a few kinds of loops, and the type you choose to use can help determine how many times your instructions are executed.
The first type of loop structure is the for loop. This loop executes its contents a finite number of times. For example, you may wish to create a grid of 25 movie clips or check to see which of 5 radio buttons a user has selected.
For our purposes, suppose you want to trace content to the Output panel three times. To loop through a process effectively, you must first start with an initial value, such as 0, so you know you have not yet traced anything to the Output panel. The next step is to test to see if you have exceeded your limit. The first time through, 0 does not exceed the limit of three times. The next step is to trace the content once, and the final step is to increment the initial value, registering that you’ve traced the desired content once. The process then starts over until, ultimately, you will exceed the limit of the loop. The syntax for a basic for loop is as follows:
for (var i:int
= 0; i < 3; i++) {
    trace("hello");
}
You may notice the declaration and typing of the counter, i. This is a common technique because the i variable is often used only for counting and, therefore, is created on the spot and not used again. If you have already declared and typed the counter, you can omit this step. Next is the loop test. In this case, the counter variable must have a value that is less than 3. Finally, the double plus sign (++) is equivalent to i = i + 1, or “add 1 to the current value of i.”
Note
Note the use of the semicolon to execute more than one step in a single line.
The result is three occurrences of the word “hello” in the Output panel. It’s also possible to count down by reversing the values in steps 1 and 2, and then decrementing the counter:
for (var i:int
= 3; i > 0; i--) {
    trace("hello");
}
In other words, as long as the value of i is greater than 0, execute the loop and subtract one from the counter each time. This is less common, and works in this case because the loop only traces a string. However, if you need to use the actual value of i inside the loop, that need may dictate whether you count up or down. For example, if you created 10 movie clips and called them mc0, mc1, mc2, and so on, it may be clearer to count up.
The other loop you’ll likely use is the while loop. Instead of executing its contents a finite number of times, it executes as long as something remains true.
For example, look at a very simple case of choosing a random number. ActionScript generates a random number using a method of the Math class called random(). This method chooses a random number between 0 and 1. So, say you want to choose a random number greater than or equal to 0.5. For the sake of discussion, you have a 50% chance of choosing a desired number each time, so you may end up with the wrong choice several times in a row. To be sure you get a qualifying number, you can add this to your script:
var num:Number = 0;
while (num < 0.5) {
    num = Math.random();
}
Starting with a default value of 0, num will be less than 0.5 the first time into the loop. A random number is then put into the num variable, and if it’s less than 0.5, the loop will execute again. This will go on until a random number that is greater than 0.5 is chosen, thus exiting the loop.
Warning
Use while loops with caution until you are comfortable with them. It’s very easy to accidentally write an infinite loop with no exit, which will crash your machine. Do not try this code yourself, but here is a significantly simplified example of an infinite loop:
var flag:Boolean = true;
while (flag) {
    trace ("I am an infinite loop");
}
In this case, the flag variable remains true and, thus, the loop can never fail.
It’s very important to understand that although they are compact and convenient, loop structures are not always the best method to achieve an outcome. This is because loops are very processor-intensive. Once a loop begins its process, nothing else will execute until the loop has been exited. For this reason, it may be wise to avoid for and while loops when interim visual updates are required.
In other words, when a loop serves as an initialization for a process that is updated only once upon its completion, such as creating the aforementioned grid of 25 movie clips, you are less likely to have a problem. The script enters the loop, 25 clips are created, the loop is completed, a frame update can then occur, and you see all 25 clips.
However, if you want each of the 25 clips to appear one by one, those interim visual updates of the playhead cannot occur while the processor is consumed by the loop. In this situation, it’s more desirable to create a loop using methods that do not interfere with the normal playhead updates. A frame loop is just such a method. A frame loop is simply a repeating frame event, executing an instruction each time the playhead is updated. The events occur concurrently with any other events in the ordinary functioning of the file, so visual updates, for example, can continue while the frame loop is executing.
Frame loops will be explained in greater detail later in this chapter. For now, the important thing is to remember that frame loops offer a possible alternative to for and while loops.
Basic variables can contain only one value. If you set a variable to 1 and then later set that same variable to 2, the value will be reassigned to 2.
However, there are times when you need one variable to contain more than one value. Think of a set of groceries, including 50 items. A variable approach to this task would be to define 50 variables and populate each with a grocery item. That’s the equivalent of 50 pieces of paper, each containing one grocery item. That’s not a shopping list you are likely to use. It’s unwieldy, can only be created at authortime, and you’d have to recall and manage all variable names every time you wanted to access the grocery items.
An array equivalent, however, resembles the way we handle this situation in real life. You can write a list of 50 groceries on one piece of paper. You can add to the list while at the store, cross each item off as it’s acquired, and you only have to manage one piece of paper.
Creating an array is quite easy. You can prepopulate an array by setting a variable (typed as an Array) to a comma-separated list of items, surrounded by brackets. You can also create an empty array by using the Array class. Both techniques are illustrated here:
var myArray:Array = [1, 2, 3];
var yourArray:Array = new Array();
In both cases, you can add to or remove from the array at runtime. For example, you can add a value to an array using the push() method, which pushes the value into the array at the end. You can remove an item from the end of an array using the pop() method.
var myArray:Array = new Array();
myArray.push(1);
trace(myArray);
// 1 appears in the Output panel
myArray.push(2);
// the array now has two items: 1, 2
trace(myArray.pop());
// the pop() method removes the last item, displaying its value of 2
trace(myArray);
// the lone remaining item in the array, 1, is displayed
There are a dozen or so other array methods, allowing you to add to or remove from the front of an array, sort its contents, check for the position of a found item within the array, compare each value against a control value, and more.
You can also add to or retrieve values from locations within the array by using brackets and including the index, or position, of the array you need. Keep in mind that ActionScript uses zero-based arrays, which means that the first value is at position 0, the second is at position 1, the next at position 2, and so on. So, to retrieve the existing fifth value from an array, you must request the item at position 4:
var myArray:Array = ["a", "b", "c", "d", "e"];
trace(myArray[4]);
//"e" appears in the Output panel
Arrays can even contain other arrays. The result is called a multidimensional array. Arrays within arrays can resemble database structures or tables. Here are two examples of creating multidimensional arrays:
var multiArray:Array = new Array();
multiArray.push([1,2,3]);
multiArray.push([4,5,6]);

var multiArray2:Array = new Array();
var array1:Array = [1,2,3];
var array2:Array = [4,5,6];
multiArray2.push(array1);
multiArray2.push(array2);
The example in the first three lines pushes two arrays that are created on the fly into a multidimensional array. The second example pushes two existing arrays, which have already been stored in their own variables, into a multidimensional array. In both cases, the resulting array looks like this:
// [[1,2,3],[4,5,6]]
As stated earlier, this is nothing more than an array of arrays. As such, accessing values from the multidimensional array is similar to accessing values from one-dimensional arrays. First, you follow the array name with brackets and an index that identifies which array you want to query further. Because that, too, is an array, you follow it with another set of brackets and index. The following example contains the syntax required to pull 4 out of the first position of the second array in either multidimensional array in the example (the first example, multiArray, is used here):
trace(multiArray[1][0]);
// 4
Associative arrays store a pair of items—the value and an associated property name, or key, to describe that value. For example, a student might be represented this way:
var student1:Array = new Array();
student1["name"] = "Jodi";
student1["email"] = "[email protected]";
student1["phone"] = "212-555-1212";
You can access the value the same way you set the value:
trace(student1["name"]);
// Jodi
Although the values can be any data type, each property in an associative array must be a string.
Another way to accomplish this task is to use an object. Creating a custom object allows you to get and set your property values using the familiar dot syntax employed throughout ActionScript. There are two ways to define objects. The first is to write them out explicitly, as shown in the following example. The syntax looks a bit like an array, with two differences. First, the entity is wrapped with braces, not brackets. Second, instead of single values, commas separate property/value pairs. To access or populate the values, simply reference the property using dot syntax:
var student2:Object = {name:"Sally", email:
"[email protected]", phone:"212-555-1212"};
trace(student2.name);
// Sally
You can create an array of objects this way. You will see this approach in Chapter 9 when you work with components. To access an object’s property, use the same syntax, but first determine which item in the array you want to manipulate. Pull that object out of the array using brackets, then access its property using dot syntax as previously described:
var studentGroup:Aray = new Array();
studentGroup.push({name:"Jodi", email:"[email protected]",
 phone:"212-555-1212"});
studentGroup.push({name:"Sally", email:"[email protected]", phone:"212-555-1212"});
studentGroup.push({name:"Claire", email:"[email protected]",
 phone:"212-555-1212"});
trace(studentGroup[0].name);
// Jodi
Finally, the clearest way to create and populate an object is to create a new instance of the object and add its properties as needed:
var student3:Object = new Object();
student3.name = "Claire";
student3.email = "[email protected]";
student3.phone = "212-555-1212";
trace(student3.name);
// Claire
If you think of properties as ways of describing an object, using them becomes second nature. Asking where a movie clip is, for example, or setting the size of a movie clip are both descriptive steps and both use properties.
When referencing a property, you must begin with an instance, because you must decide which element to query or change. If you consider a test file with only one movie clip, instantiated as “box,” all that remains is referencing the property and either getting or setting its value.
Table 6-4 contains syntax for making five changes to movie clip properties. Later, when you learn more about events, you’ll change these properties interactively.
Table 6-4. Movie clip properties
Figure 6-7 shows the visual change made by each property included in Table 6-4. The light-colored square is the original state and the darker color represents the square after a property change (the alpha property shows only the final state). The dashed stroke for the visible property indicates that the box is not visible.

A few changes have simplified and unified the way properties are referenced in AS3. First, the properties do not begin with an underscore. Rather than varying property syntax, some with and some without leading underscores, no properties begin with the underscore character.
Second, some value ranges that used to be 0–100 are now 0–1. Examples include scaleX, scaleY, and alpha. Instead of using 50 to set a 50% value, specify 0.5.
Finally, the first scaling method uses the properties scaleX and scaleY rather than _xscale and _yscale, which are their AS1/AS2 equivalents. Typically, AS3 properties will cite the x and y versions of a property as a suffix to make the code easier to read.
Table 6-4 shows syntax for setting a property. Querying the value of a property, also known as getting the property, is just as easy. For example, to trace the box’s alpha value or store it in a variable, you can write either of the following:
trace(box.alpha);
var bAlpha:Number = box.alpha;
You can also set the properties of a class instance. For example, the following code creates an instance of the Point class, and then sets the x and y values of that point:
var myPoint:Point = new Point();
myPoint.x = 20;
myPoint.y = 20;
This code is usually more readable (or at least virtually self-commenting) than trying to make all possible property assignments when the instance is created. For example, in Chapter 7, you’ll apply filters, such as a drop shadow filter, to movie clips with ActionScript. You can customize a filter in one line using this syntax:
var ds:DropShadowFilter = new DropShadowFilter
(5, 45, 0x000000, 0.5, 5, 5, 0.5, 1, false, false, false);
However, you may not remember all of the properties that are being set in that syntax, or you may not remember the order in which they are set. If readability and clarity are more important than brevity, you can accomplish the same task using this:
var ds:DropShadowFilter = new DropShadowFilter();
ds.distance = 5;
ds.angle = 45;
ds.color = 0x000000;
ds.alpha = 0.5;
ds.blurX = 5;
ds.blurY = 5;
ds.strength = 1;
ds.quality = 1;
ds.inner = false;
ds.knockout = false;
ds.hideObject = false;
Methods, the verbs of the ActionScript language, instruct their respective objects to act. Like properties, methods appear consistently in the dot syntax that is the foundation of ActionScript, following the object calling the method. For example, if the movie clip “box” in the main Timeline issues the stop() method, the syntax would appear like this:
box.stop();
Methods also sometimes require values to be passed to the object being manipulated. For example, although the stop() method will stop a movie clip from playing the visible frame, another method will stop playback after first going to a specific frame. The following example tells the movie clip “box” to go to frame 3 and stop:
box.gotoAndStop(3);
Events make the Flash world go ‘round. They are responsible for setting your scripts in motion, causing them to execute. A button can be triggered by a mouse event, and text fields react to keyboard events. Even calling your own custom functions is a means of issuing a custom event.
Events come in many varieties. In addition to the obvious events like mouse and keyboard input, most ActionScript classes have their own events. For example, events are fired when watching a video, working with text, and resizing the Stage. To take advantage of these events to drive your application, you need to be able to detect their occurrences.
In previous versions of ActionScript, there were a variety of ways to trap events. In AS3, trapping events is simplified by relying on one approach for all event handling, the use of event listeners.
The concept of event listeners is pretty simple. Imagine that you are in a lecture hall that holds 100 people. Only one person in the audience has been given instructions about how to respond when the lecturer asks a specific question. In this case, one person has been told to listen for a specific event and to act on the provided instructions when this event occurs.
Now imagine that many more responses are required. For example, when the lecturer takes the stage, someone must dim the lights. When the lecturer clicks a hand-held beeping device, an audio/visual technician must advance to the next slide in the presentation. When each video ends, the lecturer must react by introducing the next exhibit in the lecture. Finally, when an audience member raises a hand, an usher must bring a microphone to assist the audience member in asking his or her question.
These are all reactions to specific events that are occurring throughout the lecture. Some are planned and directed to a specific recipient, such as the beeping that triggers the technician to advance to the next video in the series. Others are unplanned, such as when, or even if, an audience member has a question. Yet each appropriate party in the mix has been told which event to listen for and how to react when that event occurs.
Creating an event listener, in its most basic form, is also fairly straightforward. The first step is to identify the host of the listener. That is, which object should be told to listen for a specific event. One easy-to-understand example is instructing a button to listen for mouse events that might trigger its scripted behavior.
Once you have identified an element that should listen for an event, the next step is choosing an event appropriate for that element. For example, it makes sense for a button to listen for a mouse event, but it makes less sense for the same button to listen for the end of a video or the resizing of the Stage. It would be more appropriate for the video player to listen for the end of the video and for the Stage to listen for any resize event. Each respective element could then act or instruct others to act when that event occurs, which leads to the third main step in setting up a listener.
To identify the instructions that must be executed when an event occurs, you simply write a function, then tell the event listener to call that function when the event is heard. That function uses an argument to receive information about the event that called it, allowing the function to use key bits of data during its execution.
To tie it all together, the addEventListener() method puts the listener into service and assigns the function to be executed when the event is heard. Suppose you want a button called rotate_right_btn to listen for a mouse up event and call the function onRotateRight() when the event is heard. The code to accomplish this looks like the following script:
rotate_right_btn.addEventListener(MouseEvent.MOUSE_UP, onRotateRight);
function onRotateRight(evt:MouseEvent):void {
    box.rotation += 20;
}
In the first line, addEventListener() is attached to the button. The method requires two mandatory parameters. The first is the event for which you want to listen. In AS3, similar events are grouped together into classes to make it easier for you to check against their data types. Checking to make sure the incoming event is of type MouseEvent prevents a KeyboardEvent from triggering the listener function.
The MouseEvent class contains constants that refer to mouse events like mouse up and mouse down. This example uses the MOUSE_UP constant to reference the mouse up event.
The second parameter is the function that should be called when the event is received. In this example, it is a reference to the onRotateRight() function, which begins on the second line. The function used in an event listener is just like any other function, with one exception: the argument in a listener function is not optional.
In the following code, for example, the argument is named evt and receives information about the element that triggered the event. You can use information from this argument in the function, which you’ll do in a moment. The argument should be typed to the expected data to improve error checking. In this case, because the function listens for a MouseEvent, that is the data type is used for the argument.
To illustrate this, look at the impact of another mouse event, with more than one listener is in play.
1 myMovieClip.addEventListener(MouseEvent.MOUSE_DOWN, onStartDrag);
2 myMovieClip.addEventListener(MouseEvent.MOUSE_UP, onStopDrag);
3 function onStartDrag(evt:MouseEvent):void {
4     evt.target.startDrag();
5 }
6 function onStopDrag(evt:MouseEvent):void {
7     evt.target.stopDrag();
8 }
In this code, two event listeners are assigned to a movie clip. One listens for a mouse down event and another listens for mouse up. They each invoke different functions. In both functions, however, the target property of the event, which is retrieved from the function argument, identifies which element received the mouse event. This allows the instruction in line 3 to start dragging the selected movie clip, and allows the instruction in line 6 to stop dragging the selected movie clip without specifying the movie clip using its instance name in either case.
This generic approach is very useful because it makes the function much more flexible. It means the function can act upon any appropriate item that is clicked and passed into its argument. In other words, the same function could start and stop dragging any movie clip to which the same listener was added. In the companion source files, the start_stop_drag.fla file shows this by adding the following lines to the previous example:
9 myMovieClip2.addEventListener(MouseEvent.MOUSE_DOWN, onStartDrag);
10 myMovieClip2.addEventListener(MouseEvent.MOUSE_UP, onStopDrag);
You can drag and drop each movie clip simply by adding another movie clip to the exercise and specifying the same listeners.
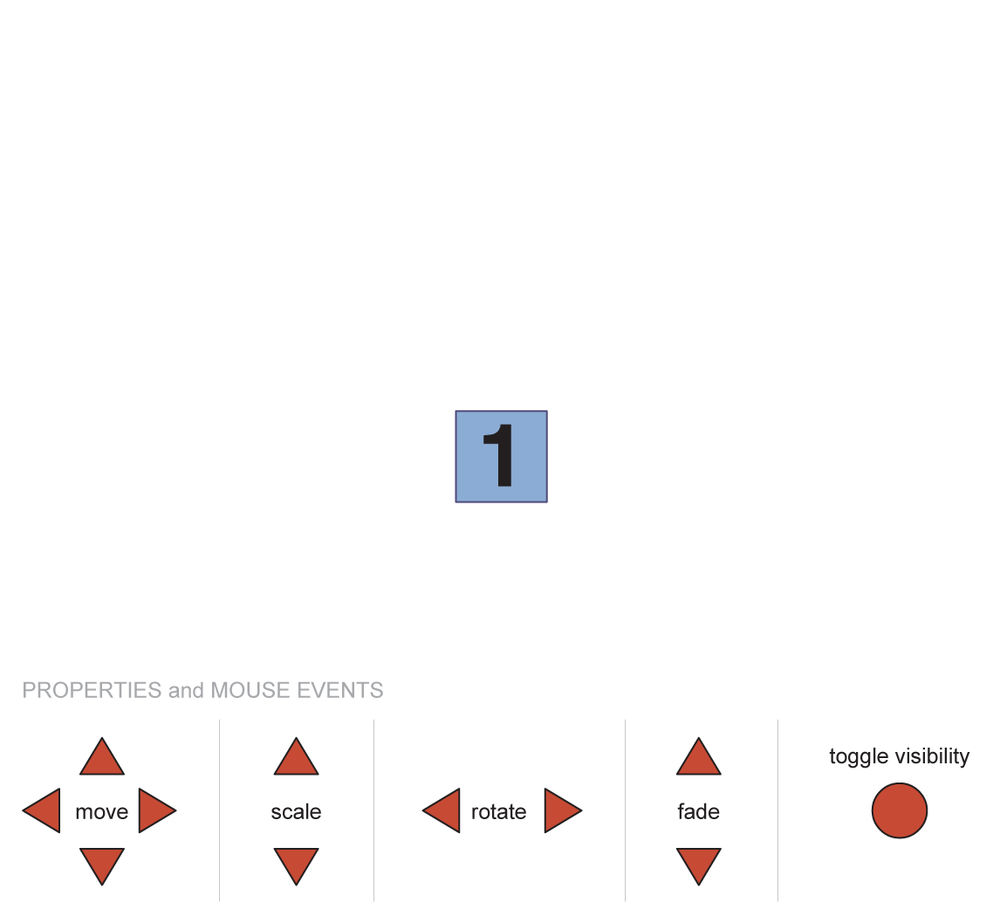
Now you can use syntax from the Properties, Methods, and Events sections of this chapter to set up interactive control over a movie clip. In the companion source code, you’ll find a file called props_methods_events.fla. It contains nothing more than the example movie clip “box,” and two buttons in the Library that will be used repeatedly to change the five properties discussed earlier. The movie clip contains numbers to show which of its frames is visible at any time, and the instance names of each button will reflect its purpose. Included are move_up_btn, scale_down_btn, rotate_right_btn, fade_up_btn, and toggle_visibility_btn, among others. The start of the main chapter project consists of several buttons that will modify properties of the center movie clip. Figure 6-8 shows the layout of the file.
Starting with movement, you need to define one or more functions to update the location of the movie clip. In this case, you’ll define a separate function for each type of movement.
1 function onMoveLeft(evt:MouseEvent):void {
2     box.x -= 20;
3 }
4 function onMoveRight(evt:MouseEvent):void {
5     box.x += 20;
6 }
7 function onMoveUp(evt:MouseEvent):void {
8     box.y -= 20;
9 }
10 function onMoveDown(evt:MouseEvent):void {
11     box.y += 20;
12 }
You can see that the structure of the functions is consistent. Once you have defined the functions, all you have to do is add the listeners to the appropriate buttons:
13 move_left_btn.addEventListener(MouseEvent.MOUSE_UP, onMoveLeft);
14 move_right_btn.addEventListener(MouseEvent.MOUSE_UP, onMoveRight);
15 move_up_btn.addEventListener(MouseEvent.MOUSE_UP, onMoveUp);
16 move_down_btn.addEventListener(MouseEvent.MOUSE_UP, onMoveDown);
This simple process is then repeated for each of the buttons on stage. The remainder of the script collects the aforementioned properties and event listeners in the same pattern used with the four movement listeners to complete the demo.
17 scale_up_btn.addEventListener(MouseEvent.MOUSE_UP, onScaleUp);
18 scale_down_btn.addEventListener(MouseEvent.MOUSE_UP, onScaleDown);
19
20 rotate_left_btn.addEventListener(MouseEvent.MOUSE_UP, onRotateLeft);
21 rotate_right_btn.addEventListener(MouseEvent.MOUSE_UP, onRotateRight);
22
23 fade_in_btn.addEventListener(MouseEvent.MOUSE_UP, onFadeIn);
24 fade_out_btn.addEventListener(MouseEvent.MOUSE_UP, onFadeOut);
25
26 toggle_visible_btn.addEventListener(MouseEvent.MOUSE_UP, onToggleVisible);
27
28 function onScaleUp(evt:MouseEvent):void {
29     box.scaleX += 0.2;
30     box.scaleY += 0.2;
31 }
32 function onScaleDown(evt:MouseEvent):void {
33     box.scaleX -= 0.2;
34     box.scaleY -= 0.2;
35 }
36
37 function onRotateLeft(evt:MouseEvent):void {
38     box.rotation -= 20;
39
40 }
41 function onRotateRight(evt:MouseEvent):void {
42     box.rotation += 20;
43 }
44
45 function onFadeIn(evt:MouseEvent):void {
46     box.alpha += 0.2;
47 }
48 function onFadeOut(evt:MouseEvent):void {
49     box.alpha -= 0.2;
50 }
51
52 function onToggleVisible(evt:MouseEvent):void {
53     box.visible = !box.visible;
54 }
Finally, you can add an example of a mouse event triggering a method. The final 10 lines of this script will toggle the movie clip between playing and stopped states. Because the stop() and play() methods are not Boolean opposites, you can’t use a single not (!) operator to switch the states. Instead, you need to use a conditional statement that tests the value of a Boolean variable. Each time the play state is reversed, the Boolean variable can be toggled using the not (!) operator to prepare for the next test.
55 var isPlaying:Boolean = true;
56 box.addEventListener(MouseEvent.CLICK, onTogglePlay);
57 function onTogglePlay(evt:MouseEvent):void {
58     if (isPlaying) {
59         box.stop();
60     } else {
61         box.play();
62     }
63     isPlaying = !isPlaying;
64 }
Line 55 creates the variable isPlaying and sets it to true. The default state of the movie clip is playing. Lines 56 through 64 contain the event listener. The listener triggers the onTogglePlay() function when a user clicks the box movie clip.
Line 58 tests to see if isPlaying is true. If so, line 59 stops the movie clip. Otherwise, line 61 plays the movie clip. In either case, the value of isPlaying is reversed (if it was false, it’s set to true, and vice versa).
Frame events are not triggered by user input the way mouse events are. Instead, they occur without intervention as the Flash file plays. Each time the playhead enters a frame that contains a frame script, that script is executed. This means that frame scripts execute only once for the life of the frame, making them excellent for seldom-executed tasks such as initializations. For a frame script to execute more than once, the playhead must leave the frame and return, either because of an ActionScript navigation instruction or a playback loop that returns the playhead to frame 1 when it reaches the end of the Timeline.
However, using an event listener, you can listen for a recurring enter frame event in a movie clip that is independent from the playhead. This type of event can trigger even when the playhead is stopped; this is a great way to run continuous animation. An enter frame event is fired at the same pace as the document frame rate. For example, if the default frame rate is 12 frames per second, the default enter frame frequency is 12 times per second.
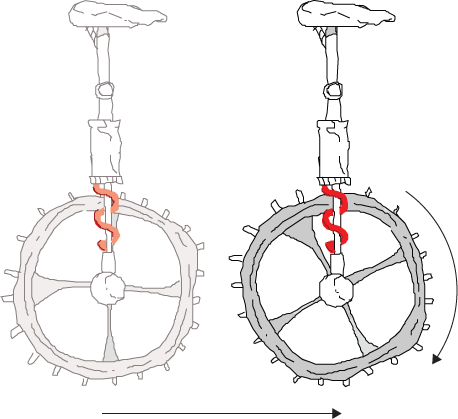
The frame_events.fla file in the companion source code demonstrates this event by updating the position of a unicycle every enter frame. It places the unicycle at the horizontal location of the mouse and rotates the wheel child movie clip. Figure 6-9 shows the effect. As the user moves the mouse to the right on the Stage, the unicycle will move to the right, and the wheel will rotate clockwise.
Here is the code for this example. The first line adds an enter frame event listener to the main Timeline. The listener function then sets the unicycle’s x location to the mouse’s x location using the mouseX property. It also sets the rotation property of the wheel clip (nested inside cycle) to the same value.
stage.addEventListener(Event.ENTER_FRAME, onFrameLoop);
function onFrameLoop(evt:Event):void {
    cycle.x = mouseX;
    cycle.wheel.rotation = mouseX;
}
Note
This example also demonstrates a scripting shortcut aided by ActionScript. When specifying a rotation greater than 360 degrees, ActionScript will understand and use the correct value; that is, 360 degrees is one full rotation around a circle, returning to degree 0 (720 degrees is twice around the circle and also equates to 0). Similarly, 370 degrees is equivalent to 10 degrees, as it’s 10 degrees past degree 0, and so on. This allows you to set the rotation of the wheel movie clip to the x coordinate of the mouse without worrying about moving past the 360-pixel point on the Stage.
While event listeners make most event handling easy to add and maintain, leaving them in place when unneeded can wreak havoc. From a logic standpoint, consider what could happen if you kept an unwanted listener in operation. Imagine a week-long promotion for radio station 101 FM, which rewards the 101st customer to enter a store each day of that week. The manager of the store is set up to listen for “customer enter” events and when customer 101 enters the store, oodles of prizes and cash are bestowed upon the lucky winner. Now imagine if you left that listener in place after the promo week was over. Oodles of prizes and cash would continue to be awarded at great, unexpected expense.
Unwanted events are not the only problem, however. Every listener occupies a small amount of memory. Injudiciously creating many event listeners without cleaning up after yourself can result in dwindling memory. Therefore, it’s a good idea to remove listeners when you know they will no longer be needed.
To do so, simply use the removeEventListener() method. By specifying the owner of the relevant event and the listener function that is triggered, you can remove that listener so it no longer reacts to future events. The removeEventListener() method requires two parameters: the event and function specified when the listener was created. Specifying the event and function is important, as you may have multiple listeners set up for the same event.
The following example rotates the hand of a watch 2 degrees every time an enter frame event is fired. When the hand rotates to 90 degrees, the listener is removed and the rotation stops. (See the remove_listener.fla source file.)
this.addEventListener(Event.ENTER_FRAME, onLoop);
function onLoop(evt:Event):void {
    watch.hand.rotation += 2;
    if (watch.hand.rotation >= 90) {
        this.removeEventListener(Event.ENTER_FRAME, onLoop);
    }
}One of the most dramatic changes introduced by AS3, particularly for designers accustomed to prior versions of the language, is the way in which code is used to access visual elements. AS3 brings with it an entirely new way of handling visual assets, called the display list. It’s literally a hierarchical list of everything you can see, including movie clips, buttons, text fields, and more.
There’s a lot of power and flexibility available to a scripter who uses the display list to its full potential. This book’s companion volume includes deeper coverage of the display list, but here you’ll focus on the tasks you’ll find yourself repeating over and over: adding assets to the list, referencing assets in the list by position or name, and removing assets from the list.
If you have experience with prior versions of ActionScript, you’ll probably be excited to hear that the many varied ways of adding an asset to the visual world of Flash have been unified and simplified. If you’re new to ActionScript, the news is even better. You only have to learn one approach to getting an asset into the public eye.
Objects that you can add to the display list are called, appropriately, display objects. For all display objects, you’ll use a variant of new MovieClip()—the new keyword followed by the object class for which you want to create an instance. Other examples include new TextField(), new Video(), new Bitmap(). Even adding an existing movie clip from the Library is consistent with this syntax, as you’ll see in a moment.
While there are many object types that you can add to the display list, you’ll focus on movie clips initially. Just like any other class, the new keyword creates an instance of the display object and you can use the object class (MovieClip) as a data type:
var mc:MovieClip = new MovieClip();
But that’s only the first half of the story. This code creates an object (in this case, a movie clip), but it only places that object in memory. It hasn’t yet become a part of the list of assets the user can see. The second half of the story is adding the object to the display list.
The primary way to add a movie clip to the display list is by using the addChild() method. To add the movie clip you created a moment ago to the main Timeline, you can place this statement after the prior instruction to create the movie clip:
addChild(mc);
Despite its simplicity, this code does imply a destination for the movie clip. By omitting an explicit destination, you cause the movie clip to be added to the scope in which the script was written—in this case, the main Timeline.
You can specify a particular location to which the movie clip will be added, but not all display objects will be happy to adopt a child. For example, neither the Video nor Bitmap display object types can have children. To include a child, the destination must be a display object container. Examples of display object containers include Stage, MovieClip, and Sprite (a one-frame movie clip with no Timeline), but for the purposes of this chapter, you’ll continue to work with movie clips.
So, if you wanted to add the mc movie clip nested inside another movie clip, called mc2, you would provide a destination object for the addChild method to act upon:
mc2.addChild(mc);
You don’t even have to specify a depth (visible stacking order), because the display list automatically handles that for you. In fact, you can even use the same code for changing the depths of existing display objects.
Thus far you’ve either referenced display objects using instance names that have been applied on the Stage (through the Properties panel) or limited the dynamic creation of display objects to empty movie clips.
However, you will likely find a need to dynamically create and use instances of movie clips that already exist in your library. This process is nearly identical to creating and using empty movie clips, but one additional step is required: you must first set up the symbol first by adding a linkage class. In its most basic use, this is nothing more than a unique name that allows you to create an instance of the symbol dynamically.
To see this process, look at the companion source file addChild.fla. In the Library, you will find a unicycle. Select the movie clip in your library, then click the Symbol Properties button (it looks like an “i” at the bottom of the Library) for access to all the symbol properties.
In the resulting dialog, shown in Figure 6-10, enable the Export for ActionScript option and add Unicycle to the Class field.
You will also likely notice that Flash adds the MovieClip class (in this case) to the Base class field for you. This makes it possible to automatically access the properties, methods, and events available to the MovieClip class. For example, you can automatically manipulate the x and y coordinates of your new custom movie clip.
Now that you’ve given your movie clip a class name, you can create an instance of that custom movie clip class the same way you created an instance of the generic movie clip class. Instead of using MovieClip(), however, you will use Unicycle() to create the movie clip. The same call of the addChild() method adds the newly created movie clip to the display list.
var cycle:MovieClip = new Unicycle();
addChild(cycle);
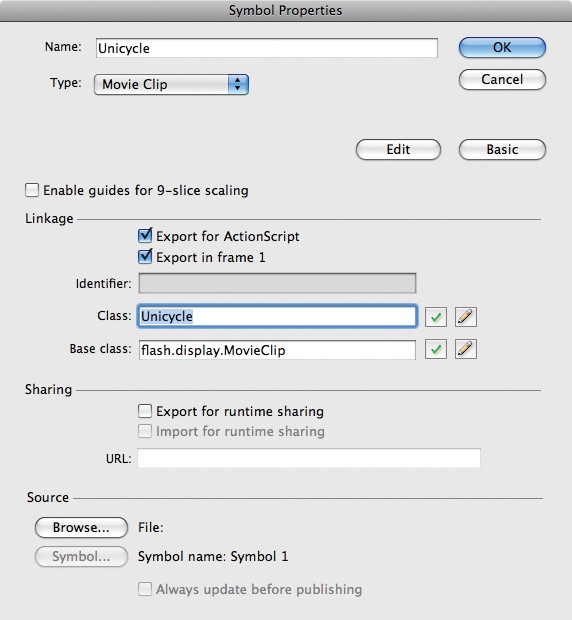
The addChild() method adds the display object to the end of the display list, which always places the child on top of other display objects. In some cases, however, you may need to add a child at a specific position in the display list. For example, you may wish to insert an item into the middle of a vertical stack of display objects.
This example, found in the addChildAt.fla source file, adds a Library movie clip with the class name Ball to the start of the display list with every mouse click. The ultimate effect is that a new ball is added below the previous balls and positioned down and to the right 10 pixels every time the mouse is clicked.
1 var inc:uint = 0;
2
3 stage.addEventListener(MouseEvent.CLICK, onClick);
4
5 function onClick(evt:MouseEvent):void {
6     var ball:MovieClip = new Ball();
7     ball.x = ball.y = 100 + inc * 10;
8     addChildAt(ball, 0);
9     inc++;
10 }
Line 1 initializes a variable that will be incremented with each ball added. Line 3 adds an event listener to the Stage, listening for a mouse click, so that any mouse click will trigger the listener’s function. The function in lines 5 through 10 performs four basic tasks. In line 6, a new Ball movie clip is created.
Line 7 manipulates the x and y coordinates in a single instruction, setting x equal to y, which is equal to the value of an expression. This is handy when both x and y values are the same. In this case, the expression sets the new ball to x and y of 100 and adds a 10-pixel offset for each ball added. For example, when the first ball is added, inc is 0, so the additional pixel offset is 0*10, or 0. inc is incremented at the end of the function, in line 9. The next mouse click that calls the function will update the offset to 1*10, or 10, pixels for the second ball; 2*10, or 20, pixels offset for the third ball; and so on. Most importantly, line 8 adds the ball to the display list, but always at position 0, making sure the newest ball is always on the bottom.
Choosing when to use addChild() and when to use addChildAt() depends entirely on your needs. If you only need to add the display object to the display list, or if you want the object to appear on top of all other objects, use addChild(). If you need to insert the object anywhere below the top of the visual stacking order, use addChildAt() and specify a depth.
Any time you do specify a depth, the new object will be sandwiched between the surrounding objects, rather than overwriting whatever is in the specified depth. The display list can have no gaps in it, so everything above an insertion level is automatically moved up a notch in the list. For example, assume a file started with objects in levels 0 through 9 by virtue of adding 10 objects to the display list. Then assume you need to insert a new display object into level 5. All objects in levels 5 through 9 will automatically move up to levels 6 through 10 to accommodate the insert.
It’s equally important to know how to remove objects from the display list. The process for removing objects is nearly identical to the process for adding objects to the display list. To remove a specific display object from the display list, use the removeChild() method:
removeChild(ball);
To remove a display object at a specific level, use the removeChildAt() method:
removeChildAt(0);
The following example is the reverse of the addChildAt() script discussed in the prior section. It starts by using a for loop to add 20 balls to the stage, positioning them with the same technique used in the prior script. It then uses an event listener to remove the children with each click.
1 for (var inc:uint = 0; inc < 20; inc++) {
2     var ball:MovieClip = new Ball();
3     ball.x = 100 + inc * 10;
4     ball.y = 100 + inc * 10;
5     addChild(ball);
6 }
7
8 stage.addEventListener(MouseEvent.CLICK, onClick);
9 function onClick(evt:MouseEvent):void {
10     removeChildAt(0);
11 }This script will work correctly as long as there is something in the display list. If, after removing the last ball, you click the Stage again, there will be a warning that, “the supplied index is out of bounds.” This makes sense, because you are trying to remove a child from position 0 of the display list, when there is nothing in the display list at all.
To avoid this problem, you can first check to see if there are any children in the display object container that you are trying to empty. Making sure that the number of children exceeds zero will prevent the aforementioned error from occurring. The following is an updated onClick() function, replacing lines 9–11 in the previous code, with the new conditional in bold:
9      function onClick(evt:MouseEvent):void {
10        if (numChildren > 0) {
11    removeChildAt(0);
12    }
13 }As discussed previously for event listeners, it’s always a good idea to try to keep track of your objects and remove them from memory when you are sure you will no longer need them.
Keeping track of objects is particularly relevant when discussing the display list because it’s easy to remove an object from the display list and forget to remove it from RAM. When this is the case, the object will not be displayed but will still linger in memory. The following script, a simplification of the previous example, will remove a movie clip from both the display list and RAM:
1 var ball:MovieClip = new Ball();
2 ball.x = 100;
3 ball.y = 100;
4 addChild(ball);
5
6 stage.addEventListener(MouseEvent.CLICK, onClick);
7
8 function onClick(evt:MouseEvent):void {
9     this.removeChild(ball);
10     //ball removed from display list but still exists
11     trace(ball);
12     ball = null;
13     //ball now entirely removed
14     trace(ball);
15
16     stage.removeEventListener(MouseEvent.CLICK, onClick);
17 }
Lines 1 through 5 create and position the ball, then add it to the display list. Line 6 adds a mouse click listener to the Stage. The first line of function content, line 9, removes the ball from the display list using the removeChild() method. Although it’s no longer displayed, it’s still around, as shown by line 11, which traces the object to the Output panel. Line 12, however, sets the object to null, removing it entirely from memory—again, shown by tracing the object to the output panel in Line 14.
As an added review of best practices, line 16 removes the event listener.
Many of the example scripts in this chapter demonstrate working with children that have been previously stored in a variable. However, you will likely need to find children in the display list with little more to go on than their position or name.
Finding a child by position is consistent with adding or removing children at a specific location in the display list. Using the getChildAt() method, you can work with the first child of a container using this familiar syntax:
var dispObj:DisplayObject = getChildAt(0);
If you don’t know the location of a child that you wish to manipulate, you can try to find it by name using its instance name, instead of using the display list index. Assuming a child has an instance name of circle, you can store a reference to that child using this syntax:
var dispObj:DisplayObject = getChildByName("circle");Finally, if you need to know the location of a display object in the display list but have only its name, you can use the getChildIndex() method to accomplish your goal.
var dispObj:DisplayObject = getChildByName("circle");
var dispObjIndex:int = getChildIndex(dispObj);In the preceding discussion, you used DisplayObject as the data type when retrieving a reference to a display object, rather than another type, like MovieClip, for example. This is because you may not know if the child is a movie clip or another type of display object.
In fact, Flash may not even know the data type, such as when referencing a parent movie clip created using the Flash interface (rather than ActionScript). Without the data type information supplied in the ActionScript creation process, Flash sees only the parent Timeline as a display object container.
To tell Flash that the container in question is a movie clip, you can cast it as such; that is, you can change the data type of that object to MovieClip. For example, consider a movie clip created in the Flash Player interface that needs to tell its parent, the main timeline, to go to frame 20. A simple line of ActionScript is all that would ordinarily be required:
parent.gotoAndStop(20);
However, since Flash doesn’t know that gotoAndStop() is a legal method of the display object container (the Stage, for example, can’t go to frame 20, and neither can a sprite), you will get the following error:
Call to a possibly undefined method gotoAndStop
through a reference with static type flash.display:DisplayObjectContainer.
To tell Flash the method is legal for the main timeline, you need to state that the parent is of a data type that supports the method. In this case, the main timeline is a movie clip, so you can say:
MovieClip(parent).gotoAndStop(20);
This will prevent the error from occurring, and the movie clip will be able to successfully send the main timeline to frame 20.
One of the most basic ActionScript skills you need to embrace is navigating within your Flash movies. You will often use these skills to control the playback of the main Timeline or movie clips nested therein.
The first thing to learn is how to start and stop playback of the main Timeline or a movie clip, and then add an initial jump to another frame. Figure 6-11 shows navigation_01.fla, which contains four Timeline tweens of black circles. For added visual impact, the circles use the Invert blend mode to create an interesting optical illusion of rotating cylinders. You can start and stop playback at any point, as well as starting and stopping in a specific frame—frame one, in this example. Initially, you’ll rely on frame numbers to specify where to start and stop.

You’ve already seen the stop() action at work in a frame script as a passive means of halting playback at the end of an animation or, perhaps, to support a menu screen or similar single frame. In the following code, look at invoking the stop() action via user input, such as clicking a button.
In the first frame of the actions layer, you’ll find the following code:
1 stopBtn.addEventListener(MouseEvent.CLICK, onStopClick);
2
3 function onStopClick(evt:MouseEvent):void {
4     stop();
5 }
This code does not introduce anything new, other than the aforementioned use of stop() as a method triggered by user interaction. Line 1 is an event listener added to a button named stopBtn. It uses a mouse click to call onStopClick.
The effect of this setup is to add to the stopBtn functionality for stopping the main movie. All playback of the main Timeline will cease when the user clicks the button. Adding new lines to the script (shown here in bold) will allow you to restart playback. The code structure is similar to the previous example, but invokes the play() method on the playBtn instead. Using this pair of buttons, you can start and stop playback at any time without relocating the playback head in the process.
1 stopBtn.addEventListener(MouseEvent.CLICK, onStopClick);
2 playBtn.addEventListener(MouseEvent.CLICK, onPlayClick);
3
4 function onStopClick(evt:MouseEvent):void {
5     stop();
6 }
7 function onPlayClick(evt:MouseEvent):void {
8     play();
9 }
Using stop() and play() in this fashion is useful for controlling a linear animation, much the way a controller bar might control audio or video playback. However, it’s less common in the case of menus or other navigation devices because typically you must jump to a specific point in your Timeline before stopping or playing.
For example, you might have generic sections that could apply to any project, such as home (start), about (info), and help. If restricted to the use of stop() and play(), you’d be forced to play through one section to get to another.
Adding again to the example script, the following content shown in bold adds a slight variation. The buttons in the new script function in similar ways, but instead of stopping in or playing from in the current frame, the new buttons go to a specified frame first. For example, if you had previously stopped playback in frame 20, triggering play() again would begin playback at frame 20. However, if you use gotoAndPlay() and specify frame 1 as a destination (shown in the script that follows), you will resume playback at frame 1 rather than at frame 20. There are no structural differences in this code, so simply add the content shown in bold to your ongoing script:
1 stopBtn.addEventListener(MouseEvent.CLICK, onStopClick);
2 playBtn.addEventListener(MouseEvent.CLICK, onPlayClick);
3 gotoPlayBtn.addEventListener(MouseEvent.CLICK, onGotoPlayClick);
4 gotoStopBtn.addEventListener(MouseEvent.CLICK, onGotoStopClick);
5
6 function onStopClick(evt:MouseEvent):void {
7     stop();
8 }
9 function onPlayClick(evt:MouseEvent):void {
10     play();
11 }
12 function onGotoPlayClick(evt:MouseEvent):void {
13     gotoAndPlay(1);
14 }
15 function onGotoStopClick(evt:MouseEvent):void {
16     gotoAndStop(1);
17 }
To add a nice level of diagnostic reporting to your playback, you can add two new properties to this script. Using the trace() method to send text to the Output panel, you can reference totalFrames to display the number of frames in your movie, and reference currentFrame to tell you which frame the playback head is displaying at the time the script is executed.
trace("This movie has " + totalFrames + " frames.");
trace(currentFrame);
The companion sample file, navigator_02.fla, demonstrates the use of these properties. It uses totalFrames at the start of playback, and uses currentFrame each time a button is clicked.
There are specific advantages to using frame numbers with goto methods, including simplicity and use in numeric contexts (such as with a loop or other type of counter). However, frame numbers also have specific disadvantages. The most notable disadvantage is that edits that you make to your file subsequent to the composition of your script may result in a change to the frame sequence in your timeline.
For example, your help section may start at frame 100, but you may then insert or delete frames in a section of your timeline prior to that frame. This change may cause the help section to shift to a new frame, and your navigation script will no longer send the playback head to the help section.
One way around this problem is to use frame labels to mark the location of a specific segment of your timeline. As long as you shift content by inserting or deleting frames to all layers in your timeline, therefore maintaining sync among your layers, a frame label will move with your content.
For example, if your help section, previously at frame 100, is marked with a frame label called “help,” adding 10 frames to all layers in your Timeline panel will not only shift the help content, but will also shift the frame label used to identify its location. So, although you will still be navigating to the “help” frame label after the addition of frames, you will correctly navigate to frame 110.
This is a useful feature when you are relying heavily on timeline tweens for file structure or transitions, or when you think you may be adding or deleting sections in your file. In fact, frame labels free you to simply rearrange your timeline if desired. The capability to go to a specific frame label, no matter where it is, means that you don’t have to arrange your file linearly, and you are free to add last-minute changes to the end of your timeline without having to remember an odd sequence of frame numbers to jump to content.
The sample file, frame_labels_01.fla, demonstrates the use of frame labels instead of frame numbers when using a goto method. It also illustrates another important and useful concept, which is that you can use these methods to control the playback of movie clips as well as the main timeline.
Instead of controlling the playback of a linear animation, frame_labels_01.fla moves the playback head between the frames of a movie clip called pages. This is a common technique for swapping content in Flash because you can keep your main Timeline simple and just jump the movie clip from frame to frame to reveal each new screen. Figure 6-12 displays the “page1” frame of frame_labels_01.fla. The Timeline inset shows the frame labels.
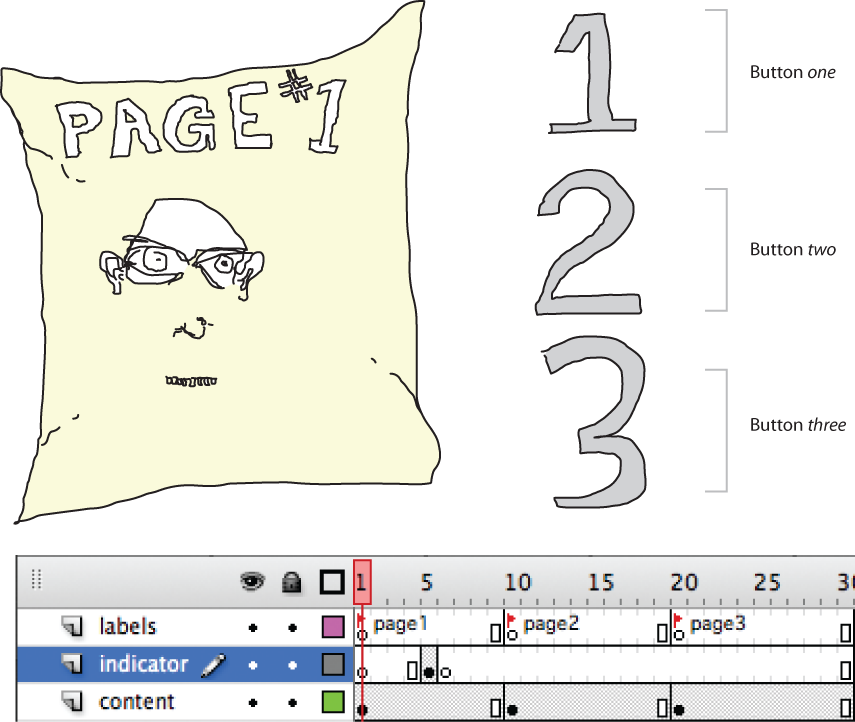
The initial setup of this example requires that you prevent the movie clip from playing on its own so that you can exert the desired control over its playback. There are several ways to do this. The first, and perhaps most obvious, approach is to put a stop() action in the first frame of the movie clip. You will see this technique used often.
The second is to add the stop() method to a main timeline script, but to target a movie clip instead of the main timeline. To do this, precede the method with the object you wish to stop, as shown in line 1 of the following script. In this case, you’re stopping the movie clip called pages.
You’ll look at a third method for stopping movie clips at the end of this chapter, but for now, let’s focus on the simple changes this file introduces. In addition to stopping the pages movie clip in line 1, this script adds listeners to buttons one, two, and three, which cause the movie clip to change frames in lines 8, 11, and 14, respectively.
1 pages.stop();
2
3 one.addEventListener(MouseEvent.CLICK, onOneClick);
4 two.addEventListener(MouseEvent.CLICK, onTwoClick);
5 three.addEventListener(MouseEvent.CLICK, onThreeClick);
6
7 function onOneClick(evt:MouseEvent):void {
8     pages.gotoAndStop("page1");
9 }
10 function onTwoClick(evt:MouseEvent):void {
11     pages.gotoAndStop("page2");
12 }
13 function onThreeClick(evt:MouseEvent):void {
14     pages.gotoAndStop("page3");
15 }
The code is essentially the same as the ActionScript you’ve seen before. To test the effectiveness of using frame labels, simply add or delete frames across all layers before one of the existing frame labels. Despite changing the frame count, you will find that the navigation still works as desired.
Also new to AS3 is the ability to dynamically change the frame rate at which your file plays at runtime. The default frame rate of a Flash CS4 movie is 24 frames per second. Previously, whichever frame rate you chose was the frame rate you were stuck with for the life of your SWF. It’s now possible to update the speed at which your file plays by changing the frameRate property of the stage, as demonstrated in the sample file frame_rate.fla.
This simple script increments or decrements the frame rate by 5 frames per second with each click of a button. You may also notice another simple example of error checking, in the function used by the slower button, to prevent a frame rate of zero or below. Start the file and watch it run for a second or two at the default frame rate of 24 frames per second. Then, experiment with additional frame rates to see how they change the movie clip animation.
1 info.text = stage.frameRate;
2
3 faster.addEventListener(MouseEvent.CLICK, onFasterClick);
4 slower.addEventListener(MouseEvent.CLICK, onSlowerClick);
5
6 function onFasterClick(evt:MouseEvent):void {
7     stage.frameRate += 5;
8     info.text = stage.frameRate;
9 }
10 function onSlowerClick(evt:MouseEvent):void {
11     if (stage.frameRate > 5) {
12         stage.frameRate -= 5;
13     }
14     info.text = stage.frameRate;
15 }
This frameRate property requires little explanation, but its impact should not be underestimated. Other interactive environments have long been able to vary playback speed, and this is a welcome change to ActionScript for many enthusiastic developers, especially animators. Be it for a Matrix parody or a sports game, slow mo has never been easier.

You won’t add anything new to the portfolio project in this chapter, but it’ll help to review the scripts you wrote in previous chapters now that you have a little more experience with AS3.
Chapter 3: The Deco Tool
To begin, you wrote a script in Chapter 3 that animated the symbols created by the Deco tool (Figure 6-13).
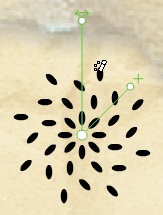
The Deco tool quickly and automatically adds movie clips to a parent movie clip container, arranging the children in circular patterns. However, you did not give each of the child ovals instance names, so you might wonder how they can be controlled with ActionScript.
The answer is by using display list methods and properties. The script you entered in Chapter 3 uses the numChildren property to determine how many ovals are in the parent movie clip, and then loops through that number, gaining access to each child using the getChildAt() method. The combination of these tools makes it possible for the script to manipulate each oval individually.
1 ovals.addEventListener(Event.ENTER_FRAME, onEnter);
2 function onEnter(evt:Event):void {
3     var numOvals:int = ovals.numChildren;
4     for (var i:int = 0; i < numOvals; i++) {
5         ovals.getChildAt(i).rotation += 10;
6     }
7     ovals.rotation = mouseX;
8 }
Line 1 adds an enter frame listener to the parent movie clip, which has an instance name of ovals, which was applied through the Properties panel. Lines 2 through 8 comprise the listener function, onEnter(). This function includes the mandatory event argument, typed to the Event class, and returns no value.
Line 3 checks the number of children in the parent movie clip and places that integer into the numOvals variable.
Lines 4 through 6 contain a for loop that loops through those children one at a time. Each time through the loop, the child at the next highest level in the display list is rotated 10 degrees. That is, the first time through the loop, the loop counter is 0. As such, the child in the ovals movie clip that is at level 0 is rotated. The next time through the loop, the ovals child at level 1 is rotated, and so on.
After the for loop fully executes, the parent movie clip (not the individual oval-shaped children) is also rotated, this time to the same value as the x position of the mouse. The entire process is repeated every time the enter frame event is fired or, by default, 24 times per second.
This means that you can move the mouse left and right to control the rotation of the container movie clip. All the while, the individual ovals inside the container continue to rotate, contributing to an interesting visual effect.
Chapter 5: The Portfolio Project Navigation
In Chapter 5, you added a script to control the navigation of the portfolio project. With every click of a button, this script populates a variable and sets the portfolio in motion. A corresponding script then sends the playhead to the frame chosen by the button click, and a stop() action halts the playhead on the desired screen.
1 var nextSection:String;
2
3 navigation.home.addEventListener(MouseEvent.CLICK, onNavigate);
4 navigation.gallery.addEventListener(MouseEvent.CLICK, onNavigate);
5 navigation.lab.addEventListener(MouseEvent.CLICK, onNavigate);
6 navigation.help.addEventListener(MouseEvent.CLICK, onNavigate);
7
8 function onNavigate(evt:MouseEvent):void {
9     nextSection = evt.target.name;
10     play();
11 }
Line 1 creates the needed variable and types its data as a string of text.
Lines 3 through 6 add event listeners to the navigation buttons that sit within the navigation bar container. Each button calls the same function when a mouse click is detected.
Lines 8 through 11 define the listener function, which expects a MouseEvent and returns no value.
Line 9 parses the incoming event information to get the name of the target object that received the click, and then puts that name into the nextSection variable. The function then sets the playhead in motion.
At the end of the section, a separate frame script tells the playhead to go to the desired frame and play through the section so the transitions can complete their visual updates.
gotoAndPlay(nextSection);
Finally, after the transitions are complete, the playhead is stopped in the middle of the content frame span by another independent script:
stop();