Three-dimensional manipulation of Flash assets is not new, but 3D has never been an integrated part of any version of the application until now.
Historically, 3D effects have been accessible to Flash developers in a variety of ways. The most basic approach to adding a 3D appearance to your projects has always been to import sequential images rendered by external 3D applications. Interactive 3D simulations became possible early on as coders began writing basic ActionScript solutions that approximated 3D with dynamic drawing techniques. Today, much more advanced 3D ActionScript packages are available from third-party developers. Several of these 3D engines contain an impressive array of 3D features, including the ability to load 3D models, control textures, lighting, and more. For your exploration, a short list of additional 3D resources is available in the upcoming 3D Outside the Box sidebar.
Unfortunately, from a beginner’s standpoint, these options are a step or two away, because their use requires intermediate to advanced ActionScript coding skills. Now the good news: for the first time, Flash CS4 Professional introduces simple 3D support available directly in the Flash interface, so even Flash neophytes can add a little 3D to their projects. When you need interactivity, you can use ActionScript, which includes the same 3D features, as well as a few more.
None of this means that Flash is now a full-fledged 3D animation or modeling application. Flash CS4’s 3D capabilities are often referred to as 2.5D because some true 3D features, such as support for models created in 3D modeling applications, are not supported. Essentially, Flash can distort movie clips in clever ways that simulate 3D. This chapter focuses on how to rotate, position, and animate movie clips within 3D space. You will also create a parallax scrolling effect for your portfolio project, in which objects at different 3D depths scroll at different speeds.
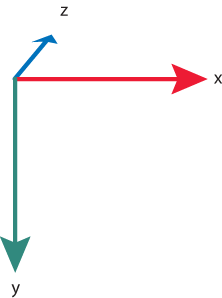
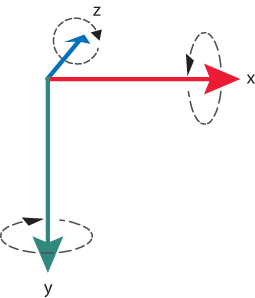
The two basic ways to move through 3D space are translation and rotation. In simple terms, translation is movement along a specific axis and rotation is spinning around a specific axis. Just like the 2D axes you’ve worked with for several chapters, 3D space also contains an x-axis and a y-axis. Furthermore, each of these 3D axes points in the same direction as its 2D counterpart. Imagine a wall in front of you. The x-axis runs left and right. Adding to the x position value moves an object to the right, while subtracting from the x position value moves the object to the left. The y-axis runs up and down. Adding to the y position value moves an object down, while subtracting from the y position value moves the object up.
3D space, however, adds a third axis—the z-axis. This z-axis is used to simulate depth in a 3D world, and will be discussed in a bit more detail later in this chapter. For now, think about the idea that something can be close to you or far away from you. The z-axis runs perpendicular to your imaginary wall. Adding to the z position value pushes an object further away from you, into the wall. Subtracting from the z position value brings an object closer to you.
Switching your frame of reference to the Flash Stage, the x- and y-axes still run left-right and up-down, respectively, just like the similarly named 2D axes. The z-axis runs perpendicular to, or in and out of, the Stage. All three axes are shown in Figure 8-1.
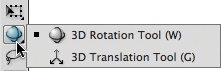
Movement along a 3D axis is easily demonstrated using the 3D Translation tool. This tool, along with the related 3D Rotation tool, can be found near the top of the Tools panel, shown in Figure 8-2.
Using the Flash interface, you can manipulate only movie clips in 3D space. (ActionScript can also alter 3D properties of button symbol instances). To use the 3D Translation tool, click on any movie clip with the tool selected. The tool then displays 3D axes on the movie clip (Figure 8-3).
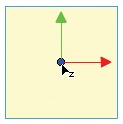
Clicking and dragging any one of these axes constrains movement along that axis. Drag the red axis left or right to move the movie clip along the x-axis. Drag the green axis up and down to restrict the movie clip’s movement to the y-axis. The blue dot at the center of the axes is equivalent to looking directly down the z-axis, as it is perpendicular to the stage. Click the blue dot and drag your mouse up and down to move the movie clip closer to or further away from your viewpoint. The movie clip will get bigger or smaller, accordingly.
It’s also possible to translate movie clips in other ways. You can move in x and y directions just by dragging the movie clip with the Selection tool, or by adjusting the x and y properties of the movie clip in the 3D Position and View section of the Properties panel. To adjust the z value of a movie clip, change the z property in the Properties panel.
In addition to translating movie clips along 3D axes, it is also possible to rotate movie clips around these same axes. Figure 8-4 shows black arrows that indicate rotation paths around each axis. The direction of these arrows shows how the movie clip rotates when positive values are used for the x, y, or z rotation properties. For example, the arrow around the z-axis indicates that positive values of the z rotation property spin the movie clip clockwise, while negative values spin the movie clip counterclockwise.
You can use the Transform panel for precise numeric adjustments to 3D rotation, but you can also use the 3D Rotation tool for a more interactive approach.
Using the 3D Rotation tool is somewhat similar to using the 3D Translation tool. When you click a movie clip, an interactive tool interface appears in the center of the movie clip. A bit more information must be conveyed to support rotation along any of three axes, however, so the interface for the 3D Rotation tool is a bit more detailed. Figure 8-5 shows four representations of the tool, and Figure 8-6 shows the effect of each corresponding manipulation on a movie clip.

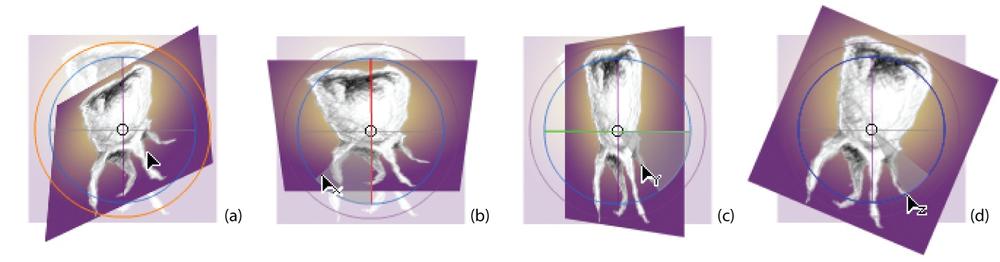
The labels in Figure 8-5 show that the red line controls rotation around the x-axis, the green line controls rotation around the y-axis, and the inner blue circle controls rotation around the z-axis. A cursor is also present at the outer orange circle in the lower-left corner of the illustration. This orange circle controls free rotation, or rotation that is not constrained along any single axis. Using this feature, you can drag your mouse around and manipulate x, y, and z rotations simultaneously, as shown in Figure 8-6. While this gives you more immediate freedom of movement, it is more difficult to precisely rotate your movie clip to a particular orientation.
For increased control, you can rotate around each axis individually. For example, Figure 8-5 shows rotation only around the x-axis. When you click the red line and drag it in a clockwise direction, the x rotation value increases and the image rotates toward you, shown in Figure 8-6. Figure 8-5 and Figure 8-6 show positive rotation along the y-axis, and Figure 8-5 and Figure 8-6 show positive rotation along the z-axis.
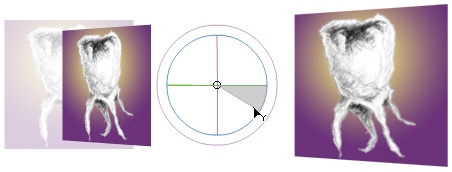
A gray wedge indicates the starting and stopping points of the rotation angle, allowing you to estimate the degree of rotation without consulting a panel. Because a circle consists of 360 degrees, a wedge that appears to occupy one quarter of the circle represents approximately 90 degrees of rotation along one axis (holding down the Shift key while using the 3D Rotation tool to snap rotation to 45-degree increments, making it easy to reach exactly 90 degrees, if desired).
The wedge display assists with x, y, and z rotation. However, because free rotation can include changes along any axes, the wedge cue is not helpful and is omitted for that tool adjustment.
Warning
One thing to bear in mind when using this visual feedback is the way Flash handles rotation angles. Flash improves performance by using positive and negative rotation angles. That is, 270 degrees is equivalent to −90 degrees, and it’s more efficient for Flash to use −90. As such, Flash sees rotating from 0 to 360 as rotating from 0 to 180 and then from −180 to 0. The wedge feedback in the 3D Rotation tool behaves the same way. When it becomes a semicircle (having traveled 180 degrees), the wedge flips to the other side of the tool and begins to diminish as you approach 0.
Thus far, this chapter has focused on transforming single objects in 3D space. However, you can also manipulate multiple objects using the 3D Translation and 3D Rotation tools. For example, Figure 8-7 shows two movie clips rotating around the y-axis at their mutual center.
To transform more than one movie clip in 3D space, you must first select all instances that you want to transform (by clicking with the Shift key pressed or by dragging over the objects) and then select the 3D Translation or 3D Rotation tool. Thereafter, all selected objects will be moved or rotated as a group. To rotate the objects around a common center point, double-click in the center of the chosen 3D tool, as described in the next section.
Note
Once a movie clip has been moved into 3D space by a 3D transformation, some 2D properties no longer apply and can’t be edited in the Properties panel.
Just as you can change the 2D transform point using the Free Transform tool, you can also change the location of the 3D center point. When selecting a movie clip with the 3D Rotation or 3D Translation, the white circle at the center of either tool’s on-Stage interface is the 3D center point. To move this point, simply drag around the white circle.
Figure 8-8, for example, shows the 3D center point moved to the top of a movie clip. By rotating the movie clip around the x-axis at its new center point, the movie clip appears to swing from its top—much like a sign hung from a support outside a dentist’s office.

To reset the 3D center point to the center of a selected movie clip, double-click on the white circle.
You can also change the 3D center point using the Transform panel. While it may be quicker and more intuitive to drag the center point around the x- and y-axes on Stage using the 3D Rotation or 3D Translation tool, the Transform panel adds the ability to easily move the 3D center point along the z-axis.
By default, 3D rotations and translations are made in global space, where all movie clips with 3D transformations share the same global coordinate system. That is, when using global transformations, you are manipulating a movie clip relative to the Stage. However, it’s also possible to transform a movie clip in local 3D space using coordinates that are relative to its parent movie clip or, when no parent exists, the main timeline.
For example, imagine a movie clip on the Stage. Adjusting its global z position would move the movie clip perpendicular to the Stage, as described earlier in the Translating 3D Objects section. Now imagine rotating the movie clip 90 degrees on the y-axis. The global z-axis is still perpendicular to the Stage, but the movie clip’s local z-axis, after the 90-degree rotation, is parallel to the Stage. Adjusting the movie clip’s global z position still moves the movie clip in and out of the Stage. Adjusting its local z position, however, moves the movie clip left and right.
To toggle between local and global 3D transformations, use the Global Transform button at the bottom of the Tools panel when a 3D tool is active (Figure 8-9). When you enable this option, movie clips will be transformed relative to the Stage. Otherwise, local coordinates will be used for transformations.
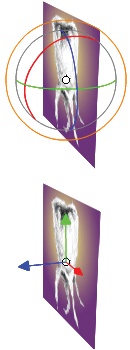
The visual feedback provided by the 3D tools updates to reflect this change. Previous figures, including Figure 8-3 and Figure 8-5, show the global 3D tool on-Stage interfaces, while Figure 8-10 shows the local interfaces. The 3D Rotation tool (top) acquires a sphere-like quality, and the orientation of the 3D Translation tool axes (bottom) change with the orientation of the movie clip. Following the preceding z-axis discussion, note the blue z-axis in the bottom of Figure 8-10. Rather than a blue dot that points directly into the Stage, the local translation mode shows the z-axis clearly pointing somewhere behind you to the left.
Switching between global and local transformations when adjusting the location of a movie clip can make it much easier to set its position more accurately in 3D space.
Two important global 3D settings affect the way all 3D objects are rendered. The first is vanishing point, which determines the orientation of the z-axis. The second is perspective angle, which determines the viewer’s field of view, much like a camera lens. You can adjust both settings in the 3D Position and View section of the Properties panel while a movie clip is selected. In Figure 8-11, a camera icon marks the perspective angle property and an icon of converging lines marks the vanishing point property.
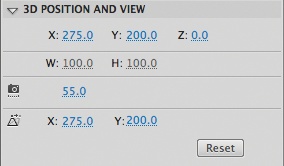
Figure 8-11. The default perspective angle (camera icon) and vanishing point (converging lines icon) settings in the Properties panel
The vanishing point is the point on the Stage to which the z-axis is aligned. That is, if you pushed a movie clip along the z-axis, it would approach the vanishing point. It is called the vanishing point because objects reduce in scale as they move farther away from the viewer, become smaller and smaller as they approach the distant point, and eventually vanish from view. In scenes with horizon lines, for example, such as looking down a highway running through the desert, the horizon usually goes through the vanishing point.
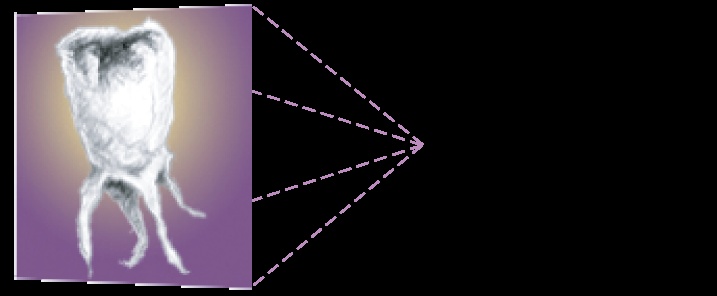
The default vanishing point is the center of the Stage. Figure 8-12 illustrates the point by showing lines emanating from all four corners of a movie clip, converging on the vanishing point.
You can change the global orientation of the z-axis in a 3D world, and thus the appearance of the scene, by changing the vanishing point. Figure 8-13 shows a before-and-after view of a vanishing point change. The original vanishing point is still depicted using purple dashed lines. Orange dashed lines indicate the new vanishing point.
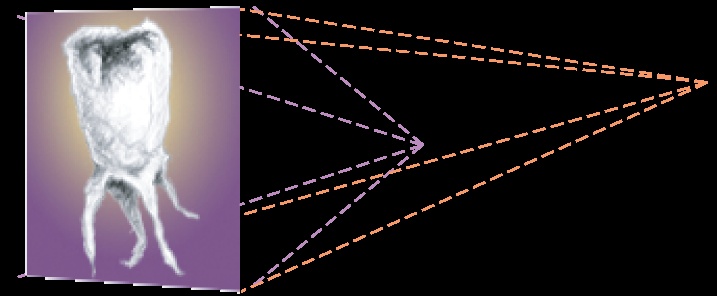
Note the change in the movie clip’s appearance. It appears to have rotated a bit more on the y-axis. You can see where the previous corners of the movie clip were by looking at the ends of the purple dashed lines. In actuality, the movie clip’s rotation has not changed. Instead, the visual update was caused by the shift in the vanishing point.
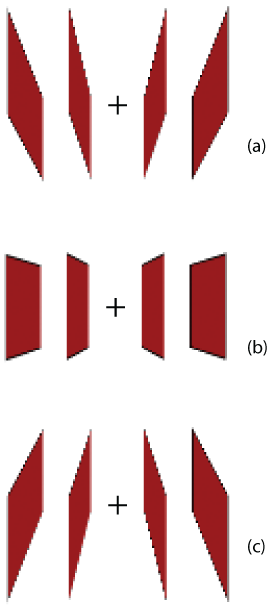
Figure 8-14. Three vanishing points applied to a 550×400 Stage: point (275, 350) (a), point (275, 200) (b), and point (275, 50) (c).
You can use the vanishing point to great effect to alter the viewpoint of a camera or viewer. For instance, Figure 8-14 shows three different examples of vanishing points applied to a 550×400 Stage. Figure 8-14(a) shows a vanishing point near the bottom of the Stage. This orients objects downward and gives the impression that the viewer is below ground, perhaps looking up at the ceiling. Figure 8-14(b) shows a vanishing point in the center of the Stage. This vantage point makes the viewer feel he or she is at ground level. Finally, a vanishing point at the top of the Stage, shown in Figure 8-14(c), implies that the user is aboveground, maybe looking down from a tall tower.
Choosing a perspective angle for a 3D scene is similar to choosing a lens for a camera. If you need to include a wide field of view in a picture, you will need a wide-angle lens. If you need a narrower field of view, to focus on something farther away, you will need a telephoto lens. A normal, or standard, lens falls somewhere in between.
Because different angles of view are optimized for different distances of viewing, changing the angle can often change the perspective of objects seen through a lens. For this reason, the field of view in a virtual 3D camera is often referred to as the perspective angle.
Figure 8-15 shows three examples of perspective angles using three rows of movie clips. In each example, four vertical rectangular movie clips are displayed with a 3D y rotation of 90 degrees. In the horizontal center of the screen, they would be invisible, as you would be looking at the very edge of the movie clip. Because the vanishing point is in the center of the four movie clips, you can see more of the sides of the rectangles that are farther to the left or right of center.
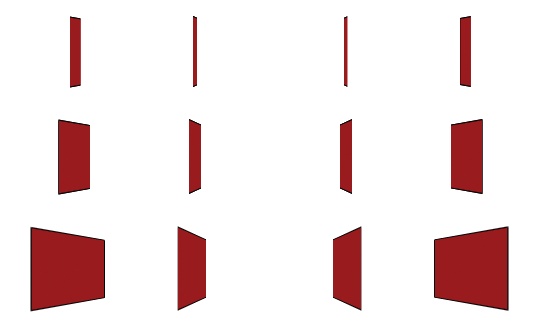
Figure 8-15. Four movie clips displayed using perspective angles of 15 (top), 55 (middle), and 105 (bottom) degrees
The top row of Figure 8-15 shows a perspective angle of 15 degrees. This is equivalent to a 100mm telephoto lens. The middle row shows a perspective angle of 55 degrees. This is Flash’s default perspective angle and is equivalent to a standard 35mm lens. The bottom row shows a perspective angle of 105 degrees, which is equivalent to a 20mm wide-angle lens.
Note
Perspective angles in camera lenses can be measured horizontally, vertically, or diagonally, yielding different values. When making comparisons between Flash’s perspective angle and camera lenses, it is helpful to consider the lenses’ horizontal view angle values.
It’s important to remember that the perspective angle affects all 3D transformations in your file, and changing the Stage size can change the way objects are affected by the angle. Making the Stage much wider, for example, without changing the perspective angle, can make objects at the edges of the Stage seem shallower in the field of view.
Flash can automatically compensate for this effect if you change the Stage size. If your file includes 3D transformations and you need to change the Stage size (Modify→Document), enable the Adjust 3D Perspective Angle to preserve current stage projection option. Flash will automatically calculate a new perspective angle, based on the new stage size, which will preserve the appearance of your 3D objects.
Because perspective angle and vanishing point settings affect all 3D objects, and because global 3D transformations are based on these values, Flash intelligently updates the appearance of every 3D object when any of these values change. You can take advantage of this by placing related 3D objects into container movie clips. By adjusting the location of the container movie clip, all its 3D children also update.
Figure 8-16 shows a movie clip with three 3D children being dragged up and away from the vanishing point. Changes caused by the leftward movement are evident in the horizontal skewing. In particular, the left square is becoming broader and the right square is becoming shallower. The upward movement is affecting the vertical skewing. The angles at all corners are more acute, and the center object appears flatter.
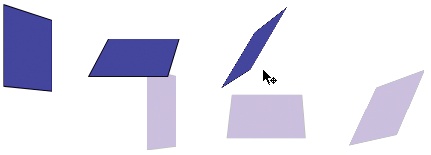
The basic example shown in Figure 8-16 can’t convey the full impact or simplicity of manipulating 3D children just by positioning the parent container. Any rotated or translated child will be affected by a change to its parent. If a child appears small and far away, for example, due to a positive z position, rotating the parent 180 degrees automatically brings that child far into the foreground. You’ll see this effect of rotating children with multiple depths when you learn more about parallax scrolling later in the chapter.
The important thing to take away from this discussion is that you don’t need to select objects as a group, reposition the 3D center point, or switch between global and local transformations using this technique. Once the children are positioned where you want them inside the parent container, all you need to do is transform the parent, and you’re done.
One of the best parts of having 3D properties integrated into the Flash CS4 Professional interface is that you can animate them as easily as you can animate 2D properties—even in tweens. Figure 8-17 shows a movie clip rotating 180 degrees around the x- and y-axes (the faded frames have been inserted in the illustration to show you the progress of the tween).

You can use the Motion Editor panel (discussed in Chapter 5) to achieve this animation effect. Before applying the 3D transformations, set up a simple motion tween that moves the movie clip from one side of the stage to another:
Open tween3d_01.fla from the companion source files. This file has one movie clip on the Stage at point (70, 200).
Right-click (Windows) or Control-click (Mac) the movie clip and select Create Motion Tween from the pop-up menu. 23 frames are added to the tween span, and the playhead should be in frame 24. Right-click or Control-click again and enable 3D Tween from the same menu.
Select the movie clip on the Stage with the Selection tool and, using the Properties panel, change its x position to
480.
As you did in Chapter 5, you have completed a 2D motion tween, and you can see the path taken by the movie clip. You can even scrub through the Timeline to watch it move. If you like, compare your work to tween3d_02.fla, then move on to add the 3D transformations.
Open the Motion Editor and scroll down to the Rotation X and Rotation Y properties. As usual, the first keyframe in any tween is provided.
Scroll horizontally until you can see frame 24. Click the frame numbers in the Motion Editor panel to place the playhead in this frame.
In the Keyframe column, click the center diamond to add a keyframe in the Rotation X and Rotation Y rows of the Motion Editor.
In the same frame (frame 24), use the Value column to set both properties to
180degrees. Your Motion Editor panel should look like Figure 8-18. The graph for both Rotation X and Rotation Y properties should slant up and to the right between frames 1 and 24. Figure 8-18 shows the playhead midway through the tween, when both rotation values have just passed 90 degrees.

Save your work if desired (it will not be used in the portfolio project) and test your movie. Your movie clip should spin around both x-and y-axes as it moves across the Stage, as depicted in Figure 8-17 and demonstrated in tween3d_03.fla.
Based on this experience, you can probably see the benefit of having Flash’s 3D features—basic though they may be—integrated directly into the authoring interface. While you certainly will have more control over 3D objects when using ActionScript, at least you can accomplish a few simple effects without knowing a lick of code.
There are drawbacks, however, with Flash’s integrated 3D feature set. The biggest shortcoming is the lack of automatic z-sorting, or sorting movie clip stacking order based on the value of their z positions, called z-depth in most z-sorting discussions. Because the z-axis represents depth in the 3D world, z-sorting restacks elements when they overlap, based on their depth along the z-axis.
This is easily demonstrated by placing your hands in front of your face. Hold both hands up about a foot or so in front of your face, and about a foot apart from each other. This represents two movie clips with the same z position, or depth. Now move your right hand another foot away from your face. Your right hand is now farther away, or has a larger z value. Now move your hands horizontally so they overlap in your line of vision. Your left hand is in front of your right hand because its depth is closer to your point of view. It would obviously be wrong if your right hand were in front of your left, because your right hand is further away.
Unfortunately, Flash doesn’t handle the z-sorting for you. If you place one movie clip each in layers 1, 2, and 3, no change in the z-depth of any of the movie clips will change the visual stacking order imposed by the layer in which each appears. This limitation doesn’t apply only to layer order, either. If you set up the same three movie clips correctly in the same layer, so the stacking order matches your desired z-depths, everything will be fine. If you then select the frontmost movie clip and send it behind the others (Modify→Arrange→Send to Back), the z-depth will remain the same, but visually, the movie clips will overlap in the wrong order.
Figure 8-19 illustrates this point. Figure 8-19(a) shows three movie clips in the same layer, stacked in an arrangement that matches their z-depths. Figure 8-19(b) shows three similar movie clips, each in its own layer, but layered in a manner that does not reflect their z-depths. Even though the movie clip in layer 4 has the highest z-axis value, it does not appear behind the other movie clips, because it resides in a higher layer. Finally, Figure 8-19(c) shows a similar arrangement, but this time the movie clips are in the same layer and their stacking order doesn’t match their z-depths.
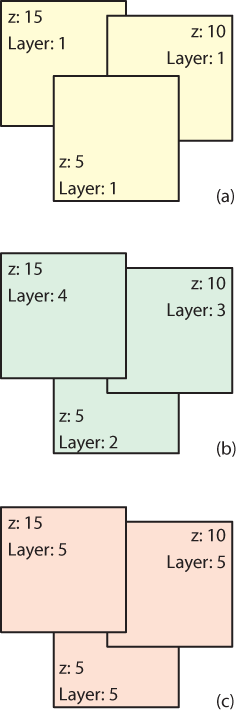
Figure 8-19. z-depth, correct in example (a), does not override layer order (b) or conflicting single-layer stacking order (c)
Unfortunately, there are only two ways to conquer this problem. The first way is to manually manage your stacking and layering orders so they don’t conflict with the desired depths of your 3D objects. This is fine for work in the Timeline, but not helpful for dynamic or interactive scenarios. In these cases, you must use custom ActionScript to sort and reorder your display objects.
In the Using ActionScript to Change 3D Properties section, later in this chapter, you will learn how to explicitly set the z value of any movie clip. However, maintaining a running inventory of all movie clips, and properly sorting their depths based on when they overlap, requires quite a bit more effort and is beyond the scope of this book. The book’s companion website, however, has more information on this topic, including links to solutions from top-notch coders. As your ActionScript skills improve, you may be able to use a script prepared for this purpose, and integrate it seamlessly into your project—or even write your own solution!
In the meantime, remain alert to awkward z-ordering and try to compensate by shuffling the layer or stacking order of your assets. When motion tweens require depth changes, impossible to achieve in a single tween, you can usually adjust your work by splitting your tweens into multiple segments, each in its own layer and using layer order to provide better depth management. This technique, too, is covered on this book’s companion website.
Parallax scrolling is an effect that shows the appearance of depth during movement. The principle behind parallax scrolling is simple: as you move past objects at different depths, closer objects will seem to rush by faster.
You’ve probably experienced this effect yourself on a road trip or train ride. Imagine you are sitting in a window seat in a car or on a train as it embarks on a trip across the countryside. Outside the window you see rocks at the edge of the road or track. Some distance beyond the rocks is a row of bushes, and further beyond the bushes is a row of trees. Finally, far off at the horizon is a mountain range.
As the car or train picks up speed, the rocks rush past your window. Although moving quickly by, the bushes don’t seem to be traveling as fast as the rocks. The distant trees are moving slower still, and the mountains appear to be stationary.
This effect is also used in 3D to give the illusion of depth. Figure 8-20 shows the rocks, bushes, trees, and mountains previously described. If you placed these elements in their own layers in the Flash Timeline and animated them in a normal 2D manner, they would all scroll at the same time. However, if you push each element further back along the z-axis, all four elements will reside in different depths and scroll by at different speeds.
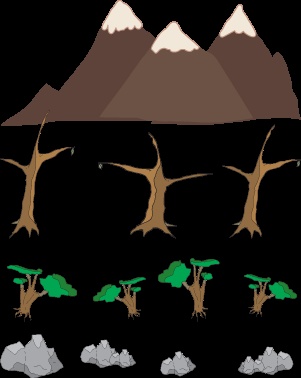
Figure 8-21 shows such an arrangement, but rotated in 3D space so you can clearly see the depth between layers. Because of scaling along the z-axis, objects closer to the viewer are wider than the smaller objects in the distance. As such, when all layers scroll by the viewer’s eye, the foreground layers move faster than the background layers.
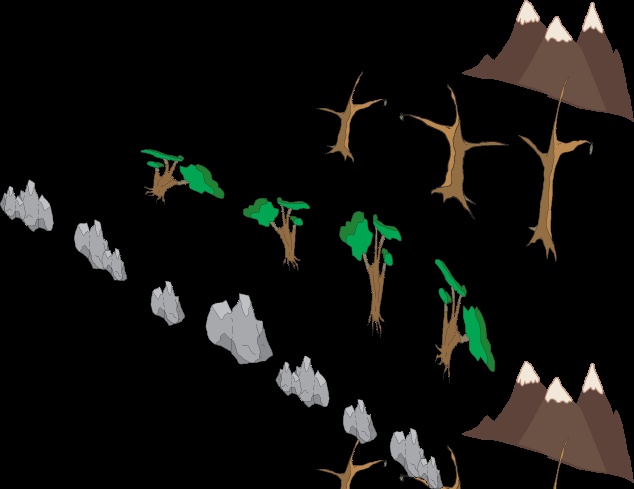
Figure 8-21. Scrolling assets, after z-translation is applied; this clip is rotated on the y-axis to illustrate parallax effect
You will use this technique for the Gallery screen of the portfolio project. The foreground elements will eventually be components (added in the next chapter) that will load in external assets. The graphics behind the component layer will scroll through the gallery at different speeds, giving the illusion of depth.
Manipulating 3D objects with ActionScript is, in many ways, as simple as transforming display objects in two dimensions. Using a handful of properties, you can do just about everything the 3D Flash interfaces can do. For example, translating a movie clip in 3D space uses x, y, and z properties. Assuming you’re transforming a movie clip with the instance name mc, here are examples of all three properties:
mc.x = 275;
mc.y = 200;
mc.z = 100;
Look familiar? It should. The x and y properties are the same properties you’ve been using for 2D manipulations, and the new z property is consistent in use.
Rotation is not much different. In 2D space, there is only one rotation property. In 3D space, the three axes around which a movie clip can rotate require three properties, but the syntax is still similar. Instead of the single rotation property for 2D space, the 3D properties are:
mc.rotationX = 10;
mc.rotationY = −20;
mc.rotationZ = 5;
Even the perspective angle and vanishing point properties are easy to use, albeit a bit verbose. The ActionScript properties themselves are straightforward enough—perspective angle is called fieldOfView and vanishing point is called projectionCenter, but they are used like this:
root.transform.perspectiveProjection.fieldOfView = 25;
root.transform.perspectiveProjection.projectionCenter = new Point(0,0);
Changing these values requires a bit more syntax because they are part of a larger transformation object. They’re collected in an object called perspectiveProjection (which also contains other 3D transformation properties) that is part of the more encompassing transform instance of applicable display objects, like movie clips.
In the preceding example code, the transform object belongs to the root of the FLA’s display list, the main timeline, which itself is a big ol’ movie clip. This change affects all global transformations, just as you witnessed when making changes to the perspective angle and vanishing point controls in the Properties panel.
Note
As with the Properties panel, the perspective angle is measured in degrees, and the vanishing point unit is a point.
Here are a few examples of the ActionScript at work. A companion source file is provided to demonstrate each property. In all cases, a single frame event listener links mouse movement with a 3D property that manipulates a movie clip with an instance name of mc.
The as_3d_rotation.fla example sets the y rotation of a movie clip to the horizontal mouse position. As you move your mouse left and right, it looks like you’re spinning a placard on a nail.
1 this.addEventListener(Event.ENTER_FRAME, onLoop);
2 function onLoop(evt:Event):void {
3     mc.rotationY = mouseX;
4 }The as_3d_translation.fla file will set a movie clip’s z-depth to the mouse’s vertical location (0 to 400)—moving the movie clip into and out of the Stage.
1 this.addEventListener(Event.ENTER_FRAME, onLoop);
2 function onLoop(evt:Event):void {
3     mc.z = mouseY;
4 }The as_3d_vanishing_point.fla file will move the vanishing point to wherever the mouse is, causing objects to reorient in 3D space. First, the location of the mouse is converted into a point (line 7), and the projectionCenter property is then set to that point (line 8). To see the effect work, 3D rotations have been applied to the movie clip in lines 1 through 3.
1 mc.rotationX = 10;
2 mc.rotationY = −20;
3 mc.rotationZ = 5;
4
5 this.addEventListener(Event.ENTER_FRAME, onLoop);
6 function onLoop(evt:Event):void {
7     var mouseLoc:Point = new Point(mouseX, mouseY);
8     root.transform.perspectiveProjection.projectionCenter = mouseLoc;
9 }The as_3d_perspective_angle.fla source file will change the field of view using the mouse’s vertical location. Because the mouseY value is divided by 4, and the height of the stage is 400, the initial value is between 0 and 100. However, the perspective angle cannot be 0, so 40 degrees is added to the initial value. The result is a demonstration of perspective angles between 40 degrees (a normal lens) and 140 degrees (an extra-wide-angle lens). The movie clip is also translated and rotated to enhance the effect.
1 mc.x = 140;
2 mc.rotationY = −45;
3
4 this.addEventListener(Event.ENTER_FRAME, onLoop);
5 function onLoop(evt:Event):void {
6     root.transform.perspectiveProjection.fieldOfView =
 mouseY / 4 + 40;
7 }
In this chapter, you will create a parallax scrolling effect that will serve as the interface for the gallery screen. The gallery interface will consist of three components added in the next chapter. Components are precreated combinations of code and graphics designed to complete tasks of varied complexity, but with little to no additional ActionScript provided by you. The gallery will ultimately present two external graphics and one video, and visitors will scroll between the three displays with the click of a button.
For this exercise, you will need a provided source file, gallery_01.fla. This file differs slightly from a new FLA derived from the book template you’ve used in prior chapters. In this case, the art required for the gallery interface is already in place. The illustrations, shown in Figure 8-22, are typical 2D movie clips, and it will be your job to manipulate these assets in 3D space.
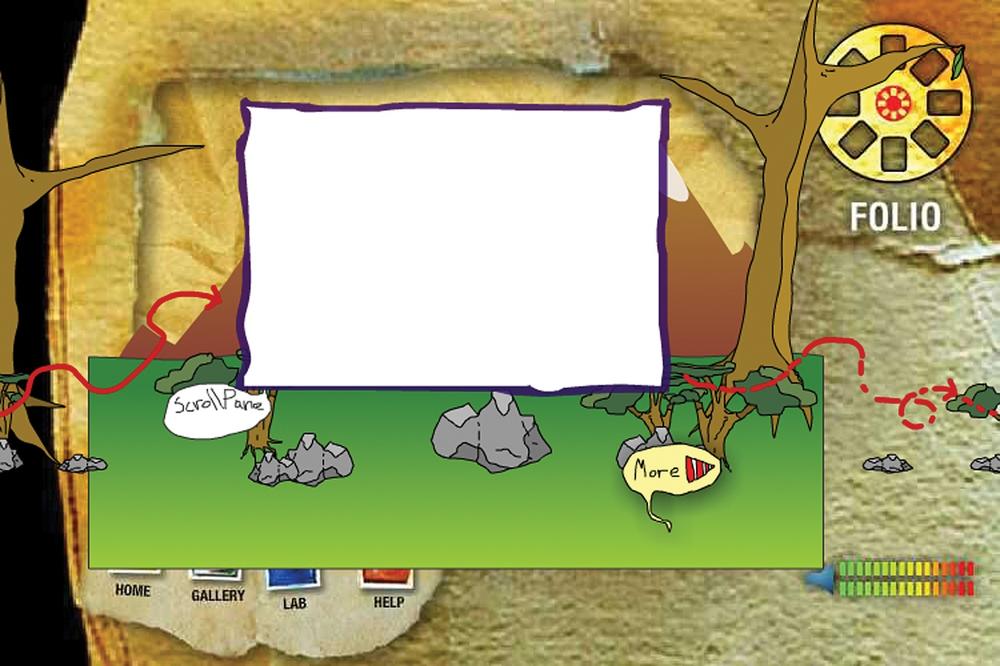
Inside the content movie clip, renamed to GalleryScreen in the Library and given an instance name of gallery, are the parts required to create a parallax scrolling interface. The content of this movie clip has three layers. Two layers are static and contain an image of a mountain range with a grassy plain and a button that will advance through the gallery. The third layer is a movie clip called parallax, and this will be the focus of your attention.
In the parallax movie clip are four layers. The background is a movie clip of trees, substantially wider than the stage and thus suitable for horizontal scrolling. Above the trees are two movie clips containing bushes and rocks, respectively. Finally, the foreground movie clip contains artwork of three frames, each labeled with the name of a component that you will add in later chapters.
To prepare your movie clip for parallax scrolling, you will adjust both the z-depths of layers in the movie clip and the position of the vanishing point:
Open gallery_01.fla from the companion source files.
Double-click the gallery movie clip to edit its contents.
Double-click the parallax movie clip to edit its contents.
Ignoring the foreground layer that contains the artwork of three empty frames (which will remain unchanged until next chapter), select the movie clip in the trees layer and give it a z value of
1000in the Properties panel. Select the movie clip in the bushes layer and set its z value to600. Finally, select the movie clip in the rocks layer and change its z value to300. With all layers pushed away along the z-axis, the assets are resized and repositioned to achieve a very basic appearance of 3D depth.Looking at the effect of the depth changes, the collection of movie clips is sitting a bit high on the stage, causing a few elements to appear as if they are floating in air. Changing the vanishing point will adjust the position of all movie clips that have z values. Select any movie clip on stage and, in the Properties panel, change the Vanishing Point y value to
320. This will move the movie clips down a bit, all moving relative to one another.Using the Edit Bar above the Stage, click on GalleryScreen to leave the parallax movie clip and go back to its parent clip, gallery.
Click once on the parallax movie clip to select it and, using the Properties panel, set its 3D x coordinate to
1235. This is the starting point of the parallax scrolling interface and the first thing viewers will see when visiting the Gallery screen.Save your work. If you want to check your progress, compare your file to gallery_02.fla.
Now it’s time to create a tween and animate the scroll. You will extend your timeline to 100 frames, change the location of the parallax movie clip over time, and add a few frames of ActionScript:
Continue with your file or, if you prefer, open gallery_02.fla from the companion source files and save that to your own file as your starting point.
Double-click the gallery movie clip to edit its contents. Don’t worry if the guide layer is no longer visible. This is just a little Flash quirk. When double-clicking a 3D element, the symbol is not edited in place. This is equivalent to editing any symbol by double-clicking in the Library.
Right-click (Windows) or Control-click (Mac) on the parallax movie clip and select Create Motion Tween from the pop-up menu.
In the Timeline panel, drag the end of the parallax layer’s tween span out to frame 100.
In the actions, button, and mountains layers, click in frame 100 and press F5 to add frames. When you are finished, all four layers should span to frame 100.
In the actions layer, create empty keyframes (F7) in frames 35 and 70. You will later add stop actions to these frames.
Move the playhead to frame 35, click on the parallax movie clip to be sure it’s selected, and, using the Properties panel, set the x value under 3D Position and View to
365. The ScrollPane frame artwork should be visible. This will automatically add a property keyframe to your tween, reflecting the movie clip’s change in x.Move the playhead to frame 70, make sure the parallax movie clip is still selected, and set the 3D x value to
−435. The FLVPlayback frame artwork should be visible.Move the playhead to frame 100, make sure the parallax movie clip is still selected, and set the 3D x value to
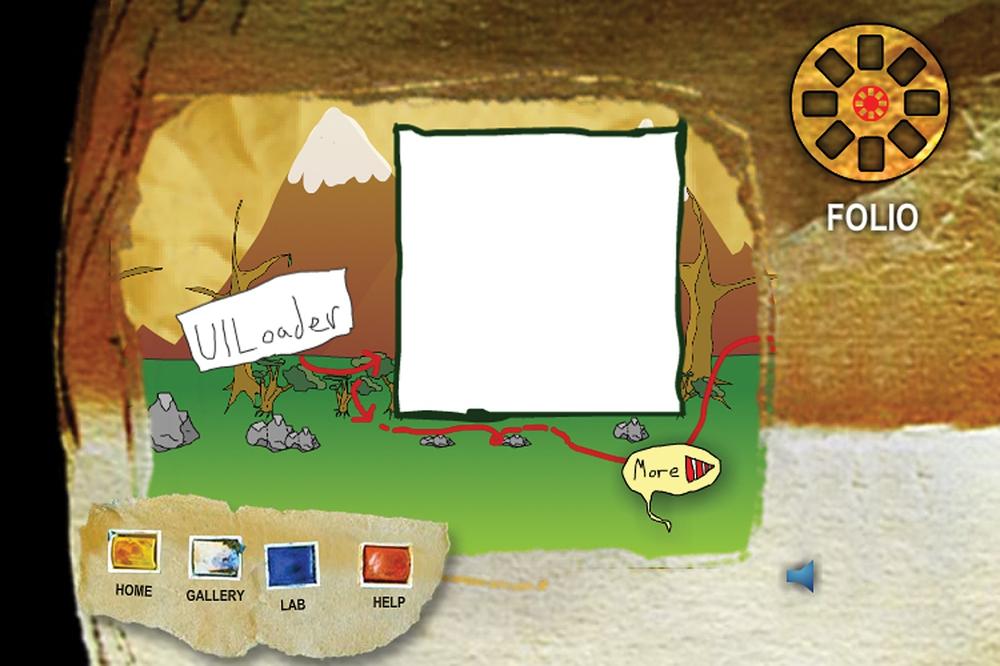
1235. The UILoader frame artwork should be visible. This last frame provides an animated return to the first item in the gallery.Save and test your movie.
The animation should scroll through the three gallery items, showing UILoader, ScrollPane, and FLVPlayback frames, and then returning to frame 1. If you look at the assets in the animation, you will see that the frames, rocks, bushes, and trees all move at a different rate, creating the parallax scrolling effect. This is achieved automatically because Flash’s 3D depth management handles the scrolling of each layer independently.
Now that you’ve seen the parallax scrolling effect, it’s time to prepare your file for ActionScript control. You will first add stop actions to stop the animation when the three component frames come into view, and then you’ll add a script to react to user button clicks.
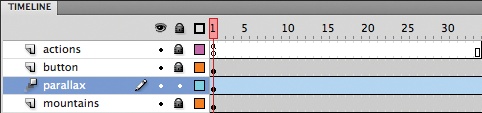
In the actions layer, add a stop action (
stop();) to frames 1, 35, and 70. Frame 100 does not receive a stop action because you want the movie clip to loop back to frame 1 on its own. Figure 8-23 shows a detail of the Timeline panel, depicting the layer structure, parallax tween, and added actions.Test your movie once again, and you’ll see that the movie clip doesn’t scroll. This is correct, and is due to the stop action in frame 1.
Save your work and compare your file to gallery_03.fla.
With the stop actions in place, you will need to add a small script to continue to preview your file. You’ll add this script in the main timeline, rather than inside the gallery movie clip, to make it easier to add it later to the main project file.
Using the Edit Bar above the Stage, click on Scene 1 to return to the main timeline. In the actions layer, add the following script, save your work, and test your file:
1 gallery.more.addEventListener(MouseEvent.CLICK, onGalleryClick);
2 function onGalleryClick(evt:MouseEvent):void {
3         gallery.play();
4 }
This script adds a mouse-click event listener to the more button inside the gallery movie clip. The main thrust of the script is line 3, which plays the movie clip. This animates the gallery interface after it’s been stopped by the stop actions in frames 1, 35, and 70. When testing your file, you should be able to click the more button and advance to the next gallery item. When the final item (the FLVPlayback component frame) is in view, clicking the more button will cause the movie to return to the first item (the UILoader component frame).
After you have finished testing, compare your file with gallery_04.fla from the companion source files.
When testing the interface, you may notice that the parallax movie clip is visible to the left of the viewing wheel depicted in the guide layer. When you integrate your gallery assets into the main project file, this will be a problem, as the gallery interface will appear from under the wheel as you scroll. To prevent this, you’ll add a layer mask to show the parallax movie clip only within the desired frame.
Continue with your gallery file or use gallery_04.fla.
From the main timeline, double-click the gallery movie clip to edit its contents.
Right-click (Windows) or Control-click (Mac) on the parallax layer name or icon and select Insert Layer from the pop-up menu. Name the new layer
mask.Select the mask layer and, using the Rectangle tool, draw a rectangle anywhere on the stage. Using the Properties panel, set its x location to
80, its y location to20, its width to520, and its height to400.Right-click (Windows) or Control-click (Mac) on the mask layer and select Mask from the pop-up menu. This will turn the mask layer into a layer mask and automatically mask the underlying layer, parallax. It will also lock both layers so you can see the mask in effect in authoring mode. Figure 8-24 shows a Timeline panel detail of the gallery movie clip after adding the mask.
Test your movie and scroll the gallery. The art should now be visible only within the masked area.
Save your work and compare your file to gallery_05.fla.

Once your parallax scrolling effect is working, you’ll need to add the necessary content to the main project file:
Continue with your gallery file or open gallery_05.fla.
From the main timeline, select and copy the gallery movie clip.
Open the main portfolio project file that you’ve been building over the past several chapters.
Scroll to the gallery section of the portfolio project file’s main timeline. Select frame 144 in the content layer and, using Paste in Place (Edit→Paste in Place), paste the gallery movie clip that you copied from your gallery file.
Switch back to the gallery file and copy the script from the actions layer.
Switch once again to the main portfolio file, select frame 147 in the actions layer, and paste the script after the existing stop action.
Save your work and test your file. The gallery should now work correctly in your main portfolio file (Figure 8-25).