
The lion’s share of the attention Flash receives is usually due to the eye candy that so many talented artists and programmers create every day. Over the last several years, however, Flash has become recognized more and more as a tool for creating applications in which text plays a major part.
Increasingly, Flash is used for everything from mortgage calculators to newsreaders to rich Internet applications of many kinds. Flash is even sometimes used as a front end for very text-intensive products, such as blogs, bulletin boards, and other dedicated content management systems.
As Flash matures, this trend increases. New versions of Flash and ActionScript continue to add text-related features, including improved components, application interface support for font families and styles, and even in-menu rendering that displays sample text in each font for an on-the-fly preview.
Note
At the time of this writing, Adobe was working on a new text architecture for the Flash Platform called the Text Layout Framework. Although still in beta, the framework boasts many dramatic text improvements, including reading and writing in vertical, right-to-left, and left-to-right languages; support for double-byte characters (used for Chinese, Japanese, and Korean, among other languages); flowing text across multiple columns and linked containers, as well as improved flow around inline images; improved typographical control, such as kerning, ligatures, and hyphenation; enhanced runtime cut, copy, paste, and undo; and much more. Check http://labs.adobe.com/technologies/textlayout/ and http://www.adobe.com/ for more information.
In this chapter, you’ll learn how to create and populate text elements using components, the Flash interface, and ActionScript. You’ll also learn how to format text using the interface and code, including native ActionScript objects and HTML and cascading style sheets (CSS). Finally, you’ll learn about a great new workflow that lets you export layouts from Adobe InDesign and open them in Flash.
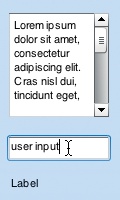
When you need to build user interfaces that require text, components are a quick and easy way to get started without using any ActionScript. In addition to the UIScrollBar component for easily customizable scrolling text (demonstrated in Chapter 9), three other text components ship with Flash CS4 Professional. Shown in Figure 11-1, from top to bottom, they are TextArea (used for scrolling text passages), TextInput (for capturing and processing user input), and Label (for basic text display).
You can use the TextArea and Label components without ActionScript by configuring the components with the Component Inspector panel. You can also configure the TextInput component this way, but it typically requires additional ActionScript to validate the user’s input. This section of the chapter will discuss use of the Component Inspector panel, and the next section will demonstrate simple ActionScript tasks for each component.
Shown in Figure 11-2, the Component Inspector panel indicates that the TextArea component can be enabled, visible, and editable. The wordWrap property can wrap words onto multiple lines, and the horizontalScrollPolicy and verticalScrollPolicy properties can set horizontal and vertical scrolling, respectively, to on, off, or auto (based on length of text). The component can be populated using the text or htmlText properties and, if the latter is used, condenseWhite can remove extraneous spaces, tabs, and return characters from the HTML text. If editable, user input can be restricted to specific characters (using the restrict property) and/or a limited number of characters (using the maxChars property).
Note
The TextArea component makes use of the UIScrollBar component discussed in Chapter 9. This nicely demonstrates the efficient reuse of components that stems the increase in file size as additional related components are used. If you use the TextArea component, for example, adding the UIScrollBar component will not increase file size further.

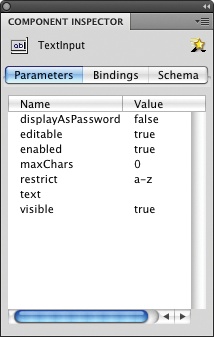
Figure 11-3 shows that the TextInput component shares many of its properties with TextArea, including editable, enabled, maxChars, restrict, text, and visible. The lone unique property, displayAsPassword, automatically replaces user input with asterisks to obscure the entered text from prying eyes.
Like the UIScrollBar component, the Label component displays text inside other components. This is apparent in Figure 11-4, where you may notice that Label shares most of its properties with the other text components. Its only unique property is autoSize, which you can set to left, center, right, or none to automatically resize the label based on the quantity of text applied. The Label component is a viable alternative to creating, styling, and populating a text field using ActionScript. This is a handy option for users without programming experience, but it can’t be changed at runtime. If you require a more dynamic solution, ActionScript is your answer.

As with most components that ship with Flash CS4 Professional, you can use the text components not only by dropping them onto the Stage and configuring them with the Component Inspector panel, but also by applying ActionScript. In most cases, the component’s parameter names correspond with like-named ActionScript properties.
This section provides one simple ActionScript example for each component. Feel free to create a file (or files) or use the text_components_01.fla companion source file. For the following code to work, each component used must already be in your file’s Library. As described in Chapter 9, dragging a component from the Components panel to the Stage also places that component in the file’s Library. Thereafter, it is available for use as many times as you need it, just by dropping it from your Library onto the Stage.
Before discussing the code specific to each component, let’s look at the concepts that are common to all three. The first is the need for information that lets the Flash compiler know how to validate and check your code when creating a SWF. Not every Flash designer or developer will use components. As such, the compiler is not automatically aware of their classes the way it knows about other native classes (such as MovieClip). So, unlike for most ActionScript written in a frame of the file’s Timeline, you must use an import statement to tell the compiler where to find the necessary classes. This first line in the following three examples doesn’t actually import anything into your file. Instead, it provides the compiler with a path, or pointer, to the location of each component’s class.
The next thing common to all three examples is the standard procedure for creating a display object, adding it to the display list, and positioning and sizing it on the stage. As you’ve seen in prior chapters, the new keyword creates an instance of the component, the addChild() method adds it to the display list, and the x, y, width, and height properties position and size the component.
The component-specific sections that follow omit these common elements, focusing instead on the properties specific to each component.
This example varies the default behavior of the TextArea component by setting its editable property to false. It then populates the display-only component with text using the text property:
1 import fl.controls.TextArea;
2 var txtArea:TextArea = new TextArea();
3 addChild(txtArea);
4 txtArea.x = 200;
5 txtArea.y = 10;
6 txtArea.editable = false;
7 txtArea.width = 100;
8 txtArea.height = 100;
9 txtArea.text = "Lorem ipsum dolor sit amet, consectetur
 adipiscing elit. Cras nisl dui, tincidunt eget, ultrices quis,
 condimentum sit amet, sapien.";
The TextInput component can restrict user input to specific characters and obscure visible text to hide password entry:
1 import fl.controls.TextInput;
2 var txtInput:TextInput = new TextInput();
3 addChild(txtInput);
4 txtInput.x = 200;
5 txtInput.y = 130;
6 txtInput.restrict = "a-z";
7 txtInput.maxChars = 8;
8 //txtInput.displayAsPassword = true;
9 txtInput.addEventListener(Event.CHANGE, onChange);
10 function onChange(evt:Event):void {
11     if (evt.target.text == "actionscript") {
12         trace("Password correct");
13     }
14 }
This example uses the restrict property of the TextInput component to limit user input to a space and letters a through z. It also limits the user to entering eight characters using the maxChars property. Optionally, you can set the displayAsPassword property to true to display asterisks instead of entered characters. This instruction is commented out in line 8 to let you see what you type. If you try this script, comment and uncomment this line a couple of times to see its effect on the component’s behavior.
Finally, the text property is used again in line 11, as the event listener in lines 9 through 14 monitors the user’s input. Every time the contents of the component change, the text is compared with the "actionscript" string. If the two compared strings match, an affirmative message is traced to the Output panel.
This simple component adds a text label that you can easily set with code:
1 import fl.controls.Label;
2 var txtLabel:Label = new Label();
3 addChild(txtLabel);
4 txtLabel.x = 200;
5 txtLabel.y = 170;
6 txtLabel.width = 100;
7 txtLabel.autoSize = TextFieldAutoSize.RIGHT;
8 txtLabel.text = "Lorem Ipsum";
This example populates the text property of the Label component, and sets its autoSize property to the constant TextFieldAutoSize.RIGHT. This value aligns the text in the label to the right and automatically resizes the component down and to the left as needed. A string value of "right" would also work for autoSize, but, as you read in previous chapters (including Chapter 6), ActionScript 3.0 makes heavy use of public static constants to make sure these values are consistent and easy to maintain.
In Chapter 2 you learned how to create Static text fields and configure basic character and paragraph properties. You may recall that Static text fields are rendered as graphics at runtime and, therefore, can’t be edited on the fly. If you need more flexibility, however, you can turn to Flash’s Dynamic and Input text fields. Dynamic text fields are ActionScript programmable, and Input text fields are Dynamic fields with the added feature of accepting user input.
Creating each type of field follows the same process. First use the Text tool to draw a text field on the stage and then, with the field still selected, use the top section of the Properties panel to change its type. Position and size settings are shared among all text types, but what makes each type different are the values of the properties in the lower sections of the panel.
Of the three text types, Dynamic fields include the largest number of features in the Properties panel, shown in Figure 11-5 and listed by section.
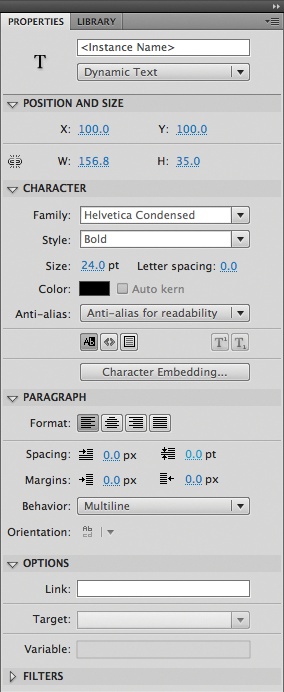
The following text field properties control character-level manipulation but also affect attributes such as anti-aliasing, font embedding, and field appearance, among others:
- Family
The Family property specifies the font family to use. To support ActionScript programming, Dynamic text fields are not converted to graphics when the SWF is compiled. As such, the font you select must either be commonplace among your audience or embedded to ensure proper display on any computer. Embedding fonts will be discussed later in the Formatting Text section of this chapter.
- Style
The Style menu includes all font styles available for the chosen font. Styles are no longer limited to plain and faux font styles (skewing fonts for italics, and thickening fonts for bold). When found, faux styles are still included, but the menu also includes all family-specific styles, such as light, regular, book, medium, bold, heavy, and so on, where applicable.
- Size
- Letter spacing
The Letter spacing setting controls the space between all the letters of the text field. This feature is sometimes called tracking in other applications. This is in contrast to kerning, which is the space between two letters.
- Color
Color is the color of the text, and provides access to the pop-up color palette.
- Auto kern
Disabled. Auto kern will use the kerning information built into the font to control the spaces between letter pairs. This option is only available to Static text fields.
- Anti-alias
Anti-alias controls how the text is blended into its surroundings. This option contains four presets: Use device fonts (for operating-system-level anti-aliasing), Bitmap text (for no anti-aliasing), Anti-aliasing for animation (standard grayscale anti-aliasing composited by Flash Player), and Anti-aliasing for readability. This last setting is a unique anti-aliasing option that uses hints of color to blend better into any color background. This can usually reduce or eliminate the faint white halo that sometimes surrounds text when you use grayscale anti-aliasing over dark or color backgrounds. This menu also contains a custom anti-aliasing option through which you can control the thickness and sharpness of embedded fonts only.
- Selectable
The final row of settings in the Character section of the Properties panel is a series of small buttons. The leftmost button controls whether the text is selectable at runtime. This is handy in some cases, such as for copy and paste support. However, if this is not a feature you want to include, it can be annoying because text-selection highlighting and/or the standard I-beam text cursor may appear and distract your users from design or animation. Typically, you should disable this setting.
- Render text as HTML
The Render text as HTML option causes the field to parse text with limited HTML support when added to the field via ActionScript. The HTML features supported will be discussed later in the Using HTML section of this chapter.
- Show border around text
The Show border around text option places a white background behind the text and surrounds the field with a thick black stroke. Without ActionScript, these colors are not configurable.
- Subscript and Superscript
The last two buttons in the row below the Anti-alias option are the Toggle the superscript and Toggle the subscript buttons. These buttons convert selected characters to superscript or subscript but are active in Static text fields only.
- Character Embedding
Character Embedding allows you to use custom fonts by embedding character outlines into the SWF during the compiling process. This means that custom fonts will appear consistent on all computers. Embedding fonts will be discussed later in the Formatting Text section of this chapter.
These text field properties control paragraph-level manipulation, including line wrapping and orientation, among other attributes:
- Format
The Format property controls the alignment of the text within the field, and can be left, center, right, or full justified.
- Spacing
The Spacing options contain paragraph-specific indent and leading (line spacing) values.
- Margins
The Margins feature specifies the text indent within the field on the left and right sides.
- Behavior
For Dynamic text fields, the Behavior menu controls the line-wrapping behavior. Options include single line, multiline, and multiline no wrap (line returns are processed but not line wrapping). Behavior options available to other text field types are explained in their respective sections.
- Orientation
This feature is disabled for dynamic text fields. The Orientation property controls the direction of the text flow. Options include horizontal, vertical left-to-right, and vertical right-to-left. This feature is only available to Static text fields.
These properties control how links applied to the text field behave.
- Link
The Link property allows you to apply URLs to text without the need for HTML. For Dynamic text fields manipulated with the Properties panel, this property applies to the entire field. Static text fields allow the application of links on a per-character basis.
Note
You can use additional ActionScript to trigger ActionScript functions from text links. This book’s companion volume, Learning ActionScript 3.0: A Beginner’s Guide (O’Reilly), contains examples of this technique.
- Target
The Target property, like its HTML counterpart, allows you to specify in which browser window the link will open.
- Variable
Disabled in all text field types in ActionScript 3.0. In ActionScript 1.0 and ActionScript 2.0 only, the Variable option provides a direct link between a variable and a text field. You can therefore use it to easily display the contents of a variable on stage.
Filters were introduced in Chapter 7, and there is nothing new here that warrants a new discussion. It is worthy to note, however, that you can apply filters directly to text fields without first enclosing them in a movie clip.
Input text fields are nearly identical to Dynamic text fields, with the important difference that they accommodate user input. Other subtle variances in behavior are cited in the following subsections.
- Character
The Selectable feature is disabled, naturally, as the entire purpose of input text is for the fields to be editable by the user and, therefore, selectable.
- Paragraph
A Password option has been added to the Behavior menu. When enabled, it substitutes asterisks for typed characters, obscuring the input from view.
The Orientation feature has been disabled. Vertical input is not supported in the shipping version of Flash CS4 Professional.
- Options
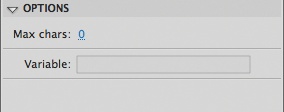
The Link and Target features have been removed, as links cannot exist where user input has not yet been entered. Instead, a Max chars option has been substituted (Figure 11-6). This feature limits the maximum number of characters that can be entered into an Input field.
As described earlier, Static text elements remain editable during authoring, but are rendered as graphics when compiled into your SWF. This means that they will render consistently on all computers, but it also means that you cannot control them with ActionScript. Accordingly, the first thing to notice is that no Instance name field exists at the top of the Properties panel while a Static text field is selected.
- Position and Size
The Height option is disabled. Although you can set the width of a Static text field, its height is automatically set to the minimum size necessary to display the entire text.
- Character
Auto kern is activated, allowing you to enable or disable the kerning information built in to each font. Toggle the superscript and Toggle the subscript are enabled, allowing users to apply superscript or subscript formatting to any character.
Render text as HTML and Show border around text are disabled, as neither ActionScript nor users can enter text or HTML into Static text fields.
- Paragraph
The Multiline feature is disabled. Line returns and line wrapping are automatically supported by manual entry, but ActionScript control does not apply.
Orientation is enabled, allowing both horizontal and vertical directional alignment.
- Options
The Variable option is removed because Static fields cannot display ActionScript variable values.
Resizing text fields is a bit different than resizing other display objects. You can scale a text field using the Free Transform tool, just like you can scale a movie clip and the text characters will scale accordingly. Shown in Figure 11-7, this can result in distorted text if you are trying to resize the text field only, rather than scaling the characters within.
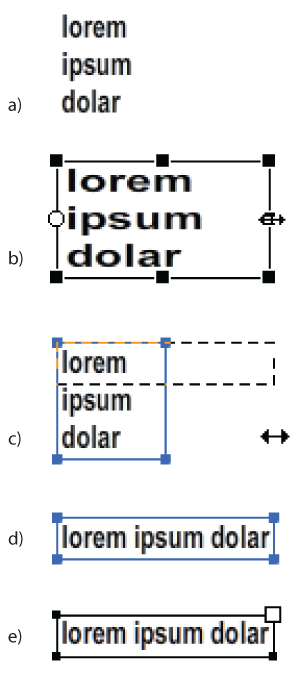
Figure 11-7. Resizing text: a) original text; b) scaling with the Free Transform tool; c) resizing using the text field handles; d) after resizing c), e) different handles displayed while editing the text at authoring time
You can resize the text field without scaling the text in one of two ways. If you click on a text field with the Selection tool, four blue handles appear. These are the text resize handles, which you can drag to change the shape of the text field, as shown in Figure 11-7 and Figure 11-7. You can also double-click to edit the text field and, while editing, use the large solid-white handle in the upper-right corner of the field to resize without scaling.
Using ActionScript to create, configure, and populate text fields brings a heightened degree of control and freedom of runtime manipulation that is unavailable to text fields created solely with interface tools. This section contains one simple ActionScript example each for Dynamic and Input text fields. They will work together in the same sample file, and will not be used in the final project. If you prefer, you can test as_text_fields_01.fla to see how the script operates.
The following script not only configures the dynamic text field, but also uses code to populate the field with text:
1 var txtFld:TextField = new TextField();
2 addChild(txtFld);
3 txtFld.text = "Hello Scaly";
4 txtFld.x = 20;
5 txtFld.y = 20;
6 txtFld.width = 100;
7 txtFld.autoSize = TextFieldAutoSize.LEFT;
8 txtFld.selectable = false;
9 txtFld.multiline = true;
10 txtFld.wordWrap = true;
11
12 for (var i:int = 0; i < 25; i++) {
13     txtFld.appendText(" " + "word" + i);
14 }
Lines 1 and 2 create a text field, which is Dynamic by default, and add it to the display list. Line 3 adds a text string to an otherwise empty text field. Lines 4 and 5 position the field, and lines 6 and 7 size the field. The width is set explicitly in line 6, but line 7 anchors the height at the upper-left corner and automatically expands down as needed. Lines 8 through 10 disable the selectable option and enable the multiline and wordWrap features. Finally, lines 12 through 14 use the appendText() method to add text to an already populated text field. The for loop executes 25 times, adding a string containing three elements to the field. The string starts with a space and is followed by “word” and the number of the current iteration through the loop. For example, the first two additions are " word0”, and this pattern continues on through " word24,” where the process ends.
Input text fields add control over user input, as well as styling options for border and background colors. This example script uses a simple conditional statement to check the accuracy of a user-typed password:
15 var txtFld2:TextField = new TextField();
16 txtFld2.type = TextFieldType.INPUT;
17 addChild(txtFld2);
18 txtFld2.x = 200
19 txtFld2.y = 20;
20 txtFld2.width = 100;
21 txtFld2.height = 20;
22 txtFld2.border = true;
23 txtFld2.borderColor = 0x990000;
24 txtFld2.background = true;
25 txtFld2.backgroundColor = 0xFFEFEF;
26 txtFld2.textColor = 0x990000;
27 txtFld2.maxChars = 10;
28 txtFld2.restrict = "0-9";
29 txtFld2.displayAsPassword = true;
30 stage.focus = txtFld2;
31 txtFld2.addEventListener(Event.CHANGE, onChange);
32 function onChange(evt:Event):void {
33     if (evt.target.text == "0123456789") {
34         trace("Password correct");
35     }
36 }
In this case, the first important change occurs in line 16 when the field is changed to an Input type. Lines 22 through 26 display a maroon border and text, with a light red background. Lines 27 and 28 restrict the user input to numbers only and limit it to 10 characters. Line 29 substitutes asterisks for characters typed by the user, and line 30 automatically places a text cursor in the input field awaiting user interaction. Finally, lines 31 through 36 duplicate the functionality of the TextInput component example from this chapter’s earlier section,"Using ActionScript to Configure Text Components.” If the user types the specified string, an affirmation is traced to the Output panel.
So far, you’ve worked with very limited text formatting options that have focused on rudimentary field styling. In fact, the only text styling you’ve experimented with thus far is text color applied to all the text in a field. It is possible to use both the Flash interface and ActionScript to exert greater control over text formatting. The first thing to understand in this regard is how to specify a font, and how that impacts your work.
In very broad terms, there are three basic categories of fonts in Flash. The first is a device font, which is an operating system-specific font that is sure to be available, even if it can differ slightly from computer to computer. The second category is a custom font, which may not display correctly if it is not available on a user’s computer. Finally, the third category is a custom font that has been embedded into the SWF to ensure consistent display everywhere.
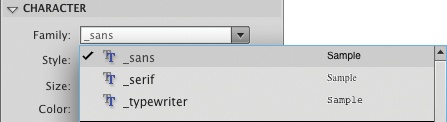
Flash targets three device fonts. The first is a font with serifs, or the small accents, tails, and flourishes added to each letter. Common examples of fonts with serifs include Times and Times New Roman. Next is a font without serifs, also called sans serif (sans means “without” in French). Examples of sans serif fonts include Helvetica and Arial. Finally, there is a typewriter font, which is a fixed-width font such as Courier and Courier New.
Device fonts save on file size because they are supplied by the operating system of each user and are relatively certain to display (barring a user’s radical reconfiguration of his or her computer). However, the font chosen by the operating system may differ slightly, so there’s no guarantee that everything will display the way you want it to.
All that is required to use a device font is to specify the names _sans, _serif, or _typewriter (note the preceding underscore characters) either in the Properties panel (Figure 11-8) or though ActionScript.
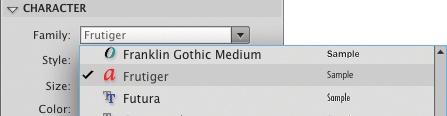
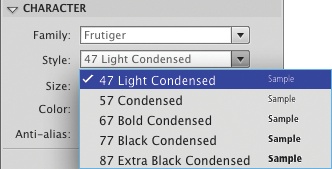
As with device fonts, you specify custom fonts using the Properties panel or ActionScript. OpenType PostScript and TrueType font formats are supported. Instead of using a generic font reference (such as _sans, for example), you must specify the actual font name (Figure 11-9) and style (Figure 11-10) because there is no substitution by the user’s operating system. As a result, there is no assurance that the end user will have the same font on his computer. For this reason, custom fonts are best used for Static text fields.
If you want to use a custom font for Dynamic or Input text fields, and expect it to be visible on all machines, you must embed the font. Flash Player also requires font embedding to properly render fonts when a field is transformed or composited in certain ways.
Up to and including Flash Player 9, for example, text created from nonembedded fonts would disappear in masked layers. These player versions also failed to apply transparency (alpha) settings when fields used fonts that were not embedded.
These issues have been corrected as of Flash Player 10, the player primarily associated with Flash CS4 Professional, but some circumstances still require embedded fonts. For example, even in Flash Player 10, if you apply a standard 2D rotation to a text field, you must use an embedded font to prevent the text from disappearing.
Note
If you want to rotate a text field without embedding a font, you can use a little-known trick. Place the field inside a movie clip and then apply 3D rotation along the z-axis. This works using the 3D Rotation tool, Transform panel, and ActionScript.
You can embed fonts using the Properties panel or by creating a font symbol and using ActionScript. When using the Properties panel, first select the field for which you want to embed fonts, specify the font of your choice, and then click the Character Embedding button in the Properties panel’s Character section. The Character Embedding dialog will appear (Figure 11-11), and you can specify exactly which glyphs (font characters) or groups of glyphs to include. For example, Figure 11-11 shows the inclusion of uppercase and lowercase letters, numbers and punctuation, and basic Latin (special characters and symbols).
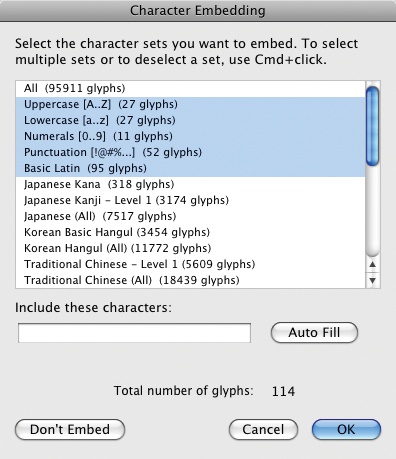
Figure 11-11. Embedding a subset of character glyphs using the Character Embedding option in the Properties panel
Every glyph you embed increases file size. If you are embedding fonts for a very isolated need, such as a single headline, you can even limit the glyphs you embed to specific characters by filling in the Include these characters input field shown in Figure 11-11. You can even have these characters automatically added to the Character Embedding dialog by clicking the Auto Fill button.
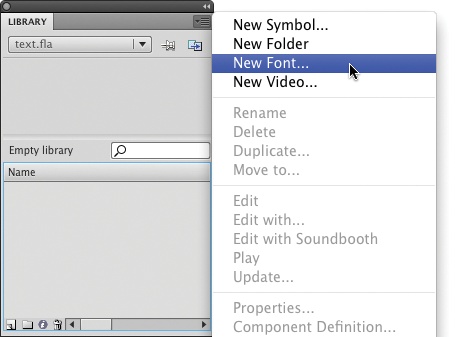
For ActionScript use, you must create a font symbol. Like other symbol types, you can use a font symbol throughout the entire file. To create a font symbol, choose New Font from the menu in the upper-right corner of the Library (Figure 11-12).
This creates a font symbol and opens the Font Symbol Properties dialog (Figure 11-13). The creation of the font symbol from here on is similar in many ways to creating a movie clip symbol, for example. First, you should choose a meaningful name for your font symbol. This can be purpose-related, such as “Headline” or “BodyCopy,” or you can label it as an embedded font by preceding the name with something like “emb” or by combining a font name and style. Figure 11-13 shows the embedding of Arial Regular; the chosen font symbol name is ArialReg.
Next, you should specify the Font and Style of your choice. If you want to use a bitmap font, rather than embedding font outlines that can be scaled to many resolutions, enable the Bitmap text option and indicate the size of the bitmap font you want to embed. This is fairly rare and is usually only used for bitmap micro fonts heavily optimized to look good at font sizes smaller than 9 points.
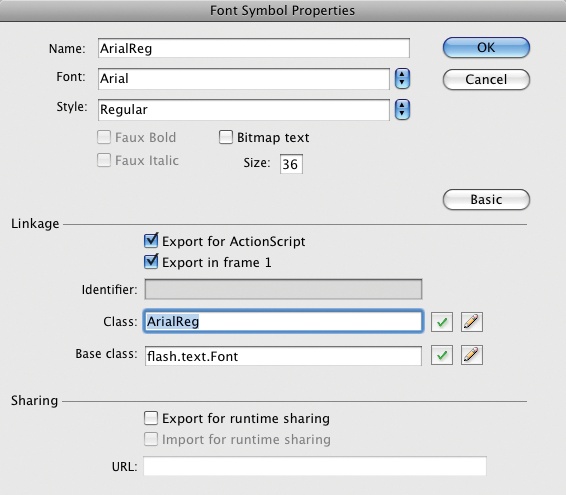
Finally, just like with a display object, you need to export the font for use with ActionScript and give it a linkage class name. Flash automatically makes the base class flash.text.Font and, unless you’re an experienced ActionScript developer writing your own classes for this purpose, you shouldn’t change it.
Note
Remember from Chapter 6 that it is considered a best practice to start your class names with an uppercase letter.
Once you’ve filled out this dialog, click OK to create your font symbol. Flash embeds the font’s entire set of glyphs, and you can now make use of the embedded font with ActionScript. The next section will discuss not only how to use embedded fonts with ActionScript, but also how to create native ActionScript objects to style the font without having to use the Properties panel.
To use ActionScript instead of the Properties panel for text formatting, you need to create and configure an instance of the TextFormat class. The following code example demonstrates how to format text this way, and also uses the embedded font discussed in the preceding section. This gives you the freedom to use ActionScript for runtime control of text formatting and also for use of custom fonts without fear of substitution on the end user’s system.
This example can be found in the text_formatting_01.fla source file. The first step in this process is to create a custom font instance using your font symbol. Thanks to the consistency of ActionScript, you can use the same method that you would for creating any other new instance; this method is shown in line 1 of the script:
1 var customFont:Font = new ArialReg();
2 var txtFmt:TextFormat = new TextFormat();
3 txtFmt.font = customFont.fontName;
4 txtFmt.color = 0x000099;
5 txtFmt.size = 12;
6 txtFmt.leading = 4;
7 txtFmt.leftMargin = 6;
8 txtFmt.rightMargin = 6;
9 txtFmt.indent = 20;
Next you need to create and configure the TextFormat instance, in lines 2 through 9. The code is very straightforward and, for easy explanation, very closely mimics the property names used in the Properties panel.
The significant departure in this code is the specification of the font. Rather than citing the name of the font you used to create your symbol, you need to use the fontName property of the new Font instance you created. In this example, the linkage class given to the font symbol is ArialReg, and the instance is stored in the customFont variable. The font name is set in line 3 using customFont.fontName.
Next is some familiar code for creating and configuring a text field:
10 var txtFld:TextField = new TextField();
11 addChild(txtFld);
12 txtFld.x = 20;
13 txtFld.y = 20;
14 txtFld.width = 200;
15 txtFld.autoSize = TextFieldAutoSize.LEFT;
16 txtFld.textColor = 0x000099;
17 txtFld.border = true;
18 txtFld.selectable = false;
19 txtFld.multiline = true;
20 txtFld.wordWrap = true;
21 txtFld.embedFonts = true;
22 txtFld.defaultTextFormat = txtFmt;
23 txtFld.text = "Scaly was born in a bathtub, and grew so incredibly thin...";
The new information in this script segment is found in lines 21 and 22. Line 21 enables the use of embedded fonts, and line 22 sets the default text format for the field to the TextFormat instance you created earlier. You must apply a default text format before adding any text to the field. Note that line 22 sets the format and the text is added to the field in the next line, line 23. Note also that this approach uses the defaultTextFormat property and applies it to the entire field.
This is in contrast to the other way to apply a TextFormat instance, which uses the setTextFormat() method and must be used after the field already contains text. This approach is required when you need to apply a format only to a segment of the field. The final segment of this script creates another TextFormat instance and uses the setTextFormat() method to apply the format only to characters 0 through 5 of the field:
24 var txtFmt2:TextFormat = new TextFormat();
25 txtFmt2.color = 0xFF0000;
26 txtFmt2.underline = true;
27 txtFld.setTextFormat(txtFmt2, 0, 5);
It’s also helpful to understand that TextFormat instances can work together. The txtFmt2 instance specifies an underline style, as well as a color, but doesn’t indicate a new font, for example. When applied along with an existing format, the text will retain any unchanged properties from the first format and take on new properties from the second format.
Warning
It’s important to know that when using embedded fonts, you must embed a separate version of each font style you want to use. For example, if you want to work with plain and bold versions of a font, you will need to create two font symbols. Similarly, if you want to embed the fonts using the Properties panel, you need to put placeholder text in the field and use plain, bold, and italic words to make sure they’re all embedded. For more information, see the companion website.
Dynamic text fields, as well as TextArea and Label components, can display very simple HTML by using ActionScript. For basic applications, all you need to do is use the htmlText property instead of the text property when populating the object with text. However, Flash’s HTML support is very limited. Table 11-1 shows the HTML tags supported, as well as qualifying notes.
Note
For more information about HTML, start with the World Wide Web Consortium tutorials at http://www.w3.org/MarkUp/Guide/.
Table 11-1. HTML tags supported by Flash Player
HTML tag | Notes |
|---|---|
| Supported attributes include |
| Bold version of font must exist to work |
| Italic version of font must exist to work |
| |
| Supported attributes include |
|
|
|
|
| All lists are bulleted; ordered and unordered qualifiers are ignored |
Supported attributes include | |
| Supported attributes include |
| Used to apply limited subset of |
Note
Text elements with HTML support can also format text with cascading style sheets (CSS). Here again, Flash’s support for CSS is very limited. For more information about CSS, start with the World Wide Web Consortium tutorials at http://www.w3.org/TR/CSS/.
Table 11-2 shows the cascading style sheet properties supported, their ActionScript equivalent, and any qualifying notes.
Table 11-2. CSS tags supported by Flash Player
CSS property | ActionScript property | Notes |
|---|---|---|
|
| Font color in 0xRRGGBB format |
|
| Controls display of item; values include |
|
| Font name |
|
| Font size in pixels |
|
| Font style; values include |
|
| Font weight; values include |
|
| Turns kerning on or off; values include |
|
| Font leading in pixels; not officially supported; similar to |
|
| Tracking in pixels |
|
| In pixels |
|
| In pixels |
|
| Aligns text; values include |
|
| Underlines text; values include |
|
| First-line paragraph indent in pixels |
There are two ways to apply CSS in ActionScript. The first is by creating your CSS data internally, as shown in the following example, which comes from the internal_html_css.fla source file. The second is by loading an external CSS document, which will be demonstrated in the upcoming section, Loading Text.
This script will be discussed in two segments, beginning with the creation of the style sheet. The first step in creating the style sheet is to create an object for each style. In ActionScript, this is just like creating an instance of any other class and configuring its properties. If you have experience using CSS, you will find that this is similar to creating a CSS object, but the syntax is, necessarily, in ActionScript. When loading external CSS files, you can use traditional CSS syntax to the extent that it is supported within Flash.
There are a few things worthy of mentioning in this first script segment. The first style (lines 1 through 3) will be applied to the HTML body tag so that all text will use the specified font and paragraph indent. The second style (lines 5 through 11) is for a headline only, which will be applied using a CSS class in an HTML span tag. Because the headline should not be indented, the textIndent property is given a negative value (line 7) to compensate for the indent applied to all text.
Finally, the style sheet is created in lines 13 through 15 and each style is added to the style sheet using a process similar to standard CSS authoring. HTML tag styles are attributed to the tag name (line 14) and class style names are preceded with a dot (.), shown in line 15.
1 var body:Object = new Object();
2 body.fontFamily = "Verdana";
3 body.textIndent = 20;
4
5 var headline:Object = new Object();
6 headline.fontSize = 18;
7 headline.textIndent = −20;
8 headline.leading = 10;
9 headline.letterSpacing = 1;
10 headline.fontWeight = "bold";
11 headline.color = "#990000";
12
13 var css:StyleSheet = new StyleSheet();
14 css.setStyle(".headline", headline);
15 css.setStyle("body", body);
The next segment creates and configures a text field (lines 16 through 23), applies the style sheet (line 25), and then populates the field with HTML text (lines 25 through 27). It’s very important to note that you must apply the style sheet before adding the HTML to the field. If this order is reversed, the text will not be styled.
16 var txtFld:TextField = new TextField();
17 addChild(txtFld);
18 txtFld.x = 20;
19 txtFld.y = 20;
20 txtFld.width = 500;
21 txtFld.multiline = true;
22 txtFld.wordWrap = true;
23 txtFld.autoSize = TextFieldAutoSize.LEFT;
24
25 txtFld.styleSheet = css;
26 txtFld.htmlText += "<body><span class='headline'
>CSS Text Formatting Possible in Flash</span><br>";
27 txtFld.htmlText += "<p>Lorem ipsum dolor sit amet,
 consectetur adipiscing elit. Aenean facilisis luctus lacus. Mauris
 porta felis quis nulla. Vivamus sollicitudin magna vitae mauris.
 Nulla ultricies accumsan mi.</p></body>";
It is also possible to load text from an external file using ActionScript. The following simple script loads text from an external file and places it into a default text field. For this to work, create and save a plain-text file called demo.txt that contains a few words. For simplicity, the default text field size used here is only 100×100 pixels. The next example will create a larger field to demonstrate the process of loading HTML and CSS files.
Next, create a new FLA, save it into the same directory as your text file, and add the following script to frame 1. When you test your movie, your external text should appear in the small field in the upper-left corner of the Stage. If you prefer, you can test the simple_text_loading.fla source file.
1 var txtFile:URLLoader = new URLLoader();
2 txtFile.addEventListener(Event.COMPLETE, onLoadTXT);
3 txtFile.load(new URLRequest("demo.txt"));
4 function onLoadTXT(evt:Event):void {
5     var txtFld:TextField = new TextField();
6     addChild(txtFld);
7     txtFld.text = evt.target.data;
8 }
Line 1 of this script creates an instance of the URLLoader class, which is responsible for loading text from external sources. It can load text, server variables, and even binary data. In all cases in this chapter, you’ll use it to load text, including simple text, HTML, and CSS data.
Lines 2 through 8 are an event listener that will respond once the text has loaded. Line 3 loads the text and uses the URLRequest class to process the URL. This required class standardizes all external file references.
Note
A URL is not just used for web addresses. URL stands for universal resource locator and is, essentially, a pathname for any file.
Finally, lines 5 through 7 create a default text field and populate it with the data coming in from the target of the listener. In this case, the target is the URLLoader instance, so the data coming in is the text that this instance loads.
You can combine this process with some of the CSS and HTML code used previously in the Using HTML and Using CSS sections of this chapter to load external HTML and CSS files in their native syntax. The following example requires that you save the HTML file named demo.html and a CSS file named demo.css (the text of which follows) into the same directory as your text FLA. These files are provided in the external_html_css directory of the companion source files.
HTML:
<body>
<span class='heading'>CSS Text Formatting Possible in Flash</span><br>
<p>Lorem ipsum dolor sit amet, consectetur adipiscing elit.
 Aenean facilisis luctus lacus. Mauris porta felis quis nulla.
 Vivamus sollicitudin magna vitae mauris. Nulla ultricies accumsan mi.</p>
</body>
CSS:
body {
    font-family: Verdana;
    text-indent: 20px;
}

.heading {
    font-size: 18px;
    font-weight: bold;
    text-indent: −20px;
    letter-spacing: 1px;
    color: #FF6633;
}

a:link {
    color: #990099;
    text-decoration: underline;
}

a:hover {
    color: #FF00FF;
}
FLA:
The only thing different about this example is that it uses two event listeners in sequence. The CSS is loaded first and, when the loading is complete, the HTML is loaded. When the HTML is loaded, the text field is then created and populated.
1 var css:StyleSheet;
2 var cssFile:URLLoader = new URLLoader();
3 cssFile.addEventListener(Event.COMPLETE, onLoadCSS);
4 cssFile.load(new URLRequest("demo.css"));
5 function onLoadCSS(evt:Event):void {
6     css = new StyleSheet();
7     css.parseCSS(evt.target.data);
8     var htmlFile:URLLoader = new URLLoader();
9     htmlFile.addEventListener(Event.COMPLETE, onLoadHTML);
10     htmlFile.load(new URLRequest("demo.html"));
11 }
12 function onLoadHTML(evt:Event):void {
13     var txtFld:TextField = new TextField();
14     addChild(txtFld);
15     txtFld.x = 20;
16     txtFld.y = 20;
17     txtFld.width = 500;
18     txtFld.autoSize = TextFieldAutoSize.LEFT;
19     txtFld.selectable = false;
20     txtFld.multiline = true;
21     txtFld.wordWrap = true;
22     txtFld.styleSheet = css;
23     txtFld.htmlText = evt.target.data;
24 }This section is an enthusiastic profile of a new feature that improves interoperability between Creative Suite 4 applications. Adobe’s new XFL file format promises to improve asset transfer between applications. In its current implementation, the format facilitates movement in one direction from InDesign CS4 to Flash CS4 Professional.
All you need to do to use the feature is export a layout from InDesign as XFL. You don’t even have to import anything in Flash! Just opening the file in Flash will convert the layout to a movie clip containing static graphics and Static text elements to preserve visual accuracy. Figure 11-14 shows the original InDesign output, and Figure 11-15 shows the final output from Flash with no interim steps applied.


Because the fidelity of the original document is being preserved, editing the text after opening in Flash is not a trivial matter. Each line of text and, in the example used in Figure 11-14 and Figure 11-15, even the initial capital letters in the body copy are separate Static text elements. However, the text is still editable, so simple edits are possible. If dynamic text resources are not essential to your project, this is a workflow worth exploring.

In this chapter, you will add text to your Help screen, as well as an ActionScript event listener that will display text when Scaly’s inverse kinematics armature passes over elements on the page.
First create a handful of cosmetic assets that will not be controlled by ActionScript, to help convey the purpose of the screen.
Open your main portfolio document and scroll the Timeline panel to the help section of your file.
In the content layer, double-click the HelpScreen movie clip to edit it.
Use the Text tool to create a text field anywhere on the stage.
Create a Static text field anywhere on the stage and type
HELPinto the field.Select the text within the field and, using the Properties panel, set the Family to
Arial Narrow, Style toBold, Color to black, and Size to76.Set the width of the field to
200, making the height approximately 90. Set the x and y coordinates to160and65, respectively.Switch to the Selection tool and copy and paste the field to create a duplicate. Use the Modify→Transform→Flip Vertical menu command to flip the field and position it at
160,120so it is immediately below the first field.Change the color of the flipped field to
0x990000(maroon) with an alpha value of50%.Select both fields by holding down the Shift key when clicking, and group them (Modify→Group).
Use the Transform panel to rotate the group
−15degrees.
Create a Static text field anywhere on the Stage and type a short descriptive blurb about yourself. The provided source file uses the following text:
<your name> is a tinkerer...a mover and shaker...based in <your locale>.Switch to the Selection tool and select the field. Using the Properties panel, set its width to approximately
125, and its x and y locations to approximately450and150, respectively. The text you included in the blurb will affect the size and position of the field. When you are finished, just be sure that it is within the framed area shown in the guide layer.
If desired, draw a few lines, words, or creative shapes in the upper- and lower-right corners of the area described by the guide layer frame. This is entirely optional, but will help the illusion that the content is under the wheel as visitors to your portfolio look through the view window.
The last task for the Help screen is to create a dynamic text field and populate it with ActionScript.
Create a Dynamic text field approximately 100 pixels tall and 100 pixels wide, and type
Drag Scaly's handinto the field.Switch to the Selection tool and select the field. Using the Properties panel, set its x and y locations to approximately
130and250, respectively.Set the font Family to
Arial Narrow, the Style toBold, the Size to14, and the Color to0x990000(maroon).Click the Character Embedding button and embed uppercase and lowercase letters, numbers, and punctuation. As an alternative to embedding fonts, you can specify a font in step 3 that you expect to find on most computers, such as Arial, or a device font such as _sans.
Double-click any unoccupied location of the Stage to return to the main Timeline and add the following script to the script frame for the Help section (frame 227 in the actions layer):
1 this.addEventListener(Event.ENTER_FRAME, onLoop);
2 function onLoop(evt:Event):void {
3     if (arm.hand.hitTestObject(navigation)) {
4         help.helpText.text = "Navigate the portfolio using these buttons.";
5     } else if (arm.hand.hitTestObject(logo)) {
6         help.helpText.text = "This is version 1.0 of my portfolio";
7     } else if (arm.hand.hitTestObject(soundController)) {
8         help.helpText.text = "Turn the sound on and off using this controller.";
9     } else {
10         help.helpText.text = "Drag Scaly's hand around to learn more...";
11     }
12 }
This script will continuously populate the Dynamic text field with a string, based on where Scaly’s hand is. The
hitTestObject()method determines if one object collides with another. In lines 3, 5, and 7, the script tests to see if Scaly’s hand collides with the navigation buttons, logo, or sound controller, respectively. If a collision is detected, the appropriate string is placed into the text field. If no collision is detected, line 9 allows an unconditional alternative and line 10 places a generic string into the field.
The project’s Lab screen will ultimately contain a text-driven animation in which characters typed into a text field will scale movie clips on screen. When the user types the letter A into the text field, the movie clip graphic for letter A will enlarge. When the next letter is typed, the A will reduce to normal size and the new letter graphic will enlarge.
To recap the screen’s asset preparation from Chapter 4, all movie clips and text fields were optimized in Adobe Illustrator for Flash use. During that process, a text object was set as a Flash Input text field and given an instance name of typeAnimInput, using Illustrator’s Flash Text panel. The text object was also placed inside an Illustrator symbol that was set as a Flash movie clip with an instance name of typeCard.
During the AI Import process, the relationship among all of these assets remained intact, and the necessary text field and movie clips were automatically created, complete with instance names. Because these assets were prepared in Illustrator, all you have to do to make the screen functional is add ActionScript. Scroll the timeline of your master portfolio FLA to the Lab section and add lines 2 through 20 of the following script to the stop() action in frame 187 of the actions layer. (The complete script appears here for clarity.)
1 stop();
2
3 var userInput:TextField = LabScreen.typeCard.typeAnimInput;
4 userInput.text = "";
5 userInput.addEventListener(TextEvent.TEXT_INPUT, onTextInput);
6
7 function onTextInput(evt:TextEvent):void {
8     var len:int = LabScreen.numChildren;
9     for (var i:int = 0; i < len; i++) {
10         var tempMC:MovieClip = MovieClip(LabScreen.getChildAt(i));
11         tempMC.scaleX = tempMC.scaleY = 1;
12     }
13
14     var char:String = evt.text.toLowerCase();
15
16     var letterMC:MovieClip = MovieClip(LabScreen.getChildByName(char + "Letter"));
17     if (letterMC) {
18         letterMC.scaleX = letterMC.scaleY = 1.5;
19     }
20 }
Line 3 stores a reference to the text field in a variable for simplicity. The typeAnimInput text field is inside the typeCard movie clip, which is inside the content movie clip, LabScreen. Line 4 empties the text field every time you enter the Lab screen.
Line 5 assigns an event listener to the text field. Each time the user types something into the field, and event will be dispatched and the corresponding listener function in lines 7 through 20 will handle the input. This is a simple way of capturing each character typed by the user.
Lines 8 through 12 set all child movie clips in the LabScreen movie clip to actual size. Line 8 determines how many children are in LabScreen. Lines 9 and 10 loop through all of those children, storing a reference to the child found at each level, and casting each to the MovieClip data type. Line 11 sets the scaleX and scaleY properties of each child to 1, or 100% actual size.
Because ActionScript is case sensitive, line 14 converts each incoming character to lowercase. This prevents the need to create a separate movie clip of artwork for both uppercase and lowercase letters. Later, when a movie clip is sought by name, the script will find the aLetter movie clip (for example) whether the user types a or A.
Finally, lines 16 through 19 enlarge the movie clip that corresponds to the most recent character typed into the field. Line 16 finds the movie clip by name, using the character and suffix “Letter” to find aLetter, bLetter, and so on. Line 17 checks to see if the movie clip exists and, if it does, line 18 sets its scaleX and scaleY properties to 1.5, or 150% actual size.
In the next chapter, you will learn about sound and write the ActionScript to enable the sound controller you created in Chapter 3.