
Audio has long been an important part of the Flash world for designers and developers alike. From MP3 jukeboxes to presentation voice-overs and sound effects, audio is as much a part of some Flash files as the vectors on which they are based. Of course, used injudiciously, sound can be an annoyance. However, well-planned sound can add a lot to games, applications, and demos.
From a programming standpoint, ActionScript 3.0 introduces a whole new level of sound management. It’s now possible, for example, to more easily control Flash’s 32 independent channels of audio, determine the amplitude of mono and stereo sounds, and control Flash properties based on data from sounds playing in real time.
Even without ActionScript, Flash is no slouch in the audio department. You can add sounds to animation and button timelines, play them while downloading, and even edit them to a minimal degree, right within Flash. You can pan sounds back and forth between the left and right stereo channels, set them to any volume, and loop them.
In this chapter, you’ll learn how to import and embed sounds for use in the Timeline and how to play external sounds with ActionScript. You’ll also learn how to apply simple effects with the Flash interface and code and optimize sound compression. Finally, you’ll complete the sound controller you created in Chapter 3 for the portfolio project.
For a complete picture of Flash’s support for file formats, this discussion is divided into two categories: importing audio, which is also often referred to as embedding audio, and loading external sounds for playback at runtime.
Working with external sounds brings many benefits to the typical Flash project. To begin with, using external audio files keeps the size of your FLA files down and speeds up compiling. Furthermore, editing external files is easy and typically doesn’t require any change to the SWF if an edit is required. Best of all, loading external sounds at runtime reduces download time and improves user experience.
There are also advantages to embedding sound files into your SWF. For example, you can place sounds directly in the Timeline, view their waveforms, and scrub through the sounds to try to synchronize them with other animation events. Imported audio files are also preferred for short sounds that must play without any download delay, such as button sound effects.
You can import a variety of file formats into Flash, which supports uncompressed and compressed sound. The most common formats are WAV, AIFF, and MP3; all three are supported on both Windows and Mac. WAV and AIFF files are typically used for uncompressed sounds, although you can use compression when creating both formats. MP3 files are for compressed sounds (specific compression algorithms will be discussed in a moment).
Additional file formats are supported when QuickTime 4.0 or later is installed. AU (Sun Audio) and MOV (sound-only QuickTime movie) files can be imported on Windows and the Mac, and SD2 (Sound Designer 2) and SFIL (System 7 Sounds) can be imported on the Mac only.
Importing a sound is the same as importing graphical assets, with one exception. Because there is no visual component to an audio file, the Import to Stage option functions just like the Import to Library option. When you import a sound, Flash automatically places it in the Library and adds nothing to the Stage or Timeline (you’ll learn to use the sound in your files in the Timeline Use and ActionScript Use sections, later in this chapter).
Note
Occasionally, applications may create MP3 files that don’t comply with recognized standards. If an MP3 file fails to import, try converting the audio file to WAV or AIFF format and reimporting. For more information about possible issues when importing, see this chapter’s upcoming sidebar, Sound Highs and Lows.
For widest compatibility, only MP3 files can be loaded from external sources and played at runtime. However, as of Flash Player 9 Update 3, released in December 2007, file formats using the AAC compression scheme are also supported for runtime playback. Apple’s iTunes and compatible hardware (iPods, iTouch, iPhone), Sony’s Playstation, and Nintendo’s Wii platforms use AAC. The most common file types using AAC are M4A, MP4 and AAC.
Note
Although Flash CS4 Professional is the most up-to-date version of Flash as of this writing, most compatibility issues do not hinge on which version of the authoring tool you’re using. While it’s true that new features are introduced with each version of the authoring tool, most compatibility problems relate to which version of the player your viewers are using.
Warning
Some of these optimization decisions are optional, but one guideline is extremely important. When reducing the sample rate, always reduce by half, starting with 44.1 kHz. That is, use a sample rate of 44.1, 22.050, or 11.0125. If you fail to do so, your sound will need to be resampled on the fly due to restrictions imposed by Flash Player. Consequently, your audio will sound like squeaking mice or bubbling molasses.
Although there may be rare circumstances when presenting full CD-quality sound over the Internet is required, you are more often going to need to compress your sounds. The leaps and bounds that high-speed bandwidth has made over the past several years still aren’t sufficient to guarantee that everyone has enough bandwidth to play 10 MB per minute in sound alone.
While using uncompressed files at runtime is uncommon, choosing whether or not to compress sounds prior to importing them is a recurring question. Some Flash designers feel that it’s best to import uncompressed sounds (such as uncompressed WAVE or AIFF files) and then let Flash compress the audio when compiling to SWF. Others prefer to compress sounds using external tools (saving to MP3) and then apply no further compression in Flash.
Using uncompressed sounds reduces or eliminates artifacts that might otherwise have been exacerbated by compressing already compressed sound. Additionally, this approach allows you to experiment with different compression settings when publishing to SWF. On the downside, using uncompressed sound significantly increases FLA file size and SWF compile time.
Using compressed sounds means slimmer FLA files, but it reduces quality when you want to change compression settings later on. With a little practical experience, you will likely develop a workflow that you prefer.
Fortunately, Flash has a variety of codecs (short for compression-decompression algorithms) for use with internal sounds, and Flash supports more than one type of compression for external sounds loaded at runtime.
Although the current Flash Player supports AAC, the most popular external compressed file format remains MP3. There are dozens of applications that compress MP3 sounds, and they are the most common audio files used on electronic sound players such as iPods.
Apple’s iTunes, the primary application used to sync with iPods, is a free, cross-platform application that can compress sounds using many Flash-compatible formats, including MP3, WAVE, AIFF, and AAC files like M4A. See this book’s companion website for examples of how to create audio files using iTunes.
When compressing audio, another key term comes into play. Bitrate represents the number of bits transferred per second. Bitrate is not a term specific to audio, but pertains to the transfer of any digital data. It surfaces frequently in discussions about audio because it is also a measure of the quality of compressed sound. In addition to bit depth and sample rate, a high bitrate contributes to higher-quality sound. As a point of comparison, a very high-quality MP3 bitrate is 320 kbps (kilobits per second, or 1,000 bits for every second of sound), a good bitrate is 128 kbps, and a low-quality sound is 16 kbps.
Note
Bit depth should not be confused with bitrate. Bitrate is how many bits per second, while bit depth is how many bits per sample. Bitrate is influenced by both bit depth and sample rate.
The most important things to remember when compressing sounds are:
Use a bit depth of 16-bit whenever possible.
Use a sample rate of 44.1 kHz or an even division thereof (22.050, for example) to avoid resampling.
Use stereo or monaural sound based on need and your willingness to drop stereo playback for file size optimization.
After considering all of the above, balance bitrate with file size; through trial and error, determine the best combination of lowest file size with the highest acceptable bitrate.
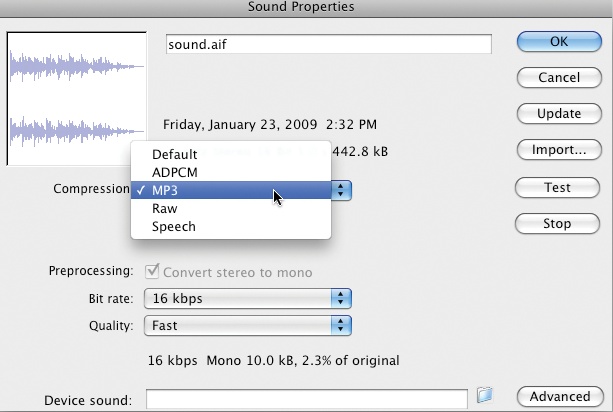
The highest degree of control you can exert over sound quality and file size comes from applying compression on a sound-by-sound basis. Once you have imported a sound, you can select it in the Library and access its properties using the Properties button (i icon) at the bottom of the Library panel.
The Sound Properties dialog (Figure 12-1) allows you to change the compression and, where applicable, convert stereo to mono (termed Preprocessing in the dialog because it occurs prior to compression), and change the Bit rate, Sample rate, and Quality of compression. The latter is an arbitrary measure that includes Fast, Better, and Best, and determines how long the compression takes.
Compression options include:
- Default
Default skips asset-specific compression and applies the file-wide compression options explained in the upcoming section, Internal File-Wide Publish Settings.
- ADPCM
ADPCM applies a 4:1 compression ratio that allows you to choose not only sample rate, but also the number of bits used during compression. This is also known as IMA or IMA ADPCM in QuickTime environments.
- MP3
MP3 uses the MPEG-1 Audio Layer 3 compression algorithm and allows you to customize preprocessing, bitrate, and quality settings.
- Raw
Raw applies no further compression. This is useful when you want to import compressed sounds.
- Speech
The Speech codec is optimized for speech and is not commonly suitable for music. It is also not compatible with Flash Lite, the Flash Platform’s player for mobile devices.
Note
At the bottom of the Sound Properties dialog, you can specify a device sound used in Adobe’s mobile Flash player, Flash Lite. The mobile devices, rather than Flash Lite, play device sounds. Because Flash can’t import common device sound formats (such as MIDI), a Library sound element serves as a proxy that links to a device sound file. Flash Lite is not covered in this book.
Using your file’s publishing settings (File→Publish Settings), you can specify compression settings that can be applied to every sound in the entire file. This only occurs when compiling the file’s SWF.
You can specify settings for streaming sounds (sounds that play while still being downloaded) and event sounds (sounds that must be fully downloaded before playback begins). The streaming option is best for larger sounds that take a long time to download, while event sounds are better suited for very short sounds that can easily be downloaded and fit into memory. Additional options will be discussed later in the Sync Types section of this chapter.
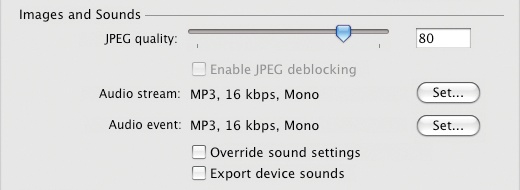
Because of their different uses, you can apply independent compression settings to each type of sound. This lets you choose a higher-quality setting for streaming sounds and a lower-quality setting for event sounds that must be small enough to download quickly. You can configure these settings in the Images and Sounds section of the Publish Settings dialog (Figure 12-2).
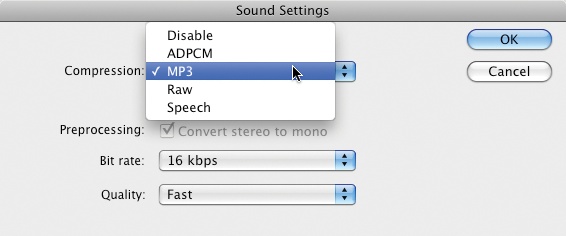
The Sound Settings dialog (Figure 12-3) offers access to the same compression algorithms available on a per-file basis. The Default per-sound option, which specifies that these global settings should be used for a specific sound, has been replaced in Publish Settings with Disable. This option disables all sound in the SWF and is useful for testing or creating alternate versions of your file with no audio.
At the bottom of the Publish Settings section (refer back to Figure 12-2), you can choose to override the sound settings. When you enable the Override sound settings option, Flash will override the per-asset sound settings and apply the global Publish Settings instead. This is useful for creating a low-quality alternate version of your file. You can also use this option to speed up SWF compilation during testing by switching to a Fast quality setting. When you’re finished with development and ready to publish your final file, you can disable the override option, and the per-sound settings will be reapplied.
Finally, you can enable the Export device sounds option to support Flash Lite development, not covered in this book.
Note
For more information about Flash Lite, visit http://www.adobe.com/products/flashlite/.
Adding sounds to the Timeline is very easy. Select the frame in the Timeline in which you want the sound to play, and choose any imported sound from the Name property in the Sound section of the Properties panel (Figure 12-4).
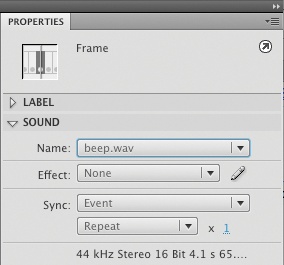
A waveform representation of the sound will appear in that frame or span of frames. During playback, anytime the playhead is in contact with a frame with sound in it, that sound will be played. The Sync property in the Properties inspector (described in the next section) controls how the sound is played and when it stops.
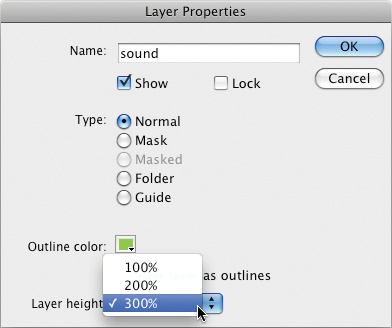
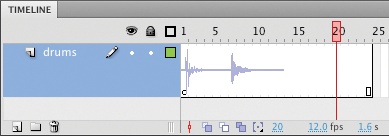
Because the normal layer height makes this waveform difficult to see, you can increase the height of specific layers. Double-click the layer icon to open the Layer Properties dialog and increase the Layer height to 200 or 300% (Figure 12-5). The result is a taller layer and a larger visual of the sound wave, shown in Figure 12-6.
The Sync type you set in the Properties panel for a Timeline-based sound will have a dramatic effect on how the sound plays. With the sound frame in the Timeline panel selected, the Properties panel shows the following four sync types.
- Stream
Stream sounds begin playing after just a few frames of data have been downloaded. They are best for long sounds and are well suited for animation soundtracks because Flash attempts to keep the Timeline and sound synchronized. You can also scrub through a stream sound and hear pieces of it in authoring mode.
Warning
The large variance in computer processor power, quantity of RAM, bus speeds, video card performance, and connection speeds (among other contributing factors) makes synchronizing audio with animation in Flash as much an art as a science. When planning synchronized sound, aim for the lowest common denominator among minimum system requirements, and test early and often.
- Event
Event sounds must be fully downloaded and play through to completion no matter what. For example, if a one-second sound ordinarily requires 24 frames to play through to completion, an Event sync type will cause that sound to play until complete, even if only allocated one frame. This is important because this sync type is used to play sound effects that often occur in very short frame spans, and the sound must be allowed to finish. A sound effect in the Down state of a button, for example, would likely only occupy one frame, leaving only 1/24th of a second to play a sound.
Sound effects also usually need to play every time they are requested, making the prospect of waiting for the sound to finish problematic. For this reason, the Event sync type will play a new instance of the sound even if the prior instance is still playing. If not used carefully, this can result in a chaotic din of sound and eat up memory quickly, as in the case of placing an Event sound in a frame loop.
Note
If you accidentally play a long sound set to the Event sync type, press the Escape key on your keyboard to stop the sound from playing.
- Start
The Start sync type is similar to Event in every respect but one. If the playhead returns to the frame before a prior instance of the sound is finished playing, it will not play another instance of the sound.
- Stop
The Stop sync type silences the specified sound. This will even work on Event sounds that are designed not to stop until they are finished playing.
Note
The companion website for this book includes sample source files that demonstrate all four sync types.
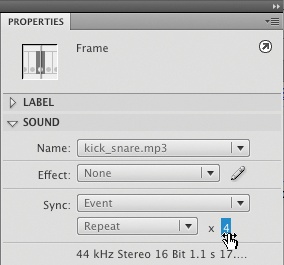
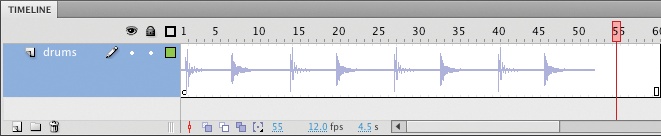
With a sound frame selected in the Timeline panel, you can loop a sound or repeat it a finite number of times by using the menu and repeat count input below the Sync menu (Figure 12-7). Loop will show no visual change in the Timeline, but will loop the sound as long as the playhead is in contact with the frames in which the sound resides. Repeat will play the sound again as many times as you specify using the repeat count. It will also repeat the waveform in the Timeline a corresponding number of times (Figure 12-8).
Warning
Looping a stream sound is not recommended because the file size will increase based on the number of times the sound is looped.
Flash lets you do some basic volume and pan editing without having to use an external editor. The Effect menu in the Properties panel contains a list of preset effects, including confining the sound to the Left channel or Right channel, channel panning options (Fade to left and Fade to right), and multichannel volume fades (Fade in and Fade out). You can also edit any of these options or assign a custom option to edit an effect from scratch.
When you choose Custom from the Effect menu or edit a preset, the Edit Envelope dialog opens. Figure 12-9 shows the dialog with the Fade Out preset. To edit the volume or pan of the sound, first click on the horizontal line that runs across the waveform to add a handle. In stereo sounds, a handle will be created in both the left (top) and right (bottom) channels. In any channel, you can then drag the handles down or up to reduce or increase volume, respectively.
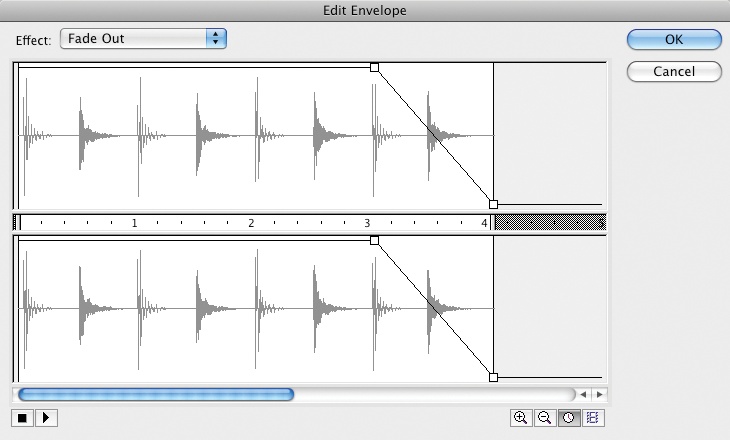
Figure 12-9 shows a reduction in volume at the end of the sound, as both channels fade to 0. Figure 12-10 shows a change in pan as the sound moves from the left to right channels. The volume is decreased in the left channel and simultaneously increased in the right channel.

During editing, you can test your work without leaving the dialog or testing your movie. Simply use the stop and play buttons in the lower-left corner of the dialog to audition your effect. No changes are made to the original file, so you can experiment to your liking.
In the lower-right corner of the dialog, you can zoom in and out of the waveform (clicking the magnifying glass icons) and switch between a time-based (watch icon) or frame-based (movie icon) display. The latter two options change the horizontal numbered strip between the channels to show either frames or seconds. In Figure 12-9, for example, the sound starts to fade at three seconds, and is muted by the fourth second.
Flash even provides a convenient workflow for editing your sounds in an external sound editor. Control+clicking (Mac) or right-clicking (Windows) on a sound asset in the Library displays a context-sensitive menu that reveals editing options. Figure 12-11 illustrates your editing choices: the cross-platform, open source editor Audacity; an editor you select on the fly; or Adobe Sound booth, an entry-level sound editor targeted at Flash users.
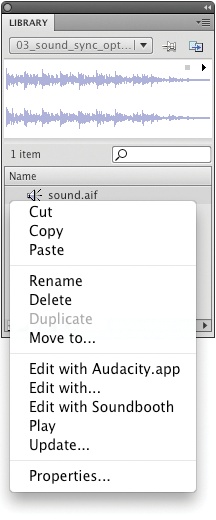
When you select one of these options, the sound opens in the selected external editor so you can then edit the file. When you save the file, it will automatically be updated in Flash.
Using ActionScript, you can exert much greater control over sound than you could if it were a part of the Timeline. For example, you can mix 32 discrete audio channels, set the volume and pan of each sound, and query the amplitude of the left and right stereo channel of every sound.
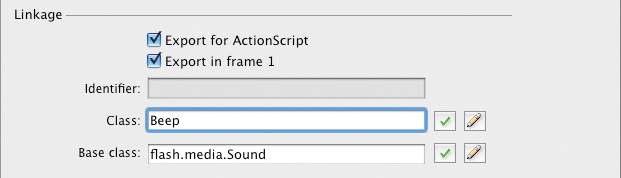
Playing an embedded sound from the Library is very similar to adding a symbol instance to the display list. The process begins by assigning the sound a Linkage class (Figure 12-12).
Create a new file using File→New. You won’t be using this file in the project, so the book template is not needed.
Import beep.wav from the companion source files.
Select the beep.wav sound in the Library and click the Properties button (the i icon at the bottom of the Library panel) to open the Sound Properties dialog.
If the Linkage section of the dialog (Figure 12-12) is not already visible, click the Advanced button to view it.
Enable the Export for ActionScript option and enter
Beepin the Class field. Note that the class you are creating extends theSoundclass, so theBeepclass will behave like a sound in many respects.Add the following script to the first frame of the Timeline and test your movie:
var beepAlert:Beep = new Beep();
beepAlert.play();
Your file should play a short beep sound from the embedded beep.wav file. If needed, compare your file with the furnished play_embedded_sound.fla file.
In addition to playing embedded sounds, you can load external audio files to play at runtime. This is advantageous for many reasons, including reducing SWF file size and making it easier to edit, update, or replace the external file.
The following exercise will span the next three sections of this chapter, adding functionality to your script as the chapter progresses:
Create a new file using File→New. You won’t be using this file in the project, so the book template is not needed.
Save the file as sound_scripting.fla in a directory of your choice, and copy the companion source file song.mp3 into the same directory.
Type the following script into frame 1 of the FLA:
1 var snd:Sound = new Sound();
2 var sndURL:URLRequest = new URLRequest("song.mp3");
3 snd.load(sndURL);
4
5 var channel:SoundChannel = new SoundChannel();
6 channel = snd.play();
Lines 1 through 3 load the external sound. First, an instance of the Sound class is created in line 1. In line 2, a
URLRequestinstance is created using the path to the sound file. Lines 5 and 6 play the sound into a unique sound channel.Save and test your movie. It will play the external audio file.
Optionally, you can play the sound only after it fully loads. This is helpful for slow connections where the sound playback speed may surpass the download speed. If desired, replace line 6 of your script with the following four lines of code:
snd.addEventListener(Event.COMPLETE, onSoundLoaded);
function onSoundLoaded(evt:Event):void
{
        channel = snd.play();
}
Now when the sound finishes loading, the complete event will be dispatched. When the event is received, the sound will play again from the beginning, into the same channel.
With regard to line numbering, the next two sections of this exercise assume this option was not added. If you chose to play the sound upon loading, adjust your file’s line numbers accordingly.
You set the volume of a sound using a range of 0 to 1. A value of 0 mutes a sound and a value of 1 sets the sound to full volume. The pan of a sound is set using a slightly different scale, from −1 to 1. The sound pan can be centered (0), entirely in the left channel (−1), or entirely in the right channel (1).
Continue with the previous example and add the following code to the script in frame 1:
7 var trans:SoundTransform = new 8 SoundTransform();
8 trans.volume = 0.5;
9 trans.pan = −1;
10 channel.soundTransform = trans;
Both
volumeandpanare properties of theSoundTransformclass. To change either value, you must first create an instance of the class. One way to accomplish this is by using thenewkeyword, shown in line 7. This creates a neutral instance with default values of full volume and center pan. After altering these values (to half volume in line 8 and full-left pan in line 9) you must then apply the transformation to the sound channel’ssoundTransformproperty (line 10). Without this final step, you are only adjusting theSoundTransforminstance, not the sound channel itself.Save and test your movie. This time, the sound will play at half volume, in the left stereo speaker only.
Note
An alternative approach to creating a SoundTransform instance is to query the soundTransform property of a sound, as in this example:
var trans:SoundTransform =
channel.soundTransform;
This starts the transform values with the existing volume and pan of the sound. This is useful for relative transformations, such as reducing the current volume (no matter what that value is) by 25%.
The final topic covered in this chapter lets you visually represent the volume of an audio file during playback. Two properties of the SoundChannel instance, leftPeak and rightPeak, contain the volume of the left stereo channel and right stereo channel, respectively (when analyzing monaural sounds, both values are equal).
Note
The term “channel” is necessarily used in two contexts in the discussions in this chapter. First, stereo playback is achieved by dividing the sound data into left and right channels, while monaural sounds have no such separation. Second, every sound, whether stereo or mono, is played into its own discrete sound channel for mixing purposes. Each file can have 32 individual sound channels, and one master mixing channel, similar to a mixing desk that you might see in a recording studio.
These two uses of the word “channel” are not the same. For example, your file can have 32 channels of sound, all of which are in stereo. This does not create 64 channels of sound because you can’t manipulate the left and right stereo divisions of an audio file independently.
In this example, two circles that represent left and right stereo speakers will expand and contract with the sound channel’s volume during sound playback:
Continue with the previous example. Using the Oval tool, draw a circle on the Stage.
Select the circle with the Selection tool and convert it to a movie clip (Modify→Convert to Symbol). Name the movie clip
speakerand choose a center registration point.Copy and paste the on-Stage instance of the speaker symbol and give one speaker an instance name of
leftSpeakerand the other an instance name ofrightSpeaker.Add the following code to the script in frame 1, save your work, and test your movie:
11 this.addEventListener(Event.ENTER_FRAME, onLoop);
12
13 function onLoop(evt:Event):void {
14 leftSpeaker.scaleX = 1 + channel.leftPeak;
15 leftSpeaker.scaleY = 1 + channel.leftPeak;
16 rightSpeaker.scaleX = 1 + channel.rightPeak;
17 rightSpeaker.scaleY = 1 + channel.rightPeak;
18 }
This script creates an event listener that listens for an enter frame event (lines 11 and 13) and adjusts the scaleX and scaleY of each speaker based on the volume of the sound channel’s left and right stereo channels, respectively.
Instead of setting these properties to the leftPeak and rightPeak values directly, they are added to a value of 1. This prevents the speakers from shrinking, possibly to a scale of 0, during quiet portions of the audio. That is, rather than displaying scales that correspond with volumes of 0, 0.5, and 1, the resulting scales are 1, 1.5, and 2. When the volume is muted, the speaker size is 100%, and at full volume the speaker size is 200%, or double the original dimensions.
Note
This book’s companion volume, Learning ActionScript 3.0: A Beginner’s Guide (O’Reilly), includes an example that visualizes the entire frequency spectrum of a sound, drawing waveforms during playback.

In this chapter you will add the ActionScript required to activate the sound controller widget of the portfolio project.
In prior chapters, you created the sound controller and integrated it into the master project file. The following script will load an external MP3 file, toggle between playing and disabled states, and visualize the amplitude of the left and right stereo channels.
Open your master portfolio FLA and add the following script to the frame 99 of the actions layer. Frame 99 is the last intro frame (prior to the Home screen) and initializes both the navigation and sound controls:
1 var snd:Sound = new Sound();
2 snd.load(new URLRequest("assets/song.mp3"));
3
4 var channel:SoundChannel = new SoundChannel();
5 channel = snd.play();
6
7 this.addEventListener(Event.ENTER_FRAME, onSoundPlayback);
8 function onSoundPlayback(evt:Event):void {
9    soundControl.lPeak.barMask.scaleX = channel.leftPeak * 4;
10   soundControl.rPeak.barMask.scaleX = channel.rightPeak * 4;
11 }
12
13 soundControl.addEventListener(MouseEvent.CLICK, onSoundToggle);
14 function onSoundToggle(evt:MouseEvent):void {
15    if (channel.leftPeak > 0) {
16        channel.stop();
17    } else {
18        channel = snd.play();
19    }
20 }
Lines 1 through 5 load and play a sound, as described in the Playing an External Sound section, earlier in this chapter. The only difference here is that, for the portfolio project, you are placing the sound file in your external assets directory, with the other external assets used throughout the book.
Lines 7 through 11 visualize the volume of the sound’s left and right stereo channels. To understand how this script works, it helps to recall the structure of the sound controller movie clip from Chapter 3. It has an instance name of soundControl and contains two child instances of a volume meter, one for each channel, named lPeak and rPeak. Within the meter is another movie clip named barMask that sits in a mask layer. By manipulating the scaleX property of the mask movie clip (lines 9 and 10), you expose different widths of the meter, and therefore different temperatures of color, during sound playback. Every enter frame (lines 7 and 8), the leftPeak and rightPeak properties return a percentage value, between 0 and 1, of the full volume of each channel.
When playing relatively quiet sounds, your visualization meter may appear a bit listless. If you want to liven things up a bit, you can increase the effect the actual peak values have on your artwork. Simply multiply the values of the leftPeak and rightPeak properties by an adjustment factor, as seen in lines 9 and 10. For example, these lines multiply low-level settings of 0.1 by 4 to become 0.4. The larger values increase the widths of the masks, showing larger meters.
Lines 13 through 20 toggle the sound playback states. With every mouse click (lines 13 and 14), a simple test is performed. If there is any volume in the left channel, the sound is stopped. If the left channel is silent, the sound is played again from the beginning. This basic script lets you turn the sound on and off.
Note
The conditional test in the function onSoundToggle() relies on the volume in the left channel for simplicity, so it’s not well suited to sounds with lots of quiet passages. The companion website demonstrates other techniques for turning sound on and off.