
Whether you realize it or not, Flash has become the most widely used video playback platform on the Web, and it is becoming more and more common in the distributed desktop video playback market. According to Nielson’s online video ratings, YouTube alone, which uses Flash Player, accounted for over 5 billion streams, and more than 77 million unique visitors just in the month of July 2008. Add in just a handful of other top video sites that use Flash, such as Nickelodeon, Disney, Hulu, and CNN, and it’s easy to see how ubiquitous Flash video has become.
The number of streams, or even unique visitors, isn’t really the most telling statistic, however. According to August 2008 data compiled by independent research firm comScore (commissioned by Adobe), Flash Player is used to view 86% of online videos in the United States, and 80% of online videos worldwide, making Flash the number one technology for viewing video online.
Why is Flash video so omnipresent? The main reason is that it uses Flash Player and doesn’t require any additional installation just for viewing video. Depending on which version of Flash Player you’re considering, up to 99% of all online users have Flash Player already installed on their systems. It is also operating system-neutral, making development for the platform much simpler and more economical.
A particularly good reason, however, for the popularity of Flash video is that it’s easy for everyone—not just experienced video professionals—to create and use. This chapter will show you how to prepare video for Flash delivery and also how to add it to your files. Adding a video to your Flash projects can be as simple as dropping a component onto the Stage, or as dynamic as necessary through ActionScript control.
Before you can use video in Flash, a little preparation is required. In addition to any editing that you might have to do to make your videos suitable for distribution, you will also have to encode, and most likely compress, your files into a Flash-compatible format.
Although the terms encoding and compression are often used interchangeably, there is a difference between the two. In simple terms, encoding is translating information from one format to another. In the video world, this might refer to converting from analog to digital, or translating from one digital format into a more appropriate specification needed for the job.
Compression, on the other hand, is the process of reducing the size of an asset. Compression and decompression algorithms (codecs) are used to reduce file size during authoring, and decompress at runtime for optimal performance and visual quality. The reason encoding and compression are sometimes used interchangeably is because most video is compressed during encoding. However, it is not uncommon to work with uncompressed video, particularly during editing.
When used in Flash, uncompressed video is not a practical reality, so video is both encoded and compressed into two primary formats:
- FLV
FLV is a proprietary format that can be used by Flash Player version 6 and later. The audio in FLV files is usually compressed using the MP3 codec, but use of uncompressed audio is also possible. Video can be compressed using one of two codecs: Sorenson Spark (H.263), available for Flash Player versions 6 and later, and On2 VP6, available for Flash Player versions 8 and later.
Which video codec you choose is typically based on need. Within Flash, On2 VP6 is considered by most to deliver better quality than Sorenson Spark at the same data rate. It can also encode alpha data for runtime compositing effects like chroma key (green screen), in which videos have a transparent background and can be blended with dynamic backgrounds. However, On2 VP6 is more processor-intensive, making Sorenson Spark a favored codec for older or less powerful computers.
- F4V
The latest versions of Flash Player, beginning with version 9 update 3 and later, can also use the H.264 codec for video and the AAC codec for audio. These are the codecs used for MPEG4 video—commonly used by later generation iPods and most other recent hardware and software vendors for audio and video playback.
Although these files are typically referred to as F4V files, Flash does not rely on the extension of the file for playback. As such, other files that have been properly encoded using H.264 and AAC, such as QuickTime movies, can also be handled by Flash Player 9 Update 3 and later.
There are numerous software packages available to encode video into Flash-compatible formats. This chapter will focus on three. Developed by the inventors of FLV codecs, Sorenson Squeeze and On2 Flix are both commercial products that offer commercial-grade versions of their codecs. Adobe Media Encoder ships with Flash CS4 Professional and will be discussed in greater detail.
Flix from On2 (http://www.on2.com/) comes in Standard, Pro, and Exporter configurations. The Standard model is a great economical encoder that encodes FLV for Flash video and FXM for JavaFX video. It supports constant bitrate encoding, one-pass variable bitrate encoding, input for a wide variety of original sources, and output using both FLV and SWF formats.
Note
As the name implies, constant bitrate (CBR) transfers a constant number of bits of data every second. Variable bitrate (VBR) encoding, on the other hand, adjusts the data transfer as the encoding progresses in an attempt to juggle maximal quality and minimal file size. The process encodes larger amounts of data when the video changes substantially from frame to frame, and encodes less data when the changes between frames are subtler.
Using VBR, encoding can be completed in one pass or two. In the latter case, the first pass is used to analyze the file and the second to encode based on the data gathered in the prior pass. The two-pass method usually yields better results, but can also take much longer.
The Exporter is a QuickTime extension that supports exporting from QuickTime-savvy applications such as Apple FinalCut Pro, Adobe AfterEffects and Premiere, and Apple iMovie and QuickTime Movie Player. It supports most of the Flix Standard features, as well as two-pass VBR encoding and alpha channel support.
The Pro version offers all the features of the Standard version plus two-pass encoding, high-definition (HD) output, support for cue points (markers that can be used for seek points and to trigger events using ActionScript), alpha channels, and batch encoding, and an HTML/player configuration that outputs final player files at the click of a mouse. It also supports a really cool feature that vectorizes your video during encoding. This creates vector shapes from every pixel-based video frame, a technique used in recent commercials and feature films such as A Scanner Darkly.
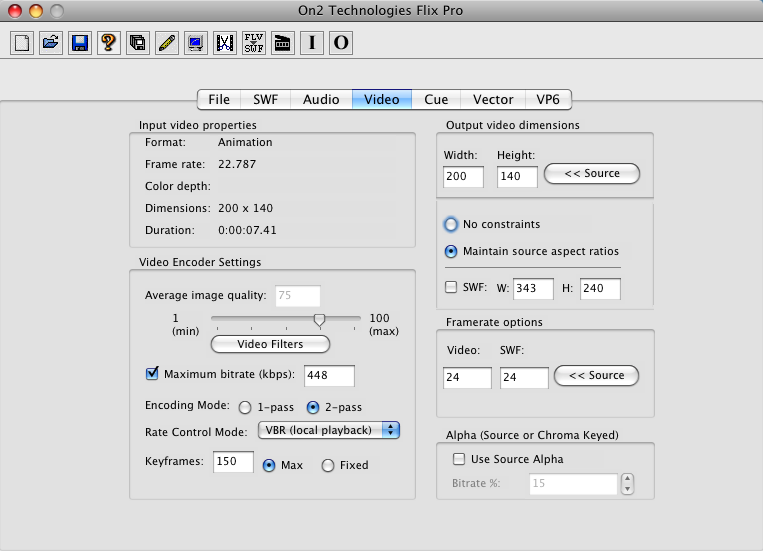
Using Flix Pro (Figure 13-1), you can specify video and audio compression settings, save and load setting presets, trim the video by setting in and out points, add overlays (for logos and similar needs), deinterlace interlaced sources like MPEG and DV, apply image filters (like brightness, contrast, hue, and saturation), apply noise reduction, and more.
Sorenson Squeeze (http://www.sorensonmedia.com/) is a full-featured video compression tool that comes in a variety of configurations. It comes in standard, Pro, and Multi-User versions that export a large number of video formats, as well as an economical version specially optimized for Flash video.
The standard version is very feature-rich, including Sorenson Video 3 Pro, Sorenson Spark Pro, Sorenson MPEG4 Pro, and Sorenson H.264 Pro video codecs. It also supports On2 VP6 Pro video encoder and BIAS SoundSoap noise reduction plug-in, both sold separately. The former supports all the Flash features enabled by the VP6 codec, and the latter is a powerful and amazingly friendly sound-reduction plug-in that washes the noise right out of your sound. Both of these features are bundled in the Pro version of Squeeze.
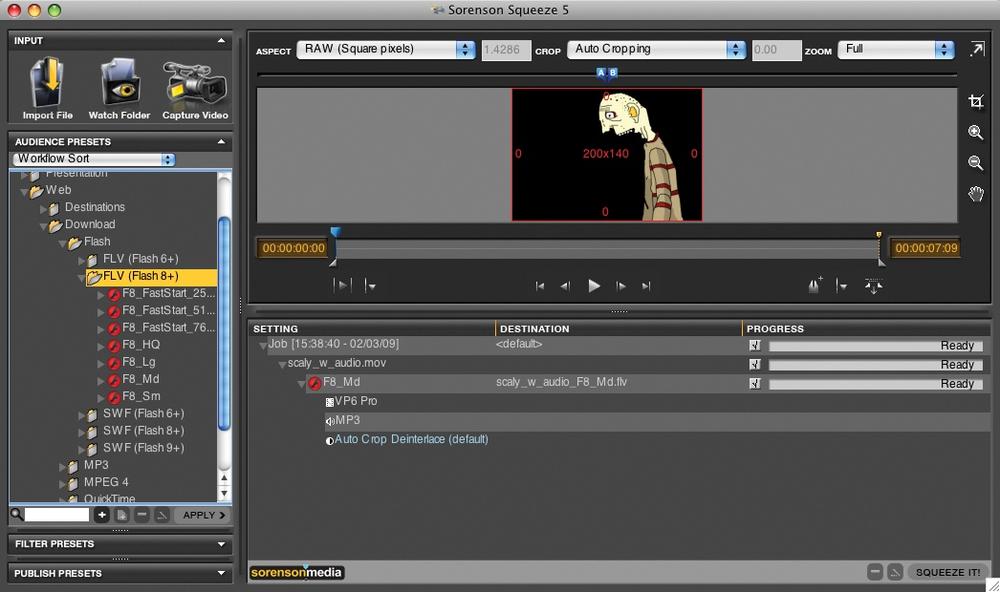
Squeeze has a customizable interface (Figure 13-2) and also includes additional cool features like batch encoding; drag and drop; a watch folder feature (which will watch for and automatically compress any files dropped into a specific folder); the ability to digitize video; watermarking, hue, saturation, sharpen, and other filters; CBR and one- and two-pass VBR encoding; high-definition (HD) output (including Blu-Ray); and more.
The Adobe Media Encoder ships with Flash CS4 Professional and is both feature-rich and simple to use. It supports encoding to a wide variety of video formats including QuickTime, MPEG2, MPEG4, and H.264, as well as audio-only formats (AIFF, WAV, MP3) and Blu-Ray high-definition versions of MPEG2 and MPEG4. For use with Flash, the application can encode to FLV with both Sorenson Spark and On2 VP6, as well as to F4V using H.264 and a wide variety of other codecs for use in non-Flash-related video work.
It supports audio and video settings, filters, cue points, trimming with in and out points, cropping, batch encoding, and even FTP features that let you upload your finished files to a server.
This section will go through the basics of using Apple Media Encoder, so you may want to open the application and locate the scaly_vid.mov furnished source file to encode your own video in the process. Where applicable, encoding instructions like the first few following this paragraph will run throughout this section. If you choose not to encode your own file, feel free to skip them as you work through the material.
The first task in encoding a video is adding a file to the encoding queue. Launching the application will display a basic screen (Figure 13-3) that allows you to add one or more files for encoding. If you wish to try Adobe Media Encoder for yourself, start by adding a file.
Click Add in the upper-right corner of the application.
Locate the scaly_vid.mov file from the furnished source files.
Click Open in the file browser dialog to add the video to the encoding queue.
You can choose an encoding format, apply encoding presets, and set the destination path for each video right from the encoding queue. However, we will take a more detailed look at each available option, so with the video selected, click Settings to open the Export Settings window (Figure 13-4).
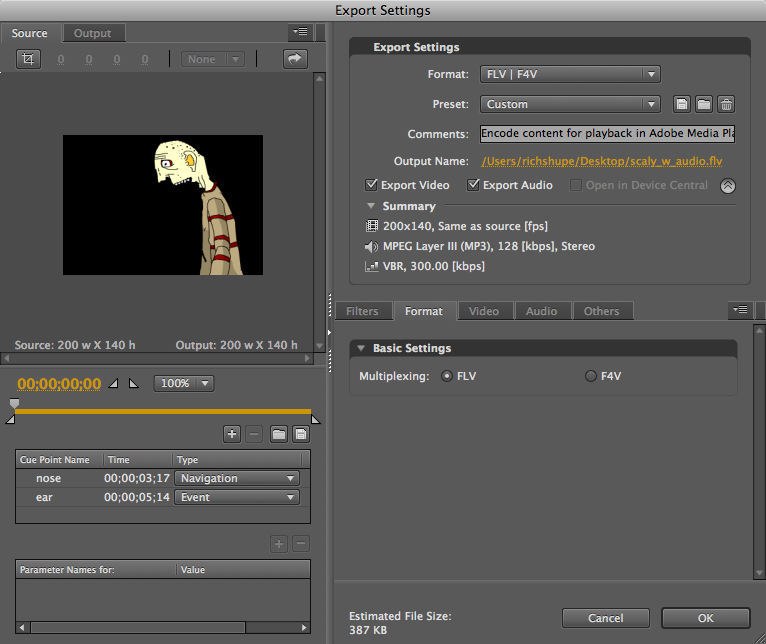
The Export Settings window is the primary Adobe Media Encoder interface, and is divided into quadrants. The upper-left corner is the source and output preview area. This is where you crop the video and preview a sample frame using the application’s current settings. The lower-left corner is where you trim the video to a smaller running time and add cue points.
The lower-right corner is where you apply all other settings, and the upper-right corner is where you select presets from menus and enable or disable video or audio encoding. It also summarizes the major settings for at-a-glance updates.
Before moving on, choose the FLV | F4V option from the Format menu.
As a starting point, choose the second option from the encoding Preset menu, FLV – Same As Source (Flash 8 and Higher).
By default, the output file will be saved in the same directory as the source file. If you want to change this directory, click on the Output Name link and specify a new location.
Make sure Export Video and Export Audio are enabled.
The tabs in the lower-right corner of the interface allow you to customize your encoding settings. For Flash video, the Format tab lets you switch between FLV and F4V formats. Because you selected the preset in step 6 of this sample exercise, FLV output has already been chosen.
The Filters tab lets you to preprocess your video with graphics filters. Gaussian Blur ships with the application and can be applied in horizontal, vertical, or both directions. Although not needed in this case, applying a very slight blur can sometimes soften the video and reduce compression artifacts.
The Video tab is where you pick a codec and customize its settings. These are the first settings you’re likely to customize.
The video settings are divided into three categories and arranged in a scrollable list (Figure 13-5).
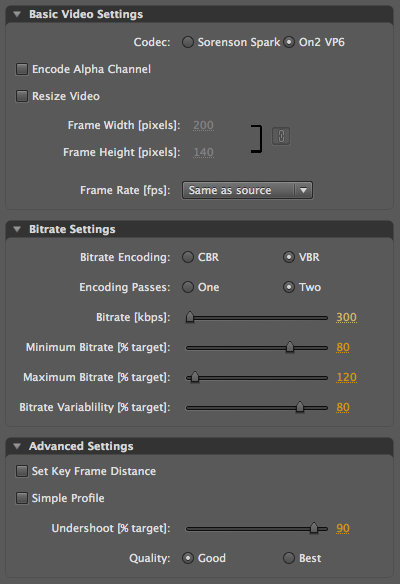
The Basic Video Settings let you choose the Codec, whether or not to Encode Alpha Channel data included in the video (when the On2 VP6 codec is selected), specify pixel width and height values to Resize Video, and set the Frame Rate.
The Bitrate Settings let you set the Bitrate Encoding to constant bitrate encoding and one- and two-pass variable bitrate encoding. You can also set a custom Bitrate. When you choose two-pass VBR encoding, you can set a target bitrate, minimum and maximum bitrate limits, and the degree to which the bitrate can vary from the target setting.
Note
For more information on bitrate, see Chapter 12.
Finally, the Advanced Settings provide optimization options beginning with how often a key frame is created (Set Key Frame Distance). Unrelated to animation key frames, a video key frame is a forced, high-quality frame that is used to refresh the video display. It is usually best to let the codec work its magic here, but if you are having problems with visual artifacts, particularly when compressing your source very aggressively, you can manually insert a key frame every nth frame to try to improve the appearance of the frame periodically.
Warning
When choosing how often to insert a key frame, remember that high-quality frames increase the size of the final output file. Furthermore, if you’ve set a maximum data rate for the video, adding key frames can reduce the overall quality of the entire video because the high-quality frame reduces the amount of data available for the surrounding frames. Try to use key frames only when needed, as evidenced by trial and error.
Simple Profile, available only when encoding with On2 VP6, will optimize encoding for playback on less powerful machines. Undershoot, also available only when encoding with On2 VP6, lets you set a percentage of the target data rate to strive for, so that you can leave a little room for extra data to be allocated to sections of the video that are difficult to compress.
Finally, Quality allows you to strike a balance between how good the file will look and how long it will take to encode. Best yields the best results using the longest encoding time, Speed sacrifices a bit of quality for a faster encoding time, and Good falls somewhere in the middle.
Continuing the example exercise, change the following video settings:
For Basic Video Settings, choose the
On2 VP6Codec, do not enable Encode Alpha Channel or Resize Video, and selectSame as sourcefor the Frame Rate.For Bitrate Settings, select VBR for Bitrate Encoding, Two Encoding Passes, and
300kbps for Bitrate, and accept the default minimum, maximum, and variability bitrate encoding percent target values of80,120, and80, respectively.For Advanced Settings, disable Set Key Frame Distance and Simple Profile, set the Undershoot (% target) to
90, and select Good Quality.
Using FLV, you don’t have many choices for the audio settings (Figure 13-6) because FLV uses the MP3 codec when compressing audio.
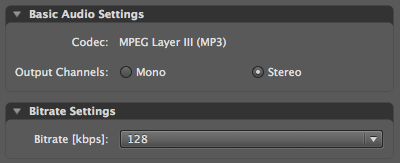
In the Basic Audio Settings section, choose
Stereofor Output Channels.For Bitrate Settings, select a
96kbps Bitrate.
Although you don’t need to trim the sample video, you can quickly learn how to reduce the playing time of a video at encoding time without having to return to your video editor.
At the top of the lower-left quadrant of the interface are the trimming controls (Figure 13-7). A horizontal bar representing the length of the video anchors these controls.

By default, the bar is orange all the way across. However, you can drag the right-angle triangles at left and right below the bar to set the in and out points of the video, respectively. These controls will make a new video with a shorter running time that starts at the in point and ends at the out point. You can preview frames before setting the in or out points by dragging the playhead wedge above the bar.
You can also click the orange time link to set a time-accurate position in the video. The time units are separated by semicolons and are, from left to right, hours, minutes, seconds, and frames. The latter will change based on the frame rate you specified in the Basic Video Settings.
Once you’re displaying the time you like, you can click the right-angle triangle buttons to the right of the time control; these correspond to the in- and out-point draggable markers, and clicking these buttons will automatically set the points for you.
The drop-down menu to the right of the trimming time and in/out buttons is not related to trimming the video length. Instead, it is situated below the video preview frame and controls the size of the preview.
Using the same playhead wedge and time controls described in the preceding section, you can set cue points. Cue points are markers that you can embed in a video. At playback, they can serve as seek positions to which you can navigate, or they can trigger events using ActionScript.
There are three types of cue points. You can embed event and navigation cue points directly into the video so that they will travel with the video file forever. This is a convenient one-time authoring process that provides for multiple future uses, but it also means that you must reencode the video to change the cue points. ActionScript cue points are applied with ActionScript and you can freely edit them any time after encoding. This is convenient but can also be slightly less accurate.
Event cue points are used to trigger events in ActionScript, allowing you to synchronize surrounding assets with the video playback. Navigation cue points can trigger events in ActionScript as well but also insert key frames into the video so you can jump to a specific time during playback. Because key frames can increase file size or reduce the overall quality of the video, use navigation cue points only when required for seeking at runtime.
To practice, you’ll add two cue points, which appear in the lower-left corner of Figure 13-4. If you prefer to use a furnished data file, click the folder button just above the Cue Points area and find the scaly_vid_cue_points.xml file supplied with the companion source files. This will import the file and prepopulate the cue point data.
Use the playhead marker to approximately locate 3 seconds and 17 frames. Alternatively, click the time control to enter 3 seconds and 17 frames precisely.
Click the plus-sign button to add a cue point.
Click the default name under Cue Point Name and rename the cue point
nose, then choose Navigation from the cue point’s Type menu.Repeat steps 14 through 16 to add an Event cue point at 5 seconds and 14 frames.
When you’re finished, always click the document button above the cue point area to save your file. If you ever need to reencode your video after it’s been removed from the encoding queue, or even to apply the same cue point settings to an alternate file, loading this file will save you a lot of time reentering cue point data. In this case, name the file scaly_vid_cue_points_01.xml.
Note
Later on, use a text editor to look at the cue point text that you exported. It is a relatively straightforward XML file. If you are comfortable with XML, editing this file before using Adobe Media Encoder can be a fast way to create many cue points.
When you become more comfortable with ActionScript, you can also add parameters and corresponding values to each cue point for use in ActionScript. This book’s companion volume, Learning ActionScript 3.0: A Beginner’s Guide (O’Reilly) includes a section in its video chapter that shows you how to use parameters when captioning a video.
Although not necessary for the sample video, you can crop edges off videos during encoding. Figure 13-8 shows using the cropping tools in the upper-left quadrant of the Adobe Media Encoder interface to crop a few pixels off the left and right edges of the video. You can set this automatically by using the aspect ratio menu (showing 4:3 in Figure 13-8), by manipulating the numbers for each edge to the left of the menu, or by dragging the corner handles of the crop rectangle on the video preview.

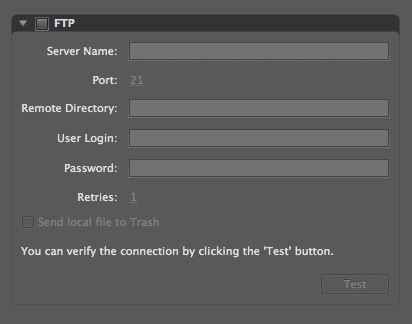
As an added nicety, you can use Adobe Media Encoder to automatically FTP finished videos to an online server (Figure 13-9), if you are familiar with using FTP and have access to the server in question. You can configure the settings like any other FTP client in the Others tab of the Encoder interface. You can even test your connection so you’re not disappointed by a failure after a long encoding process, and optionally send the local files to the trash after uploading.
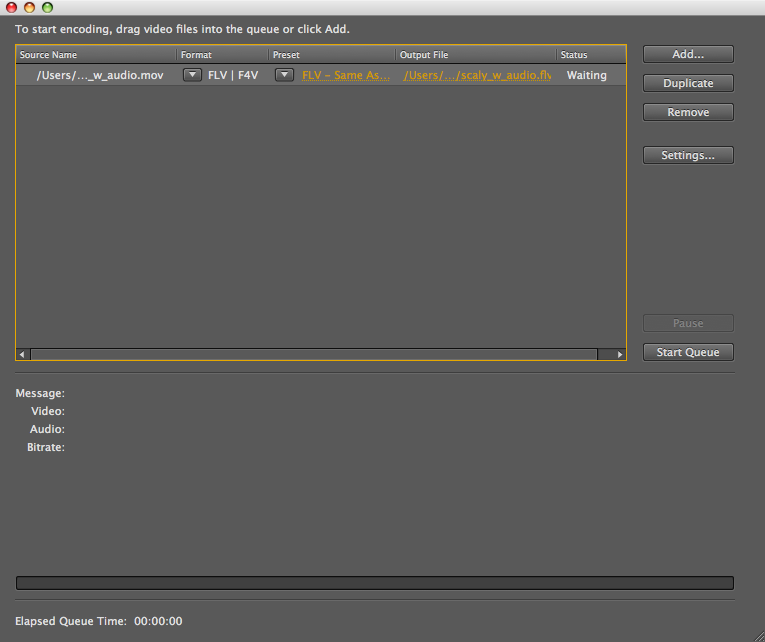
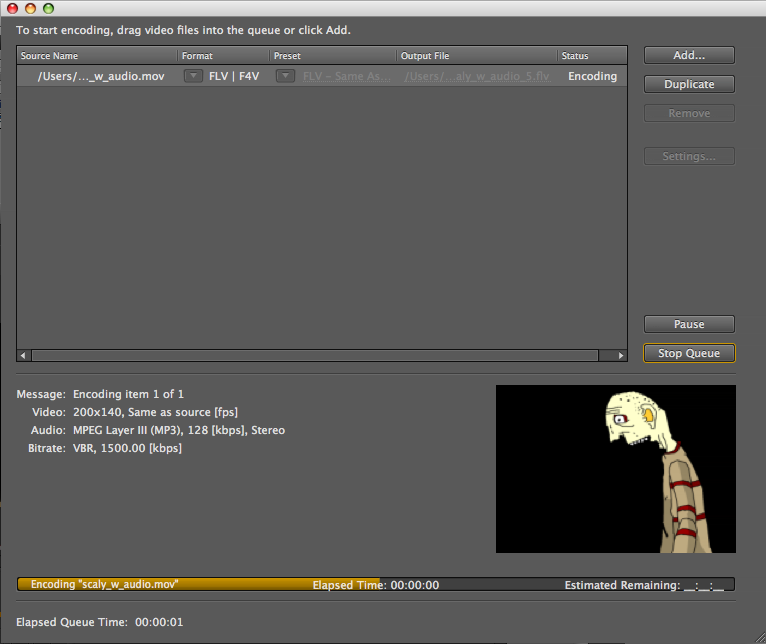
After you configure all the settings, you can click OK in the lower-right corner of the Adobe Media Encoder Export Settings window and begin encoding. Back in the main interface (Figure 13-10), you can click Start Queue to encode any videos you have in the encoding queue. A preview will appear as the progress bar advances through the encoding process. As each video finishes, its status will be updated to Finished, and the files will be ready for use.
Note
If you ever need to reencode, you can take advantage of a really handy feature: Adobe Media Encoder will keep your settings alive until the video is deleted from the encoding queue. To reencode, select the video in the queue and use the Edit→Reset Status menu command. The video will then be ready for encoding using all its prior settings.
The simplest way to add video to your file is by using the FLVPlayback component (Figure 13-11). The component will load external FLV or F4V files at runtime, and even includes a customizable player control skin. The skinning system lets you pick which controller features to offer the user, the skin’s color and degree of transparency, and whether to position the skin under or on top of the video itself.
As you learned in Chapter 9, components make it easy to expand the functionality of your projects without having to use a lot of ActionScript. Adding video to your files using the component that ships with Flash CS4 Professional is a snap: all you need to do is drop the component onto the Stage, use the Component Inspector to set a few values, such as skin selection and source path, and you’re on your way.
This is the approach outlined in the step-by-step Project Progress section at the end of this chapter, so here you’ll increase your Flash chops by using ActionScript to configure the component. The end results are not very different, and this method still relies on the component to work. However, using ActionScript to manipulate the component offers much more control, as well as the ability to change the way the component behaves at runtime. For example, if you use ActionScript, you are not locked into values you enter in the Component Inspector and can change the video source at any time.
To complete this exercise, you need a little bit of setup:
First, have the scaly_vid.flv source file handy and save a new Flash file into the same directory in which the video resides. Sharing the same directory is not required, but it will simplify discussions about pathnames.
Next, the FLVPlayback component must be in your Library. Drag the component from the Components panel to the Stage. After the next step, you’ll delete the component from the Stage just like a movie clip or button instance, and the component will stay in your Library, ready for use.
Now you need a skin for the video player. A quick way to get the skin you need is to specify the skin in the Component Inspector and then test your movie. When compiling the SWF, Flash will automatically copy the skin to the same directory as your SWF.
Open the Component Inspector, select the component on the Stage, and double-click the skin parameter value.
From the Skin menu, select the SkinUnderPlaySeekMute skin. This will add a play/pause toggle, a seek bar, and a mute button to your skin.
Click OK to return to the Stage, then test your movie. Having specified no source for your video, only the skin will appear in your test movie. However, if you look in the directory you are using for your test file, you will see that Flash has copied the specified skin to this location for you.
Finally, delete the component from the stage and your setup is complete. You can now instantiate the component at runtime using ActionScript.
Add the following script to frame 1 and test your movie:
1 import fl.video.FLVPlayback;
2
3 var vid:FLVPlayback = new
4 FLVPlayback();
5 addChild(vid);
6 vid.width = 200;
7 vid.height = 140;
8
9 vid.source = "scaly_vid.flv";
10 vid.skin = "SkinUnderPlaySeekMute.swf";
11 vid.skinBackgroundColor = 0x996600;
12 vid.skinBackgroundAlpha = 0.5;
13 vid.autoPlay = false;
Line 1 of this script tells the compiler where to find the FLVPlayback classes required when compiling your SWF. Unlike classes that are part of the flash packages, component classes in the fl packages must be imported, even in the Timeline.
Lines 3 through 6 create a new instance of the FLVPlayback component, add it to the display list at position (0, 0), and match the width and height of the component to the source video dimensions.
Lines 8 through 12 configure the component. Line 8 sets the source using the scaly_vid.flv file that is in the same directory as your SWF; lines 9 through 11 specify the skin you selected and give it a color and alpha value. Line 12 sets the autoplay feature to false, so you must use the skin’s play button to start the video.
Note
If you are not satisfied with the feature set offered by the FLVPlayback component, or if you want to save the approximately 50–75k the component adds to your file size, you can also create ActionScript-only video playback solutions. The book’s companion website and the companion volume, Learning ActionScript 3.0: A Beginner’s Guide, have more information on the topic.
The FLVPlayback component provides support for true full-screen video playback. That is, rather than relying on prior techniques of scaling the SWF, browser window, or both to make the video as large as possible, Flash Player versions 9 and later will play the video directly to the monitor, consuming all available display space. During full-screen playback, you can then press the Escape key to return to actual-size playback.
To enable this feature using the FLVPlayback component, you must do three things. First, you must choose a skin that includes the full-screen option, such as SkinUnderPlayFullscreen or SkinUnderAll. These skins will include the button shown in Figure 13-12.

Next, you must enable full-screen support. Full-screen playback is a user preference and a possible security risk. For example, the user may not want to switch to full-screen mode. In a worst-case scenario, an unethical developer may use the feature to take over the user’s screen and simulate an interface into which the user might type sensitive information, like a password.
For these reasons, full-screen mode can only be initiated by the user, and must be enabled by the developer to work at all. Adobe has also taken additional measures, such as disabling the majority of keyboard input while in full-screen mode, to reduce security risks.
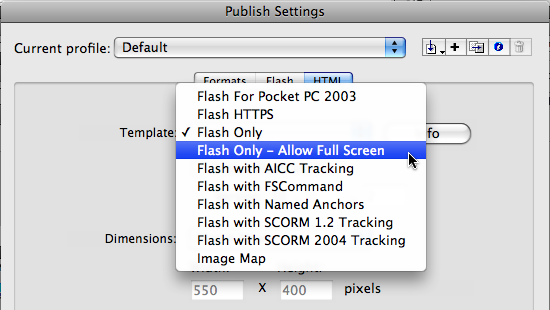
The simplest way to enable full-screen support is to change the HTML template used in the file’s Publish Settings. Using the Publish Settings dialog (File→Publish Settings), make sure HTML is enabled in the Formats section. Change the Template option in the HTML section to Flash Only – Allow Full Screen (Figure 13-13). This template will set the allowFullScreen Flash object and embed attributes to true without requiring you to edit the HTML files directly. Any file published with this setting will support full-screen mode if the FLVPlayback skin contains a full-screen button.
Third, you must preview your file in a browser. Full-screen playback does not work when testing your file within Flash because the aforementioned HTML setting must exist for Flash Player to allow the change. Therefore, instead of using Control→Test Movie to view your file, you must use the File→Publish Preview→HTML menu command (often set as the default preview option). This will switch to your default browser and show you the file in an HTML setting so you can test the full-screen mode.
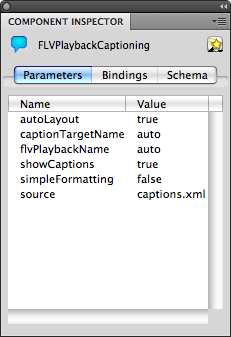
Flash also ships with a component called FLVPlayback Captioning (Figure 13-14) that will add captions to your video. The captions are typically precreated in an external XML file, which is loaded at runtime. Like the full-screen video option, the skin you select for the FLVPlayback component must include the caption button (Figure 13-15) to support this feature.


It is almost effortless to use the captioning feature within Flash. If there is only one instance of the FLVPlayback component on the Stage, the FLVPlayback Captioning component will automatically link to it. All you have to do is use the Component Inspector (Figure 13-16) to specify the path to the external caption XML file, and you’re in business.
Creating the caption file requires nothing more than a text editor, although a dedicated captioning application can help you determine the duration and times of occurrence for each caption. The text file is saved in the TimedText standard format. You can find more information about TimedText from a number of sources, including the Flash help system, the World Wide Web Consortium (http://www.w3.org/AudioVideo/TT/), and this book’s companion website.
In short, a TimedText file is an XML document that looks much like HTML. The following is a simple example that can be used with the Scaly video:
1 <?xml version="1.0" encoding="UTF-8"?>
2 <tt xmlns="http://www.w3.org/2006/04/ttaf1" xmlns:tts=
"http://www.w3.org/2006/04/ttaf1#styling">
3     <head>
4         <styling>
5             <style id="1"
6             tts:textAlign="center"
7             tts:fontSize="18"
8             tts:fontWeight="bold" />
9         </styling>
10     </head>
11     <body>
12         <div>
13             <p begin="00:00:03.00" dur="00:00:02.00"
  style="1">Nose</p>
14             <p begin="00:00:05.00" dur="00:00:02.00"
  style="1">Ear</p>
15         </div>
16     </body>
17 </tt>
Lines 1 and 2 serve administrative functions. Lines 3 through 10 include a head section that contains styling information. The single style added in lines 5 through 8 is called 1 and uses basic properties similar to cascading style sheet (CSS) properties to center and bold 18-point type.
Lines 11 through 16 specify the captions. Lines 13 and 14 show the beginning time, duration, style, and text of each caption. Finally, lines 15, 16, and 17 balance the opening XML tags for each respective section.
Note
This book’s companion volume, Learning ActionScript 3.0: A Beginner’s Guide, includes additional information about video captioning, including how to make the background behind the caption text transparent, how to apply more than one style to a single caption, and even how to swap caption files at runtime.
Throughout this chapter, you’ve worked with videos in their most common configuration—a delivery method called progressive download. Without assistance from additional server-side software, Flash videos are downloaded in progressive stages, making the material that has already been delivered available for playback while the remainder of the file continues to download. The file is usually available for playback after a sufficient buffer has been filled to cushion against bandwidth interruptions or slowdowns.
Even though progressive delivery reduces playback delays, this is still a file download process. It requires no special software and can occur using a standard remote web server, or even in a local environment on your own computer—just like loading an HTML file from a remote server or your local machine.
There are, however, a few limitations imposed by this technique. For example, the user is limited to interacting with only the portion of the video that has already been downloaded. Additionally, the file typically remains on the user’s machine until his or her web cache is cleared, making it difficult to prevent appropriation of content.
A streaming file, however, is literally delivered in a continuous stream, rather than in progressive stages, from a special server designed specifically for streaming video. Because the video is delivered in tiny pieces in a continuous stream, the user can jump around anywhere in the video, including later portions that she has not already seen.
Further, the streaming video does not typically remain on the user’s machine, and you can add security measures, such as digital rights management, user registration, and more. Additional interactive features may also be available, including interaction among multiple users, and video and audio recording.
Streaming software, like Adobe’s Flash Media Server and the open source servers red5 (from Infrared5) and Wowza Media Server (from Wowza Media), are examples of streaming Flash video servers. You can also work with vendor partners such as Influxis (http://www.influxis.com/) that can run Flash video streaming servers for you, eliminating or reducing the need to learn how to use the servers yourself.
The term “streaming” is bandied about inaccurately with surprising frequency when it comes to Flash video. In many cases, when Flash users refer to streaming video they are really talking about progressive download delivery. It will help you plan your projects, create more accurate budgets, and avoid possible communication problems if you, your colleagues, and your clients understand the difference between these two terms.
Note
For more information on streaming video, check out Flash Video for Professionals: Expert Techniques for Integrating Video on the Web by Lisa Larson and Renee Costantini (Sybex).
In this book, and for the portfolio project, you will be using progressive download video, so streaming options are something you can explore at a later time.
While loading external videos at runtime is the vastly preferred method for adding Flash video to your projects, there is an alternate approach. You can also embed a video directly into a SWF so that even the video asset is internal.
Embedding is useful for special cases when you’re dealing with very small videos. For example, if the videos are very short (under 10 seconds is generally recommended), they can be used for simple animations and for special effects, such as animating small sources with alpha channels (like fire).
Note
Although not commonplace, using small, embedded videos for special effects is analogous to creating a movie clip from an imported image sequence, as discussed in Chapter 3.
To embed videos in Flash CS4 Professional, the video must already be encoded in FLV format. Once you have an FLV asset, you can import it just like any other asset (File→Import to Stage), starting with a file-browsing process and instructions to Flash regarding how to handle the import (Figure 13-17).
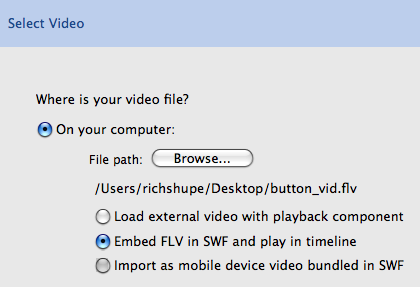
Importing to the Stage or Library has the same effect. The import process presents you with options (Figure 13-18), including which type of symbol to create upon import, whether or not to add the video to the Stage, and whether or not to include audio. Using the Expand timeline if needed option, you can even automatically extend the timeline to the required number of frames to contain the full length of the video.

When choosing which symbol type to create, you have three options:
- Embedded video
This option places the video into the Timeline that is active at the moment of importing the asset. This is preferred if you must try to scrub or synchronize the video with other assets in the same Timeline.
- Movie clip
This is usually your best option because it gives you the greatest degree of ActionScript control. Also, you can place the movie clip in a single frame of a parent Timeline, if desired, and the video will still play.
- Graphic
This option is the least attractive because the graphic’s parent Timeline must contain as many frames as the graphic to play the whole video. However, it’s a viable option if you do not plan to use ActionScript.
After importing to your chosen Timeline, you can scrub through the video as if it were any other Timeline layer, previewing the video in any frame.
It’s very important to remember that embedding video is not a recommended alternative to loading external FLV or F4V files. Embedding videos longer than 10 seconds is discouraged for a number of reasons. Here are some highlights:
- Large videos increase download time and memory requirements
When a video is embedded, the entire SWF must be downloaded prior to playback, so large videos can contribute to excessively long download times. Additionally, embedded videos must fit entirely into memory, which causes problems when large videos are played on computers with limited RAM.
- Problems aside, large videos may not even fit into a SWF
Although there have been reported workarounds, Adobe’s official statement is that videos that span more than 16,000 frames in the Timeline are not supported. That’s a lot of frames, but long videos can eat up frames quickly. If you consider a video frame rate of 30 frames per second, a video longer than approximately nine minutes cannot be embedded.
- Embedding videos increases development time
Embedded videos dramatically increase the time required to compile SWFs. Long videos can cause publish times to exceed one hour, so you can imagine how tedious testing video integration can be. More importantly, you can’t easily edit and replace embedded videos. Instead, you must discard the embedded video, reimport a replacement, and recompile the SWF. Frequent changes can be torturous.
- Significant synchronization issues exist
The video and audio in longer videos can fall out of sync and can end up drifting apart by several seconds by the time the video has completed playing. This discrepancy can begin after seconds, not minutes, of playback and can quickly render the video unusable. Another significant limitation is that when a video is embedded, the frame rates of the SWF and video must match. For example, when using lower-quality video assets that were compressed at 5–12 frames per second, the SWF must also run at that frame rate, limiting the speed of other animations, transitions, and ActionScript performance linked to frame rate.
To emphasize the fact that embedding video is not a preferred practice, the video-importing dialog contains the following message:
Warning
Embedded video is likely to cause audio synchronization issues. This method of importing video is ONLY recommended for short video clips with no audio track.

In Chapter 9, you learned how to add functionality to your files with little to no programming using components. In this chapter, you’ll finish your Gallery screen, and thus the last piece of content in your portfolio, by adding a video using the FLVPlayback video component (Figure 13-19).

You are strongly encouraged to encode the provided scaly_vid.mov source file to learn more about creating Flash-compatible video files. If you have Adobe Media Encoder (the video-encoding application that ships with Flash CS4 Professional) installed, you can follow the steps described previously in the Encoding Software section of this chapter. If you prefer not to compress the video yourself, feel free to use the provided source file, scaly_vid.flv.
Place the scaly_vid.flv video from the furnished source files into the assets folder of your main portfolio project directory.
Open your main portfolio file or pick up from the provided source file, portfolio_12_final.fla, and scroll the Timeline panel until you can see the Gallery section.
Double-click the Gallery movie clip to edit it, and then double-click the foreground movie clip to revisit the components.
Scroll to the far right of the movie clip so you can see the frame in which the FLVPlayback component will reside. Select the components layer and drag the FLVPlayback component from the Components panel (under Video this time, not User Interface) to the frame on the Stage.
Using the Properties panel, set the size of the component to a width and height of
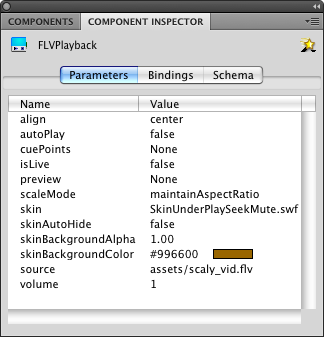
200and140, respectively, and position the component neatly within the frame, nearly touching the top edge of the frame. Playback controls will appear below the video; you must leave room for them.With the component selected, open the Component Inspector (Figure 13-20). Click the source value field and type
assets/scaly_vid.flv. This selects the video asset, but you still need to choose your controls.Click the skin value field and, from the skins menu, choose
SkinUnderPlaySeekMute.swf. This will select one of the skins that sits under the video (instead of atop the video) and includes a play/pause button, seek bar, and mute button. This is a small video, so you don’t need (or even have room for) all the features available.To test your movie, go to the Gallery screen, advance to the last component, and make sure your video plays. You should see a skin and a video. If you see a video but no skin, check step 6. If you see a skin that seeks forever or fails to perform in any way, check step 5.
Theoretically, you are now done, but you want to add one small enhancement. The skin selection process in step 6 automatically copied the skin SWF to the same directory as your main portfolio FLA. Look in that directory and move the skin into the assets folder. Then go back to Flash to change the location of the skin.
Click the Component Inspector’s skin value field (Figure 13-20) and, from the skins menu that appears, choose
Custom Skin URL. Then typeassets/SkinUnderPlaySeekMute.swfin the URL field.Follow the instructions in step 7 again, but this time, if there is a missing skin, check step 9 for any errors.
Save your file and compare it against the chapter project file, portfolio_13_final.fla.
Your project is now almost complete! It’s time to ready all your hard work for deployment. In the next chapter, you’ll create a preloader to keep the initial interest of viewers with slower Internet connections. You’ll then wrap everything up for distribution via the Web. Finally, you’ll package your portfolio for desktop distribution using the Adobe Integrated Runtime (AIR) engine.