
Chapter 5. Faster, Simpler, More Fun
Introduction
Nearly every day, someone asks on the jQuery Google Group how they can make their code simpler or faster, or how to debug a piece of code that isn’t working.
This chapter will help you simplify your jQuery code, making it easier to read and more fun to work on. And we’ll share some tips for finding and fixing those bugs.
We’ll also help you make your code run faster, and equally important, find out which parts of your code you need to speed up. So your site’s visitors will have more fun using the snappy pages on your site.
That’s what we call a win-win situation. Happy coding!
5.1. That’s Not jQuery, It’s JavaScript!
Problem
You’re a web designer who is new to jQuery, and you’re
having trouble with the syntax of an if/else statement. You know it must be a
simple problem, and before asking on the jQuery mailing list, you do
your homework: you search the jQuery documentation and find nothing.
Web searches for terms like jquery if else
statement aren’t proving helpful either.
You also need to split an email address into two parts,
separating it at the @ sign. You’ve
heard that there is a function to split strings, but there doesn’t
seem to be any information in the jQuery documentation about this
either.
Is jQuery really that poorly documented?
Solution
The if/else statement
and the .split()
method for strings are part of JavaScript, not part of
jQuery.
So, these web searches will turn up more useful results:
| javascript if else statement |
| javascript split string |
Discussion
JavaScript experts, please don’t bite the newbies.
Newbies, don’t feel bad if you’ve scratched your head over something like this.
If you’re an old pro at JavaScript, you may laugh at these questions. But they come up fairly often on the jQuery mailing list, and understandably so. jQuery is designed to make simple JavaScript coding so easy that someone who’s never programmed before can pick up the basics and add useful effects to a page, without having to learn a “real” programming language.
But jQuery is JavaScript. jQuery itself is 100% pure JavaScript code, and every line of jQuery you write is also a line of JavaScript.
You can indeed get many simple tasks done with jQuery without really understanding its relationship to JavaScript, but the more you learn about the underlying language, the more productive—and less frustrating—your jQuery experience will be.
5.2. What’s Wrong with $(this)?
Problem
You have an event handler that adds a class to a DOM
element, waits one second using setTimeout(), and then removes that class:
$(document).ready( function() {
    $('.clicky').click( function() {
        $(this).addClass('clicked'),
        setTimeout( function() {
            $(this).removeClass('clicked'),
        }, 1000 );
     });
});
The class gets added when you click, but it never gets removed.
You have confirmed that the code inside setTimeout() is being called, but it doesn’t
seem to do anything. You’ve used .removeClass() before, and that code looks
correct. You are using $(this) the same way in both places,
but it doesn’t seem to work inside the setTimeout() call.
Solution
Save this in a variable
before calling setTimeout():
$(document).ready( function() {
    $('.clicky').click( function() {
        var element = this;
        $(element).addClass('clicked'),
        setTimeout( function() {
            $(element).removeClass('clicked'),
        }, 1000 );
     });
});
Even better, since you’re calling $() in both places, follow the advice in Recipe 5.3 and copy $(this) to a variable instead of this:
$(document).ready( function() {
    $('.clicky').click( function() {
        var $element = $(this);
        $element.addClass('clicked'),
        setTimeout( function() {
            $element.removeClass('clicked'),
        }, 1000 );
     });
});
Discussion
What is $(this) anyway, and why doesn’t it always
work? It’s easier to understand if you separate it into its two parts,
$() and this.
$() looks mysterious, but it
really isn’t: it’s just a function call. $ is a reference to the jQuery function, so $() is simply a shorter way to write
jQuery(). It’s just an ordinary
JavaScript function call that happens to return an object.
Note
If you’re using another JavaScript library that redefines
$, that’s a different matter—but
then you wouldn’t use $() in your
jQuery code; you’d use jQuery()
or a custom alias.
this is one of the more
confusing features in JavaScript, because it’s used for so many
different things. In object-oriented JavaScript programming, this is used in an object’s methods to refer
to that object, just like self in
Python or Ruby:
function Foo( value ) {
    this.value = value;
}

Foo.prototype.alert = function() {
    alert( this.value );
};

var foo = new Foo( 'bar' );
foo.alert();  // 'bar'
In the code for a traditional on
attribute, eventthis refers to the
element receiving the event—but only in the attribute itself, not in a
function called from the attribute:
<a href="#" id="test" onclick="clicked(this);">Test</a>

function clicked( it ) {
    alert( it.id );            // 'test'
    alert( this.id );          // undefined
    alert( this === window );  // true (what?)
}
As you can see from the third alert(), this is actually the window object inside the function. For
historical reasons, window is the
“default” meaning of this when a
function is called directly (i.e., not called as a method of an
object).
In a jQuery event handler, this is the DOM element handling the event,
so $(this) is a jQuery wrapper for
that DOM element. That’s why $(this).addClass() works as expected in our
“Problem” code.
But the code then calls setTimeout(), and setTimeout() works like a direct function
call: this is the window object. So when the code calls
$(this).removeClass(), it’s
actually trying to remove the class from the window object!
Why does copying this or
$(this) into a local variable fix
this? (Pun intended.) JavaScript creates a
closure for the parameters and local variables of
a function.
Closures may seem mysterious at first, but they really boil down to three simple rules:
You can nest JavaScript functions one inside another, with multiple levels of nesting.
A function can read and write not only its own parameters and local variables but also those of any functions it’s nested in.
The previous rule always works, even if the outer function has already returned and the inner function is called later (e.g., an event handler or
setTimeout()callback).
These rules apply equally to all functions, both named and
anonymous. However, this is not a
function parameter or local variable—it’s a special JavaScript
keyword—so these rules do not apply. By copying the value of this into a local variable, we take
advantage of the closure to make that value available in any nested
functions.
5.3. Removing Redundant Repetition
Problem
You need to hide, show, or otherwise manipulate some DOM elements when the page loads, and you also need to take the same actions later in response to a couple of different events:
$(document).ready( function() {

    // Set visibility at startup
    $('#state').toggle( $('#country').val() == 'US' );
    $('#province').toggle( $('#country').val() == 'CA' );

    // Update visibility when country selector changes via mouse
    $('#country').change( function() {
        $('#state').toggle( $(this).val() == 'US' );
        $('#province').toggle( $(this).val() == 'CA' );
    });

    // Also update when country selector changes via keyboard
    $('#country').keyup( function() {
        $('#state').toggle( $(this).val() == 'US' );
        $('#province').toggle( $(this).val() == 'CA' );
    });

});
The code is working, but you want to simplify it so there’s not so much duplicate code.
Note
Why handle both the change and keyup events? Many websites handle only the change event on a select list. This works
fine if you make a selection with the mouse, but if you click the
select list and then use the up and down arrow keys to select among
the options, nothing happens: keystrokes in a select list do not
fire the change event. If you
also handle the keyup event, the
select list will respond to the arrow keys, providing a better
experience for keyboard users.
Solution 1
Move the duplicate code into a function, and call the function
both at load time and in response to the event. Use jQuery’s .bind() method to wire up both event handlers at the same time. And
save data used more than once in variables:
$(document).ready( function() {

    var $country = $('#country'),

    function setVisibility() {
        var value = $country.val();
        $('#state').toggle( value == 'US' );
        $('#province').toggle( value == 'CA' );
    }

    setVisibility();
    $country.bind( 'change keyup', setVisibility );
});
Solution 2
Use jQuery’s event triggering to fire the event immediately
after attaching it, along with the .bind() trick and local variables from
solution 1:
$(document).ready( function() {

    $('#country')
        .bind( 'change keyup', function() {
           var value = $(this).val();
           $('#state').toggle( value == 'US' );
           $('#province').toggle( value == 'CA' );
        })
        .trigger('change'),

});
Discussion
It’s standard programming practice in just about any language to
take duplicate code and move it into a separate function that can be
called from multiple places. Solution 1 follows this approach: instead
of repeating the code to set the visibility, it appears once in the
setVisibility() function. The code then calls that function directly at startup
and indirectly when the change
event is fired.
Solution 2 also uses a common function for both of these cases.
But instead of giving the function a name so it can be called directly
at startup, the code merely sets the function as the event handler for
the change event and then uses the
trigger() method to trigger that same event—thus calling the function
indirectly.
These approaches are more or less interchangeable; it’s largely a matter of taste which you prefer.
5.4. Formatting Your jQuery Chains
Problem
You have a lengthy jQuery chain that includes methods
like .children() and .end() to operate on several related groups of elements. It’s
getting hard to tell which operations apply to which elements:
$('#box').addClass('contentBox').children(':header')
    .addClass('contentTitle').click(function() {
        $(this).siblings('.contentBody').toggle();
    }).end().children(':not(.contentTitle)')
    .addClass('contentBody').end()
    .append('<div class="contentFooter"></div>')
    .children('.contentFooter').text('generated content'),
Solution
Put each method call in the chain on its own line, and put the
. operators at the beginning of
each line. Then, indent each part of the chain to indicate where you
are switching to different sets of elements.
Increase the indentation when you use methods like .children() or .siblings() to select different elements, and decrease the
indentation when you call .end() to
return to the previous jQuery selection.
If you’re new to jQuery, you’ll probably want to read the
recipes about basic chaining and .end() in Chapter 1:
$('#box')
    .addClass('contentBox')
    .children(':header')
        .addClass('contentTitle')
        .click(function() {
            $(this).siblings('.contentBody').toggle();
        })
    .end()
    .children(':not(.contentTitle)')
        .addClass('contentBody')
    .end()
    .append('<div class="contentFooter"></div>')
    .children('.contentFooter')
        .text('generated content'),
Discussion
By breaking each call out onto its own line, it becomes very
easy to scan the code and see what is happening. Using indentation to
indicate when you’re modifying the set of elements makes it easy to
keep track of when destructive operations are occurring and being
undone via .end().
This style of indentation results in every call for any given
set of elements always being lined up, even if they’re not
consecutive. For example, it’s clear that the wrapper <div> has an element prepended and
appended to it, even though there are operations on other elements in
between.
Putting the .
operators at the beginning of the lines instead of the end is
just a finishing touch: it gives a better visual reminder that these
are method calls and not ordinary function calls.
Note
Did jQuery invent chaining? No. jQuery does make very good use of method chaining, but it’s something that has been around since the earliest days of JavaScript.
For example, here is a familiar use of chaining with a string object:
function htmlEscape( text ) {
return text
.replace( '&', '&' )
.replace( '<', '<' )
.replace( '>', '>' );
}5.5. Borrowing Code from Other Libraries
Problem
You found a useful function in another JavaScript
library and want to use the same technique in your jQuery code. In
this case, it’s the .radioClass()
method from the Ext Core library,
which adds a class to the matching element(s) and
removes the same class from all siblings of the
matching element(s).
Note
The name .radioClass()
comes from the behavior of radio buttons in both web applications
and desktop apps, where clicking one button selects it and deselects
the other buttons in the same radio button group.
The name radio button for those input elements comes from the station buttons in old car radios—the mechanical ones where pushing in one button caused all of the other buttons to pop out.
Given this HTML:
<div>
    <div id="one" class="hilite">One</div>
    <div id="two">Two</div>
    <div id="three">Three</div>
    <div id="four">Four</div>
</div>
you’d like to run code like this:
// Add the 'hilite' class to div#three, and
// remove the class from all of its siblings
// (e.g. div#one)

$('#three').radioClass('hilite'),
You may even want to allow a “multiple-select” radio class:
// Add the 'hilite' class to div#two and
// div#four, and remove the class from the
// other siblings (div#one and div#three)

$('#two,#four').radioClass('hilite'),
Solution
Write a simple plugin to add the .radioClass() method to jQuery:
// Remove the specified class from every sibling of the selected
// element(s), then add that class to the selected element(s).
// Doing it in that order allows multiple siblings to be selected.
//
// Thanks to Ext Core for the idea.

jQuery.fn.radioClass = function( cls ) {
    return this.siblings().removeClass(cls).end().addClass(cls);
};
This is a short enough function that it’s not too hard to follow as a one-liner, but indenting the code as described in Recipe 5.4 makes it completely clear how it works:
jQuery.fn.radioClass = function( cls ) {
    return this                // Start chain, will return its result
        .siblings()            // Select all siblings of selected elements
            .removeClass(cls)  // Remove class from those siblings
        .end()                 // Go back to original selection
        .addClass(cls);        // Add class to selected elements
};
Discussion
The composer Igor Stravinsky is reported to have said, “Good composers borrow; great composers steal.” He apparently stole the quote from T.S. Eliot, who wrote, “Immature poets imitate; mature poets steal.”
Good ideas come from many places, and other JavaScript libraries are chock-full of good code and ideas. If there is code in another open source library that you can use or that you can translate to work with jQuery, you’re free to do that—if you respect the other author’s copyright and license.
Note
For information on open source and free software, see the following sites:
You may not even need the actual code in a case like this one, where the implementation is very simple and just the idea of having a “radio class” method is the missing link. While not required, it’s a good courtesy to give credit to the source of the idea.
Whether the idea comes from elsewhere or is something you thought of yourself, in a surprising number of cases you can write a useful jQuery plugin in one or a few lines of code.
5.6. Writing a Custom Iterator
Problem
You’ve selected multiple elements into a jQuery object, and you need to iterate through those elements with a pause between each iteration, for example, to reveal elements one by one:
<span class="reveal">Ready? </span>
<span class="reveal">On your mark! </span>
<span class="reveal">Get set! </span>
<span class="reveal">Go!</span>
You tried using each(), but of course that revealed the elements all at
once:
$('.reveal').each( function() {
    $(this).show();
});
// That was no better than this simpler version:
$('.reveal').show();
Solution
Write a custom iterator that uses setTimeout() to delay the callbacks over time:
// Iterate over an array (typically a jQuery object, but can
// be any array) and call a callback function for each
// element, with a time delay between each of the callbacks.
// The callback receives the same arguments as an ordinary
// jQuery.each() callback.
jQuery.slowEach = function( array, interval, callback ) {
    if( ! array.length ) return;
    var i = 0;
    next();

    function next() {
        if( callback.call( array[i], i, array[i] ) !== false )
            if( ++i < array.length )
                setTimeout( next, interval );
    }

    return array;
};
// Iterate over "this" (a jQuery object) and call a callback
// function for each element, with a time delay between each
// of the callbacks.
// The callback receives the same arguments as an ordinary
// jQuery(...).each() callback.
jQuery.fn.slowEach = function( interval, callback ) {
    return jQuery.slowEach( this, interval, callback );
};
Then simply change your .each() code to use .slowEach() and add the timeout value:
// Show an element every half second
$('.reveal').slowEach( 500, function() {
    $(this).show();
});
Discussion
jQuery’s .each() method is
not rocket science. In fact, if we strip the jQuery 1.3.2
implementation down to the code actually used in the most typical use
(iterating over a jQuery object), it’s a fairly straightforward
loop:
jQuery.each = function( object, callback ) {
    var value, i = 0, length = object.length;
    for(
        value = object[0];
        i < length  &&  callback.call( value, i, value ) !== false;
        value = object[++i]
    ) {}

    return object;
};
That could also be coded in a more familiar way:
jQuery.each = function( object, callback ) {
    for(
        var i = 0, length = object.length;
        i < length;
        ++i
    ) {
        var value = object[i];
        if( callback.call( value, i, value ) === false )
            break;
    }

    return object;
};
We can write similar functions to iterate over arrays or jQuery
objects in other useful ways. A simpler example than .slowEach() is a method to iterate over a
jQuery object in reverse:
// Iterate over an array or jQuery object in reverse order
jQuery.reverseEach = function( object, callback ) {
    for( var value, i = object.length;  --i >= 0; ) {
        var value = object[i];
        console.log( i, value );
        if( callback.call( value, i, value ) === false )
            break;
    }
};
// Iterate over "this" (a jQuery object) in reverse order
jQuery.fn.reverseEach = function( callback ) {
    jQuery.reverseEach( this, callback );
    return this;
};
This doesn’t attempt to handle all of the cases that .each() handles, just the ordinary case for
typical jQuery code.
Interestingly enough, a custom iterator may not use a loop at
all. .reverseEach() and the standard .each() both use fairly conventional loops,
but there’s no explicit JavaScript loop in .slowEach(). Why is that, and how does it
iterate through the elements without a loop?
JavaScript in a web browser does not have a sleep() function as found in many languages. There’s no way to pause
script execution like this:
doSomething();
sleep( 1000 );
doSomethingLater();
Instead, as with any asynchronous activity in JavaScript, the
setTimeout() function takes a callback that is called when the time interval
elapses. The .slowEach() method
increments the “loop” variable i in
the setTimeout() callback, using a
closure to preserve the value of
that variable between “iterations.” (See Recipe 5.2 for a discussion of
closures.)
Like .each(), .slowEach() operates directly on the jQuery
object or array you give it, so any changes you make to that array
before it finishes iterating will affect the iteration. Unlike
.each(), .slowEach() is asynchronous (the calls to
the callback function happen after .slowEach() returns), so if you change the
jQuery object or its elements after .slowEach() returns but before all the
callbacks are done, that can also affect the iteration.
5.7. Toggling an Attribute
Problem
You need a way to toggle all of the checkmarks in a group of checkboxes. Each checkbox should be toggled independently of the others.
Solution
Write a .toggleCheck() plugin
that works like the .toggle() and .toggleClass() methods in the jQuery core to
allow you to set, clear, or toggle a checkbox or group of
checkboxes:
// Check or uncheck every checkbox element selected in this jQuery object
// Toggle the checked state of each one if check is omitted.

jQuery.fn.toggleCheck = function( check ) {
    return this.toggleAttr( 'checked', true, false, check );
};
Then you can enable a group of buttons:
$('.toggleme').toggleCheck( true );or disable them:
$('.toggleme').toggleCheck( false );or toggle them all, each one independent of the rest:
$('.toggleme').toggleCheck();This .toggleCheck() method
is built on top of a more general-purpose .toggleAttr() method that works for any attribute:
// For each element selected in this jQuery object,
// set the attribute 'name' to either 'onValue' or 'offValue'
// depending on the value of 'on. If 'on' is omitted,
// toggle the attribute of each element independently
// between 'onValue' and 'offValue'.
// If the selected value (either 'onValue' or 'offValue') is
// null or undefined, remove the attribute.
jQuery.fn.toggleAttr = function( name, onValue, offValue, on ) {

    function set( $element, on ) {
        var value = on ? onValue : offValue;
        return value == null ?
            $element.removeAttr( name ) :
            $element.attr( name, value );
    }
    return on !== undefined ?
        set( this, on ) :
        this.each( function( i, element ) {
            var $element = $(element);
            set( $element, $element.attr(name) !== onValue );
        });
};
Why go to the trouble of building something so general-purpose?
Now we can write similar togglers for other attributes with almost no
effort. Suppose you need to do the same thing as .toggleCheck(), but now you’re enabling and
disabling input controls. You can write a .toggleEnable() in one line of code:
// Enable or disable every input element selected in this jQuery object.
// Toggle the enable state of each one if enable is omitted.

jQuery.fn.toggleEnable = function( enable ) {
    return this.toggleAttr( 'disabled', false, true, enable );
};
Note how the onValue and
offValue parameters let us swap the
true and false attribute values, making it easy to
talk about “enabling” the element instead of the less intuitive
“disabling” that the disabled
attribute provides normally.
As another example, suppose we need to toggle a foo attribute where its “on” state is the
string value bar, and its “off”
state is to remove the attribute. That’s another one-liner:
// Add or remove an attribute foo="bar".
// Toggle the presence of the attribute if add is omitted.

jQuery.fn.toggleFoo = function( add ) {
    return this.toggleAttr( 'foo', 'bar', null, add );
};
Discussion
It’s always good to beware of feeping creaturism (aka creeping featurism). If all we really needed were to toggle checkboxes, we could code the whole thing like this:
jQuery.fn.toggleCheck = function( on ) {
    return on !== undefined ?
        this.attr( 'checked', on ) :
        this.each( function( i, element ) {
            var $element = $(element);
            $element.attr( 'checked', ! $element.attr('checked') );
        });
};
That is a bit simpler than our .toggleAttr() method, but it’s only useful
for the checked attribute and
nothing else. What would we do if we later needed that .toggleEnable() method?
Duplicate the whole thing and change a few names?
The extra work in .toggleAttr() buys us a lot of flexibility:
we now can write a whole family of attribute togglers as
straightforward one-liners.
Note
Check the documentation for the version of jQuery you’re using before writing new utility methods like this. It’s always possible that similar methods could be added to future versions of jQuery, saving you the trouble of writing your own.
5.8. Finding the Bottlenecks
Problem
Your site is too slow to load or too slow to respond to clicks and other user interaction, and you don’t know why. What part of the code is taking so much time?
Solution
Use a profiler, either one of the many available ones or a simple one you can code yourself.
Discussion
A profiler is a way to find the parts of your code that take the most time. You probably already have at least one good JavaScript profiler at your fingertips. Firebug has one, and others are built into IE 8 and Safari 4. These are all function profilers: you start profiling, interact with your page, and stop profiling, and then you get a report showing how much time was spent in each function. That may be enough right there to tell you which code you need to speed up.
There are also some profilers specific to jQuery that you can find with a web search for jquery profiler. These let you profile selector performance and look more deeply at jQuery function performance.
For really detailed profiling, where you need to analyze individual sections of code smaller than the function level, you can write a simple profiler in just a few lines of code. You may have coded this ad hoc classic:
var t1 = +new Date;
// ... do stuff ...
var t2 = +new Date;
alert( ( t2 - t1 ) + ' milliseconds' );
Note
The +new Date in this code
is just a simpler way of coding the more familiar new Date().getTime(): it returns the
current time in milliseconds.
Why does it work? Well, the new
Date part is the same: it gives you a Date object representing the current time.
(The () are optional, as there
are no arguments.) The + operator
converts that object to a number. The way JavaScript converts an
object to a number is by calling the object’s .valueOf() method. And the .valueOf()
method for a Date object happens to be the same thing as
.getTime(), giving the time in milliseconds.
We can make something more general-purpose and easier to use with only 15 lines of code:
(function() {

    var log = [], first, last;

    time = function( message, since ) {
        var now = +new Date;
        var seconds = ( now - ( since || last ) ) / 1000;
        log.push( seconds.toFixed(3) + ': ' + message + '<br />' );
        return last = +new Date;
    };

    time.done = function( selector ) {
        time( 'total', first );
        $(selector).html( log.join('') );
    };

    first = last = +new Date;
})();
Now we have a time() function
that we can call as often as we want to log the elapsed
time since the last time() call
(or, optionally, since a specific prior time). When we’re ready to
report the results, we call time.done(). Here’s an example:
// do stuff
time( 'first' );
// do more stuff
time( 'second' );
// and more
time( 'third' );
time.done( '#log' );
That JavaScript code requires this HTML code to be added to your page:
<div id="log">
</div>
After the code runs, that <div>
| 0.102 first |
| 1.044 second |
| 0.089 third |
| 1.235 total |
We can see that the largest amount of time is being spent
between the time('first') and
time('second') calls.
Warning
Beware of Firebug! If you have Firebug enabled on the page you are
timing, it can throw off the results considerably. JavaScript’s
eval() function, which jQuery 1.3.2 and earlier use to evaluate
downloaded JSON data, is affected to an extreme degree: an array of
10,000 names and addresses in the format from Recipe 5.11 takes 0.2 seconds in
Firefox normally, but 55 seconds with Firebug’s
Script panel enabled. Later versions of jQuery use Function() for this, which isn’t affected by Firebug.
If Firebug affects your page as badly as that and if you can’t find a workaround, you may want to detect Firebug and display a warning:
<div id="firebugWarning" style="display:none;">
    Your warning here
</div>

$(document).ready( function() {
    if( window.console && console.firebug )
        $('#firebugWarning').show();
});
For many optimization exercises, this code may be sufficient. But what if the code we need to test is inside a loop?
for( var i = 0; i < 10; ++i ) {
    // do stuff
    time( 'first' );
    // do more stuff
    time( 'second' );
    // and more
    time( 'third' );
}
time.done( '#log' );
Now our little profiler will list those first, second, and third entries 10 times each! That’s not too hard to fix—we just need to accumulate the time spent for each specific message label when it’s called multiple times:
(function() {

    var log = [], index = {}, first, last;

    // Accumulate seconds for the specified message.
    // Each message string has its own total seconds.
    function add( message, seconds ) {
        var i = index[message];
        if( i == null ) {
            i = log.length;
            index[message] = i;
            log[i] = { message:message, seconds:0 };
        }
        log[i].seconds += seconds;
    }

    time = function( message, since ) {
        var now = +new Date;
        add( message, ( now - ( since || last ) ) / 1000 );
        return last = +new Date;
    }

    time.done = function( sel ) {
        time( 'total', first );
        $(sel).html(
            $.map( log, function( item ) {
                return(
                    item.seconds.toFixed(3) +
                    ': ' +
                    item.message + '<br />'
                );
            }).join('')
        );
    };

    first = last = +new Date;
})();
With this change, we’ll get useful results from that loop:
| 0.973 first |
| 9.719 second |
| 0.804 third |
| 11.496 total |
When you run timing tests on a web page, you won’t get the same result every time. In fact, the timing results will probably vary quite a bit if you reload a page or rerun a test multiple times.
What should you do to get the “real” number? Average the results?
Probably not. Here’s a chart of the fillTable() timing from Recipe 5.11 for 50 consecutive
runs, taken about 10 seconds apart:
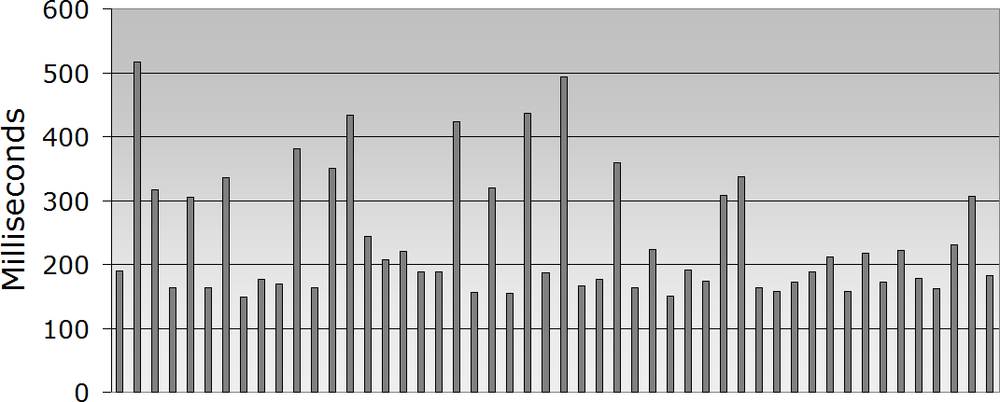
There’s a distinct pattern here: a large majority of runs in the 150–200 millisecond range, with a small number of scattered runs taking longer. It seems likely that something around 175 milliseconds is the real timing, and the runs taking much longer were affected by other processes on the machine.
It’s also possible that some of the longer runs are caused by garbage collection in the browser. It would be hard to distinguish that from time taken by other processes, so the most practical thing is probably just to disregard these outliers.
5.9. Caching Your jQuery Objects
Problem
You’re logging the various properties of the event object for a mousemove event, and the code lags behind
because it uses $('.classname')
selectors to find and update table cells with the event data.
Your page contains this HTML code for the log:
<table id="log">
    <tr><td>Client X:</td><td class="clientX"></td></tr>
    <tr><td>Client Y:</td><td class="clientY"></td></tr>
    <tr><td>Page X:</td><td class="pageX"></td></tr>
    <tr><td>Page Y:</td><td class="pageY"></td></tr>
    <tr><td>Screen X:</td><td class="screenX"></td></tr>
    <tr><td>Screen Y:</td><td class="screenY"></td></tr>
</table>
and this JavaScript code:
$('html').mousemove( function( event ) {
    $('.clientX').html( event.clientX );
    $('.clientY').html( event.clientY );
    $('.pageX').html( event.pageX );
    $('.pageY').html( event.pageY );
    $('.screenX').html( event.screenX );
    $('.screenY').html( event.screenY );
});
The page also contains a large number (thousands!) of other DOM elements. In a simpler test page, the code performs fine, but in this complex page it is too slow.
Solution
Cache the jQuery objects returned by the $(...) calls, so the DOM queries only have
to be run once:
var
    $clientX = $('.clientX'),
    $clientY = $('.clientY'),
    $pageX = $('.pageX'),
    $pageY = $('.pageY'),
    $screenX = $('.screenX'),
    $screenY = $('.screenY'),
$('html').mousemove( function( event ) {
    $clientX.html( event.clientX );
    $clientY.html( event.clientY );
    $pageX.html( event.pageX );
    $pageY.html( event.pageY );
    $screenX.html( event.screenX );
    $screenY.html( event.screenY );
});
You may also be able to speed up those selectors considerably; see the next recipe for ways to do that. But simply calling them once each instead of over and over again may be enough of an improvement right there.
Discussion
One of the classic ways to optimize code is to “hoist” repeated calculations out of a loop so you have to do them only once. Any values that don’t change inside the loop should be calculated one time, before the loop starts. If those are expensive calculations, the loop will then be much faster.
This works just as well when the “loop” is a series of
frequently fired events such as mousemove and the “calculation” is a jQuery
selector. Hoisting the selector out of the event handler makes the
event handler respond faster.
Of course, if you’re calling multiple selectors inside a loop, that will also benefit from moving them outside the loop in the same manner.
Note
Why do $clientX and the
other variable names begin with the $ character?
$ doesn’t have any special
meaning in JavaScript—it’s treated just like a letter of the
alphabet. It’s simply a popular convention in jQuery code to use the
$ prefix as a reminder that the variable contains a reference
to a jQuery object and not, say, a DOM element, because a variable
name of $foobar has a visual
resemblance to the jQuery operation $('#foobar').
This is especially helpful when you need to use both a jQuery object and its underlying DOM element, e.g.:
var $foo = $('#foo'), foo = $foo[0];
// Now you can use the jQuery object:
$foo.show();
// or the DOM element:
var id = foo.id;
5.10. Writing Faster Selectors
Problem
Your code contains a large number of $('.classname') selectors. You’re caching
them as described in the previous recipe, but the selectors are still
affecting your page load time. You need to make them faster.
Solution
First, make sure you are using a recent version of jQuery (1.3.2 or later) for faster selector performance in most browsers, especially with class selectors.
If you have control over the HTML page content, change the page
to use id attributes and '#xyz' selectors instead of class attributes and '.xyz' selectors:
<div class="foo"></div>
<div id="bar"></div>

$('.foo')  // Slower
$('#bar')  // Faster
If you must use class name selectors, see whether there is a parent element that you can find with a faster ID selector, and then drill down from there to the child elements. For example, using the HTML from the previous recipe:
<table id="log">
    <tr><td>Client X:</td><td id="clientX"></td></tr>
    ...
</table>
you could use this:
$('.clientX')         // Slower
$('td.clientX')       // May be faster
$('#log .clientX')    // May be much faster
$('#log td.clientX')  // Possibly faster in some browsers
Note
Beware of selector speed test pages that don’t reflect
the actual page content you are using. In a very simple page, a
simple $('.clientX') selector may
test out faster than a fancier selector like $('#log
td.clientX')—even in browsers and jQuery versions where
you might expect the class selector to be slow.
That’s just because the more complicated selector takes more time to set up, and in a simple page that setup time may dominate performance.
The test page for this recipe deliberately contains a very large number of elements to provoke selector performance problems that only show up in large pages.
Neither one, of course, shows exactly what any selector’s performance will be in your page. The only way to be sure which selector is fastest in a particular page is to test each in that page.
Discussion
It’s easy to forget that an innocent-looking call like $('.clientX') may take considerable time.
Depending on the browser and version of jQuery, that selector may have
to make a list of every DOM element in your page and loop through it
looking for the specified class.
jQuery versions prior to 1.3 use this slow method in
every browser. jQuery 1.3 introduced the Sizzle
selector engine, which takes advantage of faster DOM APIs in newer
browsers such as getElementsByClassName() and querySelectorAll().
However, for most websites you’ll probably need to support IE 7 for some time to come, and class selectors are slow in IE 7 when you have a complex page.
If you can use it, selecting by ID as in $('#myid') is generally very fast in all
browsers, because it simply uses a single call to the getElementById() API.
It also helps to narrow down the number of elements that need to be searched, either by specifying a parent element, by making the class selector more specific with a tag name, or by combining those and other tricks.
5.11. Loading Tables Faster
Problem
You’re loading a JSON data object with 1,000 names and addresses and using jQuery to create a table with this data. It takes 5–10 seconds to create the table in IE 7—and that’s not even counting the download time.
Your JSON data is in this format:
{
    "names": [
        {
            "first": "Azzie",
            "last": "Zalenski",
            "street": "9554 Niemann Crest",
            "city": "Quinteros Divide",
            "state": "VA",
            "zip": "48786"
        },
        // and repeat for 1000 names
    ]
}
Your JavaScript code is as follows:
// Return a sanitized version of text with & < > escaped for HTML
function esc( text ) {
return text
.replace( '&', '&' )
.replace( '<', '<' )
.replace( '>', '>' );
}
$(document).ready( function() {
function fillTable( names ) {
$.each( names, function() {
$('<tr>')
.append( $('<td>').addClass('name').html(
esc(this.first) + ' ' + esc(this.last)
) )
.append( $('<td>').addClass('address').html(
esc(this.street) + '<br />' +
esc(this.city) + ', ' +
esc(this.state) + ' ' + esc(this.zip)
) )
.appendTo('#nameTable'),
});
}
$.getJSON( 'names/names-1000.json', function( json ) {
fillTable( json.names );
});
});And you have this HTML code in your document:
<table id="nameTable">
</table>
It works fine, resulting in the browser display shown in Figure 5-1.

It’s just much too slow.
Solution
Combine several optimizations:
Insert a single
<table>or<tbody>instead of multiple<tr>elementsUse
.innerHTMLor.html()instead of DOM manipulationBuild an array with
a[++i]and.join()it instead of string concatenationUse a bare-metal
forloop instead of$.eachReduce name lookups
The result is this new version of the code (using the same
esc() function as before):
$(document).ready( function() {

    function fillTable( names ) {
        // Reduce name lookups with local function name
        var e = esc;
        //
        var html = [], h = −1;
        html[++h] = '<table id="nameTable">';
        html[++h] = '<tbody>';
        for( var name, i = −1;  name = names[++i]; ) {
            html[++h] = '<tr><td class="name">';
            html[++h] =     e(name.first);
            html[++h] =     ' ';
            html[++h] =     e(name.last);
            html[++h] = '</td><td class="address">';
            html[++h] =     e(name.street);
            html[++h] =     '<br />';
            html[++h] =     e(name.city);
            html[++h] =     ', ';
            html[++h] =     e(name.state);
            html[++h] =     ' ';
            html[++h] =     e(name.zip);
            html[++h] = '</td></tr>';
        }
        html[++h] = '</tbody>';
        html[++h] = '</table>';

        $('#container')[0].innerHTML = html.join(''),
    }

    $.getJSON( 'names/names-1000.json', function( json ) {
        fillTable( json.names );
    });
});
The new code requires the HTML code in your document to be changed to the following:
<div id="container">
</div>
On one test system in IE 7, the new code runs in 0.2 seconds compared with 7 seconds for the original code. That’s 35 times faster!
Granted, the code is not as clean and elegant as the original, but your site’s visitors will never know or care about that. What they will notice is how much faster your page loads.
Discussion
Sometimes you’ll get lucky and find that one specific optimization is all it takes to fix a performance problem. Sometimes, as in this recipe, you’ll need several tricks to get the speed you want.
The biggest speed boost in this code comes from inserting a
single <table>
element with all its children in a single DOM operation, instead of
inserting a lengthy series of <tr> elements one by one. In order to do this, you need to generate
the entire table as HTML. That means you need to paste together a
large number of strings to build the HTML, which can be very fast or
very slow depending on how you do it. And with 1,000 items to loop
though, it’s worth finding the fastest way to write the loop
itself.
You may wonder, “Is this still jQuery code? It looks like plain old JavaScript!” The answer is yes, and yes. It’s quite all right to mix and match jQuery code with other JavaScript code. You can use simpler jQuery ways of coding in most of your site, and when you discover the slow parts, you can either find faster jQuery techniques or use plain old JavaScript as needed for performance.
5.12. Coding Bare-Metal Loops
Problem
You’re calling $.each(array,fn) or $(selector).each(fn) to iterate over
thousands of items in your code, and you suspect that all those
function calls may be adding to your load time:
$.each( array, function() {
    // do stuff with this
});
or:
$('.lotsOfElements').each( function() {
    // do stuff with this or $(this)
});
Solution
Use a for loop instead of
.each(). To iterate over an array, it’s hard to beat this
loop:
for( var item, i = −1; item = array[++i] ) {
    // do stuff with item
}
But there is a catch: this loop works only if your array has no
“false” elements, that is, elements whose value is undefined, null, false, 0,
or "". Even with that restriction,
this loop is useful in many common cases, such as iterating over a
jQuery object. Just be sure to cache the object in a variable:
var $items = $('.lotsOfElements'),
for( var item, i = −1; item = $item[++i] ) {
    // do stuff with item (a DOM node)
}
It’s also common to have JSON data that contains an array of objects as in our example from Recipe 5.11:
{
    "names": [
        {
            // ...
            "zip": "48786"
        },
        // and repeat for 1000 names
    ]
}
If you know that none of the objects making up the elements of
the names array will ever be null,
it’s safe to use the fast loop.
For a more general-purpose loop that works with any array, there is always the classic loop that you’ll see in many places:
for( var i = 0; i < array.length; i++ ) {
     var item = array[i];
    // do stuff with item
}
But you can improve that loop in three ways:
Cache the array length.
Use
++i, which is faster thani++in some browsers.Combine the test and increment of the loop variable to remove one name lookup.
The result is as follows:
for( var i = −1, n = array.length; ++i < n; ) {
    var item = array[i];
    // do stuff with item
}
Note
Would it be even faster to use a while loop or a do...while loop? Probably not. You could
rewrite the previous loop as follows:
var i = −1, n = array.length;
while( ++i < n ) {
    var item = array[i];
    // do stuff with item
}
or:
var i = 0, n = array.length;
if( i < n ) do {
    var item = array[i];
    // do stuff with item
}
while( ++i < n );
But neither one is any faster than the more readable for loop.
To iterate over an object (not an array), you can use a for..in loop:
for( var key in object ) {
    var item = object[key];
    // do stuff with item
}Discussion
$(selector).each(fn) is the
customary way to create a jQuery object and iterate over it, but it’s
not the only way. The jQuery object is an “array-like” object with
.length and [0], [1],
..., [length-1] properties. Therefore, you can
use any of the looping techniques you would use with any other array.
And because the jQuery object never contains “false” elements, you can
use the fastest for loop listed at
the beginning of the solution.
If you use the time()
function from Recipe 5.2 or another profiler
to measure loop performance, be sure to test your actual code, not a
simplified test case that just runs the loop without the full loop
body. The simplified test would miss one potential benefit of the
for loop: fewer name lookups
resulting from less function nesting. See Recipe 5.13 for the details.
5.13. Reducing Name Lookups
Problem
Your code has an inner loop, down inside several levels of nested functions, that runs hundreds or thousands of times. The inner loop calls several global functions, and it references some variables defined in the outer functions or globally.
Each of these references is triggering several name lookups because of the nested functions. It’s slowing down your code, but profilers don’t show what the problem is, and it isn’t obvious from looking at the code that there’s a problem!
Solution
Investigate every name that appears in your innermost loop, and figure out how many name lookups it requires. Reduce the number of name lookups by caching object references locally or using fewer nested functions.
Discussion
Closures are a wonderful thing. They make it trivial to capture state information and pass it along to asynchronous functions such as event handlers or timer callbacks. If JavaScript didn’t have closures, then every asynchronous callback would need to have a way to pass that state around. Instead, you can simply use a nested function.
The dynamic nature of JavaScript is also a wonderful thing. You can add properties and methods to any object, any time, and the JavaScript runtime will happily chase down those references when you need them.
Put these together, and you can get a lot of name lookups.
Note
The most modern JavaScript interpreters have improved greatly in this area. But if you want your code to run fast in the most popular browsers—such as any version of IE— you still need to worry about the number of name lookups.
Consider this code:
// A typical function wrapper to get a local scope
(function() {
    // Find the largest absolute value in an array of numbers
    function maxMagnitude( array ) {
        var largest = -Infinity;
        $.each( array, function() {
            largest = Math.max( largest, Math.abs(this) );
        });
     return largest;
    }
    // Other code here calls maxMagnitude on a large array
})();
Remember that JavaScript looks up a name first in the local scope (function), and if the name isn’t found there, it works its way up through the parent nested functions and finally the global scope. Not only does the JavaScript runtime have to look up each name every time you use it, it also has to repeat those lookups when the names are actually defined in parent functions or in the global scope.
So, if this block of code is in the global scope, the each() callback does the following name lookups in every
iteration:
1. largest in local scope [fail]
2. largest in MaxMagnitude() [success]
3. Math in local scope [fail]
4. Math in MaxMagnitude() [fail]
5. Math in anonymous wrapper function [fail]
6. Math in global scope [success]
7. abs in Math object [success]
8. Math in local scope [fail]
9. Math in MaxMagnitude() [fail]
10. Math in anonymous wrapper function [fail]
11. Math in global scope [success]
12. max in Math object [success]
13. largest in local scope [fail]
14. largest in MaxMagnitude() [success]
Now rewrite the code as follows:
// A typical wrapper to get a local scope
(function() {
    // Find the largest absolute value in an array of numbers
    function maxMagnitude( array ) {
        var abs = Math.abs, max = Math.max;
        var largest = -Infinity;
        for( var i = −1, n = array.length; ++i < n; ) {
            largest = max( largest, abs(array[i]) );
        }
        return largest;
    }
    // Other code here calls maxMagnitude on a large array
})();
This not only eliminates the callback function call in every iteration, it also reduces the number of name lookups per iteration by 10 or more. The loop body in this version does these name lookups:
1. largest in local scope [success]
2. abs in local scope [success]
3. max in local scope [success]
4. largest in local scope [success]
That’s more than a 70 percent improvement over the first version.
If this code is nested even deeper inside another function, the
difference is even greater, since each nested function adds one more
lookup for each of the Math object
lookups.
Note
In this discussion we’re omitting the this and array[i] lookups, as well as the lookups
in the for loop itself. Those are
roughly comparable between the two versions.
In Recipe 5.11, a single name lookup optimization accounts for a 100 ms improvement. That’s not a huge difference, but a tenth of a second off your page load time for a one-line code change is good value.
The original code calls esc() six times in each loop iteration, for a total of 6,000
calls in the thousand-name test case. These calls are inside three
nested functions, and esc() is a
global function, so it takes four name lookups simply to resolve the
function name for each call. That’s 24,000 name lookups!
The improved code reduces the function nesting by one, so that cuts it down to 18,000 name lookups (two nested functions and the global scope at 6,000 each), but then it uses one last trick in the innermost function:
function fillTable( names ) {
    var e = esc;
    // and now call e() in the inner loop instead of esc()
}
Now, the 6,000 calls to e()
are each resolved in a single name lookup. That’s a reduction of 12,000 name lookups. No
wonder it knocks a tenth of a second off the load time.
5.14. Updating the DOM Faster with .innerHTML
Problem
You’re creating a large block of HTML code and using
$('#mydiv').html(myhtml); to insert
it into the DOM. You’ve profiled the code and found that the .html() method is taking longer than expected.
Solution
Use $('#mydiv')[0].innerHTML =
myhtml; for faster DOM updates—if you don’t require any of the special processing
that .html() provides.
Discussion
The .html() method uses the
.innerHTML property to actually insert the HTML content into the DOM, but it
does quite a bit of preprocessing first. In most cases this won’t
matter, but in performance-critical code you can save some time by
setting the .innerHTML property
directly.
It’s actually jQuery’s internal .clean() method that does this processing. If you read the source code
for .clean(), you’ll see that it
goes to quite a bit of work to clean up the HTML input.
Note
The easiest way to find most methods in the jQuery source code
is to search for the method name with a : after it; e.g., to find the .clean() method, search for clean: in the
uncompressed jQuery source.
The code in Recipe 5.11
runs afoul of some of this cleanup. That recipe’s HTML code contains a
large number of <br /> tags.
There’s a regular expression in .clean() that finds all self-closing tags
(tags that end with /> and
therefore do not require a closing tag) and checks that these tags are
indeed in the limited set of HTML tags that can be self-closed. If
not, then it converts the HTML to an open–close tag.
For example, if you code $('#test').html('<div />'),, then this
invalid HTML is automatically converted to $('#test').html('<div></div>'),.
This makes coding easier, but if you have a very long HTML string that
contains many self-closing tags, .clean() has to check them all—even if all
those tags are valid like the <br
/> tags in the other recipe.
The .html() method replaces
any existing content, and it takes care to avoid memory leaks by
removing all event handlers that you’ve attached through jQuery to any
of the elements being replaced. If there are any event handlers in the
content being replaced, you should stick with .html(), or if you just need this event
handler cleanup but don’t need the other HTML cleanup, you could
possibly use $('#test').empty()[0].innerHTML
= myhtml; to get the event cleanup only.
The bottom line: if you know for sure that your code doesn’t
require the event cleanup or HTML cleanup that jQuery normally
provides, then with caution you can use .innerHTML directly. Otherwise, stick with
.html() for safety.
5.15. Debugging? Break Those Chains
Problem
A chain of jQuery methods is failing somewhere along the way. The HTML code is as follows:
<div class="foo">
    before
        <span class="baz" style="display:none;">
            test
        </span>
    after
</div>
and the JavaScript code (part of a button click event handler) is as follows:
$('.foo').css({ fontsize: '18px' }).find('.bar').show();But when you run the code, the font size isn’t set, and the hidden element isn’t shown.
You have Firebug or another JavaScript debugger, but it’s hard to trace through the code. How can you tell where in the chain it is failing?
Solution
Break up the chain into individual statements, and store each jQuery object in a variable:
// $('.foo').css({ fontsize: '18px' }).find('.bar').show();
var $foo = $('.foo'),
$foo.css({ fontsize: '18px' });
var $bar = $foo.find('.bar'),
$bar.show();
Now you have several debugging options. One is to use the Step Over command in the debugger to single step over each statement and observe your variables and the state of the page after each step.
In this code, you’d want to check $foo and $bar after their values are assigned. What
is the value of the .length
property of each? That tells you how many DOM elements were selected.
Does each object contain the DOM elements you expect? Check the
[0], [1], [2],
etc., properties to see the DOM elements.
Assuming that $foo contains
the correct DOM elements, what happens after the .css() method is called? With Firebug’s CSS
Inspector, you’ll find that the CSS font-size property is unchanged after the
method call. Wait a minute! It’s font-size, not fontsize? There’s the problem. Checking the
docs, you find that the correct way to write this is either of
these:
$foo.css({ fontSize: '18px' });

$foo.css({ 'font-size': '18px' });
That’s one problem down, but what about the other one? After
$bar is assigned, if we look at its
.length property, we’ll see that it
is zero. This tells us that we didn’t succeed in selecting any
elements. A look at the HTML and JavaScript code will then reveal that
we simply misspelled the class name.
Now we can incorporate these two fixes back in the original chain:
$('.foo').css({ fontSize: '18px' }).find('.baz').show();Another alternative is to use Firebug’s logging statements:
// $('.foo').css({ fontsize: '18px' }).find('.bar').show();
var $foo = $('.foo'),
console.log( $foo );
$foo.css({ fontsize: '18px' });
console.log( $foo.css('fontsize') );
var $bar = $foo.find('.bar'),
console.log( $bar );
$bar.show();
These console.log() calls
will reveal that $bar doesn’t have
any elements selected, although
we’ve fallen into a trap on the call that attempts to log the font
size: we misspelled fontSize in the console.log() call as well!
This is where combining multiple debugging techniques helps: log those variables, use Firebug’s inspectors, read and reread your source code, and have someone else look at the problem too.
Discussion
jQuery’s chaining helps make it easy to write concise code, but it can get in the way when debugging, because it is hard to step through the individual steps of the chain and see their results. Breaking up the chain into individual statements, even on a temporary basis while debugging, makes this task easier.
5.16. Is It a jQuery Bug?
Problem
You’re calling some jQuery code to show a hidden element
and set its HTML content after a time delay using setTimeout():
function delayLog( text ) {
    setTimeout( "$('#log').show().html(text)", 1000 );
}
// ... and somewhere else in the code ...
delayLog( 'Hello' );
The .show() call works, but
the .html(text) call fails. The
Firebug console reports that the text variable is undefined. The same jQuery
code works when you don’t call it from setTimeout(). Is there a problem using
jQuery with setTimeout()?
Solution
One way to find out whether jQuery is the source of a problem is
to replace your jQuery code with other JavaScript code that doesn’t
use jQuery. In this example, we can replace the jQuery code with a
simple alert():
function delayLog( text ) {
    setTimeout( "alert(text)", 1000 );
}
When we try this version of the code, the same problem occurs:
there is no alert, and Firebug again reports that text is undefined.
This doesn’t identify the problem, but it narrows it down a lot.
It clearly isn’t jQuery (unless the mere presence of the jQuery
library is interfering with your page, but you can rule that out by
running the code in a simple test page that doesn’t include jQuery).
So, it must be something wrong with this code itself, most likely to
do with the way we’re using setTimeout().
Indeed, the problem here is that when a string argument is
passed to setTimeout(), it is
executed in the global scope, i.e., as if the
code were located outside of any function. The easiest way to fix it
is to use a local function for the callback instead of a text
string:
function delayLog( text ) {
    setTimeout( function() {
        alert(text);
    }, 1000 );
}
Unlike code in a string, a nested function has full access to the outer function’s variables and parameters. So, this code will alert the text as expected.
And finally, here is a corrected version of the original jQuery code:
function delayLog( text ) {
    setTimeout( function() {
        $('#log').show().html(text);
    }, 1000 );
}
Discussion
When debugging, if you aren’t sure what is causing a problem,
finding out where the problem isn’t can help you
track it down. The purpose of this recipe isn’t to help you
troubleshoot setTimeout()
problems—after all, this is a jQuery book, not a general JavaScript
book—but to help you focus your debugging efforts by quickly ruling
out (or confirming!) jQuery as the source of the problem.
5.17. Tracing into jQuery
Problem 1
You’re using the Step Into feature in Firebug or another JavaScript debugger to try to step through the jQuery code to see what it actually does when you make a jQuery call. But when you step into the jQuery code, it’s all mashed into one long, unreadable line of code and you can’t step through it:
(function(){var l=this,g,y=l.jQuery,p=l.$,o=l.jQuery=l.$=function(E,F)...Solution 1
You’re using the minified version of jQuery. Instead, load the uncompressed version of jQuery into your page for testing.
If you are loading the code from the Google Ajax Libraries API
with a <script> tag, change
it like this:
<!-- Comment out the minified jQuery -->
<!--
<script type="text/javascript"
  src="http://ajax.googleapis.com/ajax/libs/jquery/1.3.2/jquery.min.js
"></script>
-->
<!-- Use the uncompressed version for testing -->
<script type="text/javascript"
  src="http://ajax.googleapis.com/ajax/libs/jquery/1.3.2/jquery.js"></script>
If you’re using Google’s JavaScript loader, change it like this:
// Comment out the minified jQuery
// google.load( 'jquery', '1.3.2' );
// Use the uncompressed version for testing
google.load( 'jquery', '1.3.2', { uncompressed:true });
Now you will be able to step into and through the jQuery code.
Problem 2
Having fixed that problem, you want to learn how jQuery’s
.html() and .show() methods work. So, you are trying to
trace into this code in the debugger:
$('#test').html( 'test' ).show();But when you use the Step Into command, the debugger goes into the jQuery constructor instead of either of the methods that you’re interested in.
Solution 2
The previous line of code contains three
function calls: a call to the jQuery ($) constructor followed by calls to the
.html() and .show()
methods. The Step Into command steps into the first of those
calls, the constructor.
At that point you can immediately do a Step Out followed by
another Step In. This steps you out of the jQuery constructor (thus
putting you back in the middle of the original
line of code) and then into the .html() method.
To get to the .show() method,
use another pair of Step Out and Step In commands. Each time you do
this, you’ll work your way one step further through the jQuery
chain.
If this gets tedious, break the chain as described in Recipe 5.15, and add debugger; statements wherever you want to
stop. If you want to trace into the .show() method, you can change the code to
the following:
var $test = $('#test'),
$test.html( 'test' );
debugger;
$test.show();
Now when the code stops on the debugger; statement, you can just use Step
In (twice, first to step to the $test.show(); statement and then to step
into that function call).
Note
You could use Step Over to step from the debugger; statement to the next line,
since after all you’re not yet stepping “into” anything, but it’s
easier to click Step In (or hit the F11 key in Windows) twice, and
it works just as well. Or, instead of the debugger; statement, you can set a
breakpoint on the $test.show()
line itself, and then a single Step In will go into the code for the
.show() method.
Discussion
The minified version of jQuery is great for production use but not so good for development. It collapses all of the code into one or two lines, making it nearly impossible to step through the code in a debugger. Also, the common use of chained methods makes it more difficult to step into jQuery methods. Using the tips in this recipe, you can easily trace through the jQuery code in the debugger, whether to chase down a bug or to learn how the code works.
Note
Do not let your test-driven friends talk you out of using a debugger! Even if you find most of your bugs through unit testing and other means, one of the best ways to learn about a piece of code is to step through it in the debugger and study its variables and properties as you go.
After all, as you read code, you have to step through it in your head and form a mental model of what its variables contain. Why not let the computer step through the code and show you what’s in those variables?
5.18. Making Fewer Server Requests
Problem
You’re including jQuery and a number of plugins in your page. The sheer number of server requests is slowing down your page load time:
<script type="text/javascript" src="jquery.js"></script>
<script type="text/javascript" src="superfish.js"></script>
<script type="text/javascript" src="cycle.js"></script>
<script type="text/javascript" src="history.js"></script>
<script type="text/javascript" src="hoverintent.js"></script>
<script type="text/javascript" src="jcarousel.js"></script>
<script type="text/javascript" src="thickbox.js"></script>
<script type="text/javascript" src="validate.js"></script>
After the page loads, you are downloading some JSON data using
$.getJSON(), thus adding yet
another server request:
$(document).ready( function() {
    $.getJSON( 'myjson.php?q=test', function( json ) {
        $('#demo').html( json.foo );
    });
});
myjson.php is a script on
your server that returns JSON data like this:
{
    "foo": "bar"
}
Solution
Load jQuery from Google’s Ajax library, and combine all your plugins into a single file:
<script type="text/javascript"

  src="http://ajax.googleapis.com/ajax/libs/jquery/1.3.2/jquery.min.js"></script>

<script type="text/javascript" src="plugins.js">
</script>
Or, combine all of the JavaScript code you use most frequently (jQuery, plugins, and your own code) into a single file:
<script type="text/javascript" src="allmyscripts.js"></script>
Either way, it also helps to
minify the .js files
(remove comments and extra whitespace) to reduce their size. And make
sure your server is using gzip compression on the files it
downloads.
For the JSON data, since this page is generated by your own
server application, you can “burn” the JSON data directly into the
HTML page as it’s generated, using a <script> tag:
<script type="text/javascript">
    var myJson = {
        "foo": "bar"
    };
</script>
The highlighted portion of that script tag is identical to the
JSON data downloaded by myjson.php
in the original code. In most server languages it should be easy to
include the content in this way.
Now the jQuery code to use the JSON data is simply:
$(document).ready( function() {
    $('#demo').html( myJson.foo );
});
This eliminates one more server request.
Discussion
One of the keys to fast page loading is to simply minimize the number of HTTP requests. Making requests to different servers can also help. Browsers will make only a small number of simultaneous downloads from any single domain (or subdomain), but if you download some of your files from a different domain, the browser may download them in parallel as well.
Note
Pointing different <script> tags to different domains may allow them to be downloaded
in parallel, but it doesn’t affect the order of
execution. <script> tags are executed in the
order they appear in the HTML source.
You can combine JavaScript files by hand by simply copying and pasting them into one big file. This is inconvenient for development but does speed up downloading.
There are a number of file combiner/minifiers available for various server languages.
Ruby on Rails:
The packager built into Rails 2.0
PHP:
Python:
Java:
In addition to JavaScript code, check your CSS for multiple
.css files. Some of the tools
listed can merge your .css files
into a single download, just as they do for .js files.
Warning
At one time, “packing” JavaScript was all the rage. This not only removes comments and whitespace but also rewrites all of the JavaScript code so that it’s not even JavaScript code anymore. Packing requires an unpacking step at runtime—every time the page loads, even if the JavaScript code is already cached. Because of this, packing has fallen out of favor, and “minifying” the code (removing comments and whitespace) is recommended instead, combined with gzip compression. Much of the benefit of packing comes from removing duplicate strings, and gzip does that for you anyway.
5.19. Writing Unobtrusive JavaScript
Problem
You have a page with inline event handler attributes creating a hover effect for a menu.
Your content (HTML), presentation (CSS), and behavior (JavaScript) are all mixed up, making it hard to maintain each on their own and resulting in duplicate JavaScript and style settings:
<!DOCTYPE html PUBLIC "-//W3C//DTD XHTML 1.0 Transitional//EN"
    "http://www.w3.org/TR/xhtml1/DTD/xhtml1-transitional.dtd">
<html xmlns="http://www.w3.org/1999/xhtml" xml:lang="en" lang="en">
<head>
    <meta http-equiv="Content-Type" content="text/html; charset=utf-8" />
    <meta http-equiv="Content-Language" content="en-us" />
    <title>Menu Demo</title>

    <style type="text/css">
        .menu {
            background-color: #ccc;
            list-style: none;
            margin: 0;
            padding: 0;
            width: 10em;
        }
        .menu li {
            margin: 0;
            padding: 5px;
        }
        .menu a {
            color: #333;
        }
    </style>
</head>
<body>
<ul class="menu">
    <li onmouseover="this.style.backgroundColor='#999';"
        onmouseout="this.style.backgroundColor='transparent';">
        <a href="download.html">Download</a>
    </li>
    <li onmouseover="this.style.backgroundColor='#999';"
        onmouseout="this.style.backgroundColor='transparent';">
        <a href="documentation.html">Documentation</a>
    </li>
    <li onmouseover="this.style.backgroundColor='#999';"
        onmouseout="this.style.backgroundColor='transparent';">
        <a href="tutorials.html">Tutorials</a>
    </li>
</ul>
</body>
</html>
Solution
Replace inline JavaScript with jQuery event handlers, and
add/remove classes instead of manipulating the backgroundColor style directly:
<!DOCTYPE html PUBLIC "-//W3C//DTD XHTML 1.0 Transitional//EN"
    "http://www.w3.org/TR/xhtml1/DTD/xhtml1-transitional.dtd">
<html xmlns="http://www.w3.org/1999/xhtml" xml:lang="en" lang="en">
<head>
    <meta http-equiv="Content-Type" content="text/html; charset=utf-8" />
    <meta http-equiv="Content-Language" content="en-us" />
    <title>Menu Demo</title>

    <style type="text/css">
        .menu {
            background-color: #ccc;
            list-style: none;
            margin: 0;
            padding: 0;
            width: 10em;
        }
        .menu li {
            margin: 0;
            padding: 5px;
        }
        .menu a {
            color: #333;
        }
        .menuHover {
            background-color: #999;
        }
    </style>

    <script type="text/javascript"
src="http://ajax.googleapis.com/ajax/libs/jquery/1.3.2/jquery.js">
    </script>

    <script type="text/javascript">

        $(document).ready( function() {
            $('li').hover(
                function() {
                    $(this).addClass('menuHover'),
                },
                function() {
                    $(this).removeClass('menuHover'),
                });
        });

    </script>
</head>
<body>

<ul class="menu">
    <li><a href="download.html">Download</a></li>
    <li><a href="documentation.html">Documentation</a></li>
    <li><a href="tutorials.html">Tutorials</a></li>
</ul>
</body>
</html>
We’ve removed the inline event handlers and replaced them with jQuery event handlers, separating the content and behavior. Now if we want to add more menu items, we don’t have to copy and paste the same batch of event handlers; instead, the event handler will automatically be added.
We have also moved the style rules for the hover effect into a CSS class, separating the behavior and presentation. If we want to change the styling for the hover effect later, we can just update the stylesheet instead of having to modify the markup.
Discussion
While an “all in one” HTML file with on
attributes works fine in a small, simple page, it doesn’t scale up
very well. As your pages get more complex, separating presentation and
behavior makes the code easier to maintain.event
We didn’t do it in this simple example, but if you have multiple
pages using the same JavaScript or CSS code, move that code to a
common .js or .css file. That way it will be downloaded
into the browser cache once, instead of being re-sent on every page
load. As a result, once one of your pages has been visited, the rest
will load faster.
5.20. Using jQuery for Progressive Enhancement
Problem
You want to build a site that allows simple task management with a great user experience using animations and Ajax, but you also want to support users who have JavaScript disabled.
Solution
You can build the site to work without all the flashiness and then unobtrusively add the JavaScript functionality:
<!DOCTYPE html PUBLIC "-//W3C//DTD XHTML 1.0 Transitional//EN"
    "http://www.w3.org/TR/xhtml1/DTD/xhtml1-transitional.dtd">
<html xmlns="http://www.w3.org/1999/xhtml" xml:lang="en" lang="en">
<head>
    <meta http-equiv="Content-Type" content="text/html; charset=utf-8" />
    <meta http-equiv="Content-Language" content="en-us" />
    <title>Task List</title>

    <script type="text/javascript"
src="http://ajax.googleapis.com/ajax/libs/jquery/1.3.2/jquery.js">
    </script>

    <script type="text/javascript">

        $(document).ready( function() {
            var url = $('form').attr('action'),
            $(':checkbox').click(function() {
                $.post(url, this.name + '=1'),
                $(this).parent().slideUp(function() {
                    $(this).remove();
                });
            });
            $(':submit').hide();
        });

    </script>
</head>
<body>
<form method="post" action="tasklist.html">
    <ul>
        <li>
            <input type="checkbox" name="task1" id="task1" />
            <label for="task1">Learn jQuery</label>
        </li>
        <li>
            <input type="checkbox" name="task2" id="task2" />
            <label for="task2">Learn Progressive Enhancement</label>
        </li>
        <li>
            <input type="checkbox" name="task3" id="task3" />
            <label for="task3">Build Great Websites</label>
        </li>
    </ul>
    <input type="submit" value="Mark Complete" />
</form>
</body>
</html>
The input form in this page doesn’t require JavaScript. The user checks off the tasks he has completed and submits the form, and then it would be up to the server to load a new page with the completed tasks removed from the list.
Now, we can progressively enhance the page using jQuery: we bind an event handler to the checkboxes that mimics a standard form submit, by getting the submit URL for the form and generating POST data showing that the checkbox was checked. Then we animate the removal of the task to provide feedback to the user. We also hide the submit button because marking tasks complete has become an instantaneous process.
Discussion
Although few people browse without JavaScript these days, it’s still a good practice when possible to build your pages so they work fine without JavaScript and then use jQuery and JavaScript to enhance them.
Warning
Beware that you don’t make the user experience worse with JavaScript enhancements. The non-JavaScript version of this page may not give immediate feedback when you check off a task, but it does give you a way to change your mind easily if you make a mistake: either uncheck it before submitting or just don’t submit the form at all.
If you “submit” each checkbox immediately when it’s clicked, be sure you provide a way for your visitor to undo that action. If the task item disappears from the page, people will be afraid to click for fear of clicking the wrong item. You could either leave the item in the page but move it to a “completed” section or add an explicit Undo option.
5.21. Making Your Pages Accessible
Problem
You’re building a web application with complex widgets and lots of Ajax functionality, but you want to accommodate visitors with disabilities.
Solution
Add keyboard accessibility and Accessible Rich Internet
Applications (ARIA) semantics to your widgets. In the following code, the changes to support these
features are indicated in bold:
<!DOCTYPE html PUBLIC "-//W3C//DTD XHTML 1.0 Transitional//EN"
    "http://www.w3.org/TR/xhtml1/DTD/xhtml1-transitional.dtd">
<html xmlns="http://www.w3.org/1999/xhtml" xml:lang="en" lang="en">
<head>
    <meta http-equiv="Content-Type" content="text/html; charset=utf-8" />
    <meta http-equiv="Content-Language" content="en-us" />
    <title>Dialog Demo</title>

    <style type="text/css">
        table {
            border-collapse: collapse;
            width: 500px;
        }
        th, td {
            border: 1px solid #000;
            padding: 2px 5px;
        }
        .dialog {
            position: absolute;
            background-color: #fff;
            border: 1px solid #000;
            width: 400px;
            padding: 10px;
        }
        .dialog h1 {
            margin: 0 0 10px;
        }
        .dialog .close {
            position: absolute;
            top: 10px;
            right: 10px;
        }
    </style>

    <script type="text/javascript"
src="http://ajax.googleapis.com/ajax/libs/jquery/1.3.2/jquery.js">
    </script>

    <script type="text/javascript">

        $(document).ready( function() {
            function close() {
                dialog.hide();
                $('#add-user').focus();
            }

            var title = $('<h1>Add User</h1>')
                    .attr('id', 'add-user-title'),

                closeButton = $('<button>close</button>')
                    .addClass('close')
                    .click(close)
                    .appendTo(title),

                content = $('<div/>')
                    .load('add.html'),

                dialog = $('<div/>')
                    .attr({
                        role: 'dialog',
                        'aria-labelledby': 'add-user-title'
                    })
                    .addClass('dialog')
                    .keypress(function(event) {
                        if (event.keyCode == 27) {
                            close();
                        }
                    })
                    .append(title)
                    .append(content)
                    .hide()
                    .appendTo('body'),

            $('#add-user').click(function() {
                var height = dialog.height(),
                    width = dialog.width();

                dialog
                    .css({
                        top: ($(window).height() - height) / 2
                            + $(document).scrollTop(),
                        left: ($(window).width() - width) / 2
                            + $(document).scrollLeft()
                    })
                    .show();

                dialog.find('#username').focus();

                return false;
            });
        });

    </script>
</head>
<body>
<h1>Users</h1>
<a id="add-user" href="add.html">add a user</a>
<table>
<thead>
    <tr>
        <th>User</th>
        <th>First Name</th>
        <th>Last Name</th>
    </tr>
</thead>
<tbody>
    <tr>
        <td>jsmith</td>
        <td>John</td>
        <td>Smith</td>
    </tr>
    <tr>
        <td>mrobertson</td>
        <td>Mike</td>
        <td>Robertson</td>
    </tr>
    <tr>
        <td>arodriguez</td>
        <td>Angela</td>
        <td>Rodriguez</td>
    </tr>
    <tr>
        <td>lsamseil</td>
        <td>Lee</td>
        <td>Samseil</td>
    </tr>
    <tr>
        <td>lweick</td>
        <td>Lauren</td>
        <td>Weick</td>
    </tr>
</tbody>
</table>
</body>
</html>
We’ve added several useful features with just a small amount of additional code:
We added ARIA semantics (
roleandaria-labelledby) so that assistive technology devices such as screen readers know that our<div>We placed the keyboard focus in the dialog’s first input field when it opens. This is helpful for all your visitors, sighted and nonsighted alike.
We moved the keyboard focus back to the Add Users link when the dialog closes.
We allowed the dialog to be canceled with the Escape key.
Discussion
ARIA is a work in progress, so browser and screen reader support for it is still limited. But by adding it now, you’ll be better prepared for those visitors who can use it. And improved keyboard access benefits all your visitors.