Over the past few versions, Photoshop has gotten an impressive face-lift, helping to make the traditionally complex program a bit easier to use. Photoshop CS3 certainly continues this trend by introducing a customizable user interface that enables you to turn off the features you don’t want or need. In this chapter, you’ll learn how to use Photoshop and get familiar with its tools and features.
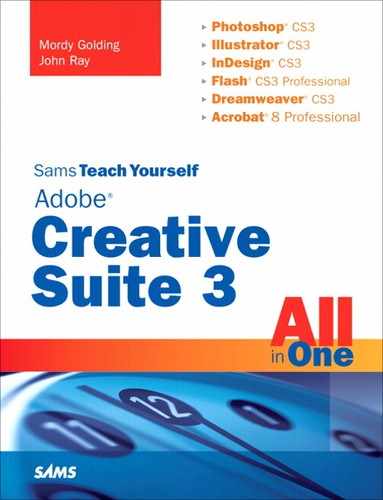
When you first look at Photoshop (see Figure 6.1), you’ll see the standard menu bar across the top of the screen.
Directly under the menu bar is the Tool Options bar, which is context sensitive. That means the options listed in this area change depending on what tool you have selected. To the far right of the Tool Options bar is the button used to access Adobe Bridge and a button to access common workspaces and create new workspaces.
Along the left side of the screen is the toolbox, which contains all of Photoshop’s tools, as well as several other functions. The color proxies indicate the foreground and background colors (you can also choose colors by clicking on the proxies), and the two icons surrounding the proxies enable you to set the colors to the default black foreground and white background, and to swap the foreground and background colors. Directly below the proxy icons are the Quick Mask mode buttons—we’ll talk more about these useful mask buttons later in “Working with Masks”—and under those are the different view modes: Standard, Full Screen with Menu Bar, and Full Screen. You can toggle through the view modes by repeatedly pressing the F key on your keyboard (the letter F, not a Function key).
Along the right side of your screen are some of Photoshop’s panels. We discuss the primary panels and how to use them as we go through this chapter.
Finally, the document window is where you work on your file. The gray area is the part of the window that falls outside the image area. Photoshop lists the filename, the view percentage, and the color mode right in the title bar of each file. Along the bottom left of the window you’ll find the status bar, including a zoom indicator and save status indicator.
You have to start with something, right? With Photoshop, you have various options: You can open existing files, whether Photoshop files, JPEG images, or any other of Photoshop’s enormous list of supported image types; you can create a new file from scratch (basically a blank document); or directly import files from another source, such as a scanner or a digital camera.
As with just about any computer program, you can open a file by choosing File, Open or by pressing (Cmd-O) [Ctrl+O] to bring up the standard system Open dialog box. In Photoshop CS3, Adobe’s own file picker is shown by default on a fresh install, as seen in Figure 6.2.

Using the pop-up view menu on the right side, you can show thumbnails or tiles of the files you are browsing. You can also use the Version Cue icon on the left side of the window to directly access files in Version Cue.
When you’ve located the file you want to open, click the Open button to open the file. Photoshop also lets you open several files at once by holding the (Cmd) [Ctrl] key as you click the different files. You can also open files in Photoshop directly from Adobe Bridge.
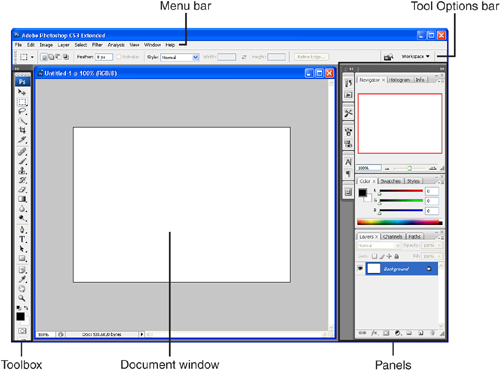
To start from scratch and create a new file, choose File, New or press (Cmd-N) [Ctrl+N] to access the New dialog box (see Figure 6.3). Here you can give your file a name (you can do this later when you actually save the file, too) and choose a size and resolution for your file. In the Presets pop-up menu, Adobe has also included many common canvas sizes, and you can choose one of those (for example, a 5×7-inch file). Choosing the right resolution is very important when you create a Photoshop file because changing the resolution in the file later could cause degradation or distortion in your file.
There’s an option to choose what the default background of your file will be (White, Background Color, or Transparent), as well as the Color Mode (we’ll cover these in just a moment). To view Advanced options, click the disclosure arrow. Here you can set a color profile or specify a nonsquare pixel aspect ratio for video content. The full expanded New File dialog can be seen in Figure 6.3.
Photoshop lets you create files using any of several color modes, and it’s important to know which one to choose. Although you can change color modes later in the process, just about any such change will cause color shifts. Each color mode has a gamut, or range of colors that can be produced. Some gamuts are wider, or can contain more colors, than others. For example, certain colors can be displayed in RGB that simply can’t be reproduced in CMYK (for example, bright greens, oranges, or pastel colors). So converting an RGB file to CMYK might cause some colors to become dull or to change color altogether because those colors don’t exist in CMYK. Let’s take a look at each of the supported color models:
Bitmap—. Also called one-bit, a one-bit bitmap image can contain only two colors—usually black and white (like my favorite kind of cookie). It’s useful for certain workflows, such as screen printing or specialized newspaper techniques. Some other programs (Illustrator or InDesign, for example) can change the black color of a bitmap to a different color, so scanned logos are also sometimes saved as bitmap images.
Grayscale—. The Grayscale color model is a range of grays, from white to black. The number of grays is determined by the bit depth, which we’ll look at shortly. Mainly used for single-color artwork such as black-and-white photographs, the Grayscale model is also used to create monotones, duotones, tritones, and quadtones—all of which we cover later in “Monotones, Duotones, Tritones, and Quadtones.”
RGB Color—. RGB (red, green, and blue) is a color method used to display color on televisions, computer monitors, and video screens. In RGB, you start with black (when your TV is off, the screen is black), and adding values of red, green, and blue results in white. When you’re working on files that will be used in video, for broadcast, on the Web, or for onscreen presentations, RGB is the format you should use.
CMYK Color—. CMYK is a color method used to print color on paper. Unlike RGB, if you mix all the colors together in the CMYK color space, you get black, but if none of the colors is present, you get white. Anything you see in print uses CMYK (a blank piece of paper is white), so obviously when you’re designing content that will be printed in color, CMYK is the color model of choice. CMYK stands for cyan (a shade of blue), magenta (a shade of red), yellow, and key (black). Black is referred to as key because that is traditionally the key color; it reinforces and invigorates the other colors (or so a printer once told me).
Lab Color—. Almost scientific in nature (as if the other color models weren’t), the Lab color model contains a Luminance level called L and two channels of color, called a and b (hence the name Lab). Lab has the widest color gamut of all those listed here, and Photoshop uses this model internally to calculate operations. For example, when you convert an image from RGB to CMYK, Photoshop first internally converts the RGB data to Lab and then converts the Lab data to CMYK. Because very few—if any—applications can use or understand Lab files, I suggest that you choose this color model only if your image isn’t going to be placed into other applications or printed on a press.
Along with color modes are bit depths. The bit depth is the number of bits used to store information about the components that make up a color model. For example, in a grayscale image, there are only shades of gray, ranging from white to black, so only a single value is used to represent the image. In an 8-bit grayscale image, there are 2 to the power of 8, or 256, levels of gray. In a 16-bit grayscale image, there are 2 to the power of 16 levels, or more than 65,000, shades of gray.
In other color models, the bit depth is applied to the values that make up the color. In 8-bit RGB, for example, there are a total of 256 levels of red, 256 levels of green, and 256 levels of blue that can be used and mixed. In general, the higher your bit depth, the smoother your gradients and the better your image quality will be.
Another way to bring images into Photoshop is to import them from another hardware source. Plenty of scanners, traditional cameras with digital film backs, fully digital cameras, video capture devices, and the like can be used to capture images that can be directly imported into Photoshop. Each of these devices usually comes with a plug-in for Photoshop to allow this use. For example, my Epson Expression 1600 FireWire scanner has a plug-in that enables me to access my scanner from the File, Import submenu.
More popular than almost anything these days are digital cameras. It seems as though just about everyone has one. Some cameras let you import pictures directly into Photoshop as JPEG images; others simply copy the files to your hard drive. Additionally, some cameras support something called camera raw format.
Many of the newer digital cameras have the capability to shoot in “raw” format. This means that the camera preserves the image in an uncompressed and unmodified format instead of storing it as a JPEG file and/or applying enhancements, such as color saturation (as most cameras do). The benefit, of course, is that the image is unadulterated and contains every aspect of the data that the camera can capture. You can open raw files directly in Photoshop or through Bridge.
With so many features for hundreds of different tasks, there are many different menus and commands to choose from when using Photoshop. If you work for a news media agency and aren’t allowed to alter images using features such as the Vanishing Point filter, you might want to create a Photoshop environment that has less clutter.
Choose Edit, Menus to open the Keyboard Shortcuts and Menus dialog box. Clicking on the eyeball icon next to a menu command determines the visibility of that menu item, as shown in Figure 6.4.

Besides showing or hiding menu items, you can apply specific colors to each menu item. This is helpful if you want to make an item easier to find. Any changes you make to menu items are stored in custom workspaces, accessible through the workspace button in the Tool Options bar.
In addition to menu items, panel groupings and arrangement are also saved in custom workspaces. To save your current workspace in a custom workspace, choose Save Workspace from the Workspace pop-up menu.
Adobe has included several workspaces by default, including a very useful workspace called What’s New in CS3, shown in Figure 6.5. When chosen, the What’s New in CS3 workspace highlights all of the features that are new in Photoshop CS3.
Selections are especially important in Photoshop due to the pixel-based nature of the program. With a few exceptions, such as text and vector shapes, everything in Photoshop is just a mass of pixels. If you have a photograph with a blue sky, don’t think of it as a sky that’s colored blue, but rather many, many blue pixels that together form the image of a sky. If you want to change the sky to a different color, you can’t just select the sky; you have to select all the individual pixels that form the sky. At a basic level, if you want to manipulate only part of your image, you need to isolate that part so other parts of your image aren’t affected.
It might all sound a bit confusing, but as we go through the individual selection tools and the methods used to work with selections, everything will begin to make sense.
The Marquee selection tools are used whenever you want to select a rectangular or elliptical range of pixels. For example, say that you want to darken a rectangular area of a photo so you can overlay some text. You would use the Rectangular Marquee tool to select an area that you will darken.
You have various options when using the Marquee tools:
Holding the Shift key while dragging constrains the marquee area to a square or a circle.
Holding the Option (Alt) key while dragging makes the point where you clicked the center of the marquee rather than the corner of the marquee.
Holding the spacebar freezes the marquee and lets you drag it anywhere in your image with the mouse.
The options for the Marquee tool can be found in the Tool Options bar. By default, if you currently have a selection on your screen and then you draw a new marquee, you get a new selection and the previous marquee is discarded. You can change this behavior by clicking one of the Add, Subtract, or Intersect buttons, shown in Figure 6.6.
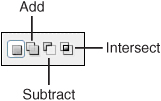
For example, if you draw your first selection, click the Add button, and then draw another marquee, both areas are selected simultaneously. If your new marquee overlaps the previous one, they are joined together to form a single larger selection.
At times you might want to draw a marquee that is a specific size. Rather than guessing as you draw the marquee, you can choose one of the options from the Style pop-up menu in the Tool Options bar: Fixed Aspect Ratio (which resamples the file) or Fixed Size. When either of these two options is chosen, you can enter a Width and Height value, and you’ll notice that as you draw with the Marquee tool, your selection will be created or constrained to the dimensions you’ve specified.
After you’ve drawn your selection, you can move the selection around as you like by positioning your cursor anywhere inside the marquee and then dragging it. You’ll notice that only the selection itself moves, not the pixels that are inside it. To move the pixels, switch to the Move tool or press and hold the (Cmd) [Ctrl] key before you start dragging the selection. To drag a copy of the selected pixels, press and hold (Cmd-Option) [Ctrl+Alt] before you click and drag.
Although the Marquee selection tools can be quite helpful, chances are, there will be plenty of times when you’ll need to select something that isn’t rectangular or elliptical in shape. The Lasso tool enables you to make irregularly shaped selections. Simply choose the Lasso tool and press the mouse button. As you drag, you’ll see a line appear. When you release the mouse button, Photoshop closes the path and turns it into a selection. All the options we spoke about for the Marquee tools (adding, subtracting, moving, and so on) are available here as well.
If you’re not as comfortable using a mouse, it can be difficult to make clean selections using the Lasso tool. Don’t fret, though—Photoshop has two variations of the Lasso tool that might help:
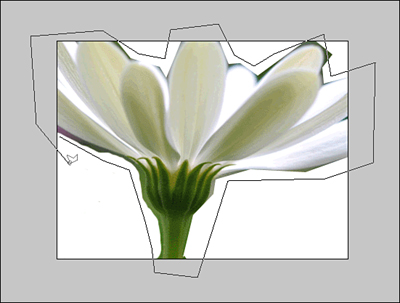
Polygonal Lasso tool—. I personally use this selection tool more than any other, and I find it extremely useful for many tasks. Instead of having to press the mouse and drag it all over your screen, you can click once and then move your cursor to the next spot and click again. A “rubber band” follows your cursor around to give you visual feedback of where your selection path will be drawn, as demonstrated in Figure 6.7. You can either click the original point to close your path and turn it into a selection or simply double-click to have Photoshop automatically close the path for you.
Magnetic Lasso tool—. You spent enough money on your computer and on the software you’re using, so why are you left doing all the work? Shouldn’t the computer be doing the work for you? Well, the Magnetic Lasso tool does its part: It automatically detects edges as you use it. An edge here is defined as a shift or change between one color and another. As you drag along an edge with the Magnetic Lasso tool, it automatically detects the edge and draws a path along it (shown in Figure 6.8). Double-clicking with the tool automatically closes the path and turns it into an active selection.
If you look at the Tool Options bar when you have the Magnetic Lasso tool selected, you can see various options that control the sensitivity of the tool. Width refers to how far the tool will look for an edge from where your cursor is. Edge Contrast controls how sensitive the tool is with regard to differences in color. A higher number finds only an edge that is a high-contrast one, whereas a lower number looks for more subtle shifts in color. The Frequency value determines how many points the tool uses to draw out the path. A higher number yields a path that is more precise, and a lower number results in a smoother path. The button at the right enables you to use a pressure-sensitive tablet to change the Width setting.
For selecting areas of similar color, you can use the Magic Wand tool. By default, the Magic Wand selects all pixels of similar color adjacent to the area that you click. Simply click an area of your image. If you uncheck the Contiguous option in the Tool Options bar, Photoshop selects all similarly colored pixels throughout the entire document.
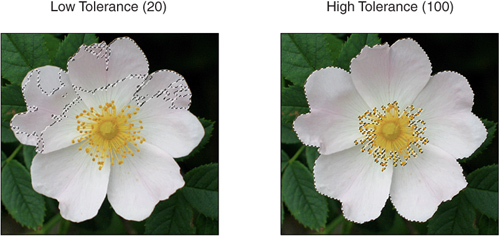
You can control how sensitive the Magic Wand tool is by adjusting the Tolerance setting in the Tool Options bar. A low tolerance number means the Magic Wand selects only pixels that are closer to the color that you clicked. For example, if you click a dark blue color with a low tolerance, the Magic Wand selects only dark-blue pixels—but with a higher tolerance, other shades of blue are selected as well. You can see this setting in Figure 6.9. As with the other selection tools, you can use the Add, Subtract, and Intersect options with the Magic Wand tool.
Although the Magic Wand tool is cool, it doesn’t really provide the user (that’s you) with any useful feedback. It’s basically hit and miss—you click, see what is selected, deselect, change the Tolerance level a bit, and then try again.
Let me direct your attention to the Color Range feature (Select, Color Range). Here you can use an eyedropper tool to click parts of an image and get a preview so you can see what will be selected before you actually make the selection, as seen in Figure 6.10.
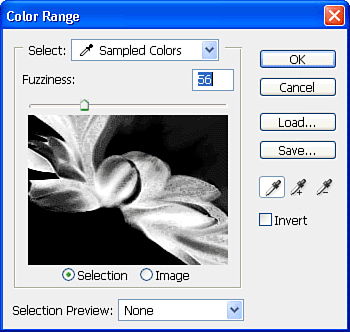
Above that, you have options such as Fuzziness, which can control how sensitive the feature is to color shifts. Using the Select pop-up menu, you can choose to automatically select ranges of predefined colors, highlights, shadows, midtones, and even out-of-gamut colors.
For even better previewing, you can choose to preview your document window itself with different viewing options that are found in the Selection Preview pop-up menu. Clicking on the OK button closes the Color Range dialog box and returns you to your document, with your new selection waiting for you.
New in Photoshop CS3 is the Quick Selection tool. This tool makes selecting an area as easy as painting inside of it. Grouped with the magic wand, the selection tool looks like a wand over an oval shaped selection. Like the magic wand, the tool uses similarities in color to make selections, but, unlike the magic wand, it does so in a more natural way.
To use the Quick Selection tool, simply choose it, then use it to “paint” inside the area that you want to select. As you paint, the selection will spread out from the tool until it reaches an edge. You can control the size of your selection “brush” using the brush size selection in the options bar. You can also choose whether or not the tool is creating a new selection (the default), adding to a selection, or subtracting from a selection by using the three quick selection tool icons in the options bar (immediately to the left of the brush size indicator).
The quick selection tool offers one of the easiest and most precise ways to make accurate selections within an image. Although long-time Photoshop gurus may turn to the magic wand through habit, the Quick Selection tool will likely become your first stop for complex selections in the future.
Ever see a nice vignette photograph with a soft edge and wonder how they did that? Wonder no more. Until now, you’ve been creating selections that have hard edges. Using a technique called feathering, you can specify a gradual edge for your selection instead of a hard one. You can specify how soft your edges are by indicating how many pixels you want your feather to be. For each of the selection tools, you can specify a feather amount in the Tool Options bar. Doing so applies the feather to your selection as you make it. Alternatively, you can apply a feather by making a selection, choosing Select, Modify, Feather, and then entering a feather radius, demonstrated in Figure 6.11.
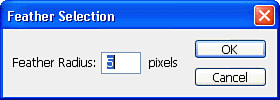
When you apply a feather to a selection, it stays until you discard the selection. Additionally, the feather isn’t editable, meaning that you can’t change the value. So if you apply a five-pixel feather to a selection, you can’t then decide to change it to an eight-pixel feather. You basically have to discard the selection, create a new one, and then apply an eight-pixel feather (or use Undo if you applied the feather after making the selection).
Here’s an important fact: Feathers are calculated using pixels, not units that are absolute. Because the size of a pixel is dependent on the resolution of your file, a 10-pixel feather might be very soft in a 72ppi file, yet barely recognizable in a 300ppi file. As you get experience in working with feathered selections, you’ll get a better feel for how much is right for each file.
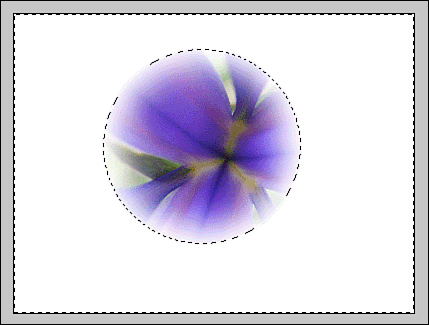
There are many uses for feathering selections. As we mentioned earlier, they can be used to help create soft-edged masks to create vignettes, as seen in Figure 6.12. They can also be used for creating soft cast shadows, for glow effects, for blending photos into each other, and more. I find that they are most useful for selections that you make for purposes of photo retouching. If you have an area that needs an adjustment such as a color shift, doing so with a regular selection creates a visible line that shows where you made the correction. Using a feathered selection, however, results in a seamless correction that no one will be able to see.
Tool Options for Everyone
The Tool Options bar is useful and gives quick access to the most commonly used options for each Photoshop tool, but the most brilliant part of it is something called Tool Presets, which enable you to save different settings that you use often. For example, say you often use a feathered 4×5 aspect ratio setting for your Rectangular Marquee. You can save that as a tool preset and access those settings with one click of a button. You can store many of these tool presets, saving you valuable time as you work on your files.
Of course, these presets aren’t limited to the selection tools—you can save tool presets for just about any Photoshop tool. You do so by choosing the settings you want in the Tool Options bar, clicking on the tool icon (the one that looks like a pop-up button), and then clicking on the Create New Tool Preset button. Alternatively, you can choose New Tool Preset from the fly-out menu, visible in Figure 6.13.
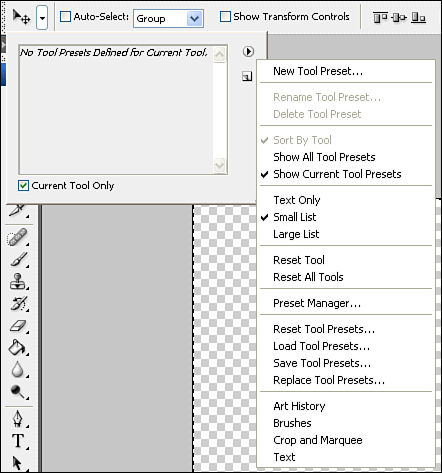
Give your new tool preset a descriptive name (otherwise, you won’t remember what each one is), and it will appear in the list from now on. These are application preferences, meaning that even if you close the file you’re working on or open a new or different file, your tool presets will still be present.
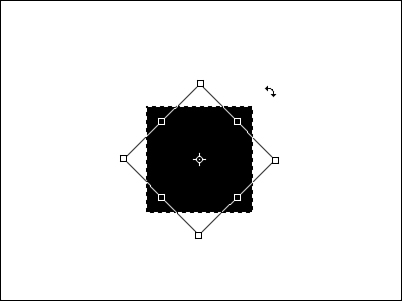
You can modify a selection after it’s created in several ways. One of the most useful is by using the Select, Inverse command or pressing (Cmd-Shift-I) [Ctrl+Shift+I], which basically selects whatever you don’t have selected (and deselects everything that was selected). Sometimes it’s easier to select the one part of an image that you don’t want and then invert your selection. You can also transform your selection. These transformations that you make (by choosing Select, Transform Selection) apply only to the selection itself, not the pixels inside them. For example, you might use the Rectangular Marquee tool to create a square selection, and then use the Transform Selection command to rotate the square to effectively get a diamond-shape selection, as seen in Figure 6.14.
Under the Select, Modify submenu, you can adjust your selection in four additional ways. All of them are useful, and it would be a good idea to experiment with them to fully understand what each one does. In each of these cases, you’ll lose your original selection, so you might want to save it before you modify the selection. These are the additional options:
Border—. Use the Select, Modify, Border command to specify a pixel width border to add around the edge of your selection. This command yields a round-cornered border, which is not appropriate in all cases.
Smooth—. Not everyone can draw with a mouse as well as they can with a pencil (myself included), so when you’re creating selections with the Lasso tools, it’s nice to know that you can smooth out your selections by choosing Select, Modify, Smooth. This is also useful when you’re making selections with the Magic Wand tool because it can sometimes create selections with jagged or uneven edges.
Expand—. At times you will want to enlarge or expand your selection by a specific number of pixels. One such example is if you want to have a border or background around the edges of text. Although you can instead scale your selections using the Transform Selection command I mentioned earlier, many times simply scaling your selection won’t work (especially with odd-shape selections).
Contract—. Rather than expanding your selections, sometimes you’ll want to contract them. You can do so by choosing Select, Modify, Contract and then specifying the number of pixels you want your selection to shrink.
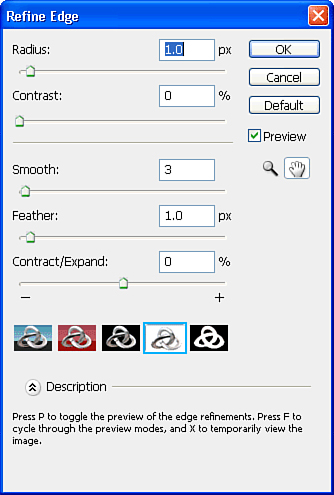
In addition to the Modify options for selections, you can also refine them using the Refine Edge button in the Tool Options bar. The Refine Edge dialog, shown in Figure 6.15, provides control over how the selection is actually made. You can choose edge softening, the radius of the edge (usually just a single pixel), whether the edge should be expanded outward or contracted in on itself, and so forth. By clicking the Preview button, you can see exactly what each setting will do.
A quick selection is easy enough to make, but many times getting just the perfect selection for your needs can take quite a bit of time (and a double dose of patience). The last thing you want in that case is to accidentally click somewhere and lose your selection. Or you might want to continue to make adjustments to that selection later. You can save your selections so you can retrieve them later by choosing Select, Save Selection (shown in Figure 6.16). It’s best to give your selections a descriptive name; otherwise, if you have several of them, it might be difficult to find the right one.
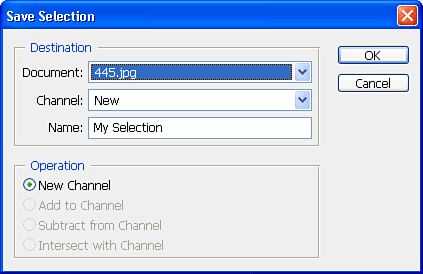
When you have selections already saved in a file, you can either continue to save new selections or add to or modify existing selections from the Save Selection dialog. Alternatively, you can load selections by choosing the Select, Load Selection command.
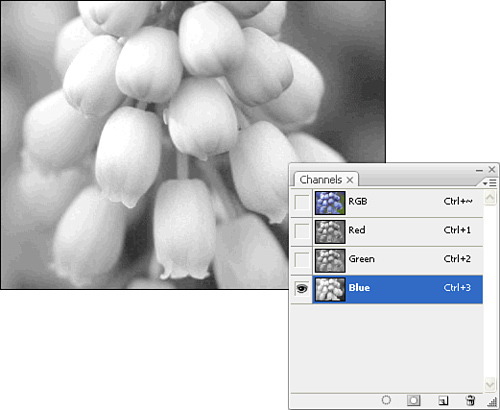
Channels can be thought of as selections because, in reality, that’s what they are. You can find them in the Channels panel.
Every file has at least one channel by default, and three or more if it is a color file. For example, an RGB file starts with three channels: one each for red, green, and blue. Photoshop also displays a composite, one for all of the channels combined, although this composite isn’t actually a channel itself. You can view and edit each channel individually by accessing the Channels panel, which gives you total control over your image, as seen in Figure 6.17.
But the real strength here is that you can create your own channels. When you save a selection (as mentioned earlier), Photoshop is creating a channel, and that is how the selection is stored. Channels that you create can contain 256 levels of gray. Certain file formats can use the information in channels as well. For example, you can specify that a channel should be a transparency mask when you export a file as a PNG from Photoshop. In contrast to clipping masks (which we discuss in “Creating a Clipping Path”) that you might save in EPS format, an alpha channel transparency mask can utilize 256 levels of gray.
Rather than having to load selections via the Select menu, you can simply (Cmd-click) [Ctrl+click] on a channel in the Channels panel to load that selection. This is true with any layer—you can create a selection based on all of a layer’s contents this way.
If you’ve used Illustrator before, you know what a Bèzier path is. You’ll learn more about it in Chapter 7, “Using Adobe Illustrator CS3,” but at a basic level, it’s an object-based path (defined by its shape rather than a set number of pixels) that you can draw using the Pen tool, demonstrated in Figure 6.18. It just so happens that Illustrator, InDesign, Flash, and Photoshop all have Bézier Pen tools—mainly because these tools are basic drawing tools.
The selection tools we’ve discussed until now aren’t really precise drawing tools at all. When you want to draw a high-quality selection, the Pen tool is the way to go. You can also use a variety of vector shape tools to create paths, including the Rectangle, Ellipse, Polygon, Line, and Rounded Rectangle tools. When you select one of these Shape tools, you need to be aware of three options in the Tool Options bar that control the behavior of the paths you draw. The Shape Layers option creates vector layer masks (covered in “Creating a Clipping Path”), the Paths option creates free-standing vector paths, and the Fill Pixels option (not available for the Pen tools) immediately commits paths to pixels as you draw. For making selections, the Paths option (the default) gives you the results that you expect. These options are located immediately to the left of the Shape tools.
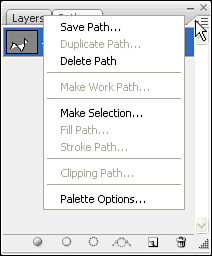
As you draw a path, you see it appear in the Paths panel. From the Paths panel, you can choose Save Path from the panel fly-out menu to save the path for future use. At any time you can also (Cmd-click) [Ctrl+click] on the path in the Paths panel to create an active selection from the path.
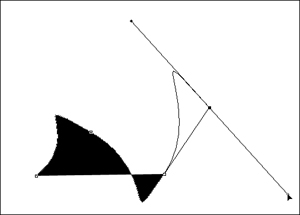
You can also use paths in the reverse context. You start by creating a selection using any of the methods we’ve discussed. Then, with the selection active, choose Make Work Path from the Paths panel fly-out menu (shown in Figure 6.19) to turn that selection into a vector path; at that point, you can use the Pen tools to further edit that path, if necessary.
A clipping path is basically a mask for an exported EPS image (although the newer TIFF format supports clipping paths as well). You can save a path with an image that will define how the image appears in a page-layout application, such as InDesign or QuarkXPress.
In Chapter 3, “The Game Plan: Developing a Workflow,” we discussed how InDesign can understand Photoshop’s native transparency, so clipping paths aren’t really necessary in a full Adobe workflow. Regardless, it’s important to know about clipping paths in case you need to work with QuarkXPress or send files to other people.
Begin by creating a path. If you’re uncomfortable using the Pen tool, use the inverse method mentioned earlier, in which you start with a selection and then convert it to a path. After the path is created, save it. Then choose Clipping Path from the Paths panel fly-out menu and choose the path you saved.
Finally, for the path to be recognized in a page-layout application, choose to save your file in either Photoshop EPS or TIFF format. See “Saving and Printing Files” later in this chapter for information on how to save files.
Trying to imagine what Photoshop would be like without layers is like trying to imagine what a peanut butter and jelly sandwich is like without the bread (everything is just one gooey, sticky mess).
Imagine painting in the traditional method. As you use the brush on the canvas, you’re adding paint. If you decide to paint a white cloud over a blue sky, the white paint covers the blue paint under it (some paint might show through, and we’ll get to the subject of opacity soon). Theoretically, if you wanted to move that cloud to a different part of the sky, you’d have to cut it out and then glue it elsewhere, leaving a gaping hole in your canvas. It’s no different in Photoshop. Let’s say you create a blue sky and then draw a white cloud over a part of it. If you try to select and move that cloud elsewhere, you’ll have a hole cut out of the sky where the cloud was originally. You can see this effect in Figure 6.20.
Now let’s talk about layers. Going back to the canvas, imagine that you first painted the sky and then covered your painting with a clear sheet of acetate (plastic). You then painted the white cloud on the acetate. Think about it: You’d see the same composite result, but if you moved the acetate around, you’d be able to position the cloud independently of the sky under it. In Photoshop, think of a layer as a sheet of acetate—only better. Layers can have opacity values, blending modes, and even special effects such as drop shadows and bevels. As you’ll see, Photoshop uses layers extensively to make files editable and easier to work with.
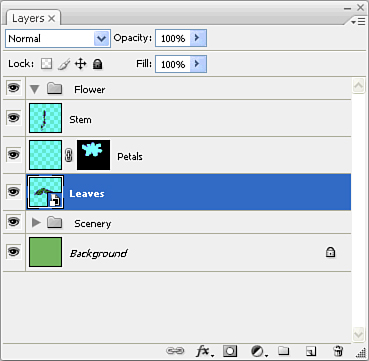
Let’s start with the basics. Layers are controlled via the Layers panel. Every Photoshop file starts with one layer, called a Background layer, which can be only the bottom-most layer in the document. This layer does not support any kind of transparency—think of it as the canvas under a painting.
To convert the Background layer so it acts like any other layer, double-click it to rename it Layer 0 and click OK.
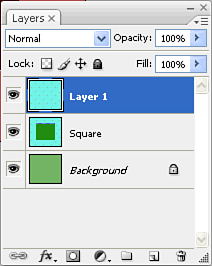
To add a layer to a file, click the Create New Layer button (the dog-eared page icon) in the Layers panel. Alternatively, you can drag an existing layer on top of the Create New Layer icon to create a duplicate layer. You can drag layers up and down to shuffle them within the hierarchy of the Layers panel, shown in Figure 6.21. Layers at the bottom of the panel are stacked behind those that appear at the top of the panel.
Besides being able to shuffle the stacking order of objects by moving layers up and down in the Layers panel, you can choose to show or hide any layer at any time. The little eye icon to the left of each layer’s entry in the Layers panel indicates whether a layer is visible (shown in Figure 6.22).
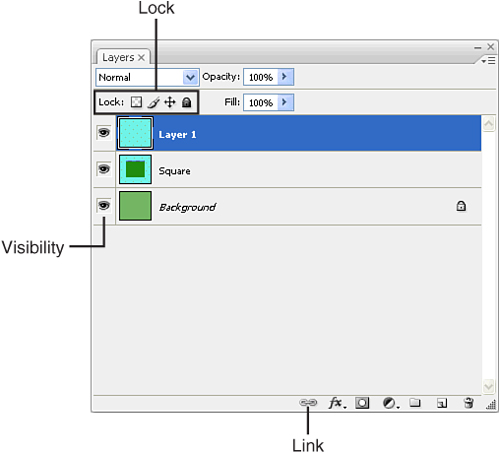
Click once on the eye to hide the layer; click again to show the layer. If you (Option-click) [Alt+click] an eye, Photoshop automatically hides all the other layers in your document, enabling you to see and work on just the layer you clicked.
Using the Move tool (the arrow with a + at the lower-right corner), you can move the items on a layer, but sometimes you’ll want to move several items together at once—and those items may be on different layers. Photoshop enables you to Shift+click layers to select them so you can move them or apply transformations to them. You can (Cmd-click) [Ctrl+click] to select noncontiguous layers as well. If you are constantly moving several layers as a single unit, rather than having to select them each time, you can link them by first selecting the layers and then clicking on the Link button at the bottom left of the Layers panel. When you do so, a link icon appears on those layers, indicating that the transform edits you make will occur to those layers as a unit. Transform edits consist of moving, scaling, and rotating, as well as using the Free Transform tool.
If you’d like to lock a layer so no changes can be made to it, simply select the layer in the Layer panel, and then click the Lock you want to use. You can also use the icons to the right of the Lock button to lock specific parts/attributes of a layer. From left to right, these layer lock options are locking transparent pixels, locking image pixels, locking the layer location, and, finally, locking everything.
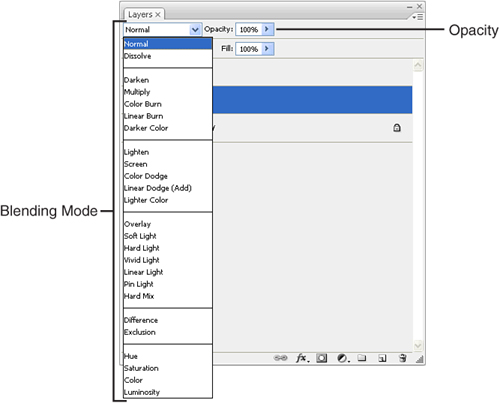
As mentioned earlier, you can apply opacity levels or blending modes to a layer that affect the appearance of the pixels on the layer. For example, changing the opacity of the top layer of your document, demonstrated in Figure 6.23, enables you to see through that layer to the layer underneath—basically allowing the lower layer to show through. Blending modes enable you to specify how the pixels from the upper layer and those from the lower layer mix with each other. For example, if you had two layers and Layer 1 was filled with blue and Layer 2 was filled with yellow, you could set Layer 2 to use the Multiply blending mode to give you a green result.
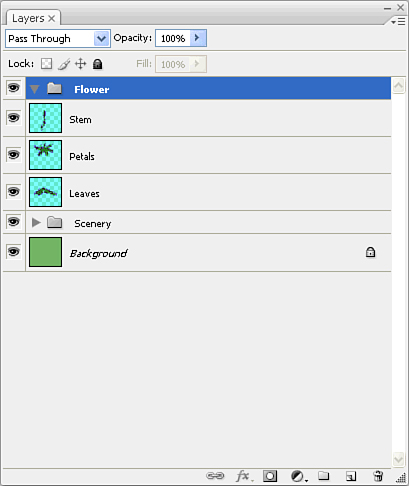
Managing a lot of layers can be difficult, and having to scroll through a large number of them is time-consuming as well. Similar in concept to Illustrator, Photoshop has the capability to create groups. A group is like a folder that has several layers inside it. You can also put a group into another group (up to four levels deep), giving you even more control.
Create new groups by clicking on the Create a New Group button (the folder icon) at the bottom of the Layers panel, and you can add other layers into a group by dragging them into the group, as seen in Figure 6.24.
Each layer can have several effects applied to it, which Photoshop refers to as layer styles. You can access the Layer Style dialog box by choosing Blending Options from the Layer panel fly-out menu. Alternatively, you can double-click the layer itself (just not on the actual name of the layer), or choose Layer, Layer Style.
To apply a particular effect, check the box for it along the left side of the dialog box, demonstrated in Figure 6.25. For each effect, you can use specific settings to control how that effect is applied. A layer can have any combination of these effects.
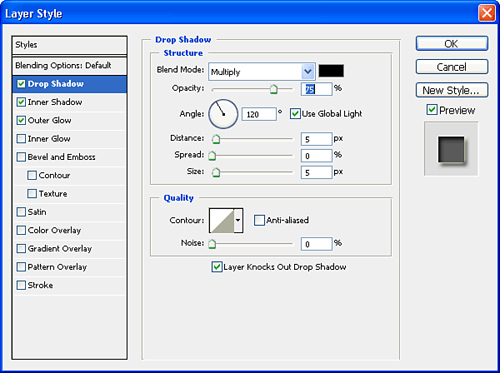
Here are some of the layer styles you can apply:
Drop Shadow—. Probably the most overused effect ever created, the drop shadow is still very useful to make elements seem to pop off the page. This effect creates a soft shadow along the outside of the objects on your layer.
Inner Shadow—. Creates a shadow within transparent areas on your layer. The effect causes your image to appear to be cut out of the page.
Outer Glow—. Adds a glow around the perimeter of objects on the selected layer.
Inner Glow—. Applies the reverse effect of the outer glow.
Bevel and Emboss—. Contains several settings that make an image appear as if it were three-dimensional by adding highlighted edges. Used often for making web buttons.
Satin—. Adds shadows and highlights to make the image appear as if it has the pillowed waves or ripples of satin.
Color Overlay—. Simply adds a color over the entire layer. Colors can be set with an opacity, and this can be used to create color casts or special effects.
Gradient Overlay—. Same as Color Overlay, but uses gradient fills.
Pattern Overlay—. Same as Color Overlay and Gradient Overlay, but with pattern fills.
Stroke—. Can be used to simulate a stroked outline around the objects on your layer.
When you’ve defined settings for a layer style that you like, you can save it as a style by clicking the New Style button. You can then easily apply that style to other layers. After you save a style, it appears in the Styles panel, shown in Figure 6.26. Alternatively, you can create new styles directly from the Styles panel.
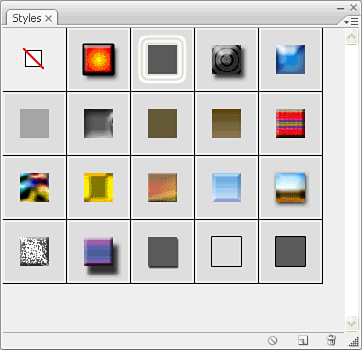
Photoshop actually ships with several sets of styles you can use. More important, you can reverse-engineer these styles by seeing how they were created by applying the style, then opening up the Layer Style dialog to see the settings. You can access these sets from the Styles panel fly-out menu.
Because layers can be manipulated so easily in Photoshop and because they are nondestructive, designers often use layers to create different variations of a design. By hiding or showing different layers, they can quickly preview several design ideas—either throughout their own process or to show a client several design possibilities.
Continually hiding and showing layers can be tedious—especially when you’re trying to remember which layers were used for which design concept. So the wonderful folks at Adobe added a feature called layer comps, which manages this entire process quite well. Layer comps can save the visibility, position, and appearance (layer style) of each layer in your document. You can then quickly step through different layer comps to see how your designs look. Photoshop is simply remembering the “state” of each layer, so if you change an item on a certain layer, that change is automatically made on all of your layer comps, which makes this a great time-saver as well.
To create a layer comp, begin in the Layers panel and hide or show your layers as necessary to show your first design. Then open the Layer Comps panel and click the Create New Layer Comp button. You’re presented with a dialog box (seen in Figure 6.27), where you can name your comp, choose which attributes Photoshop will save, and add a comment (always helpful for those of us who forget easily). Where was I again? Oh, yes, you can create additional layer comps by repeating the process.

To preview each of your comps, simply click the icon along the left side of the Layer Comps panel, visible in Figure 6.27, or use the arrow buttons at the bottom of the panel to step through the different layer comps.
A mask hides some parts of an image and lets other parts show through. This is extremely useful when you want to hide parts of an image but you don’t want to lose any data in your file by having to delete parts of it.
Earlier, we discussed one kind of mask: creating a clipping path for placing images into page-layout applications. But there are also needs for masking inside Photoshop itself—such as when you want to have one photo blend into another, or when you want to make a quick selection.
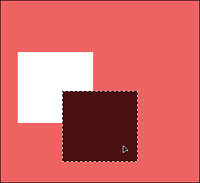
When it comes to creating a mask for a layer, Photoshop makes the task easy. Using your selection method of choice, choose the layer in the Layers panel, select the area of the image that you want to remain visible, and click the Add Layer Mask button (a white circle in a gray box) at the bottom of the Layers panel. This does two things right off the bat: First, it masks the image in your document; second, it creates a second thumbnail in your layer, as demonstrated in Figure 6.28. In fact, let’s take a closer look at what’s going on in the Layers panel.

You’ll notice that a masked layer has two thumbnails with a link icon between them. The thumbnail on the left is the image itself, and the thumbnail on the right is the mask. To edit and work with your image, click the left icon to highlight it. Any edits you make to that layer will occur to the image itself. If you click and highlight the thumbnail on the right, you can edit the mask itself.
As you move the image with the Move tool, the mask moves along with it because the link icon between the two thumbnails indicates that they are linked to each other. If you click the link, it disappears, enabling you to move the image and mask independently of each other.
To remove a mask, drag the mask thumbnail to the Layer panel’s Trash icon (in the lower right of the panel). You’ll get a dialog box asking whether you want to apply the mask (which will delete the parts of the image that are masked) or discard it (the image will return to its full view).
Although Photoshop has vector tools, it’s not a vector-based drawing program. Photoshop uses vector outlines to create masks filled with color. For example, when you draw a rectangle using Photoshop’s Rectangle tool with the Shape Layers option chosen in the Tool Options bar, a mask (which is the vector path) is created, filled with the color of your choice (which is fill pixels). You can also create vector masks by choosing Layer, Vector Mask, Reveal All or Layer, Vector Mask, Hide All.
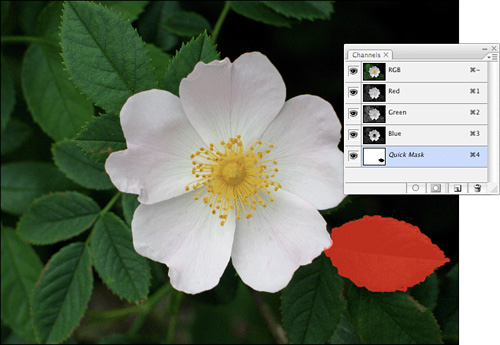
Masks and selections are nearly one and the same. Sometimes you want to create a simple quick selection, and you can best do that by using one of Photoshop’s many painting tools. That’s where Quick Mask comes into play. Press the Q key on your keyboard to enter Quick Mask mode. You can tell you’re in Quick Mask mode because it’s indicated in the document’s title bar.
When you’re in Quick Mask mode, anything you paint or draw shows up in a transparent red color (demonstrated in Figure 6.29).
Press Q again, and whatever was not red becomes your selection. This is extremely useful for creating selections that you will use in a layer mask. For example, imagine that you want a photo to fade into the layer under it. So you select the layer that the photo is on, press Q, select the Gradient tool, drag a gradient, and press Q again—your selection is now the gradient. Then you click the New Layer Mask button, and you’re done.
Throughout the design process, you constantly need to make edits and changes to your artwork. Photoshop can help by enabling you to apply transformations to your layers and selections as you need them. These functions could be as simple and straightforward as moving an object from one side of the document to the other, or as complex as applying a warp distortion.
You can apply these transformations by choosing Edit, Transform. In Photoshop, when you choose a transform function with a selection already made, the transform applies only to your selection. If you choose a transform function with no selection, the transform applies to the entire layer (or group).
If you want to apply a quick transformation, you can also choose Free Transform, which enables you to move, rotate, scale, and apply perspective to a selection all in one step.
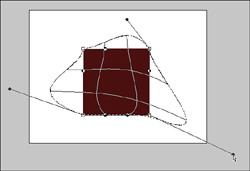
A unique transformation called Warp enables you to twist and distort your selection. When you’ve chosen to apply a warp, you are presented with a grid. By pulling the different parts of the grid, you can distort the pixels within it. Figure 6.30 demonstrates the setup of a warp effect before it is applied to a square.
As you learned in Chapter 2, “So Many Applications: Which One to Use?,” pixel-based images are limited, in that their resolution determines how they can be transformed. Enlarging pixels reduces the final quality of an image. This limitation can make the design process more difficult because you might want to reduce a particular element in size, but you know that you won’t be able to enlarge it later if you need to. As soon as you scale the element in size, the extra pixels are removed from the file, never to be seen again. This is especially true when placing content into Photoshop. For example, you might want to place some vector art from Illustrator into Photoshop. Although you can place the vector art at the size you need, they become pixels when you commit them and are then tied directly to the resolution of the file.
To address this issue, Photoshop has a feature called Smart Objects that enables you to scale artwork in Photoshop without losing any detail. Here’s how it works. When you place an Illustrator file into Photoshop, a copy of the Illustrator file is embedded inside the Photoshop file. The artwork is placed onto a special kind of layer called a Smart Object, which displays the file in pixels, as a normal layer would. When you want to scale the Smart Object, Photoshop uses the embedded Illustrator file to regenerate the file at the higher resolution and simply updates the Smart Object layer.
In fact, you can even create Smart Objects from any raster file or Photoshop layer. Doing so enables you to scale your art smaller and back to the original size, with no loss of detail (scaling the artwork larger than the original won’t help, though). Using Smart Objects, you can perform many edits in a nondestructive manner.
You can create a Smart Object in Photoshop in several ways:
Copy and paste artwork from Illustrator to Photoshop.
Drag artwork from an Illustrator window directly into a Photoshop document.
Place any file into a Photoshop document by choosing File, Place.
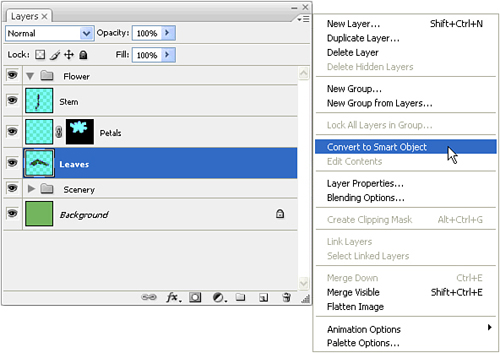
Select a layer in your Photoshop document and choose Layer, Smart Objects, Convert to Smart Object, or choose Convert to Smart Object from the fly-out menu in the Layers panel, as seen in Figure 6.31.
You can tell that a layer is a Smart Object by the icon that appears in the thumbnail of the layer (a page with black and white boxes, as seen in Figure 6.32).
After you’ve created a Smart Object in Photoshop, you can apply transformations as you would any layer. Additionally, you can perform certain functions with Smart Objects to allow for further editing. If you’ve created a Smart Object from Illustrator content, you can choose Layer, Smart Objects, Edit Contents. Alternatively, you can double-click the Smart Object icon in the Layer thumbnail. This action launches Illustrator and opens the Smart Object in Illustrator for editing. When you’ve made your changes to the file, save it and close the file. Upon returning to Photoshop, the Smart Object updates with the changes you made. Performing Edit Contents on a Smart Object that was created from a Photoshop layer opens that Smart Object in a new Photoshop file for editing.
Additionally, you can replace the contents of a Smart Object by choosing Layer, Smart Objects, Replace Contents. This enables you to embed either an updated Illustrator file or a totally new Illustrator file (similar to the Relink feature in InDesign).
Until now, we’ve been looking at Photoshop as a tool specifically for working with existing images and photographs. In reality, there’s a whole other side to Photoshop, in which your screen is a canvas and your colors are paints and your mouse (or pressure-sensitive tablet) is your paintbrush.
Photoshop enables you to choose colors in just about any way you desire. You can specify colors in RGB, CMYK, HSB, Lab, or Hexadecimal. Additionally, Photoshop ships with many different industry-standard custom color libraries such as Pantone and TOYO.
You can choose colors in Photoshop in any of several ways:
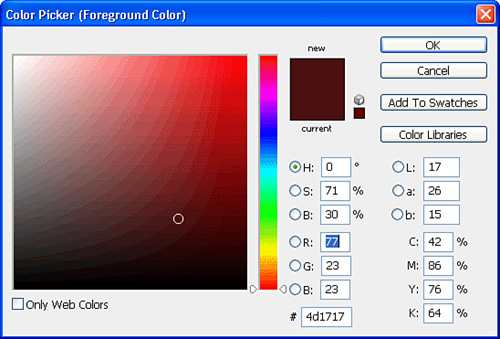
Click the Foreground or Background color proxy in the toolbox—Photoshop presents you with the Color Picker (seen in Figure 6.33), where you can choose just about any color, including industry-standard spot colors (by clicking on the Color Libraries button).
Click the Foreground or Background color proxy in the Color panel—Photoshop, again, presents you with the Color Picker.
Click anywhere on the color ramp at the bottom of the Color panel—This changes, depending on the color mode you have selected, and also provides quick shortcuts to black and white.
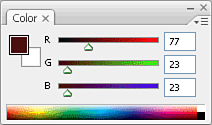
Adjust the color sliders in the Color panel—You can choose to use the sliders to choose a color by eye, or you can enter values directly for a specific color (see Figure 6.34).
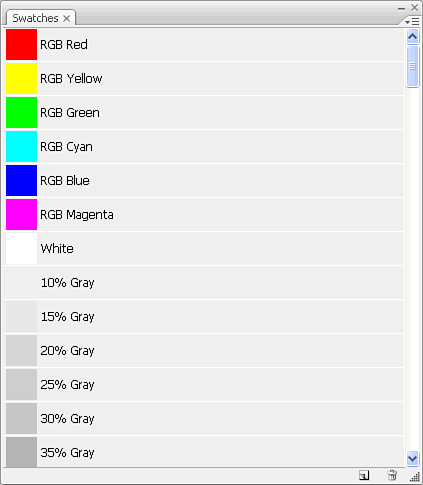
Choose a color from the Swatches panel—You can store your own custom colors as well as access other color libraries from the Swatches panel fly-out menu (see Figure 6.35).
Use the eyedropper tool—Sample a color from any area on your document or screen.
Before soft drop shadows became the latest design fad, there were gradients: fills that fade gradually from one color to another, sometimes with multiple colors. Gradients can also fade from a color to transparent.
Creating gradients in Photoshop is quite easy, and there are basically two ways to accomplish the task. The first way is to add a Gradient Overlay layer style, as discussed earlier when talking about layer styles. The second—and far more popular—way is to use the Gradient tool.
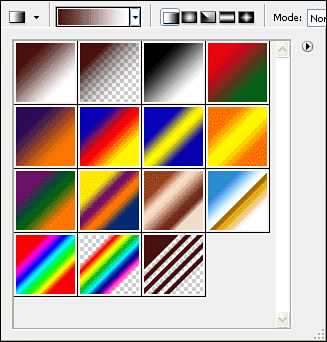
With the Gradient tool selected, the Tool Options bar changes to reflect the different options you have for applying gradients. Click the pop-up arrow to get a list of predefined gradients (shown in Figure 6.36), and you can choose from any of five types of gradients: linear, radial, angle, reflected, and diamond.
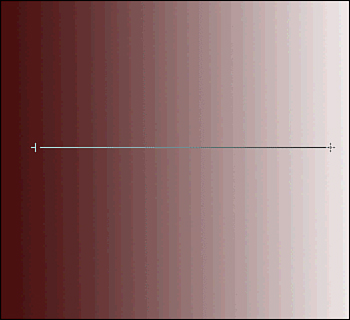
To apply a linear gradient, with the Gradient tool selected, position your cursor at the point you want the leftmost color of the gradient to begin. Press and hold the mouse button while you drag to the place where you want the rightmost color of the gradient to end, as seen in Figure 6.37. When you release the mouse, Photoshop applies the gradient.
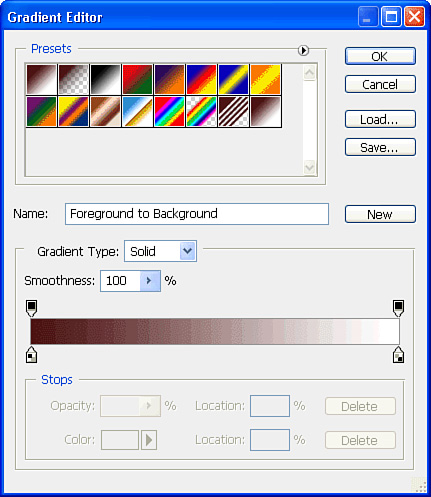
You can also create your own gradients by clicking on the gradient proxy in the Tool Options bar to open the Gradient Editor, seen in Figure 6.38. Click the New button to define a new gradient. Add a new color stop by clicking in an empty area under the gradient. You can edit the colors by double-clicking on the color-stop arrow. Arrows that appear above the gradient are opacity stops, and they let you define the transparency of the gradient at a specific point. You can have as many stops as you want in your gradient. The little diamonds that appear between the color stops are the midpoint of that section of the gradient; at that point, there’s 50% of each color. You can adjust those points by dragging them left and right as well.
To draw or paint with Photoshop, you can use either the Pencil tool or the Paintbrush tool. The Pencil tool is akin to the speedball inking pens of yesterday, enabling you to lay down solid pixels using different brush shapes. It’s great for touching up small areas or for drawing lines and the like. The Paintbrush tool, on the other hand, has more of an organic feel to it, and you can even set it to act and feel like an airbrush using the Enable/Disable Airbrush Capabilities button to the right of the Brush and Pen controls in the Tool Options bar.
To paint with these tools, simply choose a brush shape from the pop-up menu in the Tool Options bar (demonstrated in Figure 6.39) and have fun painting!
The power of the Brush tool comes from the brush engine inside Photoshop.
Historically, when it came to organic painterly drawing, Photoshop had always played second fiddle to another program, called Painter. But that changed when Adobe introduced the new brush engine back in Photoshop 7.
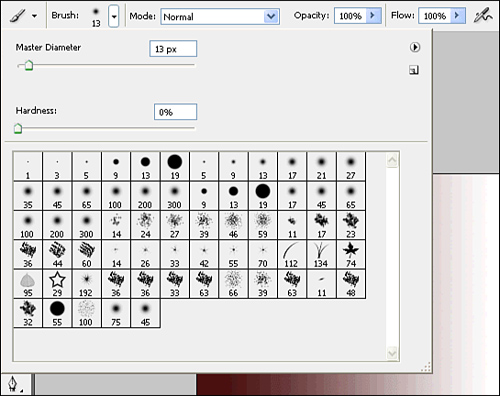
Let’s take a closer look at the incredibly powerful brush features. Click once on the button that appears at the far right of the Tool Options bar when the Brush tool is selected, or choose Window, Brushes to open the Brushes panel, shown in Figure 6.40.
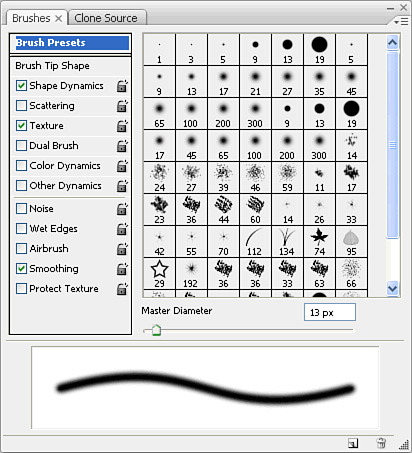
Along the left side of the panel are all the settings you can apply to a brush, the right side contains all the specific controls for each setting, and the bottom features a real-time preview of your brush.
Click each of the settings along the left to customize the behavior of your brush. With these settings, painters and illustrators can finally get the control they want and need right in Photoshop. For example, the Jitter attributes allow for a level of randomness that gives the brushes a real hand-drawn quality. When you’re done finding the right settings for your brush, you can save them to use again later.
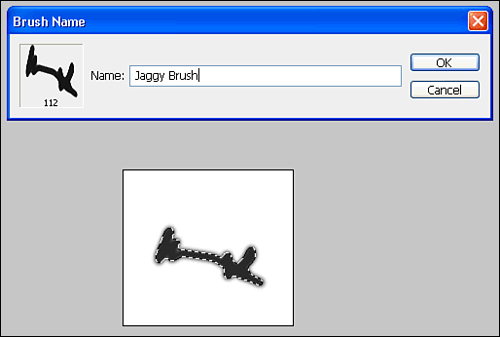
Photoshop’s brush engine lets you define your own custom brush shapes. Start with a grayscale image, and silhouette it. Then select it and choose Edit, Define Brush Preset. Give your custom brush shape a name, as seen in Figure 6.41, and when you choose the Brush tool, you’ll see your custom shape appear in the Brush Tip Shape list.
Adobe hasn’t invented time travel just yet (I’m sure it will be in the next version, though), but there is a way to go back in time using Photoshop’s History Brush.
The History Brush paints in your current file (or canvas) using pixels from a snapshot or a previous state of the file. For example, say that when you first opened your file, the sky in the photo was blue. Then you changed that blue color to orange. If you select the History Brush and indicate the source to be the original snapshot, painting with the History Brush will produce blue pixels as you paint on the sky. This is one way to get the popular “one splash of color in a black-and-white photo” effect.
Know Your History
Although Photoshop doesn’t have multiple undos (as InDesign and Illustrator do, for example), it does have something called the History panel, which records each step you make as you work. You can step backward one step at a time, or you can jump to a previous step by clicking on the entries in the History panel (shown in Figure 6.42).
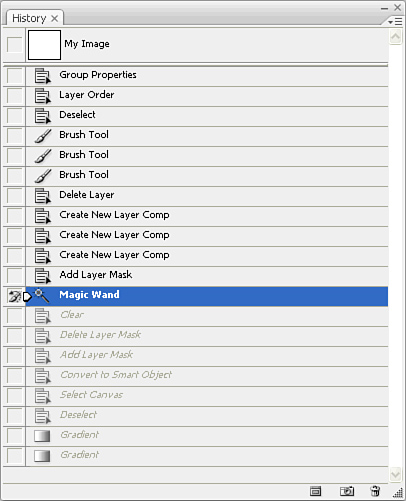
Clicking the Create New Snapshot button freezes the state of your document in time. This snapshot of your document can be used as a reference for other functions (such as the History Brush). Snapshots are stored near the top of the panel; the bottom part of the panel is a running history of the file itself (since the last time it was opened).
To use the brush, select the History Brush (the brush icon with the circle arrow behind it) from the toolbox and then open the History panel. To the left of each entry in the History panel is an empty square, and clicking there selects it as the source for the History Brush (indicated by an icon).
A variation of the History Brush, the Art History Brush lets you paint pixels from a previous history state or snapshot, but with a twist. Instead of just copying the pixels exactly, you can paint with artistic brushes, giving a really creative look to your photos. With the Art History Brush’s default settings, and using the same method as with the History Brush, the brush seems to produce very odd results. To best see the effect, you should create a new blank layer and fill it white. As you paint, you can easily see how the Art History Brush is re-creating the art that was in the snapshot, yet with a very stylized look (demonstrated in Figure 6.43).
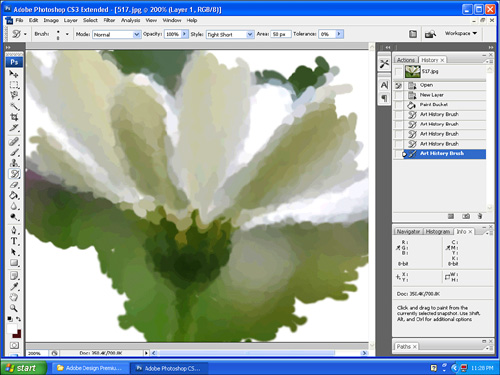
In the Tool Options bar, you can adjust any of several options for the Art History Brush. It’s a good idea to decrease the brush size to 3–5 pixels so you can better see the effect. You’ll also want to experiment with the options in the Style pop-up menu. Additionally, you can choose just about any brush shape and size via the Brushes panel.
The World Wide Web, as we know it today, supports several image formats. Actually, it isn’t the Web itself that supports the formats, but the software—or browsers—that people use to view the Web. A web browser, such as Microsoft Internet Explorer, Netscape Navigator, Firefox, or Apple’s Safari, is a window in which you can view the content of the Web. These browsers support various image formats, mainly GIF and JPEG. Other formats are supported through the use of plug-ins—add-on software that you can download (usually free)—that add functionality to your browsers. Formats that are supported by plug-ins are PNG, SWF, and SVG, although the latter two are vector-based formats and don’t apply to Photoshop. Most of today’s modern browsers come installed with some of these plug-ins.
If you’ve ever surfed the Web, you know that speed is everything. Although DSL and cable modems are becoming more popular, many people still use 56K dial-up connections. Many others are also using wireless devices such as iPhones and other devices to access the Internet. That means that surfing the Web and viewing website pages filled with graphics and images could take a long time. A designer’s challenge is to design web graphics that are small in file size, which would allow the pages to load faster. It’s always a balance—you don’t want a page that’s filled only with text, yet you also don’t want a page that contains so many images that users will skip to the next site because they have to wait too long for your page to load.
The image file formats that are supported in web browsers have many settings for such things as colors and compression, giving designers some degree of control over the final file size of each graphic. There is a direct correlation between the visual quality of a graphic and its file size. You can choose to make a file size smaller at the expense of how good the image looks. Likewise, a better-looking image will result in a larger file size.
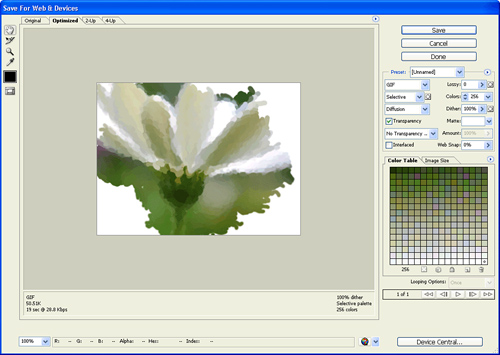
Photoshop’s Save for Web and Devices feature enables designers to make that decision easily by previewing an image in any of the supported web formats, along with all the color and compression settings. The Save for Web and Devices feature also lets you know what your final file size will be, giving you all the information you need to decide how you want to save your web graphic—all before you even save the file.
When you’re ready to save your image for the Web, you choose File, Save for Web and Devices, which launches a larger-than-life dialog box that features tools, previews, and panels of its own, as shown in Figure 6.44. We cover these settings in detail in Chapter 7.
In an effort to gain even more control over how images are displayed on the Web, a method called slicing was born. In simple terms, web slicing is the process of cutting a large image into several smaller images. This is desirable for various reasons.
First of all, there’s perception. If you tried to load a web page that had one single large image on it, you would sit there impatiently waiting for it to download and appear on the page. But when an image is sliced into smaller parts, each smaller image loads faster, and it feels like the image is loading faster.
On that same note, you can apply different optimization settings to each image slice, which could save some valuable file size space, making for a faster-loading graphic overall. As you’ll see later, these settings directly impact the final file size (read: download time) of your total image.
Slicing is also helpful if parts of a graphic need to be updated often. Instead of always creating larger images, you can update just a part of the image. Swapping out a slice or two can be more efficient than having to work with one large, bulky file all the time.
Because each slice is its own image, you can assign a link, or URL, to it, effectively making it a button. If someone clicks on a sliced part of an image, that person is linked to another web page. Of course, you can specify other functionality for such a button as well.
Finally, slices are necessary for creating rollovers, which enable you to specify that a graphic should change when the user interacts with it (such as rolling a mouse over it).
So what exactly happens when you create a slice? In reality, Photoshop CS3 splits a single image into multiple images. An HTML table is created, with each cell of the table containing one of these slices, or pieces of the image. In this way, when you display the web page in a browser, all the sliced images appear together, almost like a puzzle. This is an important concept to keep in mind because you can create only rectangular slices.
To create a slice in Photoshop, choose the Slice tool from the toolbox and click and drag in your document window, as seen in Figure 6.45. You’ll notice that the Slice tool snaps to the edges of other slices, making it easy to use.

One thing to notice as you create slices is that when you draw a slice, other dimmed slices might appear automatically in the document. These are called auto slices. Slices that you create are called user slices. As you continue to create slices, Photoshop updates the auto slices accordingly.
It makes sense to create your slices after you’ve finished the design process because if your design changes after you draw your slices, you might need to readjust your slices. Photoshop does have the capability to create a slice that changes with your design—something called a layer-based slice. A layer-based slice is a slice that’s automatically created to fit the contents of a layer. So, for example, if a layer had some text on it, defining that layer as a layer-based slice would create a slice the exact size of the text. If you changed the text at any point after that, the slice would update accordingly. To create a layer-based slice, highlight a layer in the Layers palette and choose Layer, New Layer Based Slice.
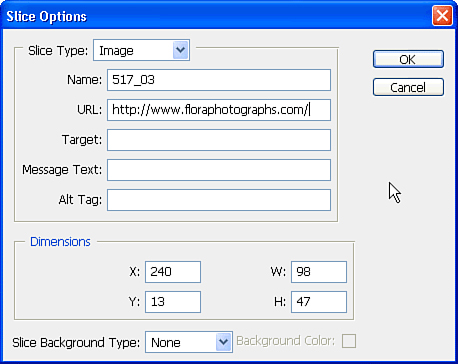
You can specify certain attributes for a slice. When saved for the Web, a slice is created as a cell in an HTML table. So, for example, a slice can have its own background color or URL link. Settings for each slice are specified via the Slice Options dialog, shown in Figure 6.46, which you can access by double-clicking a slice with the Slice Select tool.
Although Flash provides most of the animation features you’ll need, Photoshop can create frame-based animations in a pinch. You can use this to add simple motion to GIFs should the need arise.
Frame-based animation means that the illusion of movement is achieved by displaying image after image in succession. You have complete control in Photoshop over how many frames your animation will have, and you can also control timing, such as how long each frame is displayed in a browser. All the settings necessary to create animations are in the Animation panel, as seen in Figure 6.47.
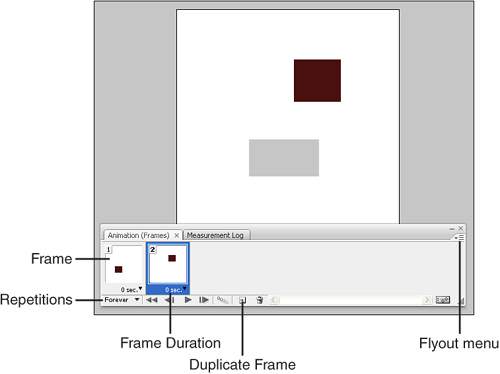
To add frames to a file, choose New Frame from the Animation panel fly-out menu, or click the Duplicate Current Frame button at the bottom of the panel. Photoshop also can help animate objects for you by using a process called tweening. The process of tweening, which comes from the word between, involves creating additional frames between two frames in an animation, changing them slightly. For example, if you had some text at the top of your image in one frame and then created a new frame and moved the text to the bottom of your image, tweening those two frames would produce an additional frame between the two, with the text in the middle of the image.
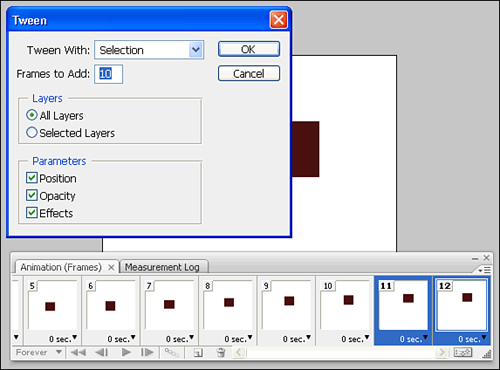
To tween frames in Photoshop CS3, select a frame and choose Tween from the Animation panel fly-out menu (or click the Tween button) to get the Tween dialog box, shown in Figure 6.48. You can then specify to tween with the previous frame or the first frame, as well as specify the number of frames you want to add to your animation. More frames produce a smoother-looking animation but result in a larger file size. You can also specify what parts of your image and what attributes should be tweened.
You can use the controls at the bottom of the Animation panel to play the animation to see how it looks.
Under each frame in the animation is a pop-up menu that enables you to specify the duration of that frame. As an animation plays, you can specify pauses as desired to make the animation play as intended.
To save the animation as an animated GIF, choose File, Save for Web and Devices, and then make sure the GIF format is selected. You can also choose to play back the animation in the dialog box to get one last look at what you’re going to get.
Although you might not need text features to color-correct your digital photos, you will most likely need them for doing any kind of web design. In fact, you never really know when you might need a little bit of text. Although you’re better off using Illustrator or InDesign for most text needs, there will be plenty of times when it will make sense to add text in Photoshop.
To add text to your image, choose the Type tool and click in your document. You’ll get a blinking insertion mark and you can begin typing. Notice that Photoshop automatically creates a new kind of layer for you—a type layer (seen in Figure 6.49).
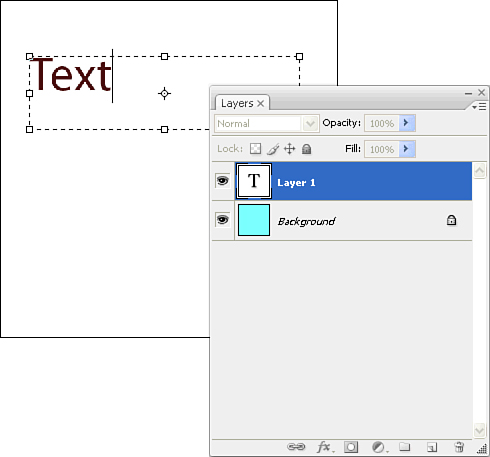
Use the Move tool to position the type layer in your document. You can also double-click the layer in the Layers panel to apply a layer style, just as you can with any normal layer. (Remember to click anywhere in the layer’s entry except on the name of the layer itself.)
With the Type tool selected, you’ll notice that the Tool Options bar, shown in Figure 6.50, updates to offer text-specific settings such as font, size, justification (left, centered, right), and color. You can also choose from several anti-aliasing options.

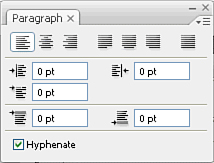
Choose Window, Character to bring up the Character and Paragraph panels to access even more text controls (see Figure 6.51). The Character panel lets you specify kerning and tracking values (the spaces between letters), as well as leading (pronounced “ledding”), which is the amount of space between each line of text in a paragraph. The Paragraph panel, on the other hand, provides access to alignment, justification, and indent settings.
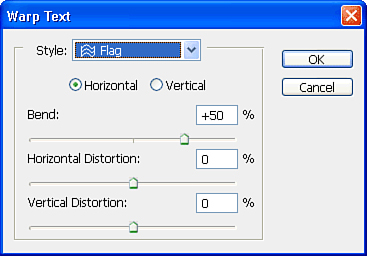
To add cool effects, you can apply warps to text, as demonstrated in Figure 6.52.

To warp text, select some text and click the Create Warped Text button in the Tool Options bar to get the Warp Text dialog box. Here you can choose from 15 preset warp effects, as well as tweak the individual settings of each type of warp, as shown in Figure 6.53.
A day will come when a camera will be introduced that can compensate for every possible thing that could go wrong in the fraction of a second it takes to snap a photo. Like the sun going behind the clouds at just the wrong moment. Like the flash not going off for some reason. Like the bright yellow taxi that just drove by. Like the lights that just went out.
Until that day comes, photos will always need some kind of adjustments made to them so they reproduce and print how you want them. Above that, sometimes you want to purposefully embellish photos, such as give them a specific color cast or engulf them in shadows.
Photoshop contains a wealth of tools and functions that can help you turn less-than-ideal photos into perfect ones.
For quick fix-me-ups, Photoshop has three auto controls that can make adjustments to files: Auto Levels, Auto Contrast, and Auto Color. All three can be found in the Image, Adjustments submenu. Depending on the photo, these controls can either be okay or useless. At times, you just want a quick edit, and that’s fine, but for most other tasks, you’ll want to read on....
A step above the auto controls is the Levels command. Press (Cmd-L) [Ctrl+L] to bring up the Levels dialog box. Notice that you are presented with a histogram that shows you the highlight, shadow, and midtone areas of your image, as seen in Figure 6.54. Drag the little triangle sliders to make adjustments.
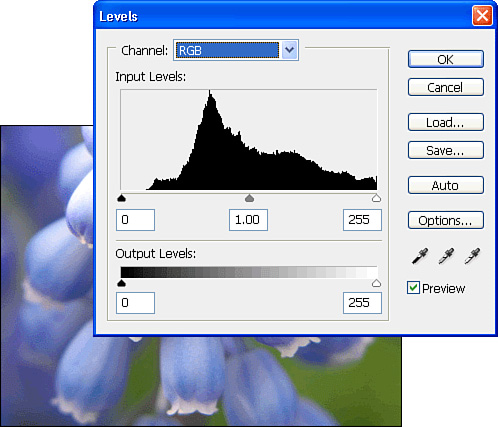
You can adjust the black-and-white points of your image by selecting the black eyedropper tool in the dialog box and then clicking on the darkest area of your photo. Repeat again with the white eyedropper, clicking on the lightest point in your image. The histogram then updates as Photoshop makes the adjustments.
What’s great about the Levels dialog box is that you can apply these changes to the entire image overall, or you can make adjustments to specific color channels by choosing one from the pop-up menu at the top of the dialog box. When you’re happy with the adjustments you’ve made, click OK.
Although the Levels feature is easy to use and pretty much straightforward, it’s limited to applying linear adjustments only. For even more control over the tonal range and values of your images, choose Image, Adjustments, Curves. Here you also have the eyedroppers to choose black and white points, but you have more precision when it comes to making tonal adjustments.
The grid in the center, seen in Figure 6.55, is your image—the region at the upper right is where the highlights are, and the region at the lower left is where your shadows live. Midtones are smack in the middle.
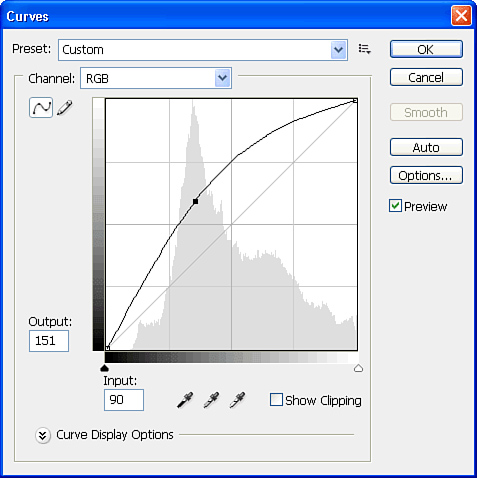
You can click in the grid to add a point and drag it to adjust the curve. The benefit here is that you can open up the shadows, but you can also add more points and adjust the curve to keep the highlights from getting blown out, as demonstrated in Figure 6.56.
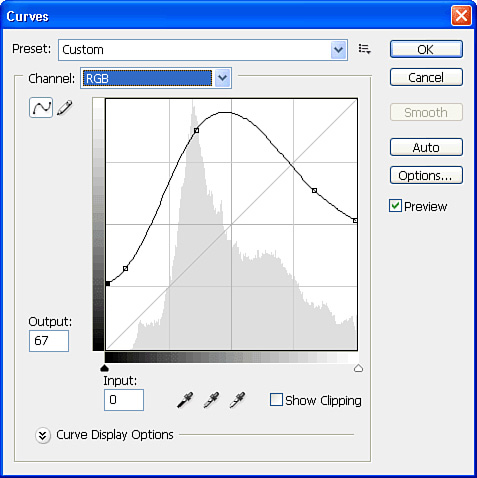
Just as with levels, you can apply curves to the entire image as a whole or to individual channels using the Channel pop-up menu. When you’ve made your adjustments, click OK.
The Shadow/Highlight command automatically adjusts both the shadows and the highlights of a picture while using “smart” intelligence to ensure that the image doesn’t lose any detail. In my humble opinion, this is probably the most valuable of all the adjustments in Photoshop.
To use this command, choose Image, Adjustments, Shadow/Highlight. Use the Shadows and Highlights sliders to make adjustments as necessary, and then click OK as seen in Figure 6.57.
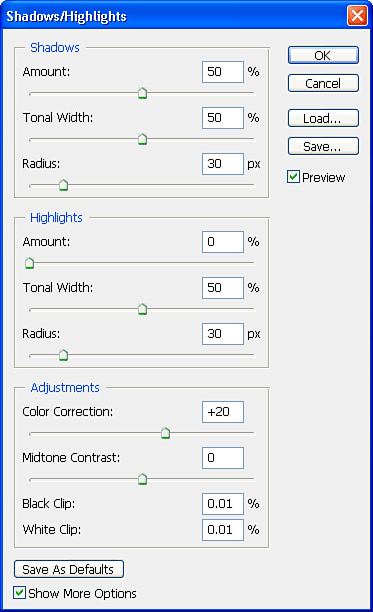
For even greater control, click the Show More Options check box at the bottom of the window. This provides the controls for shadow and highlight tonal width and radius, as well as color correction.
All the adjustments we’ve spoken about are called destructive adjustments because after these adjustments are applied and saved, the actual pixels in the file are changed and there’s no way to go back to the original version of the file.
Although sometimes you know that what you’re doing is final (or you have the original backed up), there are plenty of times when you are required to make multiple adjustments (for example, each time you go back to visit the clients, they change their minds—although I’m sure that never happens to you).
So Adobe created something called an adjustment layer that enables you to keep certain adjustments “live” and editable—even long after you’ve saved and closed the file. This is accomplished by adding the adjustment itself as a special kind of layer. To add an adjustment layer for Levels, for instance, click the Adjustment Layer button (a black and white circle) at the bottom of the Layers panel and choose Levels, as seen in Figure 6.58. You’ll see the normal Levels dialog box, as you’ve seen earlier, but when you click OK, you’ll notice that a new layer has been added to your file. Any layer that falls below this adjustment layer will be affected by it.
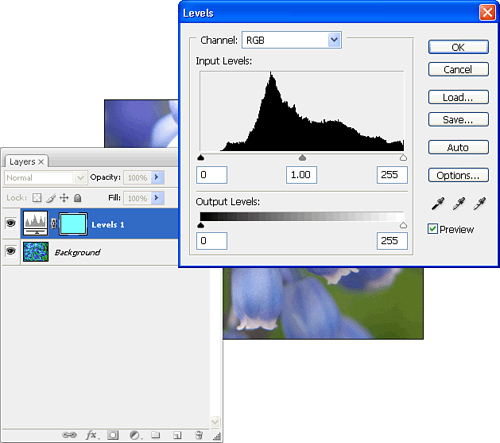
At any time, you can double-click an adjustment layer to edit it or make changes to it (double-click the adjustment thumbnail, not the name of the layer). Of course, you can also drag it to the Trash icon in the Layers panel if you want to get rid of it altogether.
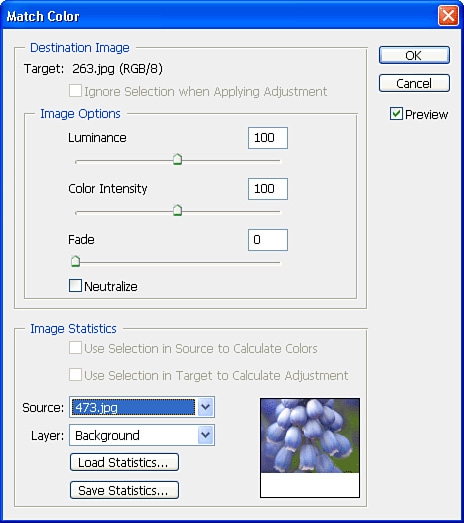
It always ends up that the lighting and color are good in some photos from a photo shoot, but the person’s expression and face are better in another. Using the Match Color feature, you can pull the color from one image and apply it to another one.
First, open both images—the one you want to change and the one that has the perfect color, which we’ll call the source image (from where the color data will be coming). From the document that has the bad color, choose Image, Adjustments, Match Color to open the Match Color dialog box, shown in Figure 6.59. The first step is to look at the Image Statistics area and, from the Source pop-up menu, choose the source file. Now that you can see the new color applied, you can tweak the settings using the sliders in the Image Options section of the dialog box. When you’re happy with the results, click OK.
If you’ve ever spent time in a traditional darkroom, you might know that dodging is underexposing film, making it lighter, whereas burning film is overexposing it, making the image darker. Photoshop has both Dodge and Burn tools that let you “paint on” these kinds of effects. Simply choose the Dodge or Burn tool, choose a brush size, and go to town. The Dodge tool looks like a black circle on a stick, and the Burn tool looks like a pinching hand, located by clicking and holding the Dodge tool icon.
Some people make their living doing one thing only: retouching photographs. Although some tasks are complicated and require masterful re-creations of elements in a photo, many retouching jobs simply require getting rid of a few scratches or a stain. Others require removing a person from a photo or restoring an aged and cracked photo to pristine quality. In either case, Photoshop has several tools you can use to assist in the task.
Probably the most popular retouching tool of all time, the Clone Stamp tool does what its name implies. You sample one area of your image and then paint with the tool elsewhere. As you paint, a clone of the area that you sampled is painted in the new location. For example, you could sample a single flower and then create many more of them in your photo (see Figure 6.60).
To use the Clone Stamp tool, select it from the toolbox and hover the mouse cursor over the area you want to sample. Press the (Option) [Alt] key and click once to sample the area. Now move your mouse pointer to hover over the area you want to paint on, and click and drag the mouse to clone the area.
Besides being used to duplicate objects, the Clone Stamp tool is very useful for fixing up blemishes and stains, or for repairing parts of a photo—such as removing a telephone wire or removing a mole from a person’s face. Just sample a clean area and clone it over the blemished area.
I still remember the first time I saw a demonstration of the Healing Brush tool in action, and the only word to describe what it does is magic. One of the problems with using the Clone Stamp tool is that not every part of an image has the same underlying tonal values. For example, say you want to remove wrinkles on a person’s face. Because of the lighting in the photo, the right side of the person’s face is darker than the left side. If you take a sample with the Clone Stamp tool from one side of the face and try to clone the other side of the face, you’ll see a visible change of tone and luminosity where you’ve painted.
You use the Healing Brush tool the same way you use the Clone Stamp tool. Find a nice clean area, (Option-click) [Alt+click], and then paint over the area you want to fix. At first, it appears to be painting it all wrong because you clearly see the brush marks. But when you let go, Photoshop examines the luminosity and tonal values of that area and compensates for them. This means you can clone from the dark side of a face to the light side of the face without worrying about the shading.
As if the Healing Brush wasn’t already easy enough to use, Photoshop includes a variation of the tool called the Spot Healing Brush. When you use the Spot Healing Brush, you don’t have to sample a clean area. Instead, you just select the tool and start painting over blemished areas. As you use the brush, Photoshop looks for areas close to where you are clicking to find clean areas from which to sample.
Calling on the same underlying technology as the Healing Brush, the Patch tool (a patch icon, located in the same place as the healing tools) provides a different way to quickly clean up or repair parts of your image. You select the Patch tool and then draw a selection around the blemished area of your photo (just like with the Lasso tool). When you’ve selected the area, click inside the selected area and drag the selection to a clean area of your photo (see Figure 6.61).
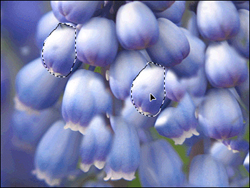
Note that you can use this tool in the reverse as well. Simply choose the Destination option in the Tool Options bar (rather than the default Source setting) and select a clean area of your photo. Then drag the selection on top of the blemished areas.
Even though today’s modern cameras promise to offer red eye–free images, we still see countless pictures that have red-eye issues. You can use any of Photoshop’s many image-correction features to manually remove red eye, but you can fix images faster using Photoshop’s Red Eye tool. After you’ve selected the tool (it’s grouped with the Healing Brush), simply click on the red area, and you’re done. Note that the Red Eye tool doesn’t work in CMYK mode.
At times, photographs exhibit lens distortion, either from specialty lenses or from a variety of natural causes. Photoshop enables you to correct for this by choosing Filter, Distort, Lens Correction. When the Lens Correction dialog box opens, you can adjust for pincushioning (vertical or horizontal distortion that bends toward the center of the image), rotation, and even chromatic aberration (glow-like artifacts that sometimes appear around the edges of detail in digital photos). The configuration options can be seen in Figure 6.62.
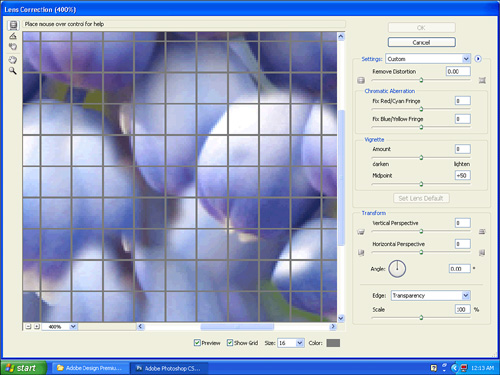
When excessive artifacts are in your image, you can try applying a Gaussian blur to soften the image and reduce the effect of the artifacts. Above that, the Gaussian Blur filter can be used for special effects, such as when you want part of an image to appear in soft focus or even completely out of focus.
Choose Filter, Blur, Gaussian Blur to bring up the dialog box, and experiment with different radius values until you achieve the effect for which you’re looking (see Figure 6.63). This filter can also be helpful when you’re trying to clear up moire[as] patterns (rippling lines that often distract from an image and that result from scanning photos from a magazine or newspaper).
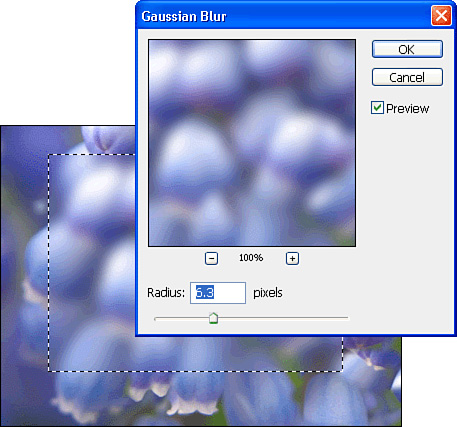
To blur just a few pixels at a time, you can use the Blur tool (a water droplet). I find the tool incredibly useful to soften up edges after I’ve silhouetted an image.
For images that are blurry or out of focus, you can try to sharpen them by choosing Filter, Sharpen, Unsharp Mask. I find that almost every photo that I scan or import requires some level of sharpening—especially images that I will be uploading for viewing on the Web. Sharpening a photo enhances the edges or borders of color, giving a clearer image that seems to have more life to it. You want to be careful not to oversharpen an image, though, because this will introduce visible artifacts, as shown in Figure 6.64.
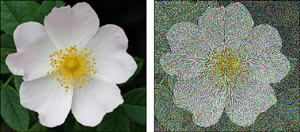
Alternatively, you can use the Sharpen tool (a cone, grouped with the Blur tool) to touch up small parts of your image interactively.
Usually when scanning from photo prints, you’ll notice dust or scratches in your scanned image. Sometimes it’s because the glass on your scanner is dirty (I clean my scanner glass daily), whereas other times it’s because the photo itself has scratches on it. In those cases you can choose Filter, Noise, Dust and Scratches to clear them up (see Figure 6.65). Be careful not to use too high of a setting because doing so might blur out parts of your image that should remain sharp.

As you’ve learned by using the photo-retouching filters, one of Photoshop’s trademarks is the capability to quickly change the appearance of a photograph or an image. Not only does Photoshop ship with a laundry list of filters for this purpose, but you also can buy other third-party filters for even more specialized purposes. Here we’ll cover a few more filters that might be useful to you beyond basic photo-retouching.
Every so often, a feature comes along that is so amazing, it just blows your mind. The Vanishing Point filter is one of those features.
The Vanishing Point filter (Filter, Vanishing Point) enables you to perform a variety of Photoshop functions in perspective. By defining a series of vanishing points, you can easily establish what Photoshop calls planes, which determine how your edits are applied to your image.
When the Vanishing Point dialog box is open, you begin by first defining a plane. Using the Create Plane tool, click four corners to define the plane with which you want to work.
You can press the X key on your keyboard to temporarily zoom in while you’re defining your plane to make it easier to align it correctly. After you’ve clicked to select the fourth corner, Photoshop creates a plane that can be used for editing (see Figure 6.66).
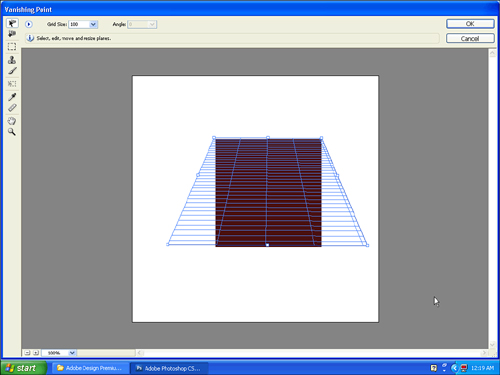
If you copied some art onto the Clipboard before opening Vanishing Point, you can paste it right into the dialog box. As you drag the pasted image or art onto the plane, Vanishing Point automatically adjusts it to the correct perspective (see Figure 6.67). Pretty cool, eh?
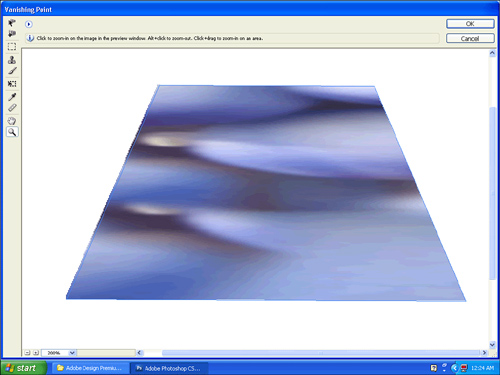
It gets better. With Vanishing Point, you aren’t limited to just one plane. You can extend planes to create a complete world of perspective and use tools such as the Clone Stamp tool to perform cloning in perspective. Start by opening an image and creating a new layer. Then open Vanishing Point and set up your first plane. When you have a plane created, press the (Cmd) [Ctrl] key and drag out a new plane from the edge of your existing plane. Adjust the plane so it is in the correct perspective.
You can drag out additional planes as necessary. When you drag one plane from another, it keeps the planes all in perspective to each other. You can then use any of the editing tools listed along the left side of the Vanishing Point dialog box, shown in Figure 6.68, to perform edits in perspective.
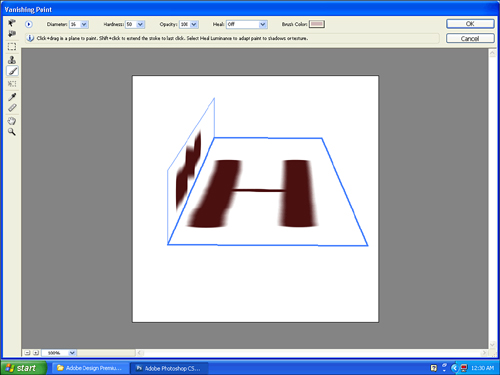
Besides being able to retouch just about any image in Photoshop, you can stylize or adjust a photo to give it a certain look. For example, Photoshop can apply a filter to a standard photograph to make it appear as if it was painted with watercolor or drawn with chalk and charcoal.
Photoshop’s Filter menu is filled with a plethora of these types of effects, but unless you know exactly what you’re looking for, it can be quite time-consuming having to go through them all and see how your selected image will look with a filter applied. So it’s with good reason that Photoshop has a feature called Filter Gallery that enables you to visually preview any of the many artistic and stylistic filters—and even combine them—in a single dialog box.
Choose Filter, Filter Gallery, and you’re presented with a full-screen dialog box, seen in Figure 6.69, that consists of four sections.
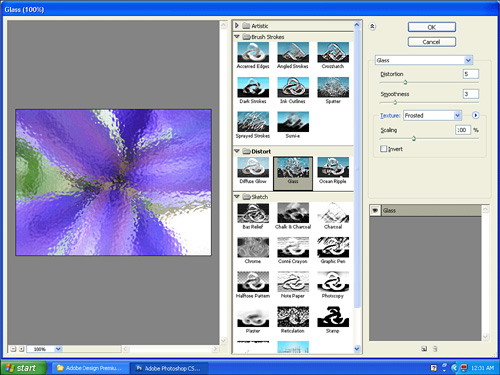
The far-left area gives you a preview of your image, and the middle section is where you choose the kind of filter you want to apply. The upper-right section enables you to tweak the individual settings of the filter that’s chosen in the center panel, and the lower-right panel allows you to control multiple filters and how they are applied to your image.
Using Filter Gallery is not only easy and useful, but it’s also addictive and fun. The possibilities are endless. Why settle for a standard stock photo for that brochure when you can create an entire stylized look by applying filters?
What makes this feature so powerful is how it enables you to experiment and apply multiple filters to your image. In the lower-right section of the dialog box, use the New Effect Layer button to add another effect (as many as you like), and choose a different filter from the middle panel. Stacking order is important, so you can also drag the filters up and down to see how the appearance changes depending on which filter is applied last. You can also disable an effect by clicking on the eye icon to the immediate left of the effect listing, just as you would with layers.
When we talked about selections way back in the beginning of this chapter, we mentioned that you can use tools such as the Magic Wand and the Magnetic Lasso to help make selections. Many times what you’re trying to do is remove the background from a photograph (called silhouetting). Depending on the image, this could be a tedious task, and you might want to try using the Extract filter.
When you choose Filter, Extract, you’re presented with another large dialog box with a large preview of your image in the center, as demonstrated in Figure 6.70.
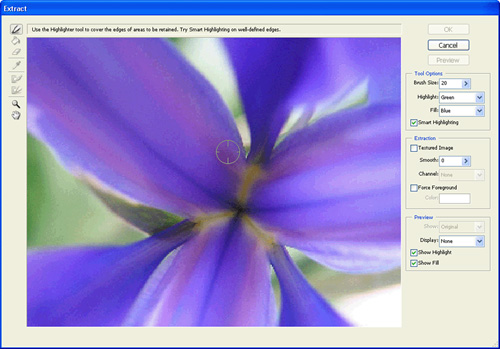
Select the Edge Highlighter tool to trace over the edge of the shape you’re trying to silhouette. You can adjust the size of the brush; the goal here is to have the actual edge you’re tracing fall into the highlighted area. Make the brush big enough that you can easily trace the edge, but at the same time, don’t make it so big that other elements are being highlighted as well.
When you’ve highlighted the edge, switch to the Fill tool and click the part of the image you want to keep, as demonstrated in Figure 6.71.
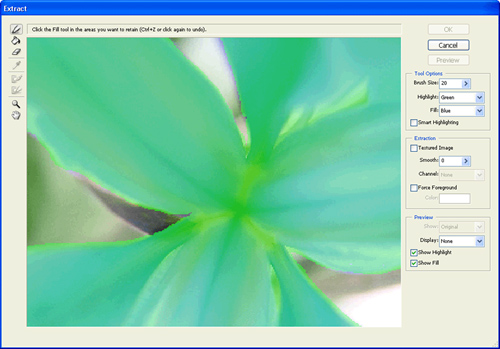
The Extract filter removes whatever is not highlighted in your file. Click the Preview button to see what the results will look like. Click OK when you’re happy with the results.
Thinking back, one of the highlights of kindergarten for me was finger painting (hey, it wasn’t that long ago, was it?). The cool squishy paint, the smell, and, most of all, the ability to mush around and mix the colors to create art worthy of nothing less than my mother’s refrigerator door. Although Photoshop can’t create bright orange handprints on your classmate’s dress, the Liquify feature can come pretty close to adding fun to your day (and Mom will still hang it on the fridge).
Seriously, though, the Liquify filter (demonstrated in Figure 6.72) can be quite useful by enabling you to smudge, pull, and distort your photos. Begin by choosing Filter, Liquify, and once again your entire screen is filled with a dialog box.
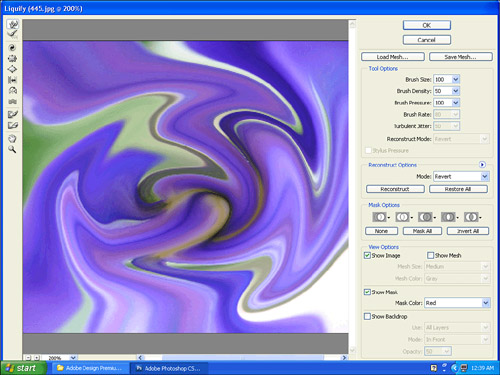
Choose any of the Liquify tools along the left of the dialog box, and change the brush size by using the bracket keys on your keyboard. Other options are available in the Tool Options section on the right side of the dialog box, and there’s an option to use your pressure-sensitive tablet as well.
What’s so great about this filter is that you can apply distortions to your file, but you can also reconstruct your image to reverse the effect of your distortions by using the Reconstruct tool. You can also use the Freeze Mask tool to highlight areas that you don’t want affected by the distortion tools. If you use the Liquify filter on a low-resolution image, you’ll see real-time performance and you’ll have a fun time distorting your image. But you won’t be having as much fun on high-resolution images because applying distortions to them takes a lot of computing power.
If you’ve used Illustrator before, you might be familiar with something called a mesh. Used for gradients and envelopes, a mesh is a matrix of points used to describe a distortion (in its most basic form). Photoshop incorporated this mesh concept behind the scenes with the Liquify filter; as you use the tools to create your distortions, Photoshop saves all the information as a mesh. At home, you’re thinking, “Um, glad to hear that—let’s get on with the lesson already,” but this enables you to save your distortion mesh from Photoshop and apply it to other files.
Let’s apply the concept to a real-world example. You are working with a low-resolution file in your comps, and then when you get client approval, you’ll replace all of your files with high-resolution ones. You can save the mesh from your low-res file and then apply it to your high-res one. To save a mesh, click the Save Mesh button in the Liquify dialog box, and use the Load Mesh button to load one.
In physics, the word noise is defined as “a disturbance, especially a random and persistent disturbance, that obscures or reduces the clarity of a signal.” But as with most things in life, you can take something that appears to be negative and turn it around, making it into a positive—something you can use. Sometimes you might have distortion in certain parts of an image, and adding some noise to that area might improve the overall appearance. Here are two examples:
Most digital cameras save pictures in JPEG format, and the pictures can sometimes contain artifacts (random pixels and anomalies, and so forth). Many times these artifacts appear because of distortion in the Blue channel. Applying some noise to just the Blue channel might result in a smoother and cleaner image overall.
Gradients that span large areas (entire pages, spreads, or large documents, such as movie posters) can print with banding—visible shifts or steps of color. This is especially evident with light colors, such as yellow. Adding a bit of noise can visually break up these steps and produce a smoother-looking gradient (although more grainy in appearance).
To add noise to a selection (or, if nothing is selected, an entire image), choose Filter, Noise, Add Noise. The dialog box shown in Figure 6.73 appears. Use the Amount slider to control how much noise is added, and choose Uniform or Gaussian distribution.
I find that when you’re adding smaller doses of noise, Gaussian looks best, but Uniform gives a better appearance when you’re adding large amounts of noise. The Monochromatic option adds only black noise (very useful for mezzotint-like effects).
Of course, sometimes you’ll want to remove noise from an image. Digital images or scans can have artifacts that take away from the overall look of the image. Choose Filter, Noise, Reduce Noise to make this adjustment.
As you’ve learned, filters are a great way to apply an enormous number of effects to your documents. They are, however, destructive—after you apply a filter and save the document, there is no way to get the original graphic back. In Photoshop CS3, this is no longer the case!
Photoshop CS3 provides a very simple way to apply filters in a non-destructive way—through the use of Smart Filters. Best of all, you don’t need to learn any new or complicated process to use this feature!
To apply a Smart Filter, you must first convert the layer that you’re working with to a Smart Object. The easiest way to do this is to simply choose Convert for Smart Filters from the Filter menu. This turns your active layer into a Smart Object.
After you’ve completed the conversion, simply apply a filter as you normally would. Although nothing appears to be different in the results, you’ll notice that the Layers panel looks a bit different, as seen in Figure 6.74.
Here you can see multiple different filters that have been applied to a layer. To get rid of a filter, simply drag it from the Layers panel to the Trash icon. You can also drag filters into different orders for a different combination of effects.
As you can see, this simple addition adds powerful new capabilities to your Photoshop toolset.
We’ve all made the following statement at some point in our lives: “For the price I paid for this computer, it should be making my coffee, too.” Well, that might be asking too much, but it isn’t too much to ask your computer to do repetitive tasks for you while you’re busy refilling your mug with your favorite brew.
You’ll be happy to know that Photoshop has best-in-class support for scripting and automation. You’ll also find plenty of scripts and features ready to go right out of the box.
So you’re probably thinking, “Sure, automation is great and everything, but I don’t know—or even want to know—how to write in scripting language,” right? Have no fear because Photoshop has something called actions—which require no knowledge of programming languages or any math, for that matter (I’m not a big fan of math).
The way it works is quite simple. You basically perform a set of operations once to show Photoshop what you want to do, and you save that sequence of events as an action. Then whenever you want to perform that sequence of events again, you play the script and Photoshop performs all the steps for you.
For example, say you have a CD that you use often, which is filled with RGB stock photos. You can’t use the photos as is, so each time you want to use one of these stock photos, you open the file, convert it to CMYK, change the resolution, and then save it as a TIFF. So you open the Actions panel and click the Create New Action button, name the action, and click the Record button. Then you open a file, convert it to CMYK, change the resolution, and save the file as a TIFF, all as you would normally do. When you are finished, you click the Stop Recording button in the Actions panel. And you’re done.
The next time you need to use a photo from that CD, you can use the action you recorded to do the conversion for you automatically. Now this might sound nice and all, saving you a few keystrokes, but it gets even better. You can apply an action to an entire group of files at once, called batch processing. In this way, you can apply conversions to all the images on your CD automatically—all while you go and grab some lunch.
To apply a batch action, choose File, Automate, Batch. Then specify the action and choose a source location (where the files are being opened from) and a destination location (where you want the adjusted files to be saved). This being Adobe Photoshop, of course, you also have many options on how to name new files and how to deal with dialog boxes and warnings, as seen in Figure 6.75.
Photoshop has built-in support for both AppleScript (used on Macintosh computers) and Visual Basic Script (used on Windows computers). If you are familiar with either of these scripting languages, you can tell Photoshop to do just about anything.
If you’re like me and can write a script as well as you can write a thesis on the advances of brain surgery in the twenty-first century, you’re thinking that this scripting stuff won’t be of much help in your everyday life.
Don’t despair. Nowhere is it stated that to use a script, you have to write it yourself. Plenty of people write them and post them to the Web, sell them, or even make themselves available to write custom scripts for people. More important, Adobe includes several scripts with Photoshop that you can use right out of the box. You can find these by choosing File, Scripts.
The Export Layers to Files script is useful for when you want to create a separate file for each layer in your document. What’s great about this script is that it can generate files in JPEG, Photoshop, TIFF, PDF, Targa, and BMP formats.
We discussed earlier how layer comps can assist in keeping tabs on multiple design ideas within a single Photoshop document. To extend that functionality even further, Photoshop includes three scripts specifically designed for the layer comps feature. You can automatically generate separate files for each of your comps, create a multiple-page PDF file that contains all of your designs, or create a web photo gallery (WPG) of your designs (which we discuss momentarily)—all with a single command.
Some cameras are designed to shoot photos in panoramic mode, giving you a very wide view of such things as a landscape or a stadium. There’s also a technique of using a regular camera to shoot a panoramic view in multiple photographs, which you can then “stitch” together in Photoshop. Photomerge is an automatic feature that attempts to create one single large file from a range of specified files by analyzing the edges of each of the pictures and aligning them where they match. Photomerge actually does a very impressive job, and, of course, you can touch up the final file as necessary, using Photoshop’s other retouching tools.
Choose File, Automate, Photomerge to get the Photomerge dialog box. When you’ve chosen the source files, click OK and watch as Photoshop does all the work, demonstrated in Figure 6.76.
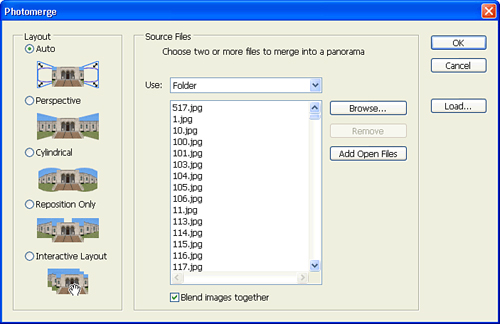
Scripts are cool, and watching scripts work right before your eyes is even cooler. One of the problems with scanning images on a flatbed scanner is that it’s a pain to make sure that each photo is perfectly straight. It’s also time-consuming to have to scan one picture at a time.
The Crop and Straighten Photos feature solves all of that by enabling you to cram several photos on your scanner at once and scan it as one large image. You also don’t need to fret about whether the images are perfectly straight. Scan your photos and choose File, Automate, Crop and Straighten Photos. Then watch as Photoshop magically detects each photo, rotates it perfectly, and then puts each one into its own file.
We discussed RGB colors and CMYK inks before, but there is an additional “color space” called spot colors. A spot color is a specified ink color that printers can use to reproduce a color exactly. There are different ways of specifying colors, and one of the most popular in the United States is the Pantone Matching System. Pantone publishes a guide of specific named colors. When you specify a Pantone color, your printer knows exactly what color you want because he uses the same Pantone guide to know what ink to put on the press.
Spot colors play a very specific role in Photoshop (they play a much larger role in applications such as InDesign and Illustrator). Photoshop can create spot channels, in which a channel is specified as a spot color. Additionally, spot colors are used when you are creating photos that will print entirely in one or several custom colors—most commonly, duotones.
Just as there are channels in your document for RGB or CMYK plates, you can have channels for spot color plates. You can add a spot channel by opening the Channels panel and choosing New Spot Channel from the panel fly-out menu. The benefit here is that you can specify an exact color so you can get a better preview onscreen. From the New Spot Channel dialog box, seen in Figure 6.77, click the color proxy to open the Color Picker. You can then choose from any of several standard spot color libraries.
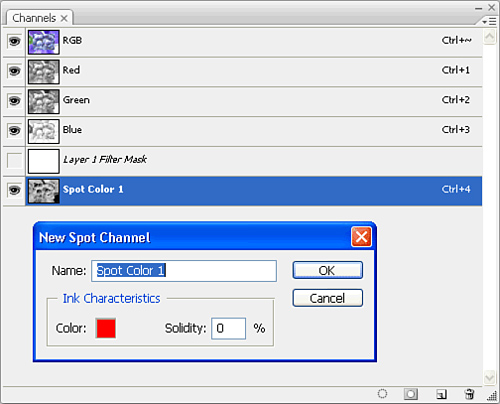
By far, the most common use of spot color in Photoshop is related to multitone files, which include monotones, or images that are entirely one spot color; duotones, or images that consist of two spot colors; tritones, or images containing three spot colors; and quadtones, which are images that contain—you guessed it—four spot colors.
Duotones are mainly used to add color or style to print jobs that are printing in only two spot colors. Multitone files can also be used to add tonal depth to an image—reason enough that some photographers and printers will print black-and-white photos as duotones made up of black and gray.
To create a multitone file, you must first make sure that your file is in Grayscale mode. If it isn’t already, choose Image, Mode, Grayscale. You can then choose Image, Mode, Duotone to open the Duotone Options dialog box, shown in Figure 6.78. From the Type pop-up menu at the top of the dialog box, choose one of the four options.
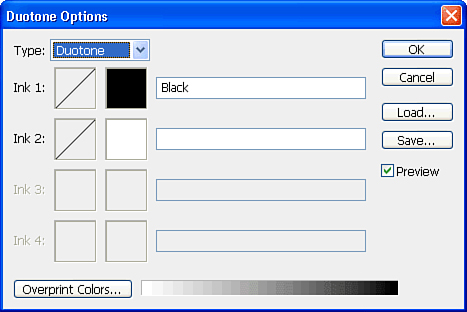
Three settings exist for each ink:
Curves—. Click the Curves box to edit the duotone curve values for each ink color (the same way you adjusted curves earlier in the chapter).
Ink Color—. Click the ink color proxy to choose the ink color.
Ink Name—. Enter the name for the ink. If you choose a color from the Color Picker, a name is automatically added for you.
If fooling around with duotone ink curves isn’t your thing, you can use one of several settings that the folks at Adobe were kind enough to include with Photoshop.
Click the Load button in the Duotone Options dialog box and navigate to the Adobe Photoshop CS3, Presets, Duotones folder, where you can choose from duotones, tritones, and quadtones. Don’t worry about the colors that are in these presets—you can easily change the colors yourself—but the valuable parts of these files are the curve settings. Experiment with different presets to find one that suits your needs.
When you’re done with your file, you can either save it or print it in any of several formats. When saving your files, you can choose from many of Photoshop’s supported formats, including JPEG, Photoshop PDF, Photoshop EPS, PNG, TIFF, or even Targa files (used for video workflows). Depending on your workflow, you might require different file formats or save directly to a Version Cue server. In Part III, “The Projects,” we dive deeper into many of these file formats.
To print your file, choose File, Print, as shown in Figure 6.79. Here you can scale and control the position of the art on your page and choose color-management options, such as specifying a color profile for your printer.
Adobe Photoshop is the defacto standard for desktop graphics applications. Exploring and familiarizing yourself with Photoshop will give you an edge when it comes to everything from animation in Flash, to print publications, and web design.
In this chapter you learned about many of the features available in Photoshop, including layers, channels, selection methods, transparency, basic animation tools, color, and much much more! You’ll find that even the most seasoned Photoshop users discover new tips and tricks as they use the application, so the best way to get comfortable with the software is to play! Since you’re not paying for paints and canvas, it doesn’t matter if you don’t get the hang of things immediately—just keep practicing with the tools and you’ll quickly see how Photoshop can improve any projects that feature graphical elements.